Microsoft Entra Registered — usually shortened to ‘device registration’ — is how you let a personal device (someone’s home laptop, phone, tablet, MacBook) talk to your tenant for work apps, without joining the device to your organization. Windows login stays on the user’s personal account. IT can’t wipe their photos. M365 apps get Single Sign-On. It’s the right answer for BYOD scenarios — and the wrong answer for corporate-issued hardware (which should be Entra-Joined instead).
This guide walks the registration end-to-end on Windows: prerequisites, the user-side flow, all five ways to verify it actually worked, and the gotchas that cause ‘I registered but SSO doesn’t work’ tickets.
Register vs Join vs Hybrid Join — pick the right one
| Feature | Entra Registered | Entra Joined | Hybrid Entra Joined |
|---|---|---|---|
| Device type | Personal (BYOD) | Org-owned | Org-owned (on-prem AD + cloud) |
| Windows login | Personal/local account | Entra ID work account | On-prem AD account |
| Supported OS | Windows, Mac, iOS, Android | Windows 10/11 Pro+ | Windows 10/11 Pro+ |
| Windows Home supported | Yes | No | No |
| Certificate location | User-level store | Computer-level store | Computer-level store |
| SSO to M365 | Yes (via PRT) | Yes (via PRT) | Yes (via PRT) |
dsregcmd signature |
WorkplaceJoined: YES | AzureAdJoined: YES | AzureAdJoined: YES + DomainJoined: YES |
| Intune management | Limited (apps + CA) | Full | Full |
| Best for | BYOD — personal phones, home PCs | Cloud-only corporate | Hybrid environments |
This post covers column 1. The other two are covered separately in the Entra ID Security pathway.
What actually happens during registration
| # | What | Detail |
|---|---|---|
| 1 | User enters Entra ID credentials | Work account on the personal device. |
| 2 | Entra authenticates | Username + password + MFA if enforced. |
| 3 | Device identity created | New object in Entra Admin Center > Devices > All Devices, join type Microsoft Entra Registered. |
| 4 | Certificate pushed | Issuer MS-Organization-Access, subject = Device ID. Stored in user-level personal cert store. |
| 5 | SSO enabled | M365 apps don’t prompt for credentials again on this device for this user. |
The user-level cert store is the design difference that makes BYOD work safely — if a different user on the same household PC registers their own work account, they get their own separate cert in their own user store. The device itself isn’t enrolled, the relationship is.
Prerequisites
- Windows 10 or 11 (Home edition is fine for Register, unlike Join)
- Internet access
- An Entra ID work account — the example uses
er01@ezaz2281.onmicrosoft.com - Tenant Device Settings allow registration (default = All)
- If MFA is enforced on the account: phone or authenticator ready
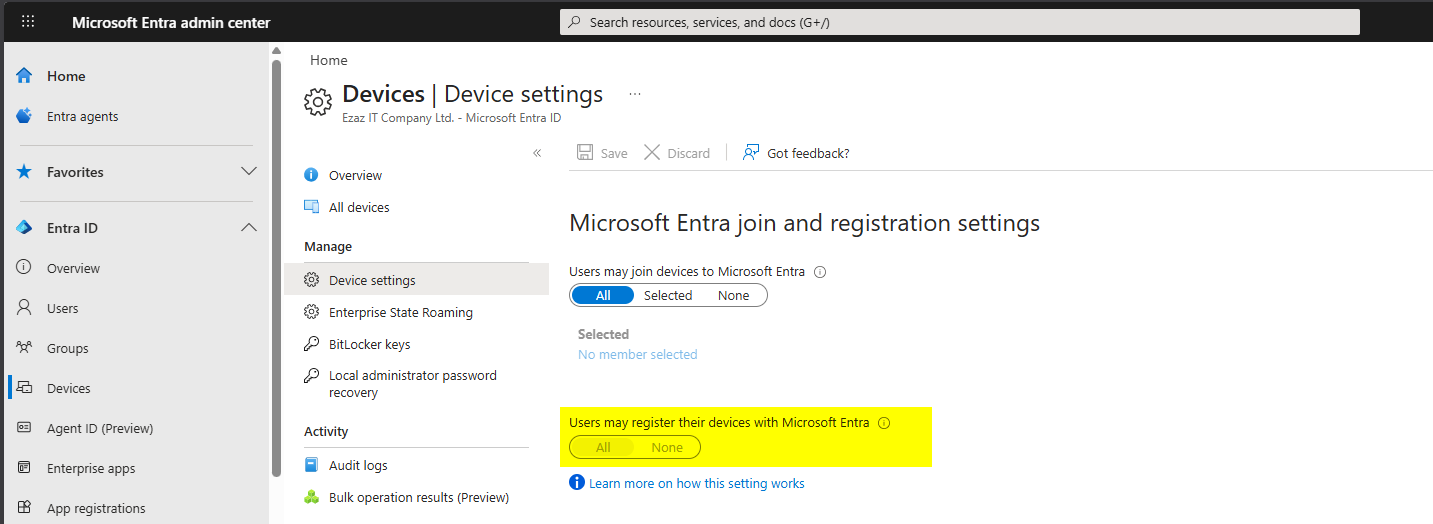
Admin pre-check — registration must be permitted
entra.microsoft.com as Global Admin > Identity > Devices > Overview > Device Settings > confirm Users may register their devices with Microsoft Entra is set to All (or that the user is in the Selected list). Save if you change anything.
Step 1 — check device status (optional)
Before registering, run this in Command Prompt to confirm the machine isn’t already registered:
dsregcmd /statusLook at the Device State block. Pre-registration you should see:
AzureAdJoined : NO
EnterpriseJoined : NO
DomainJoined : NO
WorkplaceJoined : NO
The hostname shown here (e.g. DESKTOP-8MMB5Q0) is the name that will appear in Entra Admin Center after registration.
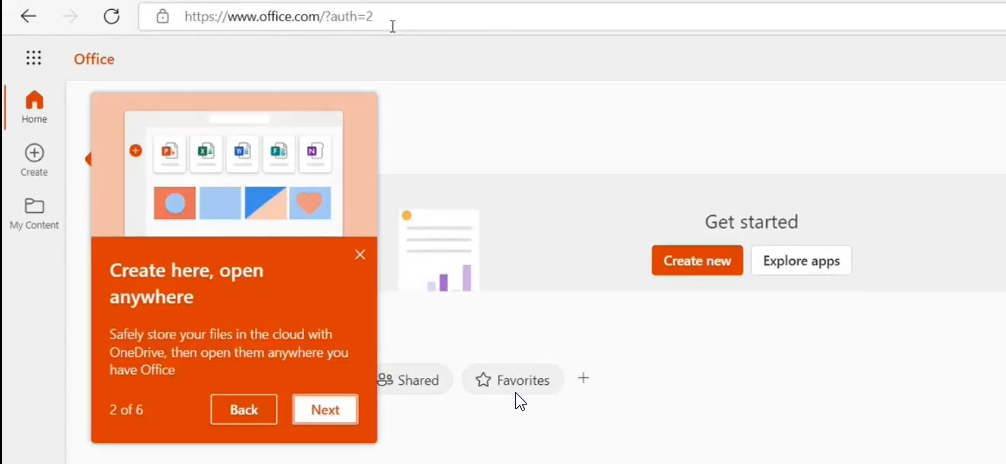
Step 2 — open Settings > Access work or school
- Start > Settings (or Win+I).
- Accounts > Access work or school.
- Click Connect. The Set up a work or school account dialog opens.

Step 3 — enter work credentials
- Type the work account in the email box:
er01@ezaz2281.onmicrosoft.com. - Click Next. Enter password > Sign in.
- Complete MFA if prompted.
DO NOT click the Join this device to Microsoft Entra ID link at the bottom of the dialog. That’s the full Join path — it changes the Windows login experience and is meant for corporate-owned hardware. For BYOD registration, just type the email in the box and click Next.
Step 4 — registration completes
You’ll see a brief loading screen: Hold on while we register this device with your company and apply policy. Then a confirmation: Your account has been added successfully. Click Done.

Step 5 — verify in Settings
You’re returned to the Access work or school page. The work account should now appear in the list as Connected to [Your Organization] Azure AD. The Windows login stays on the personal account — nothing about how the user signs in to Windows itself has changed.
Five ways to verify the registration worked
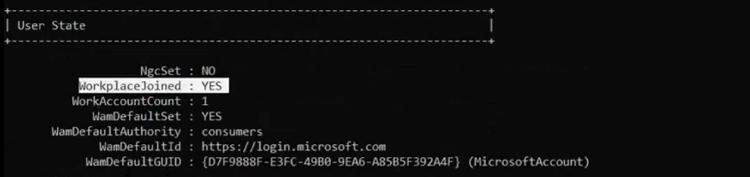
Method 1 — dsregcmd /status
Same command, after registration:
WorkplaceJoined : YESThat’s the BYOD signature. WorkplaceJoined, not AzureAdJoined. If you see AzureAdJoined: YES, you accidentally clicked the Join link in Step 3 — back the device out of Settings and start over with Connect.
dsregcmd /status shows WorkplaceJoined: YES. Note AzureAdJoined: NO — that’s how you tell Register from Join.Method 2 — certificate store (MMC)
- Win+R >
mmc> Enter. - File > Add/Remove Snap-in > Certificates > Add.
- My user account (NOT Computer account) > Finish > OK.
- Certificates – Current User > Personal > Certificates.
- Look for the cert with Issued By = MS-Organization-Access.
The Issued To value is a GUID matching the Device ID in Entra Admin Center.
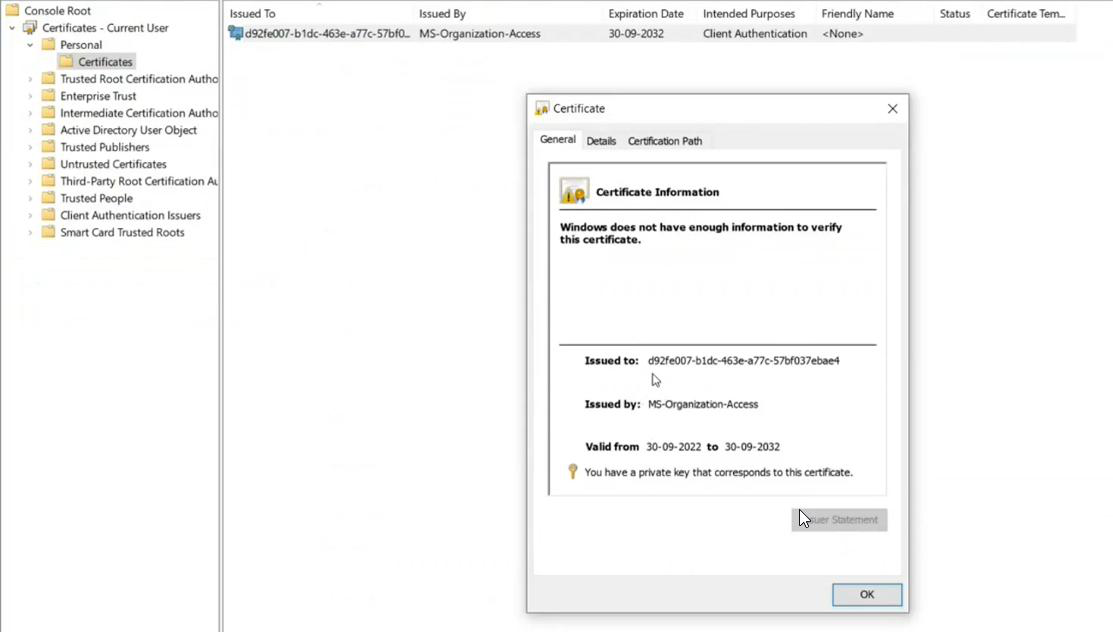
Cross-reference: note the first few chars of the cert’s Issued To (e.g. d92...ae4). Then in entra.microsoft.com > Devices > All Devices > click the device > check Device ID. They match.

Method 3 — Entra Admin Center
entra.microsoft.com > Identity > Devices > All Devices > search by hostname. The device should appear with Join Type Microsoft Entra Registered and Owner = the user account that performed the registration. Click in for full properties (Device ID, OS, version, compliance).
Also visible from the user side: Identity > Users > All Users > the user > Devices.
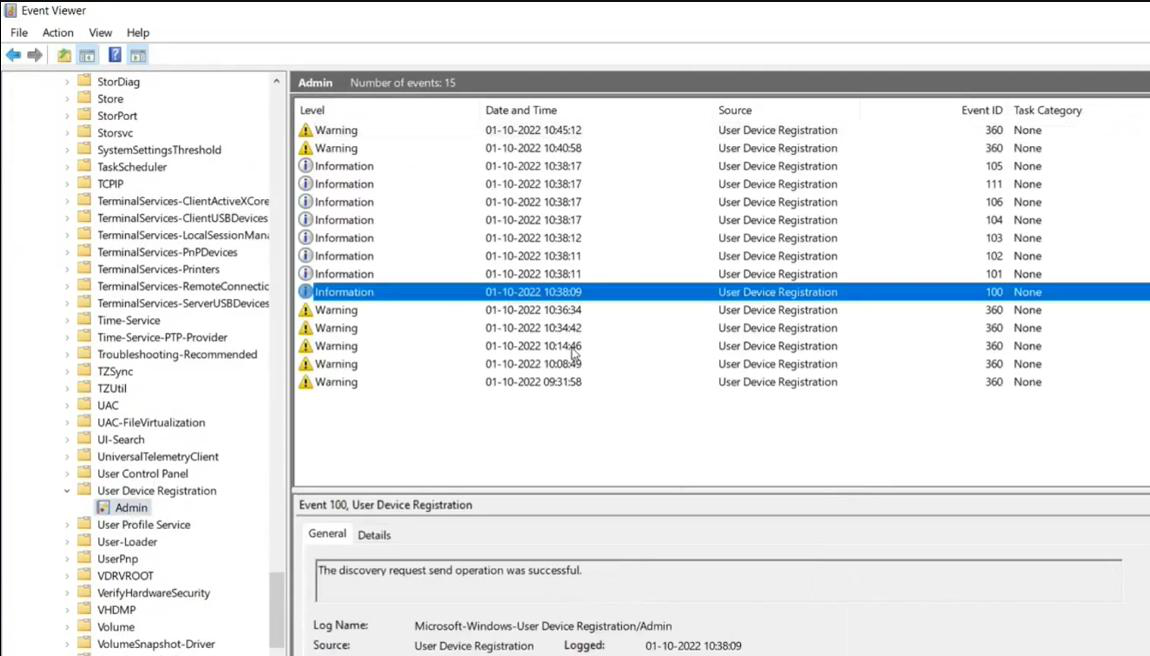
Method 4 — Event Viewer
- Win+S > Event Viewer.
- Applications and Services Logs > Microsoft > Windows.
- Scroll down to User Device Registration > Admin.
Successful registration entries include:
- Discovery request send operation was successful
- Discovery operation callback was successful
- Initialization of the join request was successful
- Join request was successfully sent
- Complete join response operation was successful
- Certificate thumbprint entry showing the pushed certificate
If registration failed, this is the first place to look — the error code in the failure entry maps to a specific cause in Microsoft docs.
Method 5 — SSO smoke test
Open any browser on the registered device (signed in as the user who registered). Go to portal.office.com or teams.microsoft.com. You should land in the app with no credential prompt. If you’re asked to sign in, registration didn’t complete cleanly — check the cert store first, then re-run the registration.
portal.office.com, no password prompt. SSO is the practical proof the registration worked.What can and can’t be managed on a registered device
Can be managed
- App protection policies — protect company data inside specific apps (e.g. block copy-paste from Outlook to personal apps) without touching anything outside.
- Conditional Access — require the registered device to meet compliance conditions before it can hit company resources.
- App deployment — certain Intune-published apps can be pushed via Company Portal.
Cannot be managed
- Full device wipe (only selective wipe of company data)
- Full device configuration policies (those need Join)
- Windows Update schedule or system settings
This is intentional. Registration treats the device as the user’s property; the org manages its own data and apps without claiming the rest.
Things that bite people
Clicked ‘Join this device’ instead of just typing email
Now the device is Entra-Joined, the user is being asked to sign into Windows with a work account, and they’re unhappy. Disconnect from Settings > Access work or school, delete the device entry from Entra Admin Center, and start over — this time clicking only Next, never the Join link.
SSO doesn’t work after registration
Almost always the cert. Check Personal cert store under Current User. Missing or wrong issuer = registration didn’t complete. Disconnect, register again. If the cert is there but SSO still fails, confirm the user signing into Windows is the same one who registered.
Same device shows multiple times in Entra Admin Center
Multiple users registered their work accounts on the same household PC. That’s expected — each registration is a separate device identity with the same hostname but different owners. Not a bug.
Password change broke registration
It didn’t. Registration trusts the cert, not the password. SSO survives password changes. The cases where SSO breaks are account disable / delete, MFA reset that invalidates the device’s session, or cert expiry (rare — the cert is long-lived).
How do I unregister?
On the device: Settings > Accounts > Access work or school > click the work account > Disconnect. That removes the Settings entry and the user-store cert. Admin should also delete the device from Entra Admin Center for cleanup.
What’s next
Registered devices cover the BYOD case. The next post in the Entra ID Security pathway tackles the harder pattern: Entra Hybrid Join — for corporate devices that already live in on-prem Active Directory and need to also be Entra-Joined, with both identity systems happy.