The disaster: someone deleted the entire VM. Or the OS volume corrupted. Or a ransomware event encrypted the host. The procedure now is to bare-metal restore from the backup we created in Part 3. We’ll build a fresh empty VM, attach the backup disk, boot from the OS ISO into the Windows Recovery Environment (WinRE), point System Image Recovery at the backup, and watch the machine come back.
This is Part 4 of the AD Backup & Disaster Recovery pathway. The previous post produced the backup artifact; this post consumes it. If you completed Part 3, you have everything you need.
Scenario setup
For the lab: delete the source VM that you backed up in Part 3. Keep the backup VHDX file safe on the host. We’re going to build a replacement VM with the same name and identical configuration, attach the backup disk, and let WinRE drive the restore.
In real life: the source VM is gone for whatever reason — ransomware, host hardware failure, accidental delete. The backup VHDX is on a different physical disk (hopefully off-host).
Step 1 — Build the replacement VM
The replacement must match the original on critical attributes:
- VM generation — Gen 1 or Gen 2. Critical, because boot data is generation-specific.
- OS version matched by the ISO — you cannot restore a Windows Server 2019 image from a 2022 ISO’s WinRE.
- vSwitch — same external vSwitch so the NIC reaches the network on first boot.
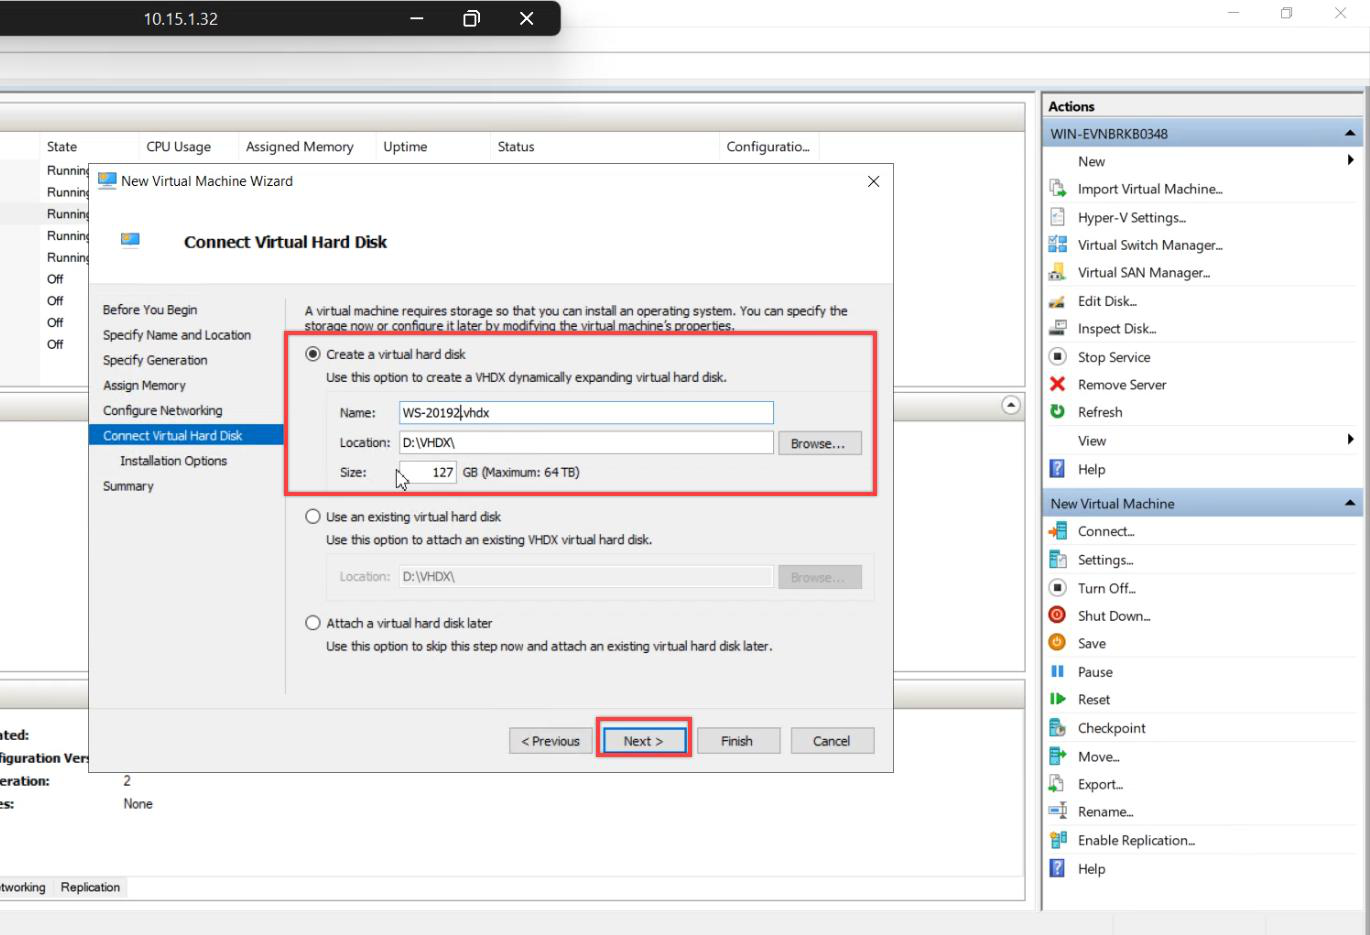
- OS disk size — equal to or larger than the original.
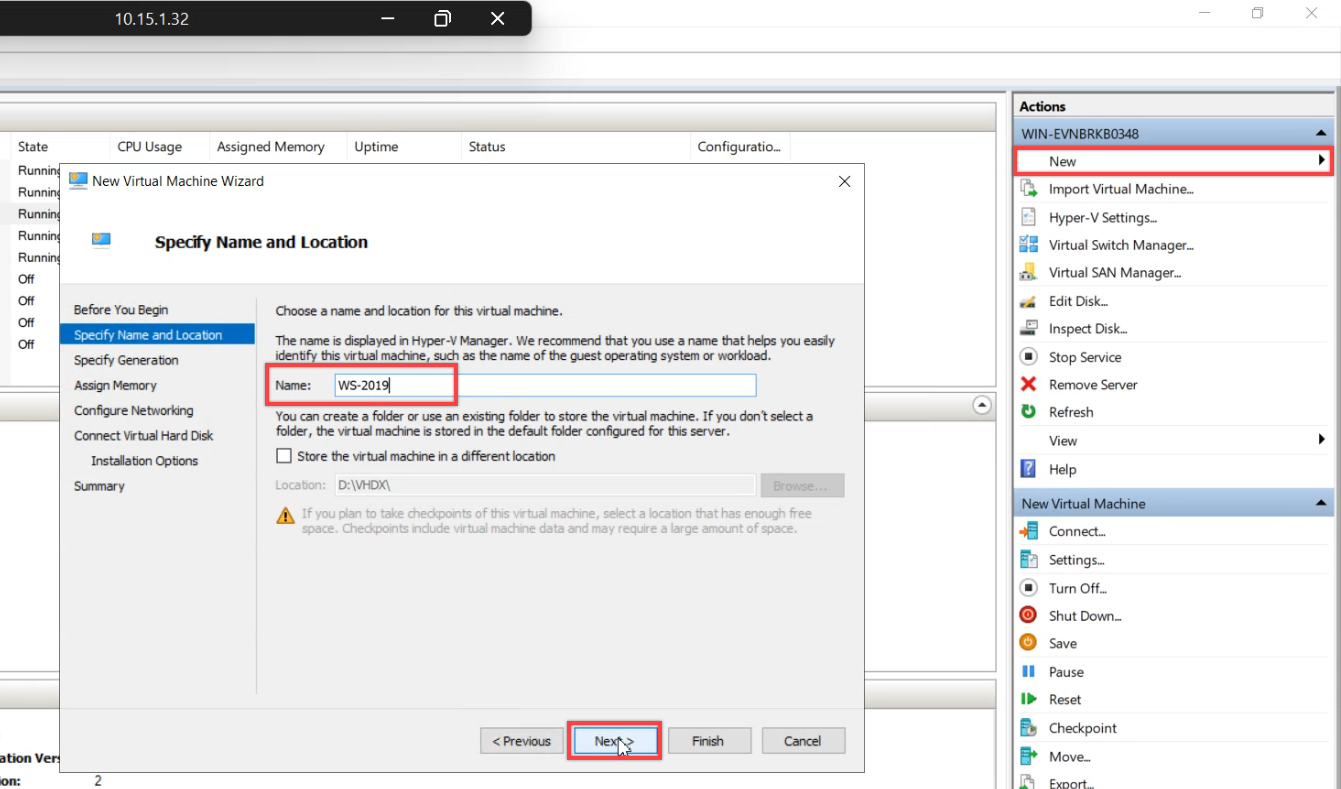
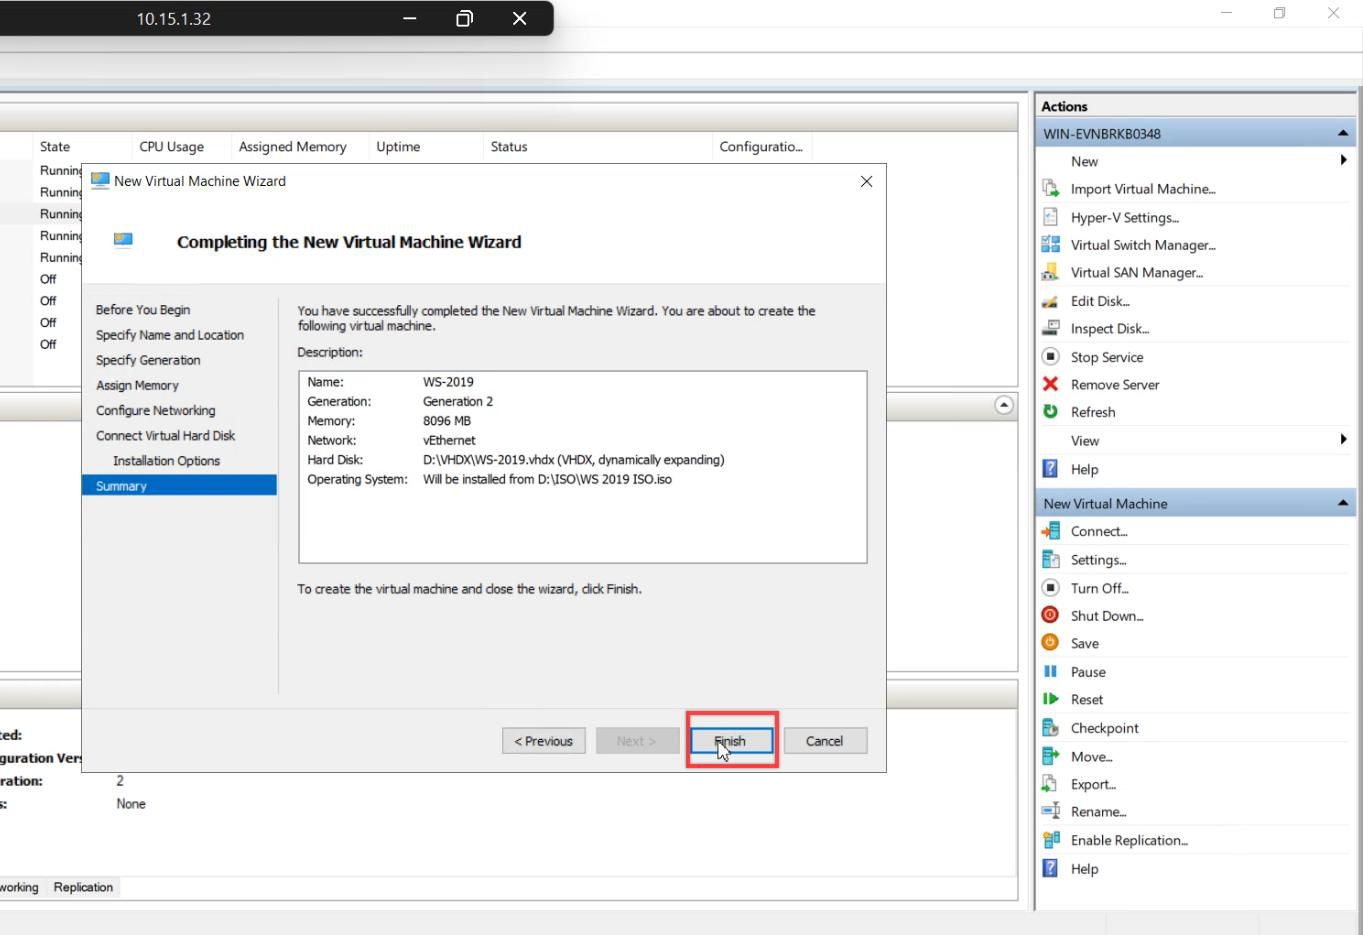
New Virtual Machine. Name matches the original.
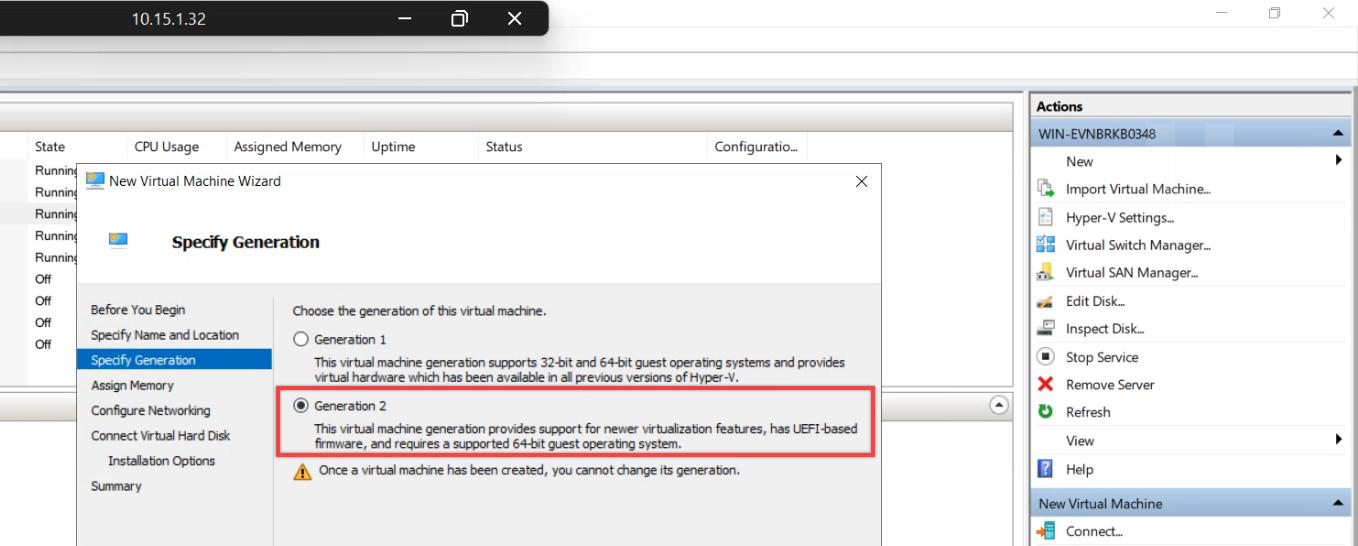
Generation: Generation 2 (matches the original; Gen 2 = UEFI). Gen 1 = MBR. Wrong generation = boot fails after restore.
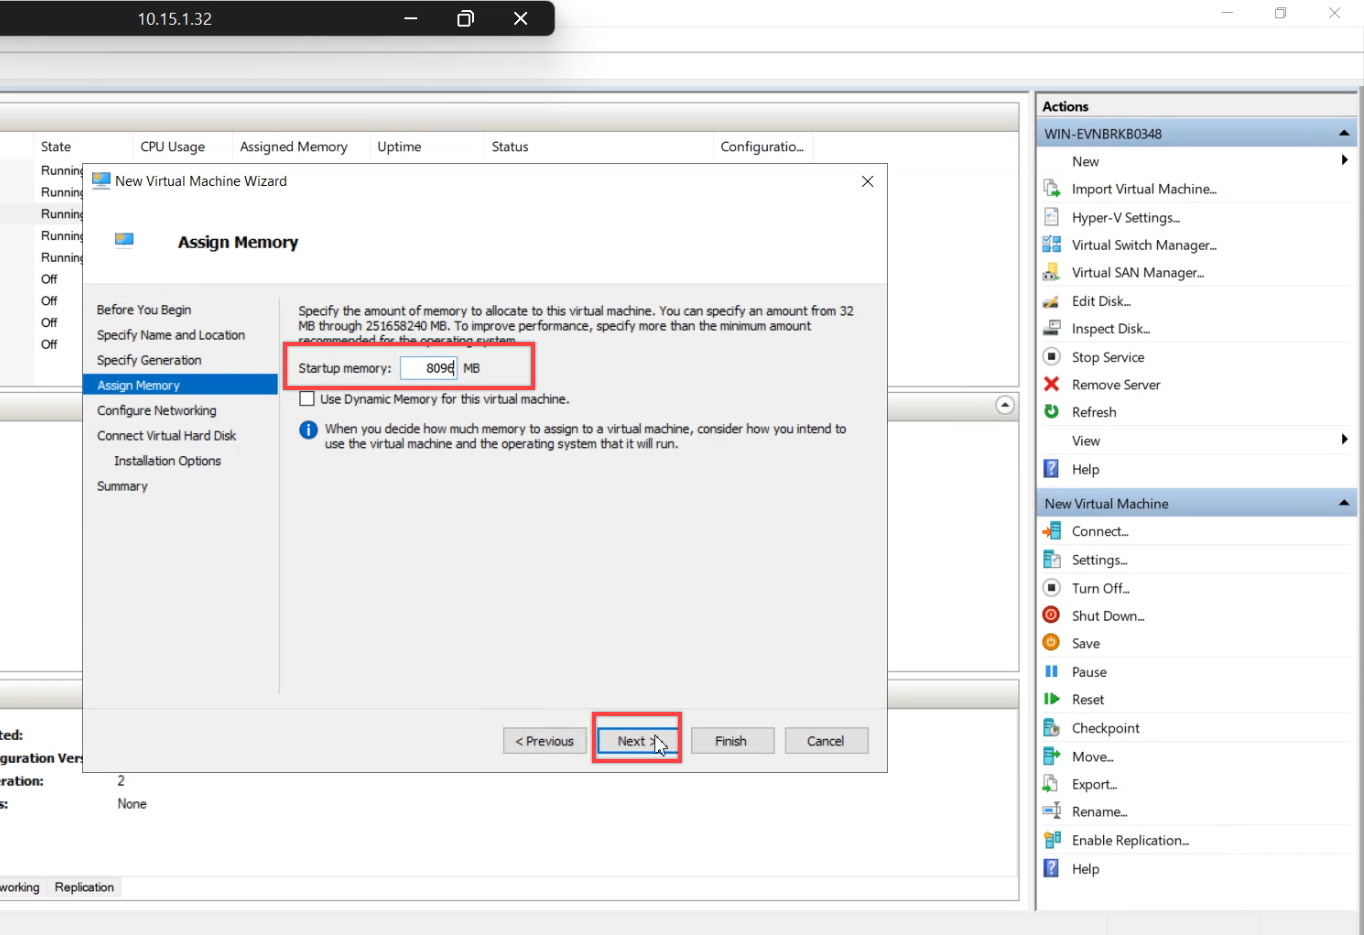
Memory: same as the original. Not strictly required for restore to work, but matching is closer to real-world.
Network: same external vSwitch used by the destroyed VM.
Create a fresh, empty OS VHDX. Don’t reuse the original’s disk — we want to prove the restore actually writes the OS from scratch.
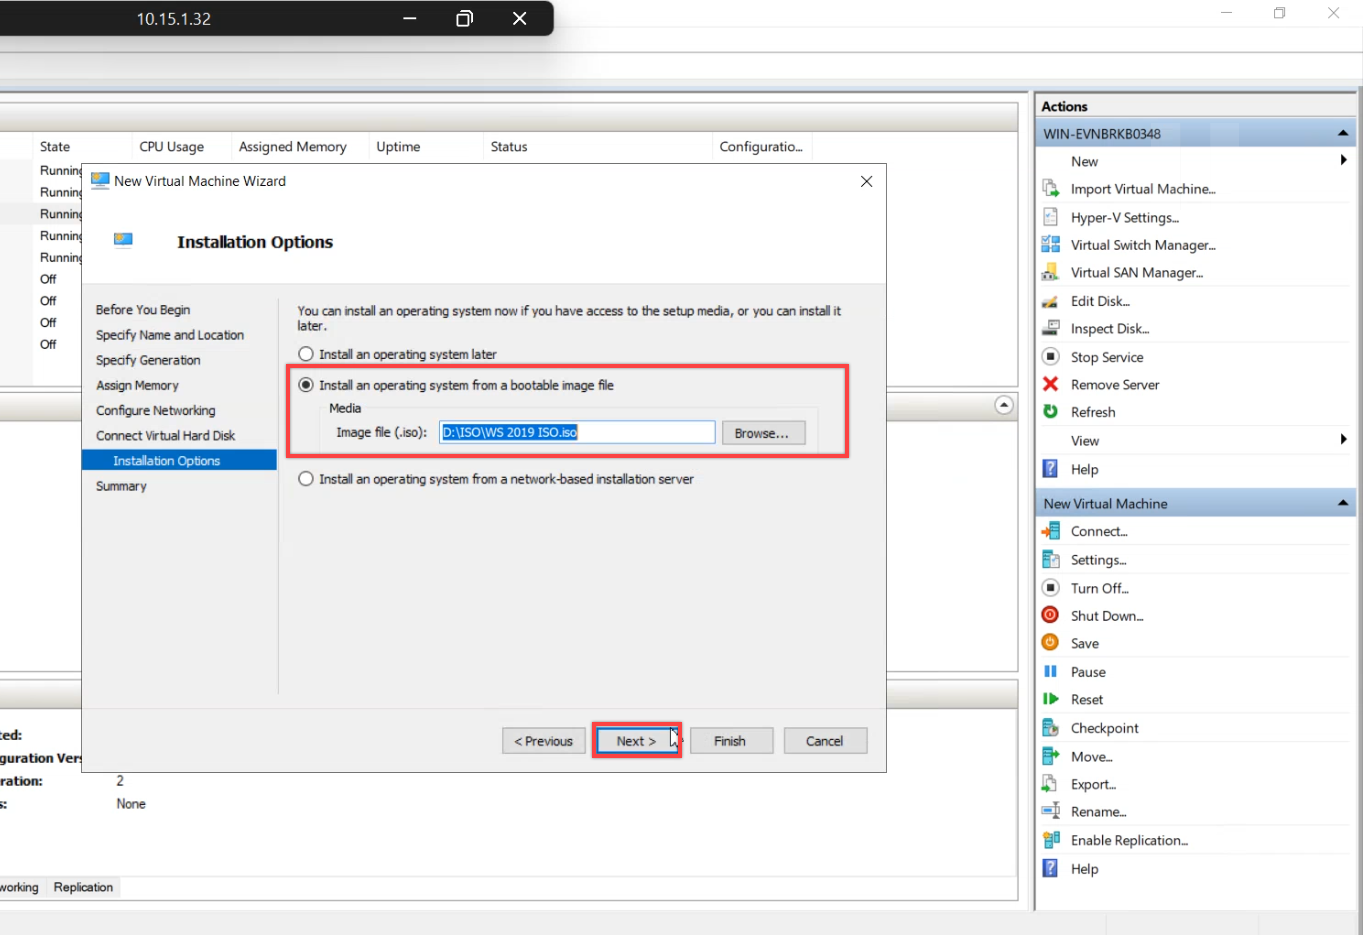
Installation Options: attach the matching ISO. Original was Server 2019 → attach the 2019 ISO. We’re only using the ISO to boot into WinRE, not to install Windows.
Step 2 — Attach the backup disk
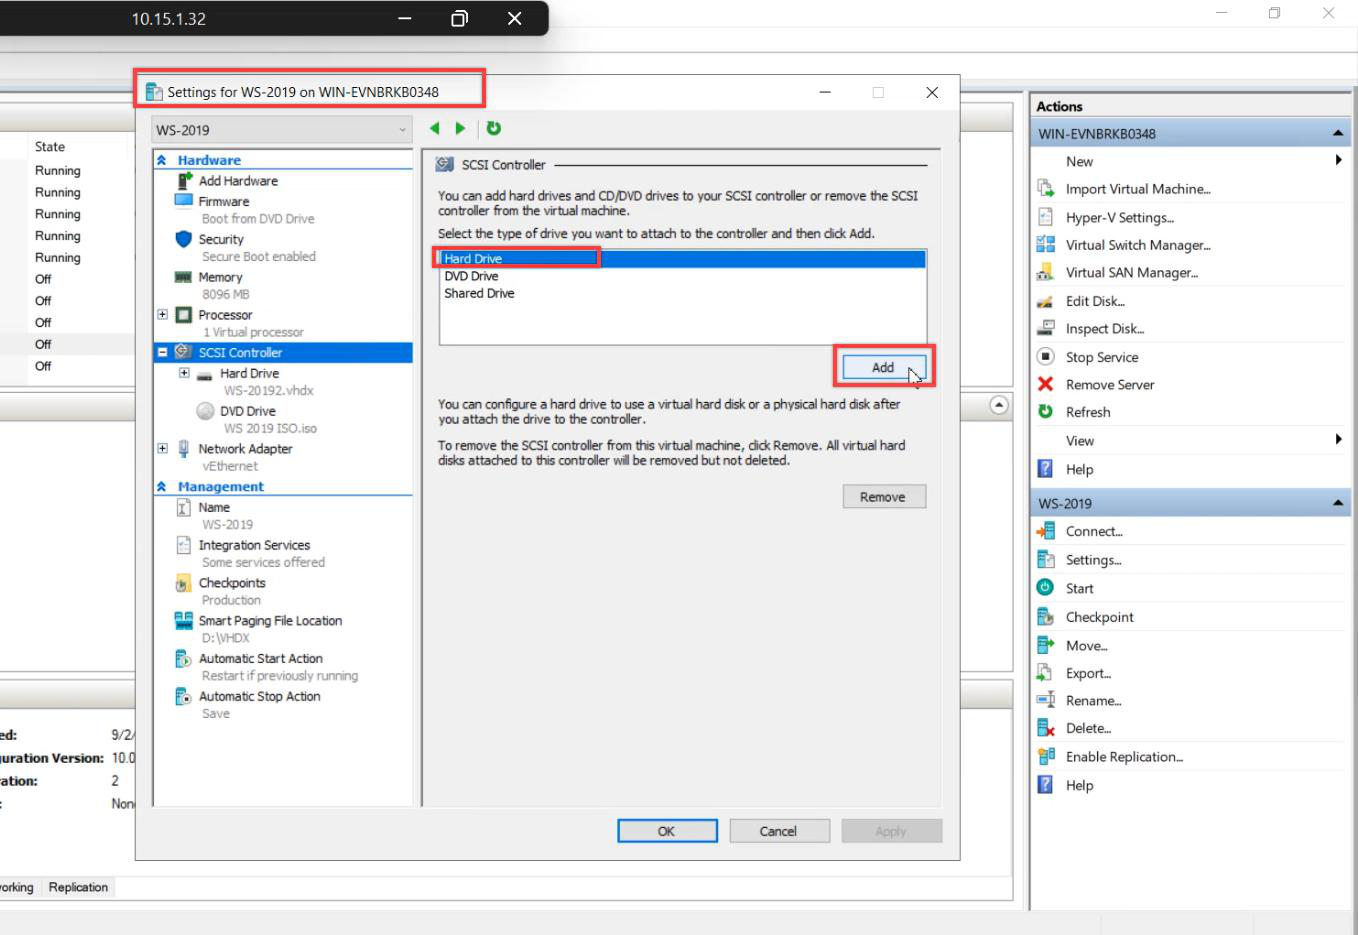
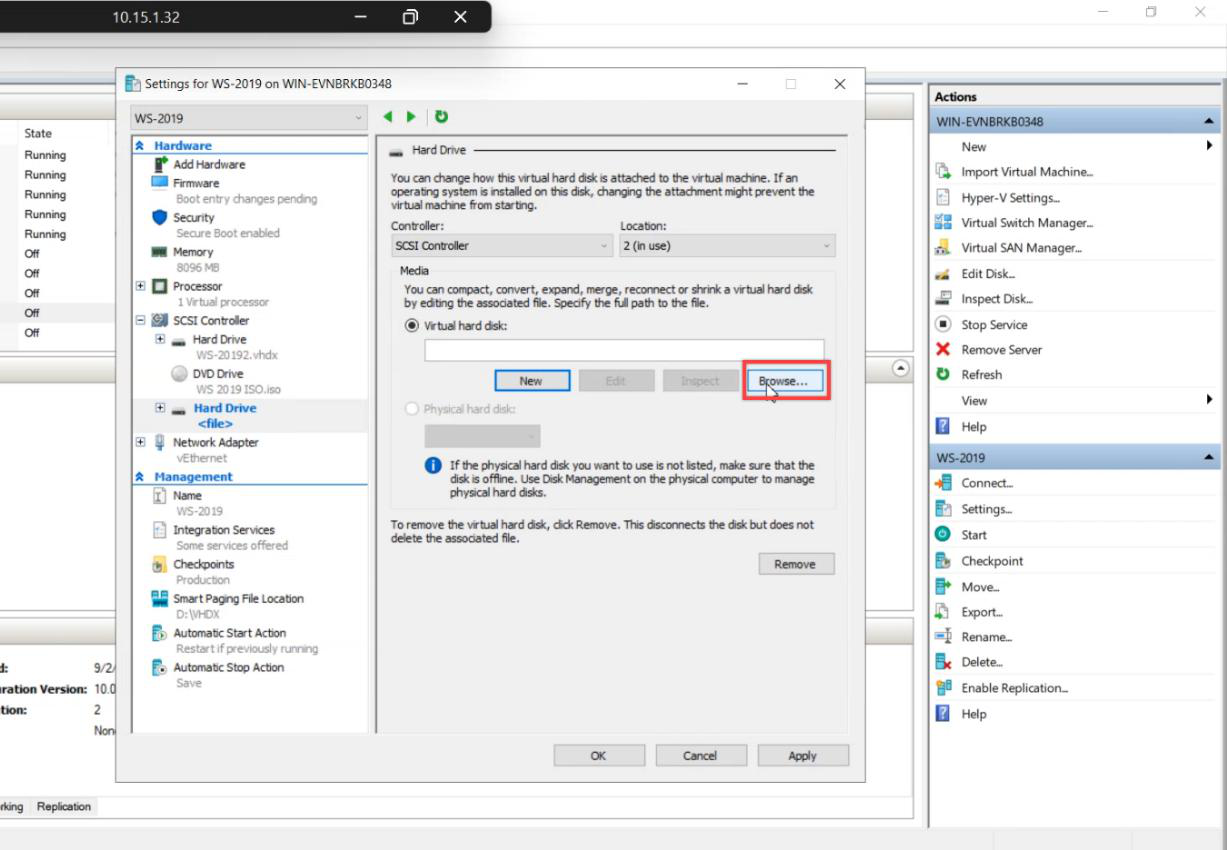
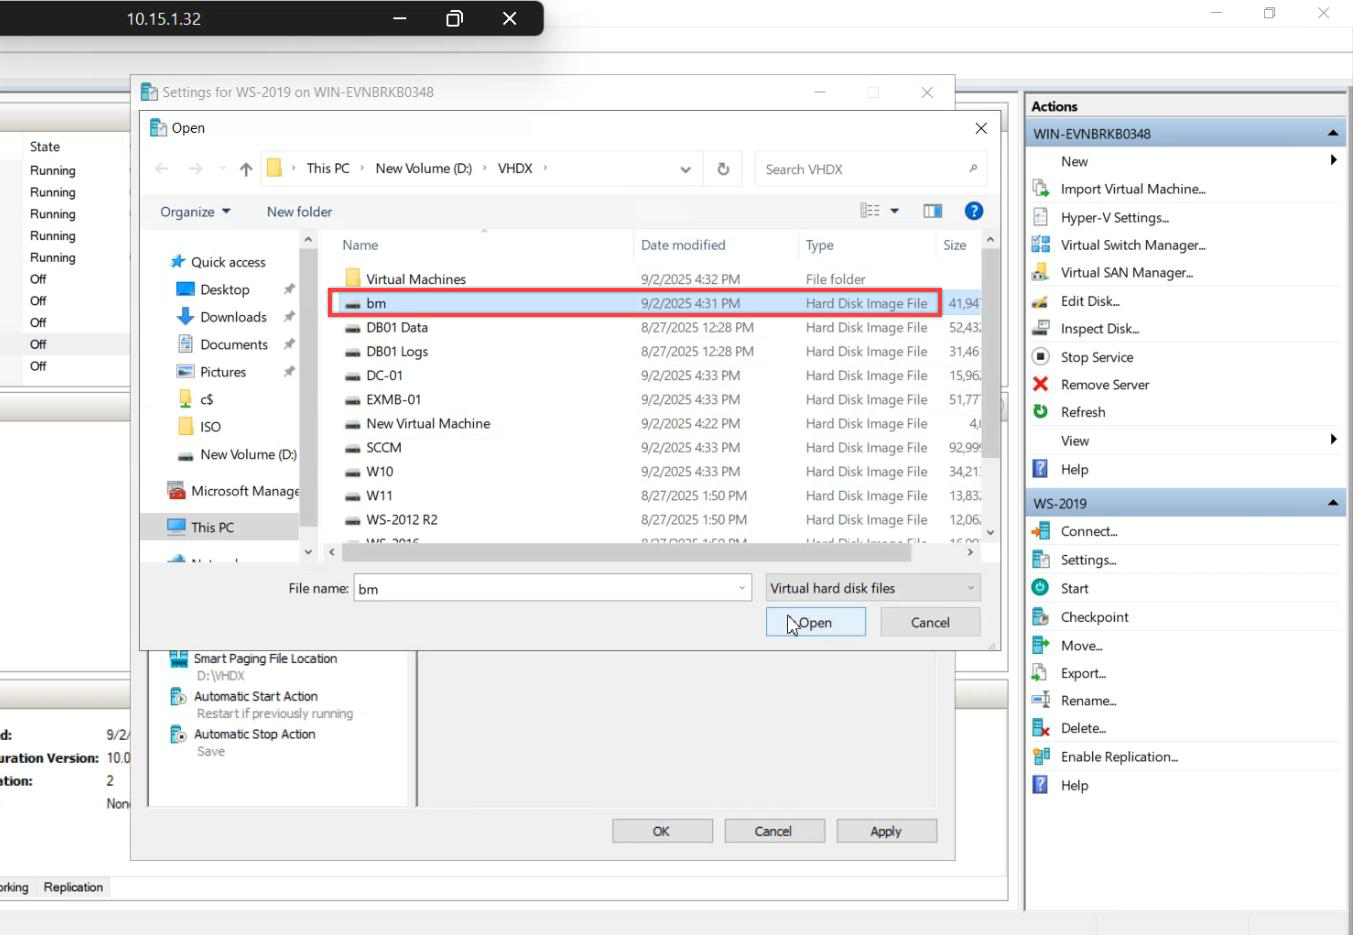
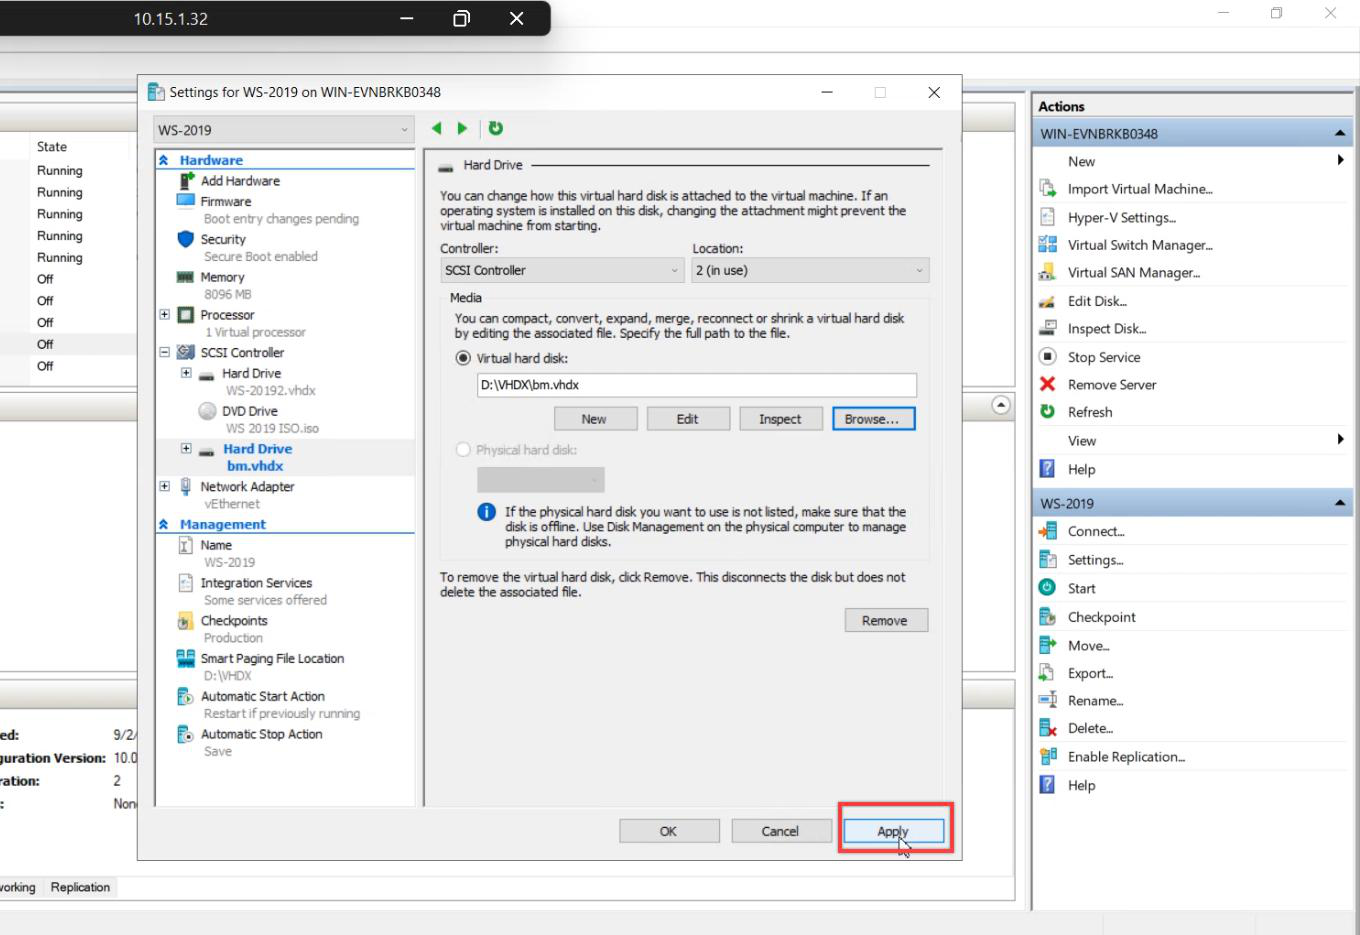
VM Settings > SCSI Controller > Hard Drive > Add > Browse (not New) > pick the backup VHDX from the host filesystem > Apply. The VM now has two disks: empty OS VHDX (target) + backup VHDX (source).
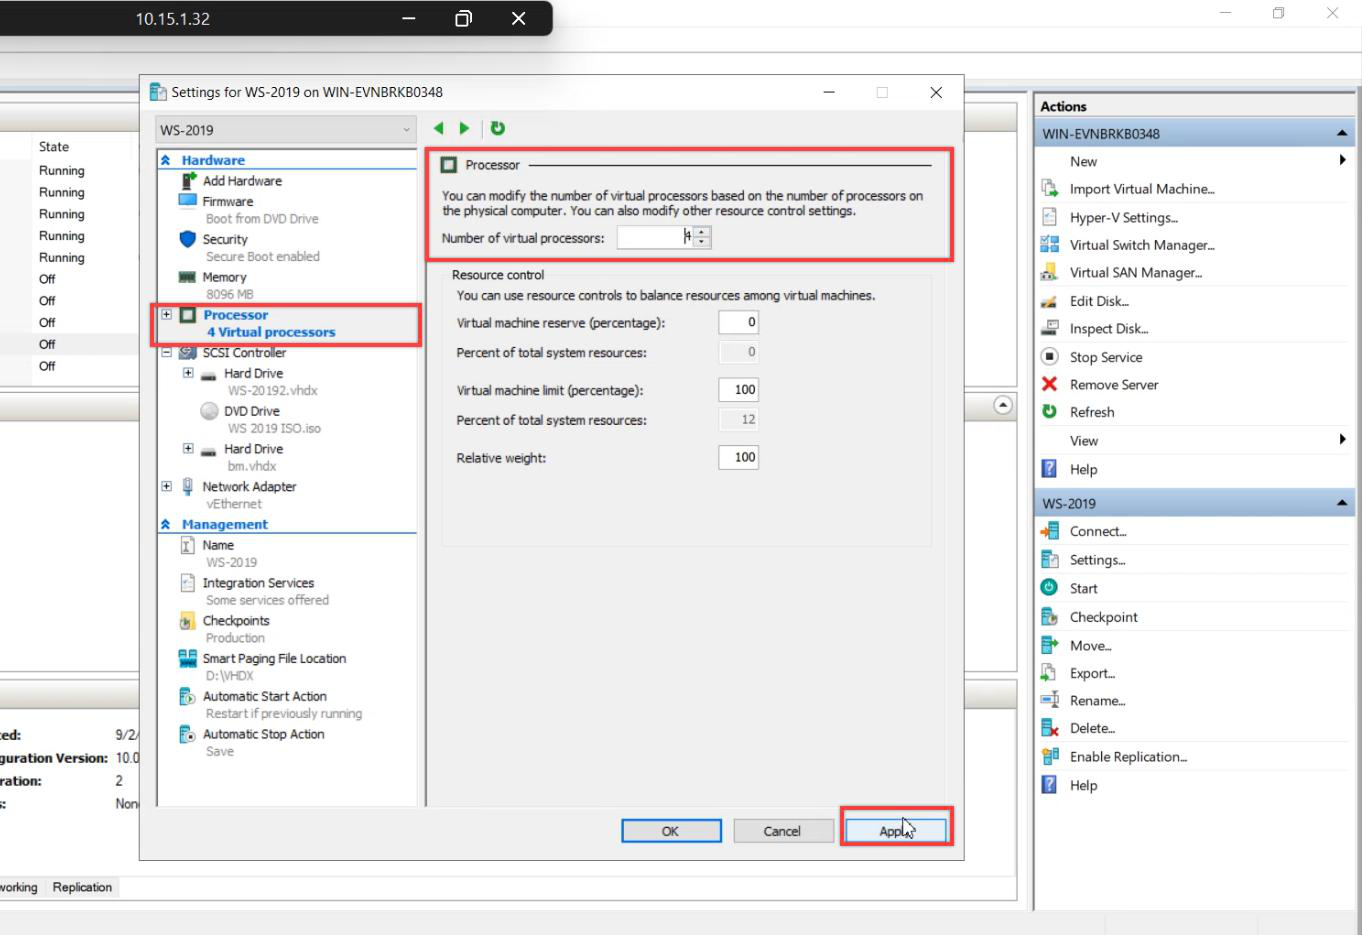
Bump vCPU to match the original. Apply > OK.
Step 3 — Boot into WinRE
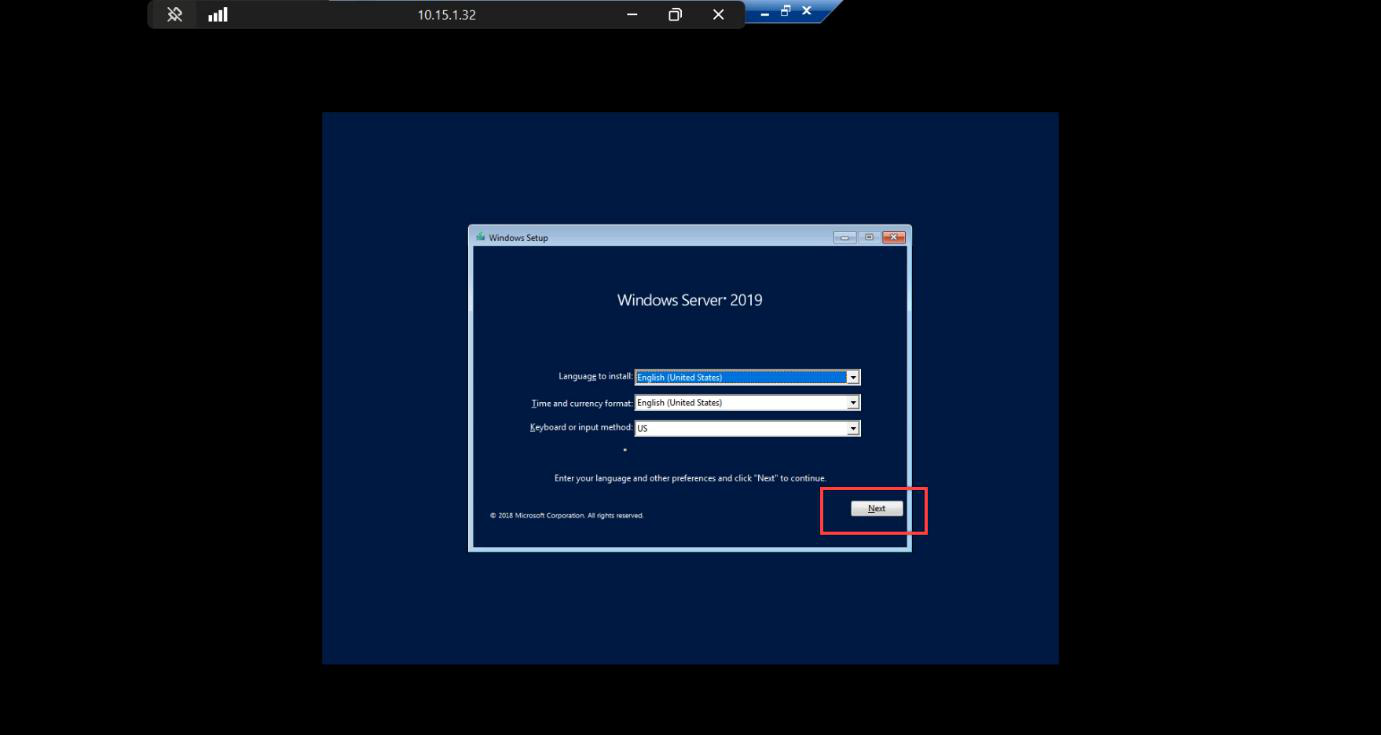
Connect > Start. Watch for the boot prompt — press spacebar repeatedly to boot from the attached ISO. The window is short.
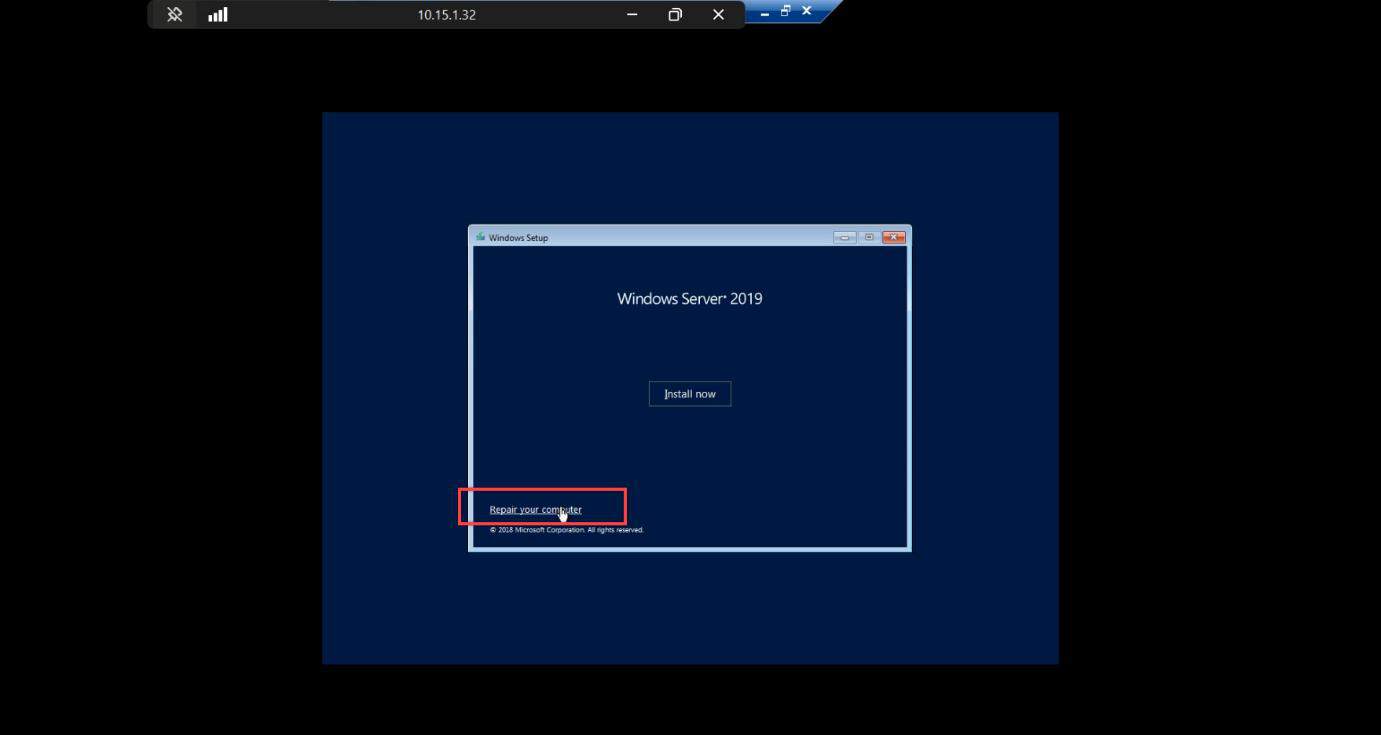
Windows Setup boots from ISO. Language + keyboard > Next.
Repair your computer link — bottom left, easy to miss. Click it. Don’t click Install Now (that’s a fresh install path).
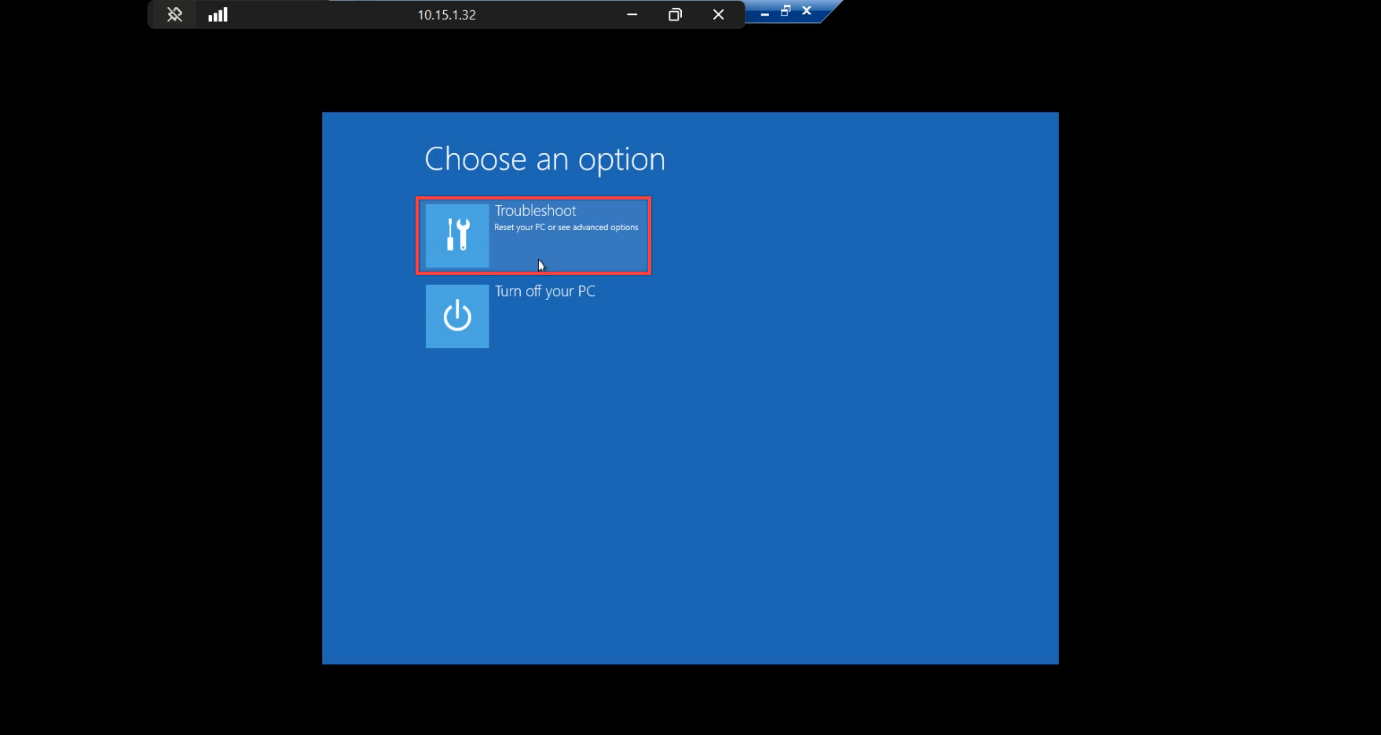
WinRE Choose an option screen > Troubleshoot.
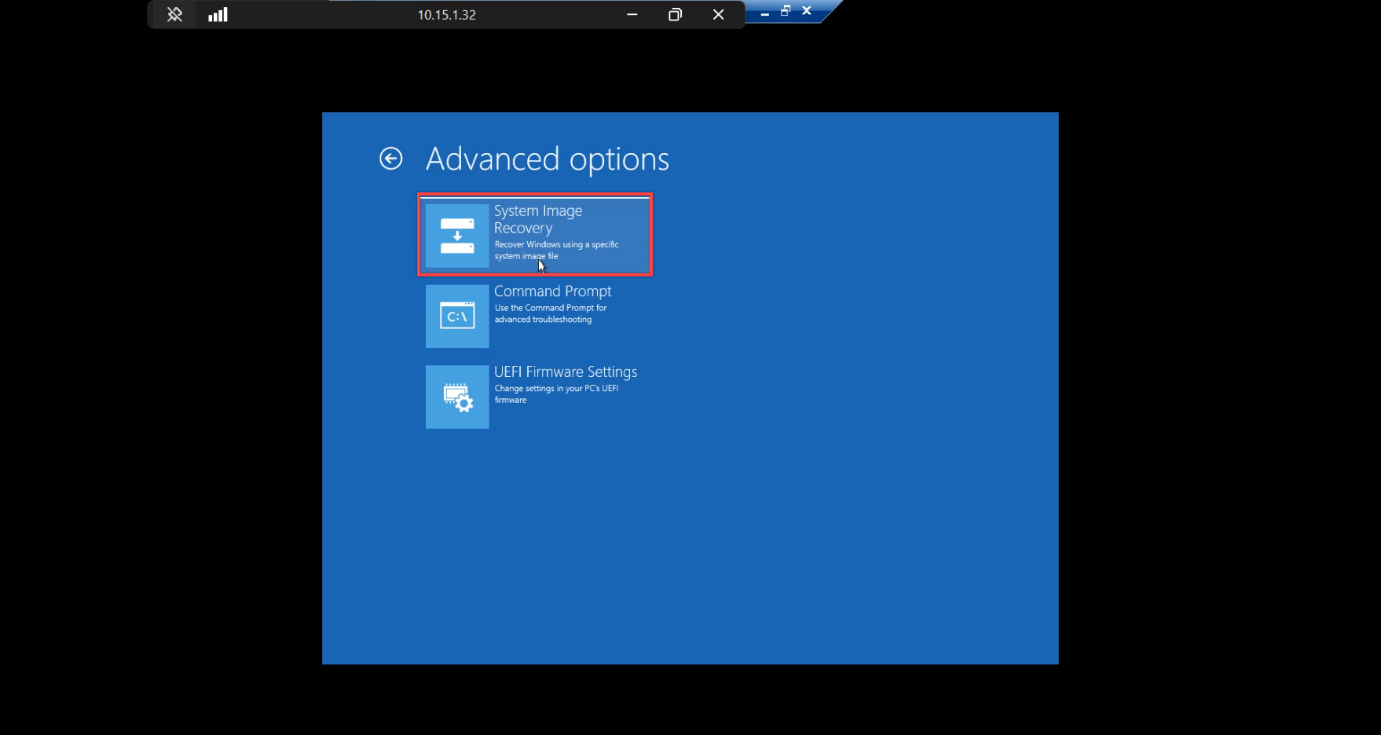
Troubleshoot > System Image Recovery. This is the WinRE entry point that reads WindowsImageBackup folders and replays them onto the empty disk.
Step 4 — Run System Image Recovery
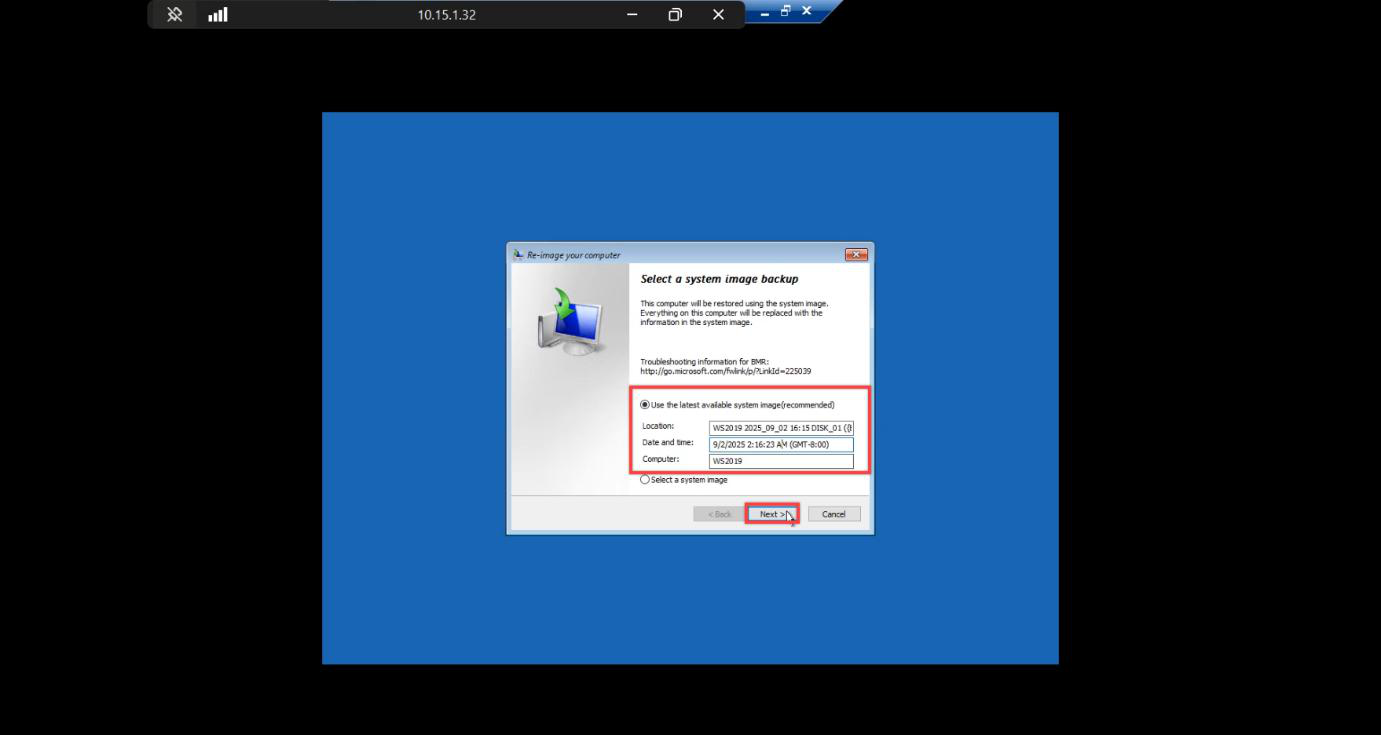
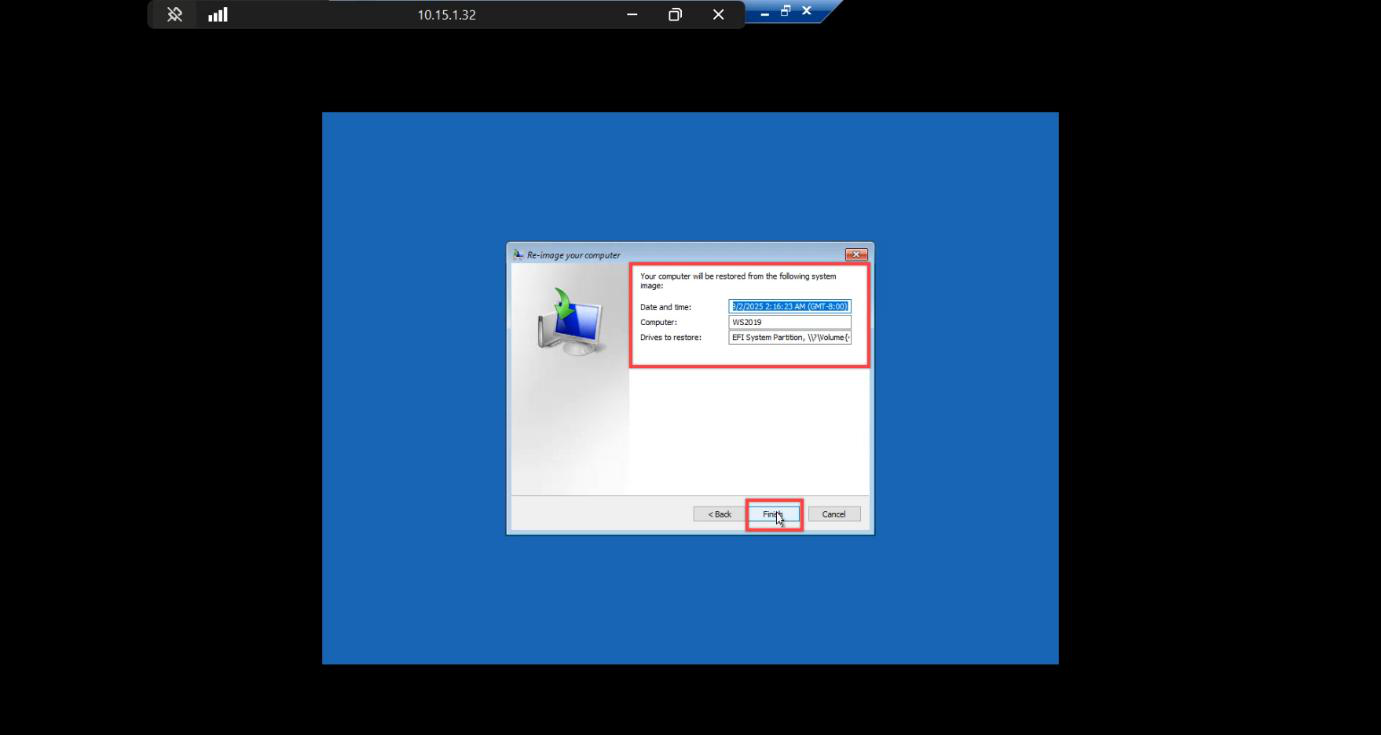
WindowsImageBackup folder.Re-image Your Computer wizard. Auto-detects the backup VHDX and lists the latest system image. If your backup doesn’t appear:
- Backup disk isn’t attached — check VM Settings.
- Backup disk has no
WindowsImageBackupfolder — you pointed at the wrong VHDX. - WinRE on the ISO is too old — mismatched OS version. 2019 backup needs 2019 ISO.
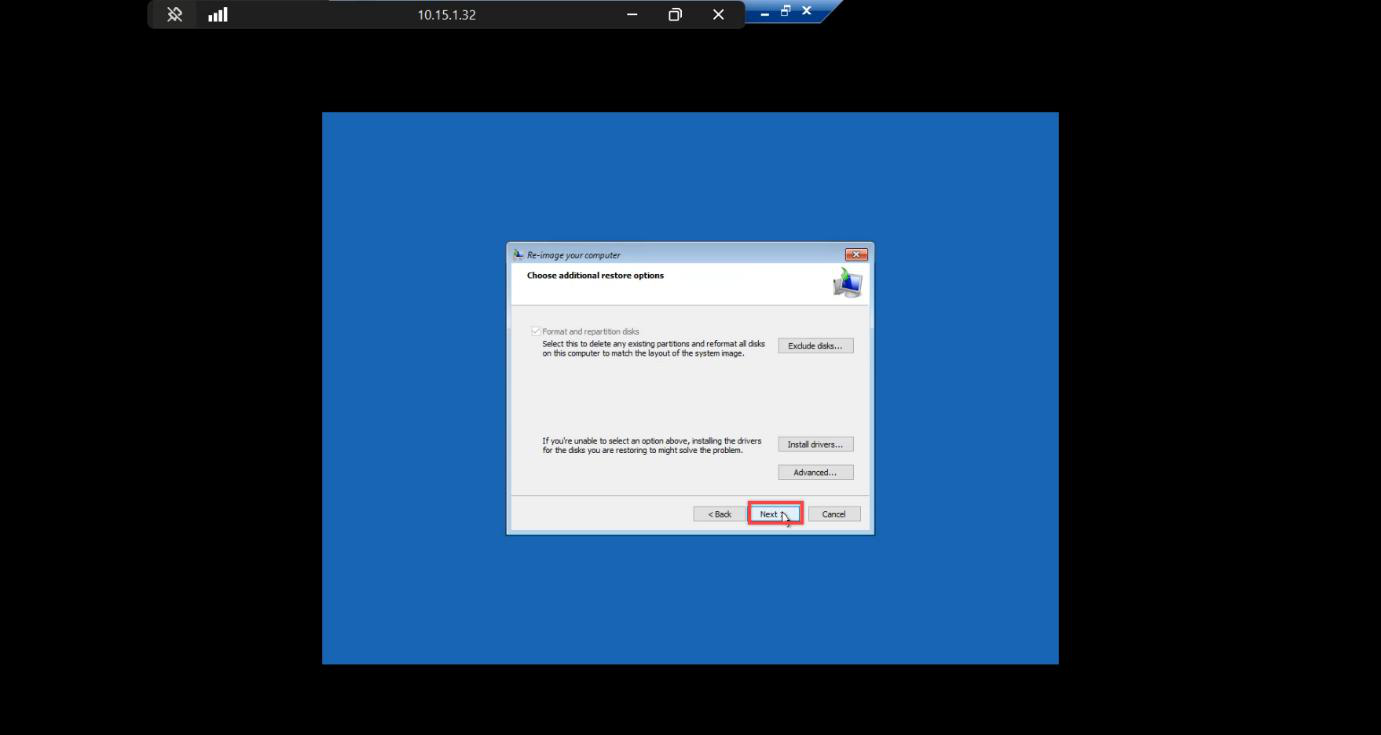
Additional options. Format and repartition disks stays ticked — bare-metal restore needs to lay down the partition layout from the backup. Other defaults are fine.
Final summary > Finish.
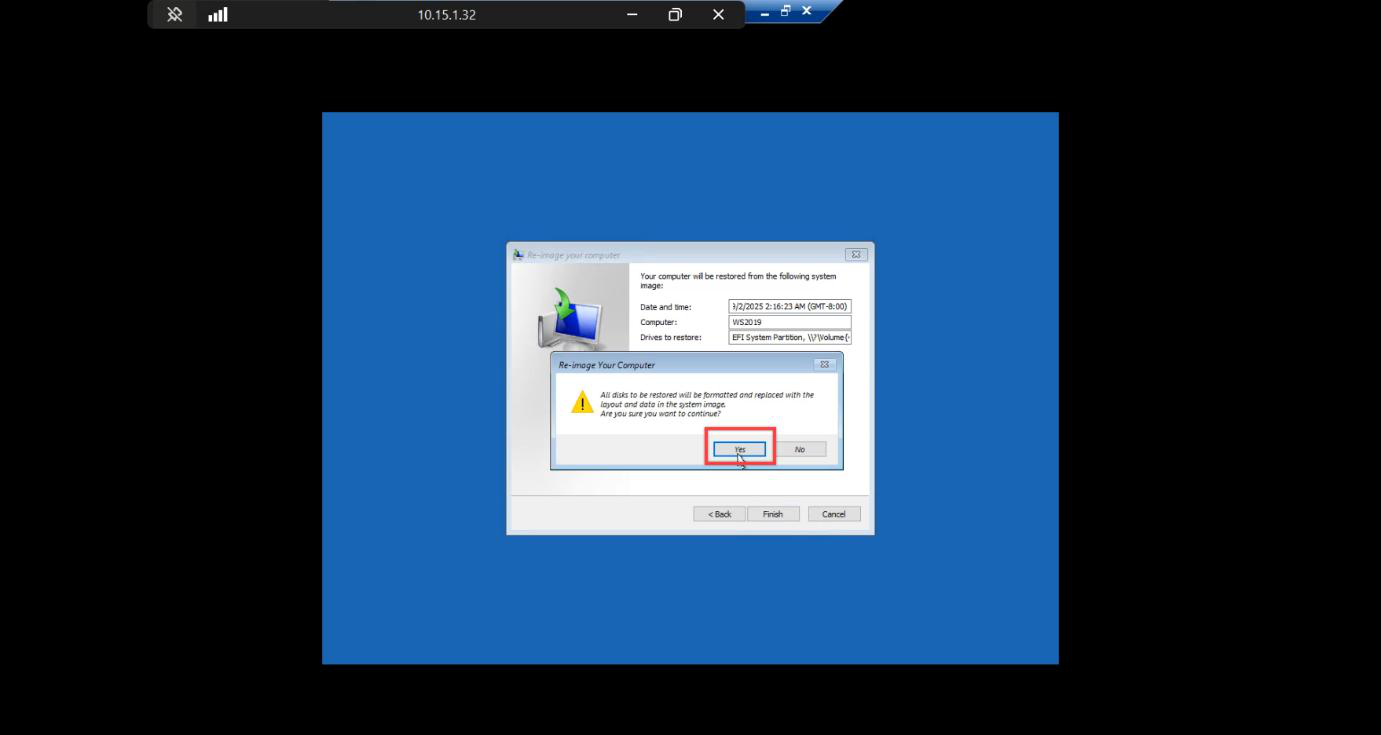
Confirmation: target disk will be wiped. Yes — restore begins. Cannot be cancelled.
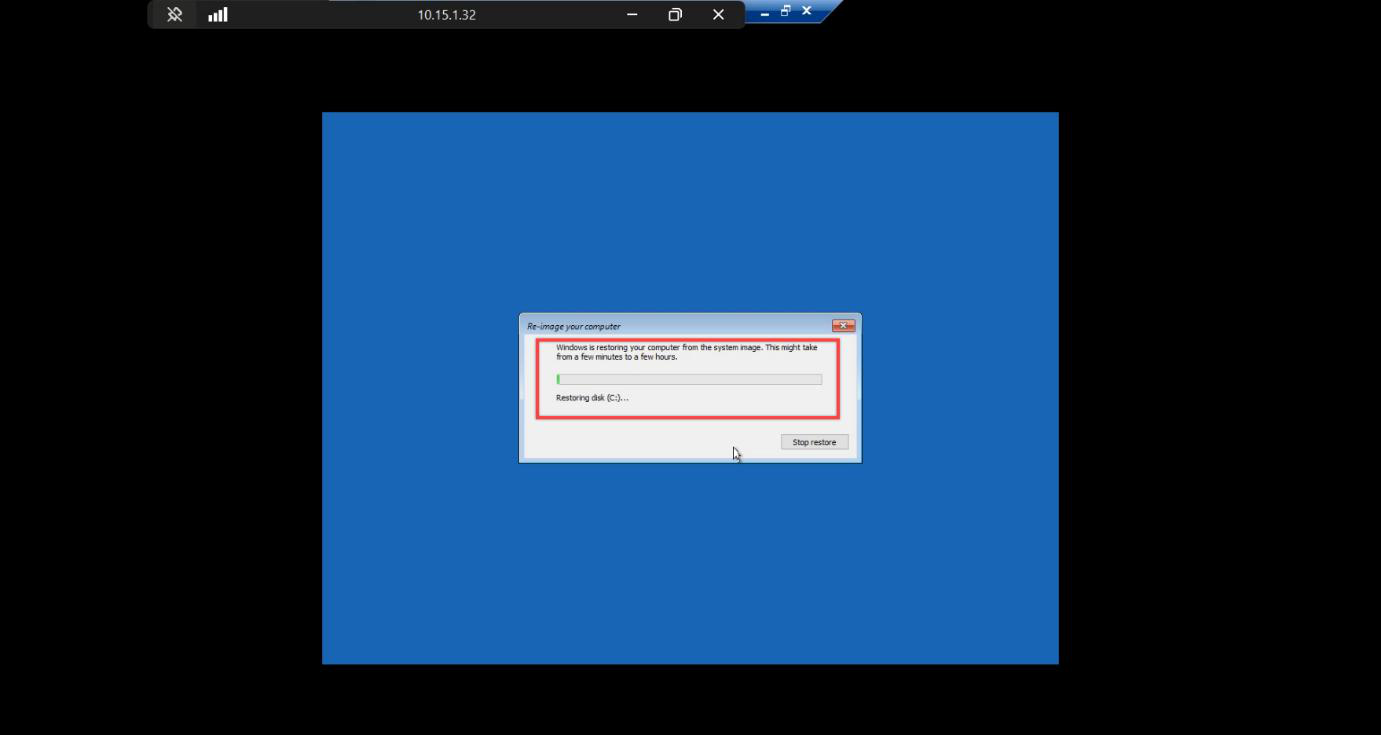
Step 5 — Wait for restore
Restore progress screen. WinRE writes the partition layout, then streams the volume data back from the backup VHDX. Time depends on backup size:
- Lab VM (~40 GB): 5–10 minutes on local NVMe.
- Production VM (~150 GB): 30–60 minutes on a typical RAID-10.
- From network share over SMB: figure 1 GB/min on a saturated gigabit link.
Don’t touch the console. Don’t move the mouse. Wait.
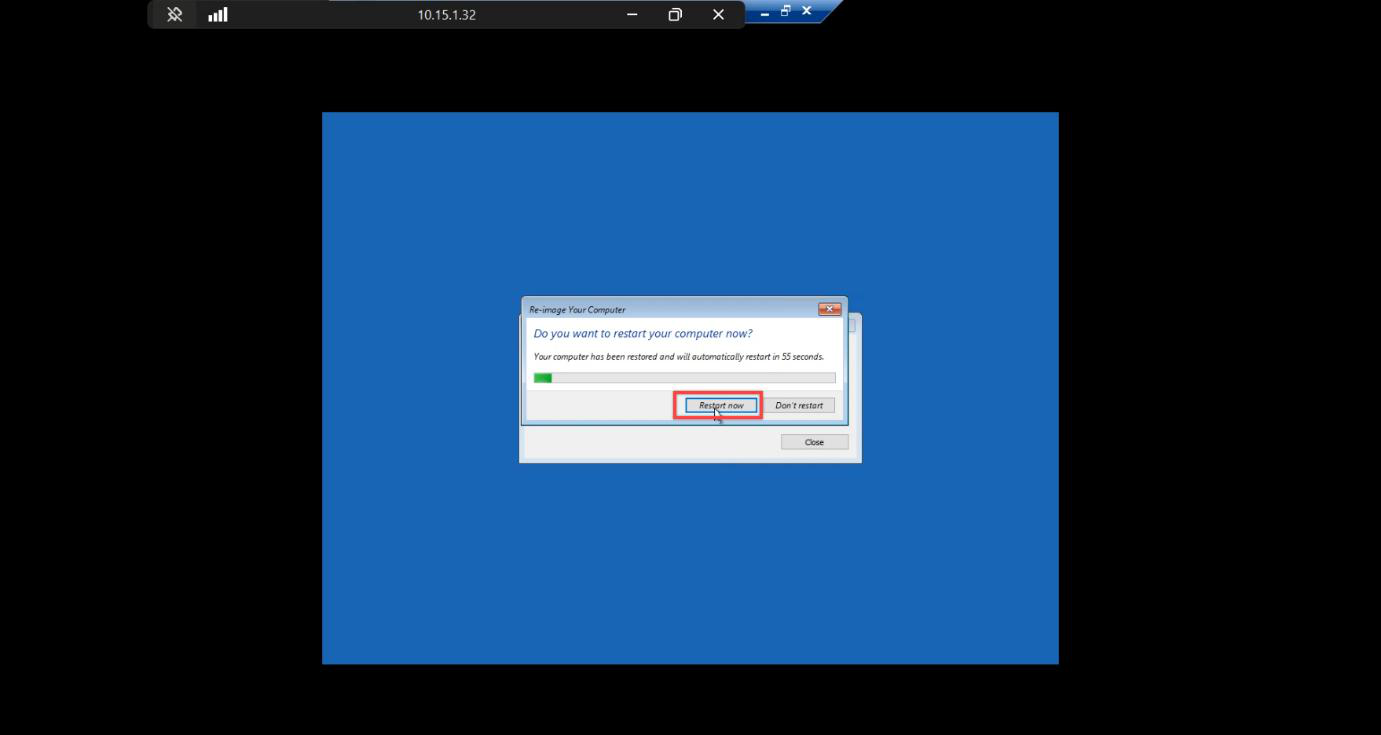
Completed. Restart Now — don’t wait the auto-restart timer.
Step 6 — Verify the restored DC
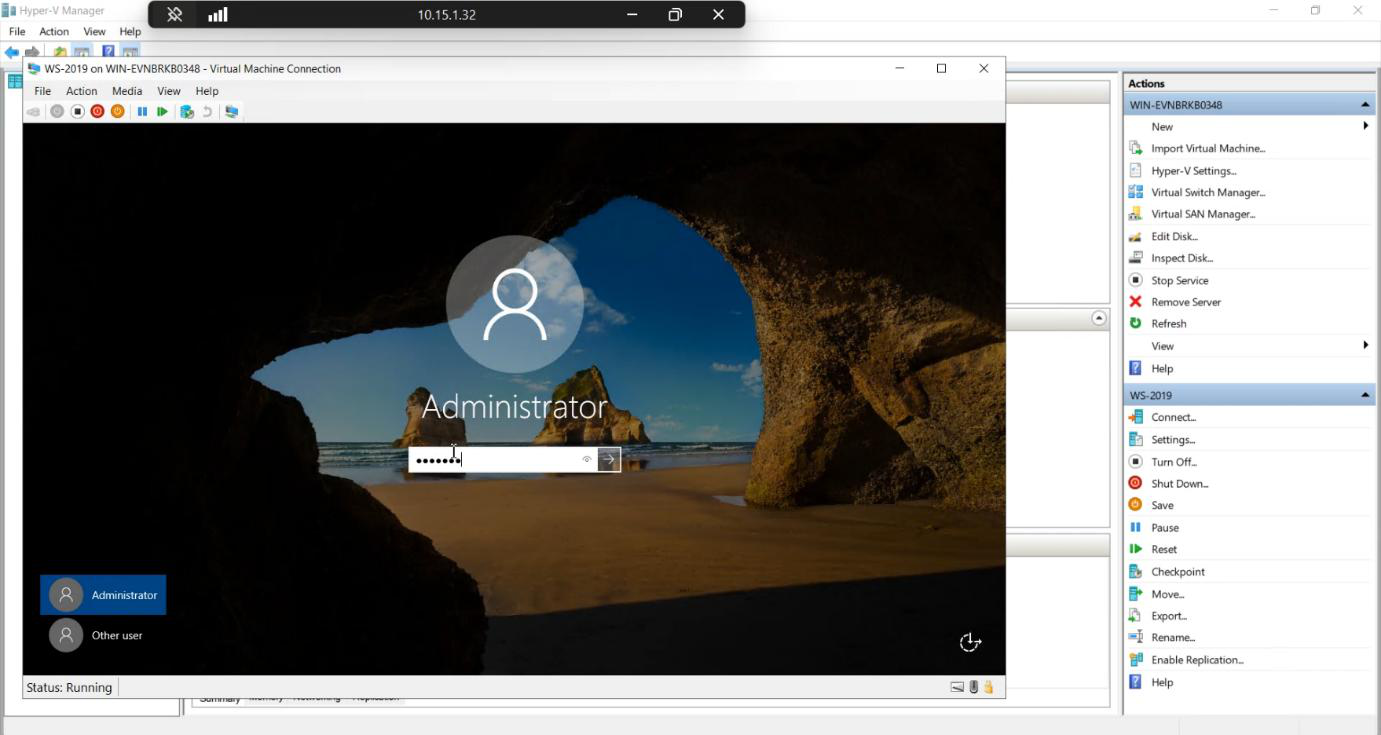
Login screen. Same credentials as before the disaster — the SAM database was part of system state, so the local Administrator password survived. AD database is at backup point-in-time, so domain admin works the same way.
Inside the restored DC:
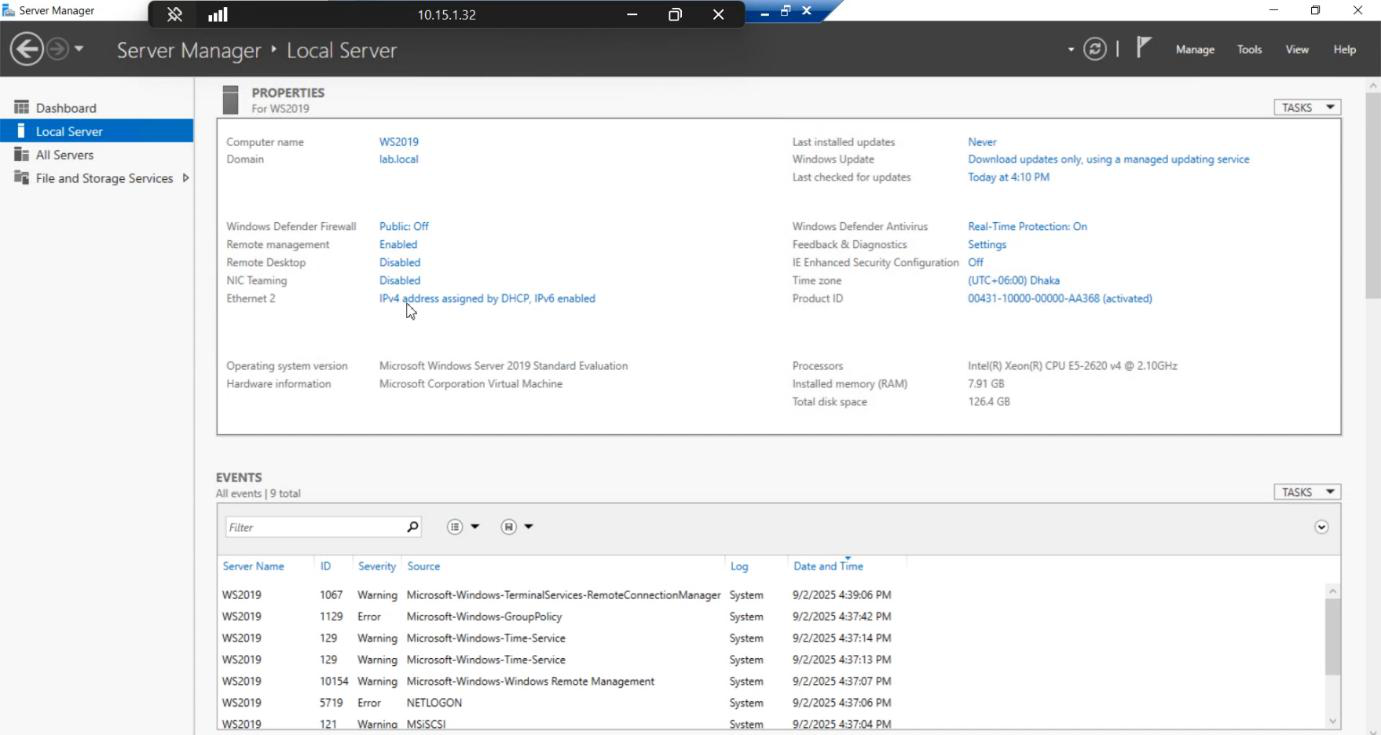
- Active Directory Users and Computers — all OUs, users, groups, GPOs are exactly as they were at backup time.
- DNS service — running and resolving.
- NTDS service — running.
- NIC IP address — this is the one thing that may need fixing. Hyper-V may have generated a new MAC for the replacement VM, which means DHCP gave a different lease (or your static config is on the new MAC). Re-apply the same IP and DNS settings as the original VM.
Once IP is fixed, replication with the surviving DCs picks up on its own. The restored DC is back online and serving the domain.
Verification checklist before declaring success
dcdiag /v
repadmin /replsummary
ipconfig /all
Get-Service NTDS, DNS, KDC, Netlogon
Look for:
dcdiagreports no critical errors — some warnings about time skew and replication-just-resumed are normal.repadmin /replsummaryshows recent successful replication with surviving DCs.- Services all Running.
- IP matches the original.
Things that bite people
Mismatched VM generation
Backed up a Gen 2 (UEFI) VM, restored to Gen 1 (BIOS) replacement. Restore completes, then the VM won’t boot — UEFI boot files in the image can’t be parsed by Gen 1’s BIOS firmware. Always match generation.
Wrong ISO version for WinRE
Backup from Server 2019, replacement booted with Server 2022 ISO. WinRE 2022 can sometimes read 2019 images but it’s flaky. Always boot from the same OS version’s ISO as the backup.
Missed the spacebar boot prompt
VM falls through to the empty OS disk and hangs. Power off, restart, try again with quicker spacebar mashing.
Backup disk too small for restore
If the replacement OS VHDX is smaller than the source, restore can fail mid-run with cryptic errors. Always size the replacement OS disk ≥ the original.
USN rollback after restore
If the restored DC was offline for < tombstone lifetime (60 days by default), replication resumes cleanly. If it was offline longer, AD treats the restored DC as a USN-rollback source — replication breaks, and the only fix is metadata cleanup + force-demote and re-promote. Always check the backup age before restoring — an old backup may be worse than a clean re-promote.
IP collision
If the destroyed VM’s IP is now leased to a different machine, the restored DC will fail to acquire it and may get a different IP from DHCP. Reserve the DC’s IP in DHCP, or just use static. Always.
Forgetting this only does non-authoritative
A normal bare-metal restore is a non-authoritative restore. When the DC comes back, it pulls newer data from surviving DCs and overwrites anything in the backup that’s out of date. That’s usually what you want — but if you needed to undo a forest-wide deletion, this won’t work. See Parts 5 and 6 for the authoritative restore path.
What’s next
You’ve completed the backup-test-restore cycle on a VM. Part 5 is the conceptual post in this pathway — non-authoritative vs authoritative restore — the distinction that decides whether your restored data overwrites the rest of the domain or gets overwritten by it. Part 6 drives the authoritative procedure with ntdsutil.
Aside: who actually uses native Windows backup in production?
Mostly nobody, for primary backups. Enterprise shops use Veeam, Commvault, DPM, Rubrik, Cohesity, or similar. But Windows Server Backup is the universal floor — it ships with the OS, no licensing, no install. Knowing the bare-metal restore procedure with the in-box tool is the difference between “backup tool down, we’re stuck” and “backup tool down, here’s the manual fallback.” Worth knowing even if it’s not your daily primary.