Post 139 covered creating a Win11 VM from scratch via PowerShell. Doing that for one VM is fine; doing it for ten is tedious; doing it for a hundred is unworkable. The pattern that scales is the golden image — build one reference VM exactly the way you want every future VM to look (OS, apps, baseline configuration, updates), Sysprep it to strip the unique identity, save the resulting VHDX as a template, then create new VMs that boot off copies of that VHDX. New VMs come up in seconds with the apps pre-installed, the time zone set, the corporate baseline applied. This post walks the build — reference VM → Sysprep → golden image VHDX → clone — and the gotchas that come with the approach.
What you need before starting
- A Hyper-V host with the role installed — the lab uses Windows Server 2025
- An existing reference VM (the lab uses
WS2K25) with the OS installed, fully patched, and configured the way you want every future VM to look. Apps installed, RDP enabled, time zone set, baseline GPO applied if domain-joined - A folder for the golden image — the lab uses
D:\VHDs\WS2K25 Golden Image\ - Roughly the same disk space as the source VHDX (you’re creating a copy)
- A few minutes of downtime on the reference VM while Sysprep runs
Why Sysprep matters
The naive approach is to just copy the VHDX of a running Windows VM and attach it to a new VM. That technically works — you get a new VM that boots — but the new VM has the same SID, the same computer name, the same activation tokens, and the same network identity as the source. On a domain network, two machines with the same SID cause subtle and infuriating bugs (Group Policy applies inconsistently, security tokens collide, audit logs become ambiguous). On a workgroup, you can’t join both to a domain because the second join attempt fails. The fix is Sysprep, which removes all of those unique identifiers from the source before you copy it.
Microsoft documents Sysprep can run a maximum of 8 times per OS installation before the activation rearm count expires. For a long-lived golden image that you keep updating in place, this is a real limit — eventually you have to rebuild the reference VM from scratch. For the typical pattern of “build the golden once, deploy clones, retire the golden when the OS releases a major update,” 8 is plenty.
Step 1 — Verify the reference VM is ready
Open the reference VM and confirm it has everything you want every future VM to inherit:
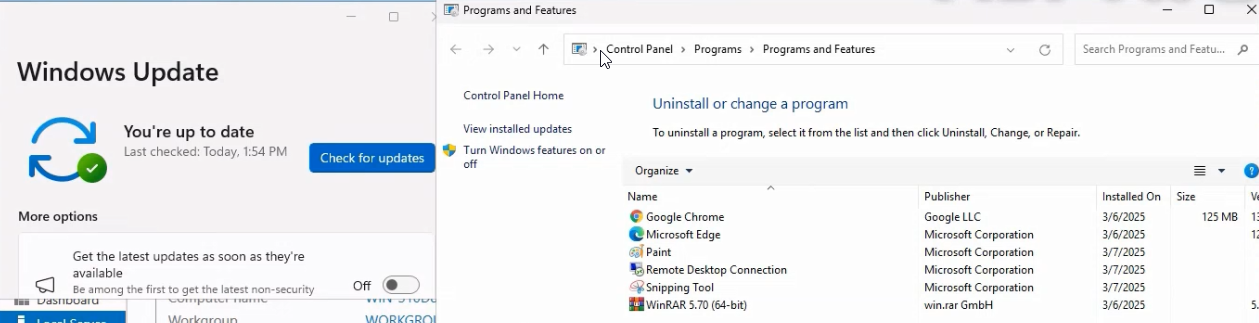
- OS fully patched —
sconfigor Windows Update should report “You’re up to date.” - Required applications installed — the lab has Chrome and WinRAR; production templates often have monitoring agents, AV agents, corporate certificates, baseline scripts.
- RDP enabled if the template will be deployed without a console — otherwise you can’t connect to clones.
- Time zone, regional settings, default browser, etc. set the way you want.
- Anti-virus exclusions and any baseline GPO already applied.

Walk through the desktop, Settings, and File Explorer. Anything that’s broken or wrong here will be broken on every clone — spend the time to fix it now rather than later.
Step 2 — Run Sysprep
Inside the reference VM, open elevated PowerShell. Navigate to the Sysprep directory and run the sysprep tool with the right switches:
cd C:\Windows\System32\Sysprep
sysprep.exe /oobe /generalize /shutdown /mode:vm
What each switch does:
/oobe— Out-Of-Box Experience. Tells Sysprep that the next boot should run the OOBE wizard (language, region, admin password, computer name) so the clone behaves like a freshly-installed machine./generalize— the operative one. Removes the SID, the computer name, the activation token, the event logs, and the Plug-and-Play hardware history. Without this, the “clone” isn’t really a clone — it’s a duplicate./shutdown— powers the VM off after Sysprep completes. The alternative is/reboot, which would immediately run OOBE on the source — not what we want for a template./mode:vm— tells Sysprep that the target is a virtual machine with consistent virtual hardware. Skips the hardware-detection step (which is the slowest part of generalisation) since the VHDX will only ever be attached to virtual hardware.
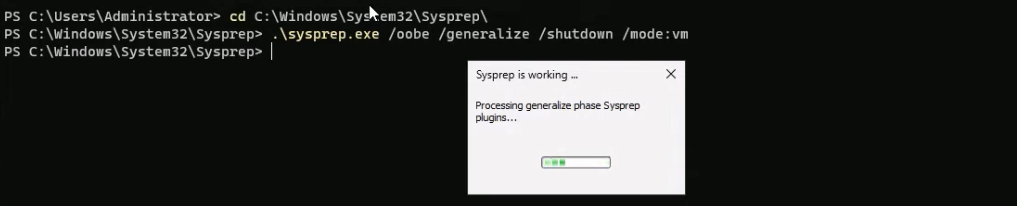
sysprep.exe /oobe /generalize /shutdown /mode:vm running inside the reference VM. The System Preparation Tool dialog confirms execution; the VM shuts down cleanly when Sysprep finishes (typically 2–5 minutes).Sysprep takes 2–5 minutes. The System Preparation Tool dialog reports progress; when finished, the VM shuts down cleanly. Don’t boot the source VM after this point — the next boot would run OOBE and re-personalise it, defeating the entire purpose. Treat the reference VM as “done” and don’t touch it again.
Step 3 — Adjust VM settings post-Sysprep
Two cleanups to do before exporting:
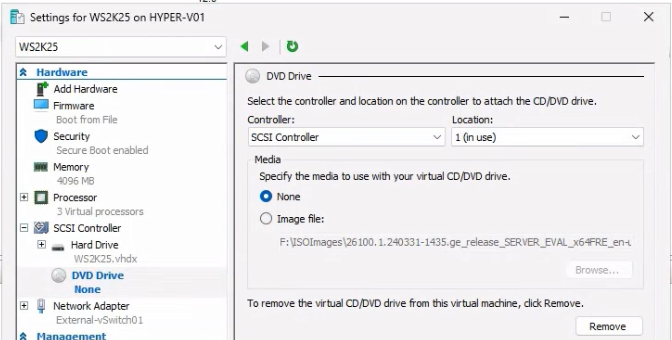
Remove the install ISO
If the reference VM still has a Windows install ISO mounted in its DVD drive, every clone will too — and at first boot the clones could end up booting back into the install media instead of the prepared OS. Open the VM’s Settings dialog, go to DVD Drive, change the media to None, click Apply.
Clear the network adapter (optional)
If the template will be deployed across multiple hosts that have different virtual switches, the saved network-adapter-to-vSwitch binding will fail when the clone tries to connect to a vSwitch that doesn’t exist on the new host. Either remove the network adapter from the template (and add it back when you create each clone) or accept that you’ll need to fix the binding manually after each clone.
For a single-host deployment, this isn’t needed — the saved binding will match the destination.
Step 4 — Export or copy the VHDX as the golden image
Two options for saving the prepared VM as a template.
Option A: Export the whole VM
Right-click the source VM in Hyper-V Manager and pick Export. Browse to a target folder (e.g., D:\HyperV VMs\Export) and click Export. Hyper-V copies the VHDX, the VM configuration XML, and any saved-state files into the target folder. The export is a self-contained bundle that can be imported on another Hyper-V host via the Import-VM wizard.
Use this when: the template will be moved between hosts, the configuration matters as much as the disk, or you’ll re-import on the same or another host using the Import wizard.
Option B: Copy just the VHDX
Open the source VM’s Settings → Hard Drive to find the VHDX path (typically D:\HyperV VMs\WS2K25\Virtual Hard Disks\WS2K25.vhdx). Copy the VHDX file to the golden-image folder:
Copy-Item "D:\HyperV VMs\WS2K25\Virtual Hard Disks\WS2K25.vhdx" "D:\VHDs\WS2K25 Golden Image\WS2K25 Golden Image.vhdx"Use this when: you’re cloning on the same host (the configuration is rebuilt fresh per VM), you want the simplest possible workflow, or you don’t need the export bundle.
The lab uses Option B — copy the VHDX, save it as WS2K25 Golden Image.vhdx under D:\VHDs\WS2K25 Golden Image\. From this moment, that file is the template — treat it as read-only; never attach it directly to a VM (always copy it first).
Step 5 — Create a new VM from the golden image
In Hyper-V Manager, Actions → New → Virtual Machine. The wizard walks the same pages as a fresh VM creation, with one critical difference at the “Connect Virtual Hard Disk” page: pick Use an existing virtual hard disk and browse to a copy of the golden image VHDX (not the original).
The PowerShell equivalent:
$VMName = 'WS2K25-SRV01'
$Source = 'D:\VHDs\WS2K25 Golden Image\WS2K25 Golden Image.vhdx'
$Target = "D:\VHDs\$VMName.vhdx"
Copy-Item $Source $Target
New-VM -Name $VMName -MemoryStartupBytes 4GB -Generation 2 -VHDPath $Target
Start-VM -Name $VMName
vmconnect.exe localhost $VMName
The Copy-Item is essential. Attaching the original golden image directly means any writes from the new VM corrupt the template. Always copy first; the new VM modifies its own copy; the original golden image stays pristine for the next clone.
The new VM boots into OOBE on first run. Pick the language, region, keyboard layout, set the admin password, choose the computer name. After OOBE finishes, the VM has a fresh SID, a fresh computer name, fresh activation, and a clean event log — AND all the apps + settings inherited from the reference VM (Chrome installed, WinRAR installed, RDP enabled, time zone set, etc.).
Step 6 — Repeat for additional clones
Every additional VM is the same workflow: copy the golden image, create the VM with the new VHDX, boot, complete OOBE. The PowerShell pattern wraps cleanly in a function:
function New-FromGoldenImage {
    param([string]$VMName, [int64]$Memory = 4GB, [int]$CPUs = 4)
    $Source = 'D:\VHDs\WS2K25 Golden Image\WS2K25 Golden Image.vhdx'
    $Target = "D:\VHDs\$VMName.vhdx"
    Copy-Item $Source $Target
    New-VM -Name $VMName -MemoryStartupBytes $Memory -Generation 2 -VHDPath $Target
    Set-VM -Name $VMName -ProcessorCount $CPUs
    Enable-VMTPM -VMName $VMName
    Start-VM -Name $VMName
}

New-FromGoldenImage -VMName 'WS2K25-SRV01'
New-FromGoldenImage -VMName 'WS2K25-SRV02' -Memory 8GB
New-FromGoldenImage -VMName 'WS2K25-SRV03' -CPUs 8
Each invocation creates a clone in roughly the time it takes to copy the VHDX (a few seconds for a 100GB sparse file, or a few minutes for a fully-allocated one).
Things that bite people in production
The 8-time Sysprep limit applies to the whole OS install
Sysprep’s rearm count is a per-Windows-install counter that decrements each time generalize runs. After 8 invocations, the OS refuses to Sysprep further (you get “A fatal error occurred while trying to sysprep the machine.”). For a golden image that you re-Sysprep after every monthly patching cycle, you’ll hit the limit in 8 months. The fix is to rebuild the reference VM from a fresh OS install rather than try to extend the rearm count.
Touching the source VM after Sysprep ruins the template
Once Sysprep completes and the VM shuts down, do NOT boot it again. Booting runs OOBE on the source, re-personalises it, and the VHDX is no longer a generalised template. If you need to update the template later (apply patches, install new apps), the right pattern is: boot the source, do the updates, re-Sysprep, save the new VHDX as the golden image. Each re-Sysprep cycle uses one of the 8 rearm slots.
Always copy before attaching
Attaching the golden VHDX directly to a new VM means the new VM’s writes go to the template file, corrupting it. Even read-only attaches can fail in subtle ways (Hyper-V may need write access for log files). Always Copy-Item to a new path and attach the copy.
Network-adapter binding doesn’t survive cross-host moves cleanly
If the source VM had its NIC bound to a vSwitch named External-1 on Host-A, the cloned VM on Host-B that has a vSwitch named Lab-Switch won’t connect — the saved binding doesn’t match anything on the new host. The clone boots fine but has no network until you fix the binding manually. Either standardise vSwitch names across hosts (recommended) or strip the network adapter from the template and re-add it on each clone.
Out-of-the-box BitLocker breaks on Sysprep
If the reference VM has BitLocker enabled, Sysprep will fail with “A fatal error occurred while trying to sysprep the machine.” in the Sysprep log (%SystemRoot%\System32\Sysprep\Panther\setupact.log). The fix is to suspend or fully disable BitLocker before running Sysprep. After cloning, re-enable BitLocker on each clone — the recovery key will be unique per VM, which is the correct behaviour anyway.
Time zone “set” on Sysprep doesn’t mean what you think
The time zone you saved on the reference VM persists through Sysprep, but OOBE on the clones may prompt for a region selection that includes time-zone defaulting. Specifying a time zone in an unattended Sysprep unattend.xml file is the supported way to lock the post-OOBE time zone; relying on the source VM’s saved value can be inconsistent. For a single-region deployment, the manual approach works fine; for multi-region, build different golden images per region or use unattended OOBE.
Where this fits
VM templates are the core of any scalable virtualization deployment. For the prerequisite (creating the reference VM in the first place), see create a VM on Hyper-V using PowerShell. For the broader virtualization surface area — live migration, replicas, checkpoints, Hyper-V replicas, vSwitch configuration — see the Hyper-V virtualization pathway. For the broader Windows Server admin context, see the Windows Server administration pathway.