Spinning up a Windows 11 VM through the Hyper-V Manager GUI works fine for one-off lab setups. For anything you might need to repeat — a fresh test environment for every code change, a baseline VM template that has to be deployed across a dozen hosts, or any kind of automated provisioning — the GUI is the wrong tool. The Hyper-V PowerShell module ships with every Windows Server installation that has the role, exposes every option the wizard does, and is straightforwardly scriptable. This post walks the seven-stage build for a Windows 11 VM — provision shell, set CPU, attach ISO, set boot order, enable TPM, start, install — with the exact cmdlets and parameters in the order they need to run.
What you need before starting
- Windows Server 2025 (or 2022/2019 — the Hyper-V cmdlets are the same; only newer Win11 hardware-flag specifics differ) with the Hyper-V role installed
- Local admin or Hyper-V Administrators rights on the host
- A Windows 11 ISO accessible to the host — the lab uses
F:\ISO Image\Windows11.iso - A folder for VHDX storage with enough free space — the lab uses
D:\VHDs\ - Roughly 6 GB free RAM on the host (4 GB for the VM + 2 GB headroom for the host)
- An understanding of Windows 11 hardware requirements: TPM 2.0, UEFI Secure Boot capable, 4 GB RAM minimum, 64 GB disk minimum
Why Generation 2 matters for Windows 11
Hyper-V VMs come in two generations. Generation 1 emulates a legacy BIOS, supports a wide range of guest OSes, and works fine for older Windows / Linux installs. Generation 2 uses UEFI firmware, supports Secure Boot, allows the virtual TPM, and is required for any Windows 11 guest. Setting -Generation 2 on New-VM is a one-time decision — you can’t change generation after creation. Get this wrong and the Win11 setup will refuse to install with a “this PC can’t run Windows 11” error.
Step 1 — Open elevated PowerShell
Right-click Start, pick Terminal (Admin) on Windows Server 2025 (or Windows PowerShell (Admin) on older releases). All the Hyper-V cmdlets that modify state require admin elevation; running them in a regular PowerShell window produces “You do not have the required permission” errors that obscure the real cause.
Step 2 — Provision the VM shell
New-VM -Name Win11-VM02 -MemoryStartupBytes 4GB -Generation 2 -NewVHDPath D:\VHDs\Win11-VM02.vhdx -NewVHDSizeBytes 100GBOne cmdlet creates the VM container and the backing VHDX in a single transaction. Parameter notes:
-Nameis the friendly name shown in Hyper-V Manager. Conventional pattern is Role-Number (Win11-VM02 = the second Win11 VM in the lab); pick something searchable in scripts.-MemoryStartupBytes 4GBsets the boot-time memory. Win11’s minimum is 4GB; Win11 Pro/Enterprise will install with 4GB but feels constrained — bump to 6GB or 8GB for daily use. Add-DynamicMemoryto enable balloon-driver-based memory expansion up to a configured maximum (a separate flag on the VM after creation).-Generation 2— UEFI firmware, required for Win11.-NewVHDPathis the path the VHDX file is created at. Pick a drive with enough free space; the file initially is tiny (Hyper-V creates it as a dynamic-expanding VHDX) but grows as the guest writes.-NewVHDSizeBytes 100GB— the maximum size the VHDX can grow to. Win11’s minimum is 64GB; 100GB gives reasonable working room for a development VM.
Verify with:
Get-VMThe VM appears in the list with state Off. The VHDX is at D:\VHDs\Win11-VM02.vhdx; Get-Item on the path confirms the file size starts small (typically 4–100 MB depending on Hyper-V version).

New-VM creates the empty VM shell and provisions the VHDX in one shot. Get-VM after confirms the VM exists in Off state, ready for further configuration.Step 3 — Set the processor count
Set-VM -Name Win11-VM02 -ProcessorCount 4The default -ProcessorCount is 1, which is unusably slow for Win11. Setting 4 vCPUs gives reasonable performance for a typical workload; for a heavily-used desktop VM, 6 or 8 are common. Don’t over-provision — vCPUs aren’t free, and giving a Win11 guest 16 vCPUs on an 8-core host actually hurts performance because of scheduler thrashing.
Verify:
Get-VM -Name Win11-VM02 | Format-List ProcessorCount
Set-VM -ProcessorCount 4 assigns 4 virtual processors. The verification line uses Format-List ProcessorCount to read just the one property back rather than the full VM object.Step 4 — Attach the Windows 11 ISO
Add-VMDvdDrive -VMName Win11-VM02 -Path "F:\ISO Image\Windows11.iso"Quotes around the path because of the space in “ISO Image.” The cmdlet creates a virtual DVD drive in the VM and attaches the ISO as the inserted media — identical to plugging a Windows 11 install disc into a physical machine.
Verify:
Get-VMDvdDrive -VMName Win11-VM02Output shows the controller, controller number, and the path of the attached ISO.

Add-VMDvdDrive attaches the Windows 11 ISO so the VM can boot from it for first-time install. Get-VMDvdDrive verifies the attachment.Step 5 — Set the DVD as the first boot device
By default a Generation 2 VM tries to boot from the VHDX first. The VHDX is empty — nothing to boot — so the VM would just sit at the firmware screen waiting. Reorder the boot list so the DVD comes first:
# Capture the DVD drive object
$BootImage = Get-VMDvdDrive -VMName Win11-VM02

# Verify the variable holds the right object
$BootImage

# Set the DVD as the first boot device
Set-VMFirmware -VMName Win11-VM02 -FirstBootDevice $BootImage

# Verify the new boot order
Get-VM -Name Win11-VM02 | Get-VMFirmware | Select BootOrder
Why the variable instead of inlining? Set-VMFirmware -FirstBootDevice takes an object, not a path. Capturing into $BootImage makes the script readable and lets you double-check the object before applying it. After the change, the boot order has the DVD drive in position 0 (first); the VHDX falls to position 1.
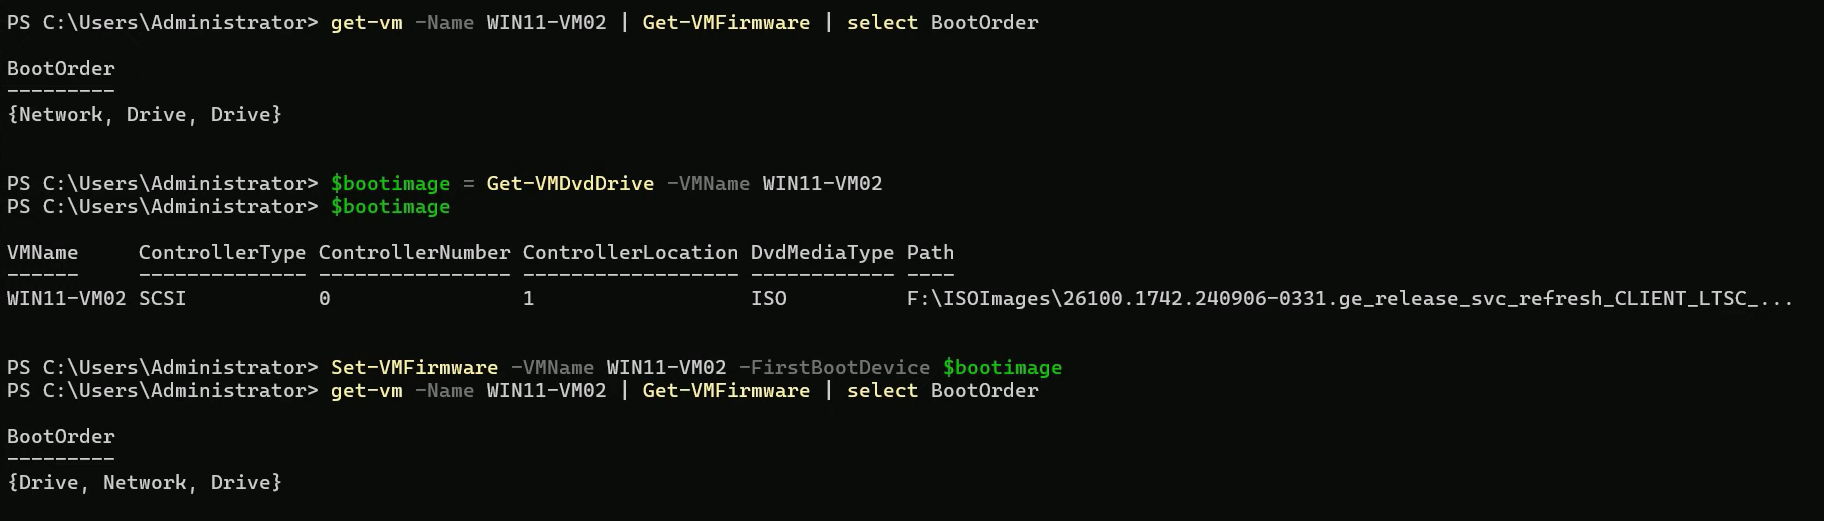
$BootImage and pass it to Set-VMFirmware -FirstBootDevice. Verification re-reads BootOrder and confirms the DVD is now in slot 0.Step 6 — Enable the virtual TPM
Enable-VMTPM -VMName Win11-VM02Windows 11 setup checks for TPM 2.0 within the first few seconds of running. Without it, you get the “This PC can’t run Windows 11” banner and the install dies. Enable-VMTPM exposes a virtual TPM 2.0 to the guest. The cmdlet has no output on success; verify with:
Get-VMSecurity -VMName Win11-VM02 | Select TpmEnabledShould report True.
Note: virtual TPM requires the host to have a Hyper-V Host Guardian Service (HGS) configured for the “shielded VM” mode, OR the host’s TPM-key-protector mode set up. On standalone hosts, the default key-protector mode works without HGS for non-shielded VMs — this is the configuration the lab assumes.

Enable-VMTPM exposes a virtual TPM 2.0 to the guest. Required for Windows 11 install — the setup checks for TPM presence early and refuses to continue without one.Step 7 — Start the VM and connect
Start-VM -Name Win11-VM02
vmconnect.exe localhost Win11-VM02
Start-VM boots the VM. vmconnect.exe opens the Virtual Machine Connection console window, which is what shows the VM’s screen output. Pass the host name (localhost when running on the host itself) and the VM name; the console connects and displays the boot sequence.
The VM POSTs from UEFI firmware, finds the DVD with the Win11 install media, boots into the setup environment. From here it’s the standard Windows 11 setup — pick language, region, keyboard, accept the license, partition the disk, install. About 15–20 minutes on a reasonable host, including the post-install OOBE prompts.

Start-VM + vmconnect.exe opens the Virtual Machine Connection console attached to the booting VM. Windows 11 setup is now running off the ISO.The complete script
For repeat use, wrap the lot in a script. Adjust the four parameters at the top for each VM:
$VMName = 'Win11-VM02'
$IsoPath = 'F:\ISO Image\Windows11.iso'
$VHDPath = "D:\VHDs\$VMName.vhdx"
$Memory = 4GB

New-VM -Name $VMName -MemoryStartupBytes $Memory -Generation 2 `
       -NewVHDPath $VHDPath -NewVHDSizeBytes 100GB

Set-VM -Name $VMName -ProcessorCount 4

Add-VMDvdDrive -VMName $VMName -Path $IsoPath

$dvd = Get-VMDvdDrive -VMName $VMName
Set-VMFirmware -VMName $VMName -FirstBootDevice $dvd

Enable-VMTPM -VMName $VMName

Start-VM -Name $VMName
vmconnect.exe localhost $VMName
Save as provision-win11.ps1. End-to-end runtime is roughly 30 seconds for the cmdlet sequence; the bulk of the time is the actual Windows install that follows. To deploy multiple VMs from one script, wrap the body in a foreach over an array of VM names — each gets its own VHDX and its own connection window.
Things that bite people in production
Generation 1 VMs cannot install Windows 11
The single most common provisioning mistake. Forgetting -Generation 2 on New-VM defaults to Generation 1, which has BIOS firmware and no virtual TPM. Win11 setup checks for TPM and Secure Boot inside the first few seconds and refuses. The VM has to be deleted and recreated; you can’t convert a Gen1 VM to Gen2.
VHDX path drives need to be NTFS or ReFS
Hyper-V refuses to create VHDX files on FAT32 or exFAT volumes. The default Windows install puts D: on NTFS, but lab setups that recycle USB drives sometimes have FAT32 ports. New-VM reports a fairly clear error in this case; the fix is to either reformat the target volume or pick a different drive.
Memory over-provisioning kills host stability
Hyper-V doesn’t enforce memory limits the way some hypervisors do — you can sum VM memory allocations past the host’s physical RAM. With Dynamic Memory enabled, the host pages aggressively under load and everything degrades to disk speed. Either match the sum of VM -MemoryStartupBytes to roughly 75% of the host’s RAM, or use Dynamic Memory with a sensible upper bound to let unused memory return to the host.
The DVD-first boot order is removed when the ISO is detached
After Win11 is installed, you typically want to remove the ISO and have the VM boot from the VHDX. Remove-VMDvdDrive takes the DVD off the VM — but Hyper-V then leaves the boot order broken because the “first boot device” was the now-removed DVD. Set-VMFirmware -FirstBootDevice with the VHDX’s hard-disk-drive object after detaching the DVD is the cleanup. Or leave the DVD attached but with no media (Set-VMDvdDrive -Path $null) — less clean but avoids the boot-order tangle.
Enable-VMTPM requires the right host security configuration
On a freshly-installed Windows Server host, Enable-VMTPM works out of the box. On hosts that have been hardened (Group Policy disabling certain VBS / virtualization features, or HGS misconfigured for shielded VMs), the cmdlet can fail with “A required attestation feature is not present.” The fix is host-side: either install / configure HGS, or relax the policy that disabled the underlying virtualization-based-security features. Outside scope of this post but worth knowing the failure mode.
vmconnect.exe doesn’t auto-launch on remote hosts
Running these commands against a remote Hyper-V host (Invoke-Command -ComputerName HV01) creates the VM remotely but doesn’t open a console — vmconnect.exe is a local UI process. To remotely view the new VM, run vmconnect.exe HV01 Win11-VM02 from your local workstation (vmconnect ships with RSAT-Hyper-V-Tools).
Where this fits
One-off VM provisioning is the entry point to broader Hyper-V automation. For VM templates and reusable provisioning patterns, the next post in the queue (post 140) covers VM templates. For the broader virtualization surface area — live migration, replicas, checkpoints, Hyper-V replicas, vSwitch configuration — see the Hyper-V virtualization pathway. For the broader Windows Server admin context, see the Windows Server administration pathway.