Overview
You’re deploying an additional Domain Controller (DC) at a remote site, and the WAN link between sites is slow. A normal promotion would force the new DC to pull a full copy of the Active Directory database from an existing DC over that link — which can take hours or days for a large directory and risks timing out partway through.
The fix is Install From Media (IFM). You pre-stage a snapshot of the AD database, registry, and SYSVOL on portable media, ship it to the remote site (USB, file share, RDP copy), and let the new DC build its directory from the local copy — falling back to the WAN only for the small delta of changes that happened since the snapshot was taken.
Prerequisites
- An existing healthy Domain Controller (DC1) running Windows Server 2022 (or newer).
- A second Windows Server 2022 VM (we’ll call it MEDIA / DC2) prepared to become an additional Domain Controller.
- A way to move a few GB of files between them — USB drive, network share, or remote desktop file copy.
- Domain Admin credentials on both servers.
Part 1: Create IFM media on the existing DC
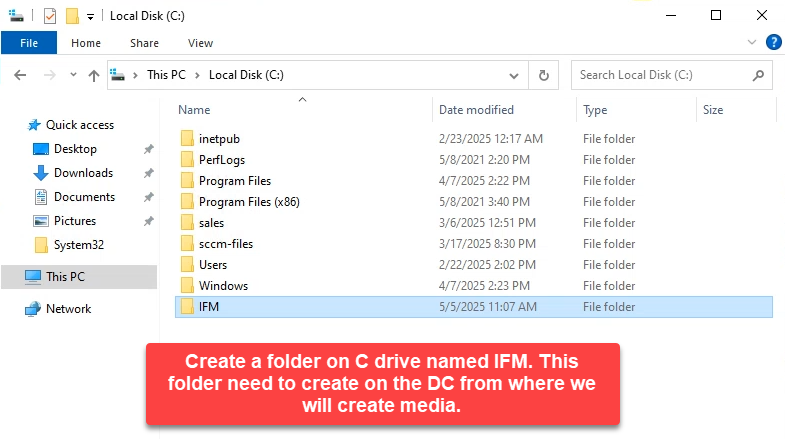
Step 1: Create a folder for the IFM files
Open File Explorer on DC1 and create a folder named C:\IFM. The folder doesn’t need to be on C: — any local volume with enough free space works — but C:\IFM is the convention everyone uses.
Step 2: Launch PowerShell as Administrator
Right-click the Start button and choose Windows PowerShell (Admin). The console host doesn’t matter (cmd works too) — ntdsutil is its own interactive shell. What matters is that the session runs with elevation and as a Domain Admin.
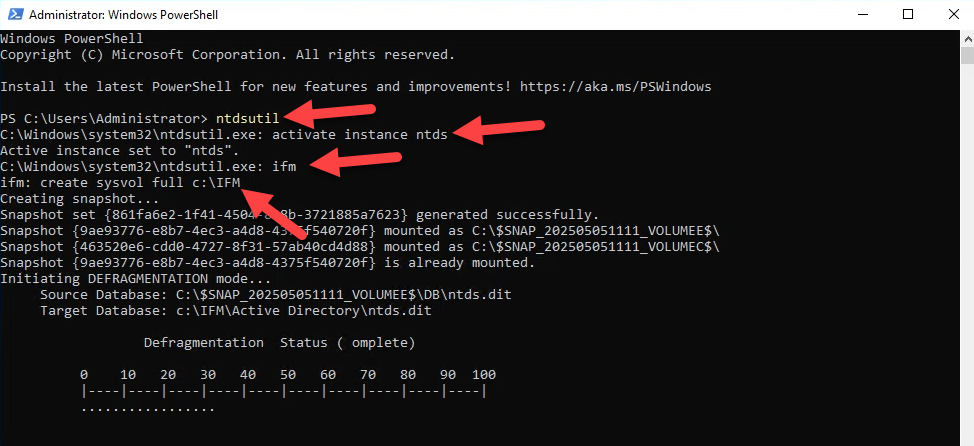
Step 3: Run ntdsutil to create the IFM media
Type the following commands one by one. Each switches you into the next sub-context inside ntdsutil.
ntdsutil
activate instance ntds
ifm
create full C:\IFM
What each command does:
activate instance ntds— targets the AD DS database for subsequent commands.ifm— enters the Install From Media sub-context.create full C:\IFM— exports a full copy of the AD database, transaction logs, and SYSVOL into the destination path.
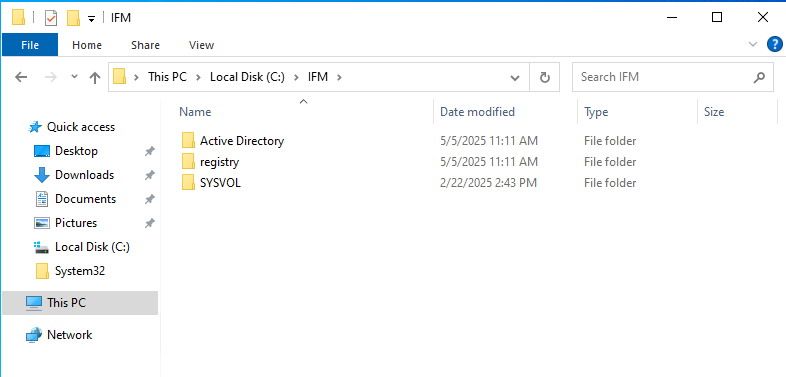
Output
When create full finishes, you’ll see three subfolders inside C:\IFM:
- Active Directory — contains
ntds.dit(the AD database itself). - Registry — the registry exports needed for the new DC.
- SYSVOL — Group Policy objects, scripts, and the rest of the SYSVOL contents.
IFM media creation is complete. Type quit twice to exit ntdsutil, or just close the window.
Part 2: Copy the IFM media to the target server
Move the entire C:\IFM folder to the target server. Any of the following works — pick the one that fits your physical and network topology:
- USB drive — literally walk the bits to the remote site. Highest bandwidth, lowest sophistication.
- Network share — expose the folder on DC1 and pull from DC2 (or stage to a fileserver in the middle).
- Remote Desktop file copy — if you’re managing both servers from the same workstation.
In our walkthrough we copied the folder to C:\Users\Administrator\Desktop\IFM on the target. Anywhere on a local drive works — just remember the path; you’ll point the promotion wizard at it.
Part 3: Install the AD DS role on the target server
Step 1: Open Server Manager
On the target server, click Start → Server Manager.
Step 2: Add Roles and Features
- Click Manage → Add Roles and Features.
- Click Next through the Before You Begin page.
- Choose Role-based or feature-based installation.
- On Server Selection, pick the local server.
- On Server Roles, check Active Directory Domain Services. Click Add Features when prompted.
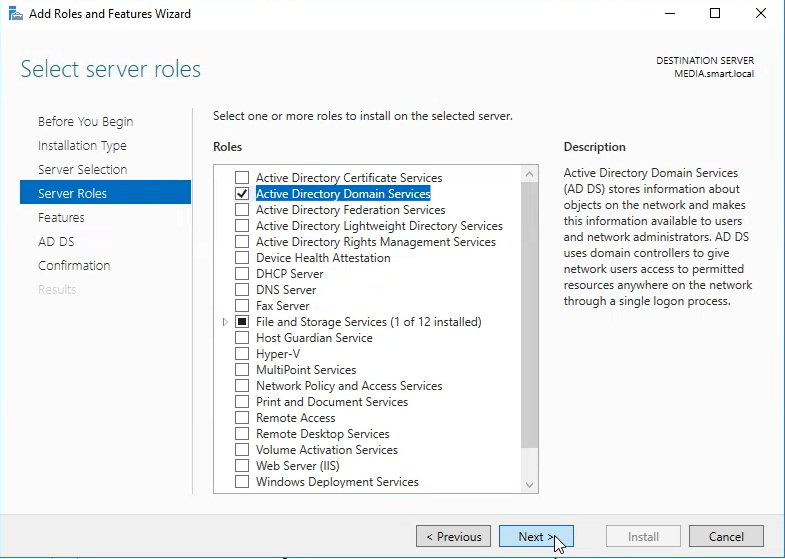
- Click Next through the rest of the wizard.
- Click Install.
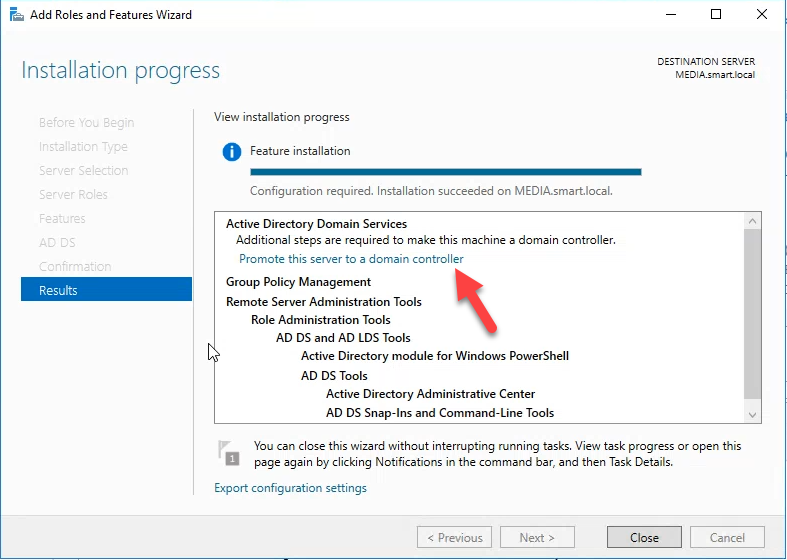
Wait for installation to finish. Don’t close Server Manager yet — the next part picks up from the same window.
Part 4: Promote the server using IFM
Step 1: Launch the promotion wizard
Once the role install completes, Server Manager shows a yellow flag at the top with a post-deployment task. Click the flag and choose Promote this server to a domain controller.
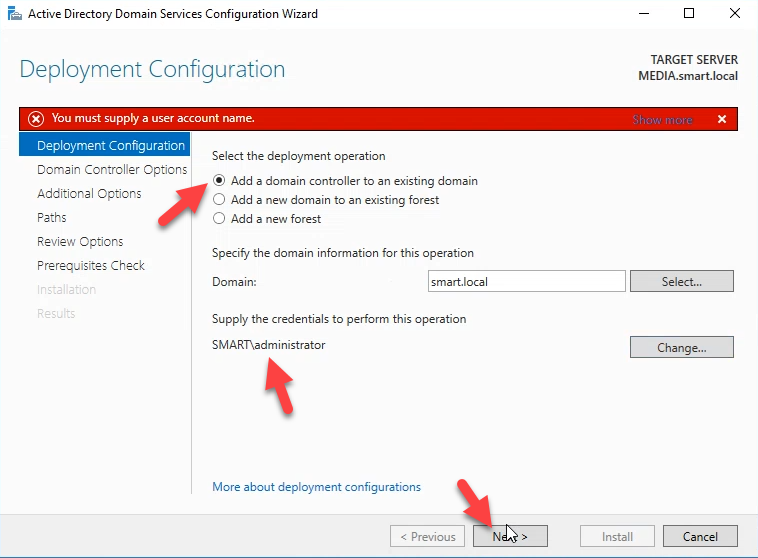
Step 2: Deployment Configuration
- Select Add a domain controller to an existing domain.
- Click Change and supply Domain Admin credentials — e.g.
SMART\Administrator. - The domain auto-fills (
smart.local). - Click Next.
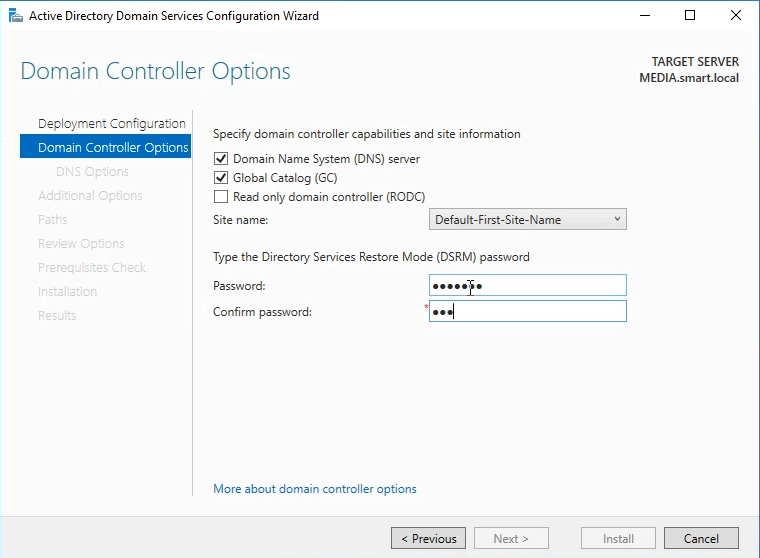
Step 3: Domain Controller Options
- Keep DNS Server and Global Catalog checked.
- Leave the site as Default unless you’ve already created an AD site that maps to the remote location.
- Set the Directory Services Restore Mode (DSRM) password.
- Click Next.
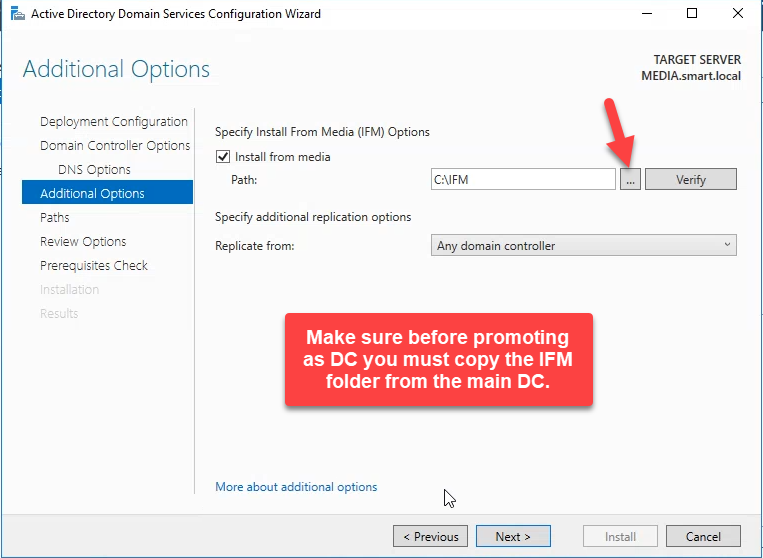
Step 4: Additional Options — the IFM hookup
This is the screen that distinguishes IFM from a normal promotion.
- Check Install from media.
- Click Browse and select your IFM folder — in our example,
C:\Users\Administrator\Desktop\IFM. - Leave the replication source as Any domain controller (or pin to a specific DC if you have a reason).
- Click Next.
Step 5: Paths
Accept the defaults (C:\Windows\NTDS, C:\Windows\SYSVOL, etc.) unless your storage layout calls for putting NTDS / SYSVOL on a separate volume.
Step 6: Review and Install
- Review the summary.
- Click Next.
- The wizard runs the Prerequisites Check.
- Once it passes, click Install.
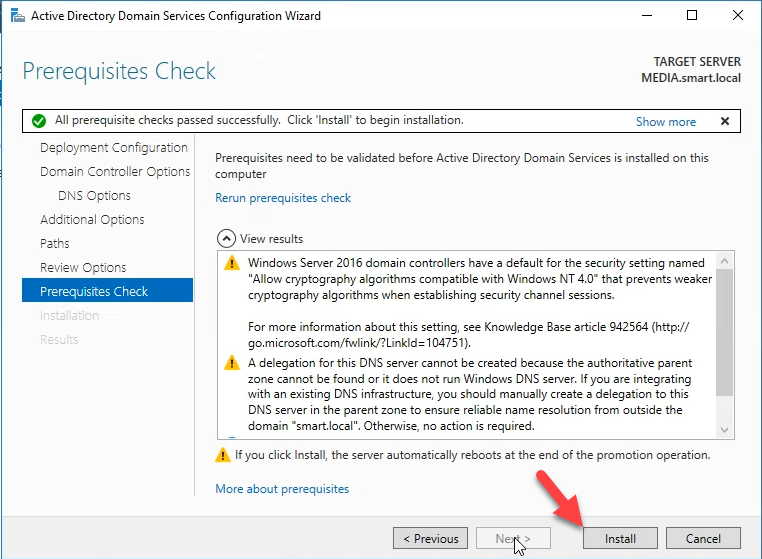
The promotion runs. The server restarts automatically when it finishes.

Part 5: Post-install verification
Step 1: Sign in
After the reboot, sign in with Domain Admin credentials.
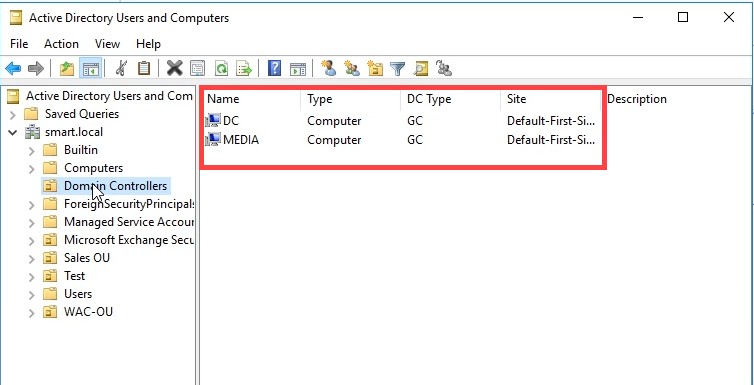
Step 2: Confirm the new DC is in the Domain Controllers OU
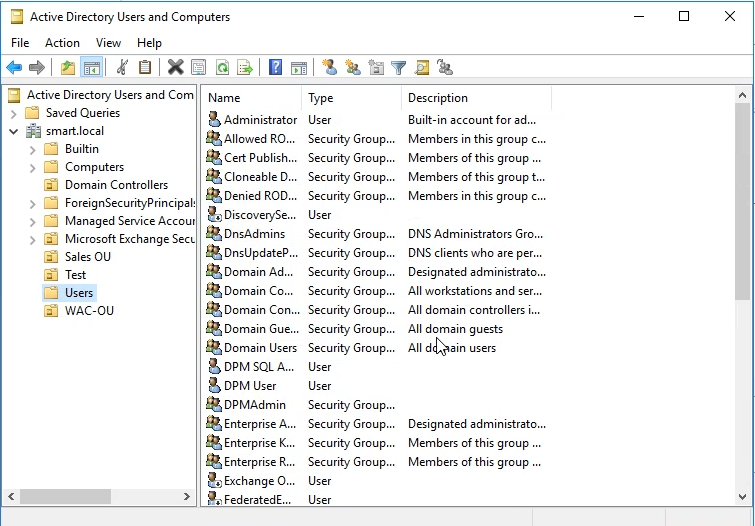
- Open Tools → Active Directory Users and Computers.
- Expand your domain and click Domain Controllers.
- Both DCs should appear — the original DC1 and your new IFM-promoted DC.
Step 3: Confirm replication is healthy
From PowerShell on either DC, run:
repadmin /replsummary
repadmin /showrepl
You want zero failures and recent successful replications across all naming contexts. dcdiag /v is also worth running once and reading top-to-bottom — if anything is wrong with the new DC’s SRV records, replication topology, or trust relationships, dcdiag surfaces it cleanly.
Summary of key concepts
- IFM = pre-stage NTDS to avoid full WAN replication. The new DC reads the database from local media, then catches up only on the delta since the snapshot.
- ntdsutil — create full exports a writable-DC snapshot. There’s also
create RODCfor a Read-Only DC media set, andcreate sysvol fullwhen you only need SYSVOL. - The IFM snapshot is sensitive. It contains every object in the directory, including computer secrets and password hashes. Treat the media exactly as you would treat the AD database itself — encrypt at rest, ship via trusted channels, wipe when done.
- The snapshot ages. If you create the IFM media but don’t actually promote within a reasonable window, the delta the new DC has to replicate keeps growing — eventually defeating the point. Generate the media close to when you’ll use it (same day is ideal).
Conclusion
Install From Media is the right answer any time you’re adding a Domain Controller across a slow link or want to compress the promotion window. The mechanics are straightforward: ntdsutil ifm create full on a healthy source DC, copy the resulting folder to the target, and tick the Install from media box during the promotion wizard. After the reboot, verify with repadmin /replsummary and dcdiag /v, and the new DC is ready to authenticate users at the remote site — without ever having pulled the full directory across the WAN.