The previous two posts in this series stood up Microsoft Entra Password Protection on an on-prem AD forest — Part 1 walked the architecture and prerequisites, Part 2 walked the actual install and the audit-then-enforce rollout. This post is the reverse: how to take it all down cleanly when retiring the feature, migrating off it, or rolling back a failed deployment in a test forest. The key word here is cleanly. The components are not coupled tightly — you CAN remove half of them and the rest will continue to limp — but a partial uninstall leaves orphaned AD objects, stale Sysvol files, and confusing event-log noise that someone will spend an afternoon untangling six months later.
Why you might be doing this
- Retiring the feature. You went all-in on Entra ID and turned off password change against on-prem (rare but happens during cloud-native migrations). The on-prem agent has nothing to do; remove it.
- Replacing with a third-party password filter. Tools like Specops Password Policy or nFront Password Filter cover the same ground with broader configurability. Some shops run them side-by-side during a transition; eventually one has to go.
- Test-forest rollback. You stood it up in a lab to evaluate, decided not to go forward, and want the lab back to baseline.
- Failed deployment. Something went wrong during install (FRS-Sysvol problem, unsupported OS edition, network surprise) and you need to get back to a known-good state before retrying.
For all four scenarios the procedure is the same. Order matters — the only thing that varies is whether you ever come back to install again.
Order of operations — do NOT improvise
The teardown is the install in reverse. Eight steps, in this order:
- Inventory: find every host running the proxy bits.
- Uninstall the proxy bits from those hosts.
- Inventory: find every controller running the agent bits.
- Uninstall the agent bits from those controllers (one at a time, with reboots).
- Remove the proxy service connection points from each domain naming context.
- Remove the agent service connection points from each domain naming context.
- Remove the forest-level configuration container under the configuration NC.
- Delete the AzureADPasswordProtection folder from SYSVOL on a writable controller (DFS-R replicates the deletion to the rest).
Steps 1–4 (bits) MUST happen before steps 5–6 (SCPs). If you remove the SCPs before uninstalling the bits, the still-running services try to phone home, fail, and spam warning events into the System event log on every host until the bits come off. Same logic for step 7: forest config gone but agent still running = noisy log spam, not a hard failure.
Step 1 — find every proxy host
From any domain-joined host with the AD module loaded (a controller or a management workstation with RSAT), run a Get-ADObject query filtered by the well-known proxy service-connection-point GUID:
$scp = "serviceConnectionPoint"
$keywords = "{ebefb703-6113-413d-9167-9f8dd4d24468}*"
Get-ADObject -SearchScope Subtree -Filter { objectClass -eq $scp -and keywords -like $keywords }
The GUID ebefb703-6113-413d-9167-9f8dd4d24468 is the well-known identifier for the proxy SCP — same value across every Entra Password Protection deployment in the world. The query returns one row per host where the proxy is registered. The DN tells you the host’s container path; trim to the CN to get the bare hostname.
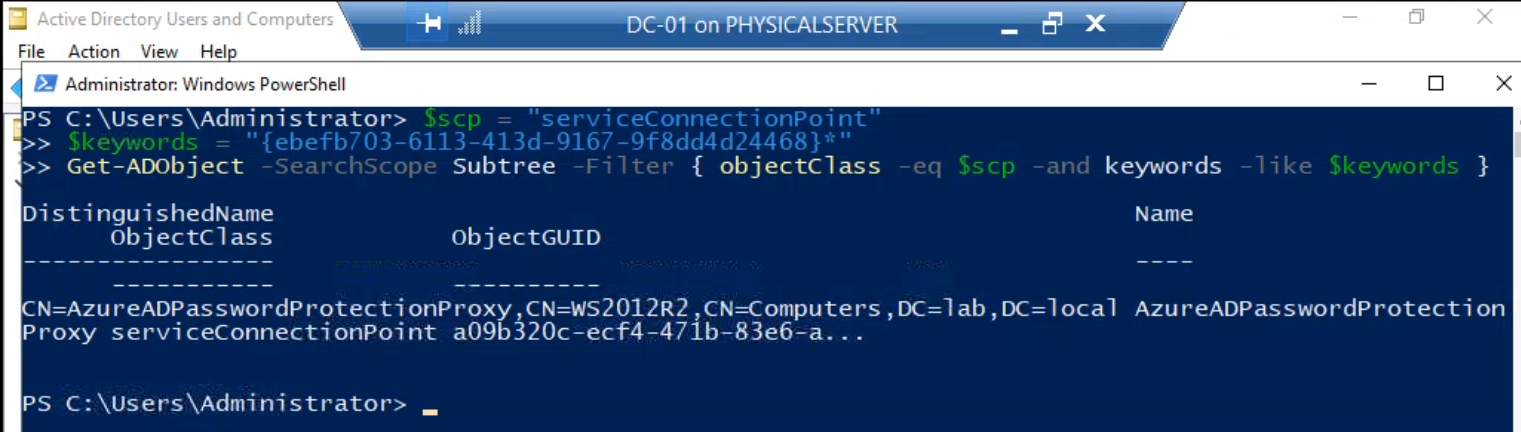
Save this output. It’s the inventory you’ll work through in the next step.
Step 2 — uninstall the proxy bits
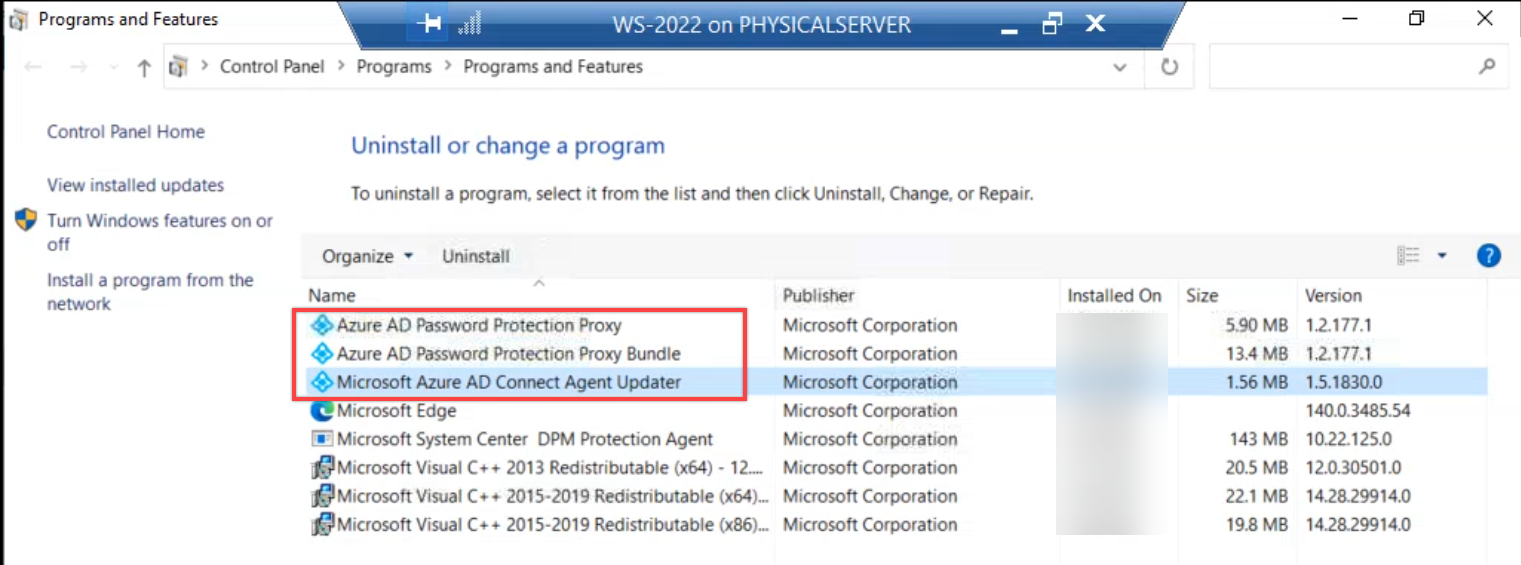
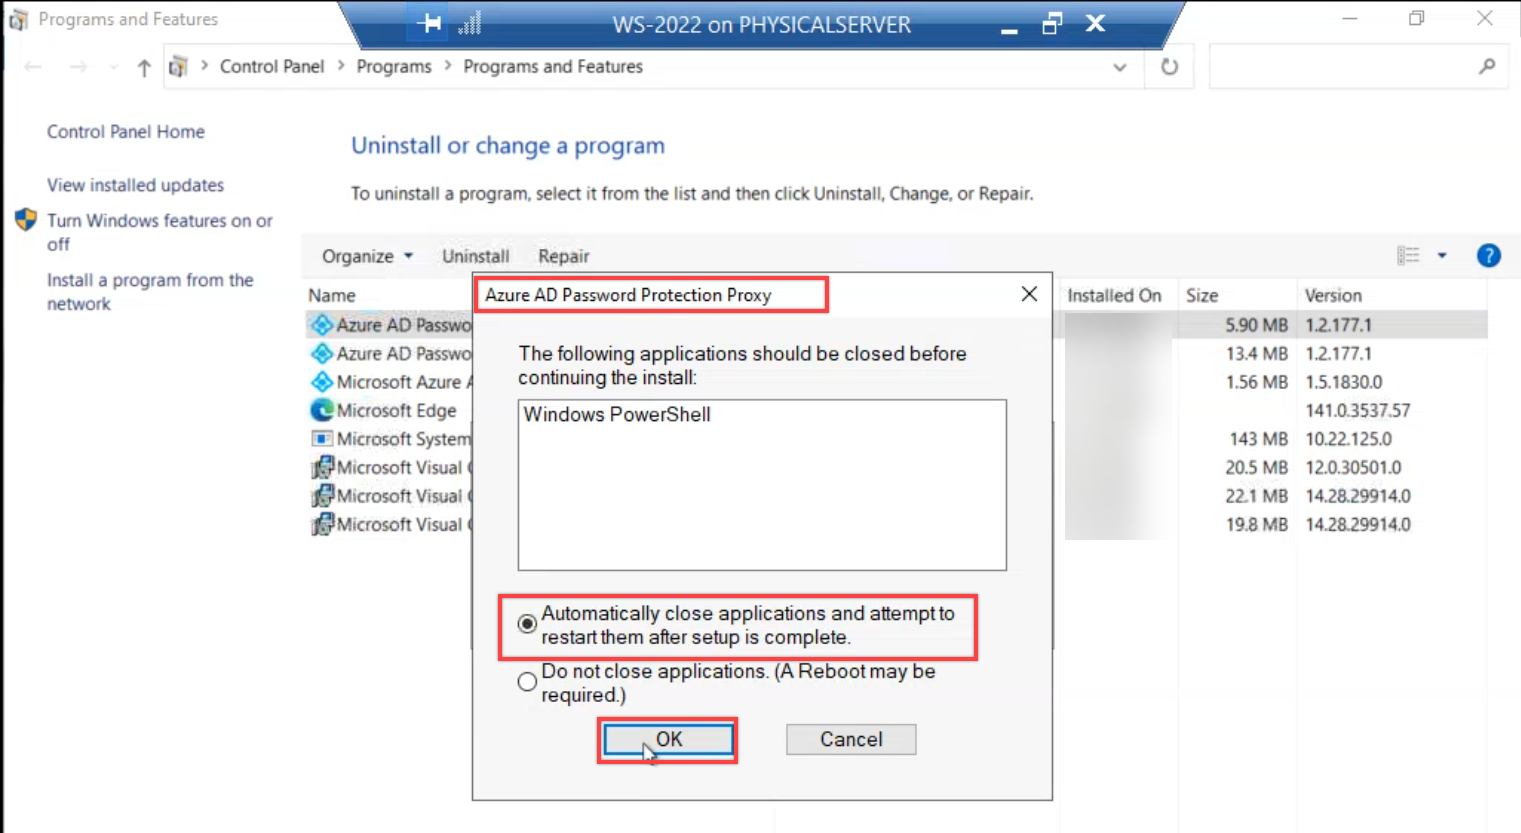
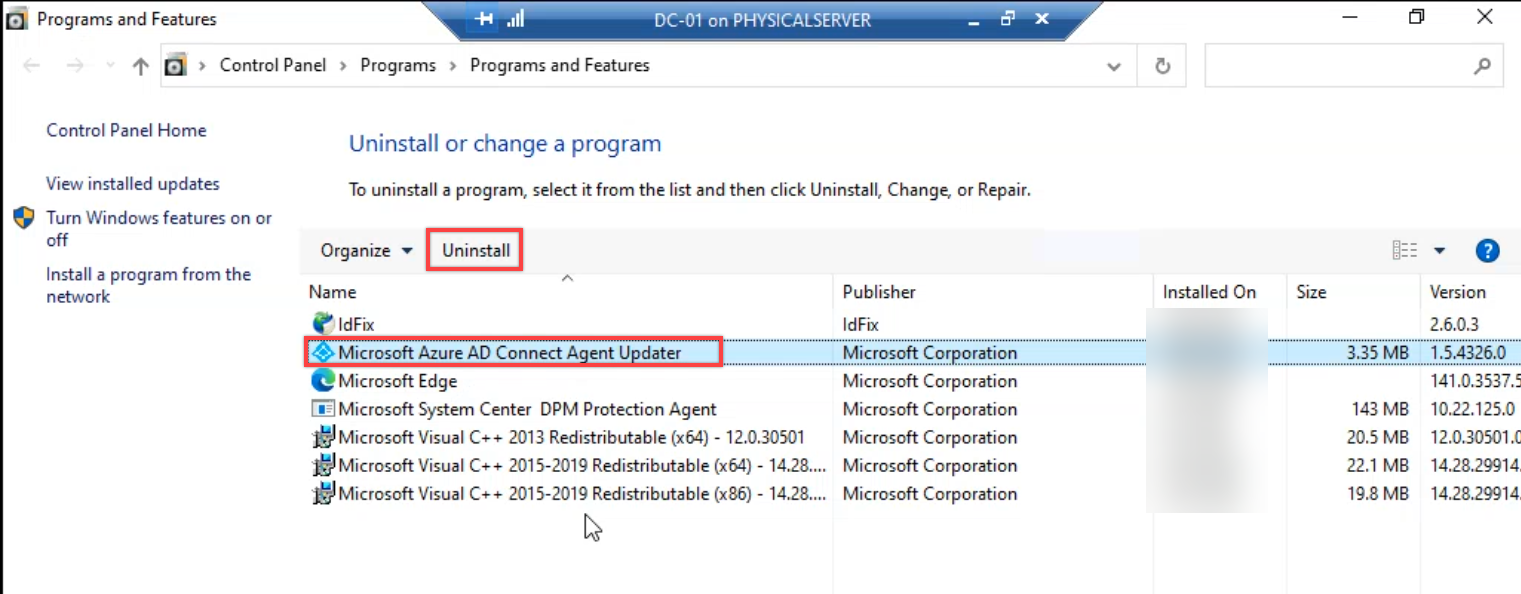
On each proxy host from the inventory, open Programs and Features (or appwiz.cpl) and locate three packages:
- Microsoft Azure AD Connect Agent Updater
- Azure AD Password Protection Proxy
- Azure AD Password Protection Proxy Bundle
Despite the legacy “Azure AD” naming (the brand became Microsoft Entra ID in 2023; the package names didn’t follow), all three are still current. Remove them in the order shown above — updater first, then the proxy, then the bundle. The order matters because the updater holds dependencies on the proxy package’s registry keys; removing the proxy first leaves orphan keys the updater uninstall can’t clean up.
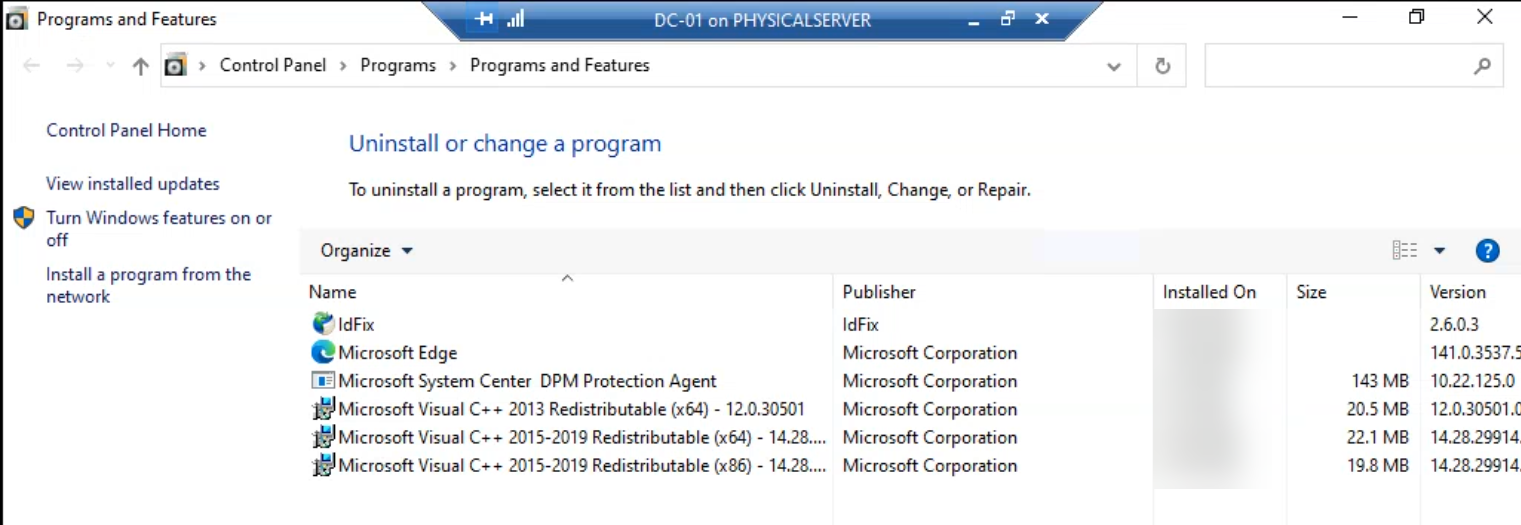
After all three packages are gone, verify that none of them remain in Programs and Features.
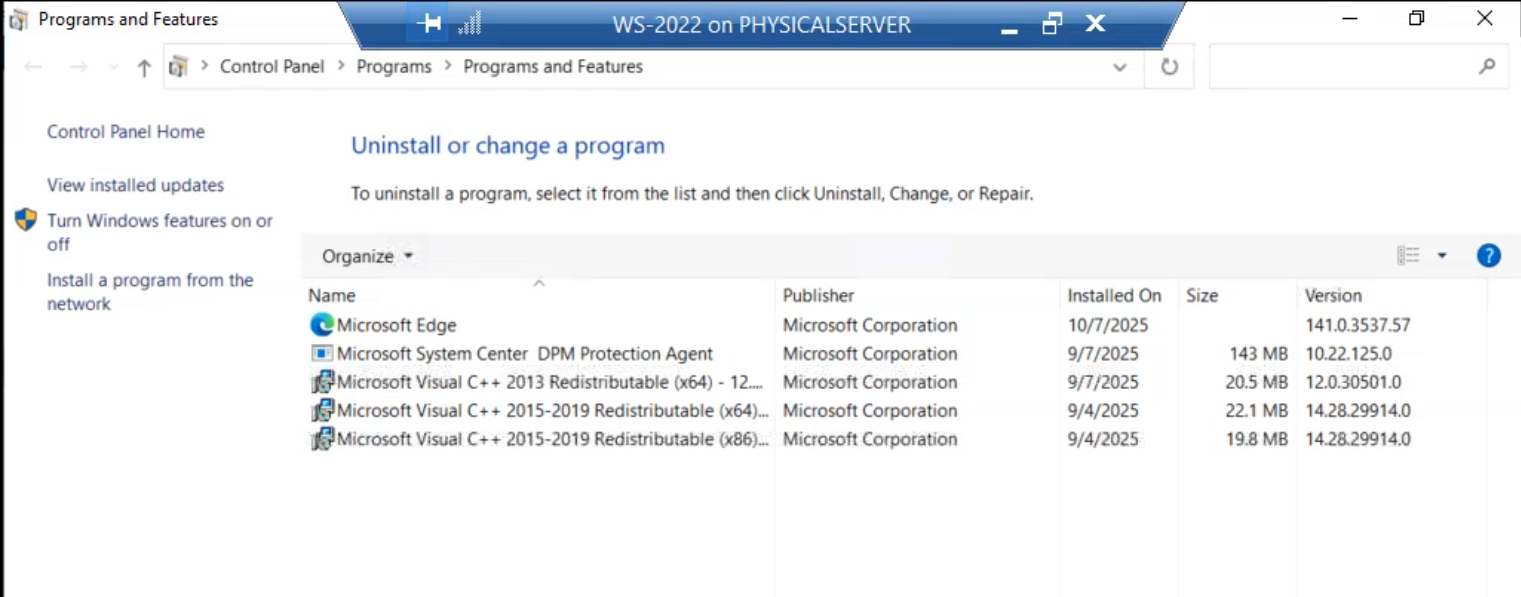
Repeat on every host from the Step 1 inventory. If your inventory had only one proxy host, you’re done with this step. For multi-proxy HA deployments (recommended baseline is two proxies) you do this on each of them.
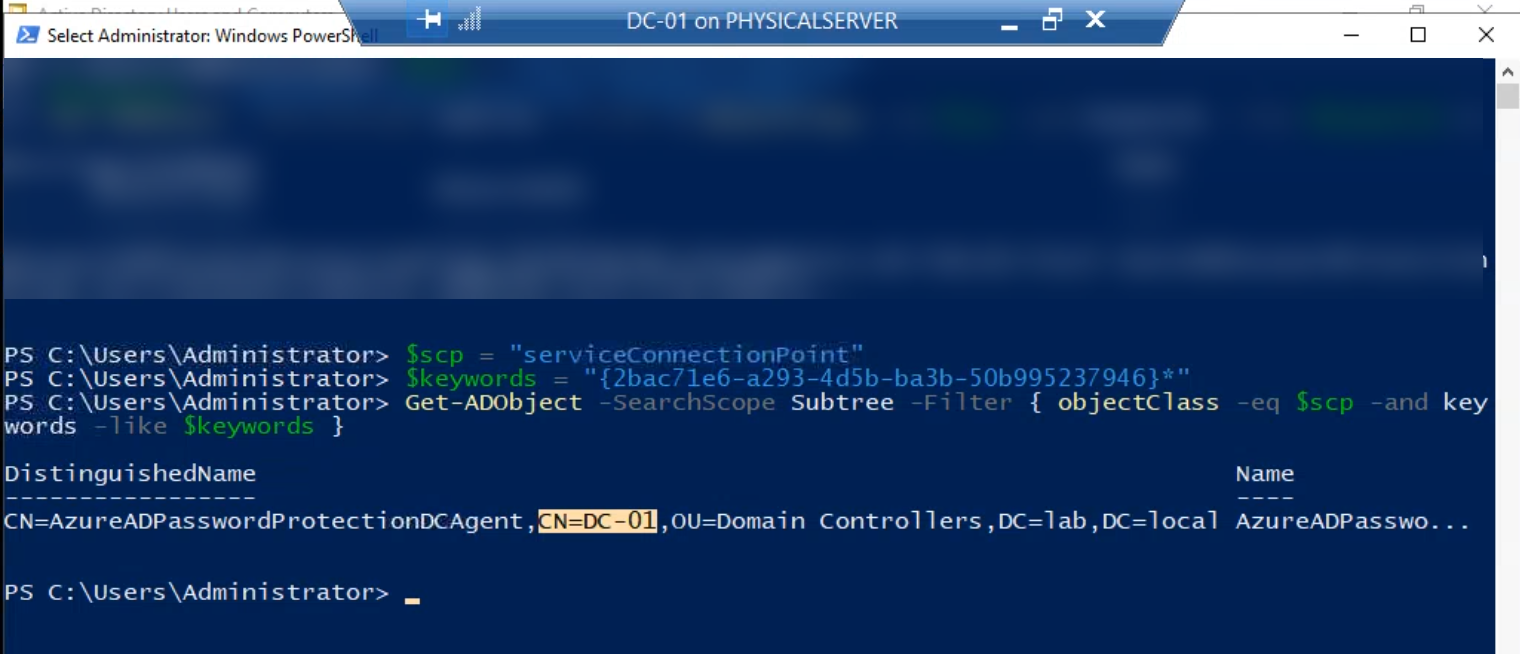
Step 3 — find every controller running the agent
Same shape as Step 1, different GUID:
$scp = "serviceConnectionPoint"
$keywords = "{2bac71e6-a293-4d5b-ba3b-50b995237946}*"
Get-ADObject -SearchScope Subtree -Filter { objectClass -eq $scp -and keywords -like $keywords }
The GUID 2bac71e6-a293-4d5b-ba3b-50b995237946 is the well-known agent SCP identifier. The query returns one row per writable controller where the agent service is currently registered.
Cross-check this against your controller inventory. Any writable controller missing from this list either never had the agent installed (deployment was incomplete) or already has it partially removed. Both are worth investigating before moving on.
Step 4 — uninstall the agent (one controller at a time)
On each writable controller, open Programs and Features and uninstall the Microsoft Entra Password Protection DC Agent package (singular — only one package per controller, unlike the proxy host).
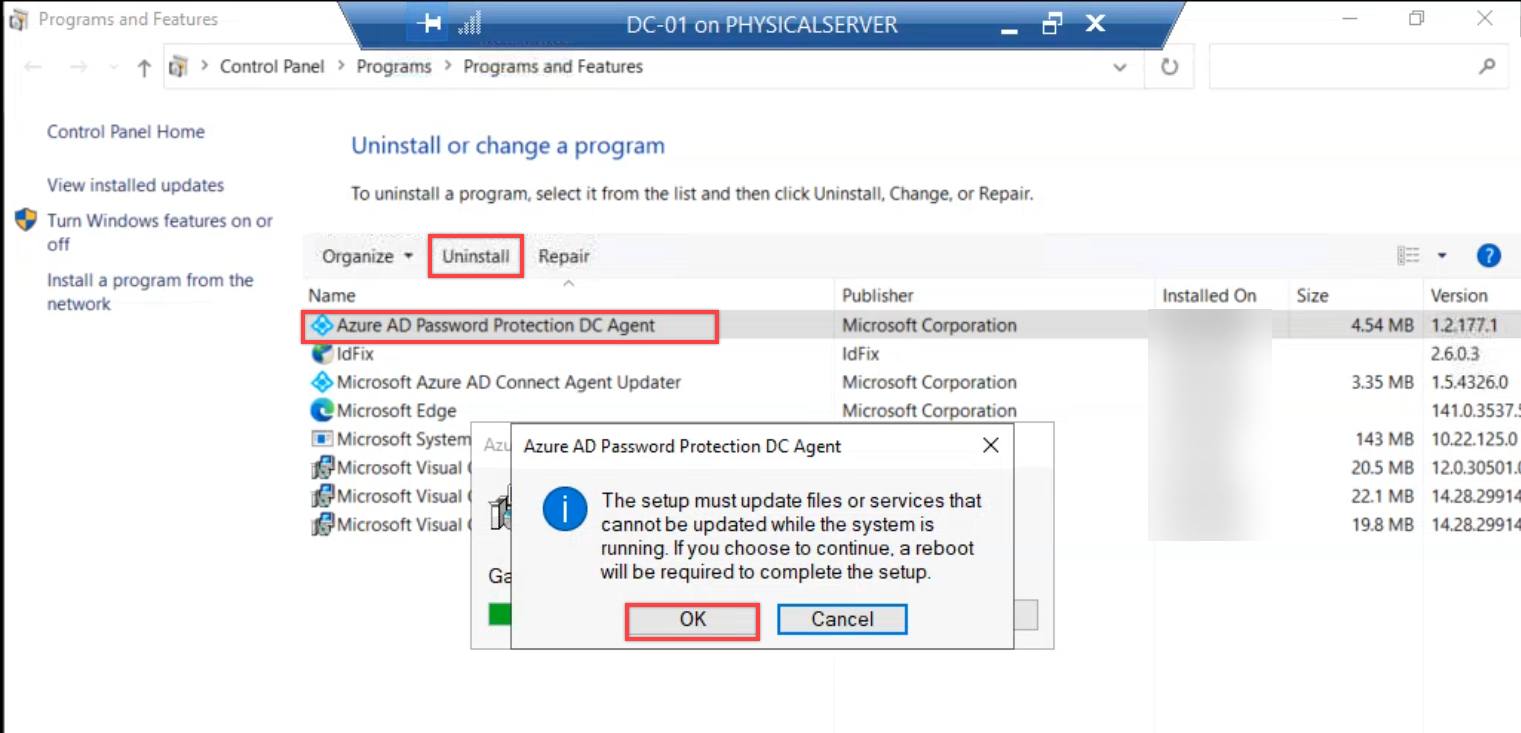
The uninstaller triggers a mandatory reboot prompt. Accept it. The reboot is non-negotiable because the password filter DLL only unloads from LSASS on next boot — without the reboot, the controller is in a limbo state where the service is gone but the filter is still loaded and evaluating against a stale cached policy.
Critical: roll the uninstall one controller at a time. Never reboot multiple controllers in the same domain simultaneously. Authentication needs to keep working during the teardown just as it did during the install. For a five-controller domain that’s ~30 minutes of work; resist the urge to script it into a parallel sweep.
After each controller comes back, verify with Get-Service AzureADPasswordProtectionDCAgent — the service should be gone (the cmdlet returns an error). Move to the next controller.
Step 5 — remove the proxy SCPs
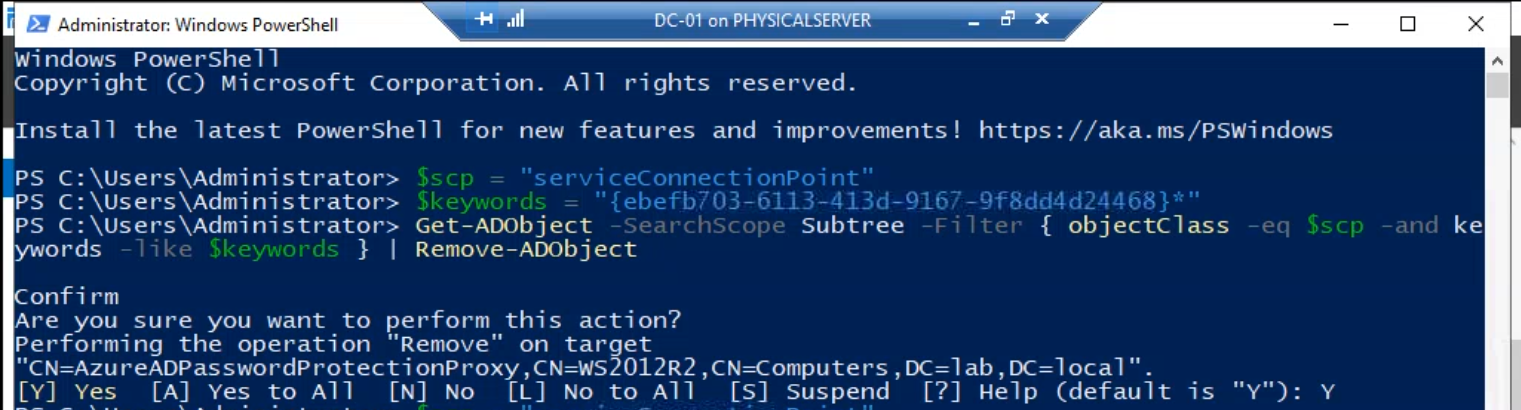
With every proxy package gone, the proxy SCPs in AD are now orphaned references to nothing. Same query as Step 1, but piped into Remove-ADObject:
$scp = "serviceConnectionPoint"
$keywords = "{ebefb703-6113-413d-9167-9f8dd4d24468}*"
Get-ADObject -SearchScope Subtree -Filter { objectClass -eq $scp -and keywords -like $keywords } | Remove-ADObject
Each SCP triggers a confirmation prompt. Type Y and press Enter for each. (For larger forests, append -Confirm:$false to skip the prompt — but only after you’ve verified the discovery query returns ONLY the objects you want gone. Skipping confirmation on a query that accidentally matches more than you intended is the fastest way to make a forest-wide mess.)
Run this from any host with the AD module and Domain Admin (forest root) credentials. The call is forest-wide because SCPs live in the configuration NC, which replicates to every domain in the forest.
Step 6 — remove the agent SCPs
Identical pattern, different GUID:
$scp = "serviceConnectionPoint"
$keywords = "{2bac71e6-a293-4d5b-ba3b-50b995237946}*"
Get-ADObject -SearchScope Subtree -Filter { objectClass -eq $scp -and keywords -like $keywords } | Remove-ADObject

Same Y-confirmation per object, same forest-wide scope. After Step 6 there are no SCP references left to either component anywhere in AD.
Step 7 — remove the forest-level configuration container
The forest registration from Part 2 (Register-AzureADPasswordProtectionForest) created a container under the configuration naming context that holds tenant linkage, signing keys, and various configuration objects. The cmdlet undoing it is Unregister-AzureADPasswordProtectionForest, but that requires the proxy bits to still be installed (the cmdlet ships with the proxy module). Since you’ve already removed the proxy in Step 2, the cmdlet isn’t available — remove the container directly with Remove-ADObject:
$passwordProtectionConfigContainer = "CN=Azure AD Password Protection,CN=Services," + (Get-ADRootDSE).configurationNamingContext
Remove-ADObject -Recursive $passwordProtectionConfigContainer
Type Y at the recursive-delete confirmation prompt. -Recursive deletes the container and everything below it — the config objects, the signing keys, the tenant link — in one operation. The CN path is forest-wide; this is the “disconnect from the cloud tenant” step that mirrors the original forest registration.

Run from a host with Enterprise Admin in the forest root (the configuration NC requires that level of write privilege). After this completes, the cloud tenant’s reference to your forest is severed — the tenant doesn’t know your AD exists anymore.
Step 8 — clean up the SYSVOL directory
The agent stored cached policy in SYSVOL during normal operation. AD cleanup removes the references but not the file content; the folder still exists on every controller’s SYSVOL replica until you delete it.
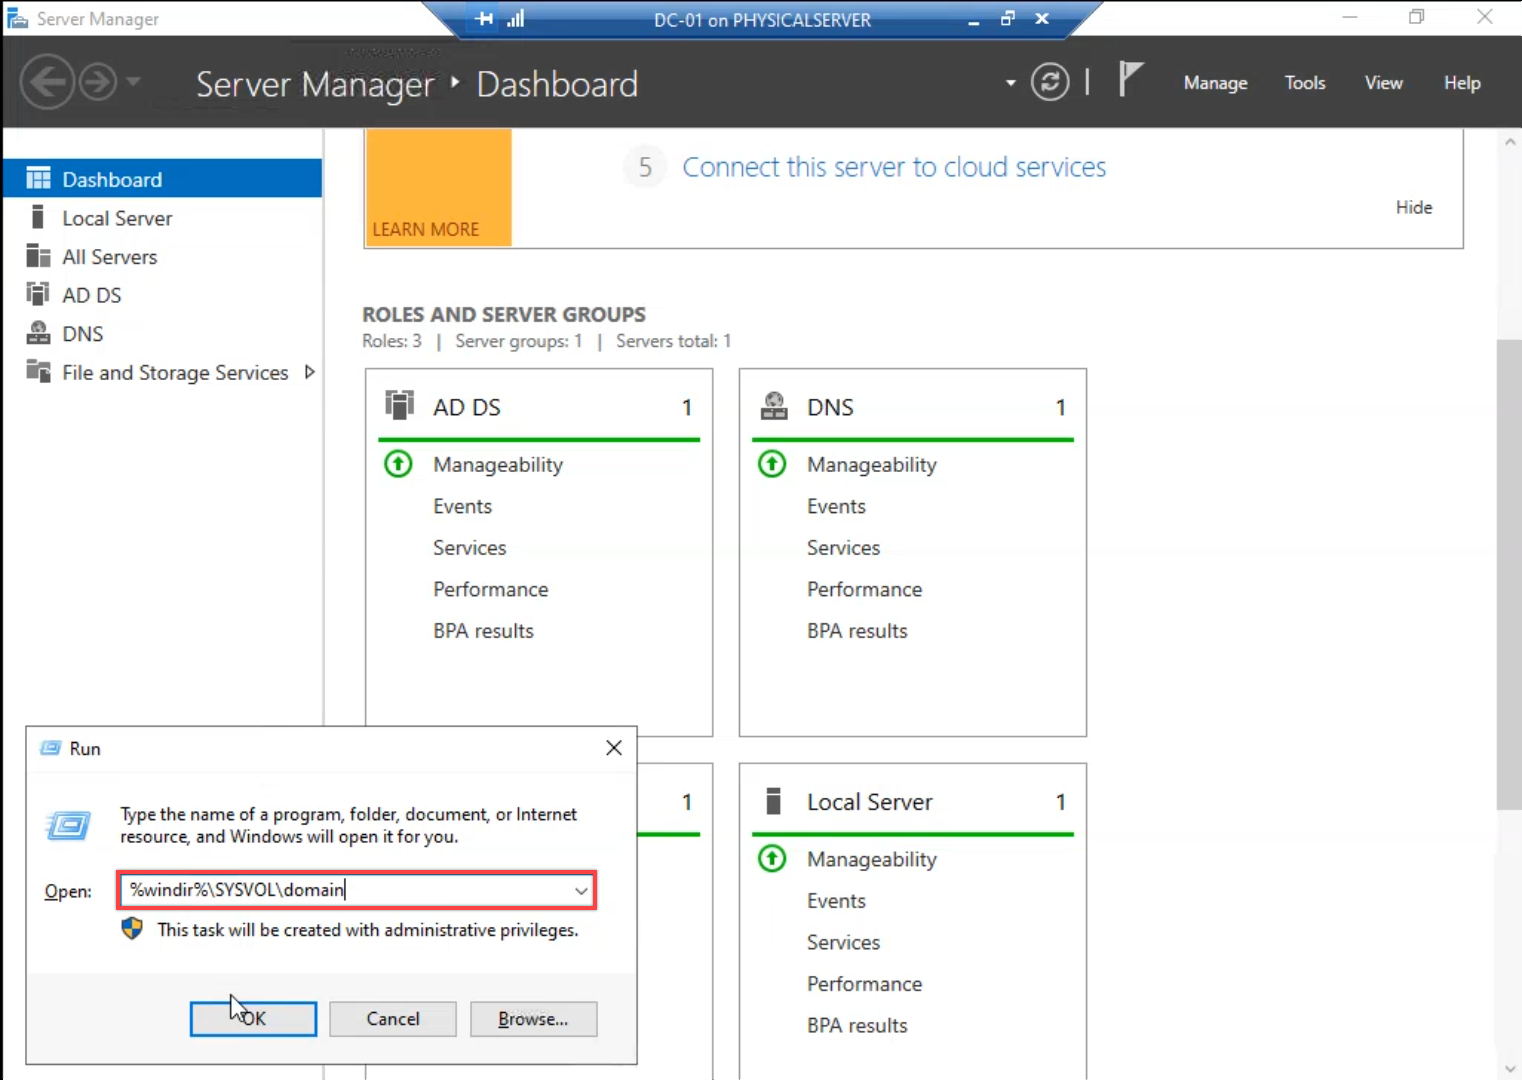
On any writable controller, open File Explorer and navigate to \\<your-domain>\SYSVOL\<your-domain>\ (or the local equivalent at C:\Windows\SYSVOL\sysvol\<your-domain>\). You’ll see the AzureADPasswordProtection folder alongside the standard Policies folder.
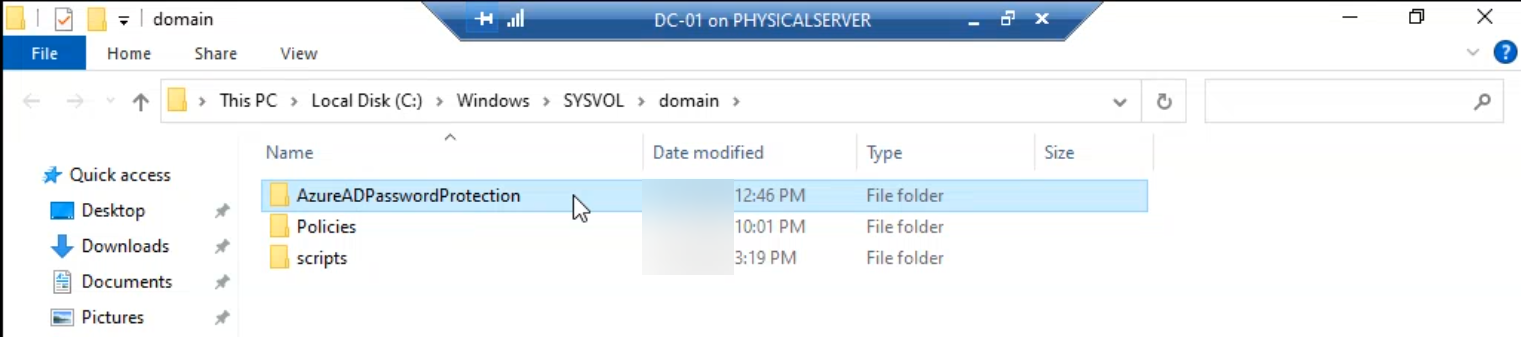
Right-click the AzureADPasswordProtection folder and delete it. SYSVOL is replicated by DFS-R; deleting on one writable controller propagates the deletion to every other controller in the domain within minutes. You do NOT need to repeat this step per controller — do it once on a writable controller and let DFS-R do the rest.
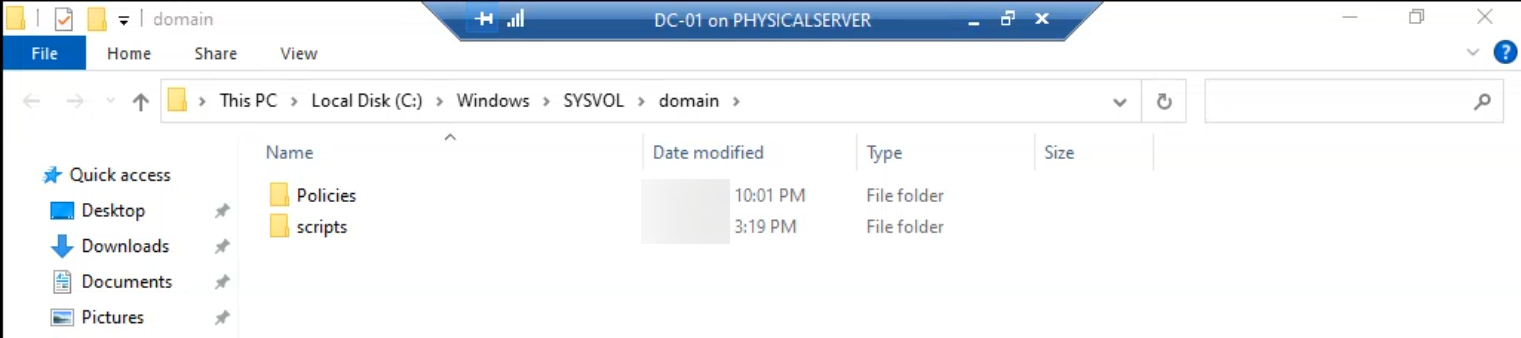
Verify by browsing SYSVOL on a different controller five minutes later; the folder should be gone there too. If it isn’t, check DFS-R replication health (dfsrdiag pollad + Get-DfsrBacklog) — SYSVOL replication being broken is a much bigger problem than the leftover folder, but worth knowing about.
What you’re left with after a clean teardown
Run a final verification pass:
- Both SCP discovery queries (Step 1 and Step 3 GUIDs) should return nothing.
Get-ADObject "CN=Azure AD Password Protection,CN=Services,<config-NC>"should return an “object not found” error.- SYSVOL on every writable controller should NOT contain an AzureADPasswordProtection folder.
- Programs and Features on every former proxy host should not list any of the three proxy packages; on every former agent host (writable controllers) should not list the agent package.
- Get-Service should return errors for both AzureADPasswordProtectionProxy (on the former proxy hosts) and AzureADPasswordProtectionDCAgent (on the former agent hosts).
If all five check out, the deployment is fully reversed. Domain password policy reverts to whatever was in place before Entra Password Protection was layered on — the legacy AD complexity rule, custom password filters from third-party tools, or fine-grained password policies via PSO objects.
Things that bite people during the teardown
Removing SCPs before uninstalling the software
The single most common teardown mistake. You read “remove SCPs” somewhere, run the Remove-ADObject calls first, then go to uninstall the bits. The result: every running service immediately starts logging warnings about missing SCPs. Errors keep accumulating until the services are removed. Functionally not catastrophic but very loud.
The fix order is forced: bits first (Steps 1–4), AD objects second (Steps 5–7), Sysvol last (Step 8). Even if you have to skip a step (e.g. one proxy host is unreachable for the uninstall), DON’T jump ahead to remove its SCP — either bring the host back online or accept the orphan SCP for now and clean up after.
Forgetting the reboot after agent uninstall
The agent service uninstall completes; you check Get-Service, the service is gone; you assume that controller is done and move on. Later, password changes on that controller still get evaluated against the (stale) cached policy because the password filter DLL never unloaded from LSASS. The reboot is mandatory. Until you reboot, the controller is in a confusing intermediate state.
Removing the forest container while the proxy is still installed
The other order mistake. You jump ahead to Step 7, remove the forest config container, then go back to uninstall the proxy. The proxy uninstaller calls into AD to deregister itself and fails because the forest container is gone. The uninstall completes anyway (the failure is logged but non-fatal), but you’ll see a stack trace in the uninstall log. Cosmetic, not functional, but avoidable by following the order.
The custom banned list is not deleted by Step 7
Step 7 removes the on-prem-side configuration. The cloud-side custom banned list (the company name + internal phrases you added in Part 2) is a tenant property and survives the teardown. If you intend to reuse the tenant for cloud-only password protection, the list is still there; if you’re also pulling the plug on the cloud feature, manually clear the list in the Microsoft Entra admin centre after Step 7.
SYSVOL DFS-R replication broken
If the AzureADPasswordProtection folder doesn’t propagate the deletion via DFS-R, you have a SYSVOL replication problem that probably predates the teardown. Investigate that first — broken SYSVOL is one of the worst silent problems in an AD environment because Group Policy delivery depends on it. The leftover folder is a symptom; the broken replication is the bug.
Wrapping up
That’s the complete teardown. Combined with Part 1 (architecture + prerequisites) and Part 2 (the install walk + audit/enforce flip), this series covers the full lifecycle of Microsoft Entra Password Protection on an on-prem AD forest. For broader hybrid-identity context, the Hybrid Identity pathway covers the wider set of features that connect on-prem AD to the cloud tenant. For the legacy password policy that Entra Password Protection layers on top of (and that the controller falls back to after this teardown), see the Group Policy pathway. For the AD fundamentals that make all of this work — SCPs, configuration NC, SYSVOL, DFS-R — see the Active Directory pathway.