You’ve got a Hyper-V lab on your laptop or a spare server. You want the guest VMs to reach the internet for Windows updates, package installs, license activation, and the occasional curl against a public API — but you don’t want to bridge them onto your home or office LAN, and you don’t want to consume a real DHCP lease for every VM. The recipe for this is a NAT virtual switch: an Internal Hyper-V switch on the host plus a Windows NetNat object that translates the lab subnet to the host’s outbound IP. Your guests share the host’s public-facing identity and stay isolated from your real network. The catch: there’s no GUI for the NAT half, so it’s a PowerShell-only job.
Why NAT vs the other Hyper-V switch types
Hyper-V ships with three switch types out of the box. Pick the wrong one and you’re either bridging guests directly onto your LAN (External) or stranding them on an island with no internet (Internal alone, or Private). The NAT recipe is a fourth option that Hyper-V doesn’t expose in the GUI:
- External — guests share the host’s physical NIC. Each guest gets a real LAN IP from your home/office DHCP server. Simple but exposes every VM directly to your real network — not what you want when half of them are deliberately broken Windows boxes for IR practice.
- Private — guests can talk to each other and ONLY each other. Host can’t reach them, no internet. Useful for air-gapped multi-VM scenarios; useless when the guest needs Windows Update.
- Internal — guests + host, no internet. The starting point for the NAT recipe. By itself it’s rarely what you want.
- Internal + NetNat — the topic of this post. Guests share an isolated subnet, the host acts as the gateway, and Windows NetNat translates outbound traffic to the host’s real IP. One outbound IP serves the whole lab; nothing leaks the other way.
What you need before starting
- Windows 10/11 or Windows Server 2016+ with the Hyper-V role installed
- Local admin on the host (the cmdlets all need elevation)
- An unused private subnet that doesn’t overlap any real network reachable from the host (if your home LAN is 192.168.1.0/24, pick something else — 10.42.0.0/24, 172.20.0.0/24)
- 5 minutes
The recipe is one Hyper-V cmdlet plus three NetNat-related cmdlets. None of them are reversible-in-place — if you make a mistake on the subnet, you have to remove the NetNat object and recreate it. Plan the subnet before you start typing.
Step 1 — create the internal switch
Open Windows Terminal (Admin) or PowerShell (Admin) on the host. From the elevated prompt:
New-VMSwitch -Name "Nat-IntVSwitch" -SwitchType InternalOne cmdlet, three things happen: a new Hyper-V virtual switch named Nat-IntVSwitch is created, its type is set to Internal (no uplink to the physical NIC), and a corresponding vEthernet adapter is auto-created on the host as the host’s loopback into the new switch.
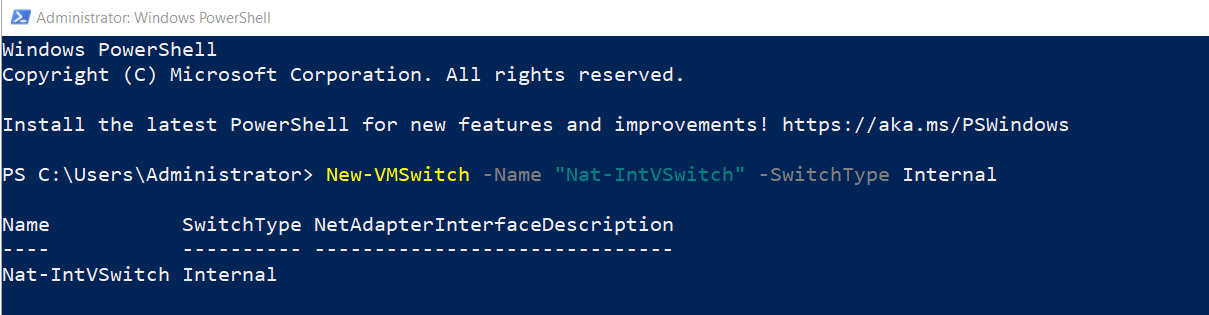

Open Hyper-V Manager and check the Virtual Switch Manager — the new switch is there. So far this is just an isolated lab switch; no NAT, no internet, the guests can only see each other and the host. The next four steps add the NAT layer.
Step 2 — find the InterfaceIndex of the new vEthernet adapter
Every Internal switch creates an auto-named vEthernet adapter on the host. The next cmdlet (assigning the gateway IP) needs that adapter’s InterfaceIndex. List the network adapters:
Get-NetAdapterLook for the row whose InterfaceAlias starts with vEthernet (Nat-IntVSwitch) — the alias matches the switch name from Step 1. Note the ifIndex value. In the example below it’s 55, but yours will be different. Hard-coding 55 from someone else’s output is the most common copy-paste mistake at this stage.
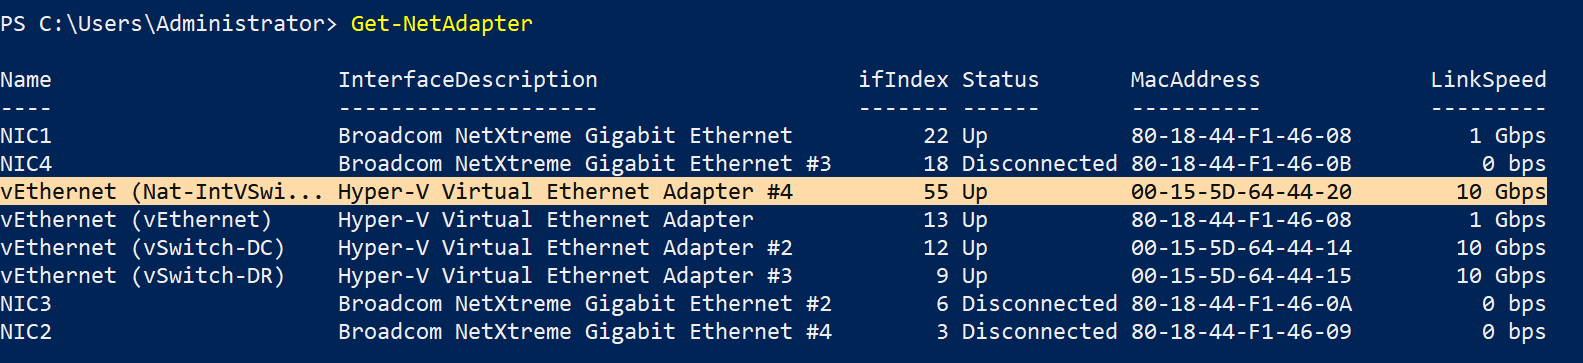
If the vEthernet adapter doesn’t appear, Step 1 didn’t work — check that the switch was actually created (Get-VMSwitch) and try again. If multiple vEthernet adapters appear (because you have other Internal/External switches), use the one whose alias matches your new switch.
Step 3 — assign the gateway IP to the vEthernet adapter
Pick a private subnet that doesn’t overlap your real network. The example uses 192.168.1.0/24 with .1 as the gateway, which works for a host whose real LAN is something else — but if your home LAN is 192.168.1.0/24, pick a different subnet. Common safe choices for labs:
- 10.42.0.0/24, 10.99.0.0/24 — rare in home networks
- 172.20.0.0/24, 172.21.0.0/24 — rare everywhere except in container labs
- 192.168.42.0/24, 192.168.99.0/24 — same private space as most home routers but a different third octet
Once you’ve picked, assign the gateway:
New-NetIPAddress -IPAddress 192.168.1.1 -PrefixLength 24 -InterfaceIndex 55Replace 55 with the InterfaceIndex from Step 2. The IP 192.168.1.1 becomes the host’s loopback into the lab subnet and the gateway every guest will use.
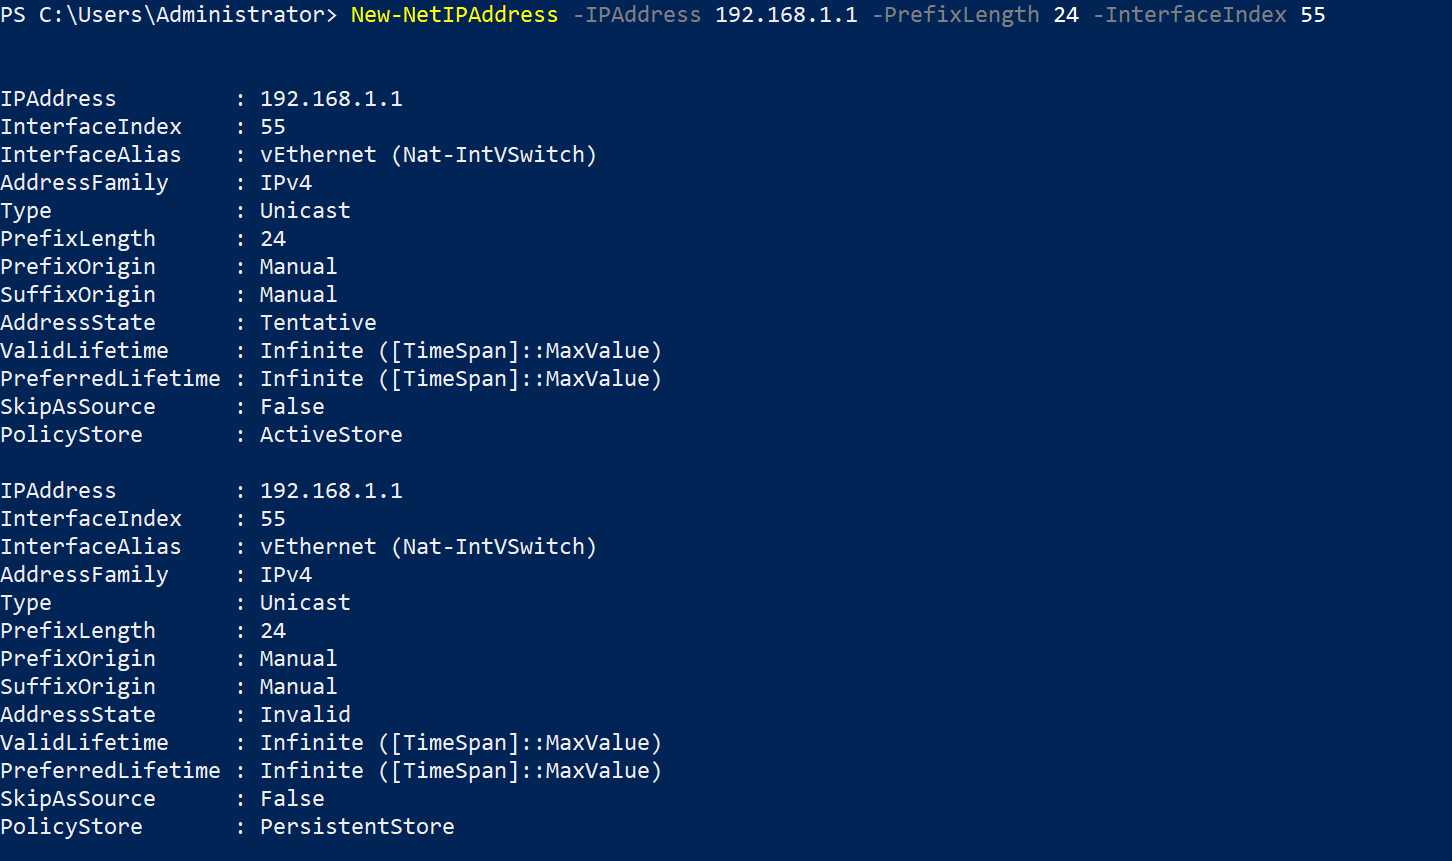
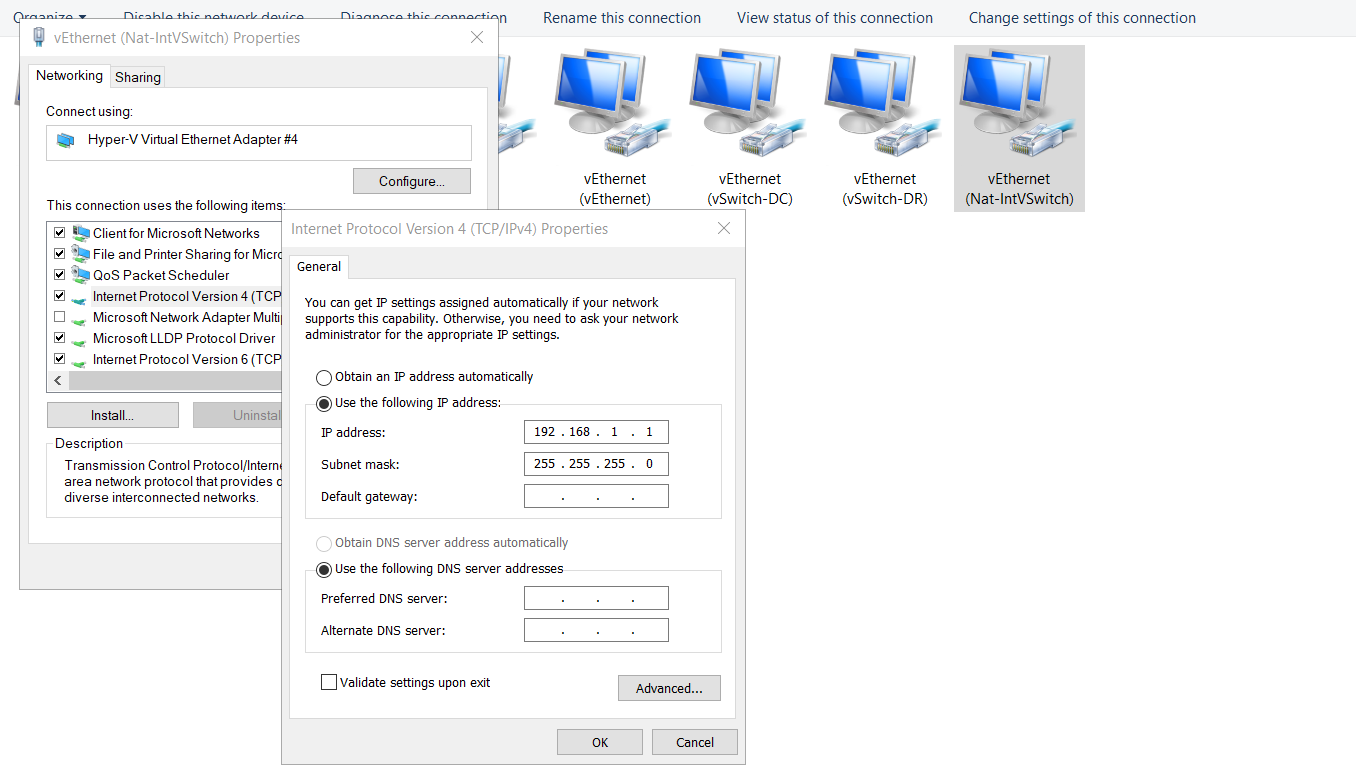
Verify in the Network Connections control panel applet (or via Get-NetIPAddress -InterfaceIndex 55): the vEthernet adapter now has 192.168.1.1/24. If the IPv6 properties also show an autoconfig address, ignore it — NAT in this recipe is IPv4-only.
Step 4 — create the NAT object
This is the cmdlet that turns “isolated lab switch” into “lab switch with internet via the host.” The NetNat object tells the host kernel: any traffic sourced from this prefix gets source-NATed to whatever IP the host uses to reach the destination.
New-NetNat -Name "TestNatNetwork01" -InternalIPInterfaceAddressPrefix "192.168.1.0/24"The Name is just a label for management. The InternalIPInterfaceAddressPrefix is the load-bearing argument — it MUST exactly match the subnet you assigned to the vEthernet adapter in Step 3 (here 192.168.1.0/24, which contains the .1 gateway).

Important constraint: Windows allows only ONE NetNat object on a host. If you try to create a second one with a different prefix, the cmdlet fails. For multi-subnet lab setups you have to use multiple Internal switches all bound to subnets that fit under one NetNat prefix — or use a different host. This is a common surprise the first time someone tries to scale up a lab.
Step 5 — verify the NAT registration
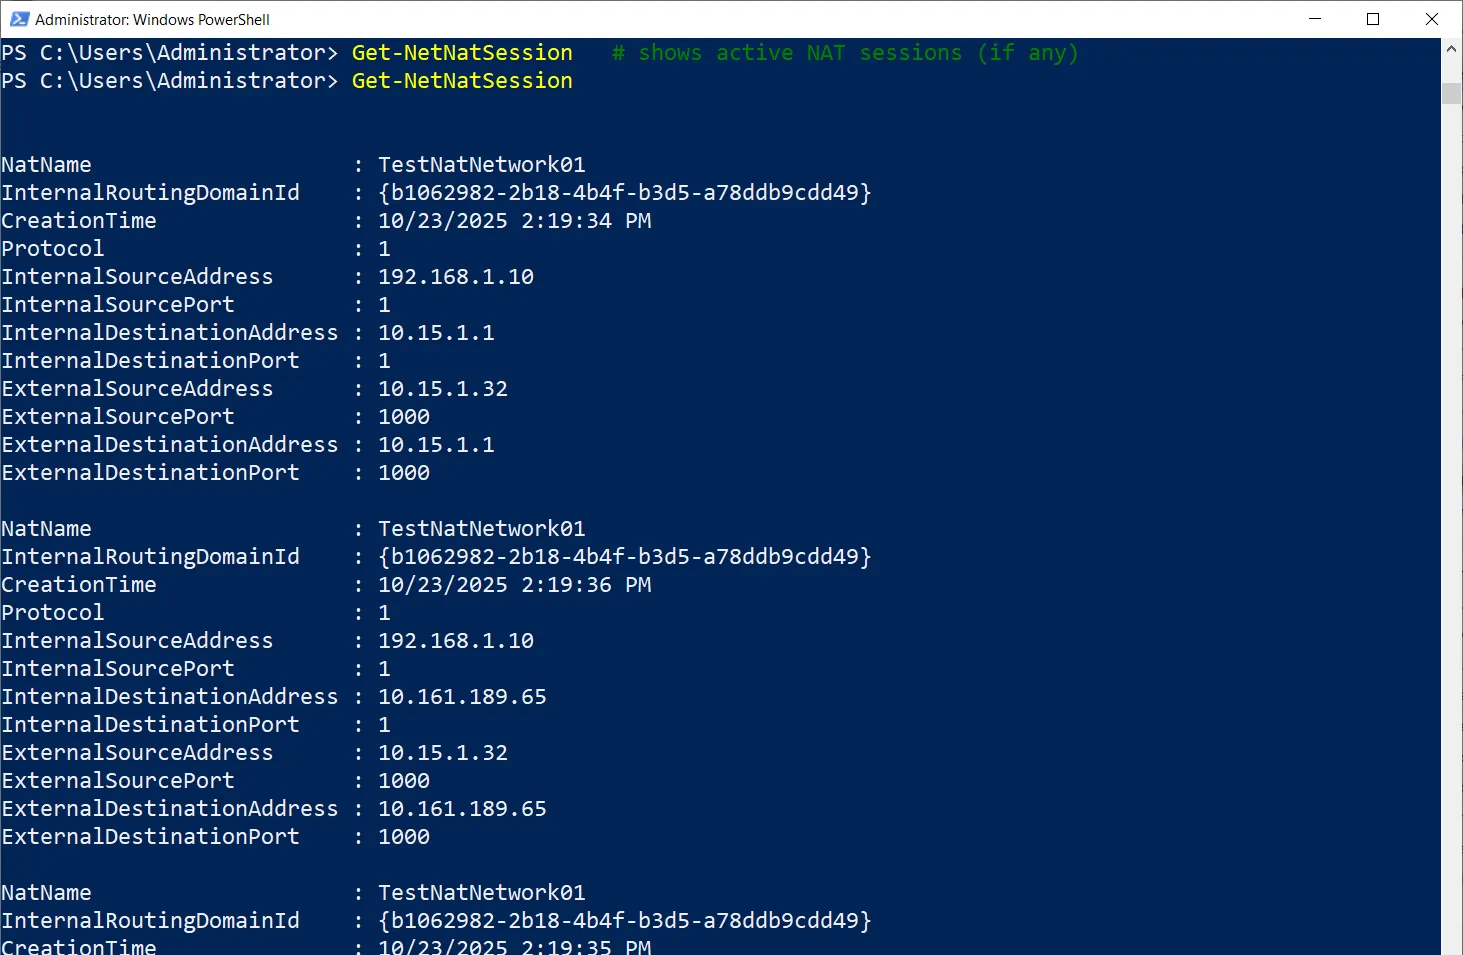
Get-NetNat
Get-NetNatSession   # shows active NAT sessions (if any)
Get-NetNat lists your NAT object with its prefix — the recipe is registered. Get-NetNatSession is empty until guests start sending outbound traffic; once they do, each active flow shows up as one row.
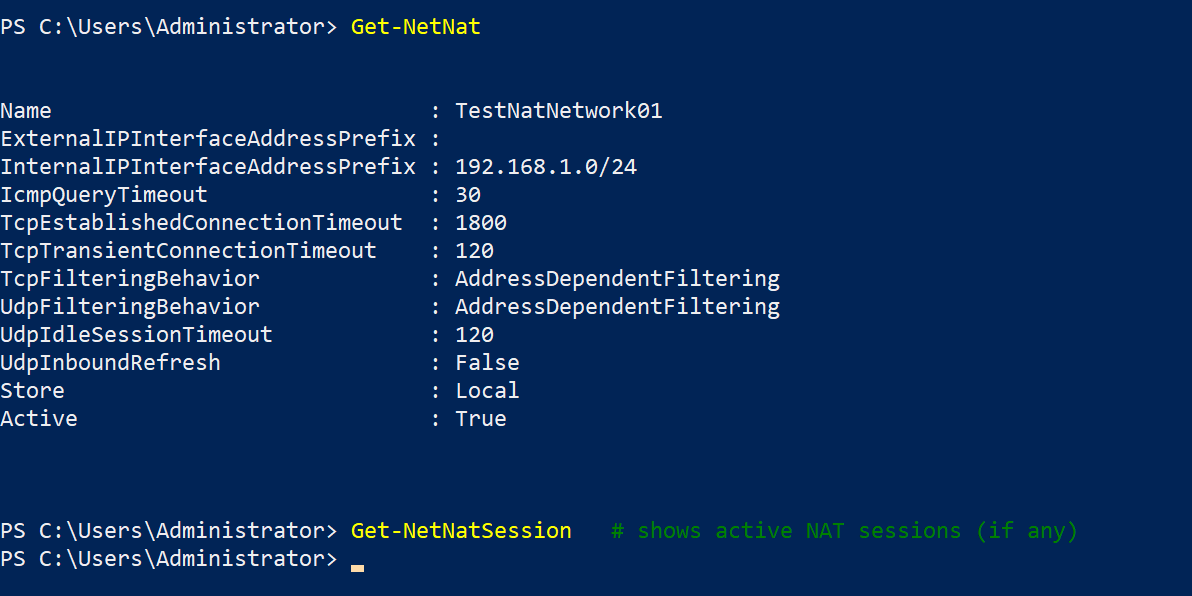
If Get-NetNat returns nothing, Step 4 failed silently — re-run with the verbose flag to see why. The most common cause is the InternalIPInterfaceAddressPrefix not matching any host adapter’s configured prefix.
Step 6 — wire each guest VM to the new switch
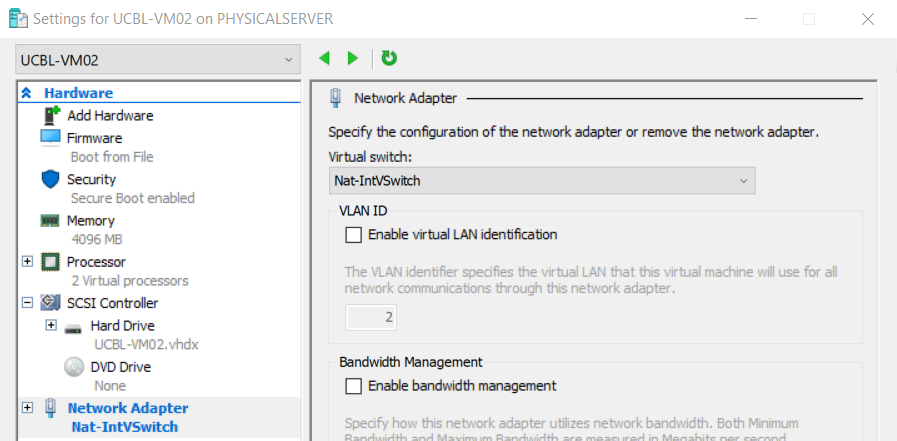
The host side is done. Now attach guests. In Hyper-V Manager:
- Right-click the VM > Settings.
- If the VM doesn’t already have a Network Adapter, click Add Hardware > Network Adapter.
- Select the adapter, choose Nat-IntVSwitch from the dropdown.
- Apply.
The guest may need its network restarted (or a quick reboot) to pick up the new connection. From the host’s perspective the wiring is done as soon as you click Apply; from the guest’s perspective the change shows up at the next DHCP renewal or interface reset.
Step 7 — configure the guest’s IP
The host doesn’t run a DHCP service on the lab subnet by default, so guests need static IPs. Inside each guest:
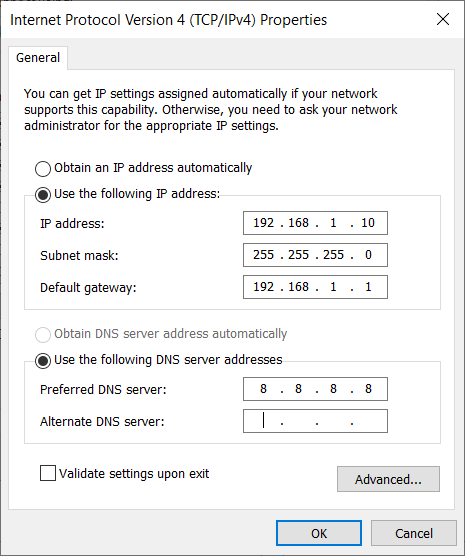
- IP address: any unused .x in 192.168.1.2–254. Pick a scheme — .11 for the first VM, .12 for the second, .21 for a domain controller, etc. Keep notes; on a 5-VM lab you don’t need a spreadsheet, but at 20 VMs you absolutely do.
- Subnet mask: 255.255.255.0 (or prefix /24).
- Default gateway: 192.168.1.1 (the host’s vEthernet adapter from Step 3).
- DNS server: a public resolver (8.8.8.8, 1.1.1.1, 9.9.9.9) for the simple case. If you’re running an internal DC in the lab and want guests to resolve internal names, point at the DC’s IP and configure it as a forwarder to a public resolver.
On a Windows guest: Control Panel > Network Connections > right-click the adapter > Properties > IPv4 > Properties. On a Linux guest: edit the netplan config or NetworkManager profile depending on the distro.
Step 8 — test from the guest
From the guest, open a command prompt or terminal and verify connectivity:
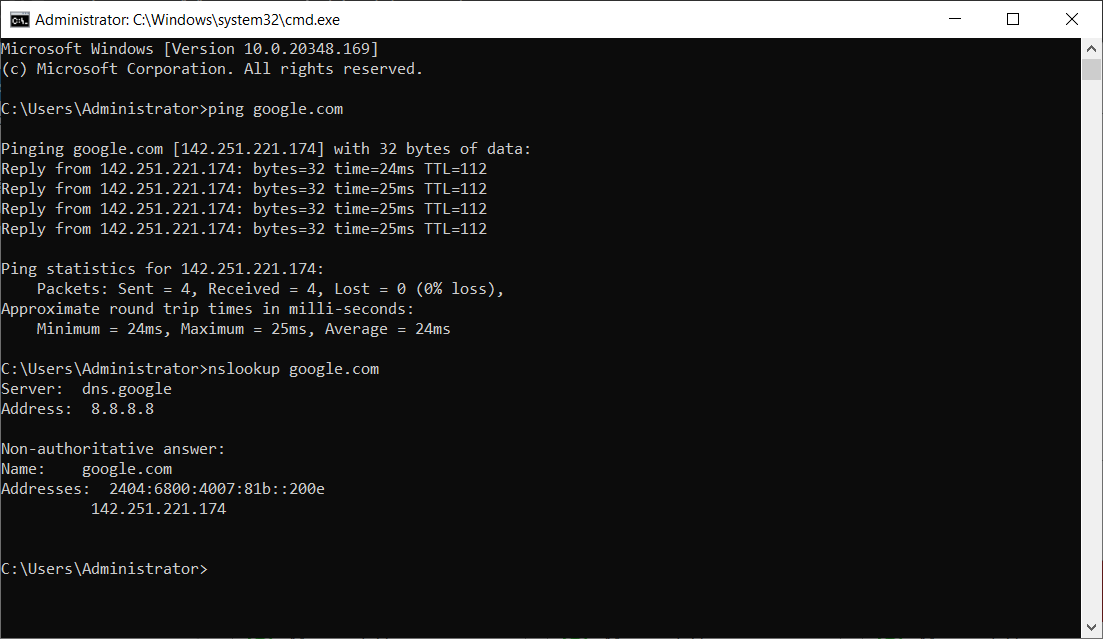
ping 8.8.8.8            # tests external IP reachability
nslookup example.com    # tests DNS resolution via configured DNS
A successful ping confirms NAT translation is working — the packet left the guest, hit the host vEthernet, was source-NATed to the host’s outbound IP, traversed your real network, and came back. nslookup confirms DNS is reachable.
If ping fails, check in this order:
- Guest’s ipconfig output — is the gateway set to 192.168.1.1? If it’s 0.0.0.0 or a different IP, the static config didn’t take.
- Host firewall — Windows Firewall on the host can block NAT traffic if the rules don’t allow it. Temporarily disable the firewall to confirm; if that fixes it, add a rule rather than leaving the firewall off.
- Subnet overlap — if your real LAN happens to be on the same subnet you picked for the lab, the host doesn’t know which way to route. Symptoms: ping to gateway works, ping to anything else fails. Fix: re-do Steps 3 and 4 with a different subnet.
- NAT object missing —
Get-NetNaton the host should still show your object. If it’s gone (a Windows update, a script you forgot about), recreate it.
Step 9 — watch the active NAT sessions
For ongoing observability:
Get-NetNatSessionRun this on the host while guests are generating traffic. Each active flow shows up as one row with InternalAddress (the guest’s .x), ExternalAddress (the host’s outbound IP), Protocol, and the source/destination ports. This is the troubleshooting goldmine: if a guest claims it’s sending traffic but no row shows up here, the NAT engine never saw the packet (firewall, routing, or guest-side problem — not a NAT problem).
Removing the NAT setup
If you’re done with the lab or want to start over with a different subnet, undo the recipe in reverse:
Remove-NetNat -Name "TestNatNetwork01"Drops the NetNat object. Guests can no longer reach the internet but can still talk to each other and the host.
Remove-NetIPAddress -InterfaceIndex 55 -IPAddress 192.168.1.1Removes the gateway IP from the host vEthernet adapter. Replace 55 with the actual InterfaceIndex. The example shows 19 in some docs — that’s a different host’s index from when the recipe was written; never copy it without checking your own.
Remove-VMSwitch -Name "Nat-IntVSwitch"Removes the Internal switch entirely. After this any VM that was attached to it loses network until you re-attach it to a different switch.
The order matters because of dependencies: the NetNat object references the prefix on the vEthernet adapter, the vEthernet adapter is owned by the switch. Remove the leaf (NAT) first, then the IP, then the switch.
Things that bite people
Subnet overlap with real networks
The single most common surprise. You pick 192.168.1.0/24 because the example uses it. Your home router also uses 192.168.1.0/24. The host now has two routes to that subnet (your real LAN via the physical NIC, and the lab via the vEthernet). Routing decisions become non-deterministic and traffic disappears. Fix: pick a different subnet from the start. Anything outside the well-known home ranges works.
Only one NetNat object per host
Already mentioned in Step 4 but worth repeating. Windows enforces one NetNat at a time. If you want multiple lab subnets, you have to use multiple Internal switches all bound to subnets that fit under a single NetNat prefix (e.g. NetNat covers 10.0.0.0/8, individual switches use 10.10.0.0/24, 10.20.0.0/24, etc.). Plan accordingly.
Inbound connections need static mapping
NAT is one-way out by default. If you want to expose a guest service to the external network (run a web server in a VM, SSH from outside the lab into a guest), you need a static port mapping:
Add-NetNatStaticMapping -NatName "TestNatNetwork01" -Protocol TCP -ExternalIPAddress "0.0.0.0" -ExternalPort 8080 -InternalIPAddress "192.168.1.11" -InternalPort 80The example forwards external port 8080 on the host to internal port 80 on the guest at .11. Use sparingly and only for services that genuinely need external access — the whole point of the NAT recipe was to keep guests isolated.
The NetNat object survives reboots
The Internal switch and the IP on the vEthernet adapter survive reboots; the NetNat object also survives. You don’t need to script the recipe into a startup task. If after a reboot guests have lost internet, check Get-NetNat first — if the object is gone, something explicitly removed it (a script, a Windows update with a bug, a Group Policy that resets network config).
InterfaceIndex changes after reboots
Sometimes (rarely) Windows renumbers interface indices after a reboot. The IP assignment from Step 3 is by index, but the vEthernet adapter is uniquely identifiable by alias too. If your reboot logic re-runs Step 3 and the index has changed, the cmdlet will fail because the alias is already in use. Use Get-NetAdapter -Name "vEthernet (Nat-IntVSwitch)" to look up the current index dynamically rather than hard-coding it in scripts.
Guest DNS resolves but ping fails (or vice versa)
If nslookup works but ping doesn’t, the issue is ICMP-specific — usually the host’s firewall is blocking ICMP echo through the NAT path. Some destinations also drop ICMP (cloudflare DNS does, intentionally). Try TCP-based tests instead: Test-NetConnection 8.8.8.8 -Port 53 in PowerShell, or curl https://example.com.
The vEthernet adapter is firewalled separately
Windows treats the vEthernet adapter as a separate network connection with its own firewall profile (Public, Private, Domain). If it lands in the Public profile by default (it usually does), the firewall is more restrictive than you might expect. Set the profile to Private explicitly:
Set-NetConnectionProfile -InterfaceIndex 55 -NetworkCategory PrivateWhere this fits
The NAT vSwitch recipe is the “default lab network” for any Hyper-V environment that needs guests with internet but without bridging. For broader Hyper-V context, see the Hyper-V Virtualization pathway. For the wider story on host networking and NAT in general, the DNS & DHCP / Networking pathway covers the underlying network plumbing this builds on. For the inverse case — multiple guests sharing internet via External switches and DHCP — see the External switch documentation in Hyper-V Manager.