Introduction
You need to create new Active Directory users in your organization. For one or two accounts the user-creation wizard in Active Directory Users and Computers (ADUC) is fine; for ten it is annoying; for a thousand it is genuinely unworkable. If a single new user takes one minute in the wizard, a thousand new users is roughly 16 hours of clicking — an entire workday plus overtime spent on something a script could finish in seconds.
In this article you will learn how to create Active Directory users in bulk from a CSV file using PowerShell. You will design a CSV template, hand it to HR (or whoever owns the user data), generate strong passwords, fill in the destination OU, and run a single script that walks every row, splats the parameters, and calls New-ADUser with a duplicate-check and proper error handling.
Files Used in This Workflow
The walkthrough uses four files. They are not magic — they just keep the workflow auditable so you can hand any of them to a colleague and explain what each one is for:
| File | Purpose |
|---|---|
NewUsersSent.csv |
The empty template you sent to the requester. |
NewUsersReceived.csv |
The filled-in version they returned. |
NewUsersFinal.csv |
The final version with passwords and OU added by IT, ready to import. |
Add-NewUsers.ps1 |
The PowerShell script that reads the CSV and creates the accounts. |
Step 1 — Create the CSV Template
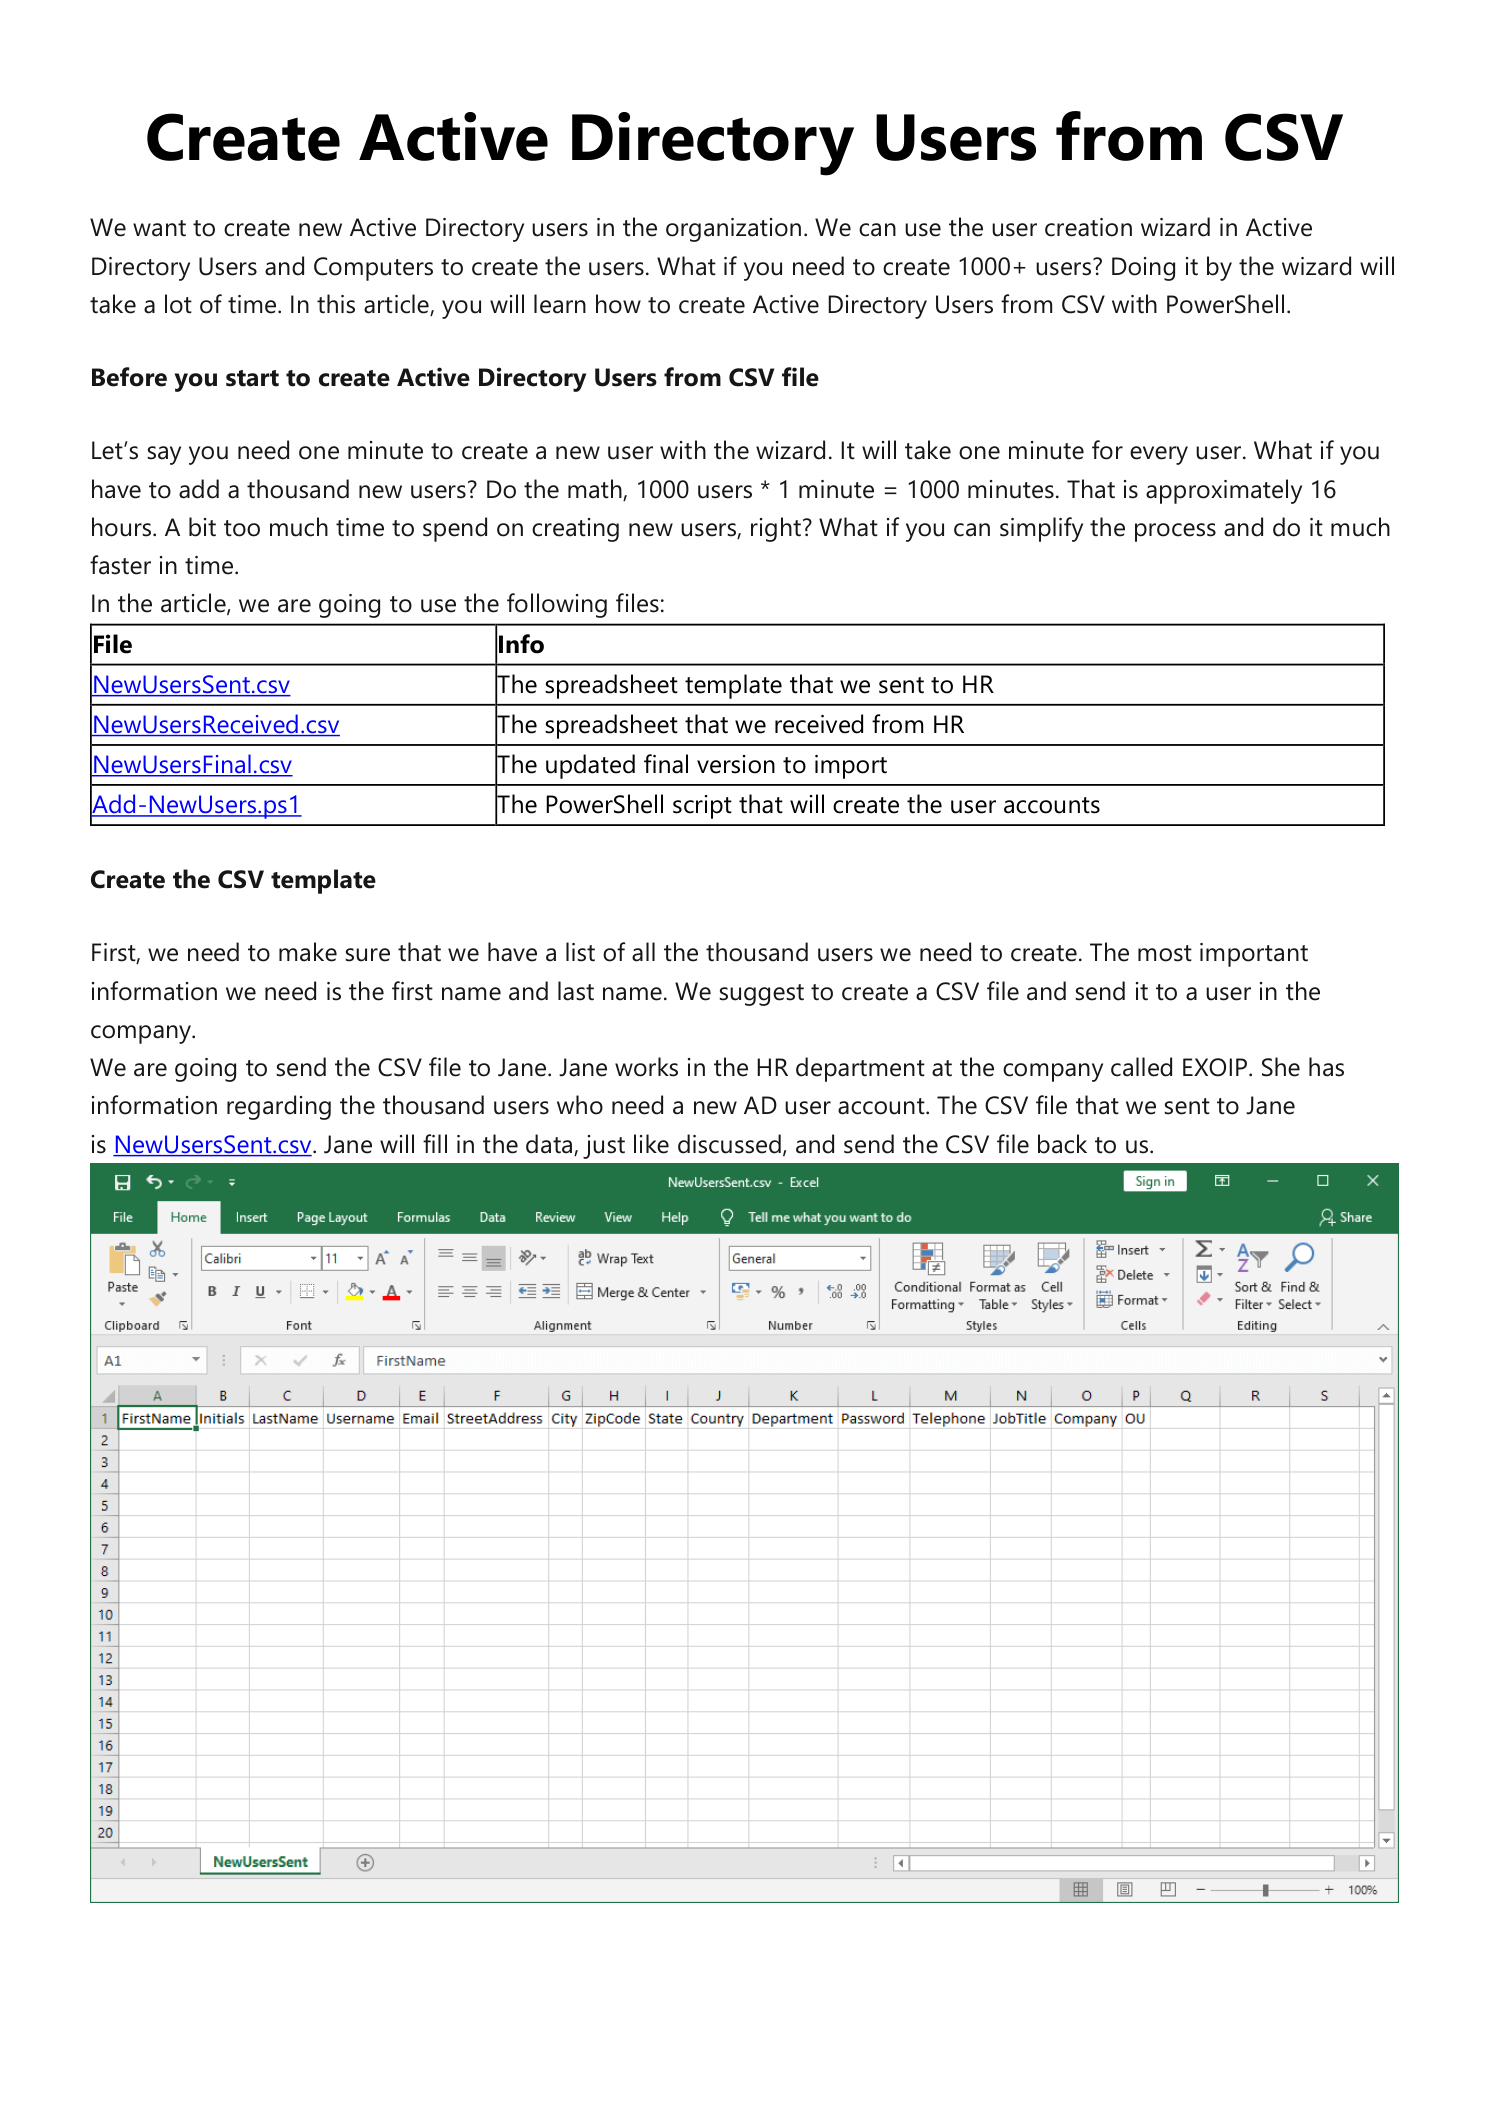
Build a CSV with one column per AD attribute you want to populate. At minimum you need FirstName and Lastname — everything else is recoverable later, but those two are the basis of the username, the display name, and the email. A practical column set looks like:
FirstName,Initials,Lastname,Username,Email,StreetAddress,City,ZipCode,
State,Country,Department,JobTitle,Telephone,Password,OU,Company
Send this empty file (NewUsersSent.csv) to the requester — for a typical hiring batch this is HR. Tell them:
- Fill in as much as possible — even the optional columns (Department, JobTitle, Telephone, Country) are useful for downstream filters and group memberships.
- Leave the Password column empty. IT will generate strong passwords centrally; HR should never be choosing or transmitting passwords.
- Leave the OU column empty. The Organizational Unit is an IT-side decision (it controls which GPOs and group memberships apply to the new users) and the value depends on your AD structure.
Step 2 — Receive the Filled CSV
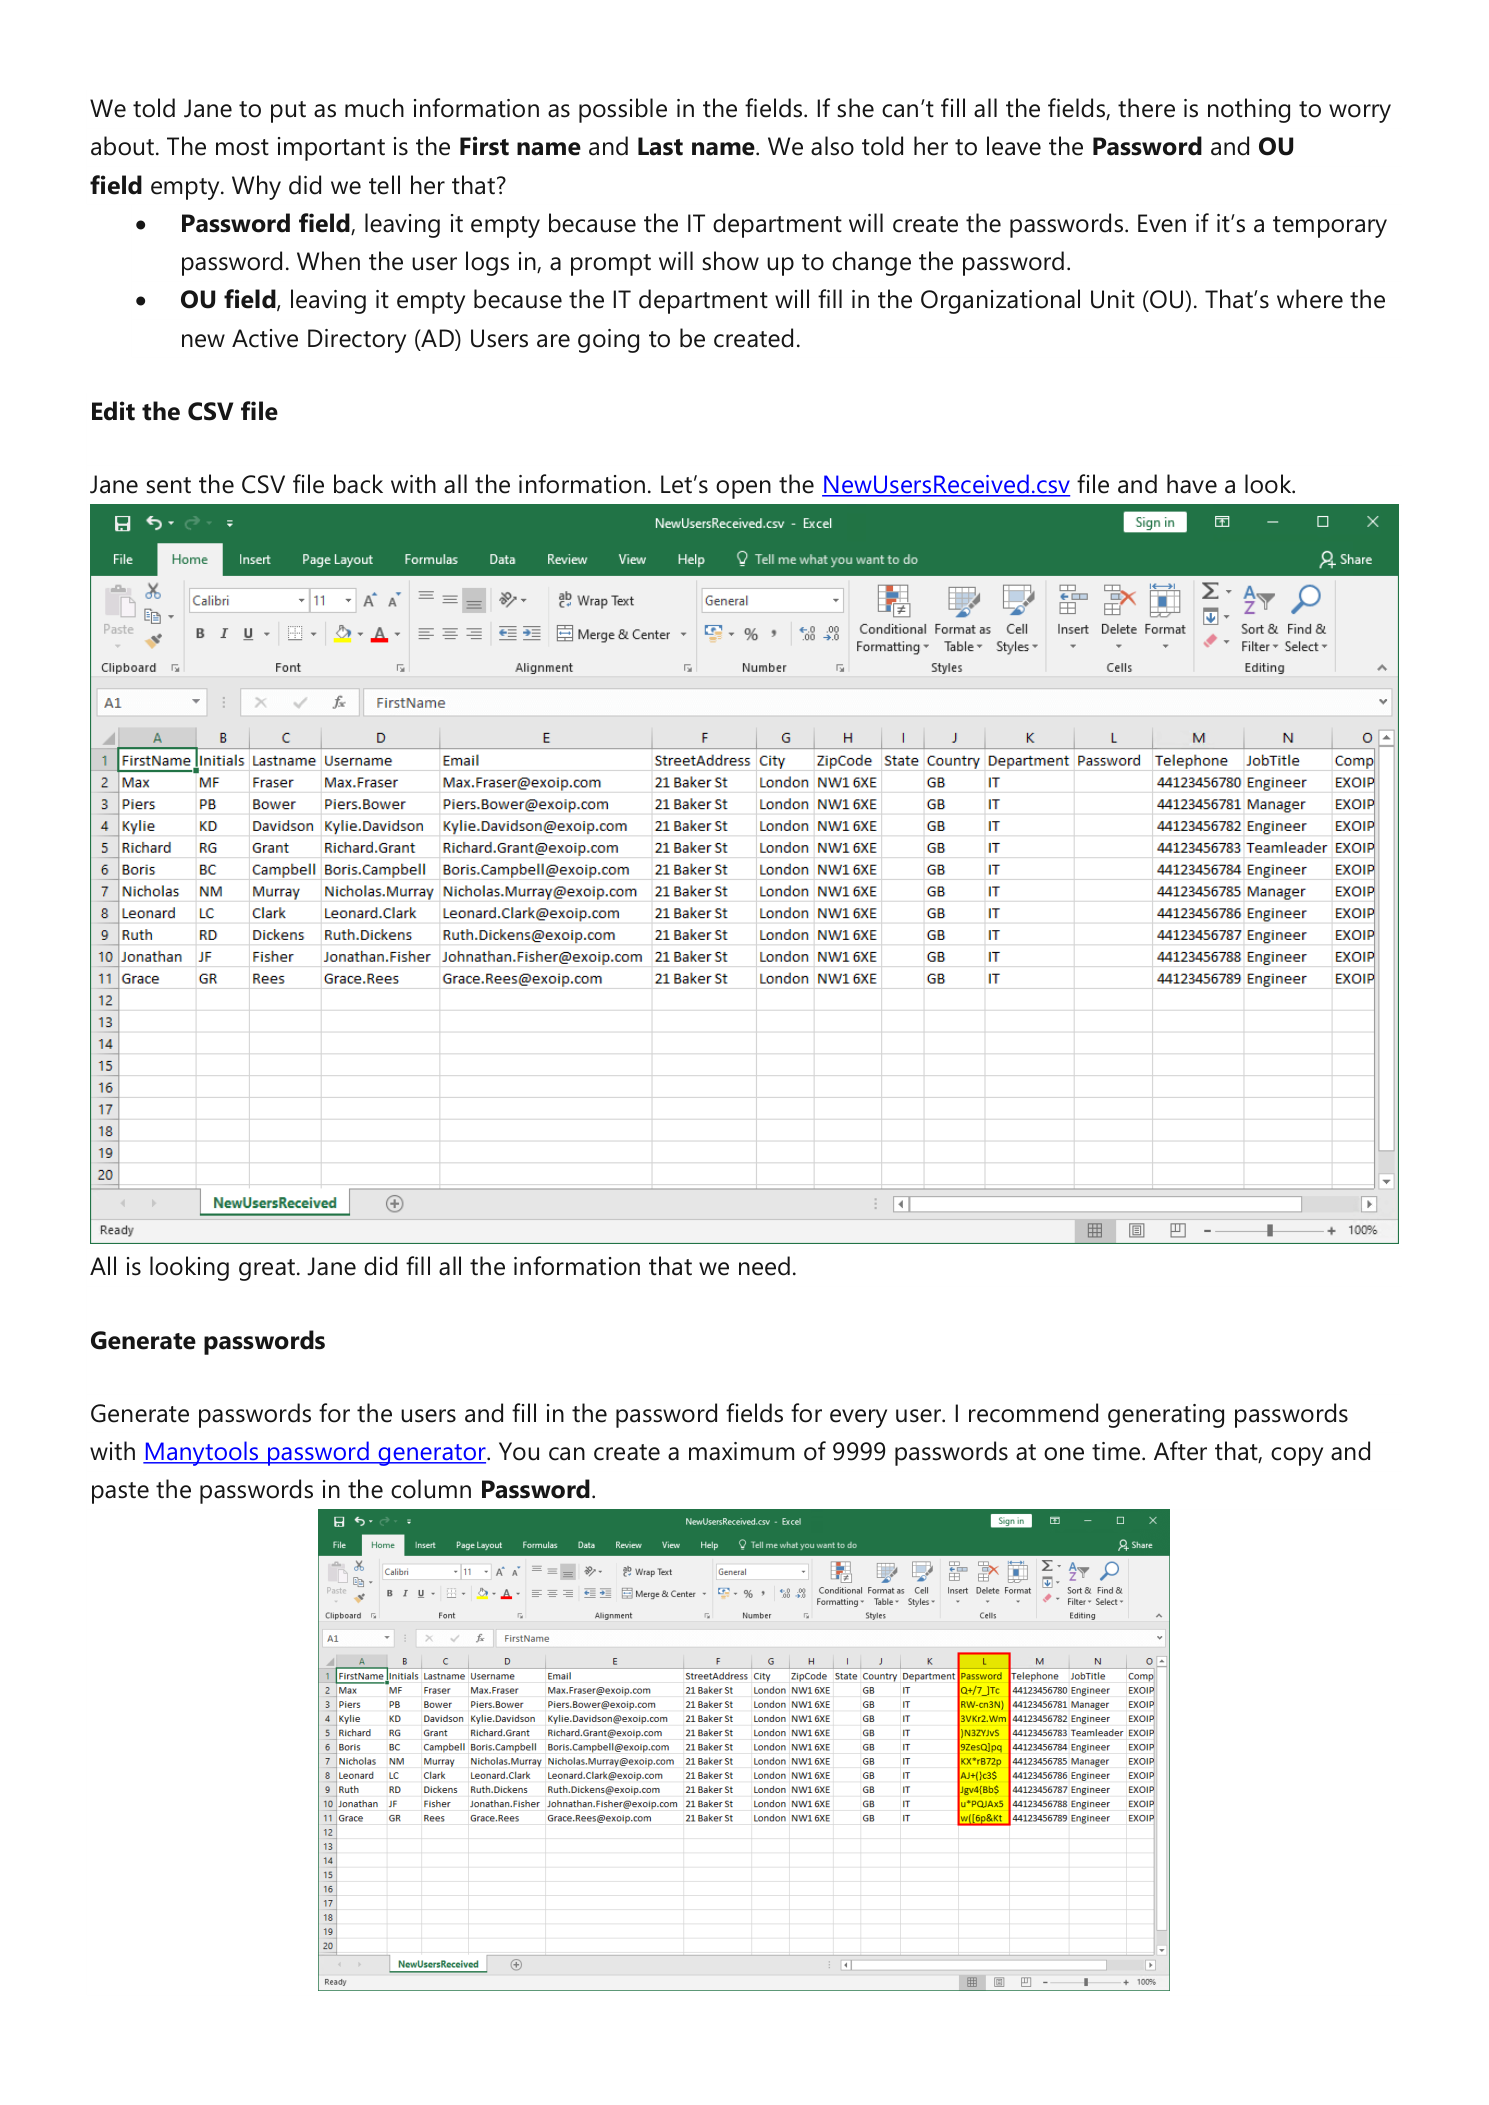
The requester returns NewUsersReceived.csv with the user data populated. Open it and sanity-check that the rows look right — the most common HR mistakes are typos in usernames, missing initials, and email addresses that conflict with existing accounts. Catch them now; fixing them after the import means deleting and recreating accounts.
Generate Passwords
Generate one strong password per user and paste them into the Password column. Any password generator with bulk output works; the article uses the free Manytools password generator, which can produce up to 9,999 passwords at a time. Pick a length and complexity that match your password policy — 16 characters with all four character classes is a sensible default.
The script flips ChangePasswordAtLogon to $True so the password you set is a one-time value: the user must change it the first time they sign in. That means you do not have to memorize or transmit each password securely — you generate them, store them in a password manager, and hand them to the user via the same secure channel you would use for any one-time secret.
Step 3 — Fill in the Destination OU
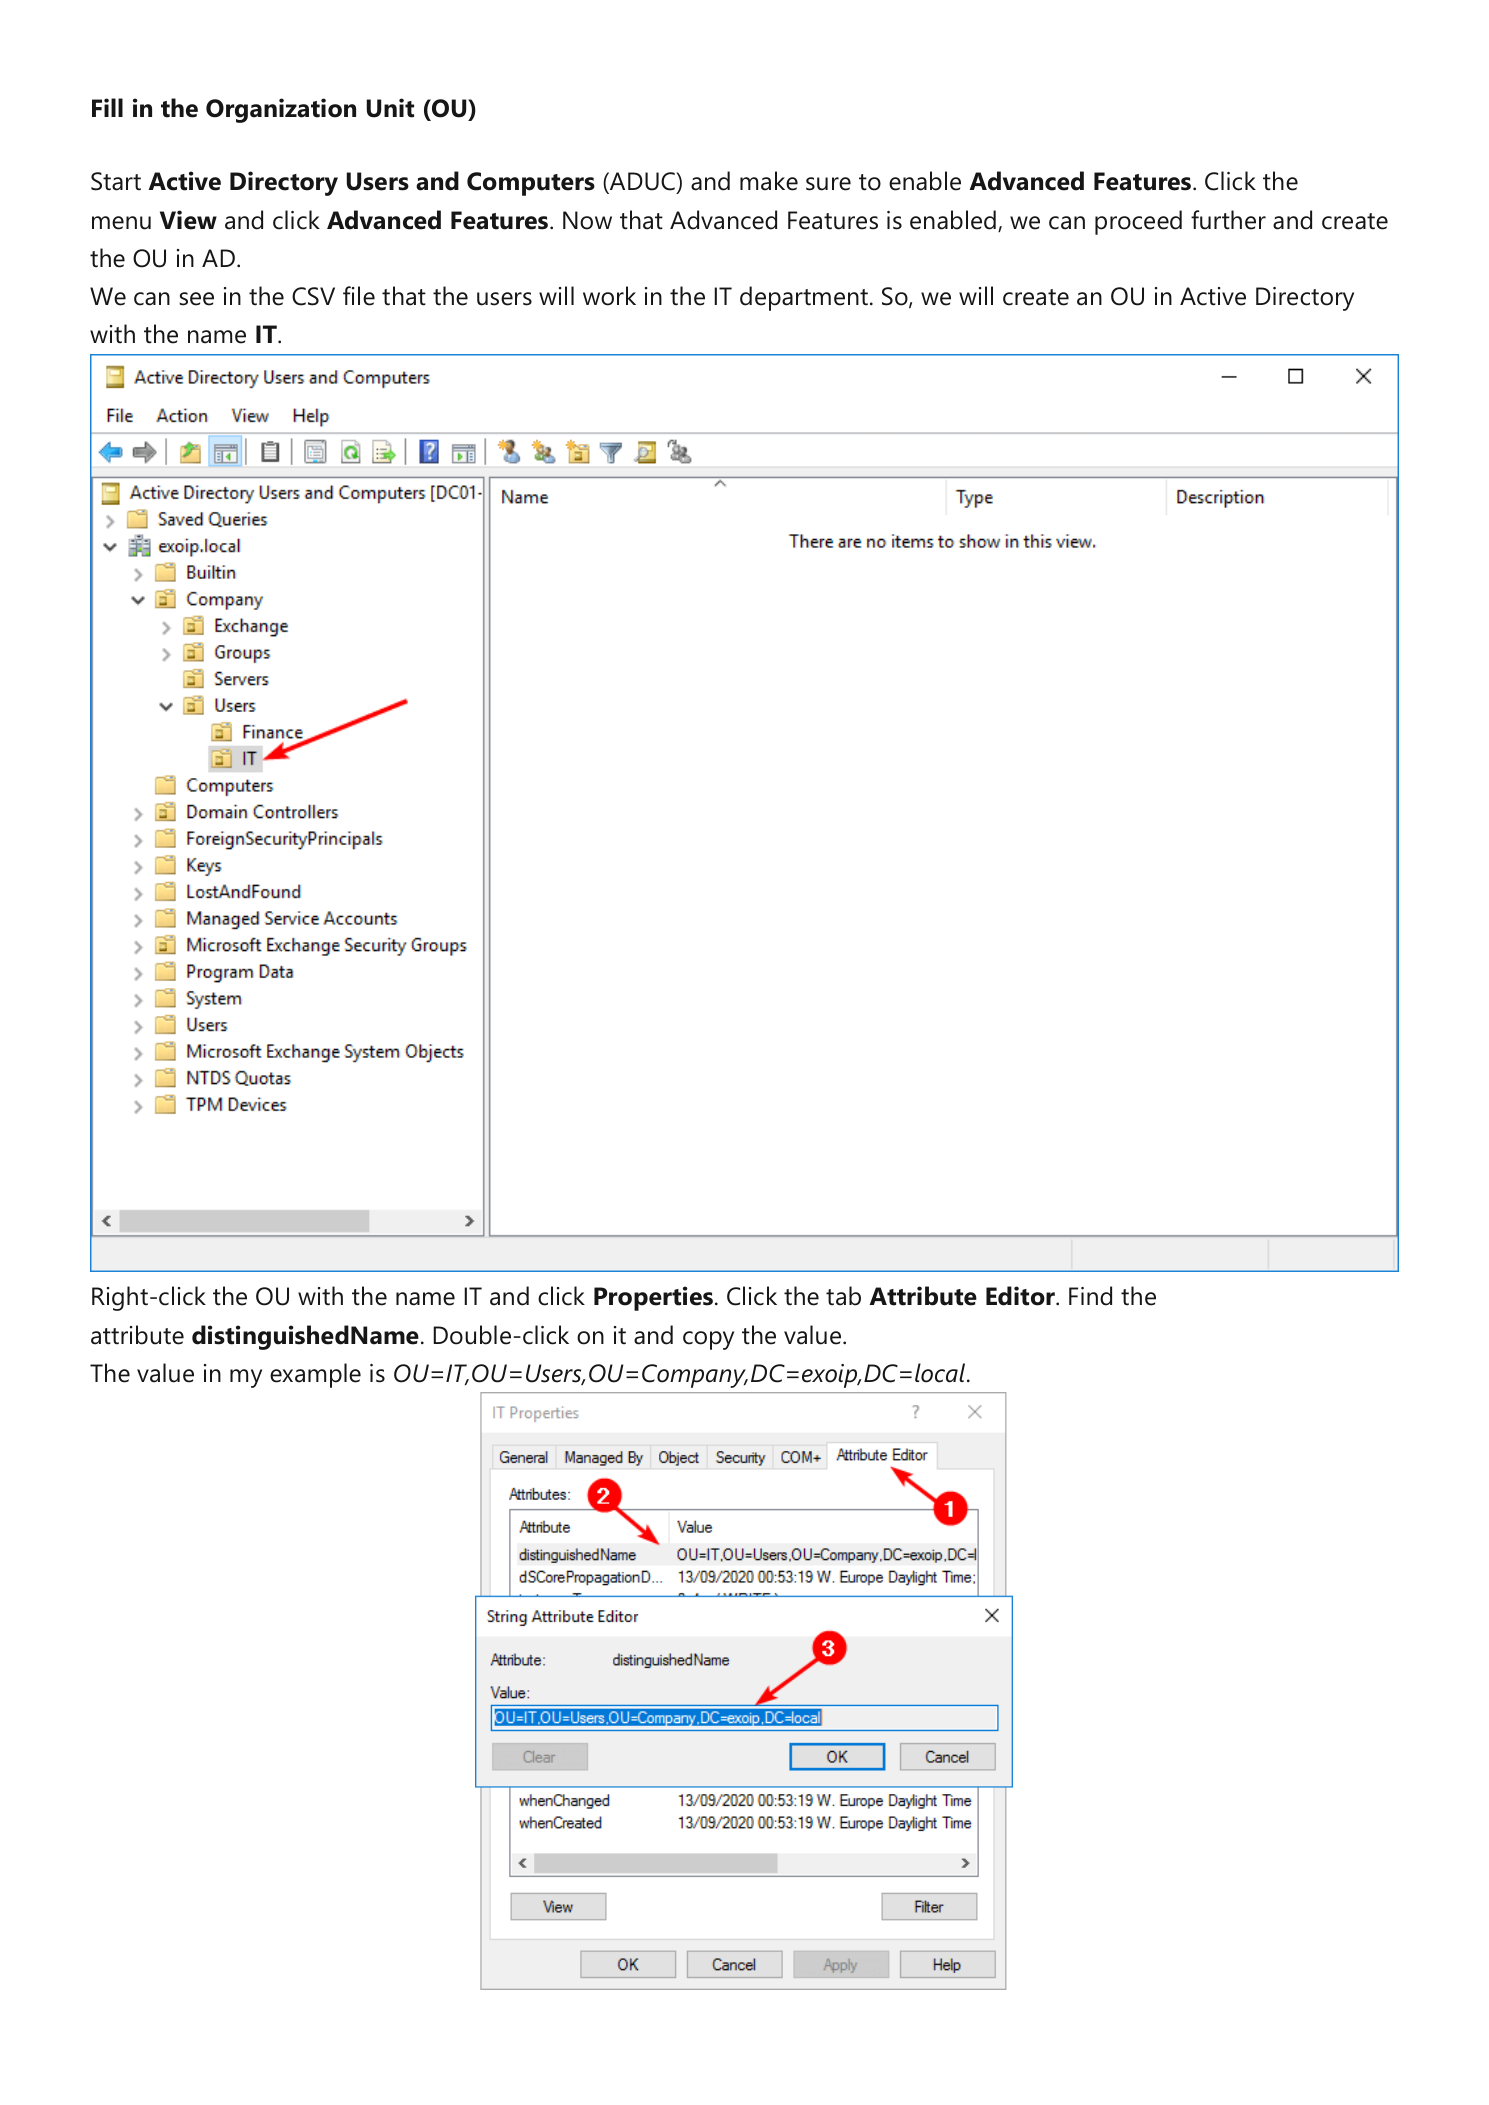
Decide where the new accounts will live in AD. In this example HR is hiring for the IT department, so the target is OU=IT,OU=Users,OU=Company,DC=infotechninja,DC=local — the IT OU under Company > Users in the infotechninja.local domain.
Find the OU’s distinguishedName
To get the exact distinguishedName string the script needs:
- Open Active Directory Users and Computers.
- Click the View menu and enable Advanced Features. Without this, the Attribute Editor tab is hidden on Properties dialogs.
- Navigate to or create the target OU (here
ITunderCompany > Users). To create it, right-click the parent OU and choose New > Organizational Unit. - Right-click the OU and choose Properties.
- Click the Attribute Editor tab.
- Find the
distinguishedNameattribute, double-click it, and copy the full value.
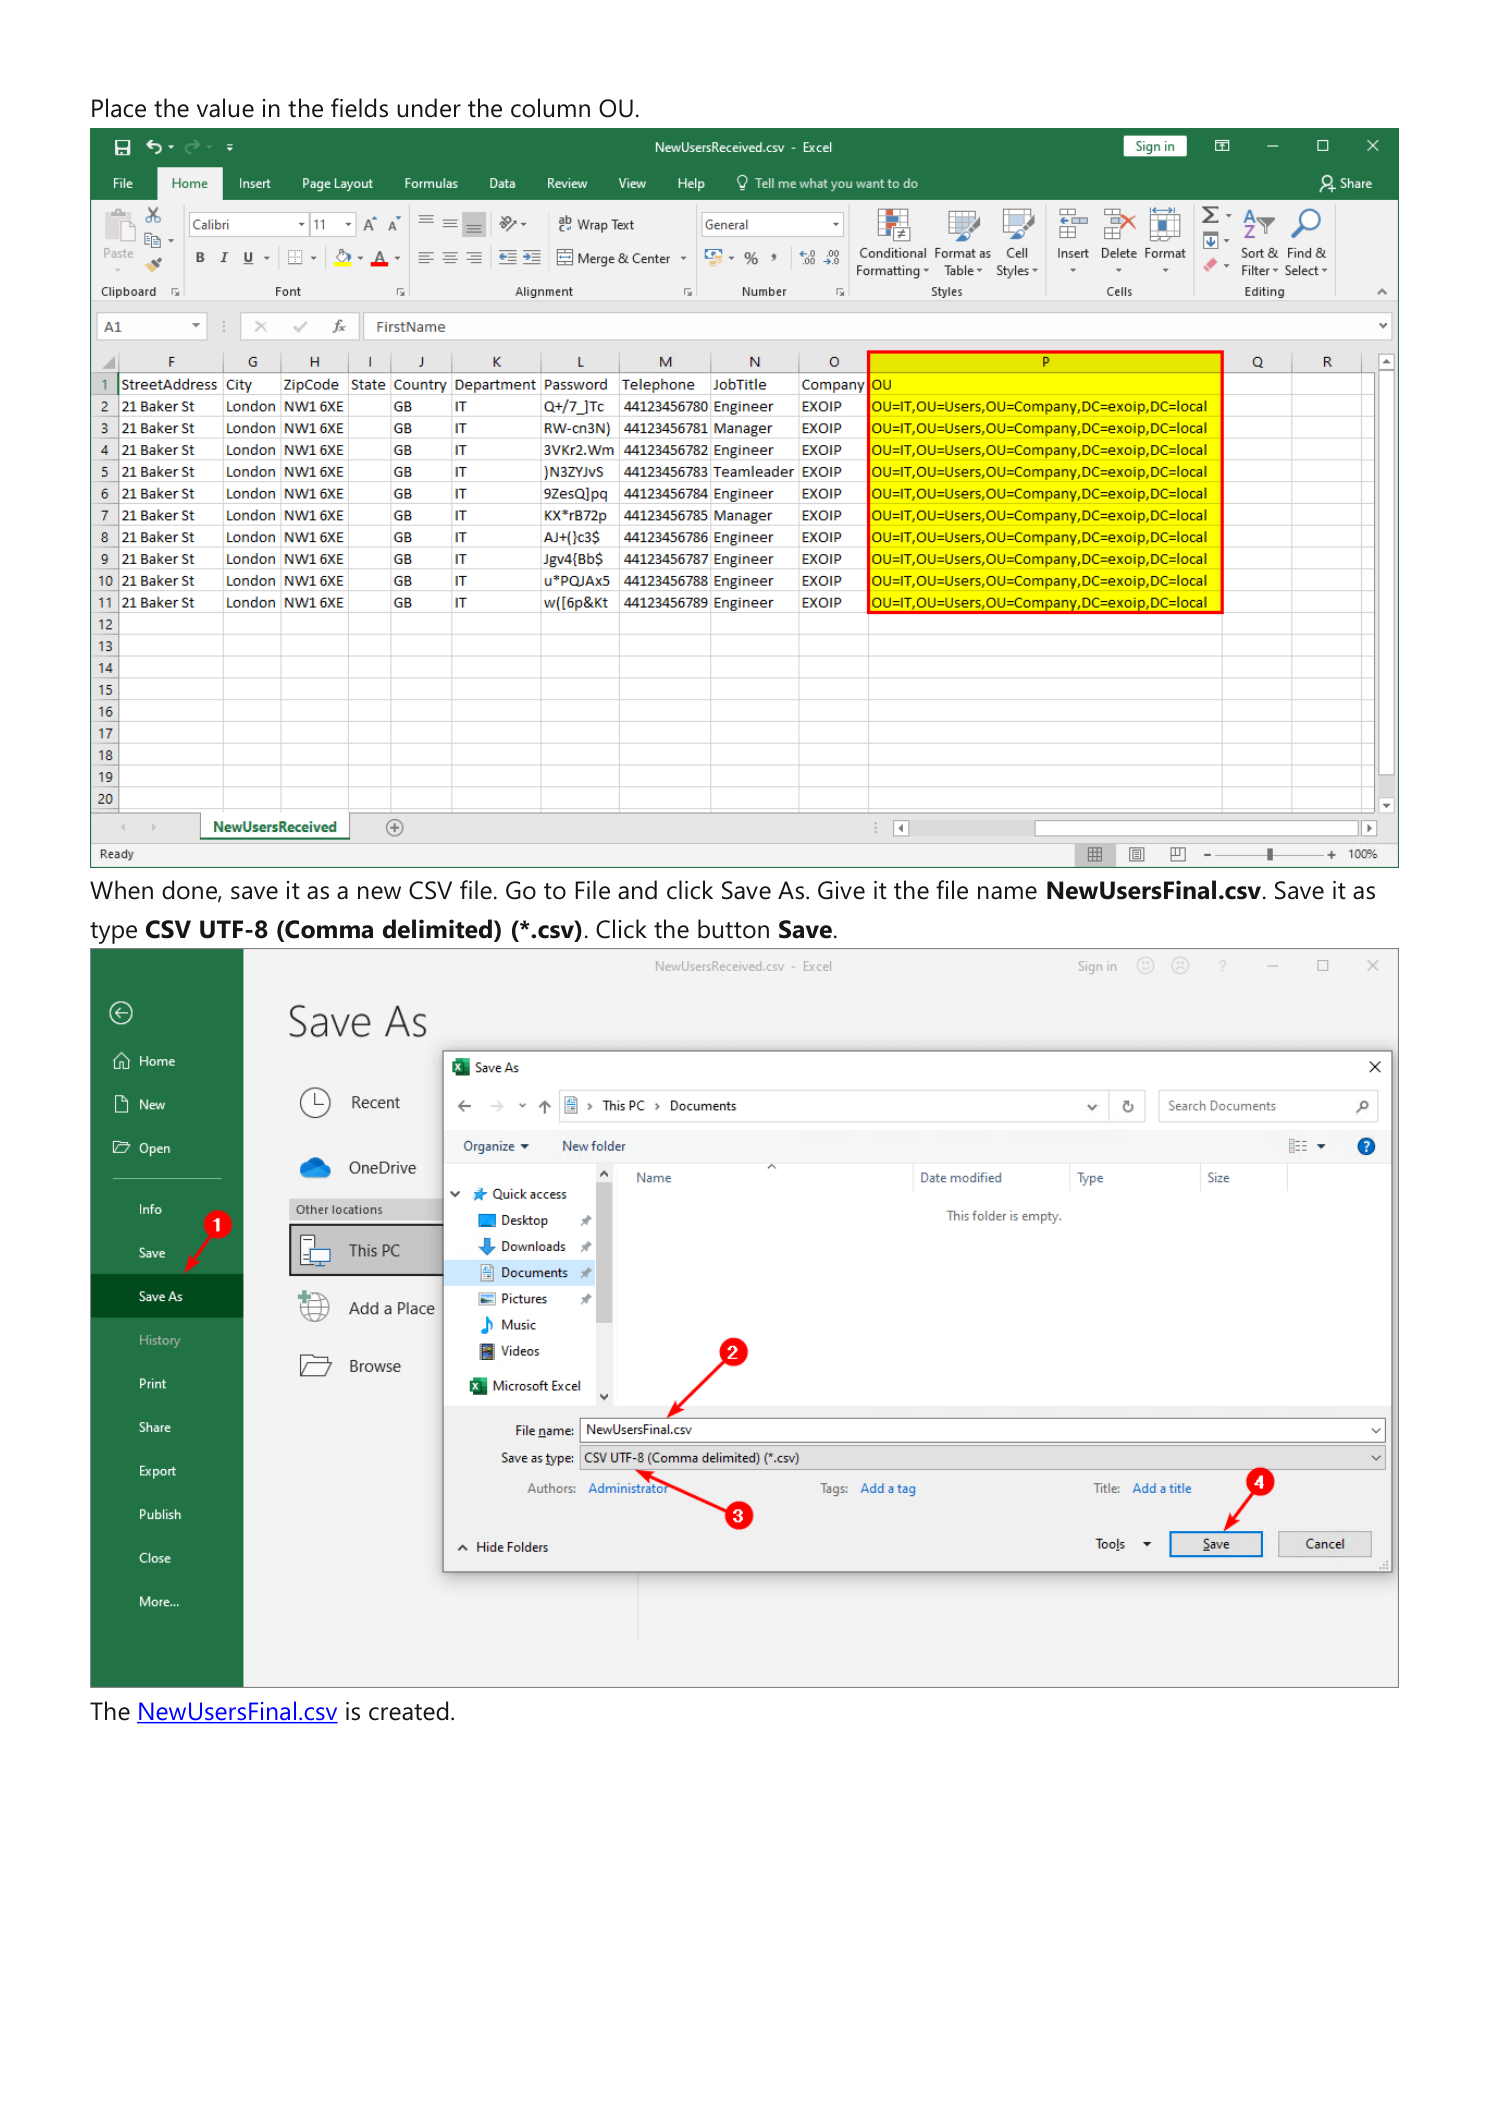
Paste the copied distinguishedName into the OU column for every row in the CSV. If different users go to different OUs (for example, sales hires into OU=Sales and IT hires into OU=IT), put each row’s correct OU in its own cell.
Save the Final CSV
Once both the Password and OU columns are filled in, save the workbook as NewUsersFinal.csv. Use File > Save As, name it NewUsersFinal, and choose CSV UTF-8 (Comma delimited) (*.csv) as the type. UTF-8 matters — without it, accented characters in names (e.g. José, Müller) round-trip as question marks.
Copy NewUsersFinal.csv to C:\Temp\ on the Domain Controller (or whichever management server has the AD PowerShell module installed and a network path to a DC).
Step 4 — Sanity-Check the CSV in PowerShell
Before running the import script, prove the CSV parses correctly. Open an elevated PowerShell window and run:
Import-Csv "C:\Temp\NewUsersFinal.csv" -Delimiter ";" | Format-TableComma vs Semicolon Delimiter
Excel on a system with European locale settings often saves CSVs with a semicolon separator instead of a comma, even when you choose “CSV (Comma delimited).” If Format-Table shows every row in a single column, the file is using a different delimiter than your -Delimiter argument expects. Try the other separator:
# If the file uses commas
Import-Csv "C:\Temp\NewUsersFinal.csv" | Format-Table

# If the file uses semicolons
Import-Csv "C:\Temp\NewUsersFinal.csv" -Delimiter ";" | Format-Table
Whichever one returns a clean table is the one the script needs to use as well. Note the choice now — you will set it in the script in the next step.
A correct table looks like this:
FirstName Initials Lastname Username   Email                  StreetAddress City   ZipCode State Country
--------- -------- -------- --------   -----                  ------------- ----   ------- ----- -------
Max       MF       Fraser   Max.Fraser Max.Fraser@infotechninja.com   21 Baker St   London NW1 6XE       GB
Piers     PB       Bower    Piers.Bower Piers.Bower@infotechninja.com 21 Baker St   London NW1 6XE       GB
...
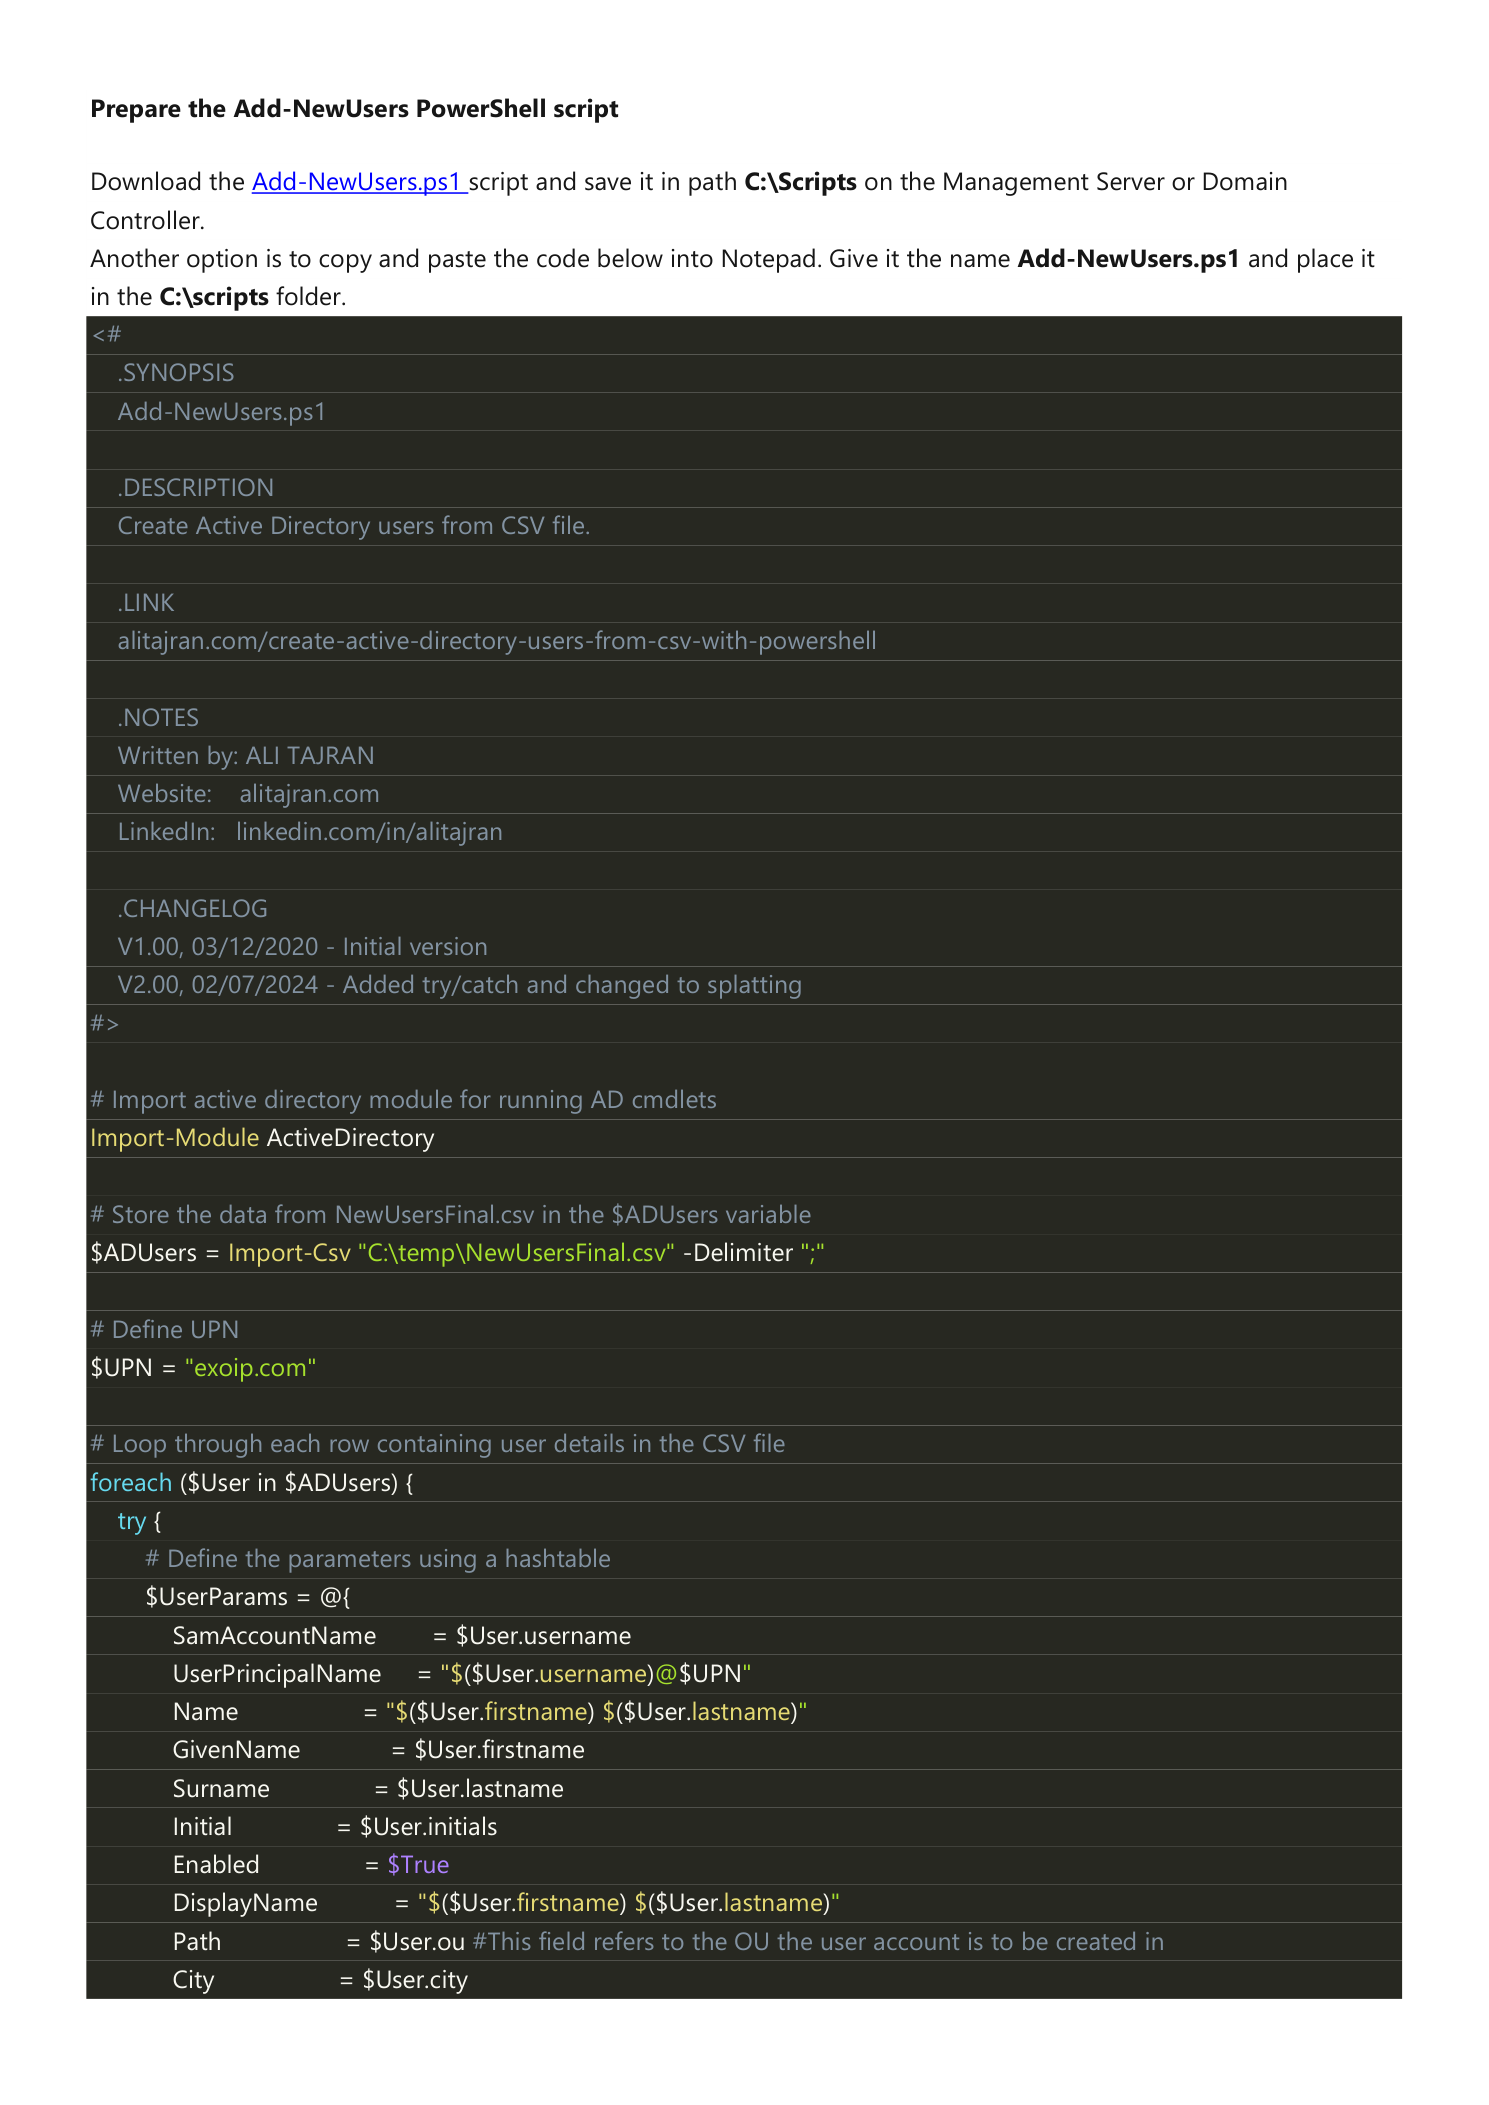
Step 5 — The Add-NewUsers.ps1 Script
The script reads the CSV row-by-row and creates an AD user from each row. It uses PowerShell splatting (a hashtable named @UserParams) so the long list of New-ADUser parameters stays readable, a duplicate check with Get-ADUser -Filter so a re-run does not error on accounts that already exist, and a try/catch wrapper so a single bad row does not abort the whole import.
<#
.SYNOPSIS
  Add-NewUsers.ps1
.DESCRIPTION
  Create Active Directory users from CSV file.
#>

# Import the AD module so New-ADUser is available
Import-Module ActiveDirectory

# Read the CSV (adjust -Delimiter to match your file)
$ADUsers = Import-Csv "C:\Temp\NewUsersFinal.csv" -Delimiter ";"

# UPN suffix that gets appended to every Username
$UPN = "infotechninja.com"

foreach ($User in $ADUsers) {
    try {
        $UserParams = @{
            SamAccountName        = $User.username
            UserPrincipalName     = "$($User.username)@$UPN"
            Name                  = "$($User.firstname) $($User.lastname)"
            GivenName             = $User.firstname
            Surname               = $User.lastname
            Initial               = $User.initials
            Enabled               = $True
            DisplayName           = "$($User.firstname) $($User.lastname)"
            Path                  = $User.ou
            City                  = $User.city
            PostalCode            = $User.zipcode
            Country               = $User.country
            Company               = $User.company
            State                 = $User.state
            StreetAddress         = $User.streetaddress
            OfficePhone           = $User.telephone
            EmailAddress          = $User.email
            Title                 = $User.jobtitle
            Department            = $User.department
            AccountPassword       = (ConvertTo-SecureString $User.password -AsPlainText -Force)
            ChangePasswordAtLogon = $True
        }

        if (Get-ADUser -Filter "SamAccountName -eq '$($User.username)'") {
            Write-Host "A user with username $($User.username) already exists in Active Directory." -ForegroundColor Yellow
        }
        else {
            New-ADUser @UserParams
            Write-Host "The user $($User.username) is created." -ForegroundColor Green
        }
    }
    catch {
        Write-Host "Failed to create user $($User.username) - $_" -ForegroundColor Red
    }
}
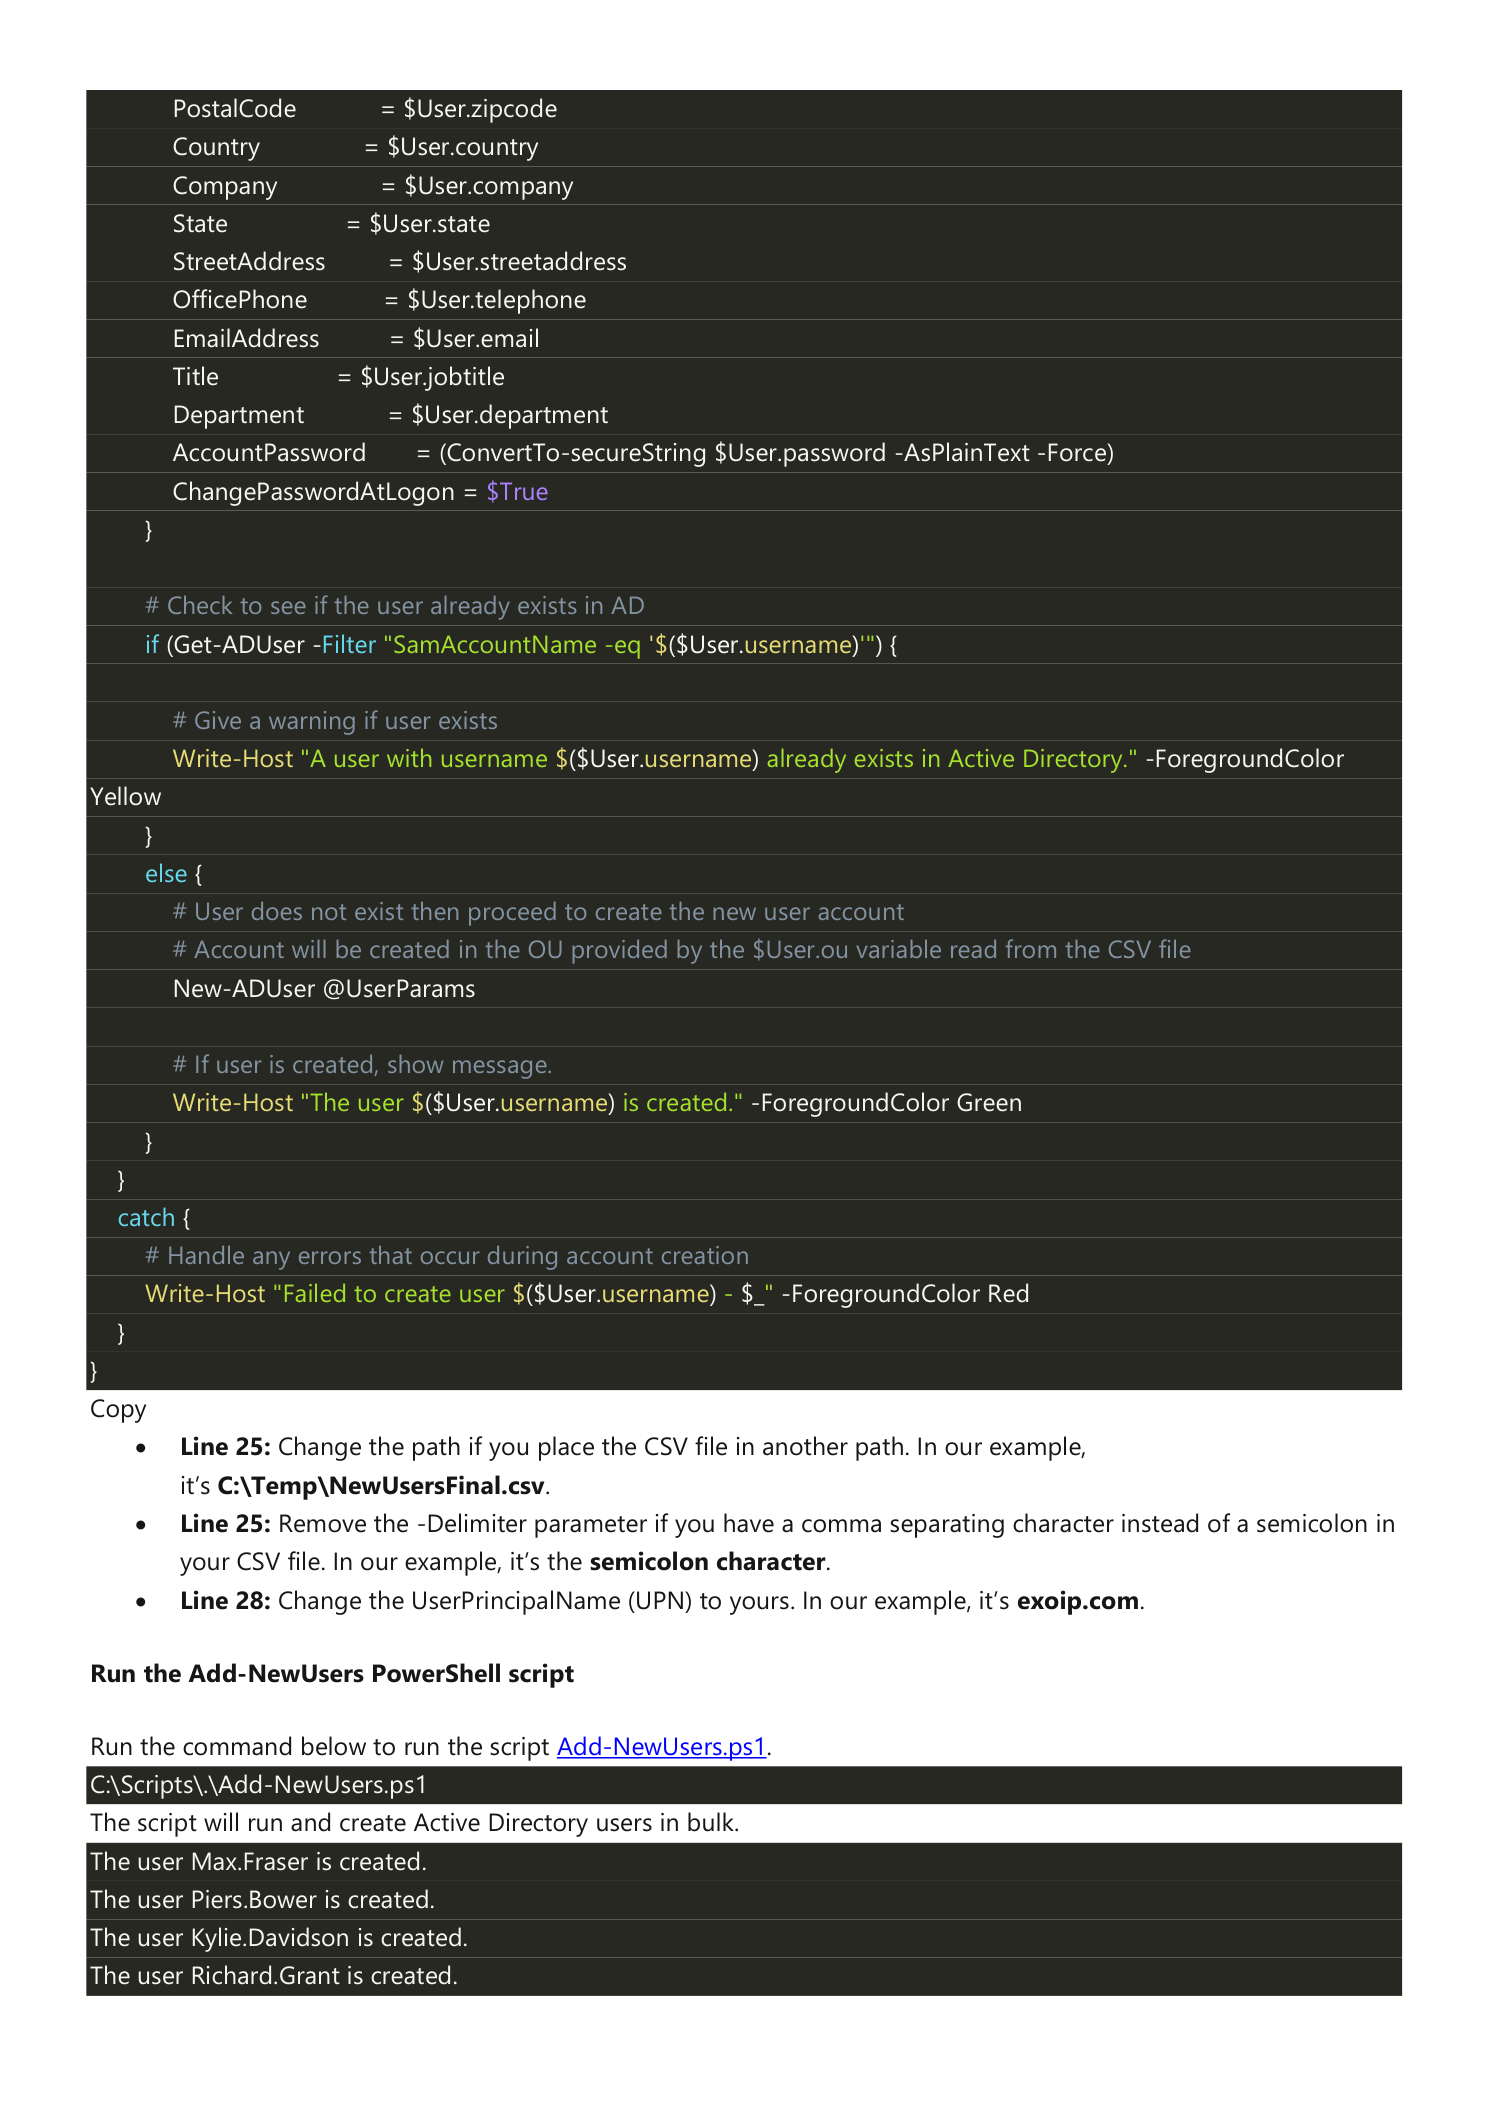
Three Lines You Must Adapt
Import-Csv "C:\Temp\NewUsersFinal.csv"— change the path if the CSV lives somewhere else on your management server.-Delimiter ";"— remove this argument if your CSV uses commas (the default), or keep it if Excel saved it with semicolons.$UPN = "infotechninja.com"— change to your domain’s UPN suffix. This is what gets appended tousernameto formusername@yourdomain.com.
Step 6 — Run the Script and Verify
Save the script to C:\Scripts\Add-NewUsers.ps1 on the Domain Controller or management server, open PowerShell as administrator, and run it:
C:\Scripts\.\Add-NewUsers.ps1For a clean import, every row produces a green confirmation:
The user Max.Fraser is created.
The user Piers.Bower is created.
The user Kylie.Davidson is created.
The user Richard.Grant is created.
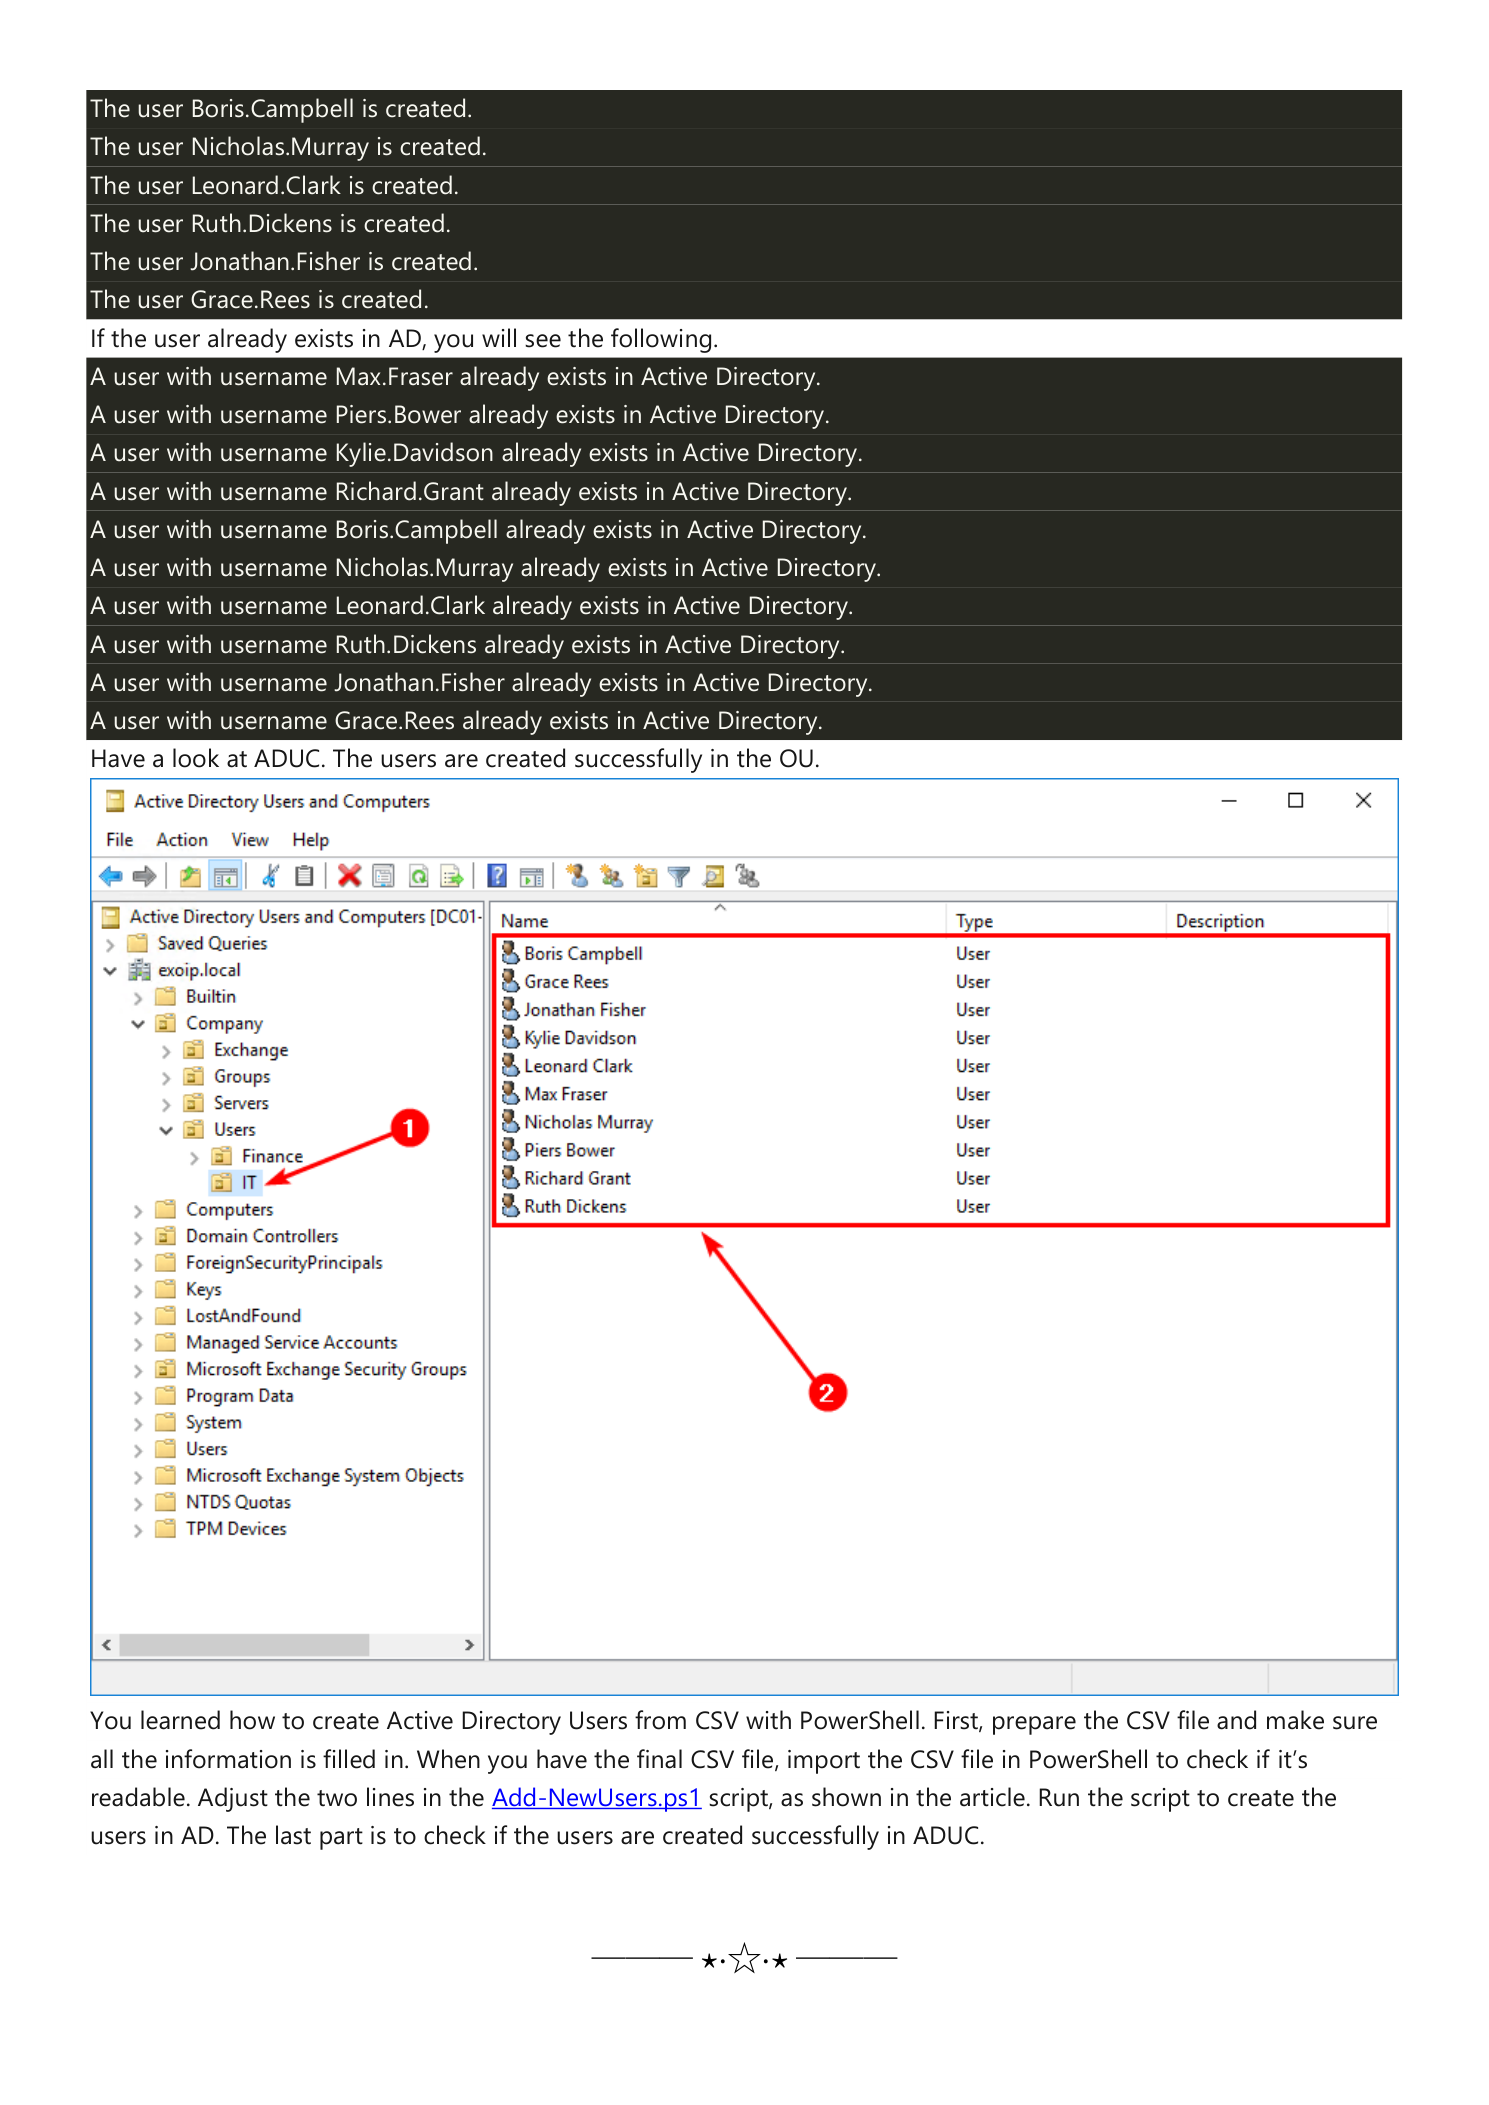
...If you re-run the script (or accidentally hand it the same CSV twice), the duplicate check kicks in and you get yellow warnings instead of errors:
A user with username Max.Fraser already exists in Active Directory.
A user with username Piers.Bower already exists in Active Directory.
...
If a row has a bad value (for example, a malformed OU, a UPN collision, or a password that fails policy), the try/catch traps it and prints a red line for that user only:
Failed to create user Bad.User - The password does not meet the length, complexity, or history requirements of the domain.The rest of the import continues normally. This is by design — you almost never want a 999-row CSV to halt because row 47 had a typo.
Open Active Directory Users and Computers and browse to the target OU. The new accounts should be visible there with the data you imported — first/last name, email, department, etc. Right-click any account and choose Properties > Account to confirm the User logon name (UPN), and Account > User must change password at next logon should be ticked.
Operational Notes
- Pre-flight in a lab. The first time you run this against a CSV in production, do a dry run in a test domain or against a single row first. CSV columns and OU paths are easy to mis-spell, and a clean test eliminates 99% of import failures before they happen.
- Hand passwords over securely. Even though every account requires a change at first logon, the initial password is still a sensitive value. Use a password manager that supports per-recipient sharing (1Password, Bitwarden), not email or Slack.
- License and group memberships. The script creates the AD object only. Microsoft 365 license assignment, security-group membership, distribution-list membership, and home-folder creation are usually separate follow-up steps. Add them to the script (or a companion script that runs after this one) once the basic import is reliable.
- UPN must match a verified domain. If you use Microsoft Entra Connect to sync to Microsoft 365, make sure the UPN suffix you assign here is in your list of verified domains in Entra. Otherwise the user will sync but cannot sign in to cloud services.
- Audit log. Every
New-ADUsercreation is logged on the DC under the Directory Service event log; for a real audit trail consider addingStart-Transcript/Stop-Transcriptaround the script so you have a written record of which CSV row mapped to which AD object on which date.
Conclusion
You learned how to bulk-create Active Directory users from a CSV with PowerShell. The complete recipe is:
- Design a CSV template with all the AD attributes you want populated.
- Hand it to the data owner (HR, hiring manager) with explicit instructions to leave Password and OU empty.
- Generate strong passwords centrally in IT and paste them into the Password column.
- Find the target OU’s distinguishedName via Advanced Features > Properties > Attribute Editor and paste it into the OU column.
- Save as
NewUsersFinal.csvwith UTF-8 encoding. - Sanity-check the CSV with
Import-Csv | Format-Tablein PowerShell. - Run
Add-NewUsers.ps1on a DC or management server. - Verify the new accounts in ADUC.
Sixteen hours of clicking turns into about thirty seconds of script time, and the audit trail is a CSV in version control instead of a chain of help-desk tickets.