Introduction
Running a Windows domain on a single Domain Controller is one of the most common — and most dangerous — mistakes in small-business IT. The moment that one DC goes offline, no user can authenticate, no domain-joined service can sign in, and no Group Policy applies. Microsoft’s own best-practice guidance is unambiguous: every domain should have at least two writable Domain Controllers for fault tolerance and high availability.
In this guide you will add a second Domain Controller (DC02-2019) to an existing domain (infotechninja.local) where DC01-2019 is already the only DC. You will install the AD DS role, promote the new server, replicate the directory from DC01-2019, then verify the new DC is healthy and replication is flowing both ways.
Domain Controllers — Best Practice
- At least two writable DCs per domain. A single-DC domain is a single point of failure for authentication, DNS, Group Policy, and every domain-joined service. If the DC fails, you also lose the ability to perform AD DS management tasks until it is recovered.
- Dedicate Domain Controllers to AD DS and DNS. Do not co-host file shares, web apps, line-of-business applications, or Hyper-V roles on a DC. The server’s full attention should be on authenticating users and computers and serving the directory.
- Run DCs on separate hosts. If both DCs live on the same hypervisor or the same physical server, you have two DCs but only one fault domain. Split them across hardware (and ideally across sites).
- Cross-configure DNS. Each DC should point at the other DC as its preferred DNS server, with
127.0.0.1(loopback) as the alternate — never let a DC resolve only against itself.
Prerequisites
- An existing Windows domain with at least one healthy Domain Controller (in this guide: DC01-2019 at 192.168.1.51 running infotechninja.local)
- A second Windows Server (2016, 2019, 2022, or 2025) — clean install, fully patched, with a meaningful hostname and a static IPv4 address on the same network
- The new server joined to the existing domain as a member server before you start
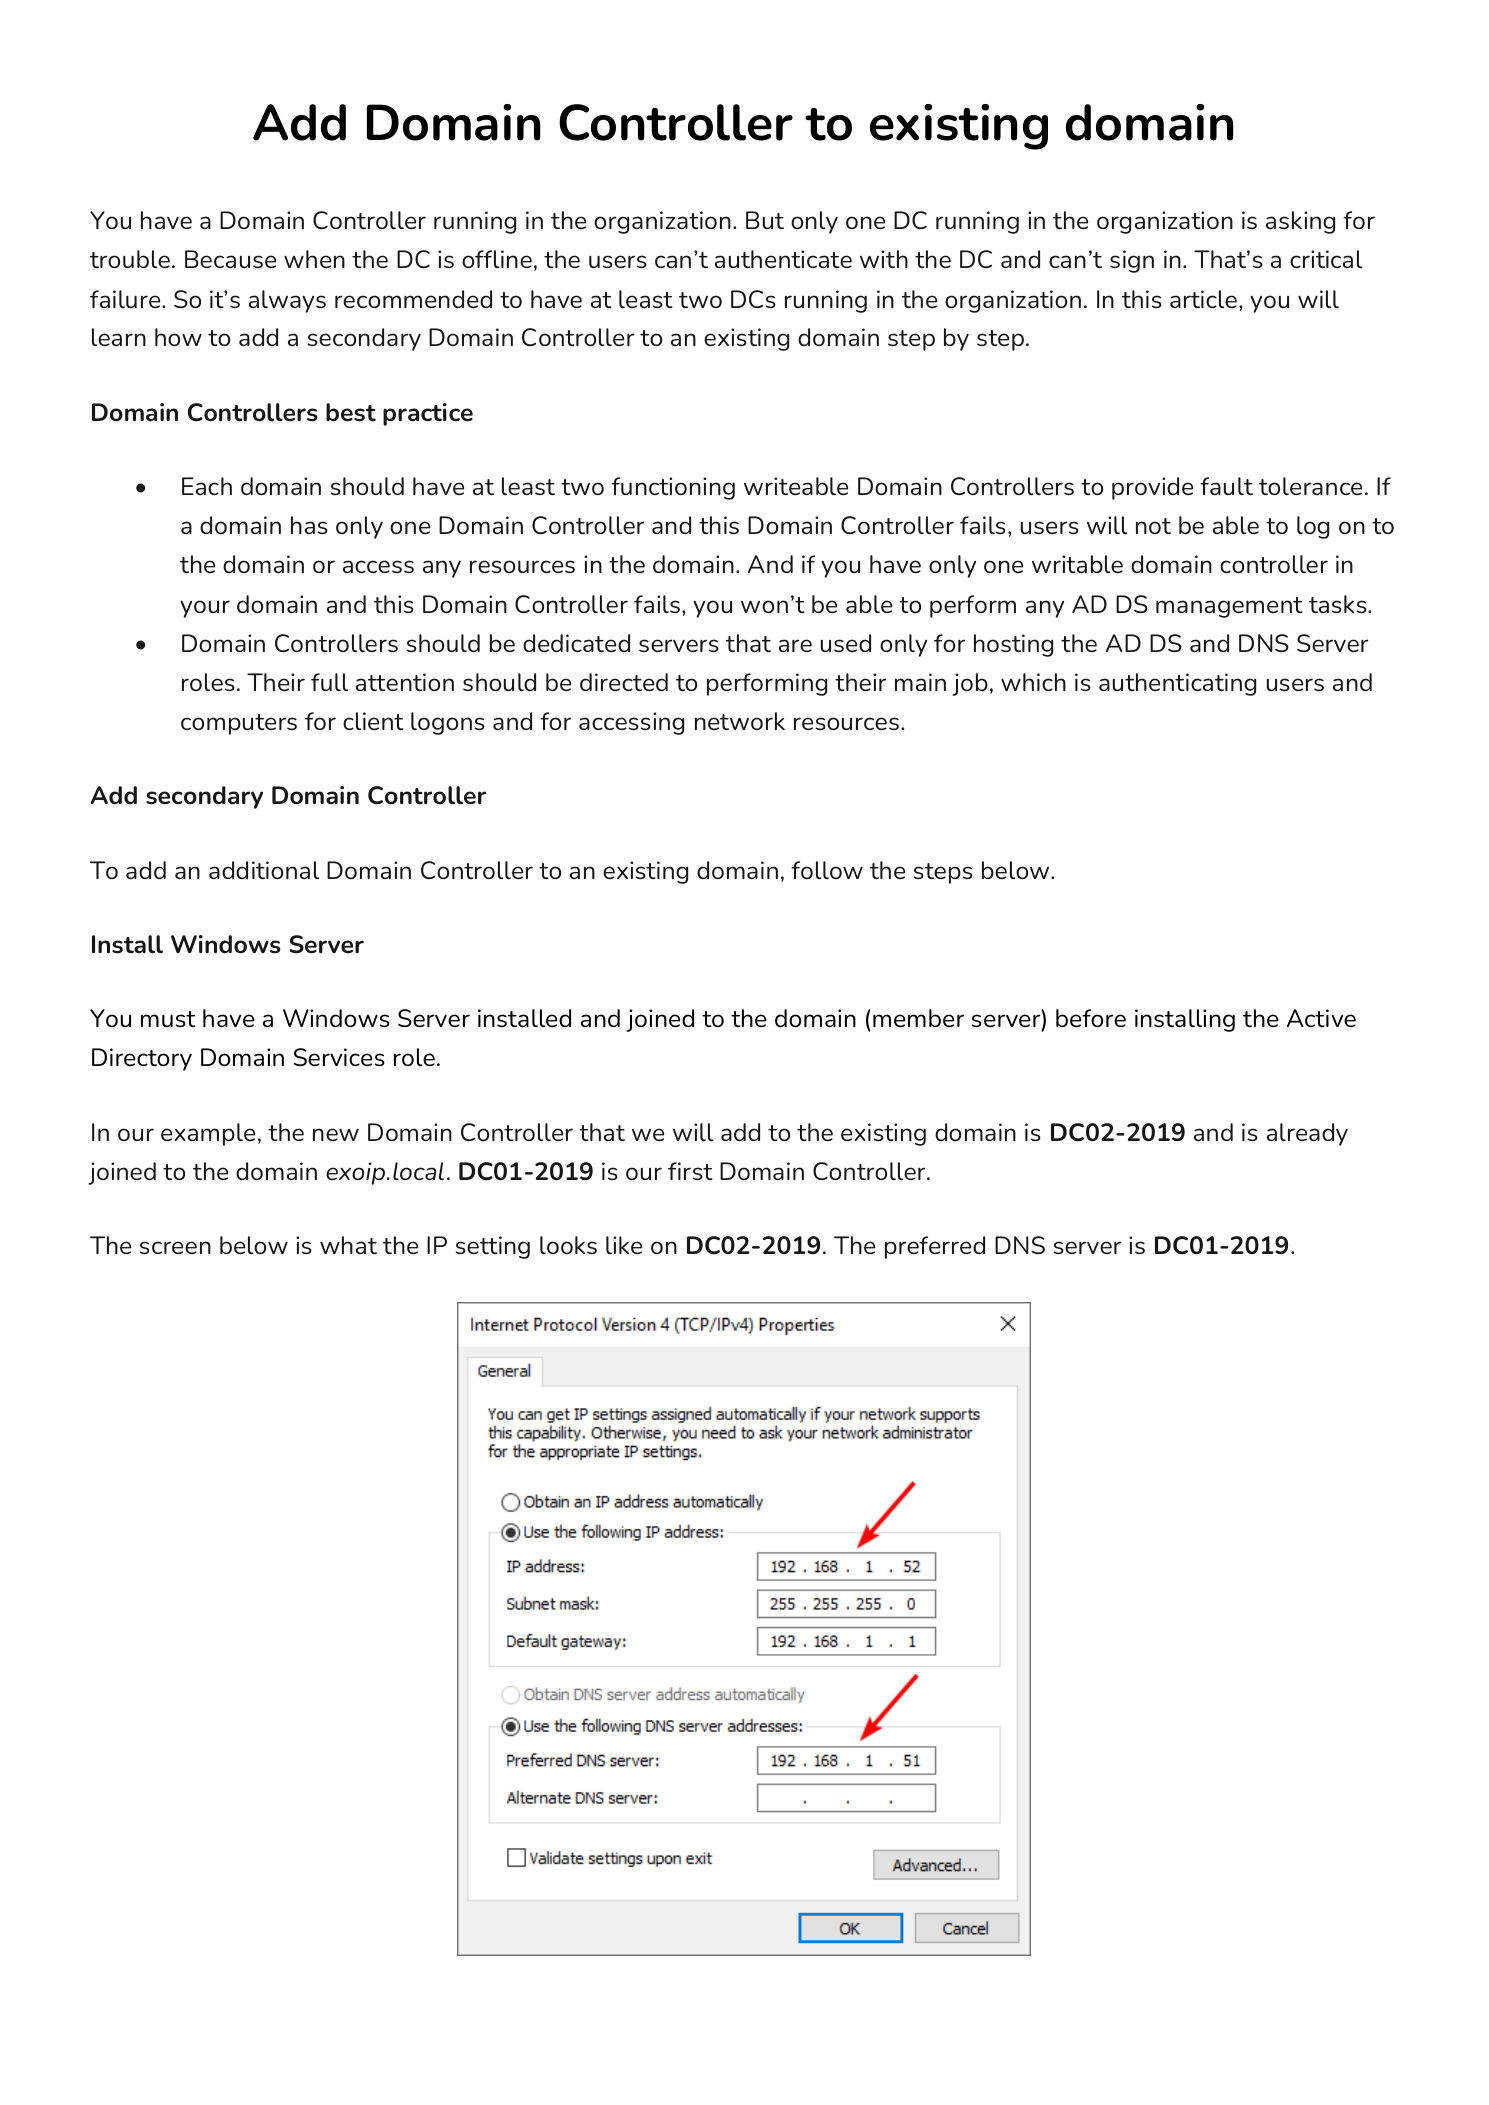
- The new server’s Preferred DNS server pointed at the existing DC (in this example 192.168.1.51) — without this, the AD DS Configuration Wizard cannot locate the domain
- Domain Administrator credentials for the existing domain — required by the promotion wizard
- A planned DSRM password for the new DC (separate from any domain account, used only for offline directory recovery)
This guide assumes you already have Windows Server installed on DC02-2019 and joined to the domain. If you need a refresher, see our walkthroughs for installing Windows Server on a virtual machine and installing Active Directory Domain Services in a new forest before continuing here.
Part 1 — Install the AD DS Role on the New Server
The first phase is identical to a fresh forest install — you add the AD DS role binaries through Server Manager, with one difference: when promotion runs later, you will join the existing forest instead of creating a new one.
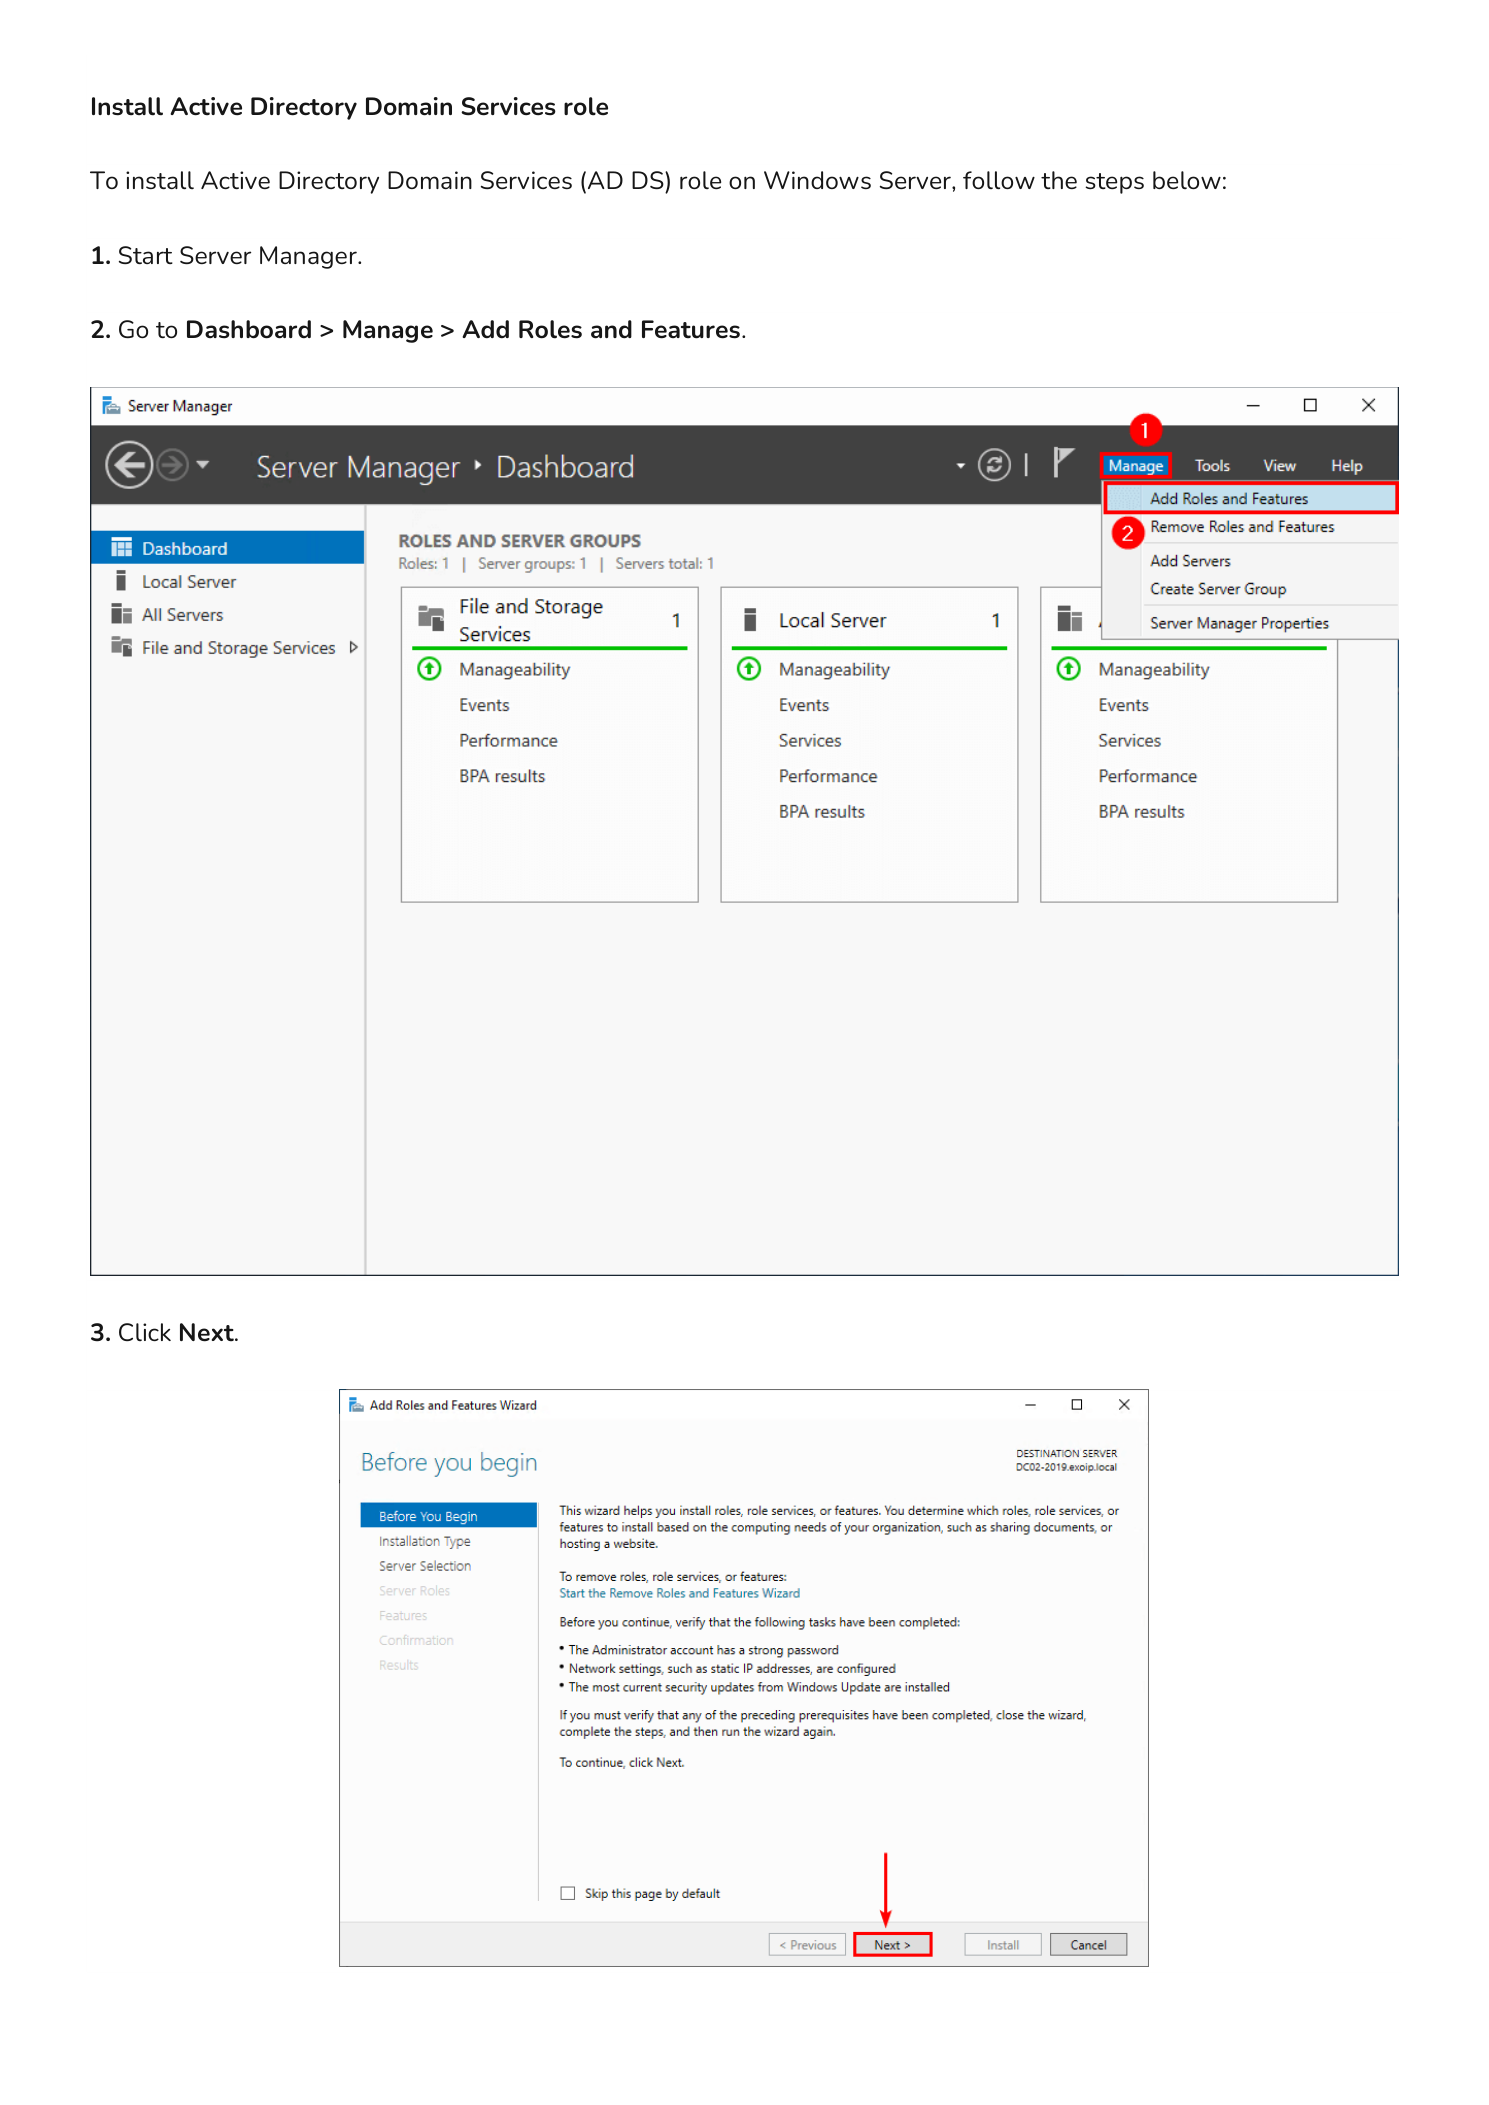
Step 1 — Launch Add Roles and Features
Sign in to DC02-2019 as a local administrator. Open Server Manager and from the Dashboard click Manage in the top-right, then choose Add Roles and Features. Click Next on the Before You Begin overview.
Step 2 — Choose Role-based Installation and the Target Server
On the Installation Type page leave the default Role-based or feature-based installation selected and click Next. On the Server Selection page, choose Select a server from the server pool and pick DC02-2019 (192.168.1.52). Click Next.

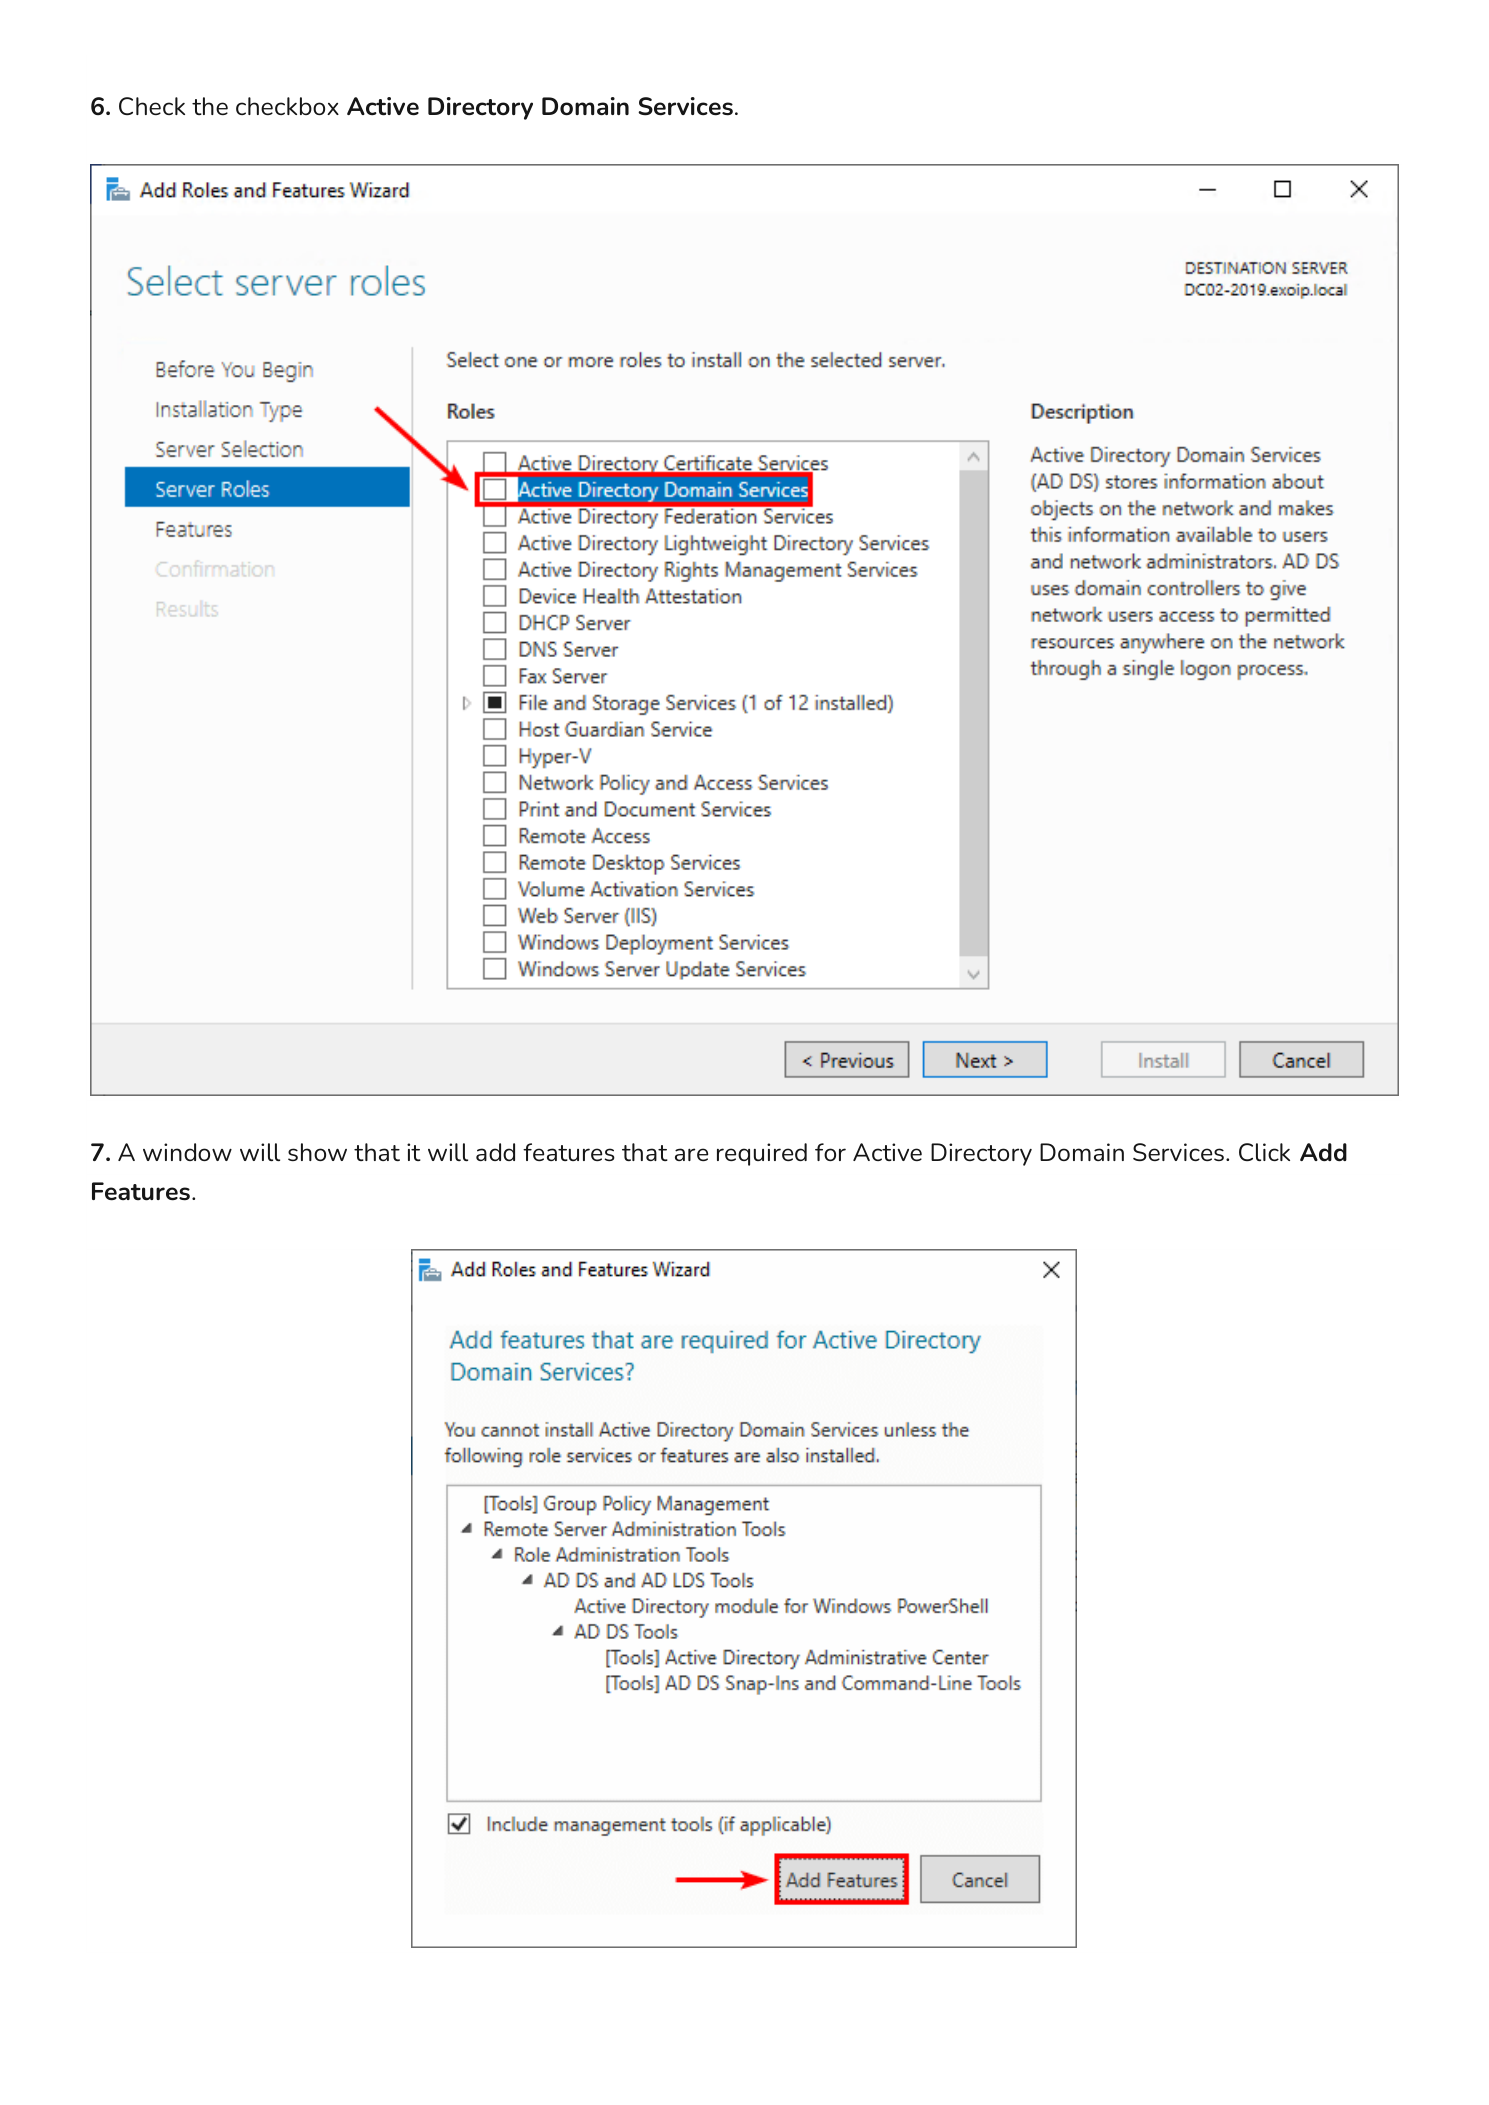
Step 3 — Add the AD DS Role and Its Management Tools
On the Server Roles page, scroll the list and check Active Directory Domain Services. The instant you check the box, a pop-up appears asking you to add the required management features (AD DS snap-ins, AD DS module for PowerShell, Group Policy Management). Click Add Features.
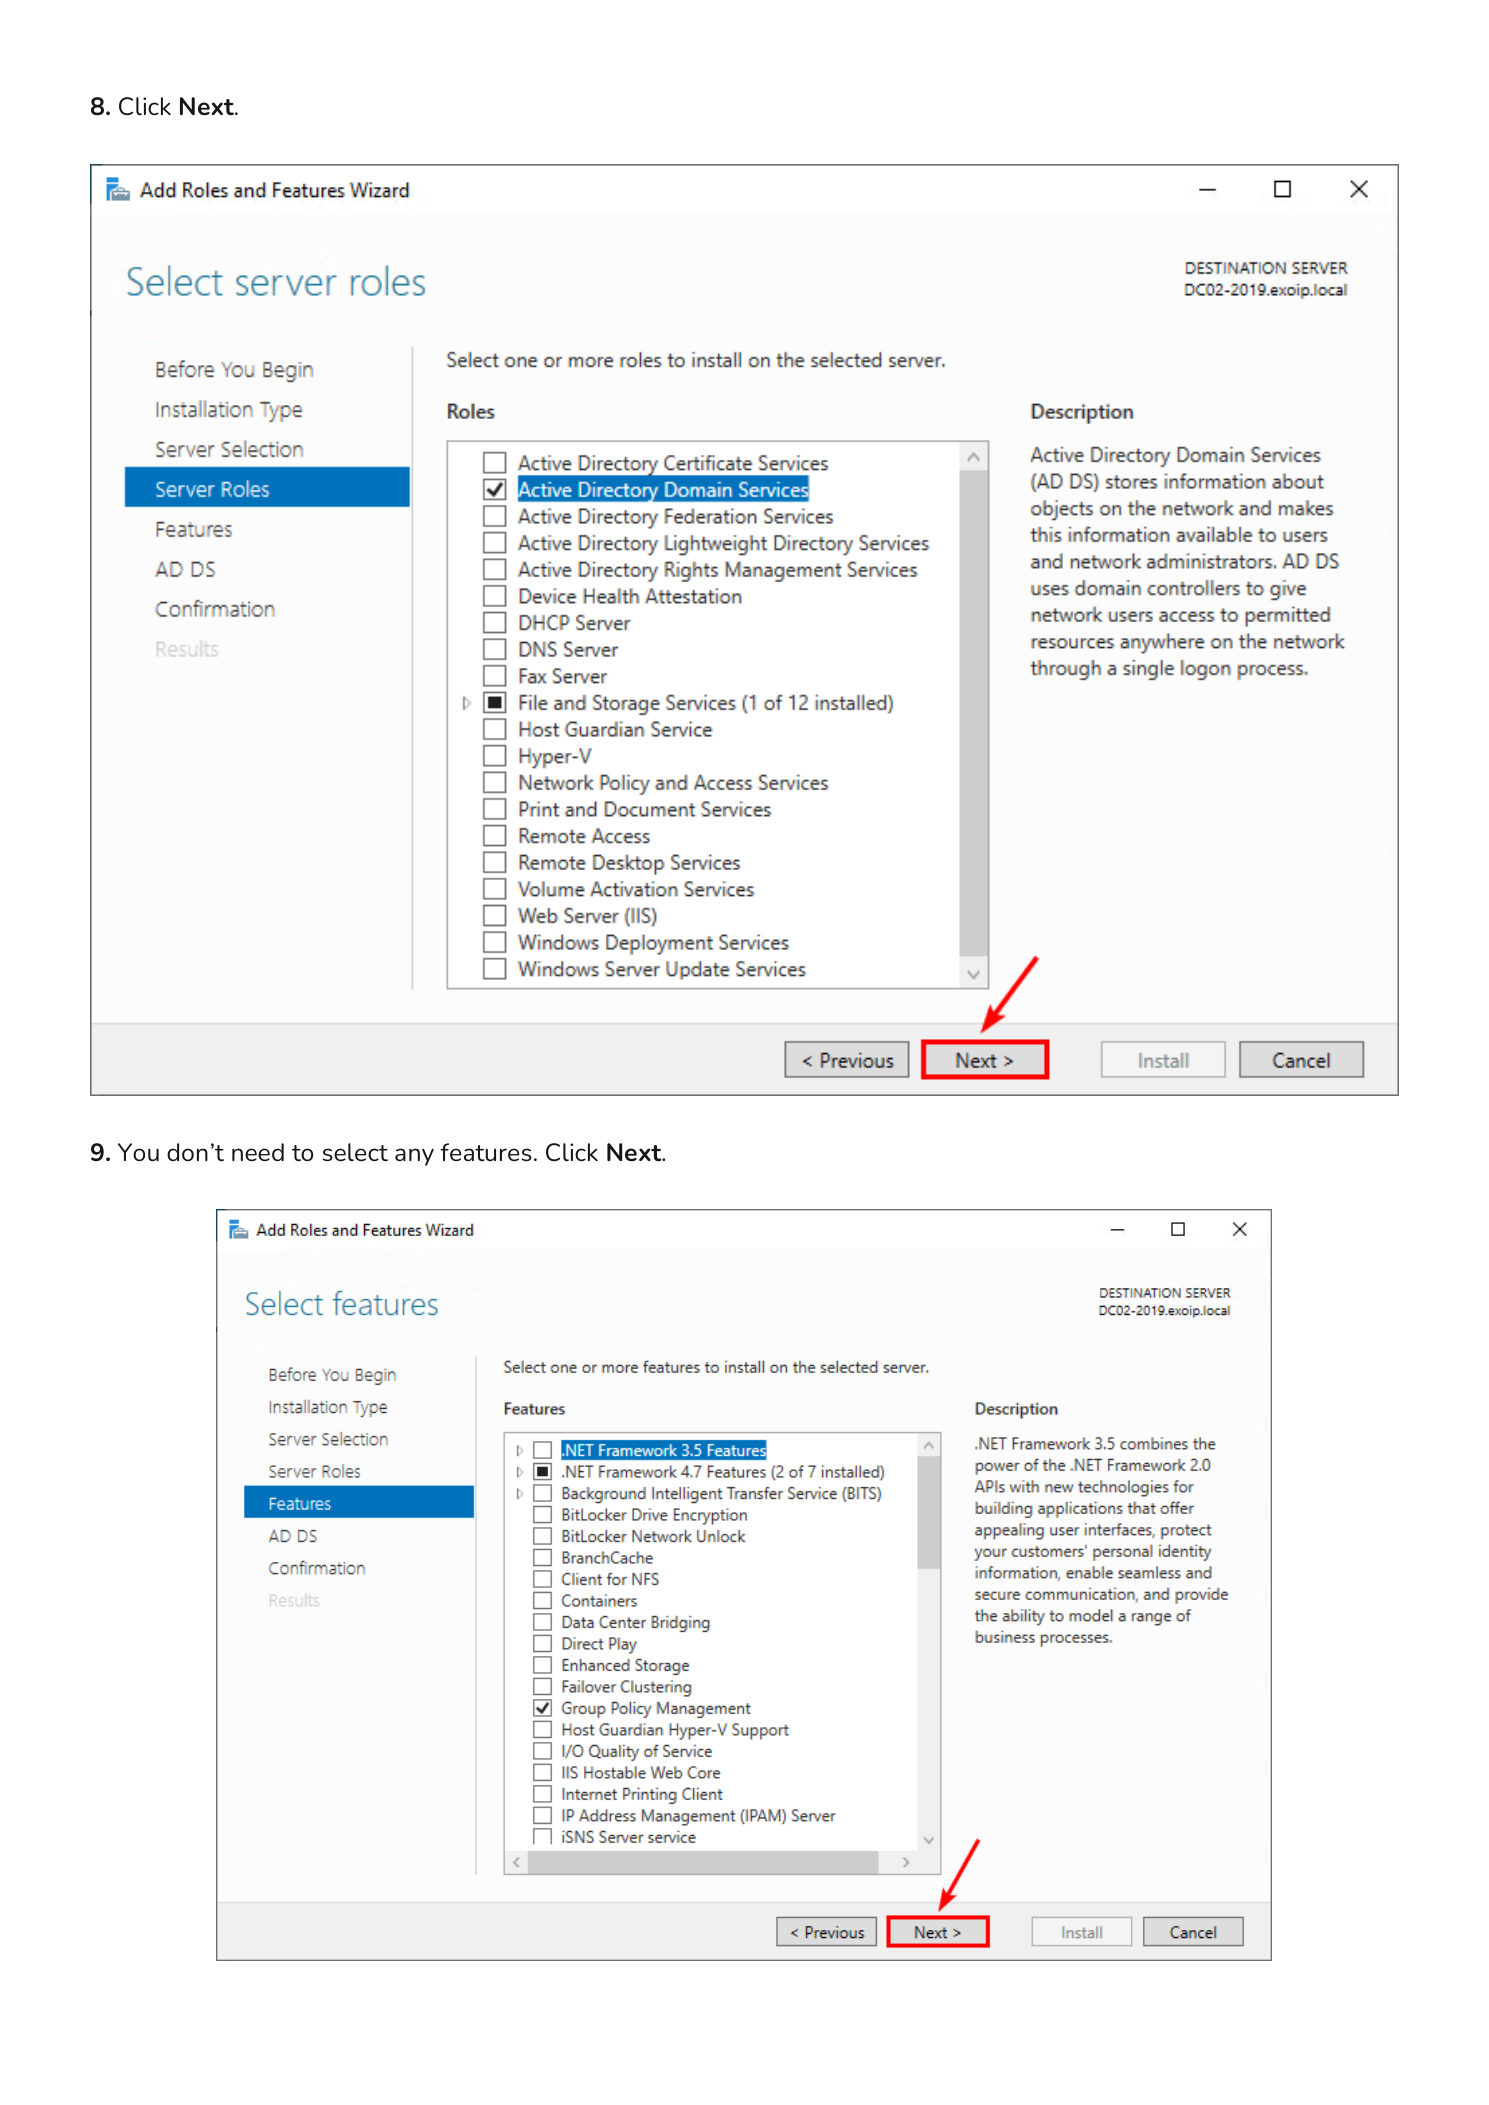
Step 4 — Skip Optional Features and the AD DS Overview
Back on the Server Roles page, click Next. On the Features page you do not need to select anything additional — the dependencies were pulled in by the previous Add Features dialog. Click Next.
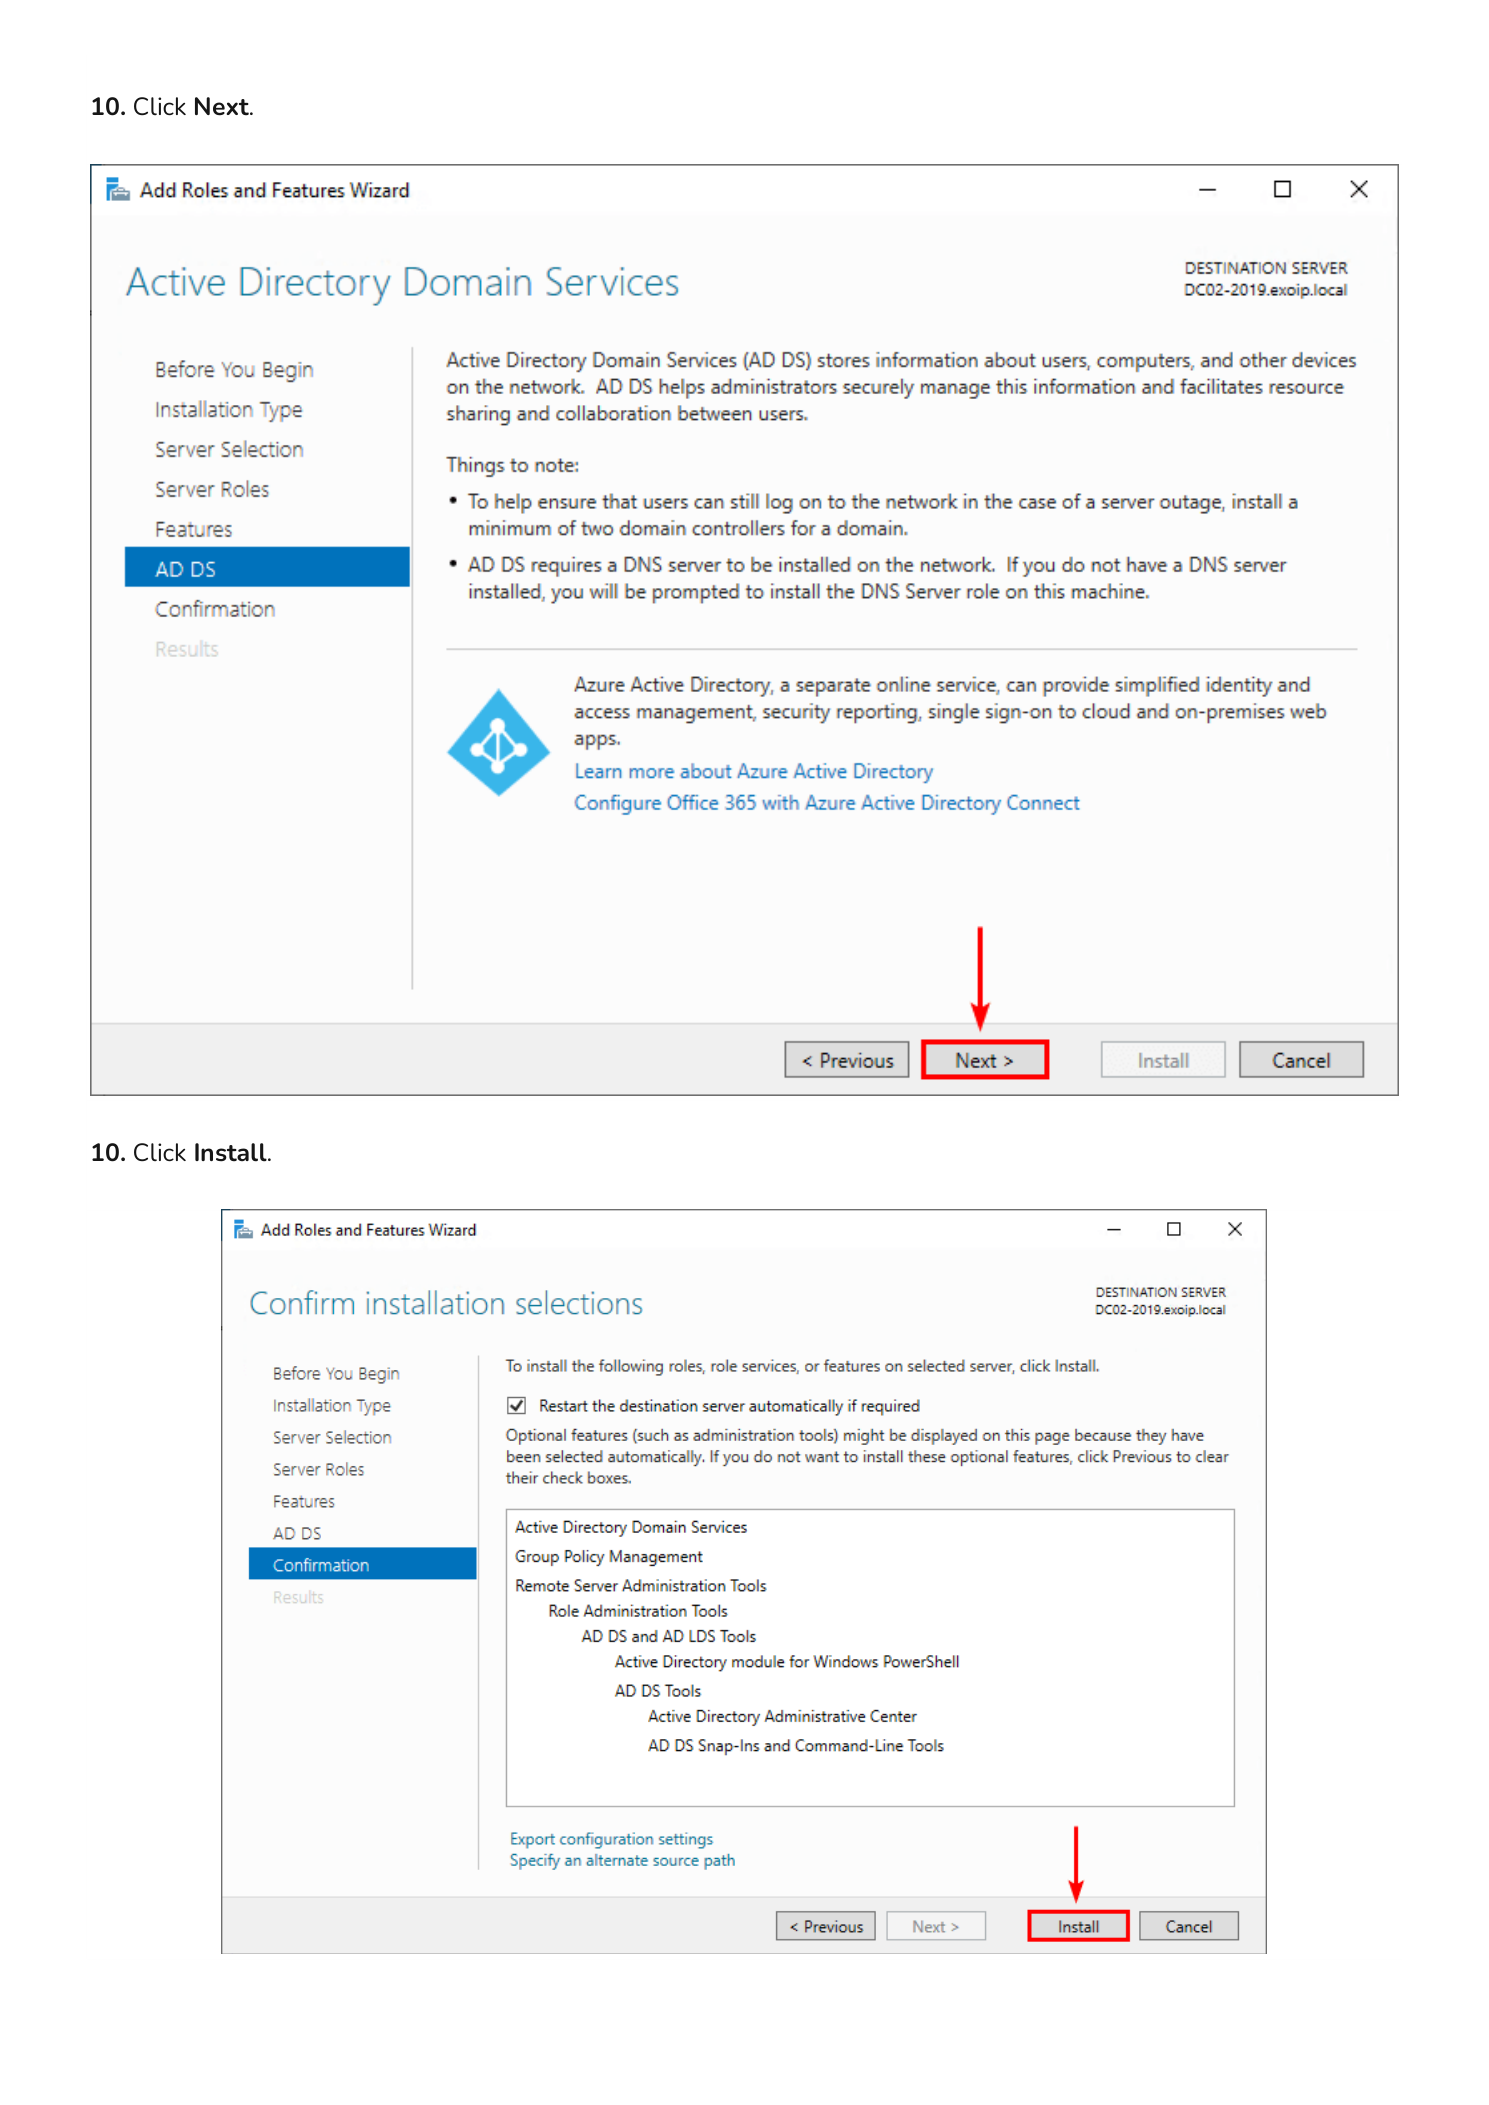
Step 5 — Confirm and Install
The next page is an informational AD DS overview describing what the role provides; click Next. The Confirmation page summarizes what is about to be installed. Click Install.
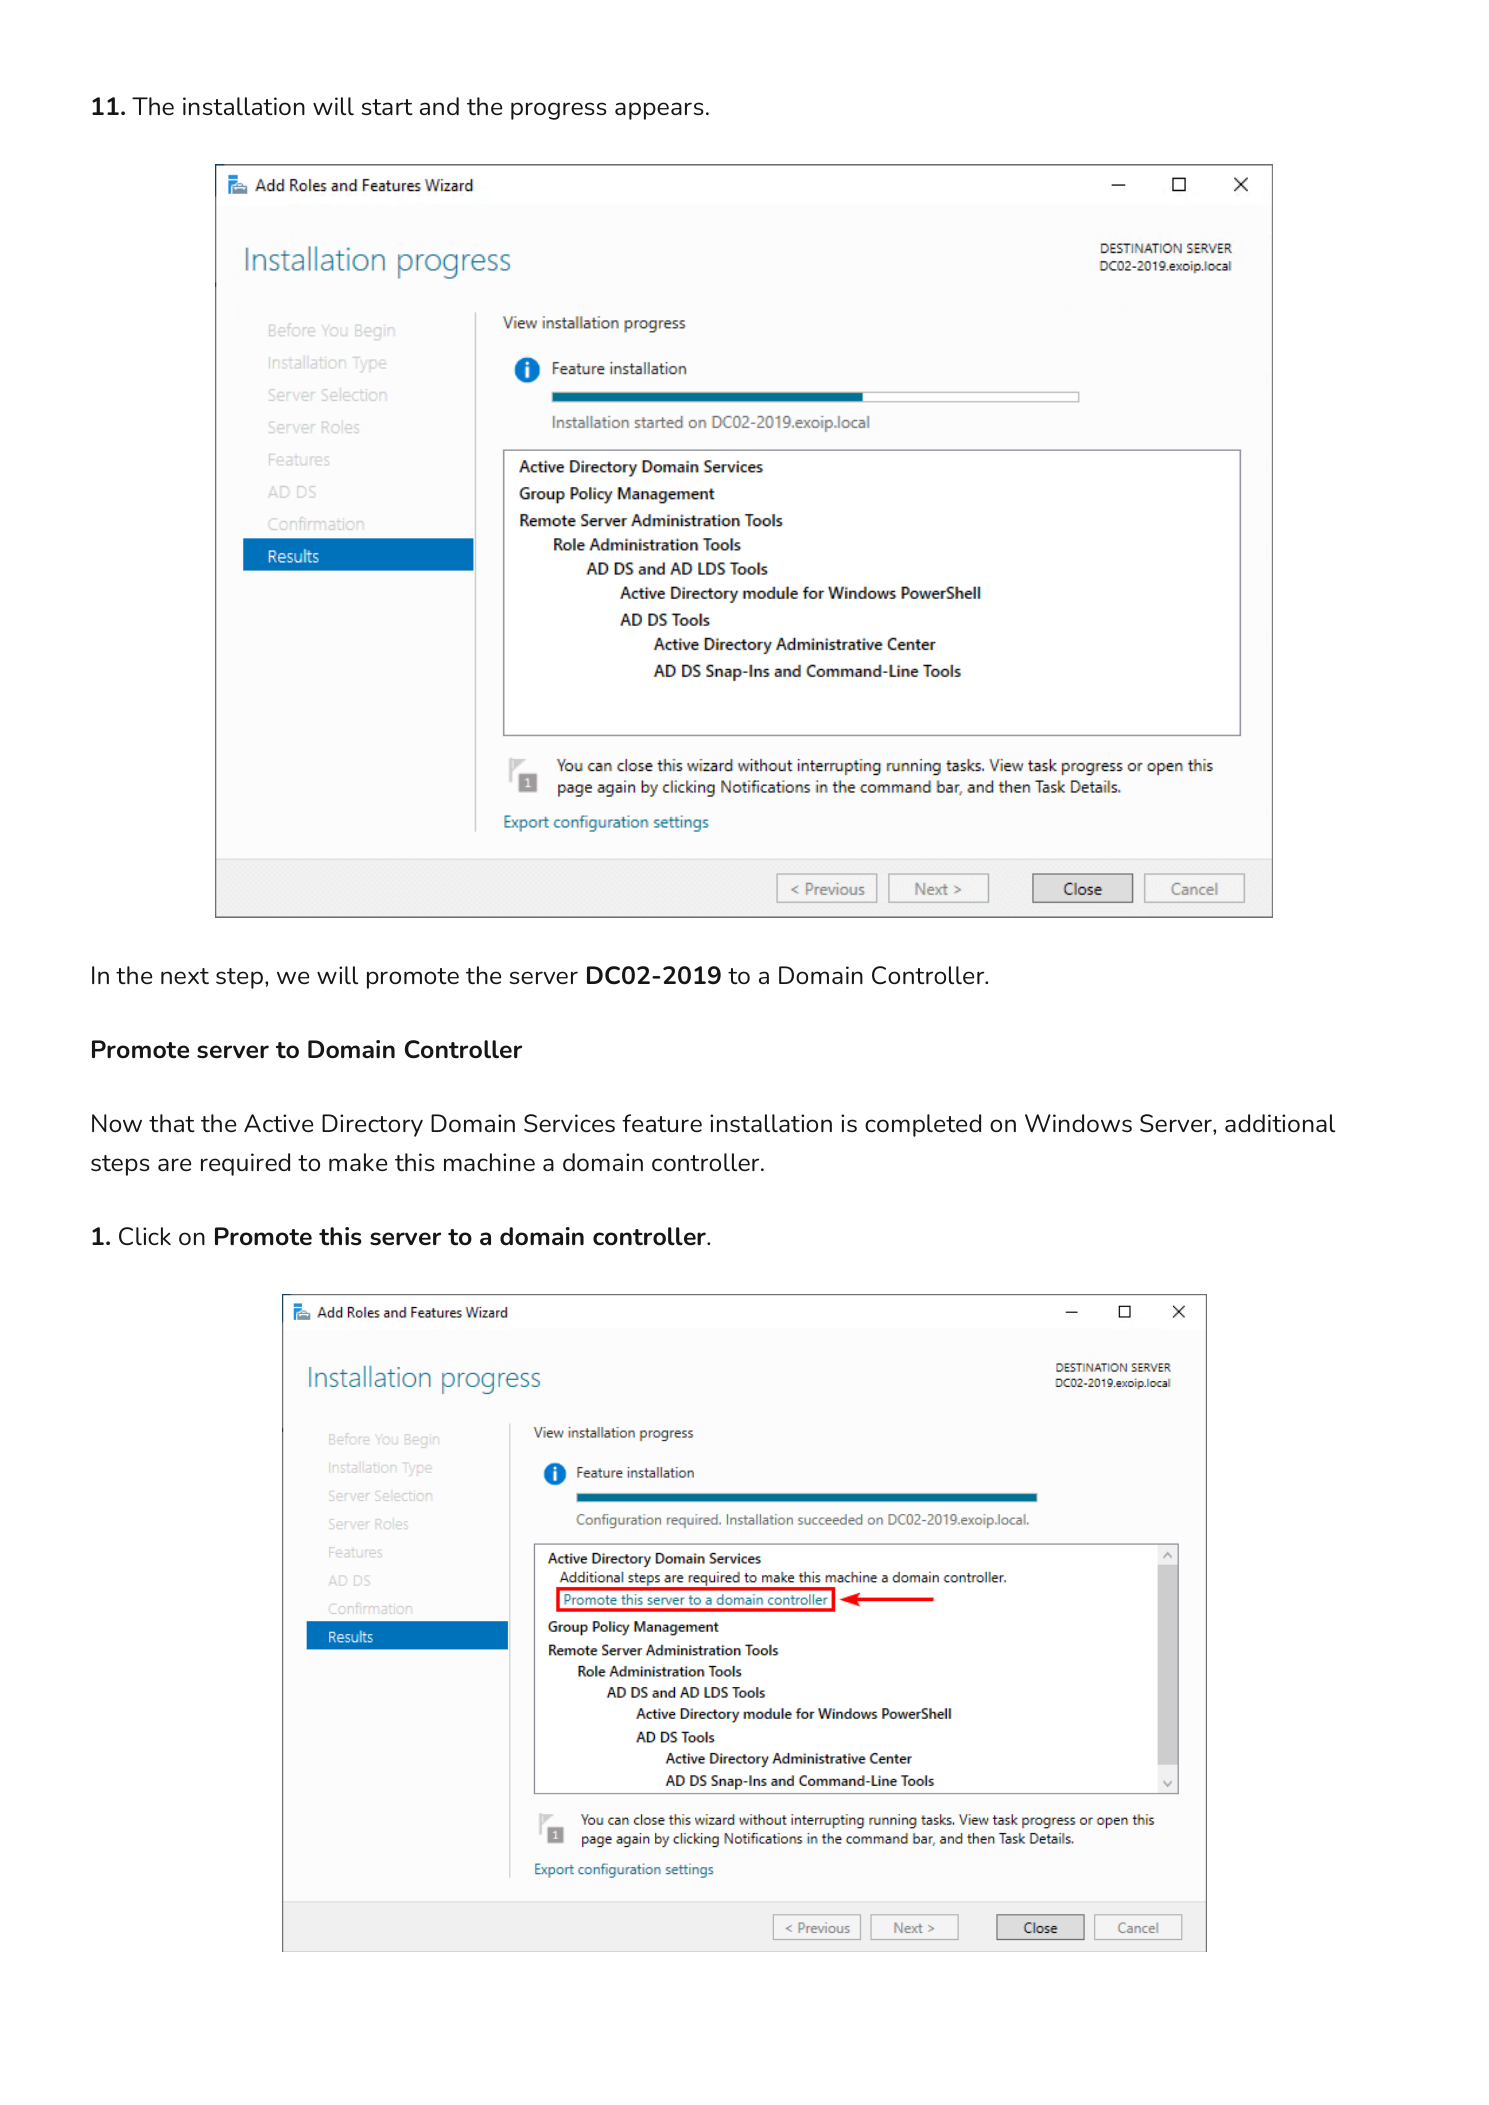
Step 6 — Wait for the Role to Install
The wizard switches to the Results page and streams installation progress. Leave this window open — when the install completes, the next phase (promotion) is launched directly from this same page.
Part 2 — Promote DC02-2019 to a Domain Controller
Installing the AD DS feature only adds the binaries. The server is not yet a Domain Controller — you still need to promote it, which is the step that joins the existing forest, replicates the directory from DC01-2019, configures DNS, and reboots the machine into its new role.
Step 7 — Add a Domain Controller to an Existing Domain
On the same Results page, click the highlighted yellow notification Promote this server to a domain controller. This opens the Active Directory Domain Services Configuration Wizard.
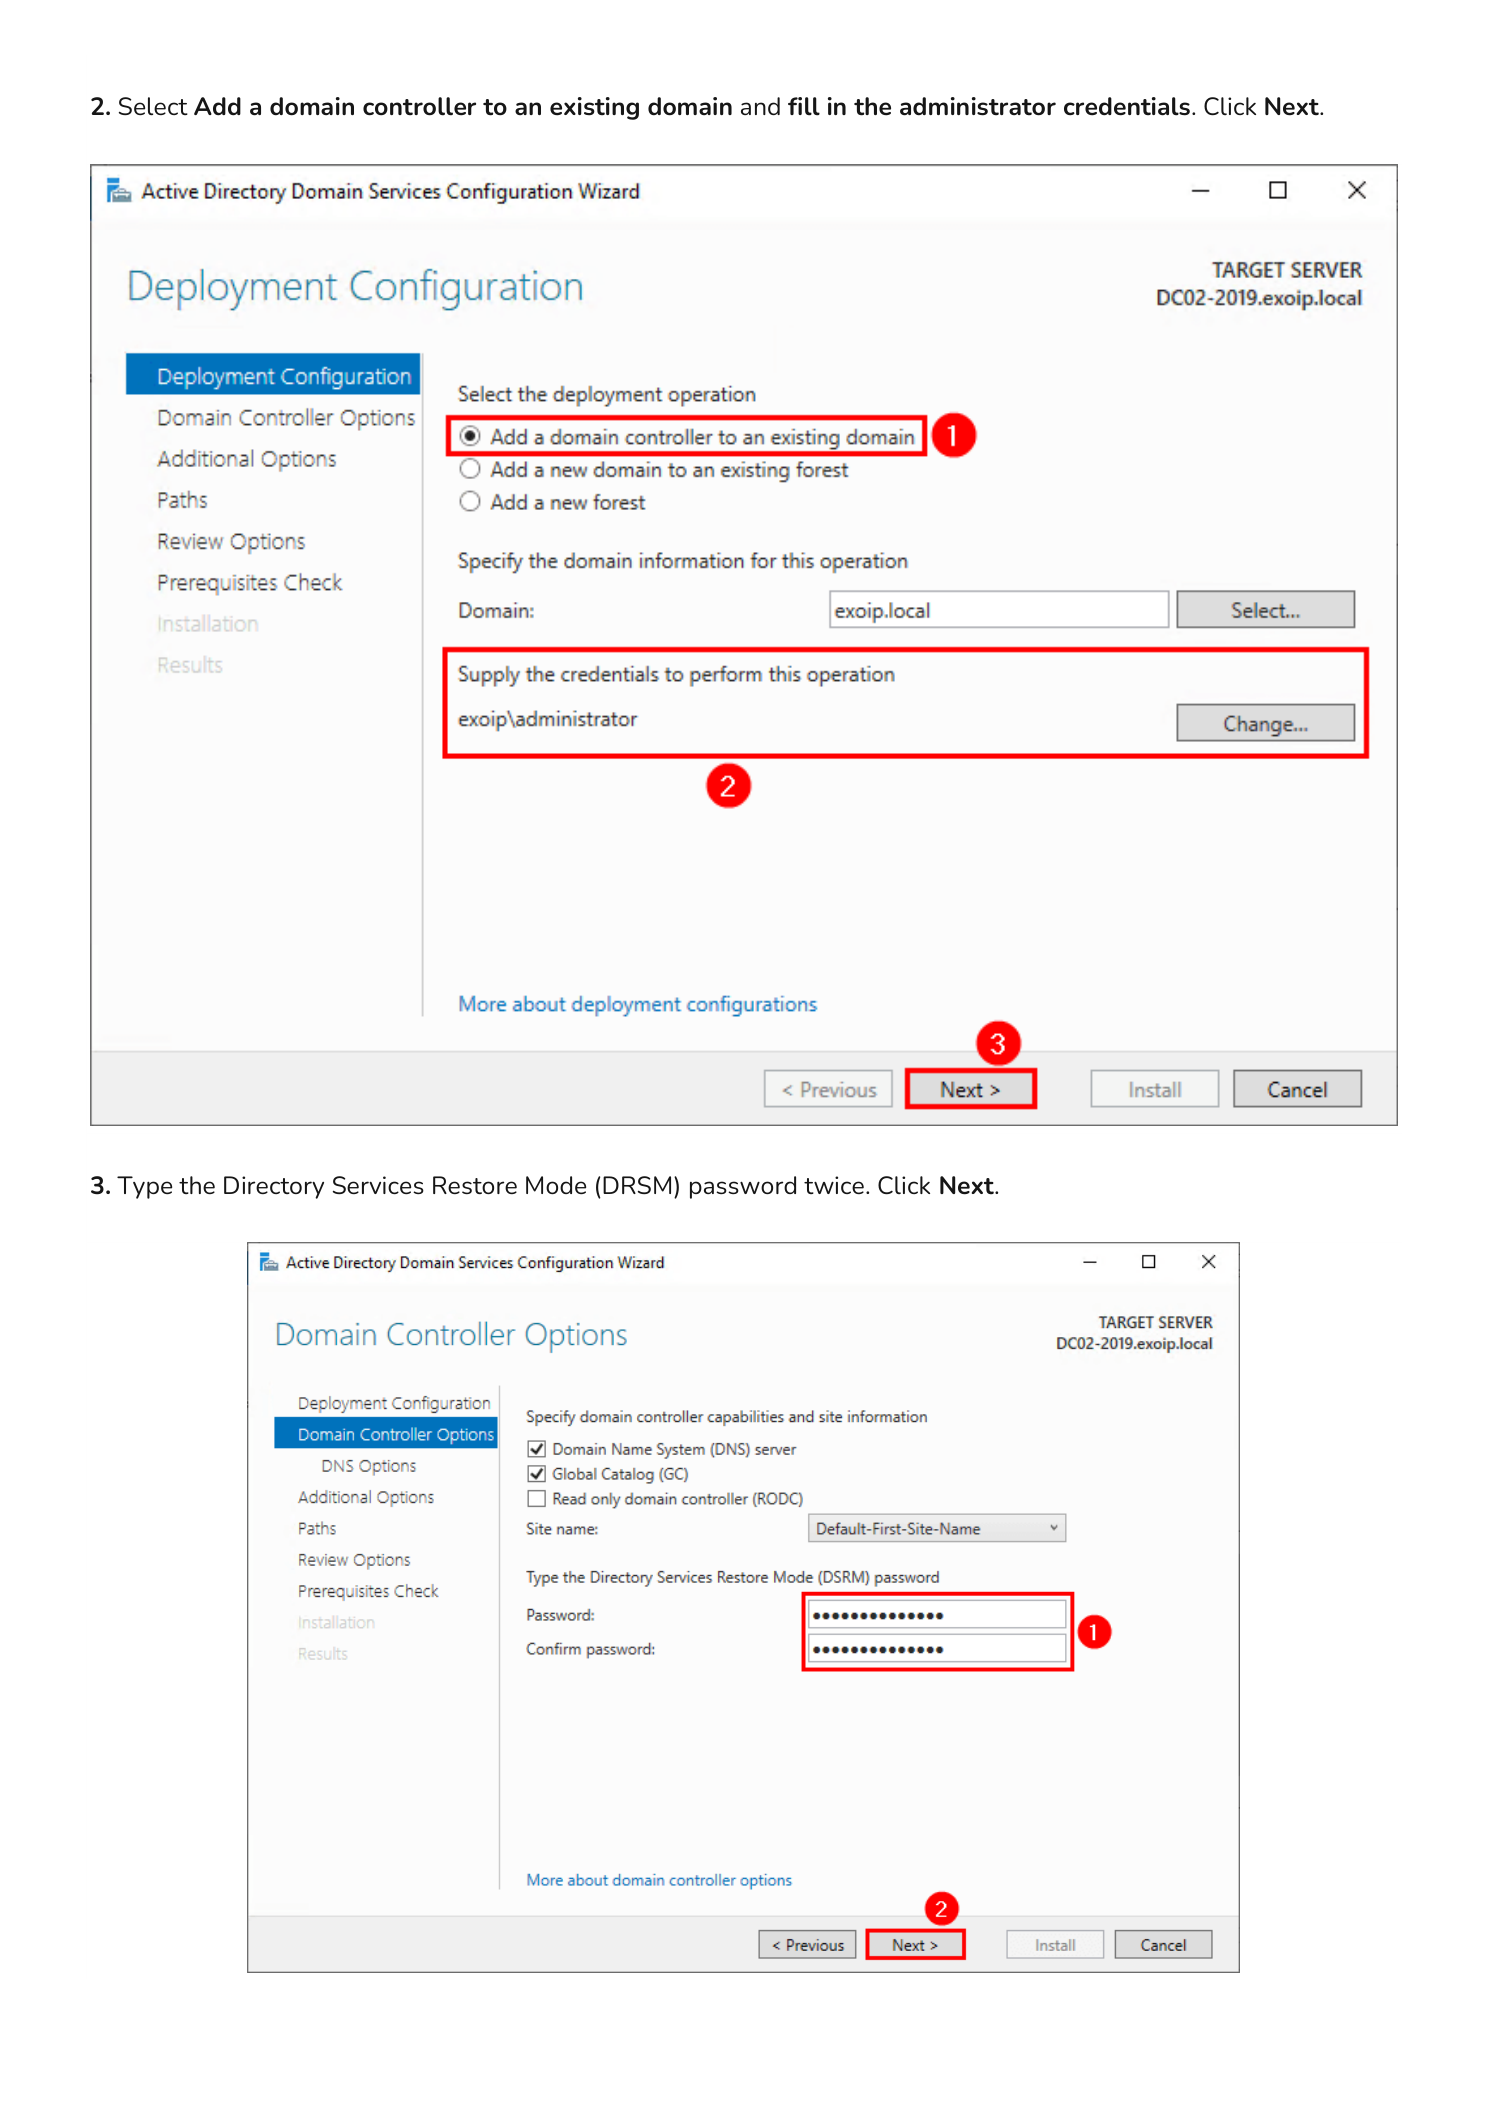
On the Deployment Configuration page, choose Add a domain controller to an existing domain (this is the path that joins an existing forest rather than creating one). The Domain field auto-populates with infotechninja.local because the server is already domain-joined. Under Supply the credentials to perform this operation, click Change… and enter Domain Administrator credentials in DOMAIN\username format (for example infotechninja\administrator) along with the password. Click Next.
Step 8 — Set the DSRM Password
The Domain Controller Options page lets you confirm capabilities (Domain Name System, Global Catalog) and pick the Site name — leave the default Default-First-Site-Name unless you have already created additional sites.
Now set the Directory Services Restore Mode (DSRM) password. This is a special offline password used only when booting the DC into directory recovery mode — it is separate from any domain account and unique to this DC. Pick a strong password and store it in your password manager; if both DCs are ever corrupted at the same time, this is the only way back in. Click Next.
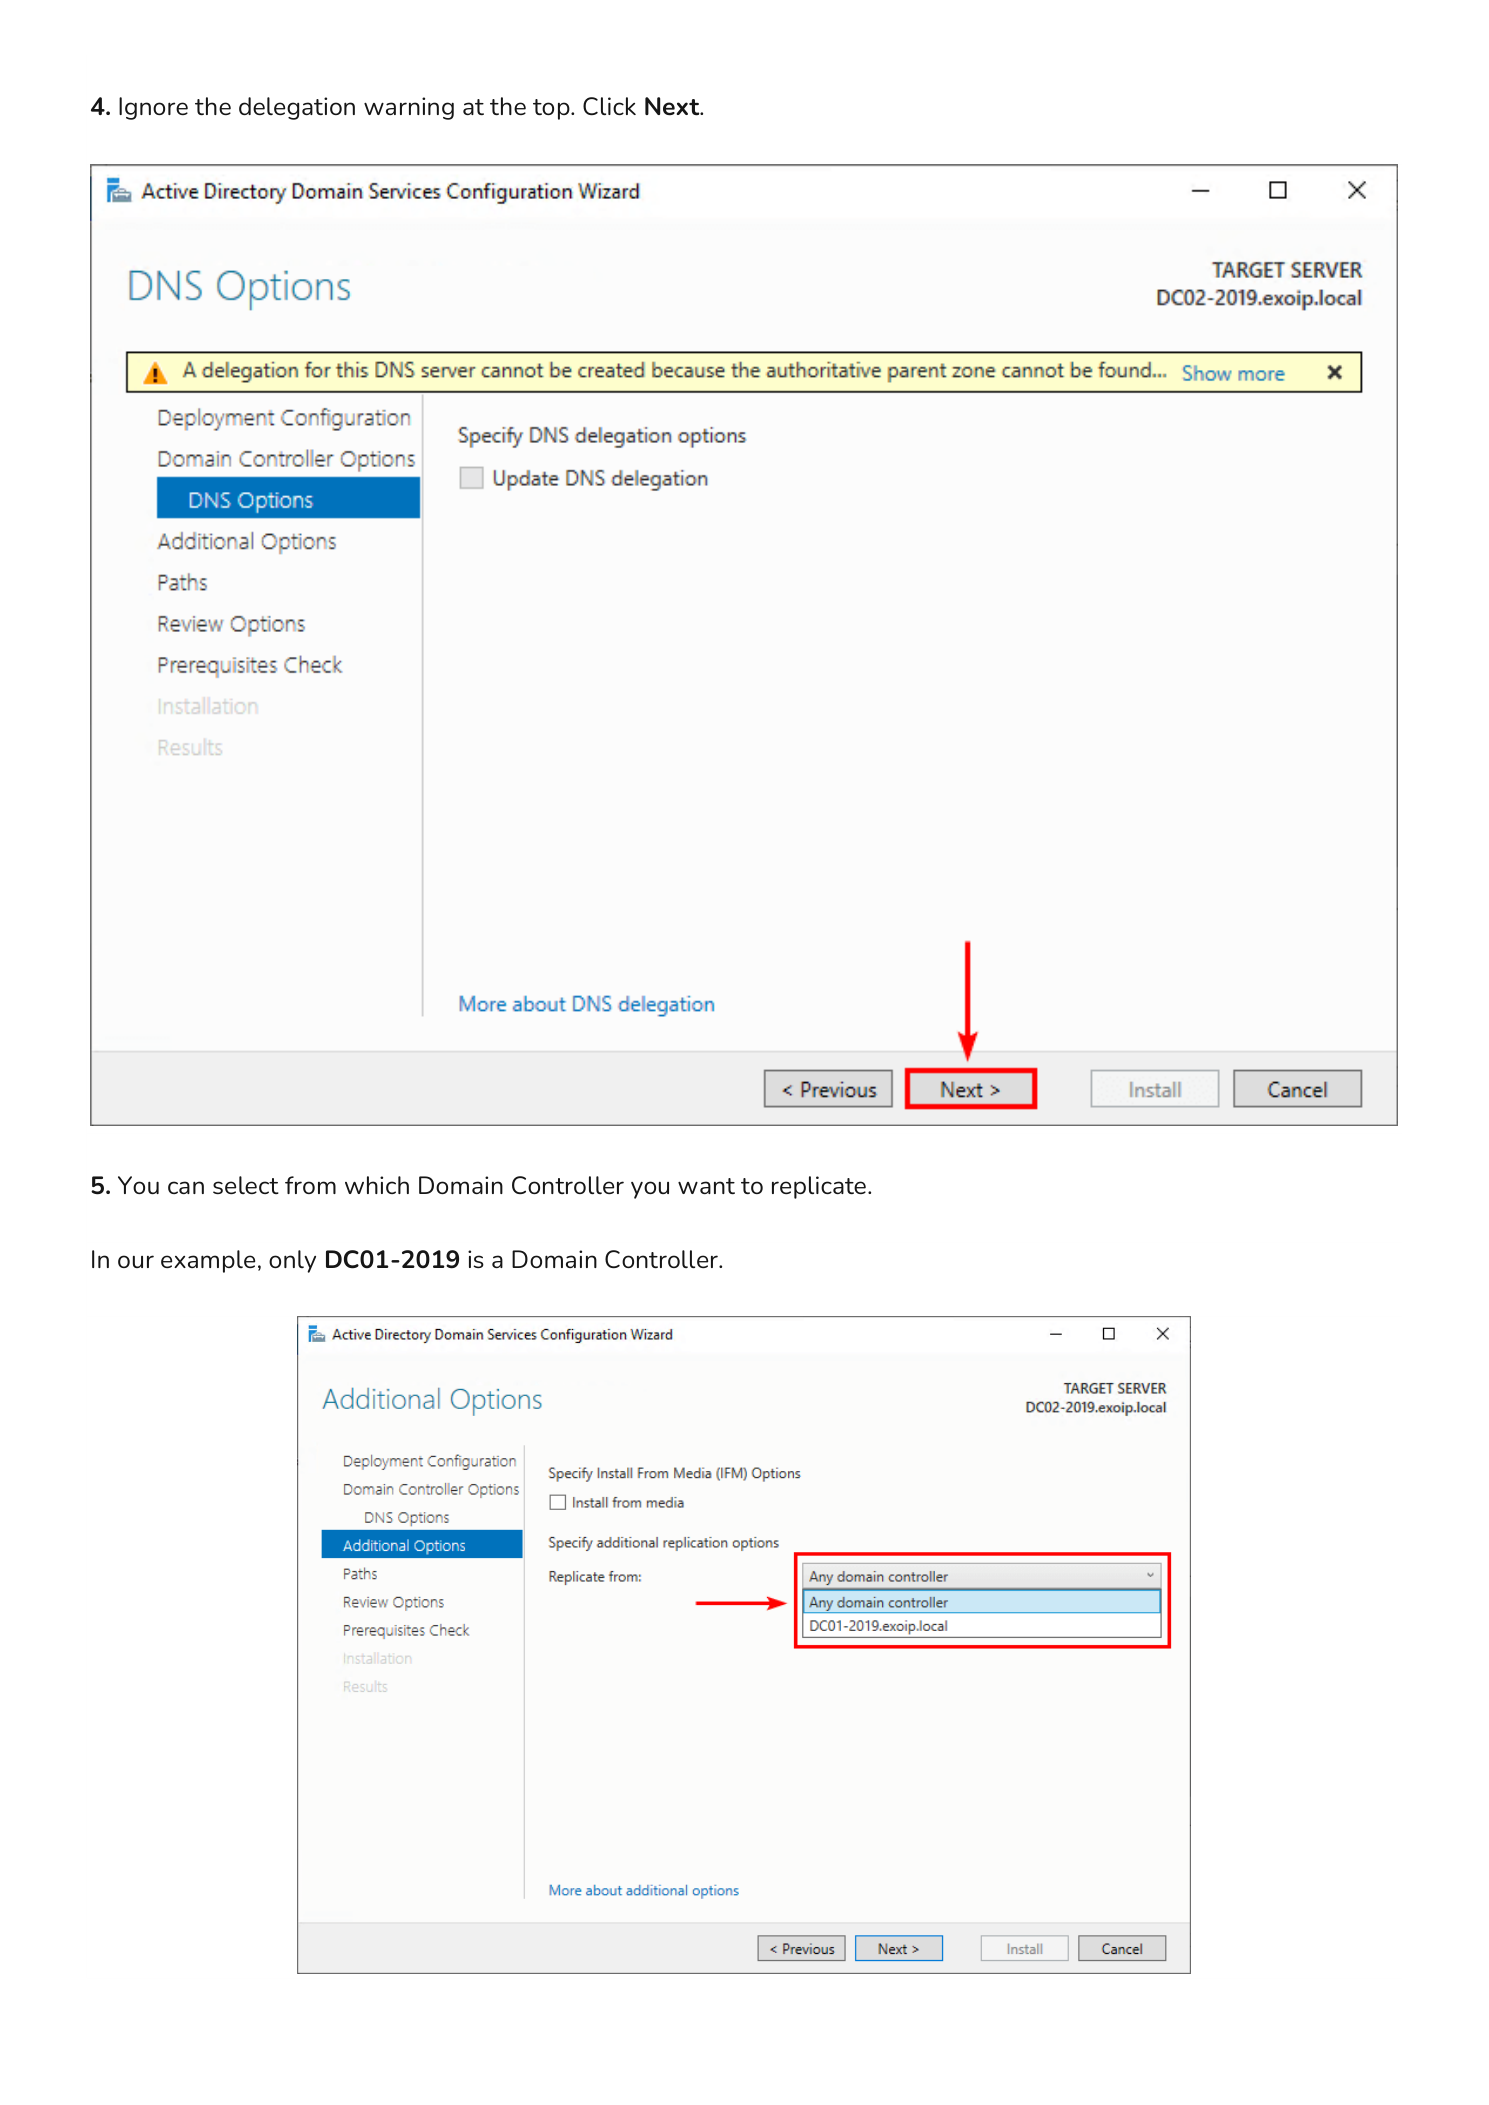
Step 9 — Skip the DNS Delegation Warning
The DNS Options page may show a yellow warning: “A delegation for this DNS server cannot be created because the authoritative parent zone cannot be found.” This is harmless and expected when you are adding a second DC to a private domain like infotechninja.local — there is no parent DNS zone to delegate from. Click Next.
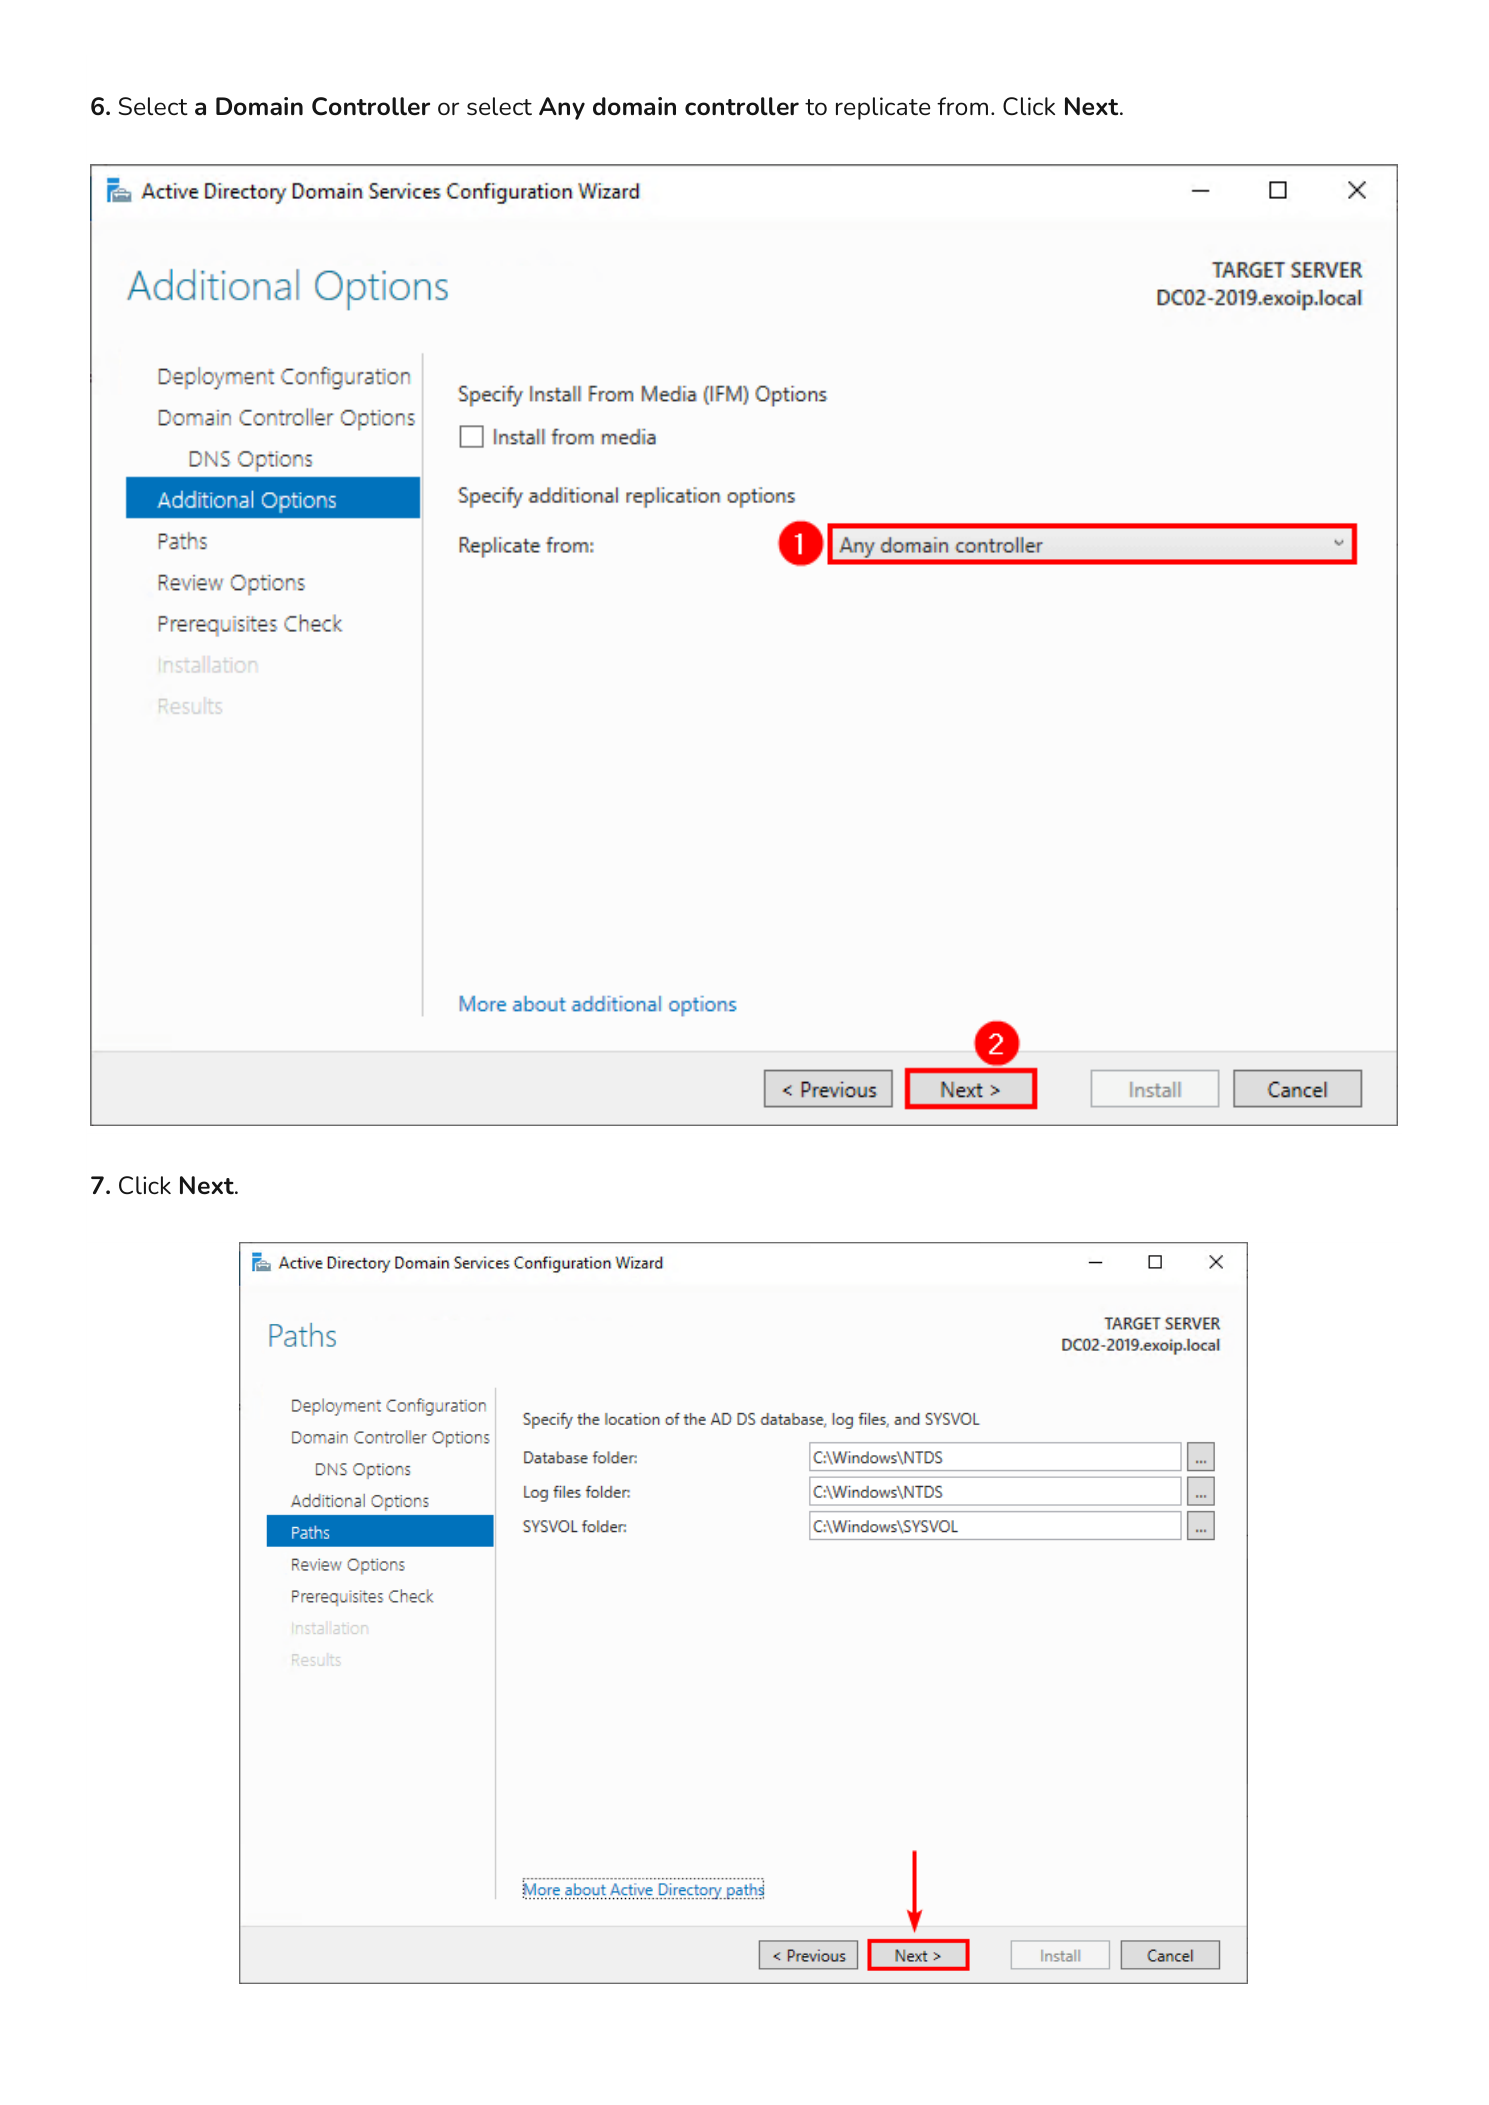
Step 10 — Choose the Replication Source
On the Additional Options page, the wizard asks which existing Domain Controller to replicate the directory from. The dropdown lists Any domain controller and every DC the wizard can find — in this lab that is just DC01-2019.infotechninja.local.
For a small environment, leave the default Any domain controller and let the wizard pick. In a larger environment with multiple sites or DCs in different time zones, choose a specific source DC that is geographically close and has a fast link — replicating the entire directory from a remote DC over a slow WAN can take hours. Click Next.
Step 11 — Review Database and SYSVOL Paths
The Paths page shows the default locations the wizard will use for the AD DS database, log files, and SYSVOL share:
- Database folder:
C:\Windows\NTDS - Log files folder:
C:\Windows\NTDS - SYSVOL folder:
C:\Windows\SYSVOL
For most installations the defaults are fine. Click Next.
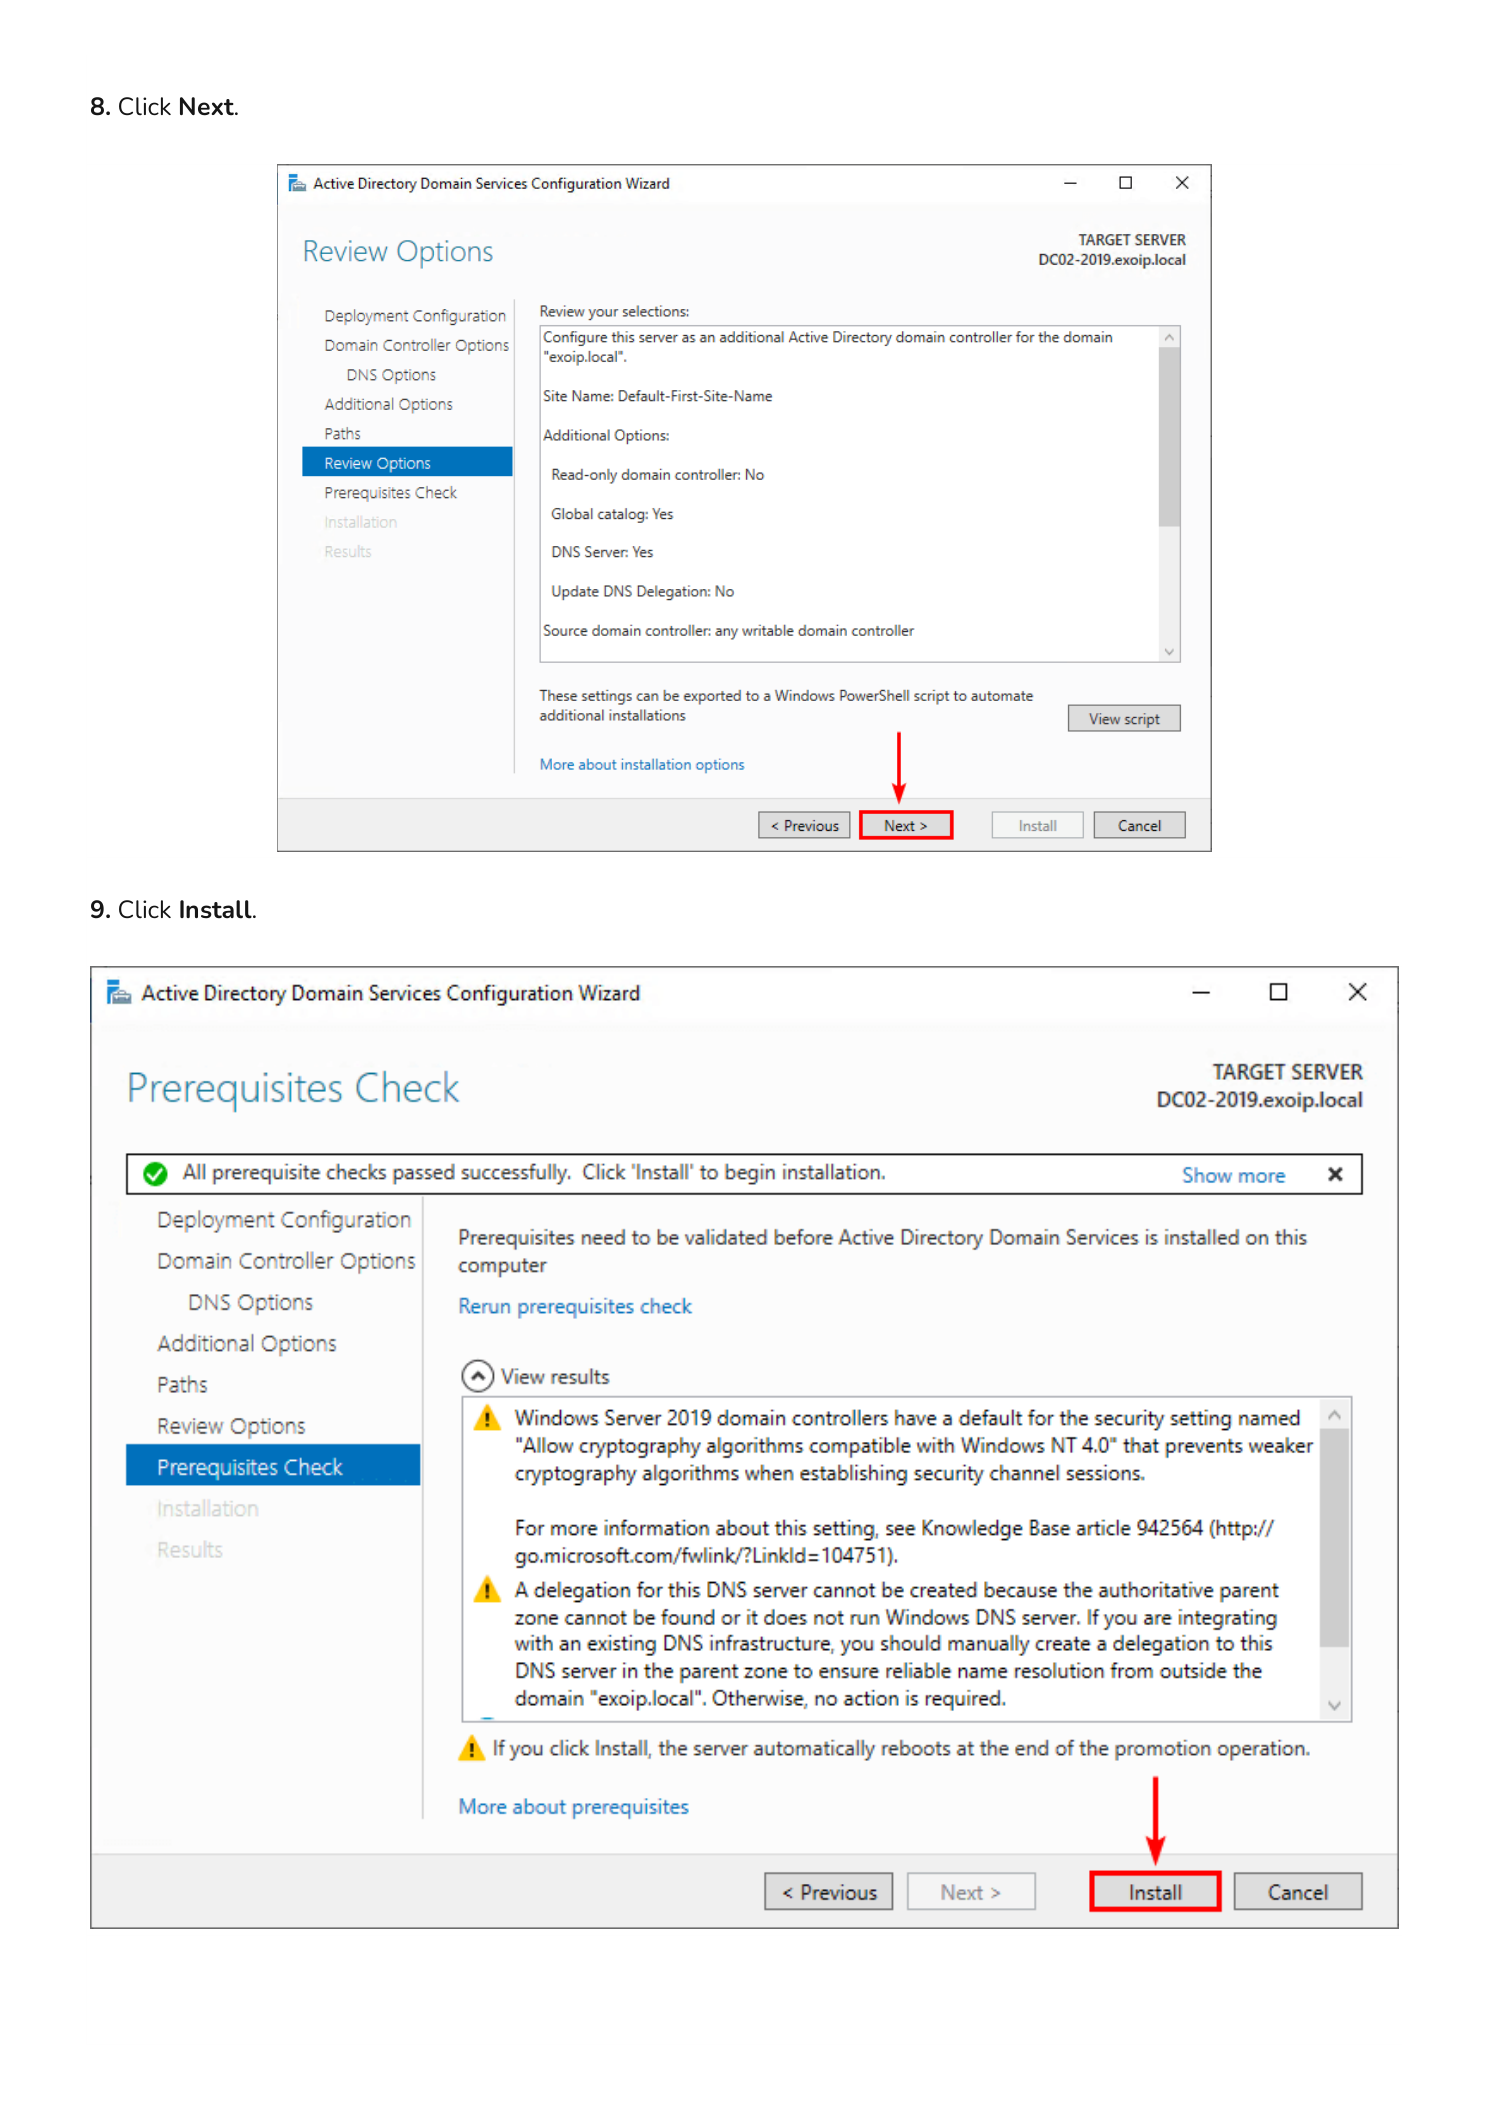
Step 12 — Run the Prerequisites Check and Install
The Review Options page summarizes every choice you have made — verify the domain name, replication source, and site are correct. Click Next. The Prerequisites Check page now runs a battery of validations: DNS reachability, network connectivity, credentials, port availability, and so on.
You may see informational warnings about Windows Server cryptography defaults or DNS delegation; these are not blockers. When the green check mark reports “All prerequisite checks passed successfully”, click Install.
Step 13 — Promotion, Replication, and Reboot
The Configuration Wizard now runs end-to-end. Behind the scenes it joins the forest, creates the new DC’s metadata in AD, replicates the entire directory partition from DC01-2019 (every user, group, computer, and Group Policy object), and configures DNS. Replication time depends on directory size and link speed — small labs finish in a few minutes; larger directories can take longer.
When the operation completes, the server automatically signs out and reboots. This is normal and required.
Part 3 — Configure DNS for High Availability
Now that two DCs are up, you must cross-configure DNS so each DC points at the other for name resolution. A DC that resolves only against itself can fail to find replication partners or other forest resources.
On DC02-2019 open the IPv4 Properties of the network adapter and set:
- Preferred DNS server: 192.168.1.51 (DC01-2019)
- Alternate DNS server: 127.0.0.1 (loopback)
On DC01-2019 open the IPv4 Properties and set:
- Preferred DNS server: 192.168.1.52 (DC02-2019)
- Alternate DNS server: 127.0.0.1 (loopback)
The pattern is “point at your partner first, fall back to yourself.” If the partner DC ever goes offline, the local loopback keeps name resolution working until the partner returns.

Part 4 — Verify the New Domain Controller
After both DCs reboot and you have cross-configured DNS, run a quick health check.
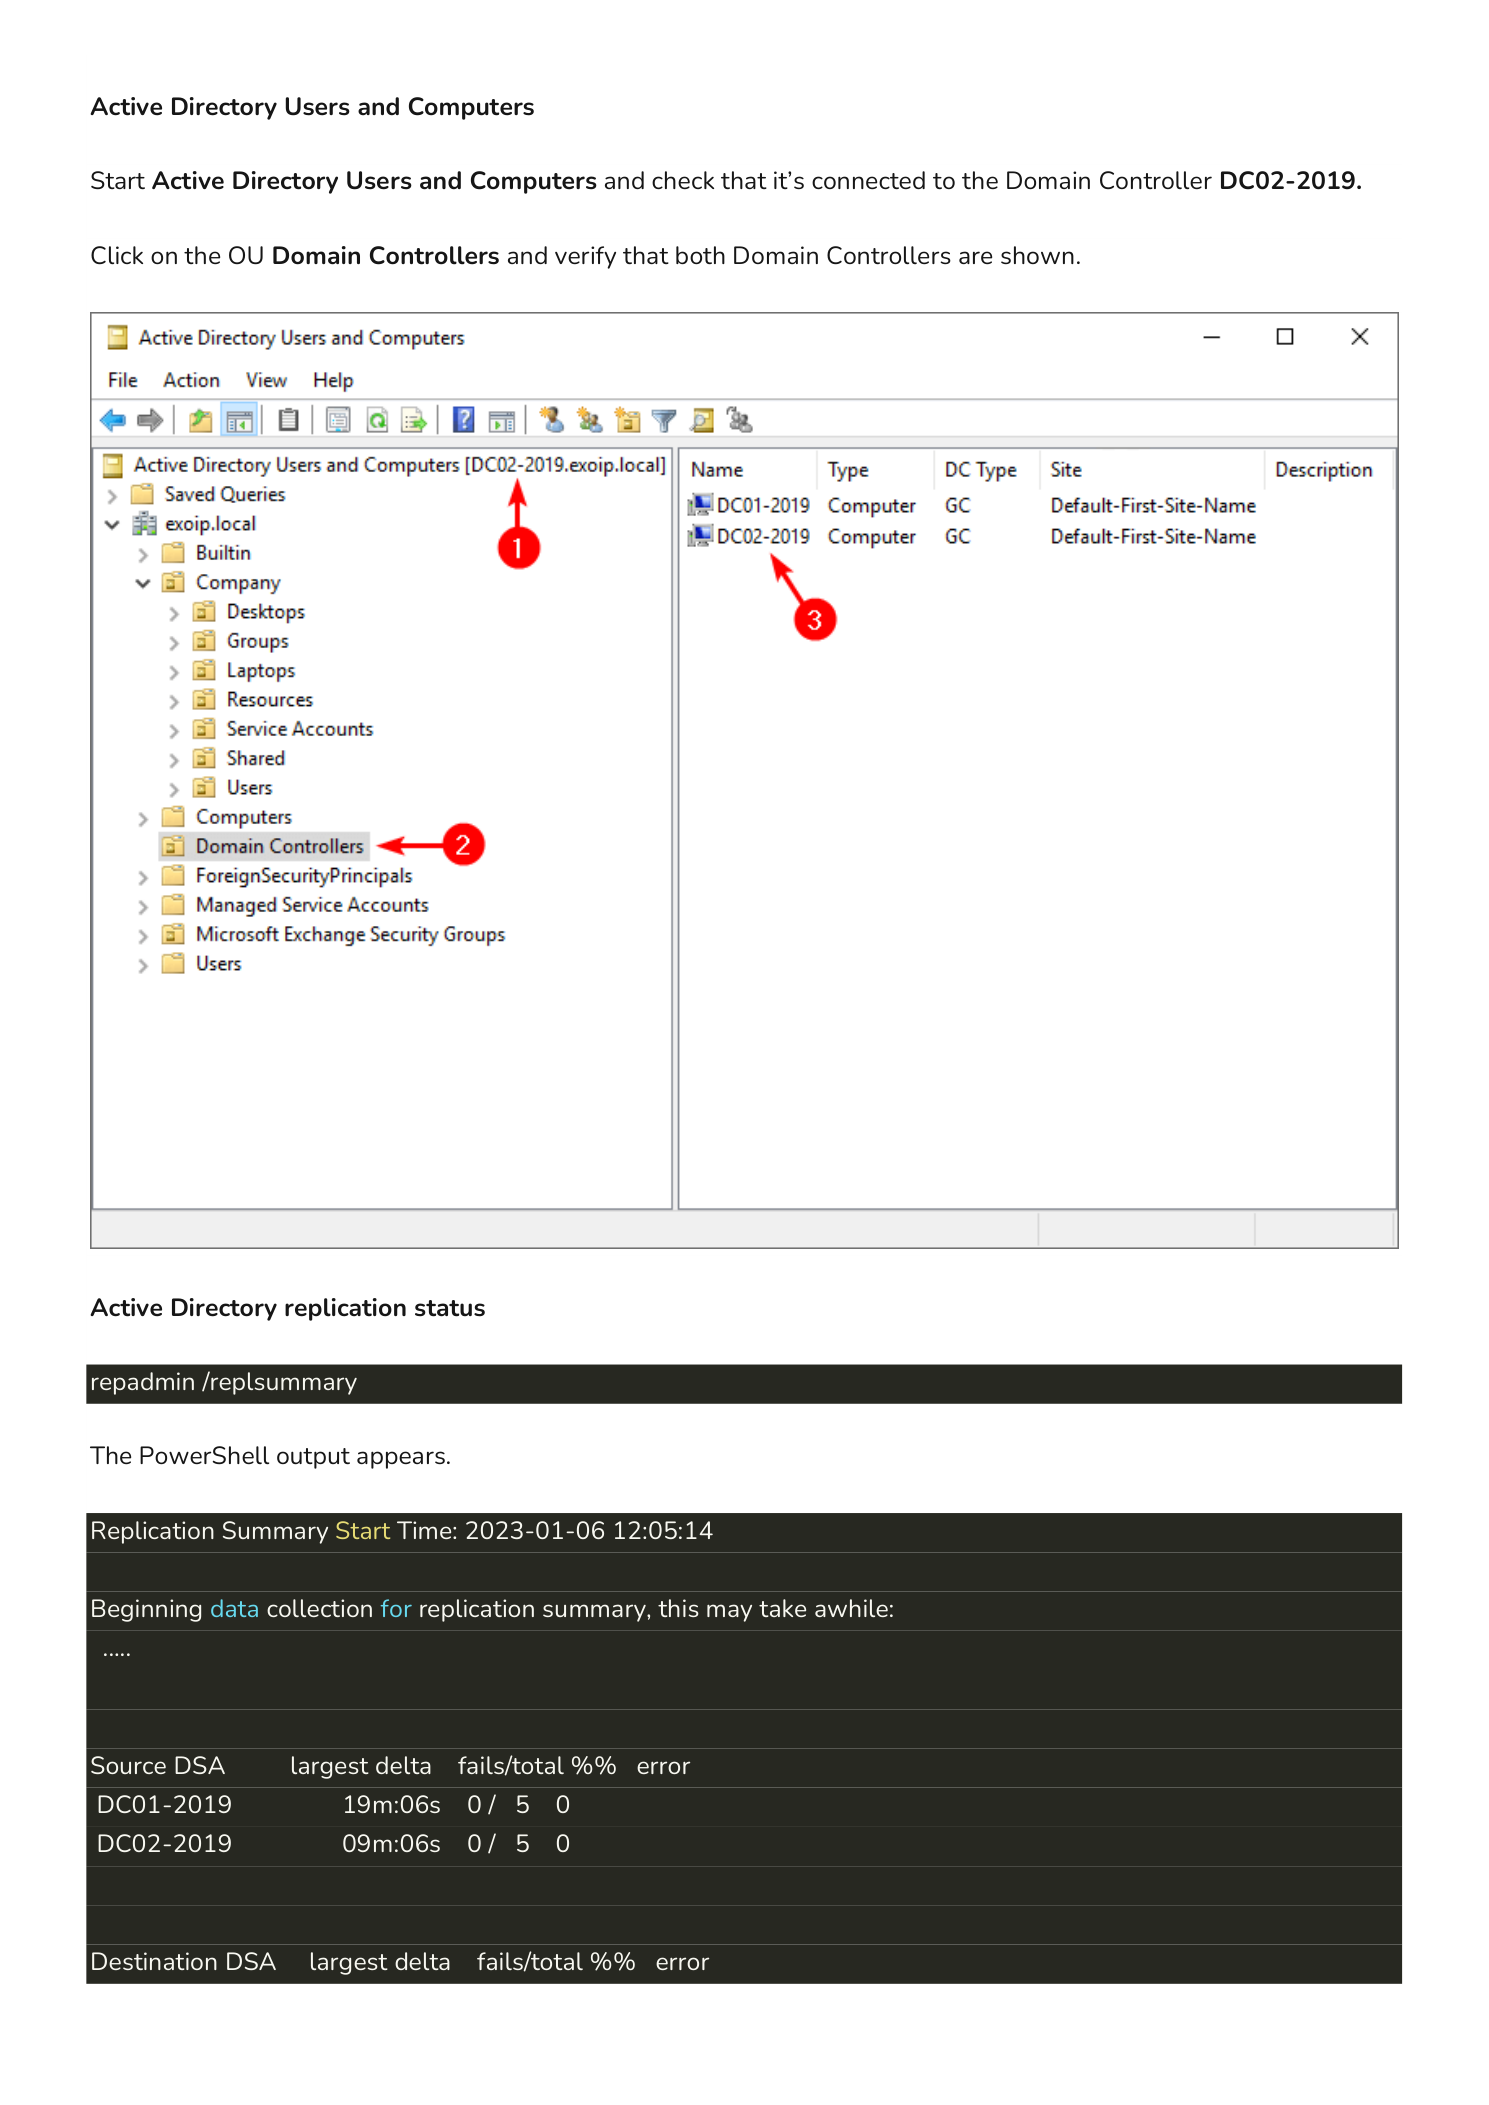
Active Directory Users and Computers
From either DC, open Active Directory Users and Computers. The title bar should show that you are connected to a Domain Controller (in this example DC02-2019 appears in the connection). Expand the Domain Controllers OU — you should now see both DC01-2019 and DC02-2019 listed as Domain Controllers with DC Type GC (Global Catalog) and Site Default-First-Site-Name.
Replication Health
Open an elevated PowerShell prompt and run:
repadmin /replsummaryThe output lists every DC as both a Source DSA (where directory data is replicated from) and a Destination DSA (where data is replicated to). Both columns should report 0 fails for every DC. Sample output from this lab:
Replication Summary Start Time: 2023-01-06 12:05:14

Source DSA       largest delta  fails/total %% error
DC01-2019            19m:06s         0 / 5    0
DC02-2019            09m:06s         0 / 5    0

Destination DSA  largest delta  fails/total %% error
DC01-2019            09m:05s         0 / 5    0
DC02-2019            19m:06s         0 / 5    0
For a deeper health view also run:
dcdiag /v— full domain controller diagnostic suite; every test should return passedrepadmin /showrepl— per-partition replication detail with last-success timestampsGet-ADDomainController -Filter *— confirms both DCs are registered in AD
What’s Next
You now have a redundant Domain Controller pair. A few items to plan for next:
- Move FSMO roles deliberately. All five Flexible Single Master Operations roles still live on DC01-2019. For balance, consider moving some (typically PDC Emulator and Infrastructure Master) to DC02-2019 — but never split FSMO roles across DCs that aren’t both reliably online.
- Configure DHCP to hand out both DNS servers — clients should learn 192.168.1.51 and 192.168.1.52 from DHCP so they survive losing either DC.
- Set up regular system state backups on at least one DC, retained off-host. AD authoritative restore depends on a clean recent backup.
- Plan AD Sites and Subnets if you operate across multiple physical locations — replication topology defaults to “everything is one site” until you tell it otherwise.
- Document the DSRM password and FSMO holder list in your team’s secrets manager — both are critical during disaster recovery.
Important Considerations
Never Run a Domain on One DC
Even after this guide, the temptation in small environments is to call it done with two DCs and move on. A single DC means no authentication when it is down; two DCs on the same hypervisor host means no authentication when that host is down. Spread DCs across independent fault domains — separate physical hosts, separate hypervisors, separate sites if possible.
Replication is Bi-Directional, but Not Instant
Within a single AD site, intra-site replication runs every 15 seconds with change notification. Between sites it follows the inter-site replication schedule (default 180 minutes). When you make a change on one DC, expect a short delay before it converges everywhere — this is normal and not a sign of broken replication.
The DSRM Password is Per-DC
Each DC has its own DSRM password set during promotion. They are not synchronized and they are not the same as any domain Administrator account. If you reuse the same DSRM password across all DCs (most teams do), document it once; if you set unique DSRM passwords per DC, document each one separately. Without DSRM access you cannot perform an authoritative restore.
Promote Before You Demote
If you are eventually replacing DC01-2019 (for example, an OS upgrade), always promote the new DC and verify replication first, then demote the old one with Uninstall-ADDSDomainController or the Server Manager wizard. Never demote a DC until at least one healthy replacement is fully replicated and serving requests.