Introduction
Active Directory Domain Services (AD DS) is the backbone of identity, authentication, and policy in any Windows-based environment. The very first step in standing up a domain is installing the AD DS role on a Windows Server and promoting that server to a Domain Controller — the machine that authenticates users, hands out Group Policy, and acts as the source of truth for the directory.
In this guide you will install the AD DS role on a fresh Windows Server, promote the server to the first Domain Controller in a brand-new forest, and walk through every wizard page from start to finish. By the end you will have a fully functioning Domain Controller you can immediately start adding users, groups, and member servers to.
What is Active Directory Domain Services?
A server running the Active Directory Domain Services role is called a Domain Controller. It authenticates and authorizes every user and computer in the domain, applies and enforces security policies, and replicates directory changes to every other DC in the forest. Without AD DS you cannot have a Windows domain — every DC participates in the directory.
The setup happens in three logical phases:
- Verify prerequisites — a Windows Server with a static IP, a meaningful hostname, and current updates
- Install the AD DS role — using Server Manager’s Add Roles and Features wizard
- Promote the server to a Domain Controller — using the post-install Configuration Wizard to create the forest
Prerequisites
- Windows Server 2016, 2019, 2022, or 2025 — a clean install with the latest cumulative updates applied
- A static IPv4 address — domain controllers must never use DHCP for their primary interface
- A meaningful computer name set before promotion (renaming a DC after promotion is painful)
- Local Administrator credentials on the server
- A planned root domain name for the forest (use a name you control — avoid
.localin production; this guide usesinfotechninja.localas a lab example) - At least 2 vCPU, 4 GB RAM, and 60 GB disk for a small lab DC
Part 1 — Install the AD DS Role
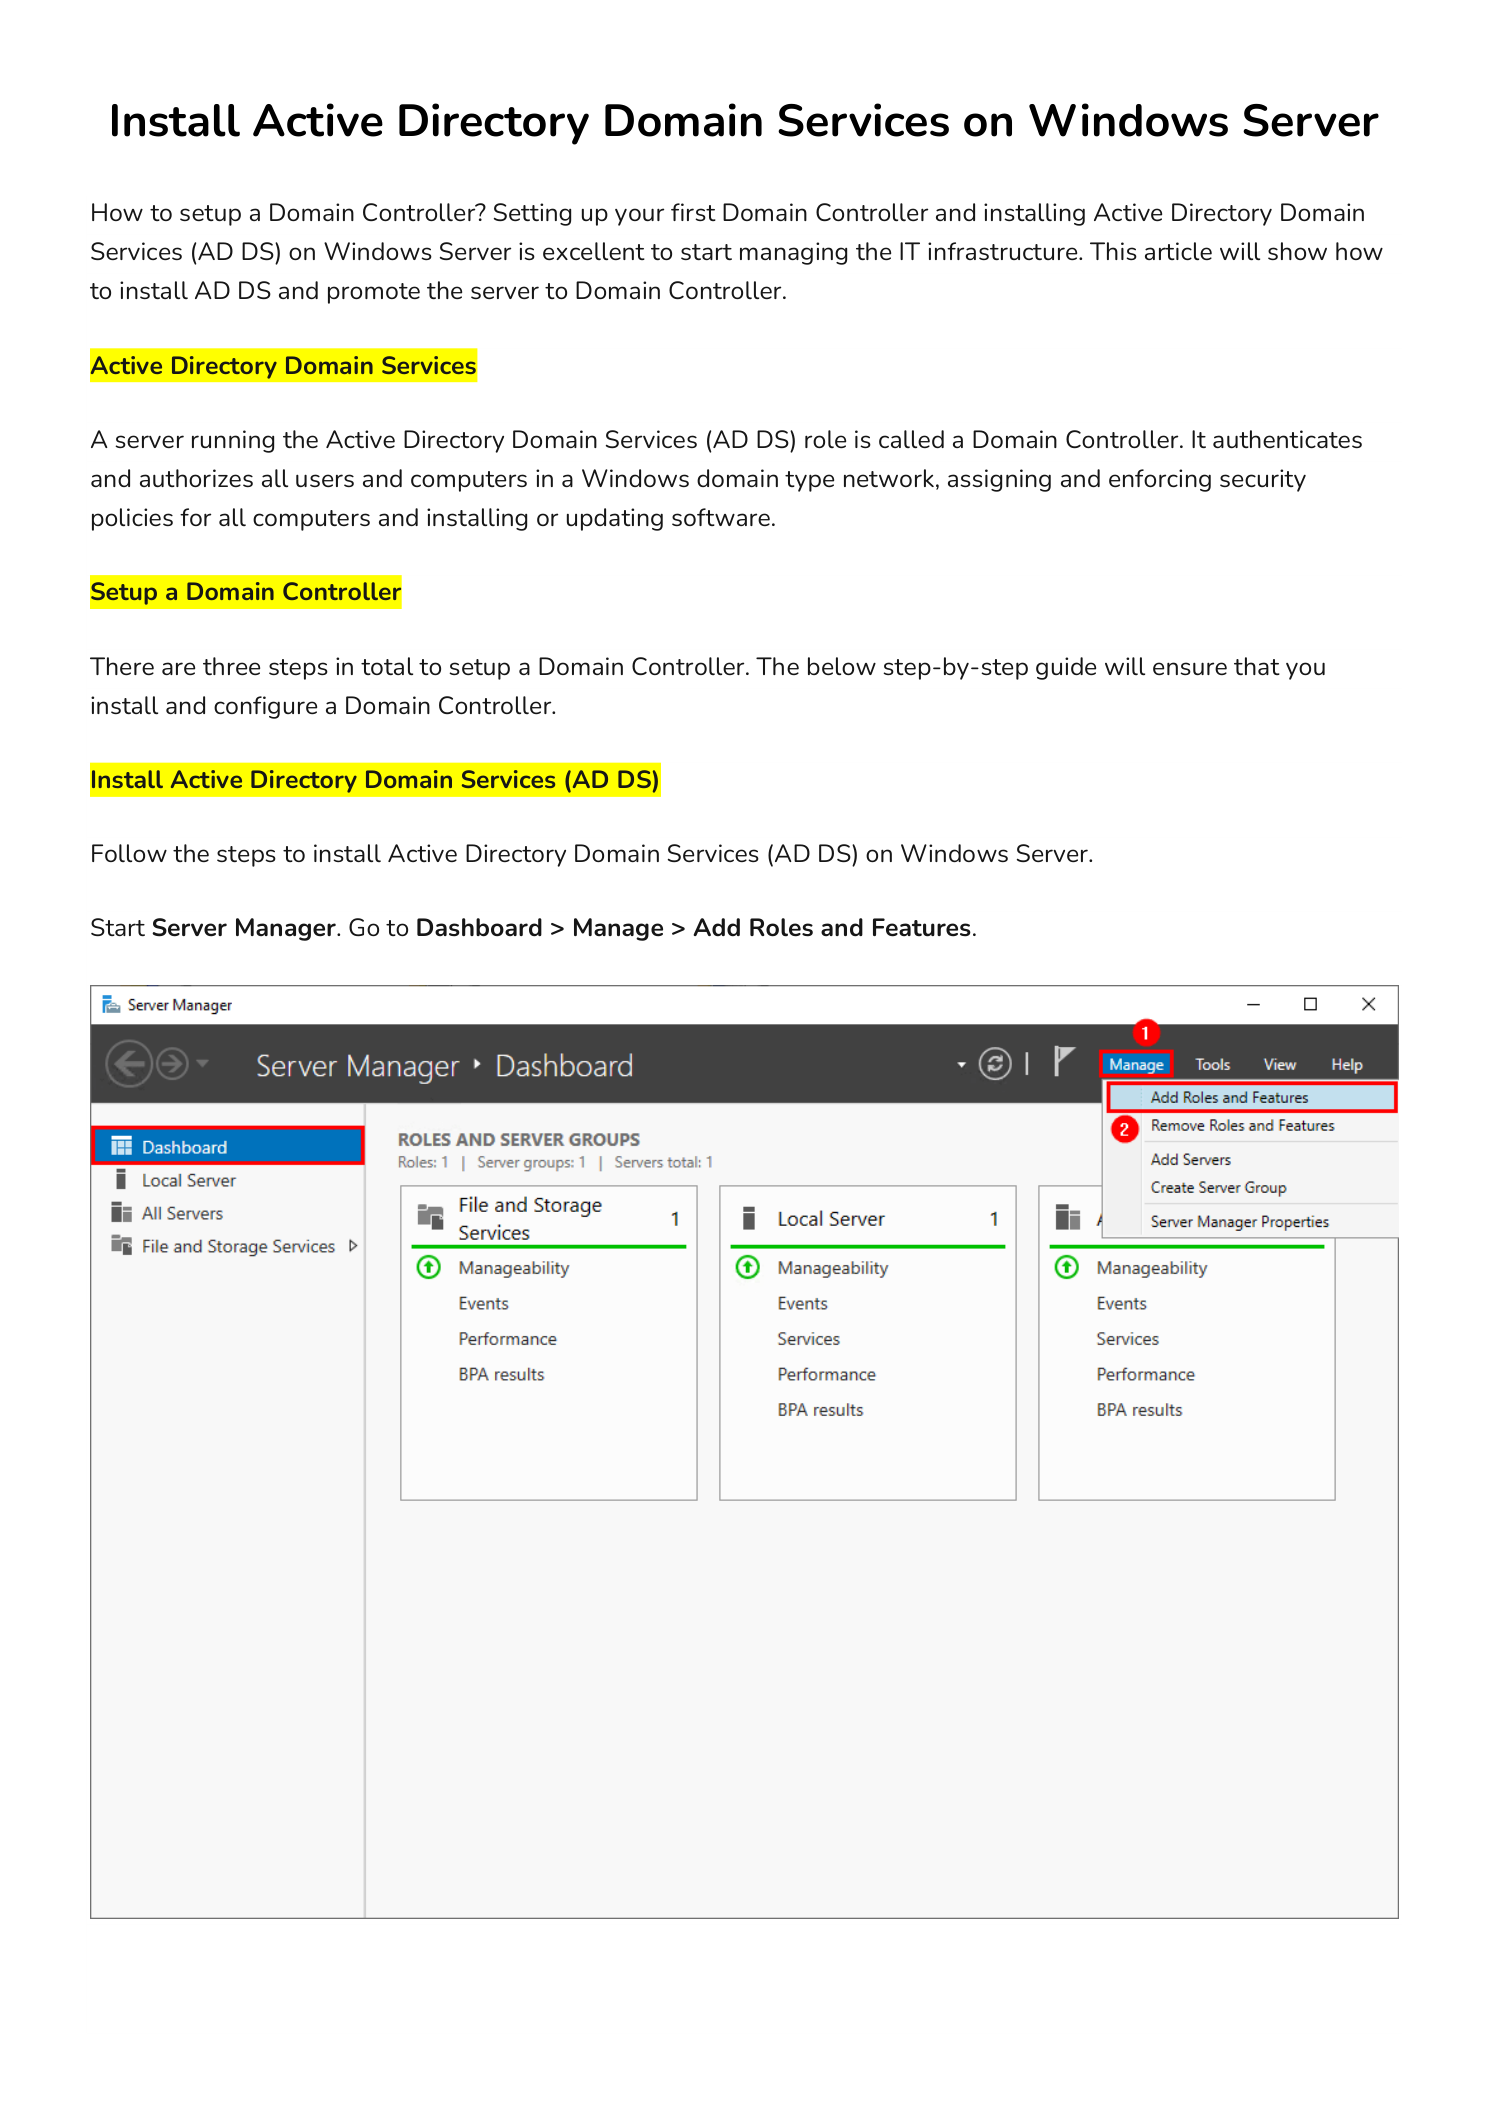
Open Server Manager. From the Dashboard, click Manage in the top-right corner and choose Add Roles and Features. This launches the Add Roles and Features Wizard, the standard entry point for installing any server role.
Step 1 — Walk Through the Wizard Intro
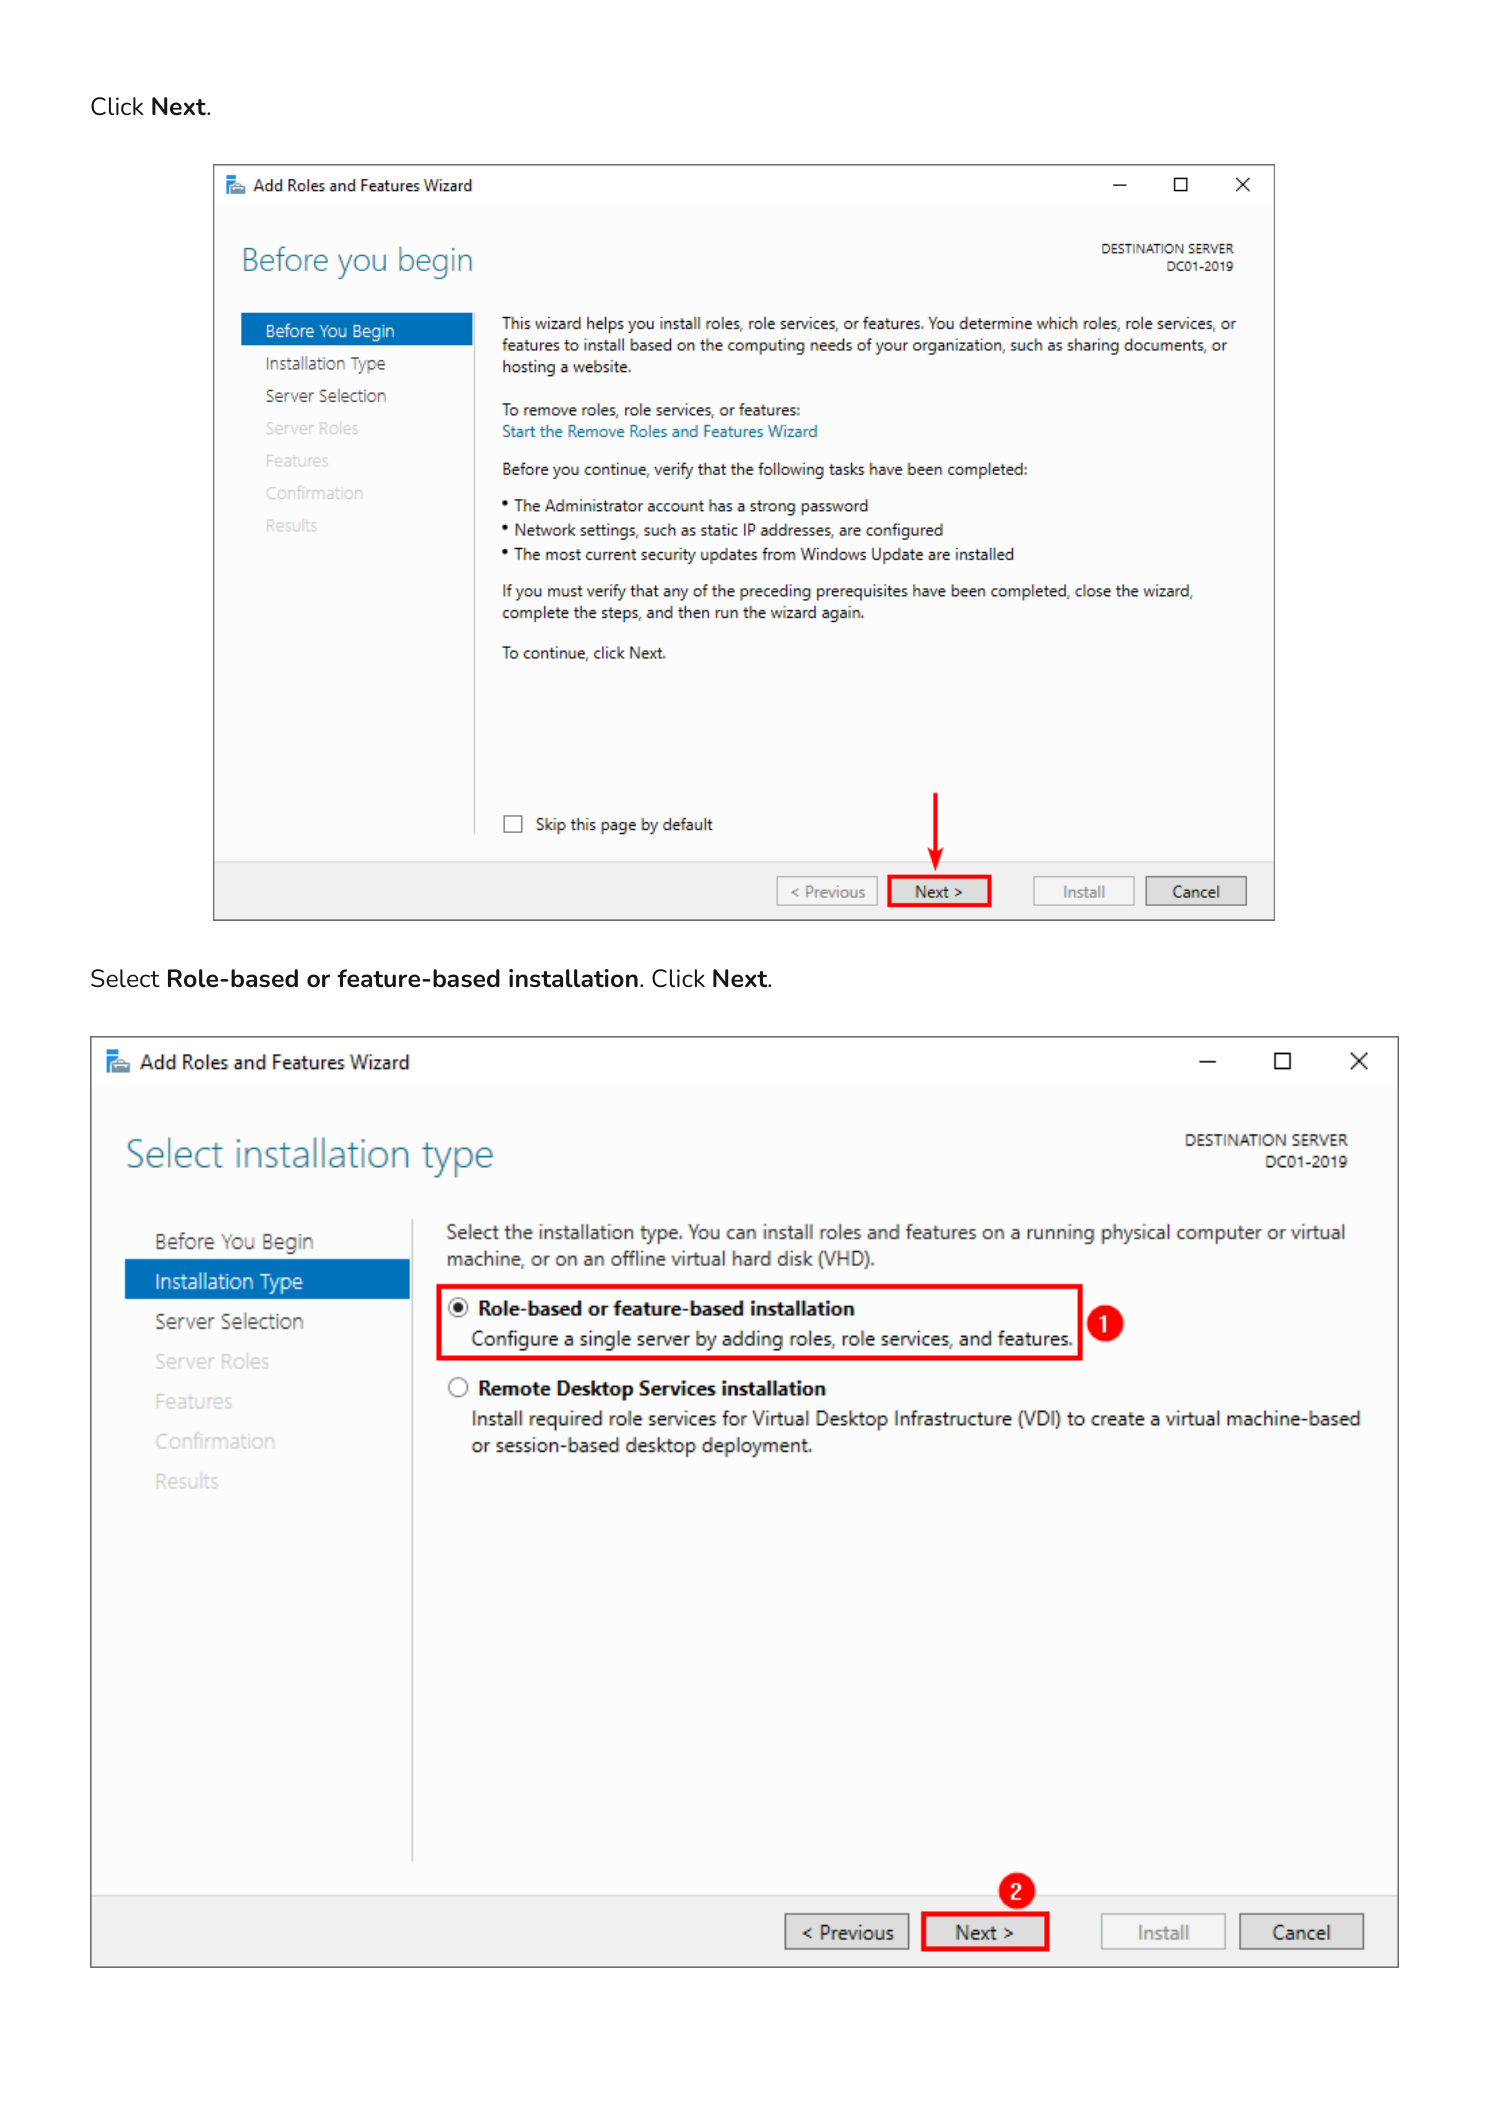
The first page is the Before You Begin overview — click Next. On the Installation Type page, leave the default Role-based or feature-based installation selected (the alternative is for Remote Desktop Services VDI farms). Click Next.
Step 2 — Select the Server and the AD DS Role
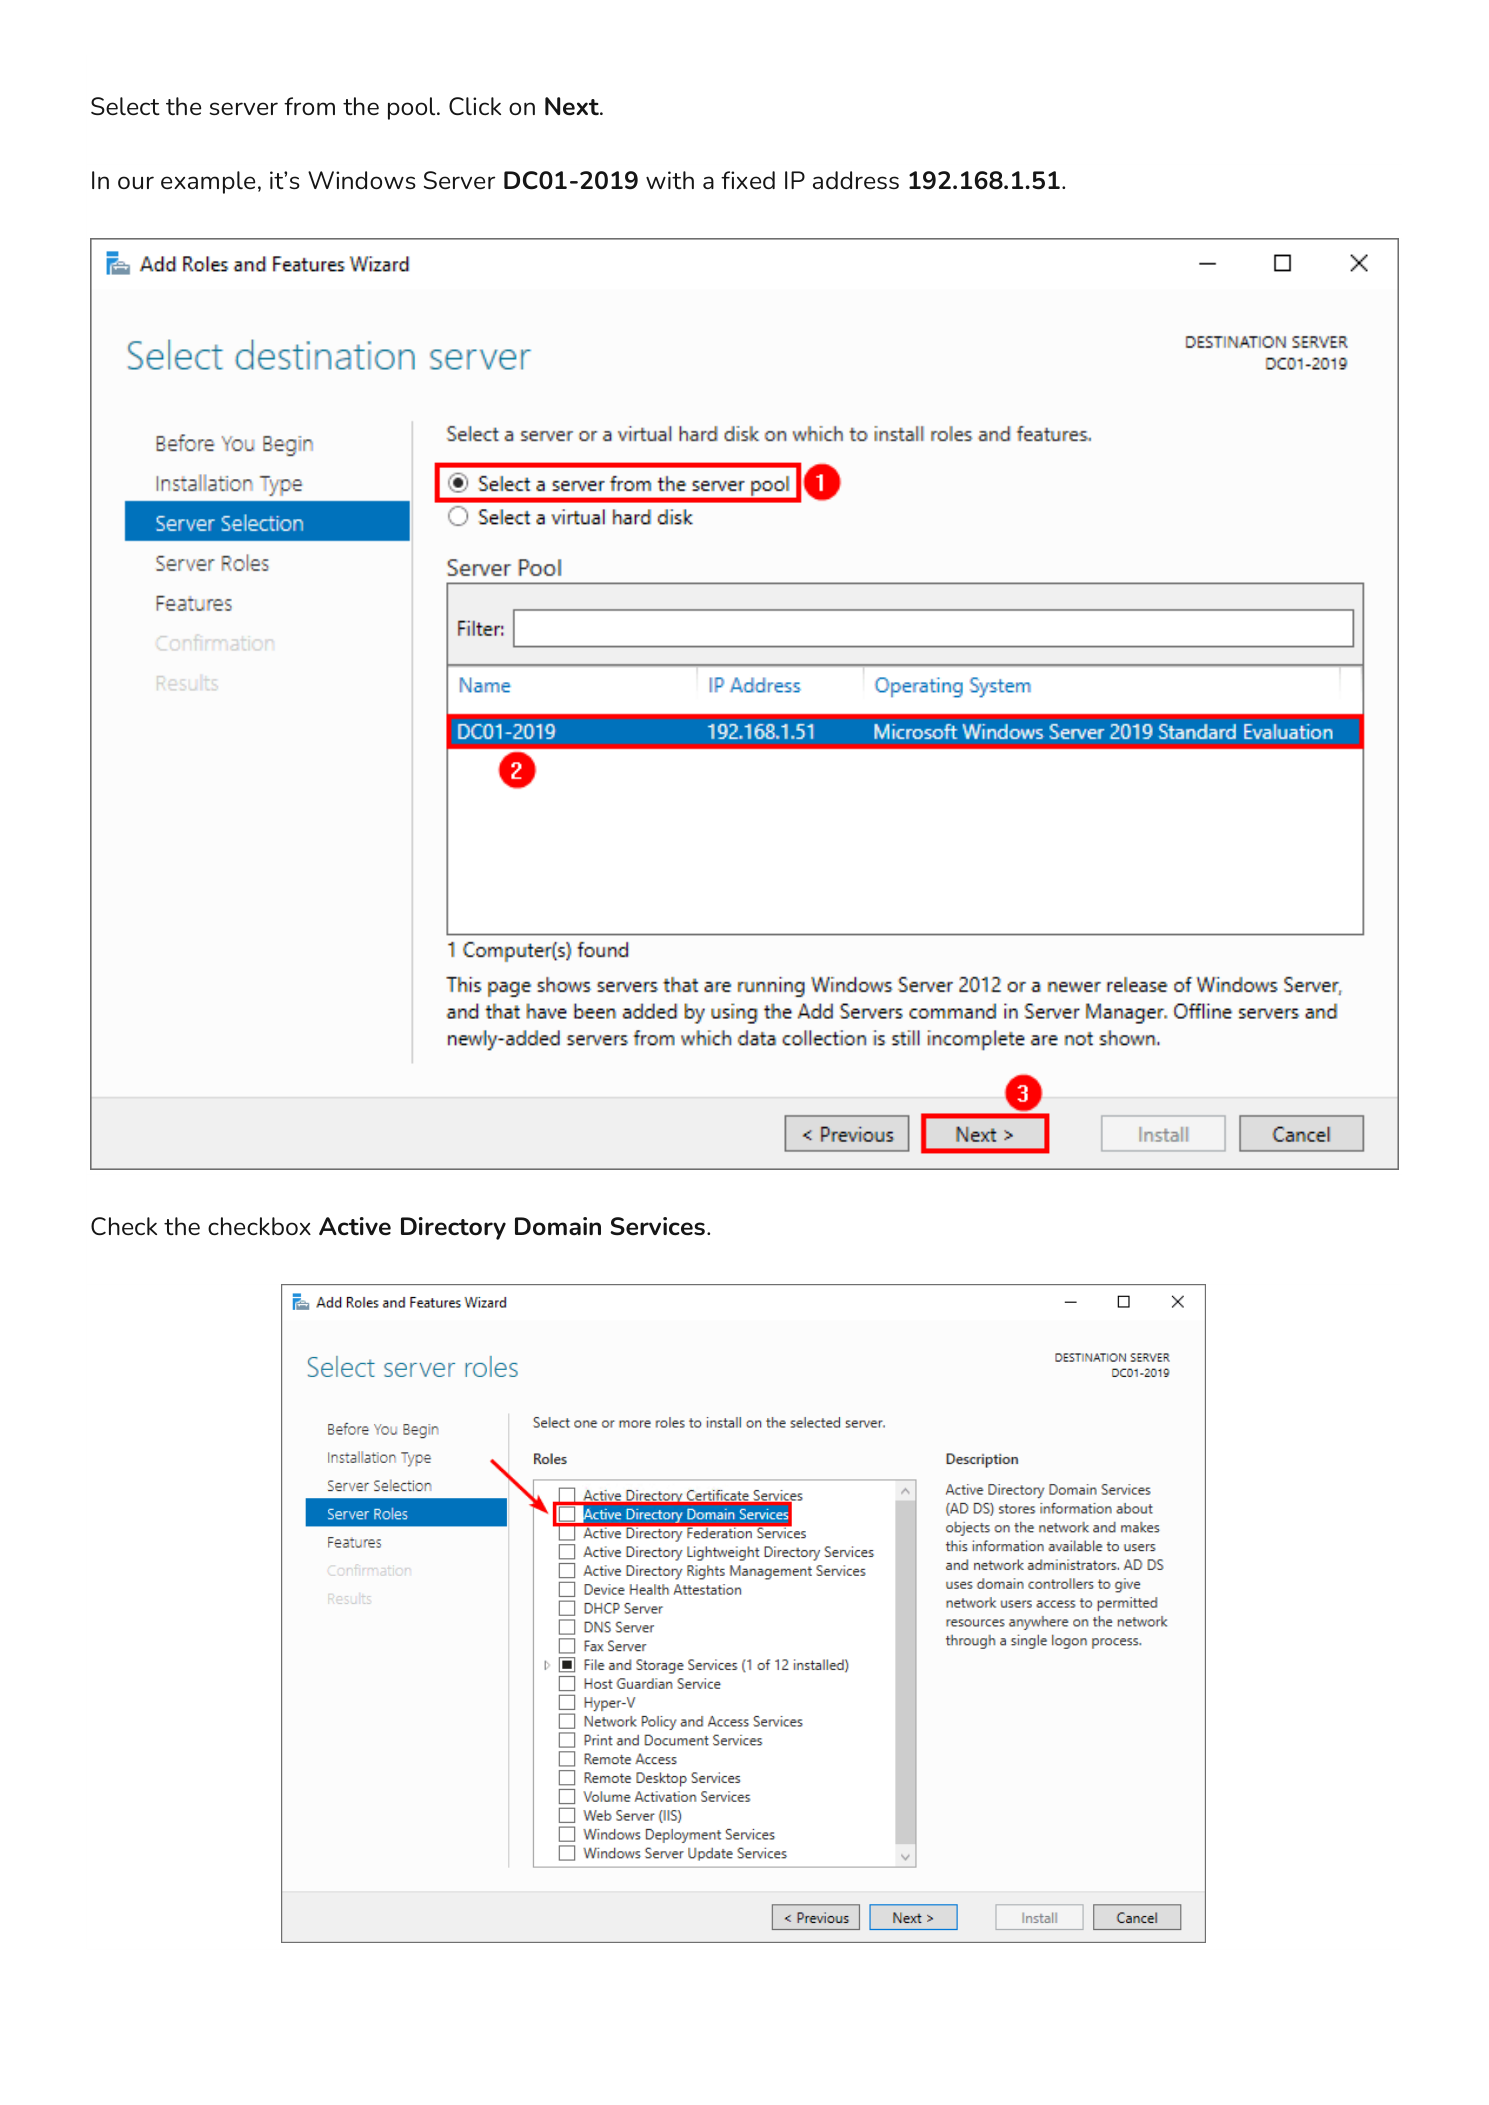
On the Server Selection page, choose Select a server from the server pool and pick the server you are installing the role on — in this example it is DC01-2019 with static IP 192.168.1.51. Click Next.
On the Server Roles page, scroll the list and check Active Directory Domain Services.
Step 3 — Add the Required Management Features
The instant you check the AD DS box, a pop-up appears asking you to add the features required to manage the role — these include AD DS snap-ins, command-line tools, and Group Policy Management. Click Add Features.
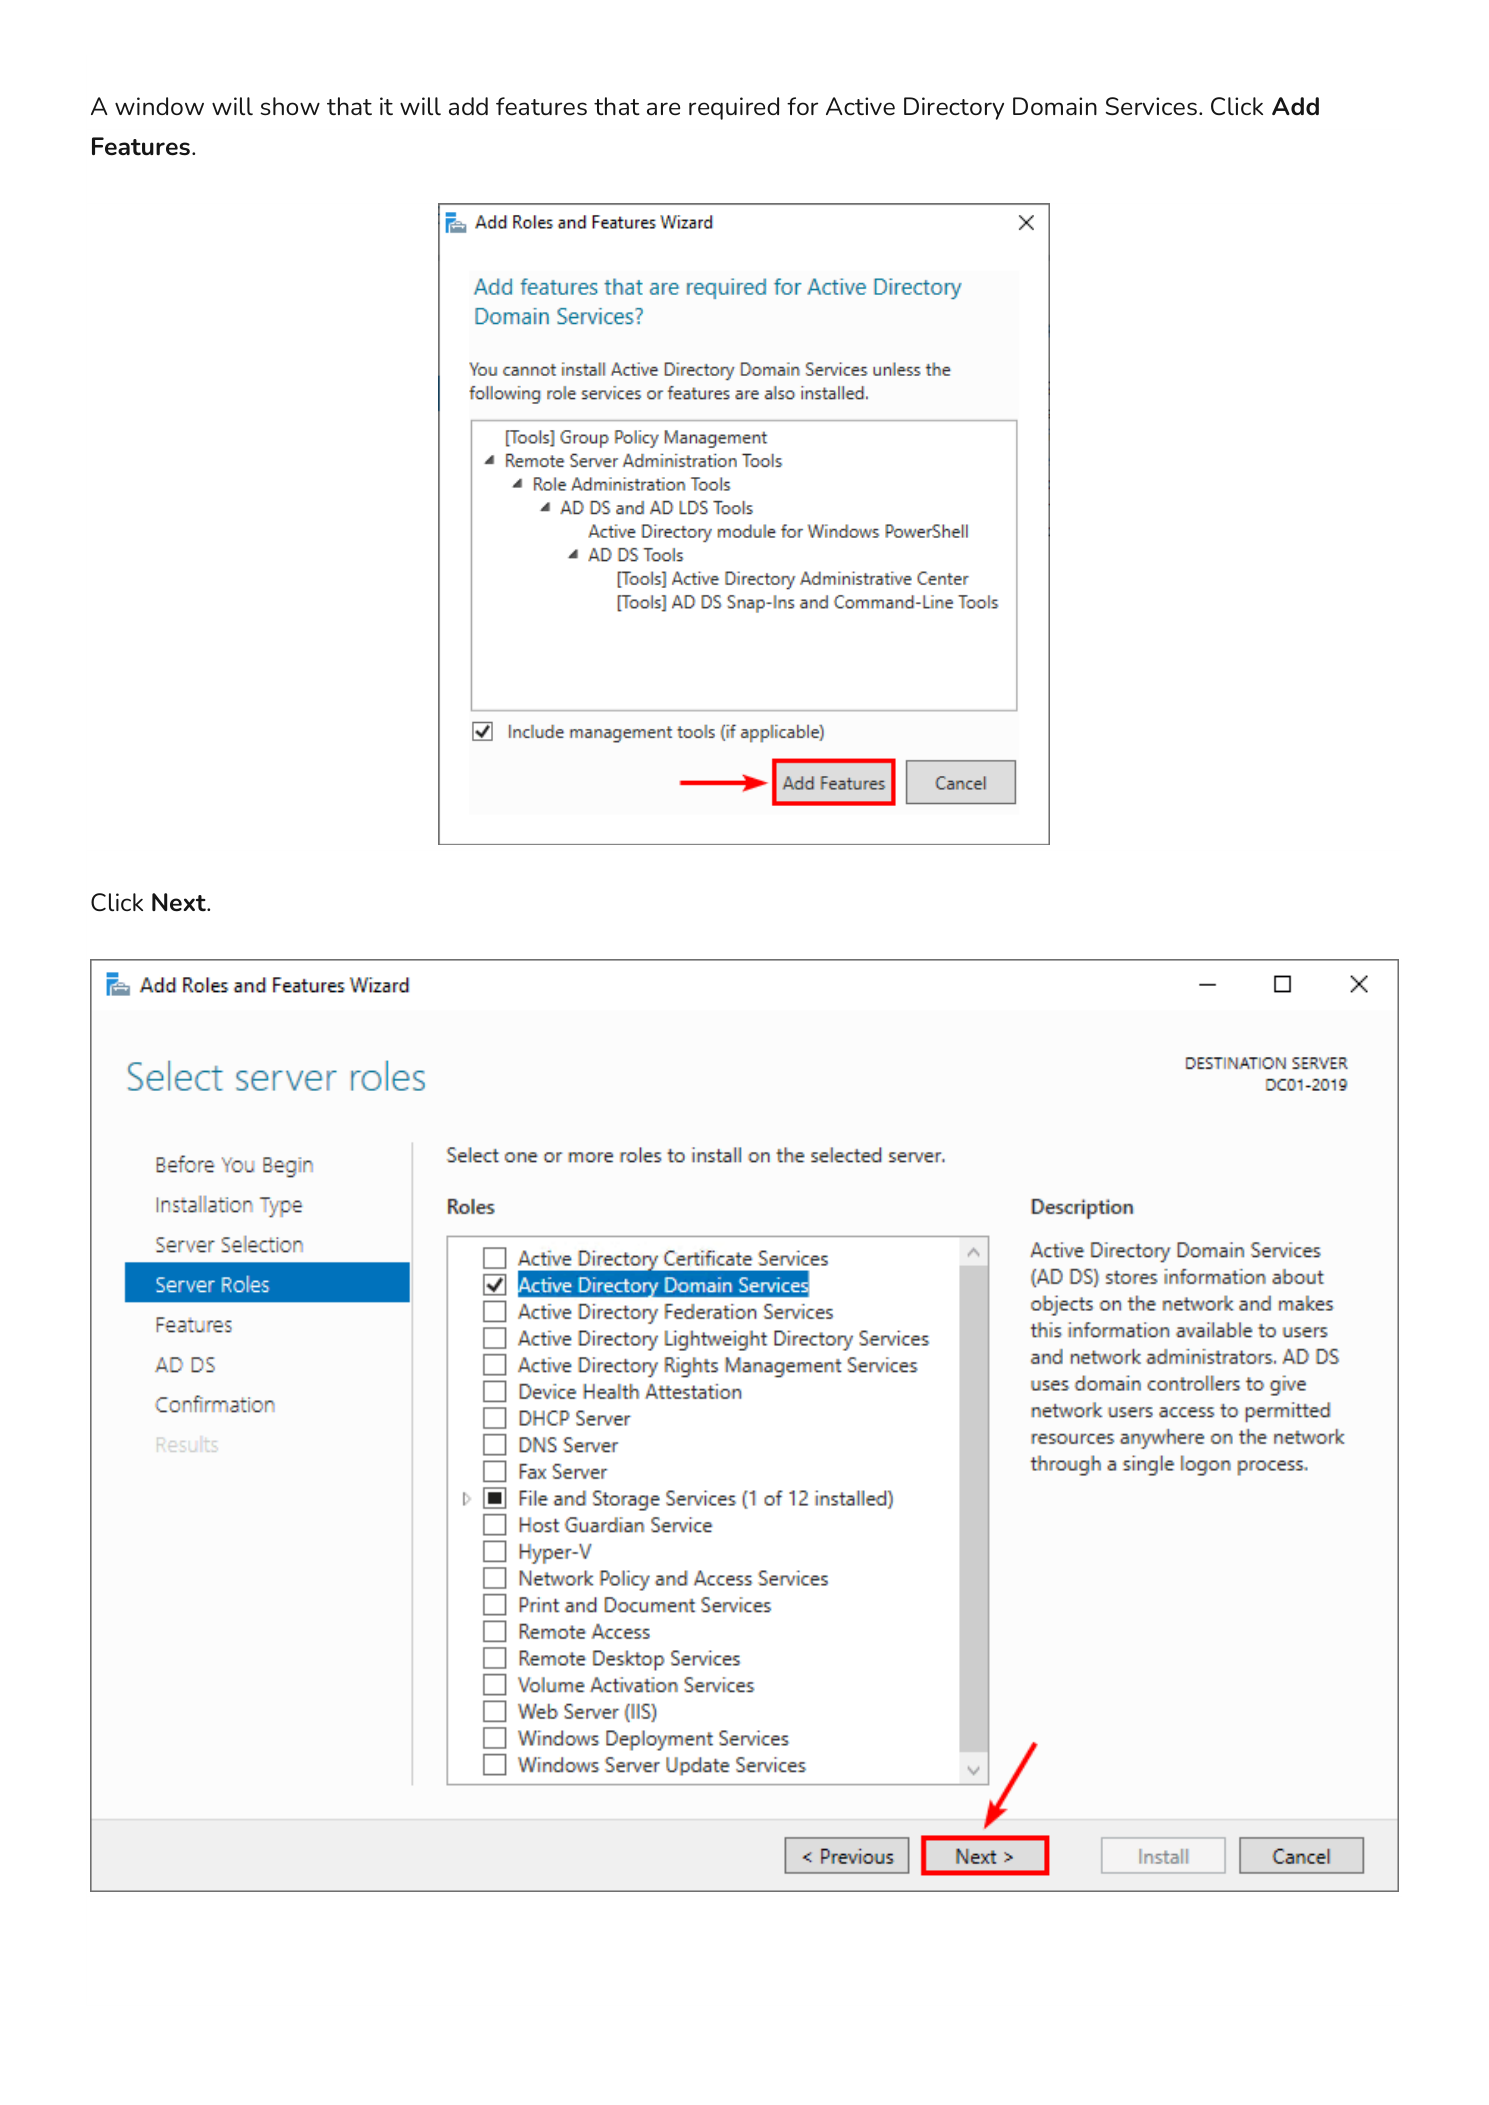
Back on the Server Roles page, click Next.
Step 4 — Skip Optional Features and Review the AD DS Overview
On the Features page you do not need to select anything additional — the AD DS prerequisites were already pulled in by the previous Add Features dialog. Click Next. The next page is an informational AD DS overview describing what the role provides; click Next again.
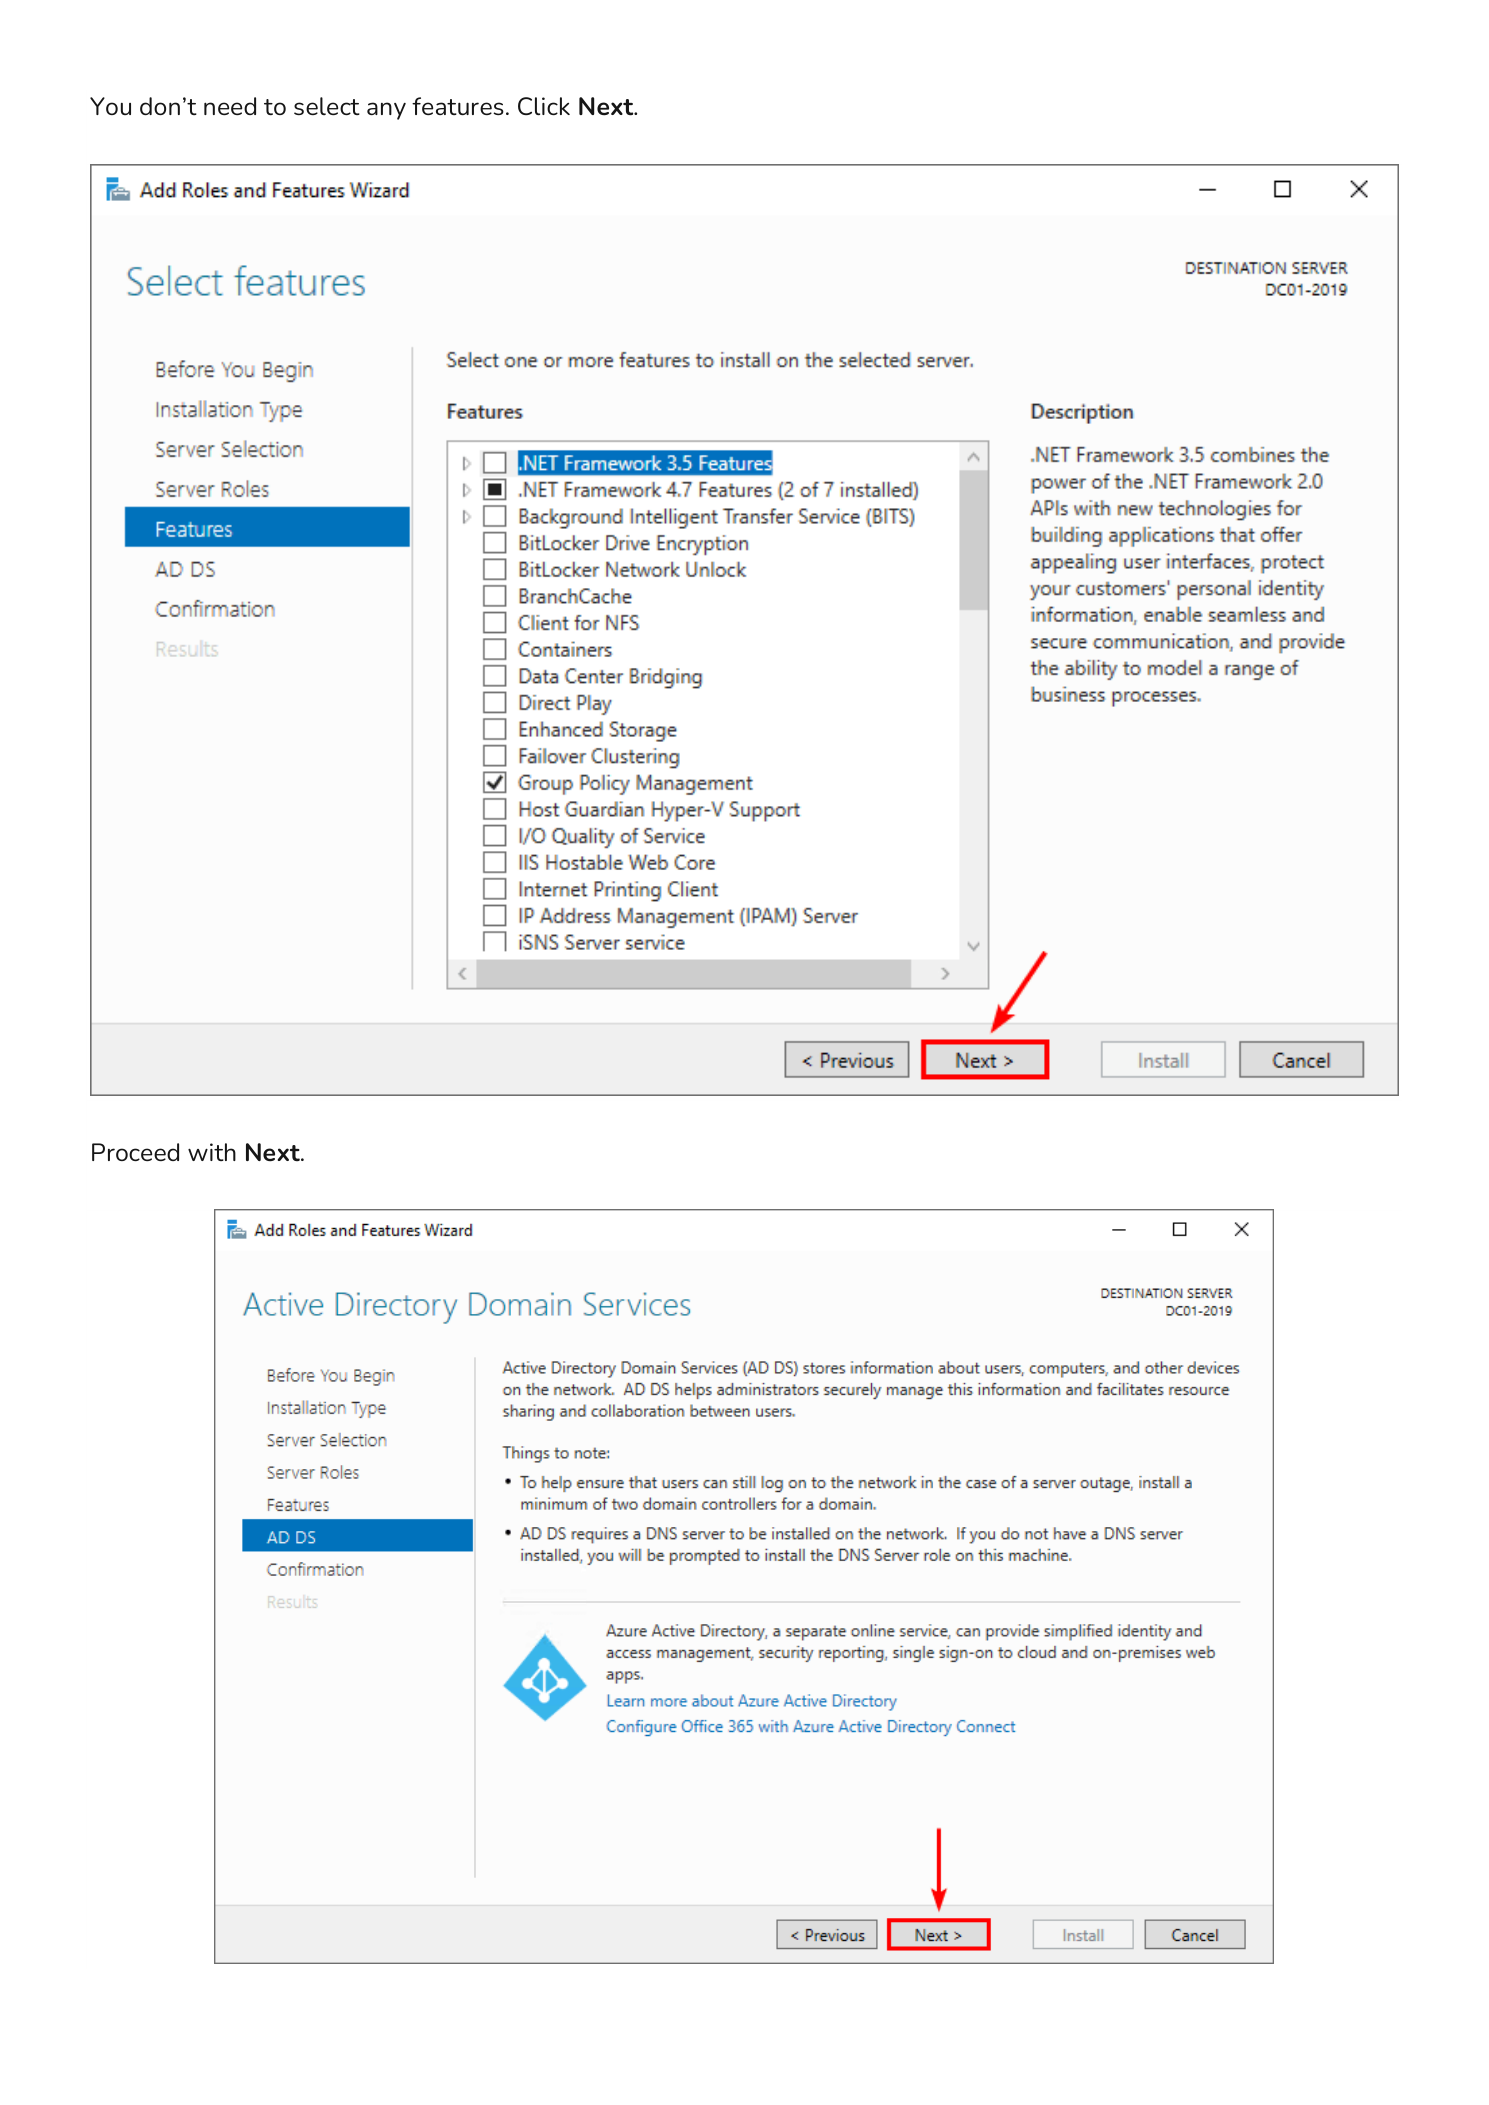
Step 5 — Confirm and Install
The Confirmation page summarizes what is about to be installed: Active Directory Domain Services itself plus the management tools. Click Install. The wizard switches to the Results page and streams installation progress in real time.
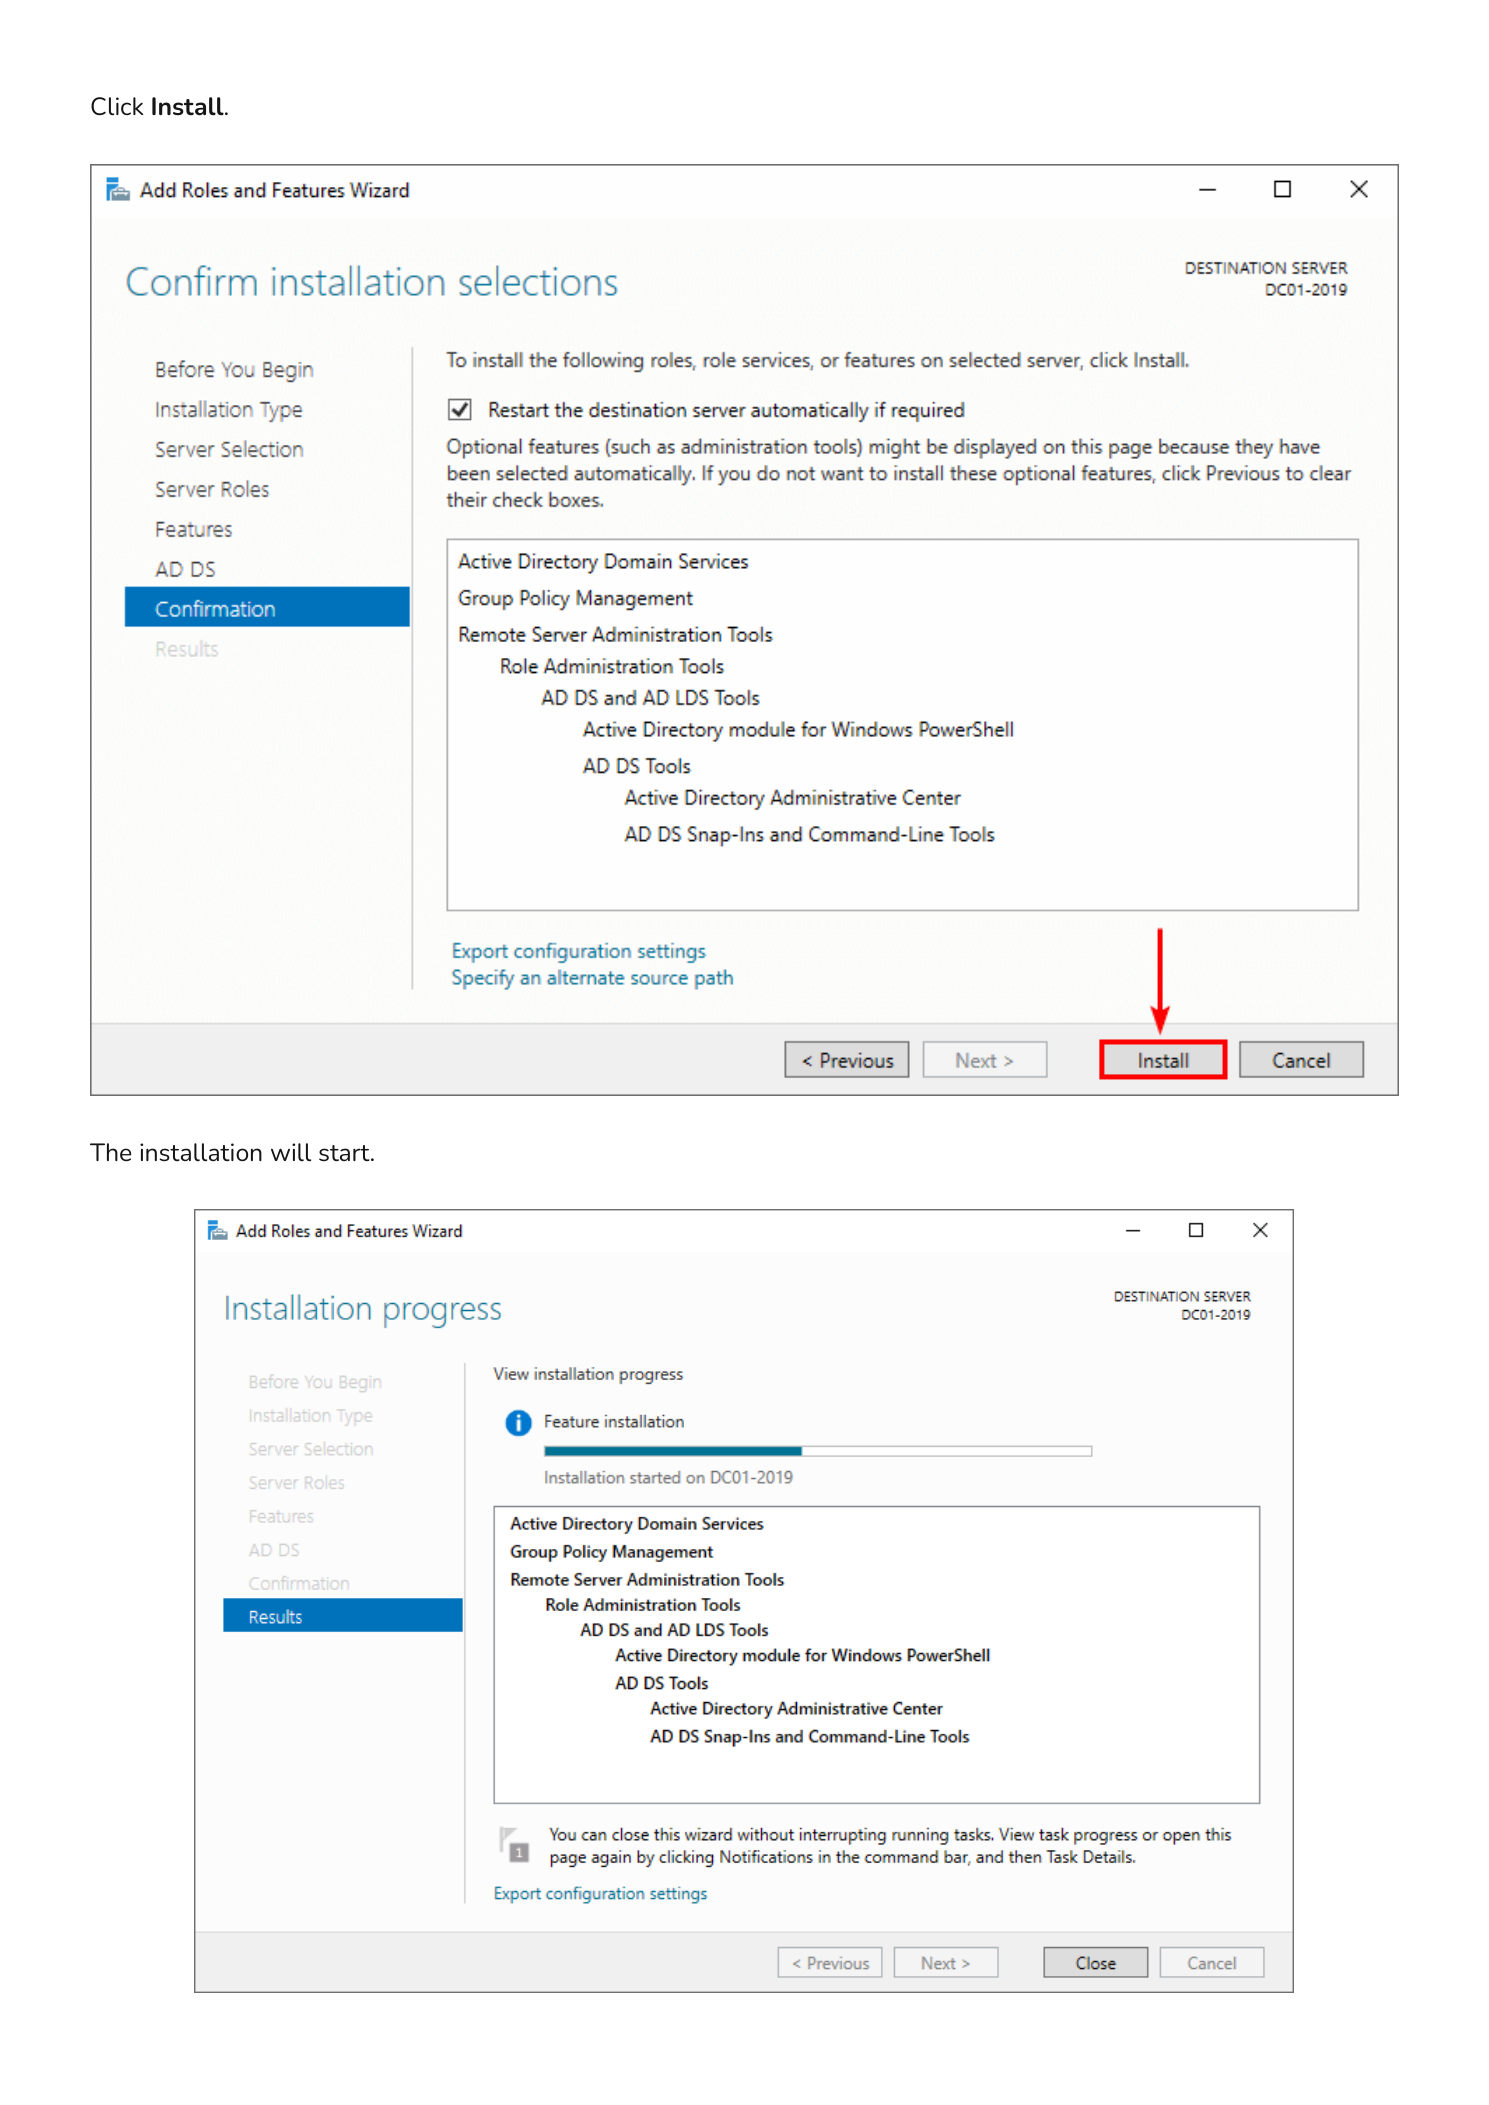
Leave this window open — when the installation completes, the next phase is launched directly from this same page.
Part 2 — Promote the Server to a Domain Controller
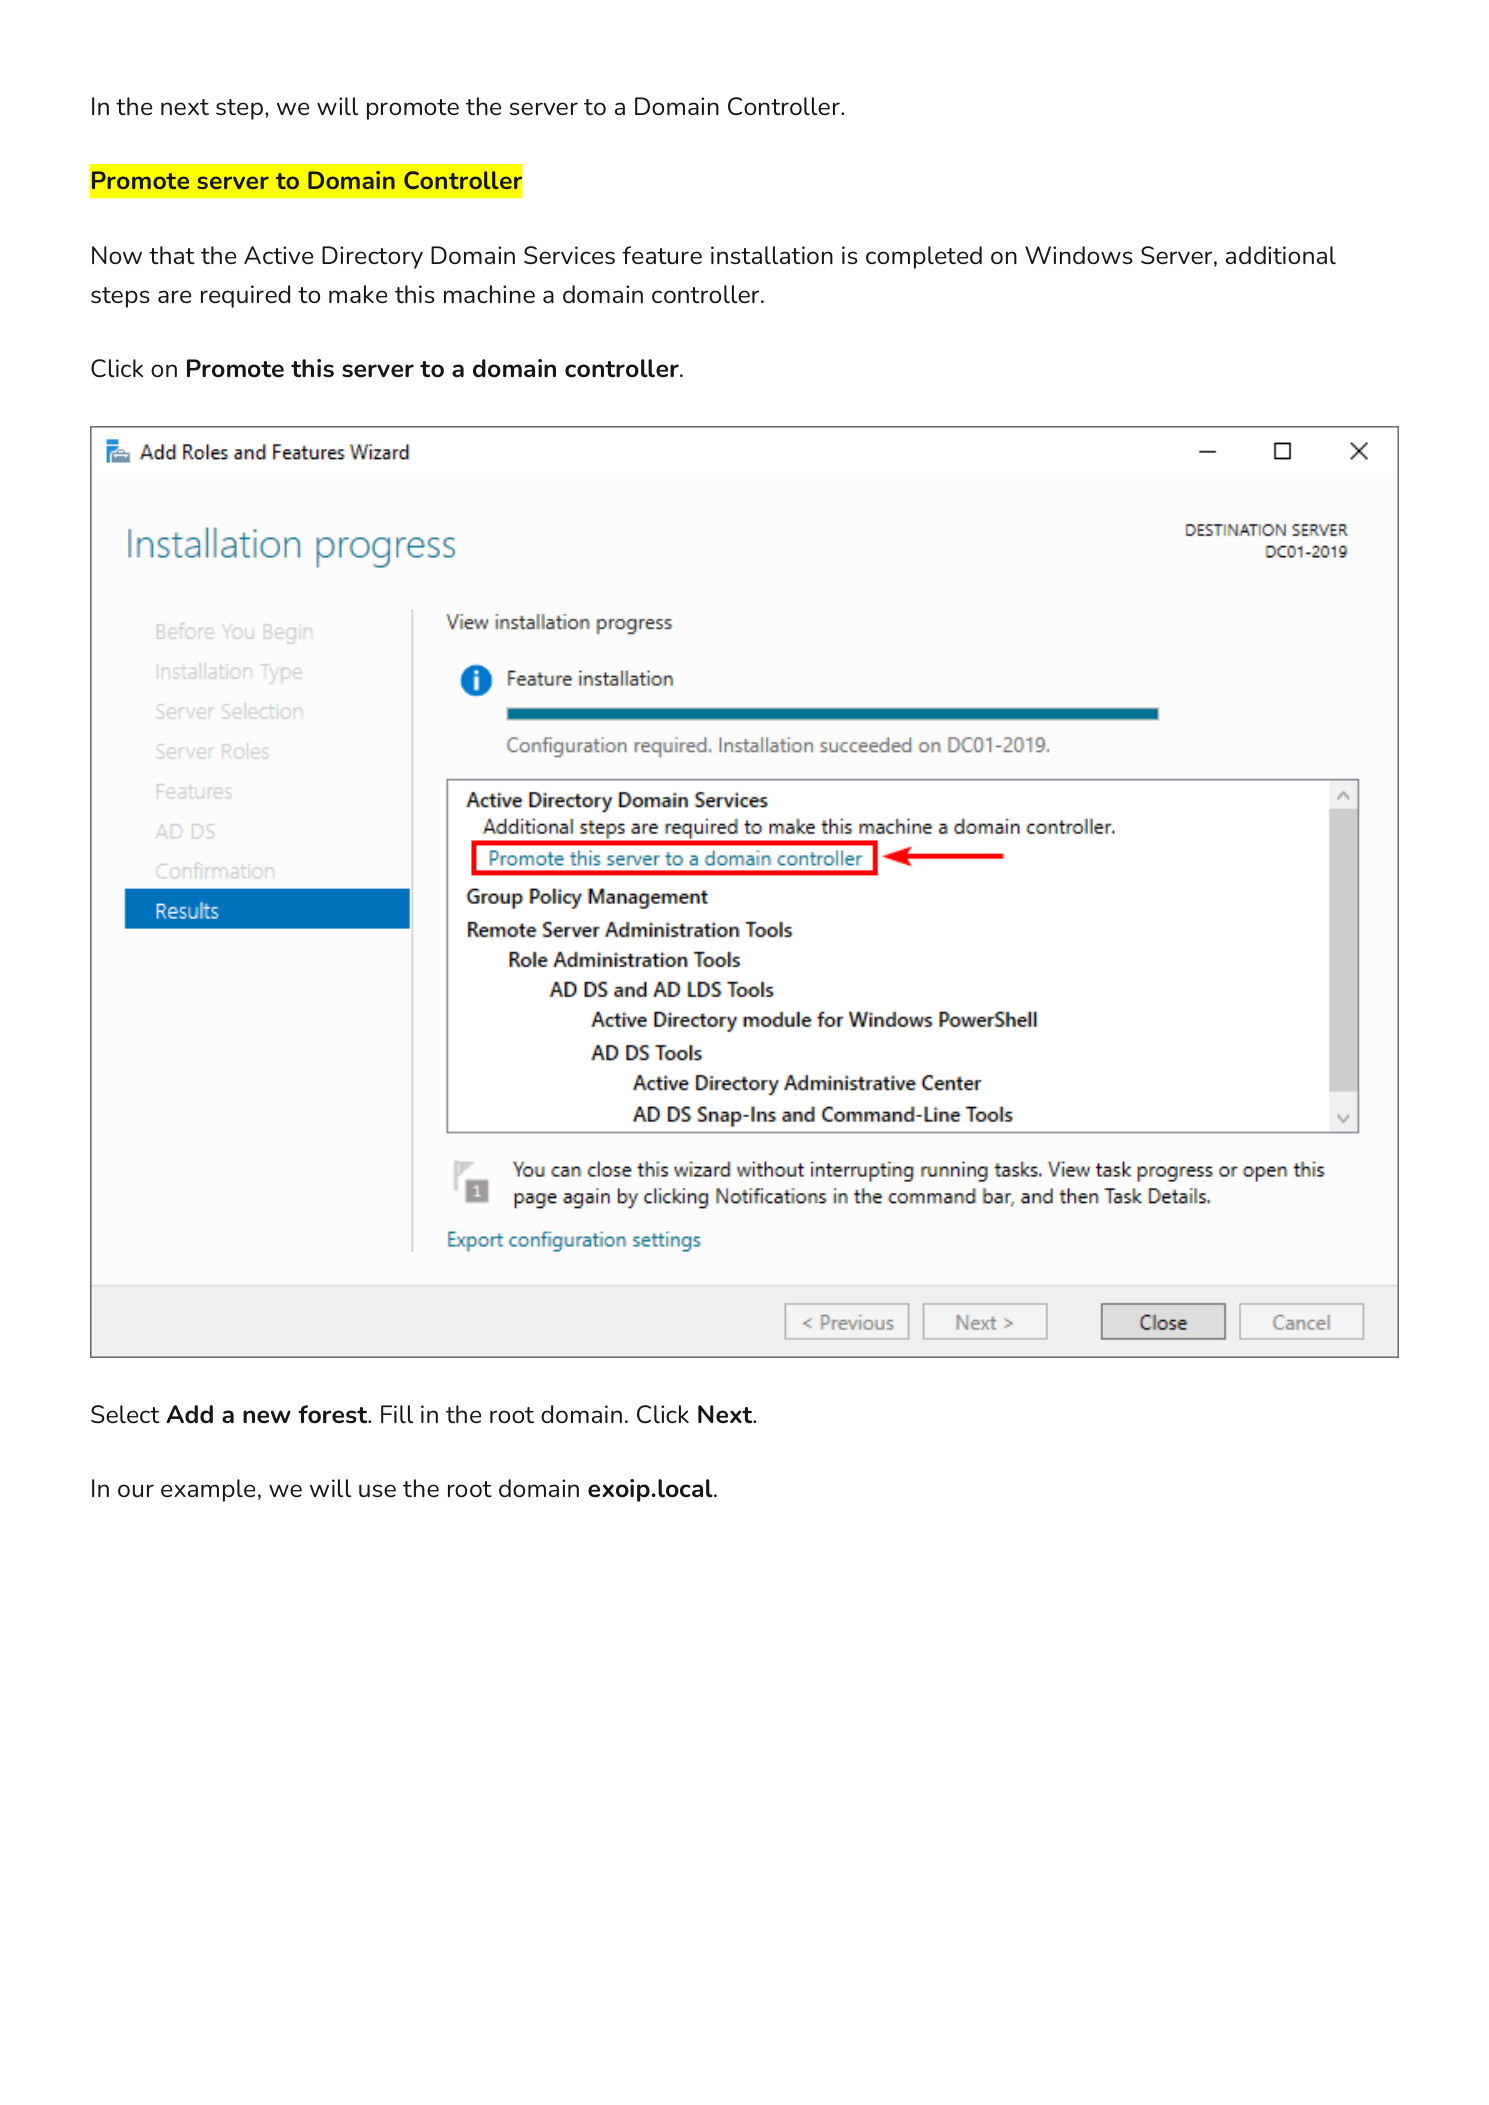
Installing the AD DS feature only adds the binaries. The server is not yet a Domain Controller — you still need to promote it, which is the step that creates (or joins) a forest, configures DNS, and reboots the machine into its new role.
Step 6 — Launch the Configuration Wizard
On the same Results page from the previous step, click the highlighted yellow notification near the top that says Promote this server to a domain controller. This opens the Active Directory Domain Services Configuration Wizard.
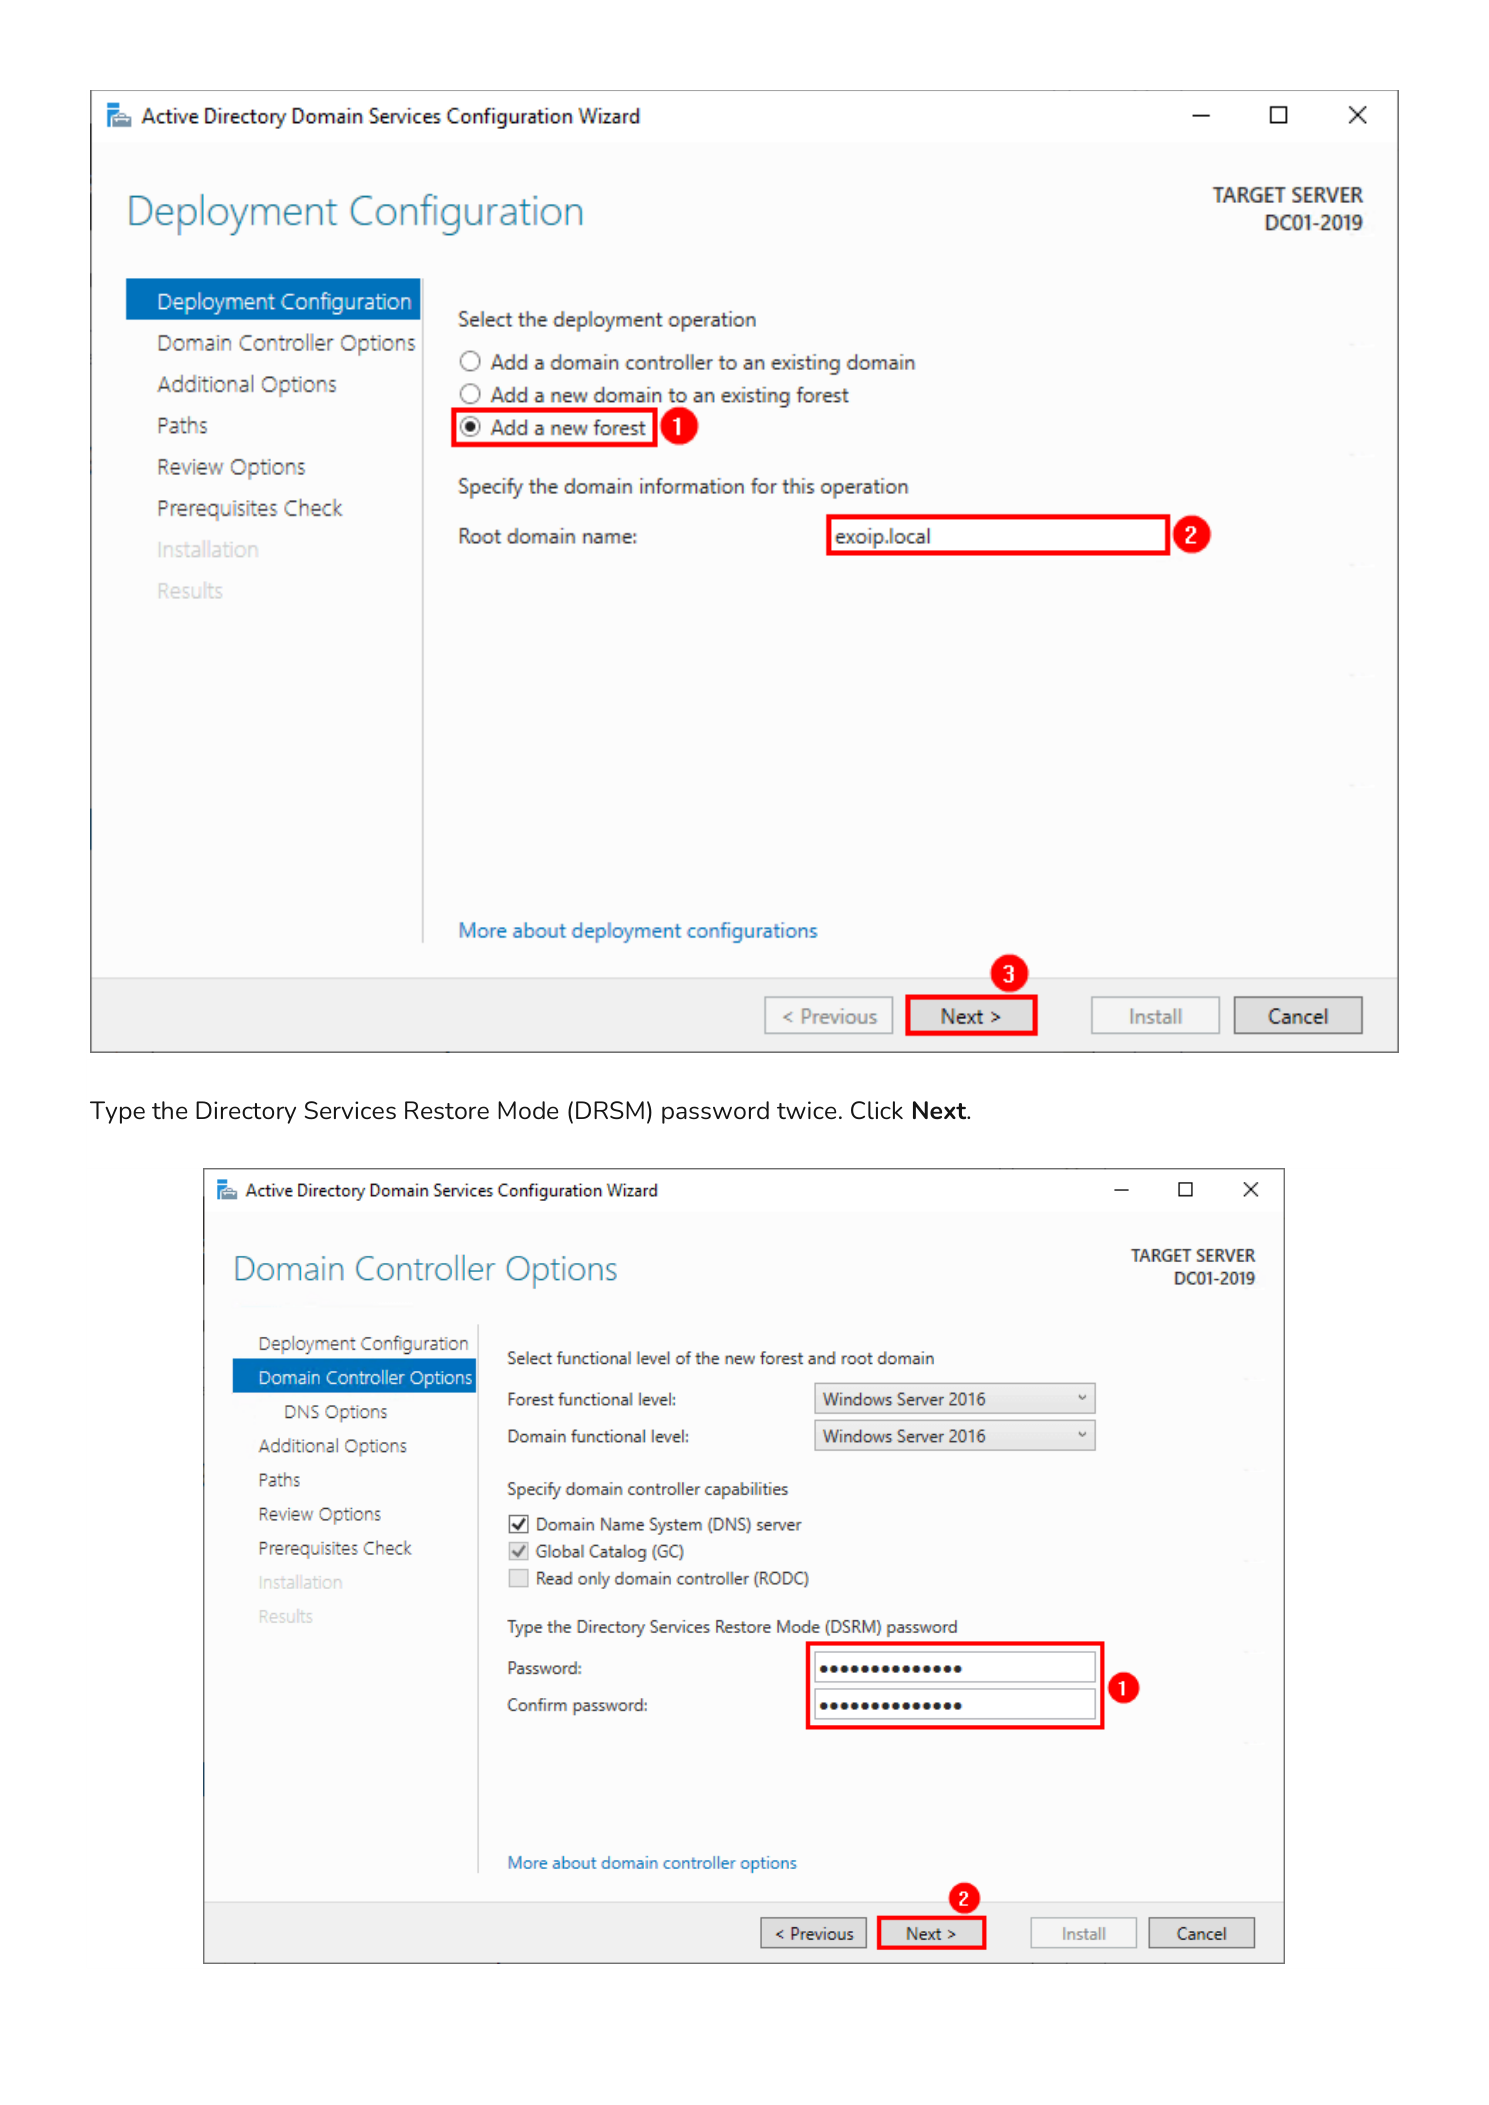
On the Deployment Configuration page, you have three choices:
- Add a domain controller to an existing domain — for adding a second/third DC to an existing forest
- Add a new domain to an existing forest — for creating a child or tree domain
- Add a new forest — for the very first DC in a brand-new directory (this guide’s path)
Select Add a new forest and enter your Root domain name — in this example infotechninja.local. Click Next.
Step 7 — Set Functional Levels and the DSRM Password
The Domain Controller Options page lets you pick your Forest functional level and Domain functional level. For a brand-new forest with modern Windows Servers, leave these at the highest available level (Windows Server 2016 or higher) — this unlocks every modern AD feature. Confirm that Domain Name System (DNS) server and Global Catalog (GC) are checked.
Now set the Directory Services Restore Mode (DSRM) password. This is a special offline password used only when booting the DC into directory recovery mode — it is separate from any domain account. Pick a strong, complex password and store it in your password manager; you do not want to discover the recovery password is lost the day you actually need it. Click Next.
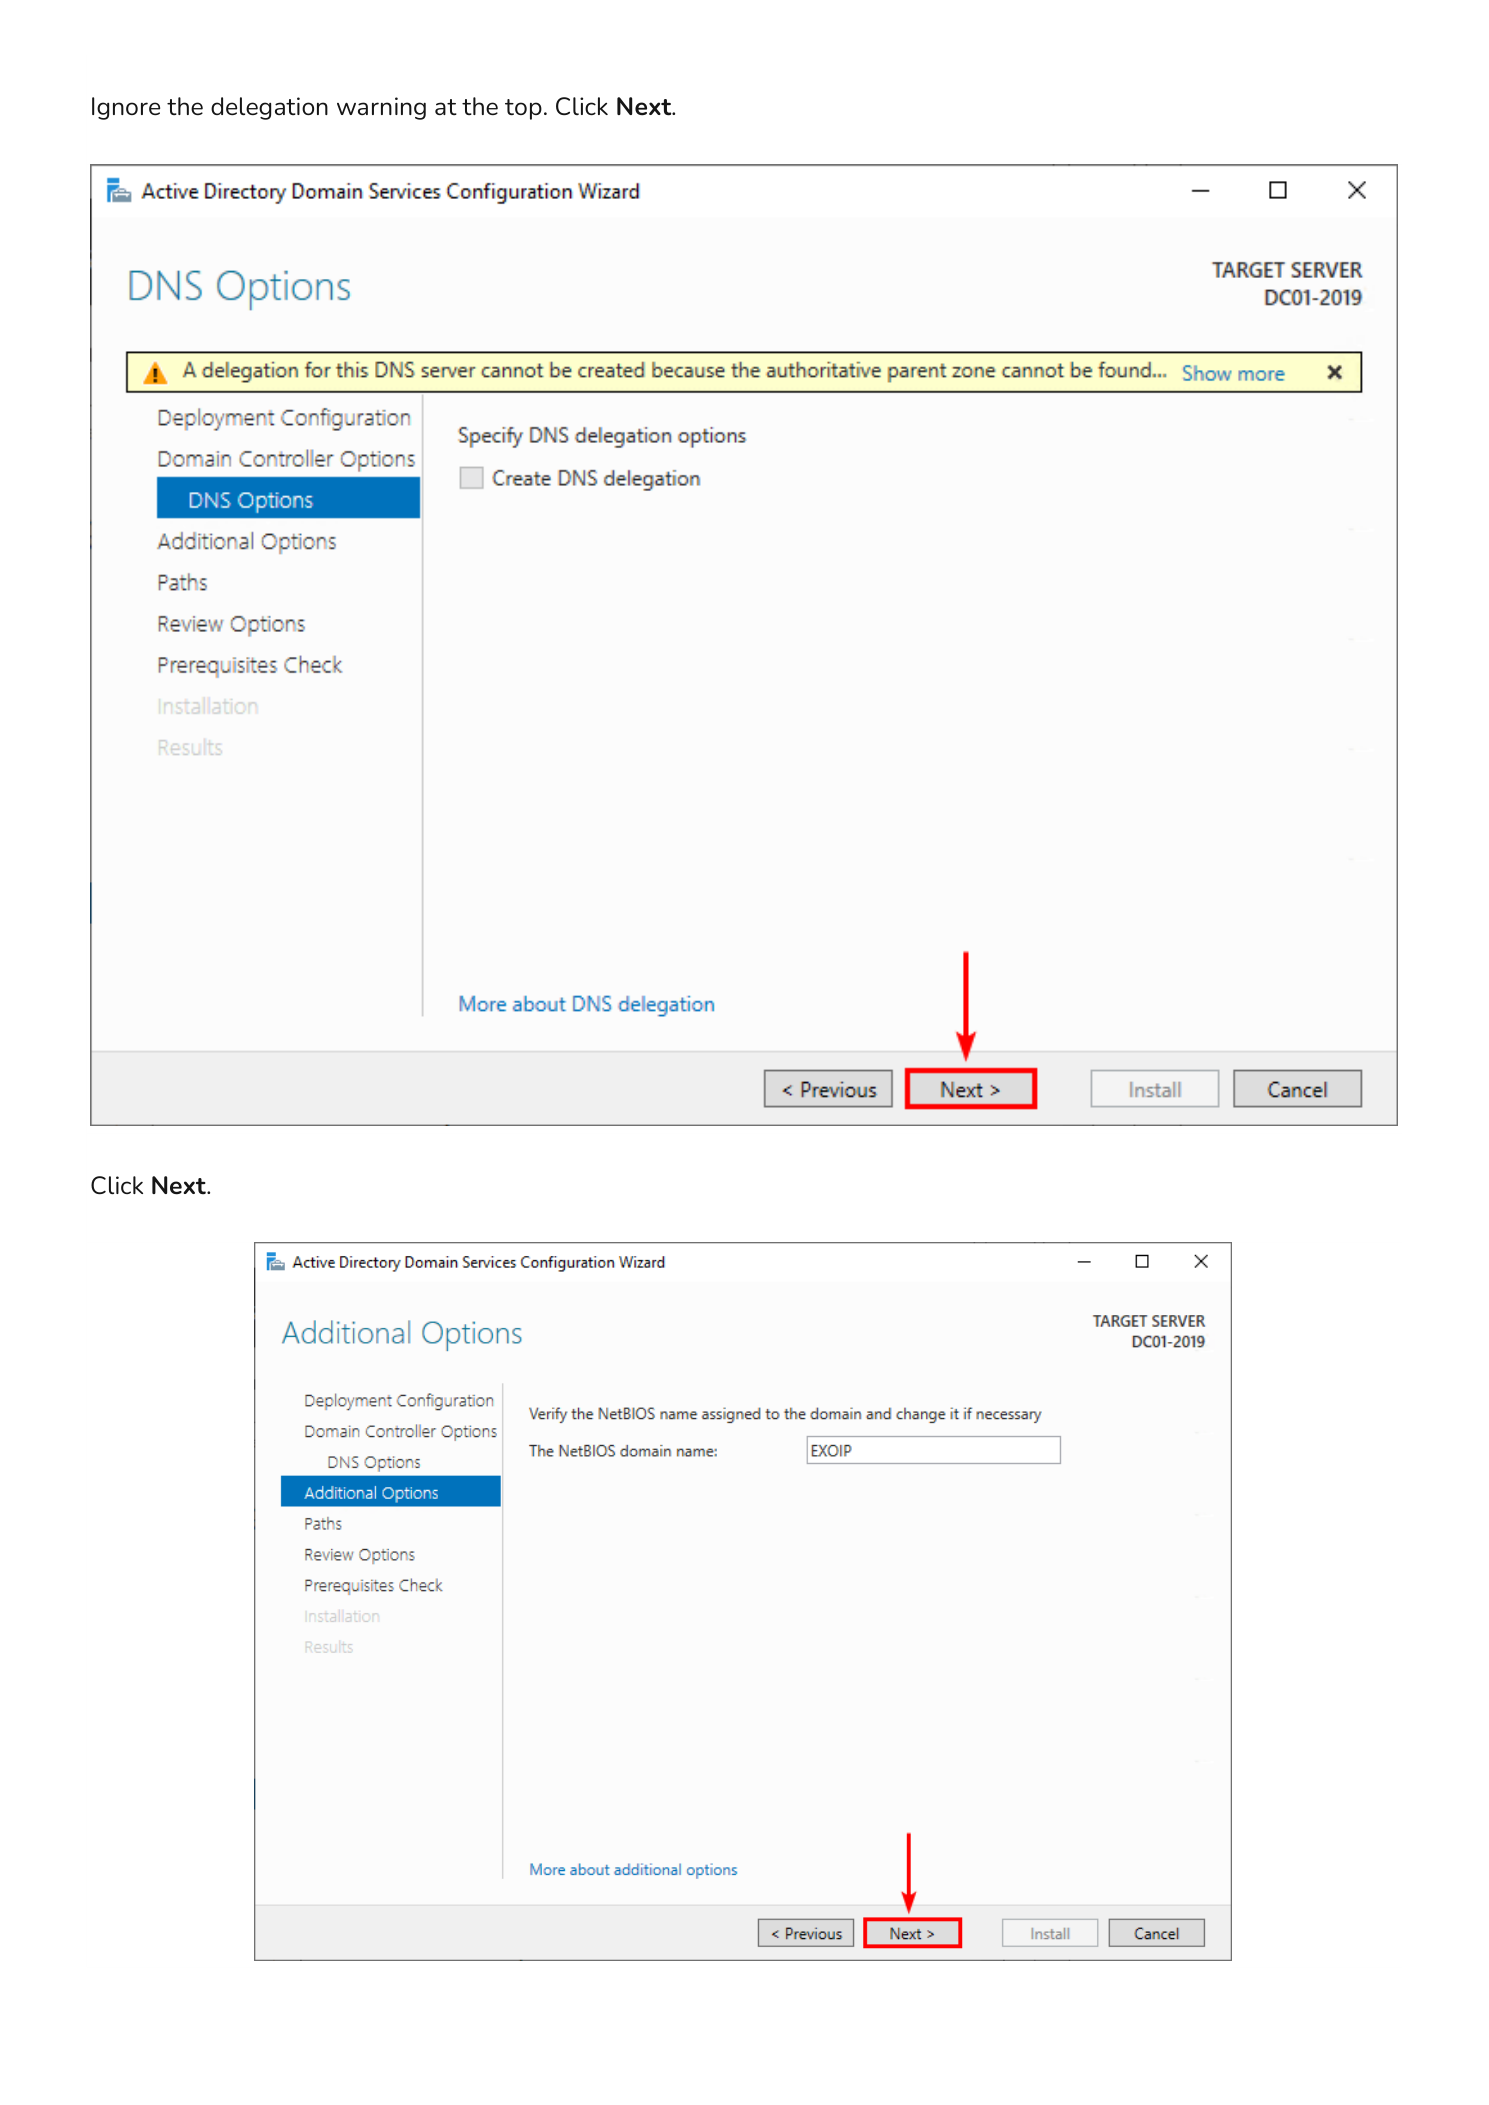
Step 8 — Skip the DNS Delegation Warning
The DNS Options page shows a yellow warning: “A delegation for this DNS server cannot be created because the authoritative parent zone cannot be found.” This is expected and harmless when you are creating a brand-new forest — there is no parent DNS zone to delegate from. Click Next.
On the Additional Options page, the wizard auto-generates a NetBIOS domain name from your root domain (for infotechninja.local it becomes INFOTECHNINJA). Accept the default and click Next.
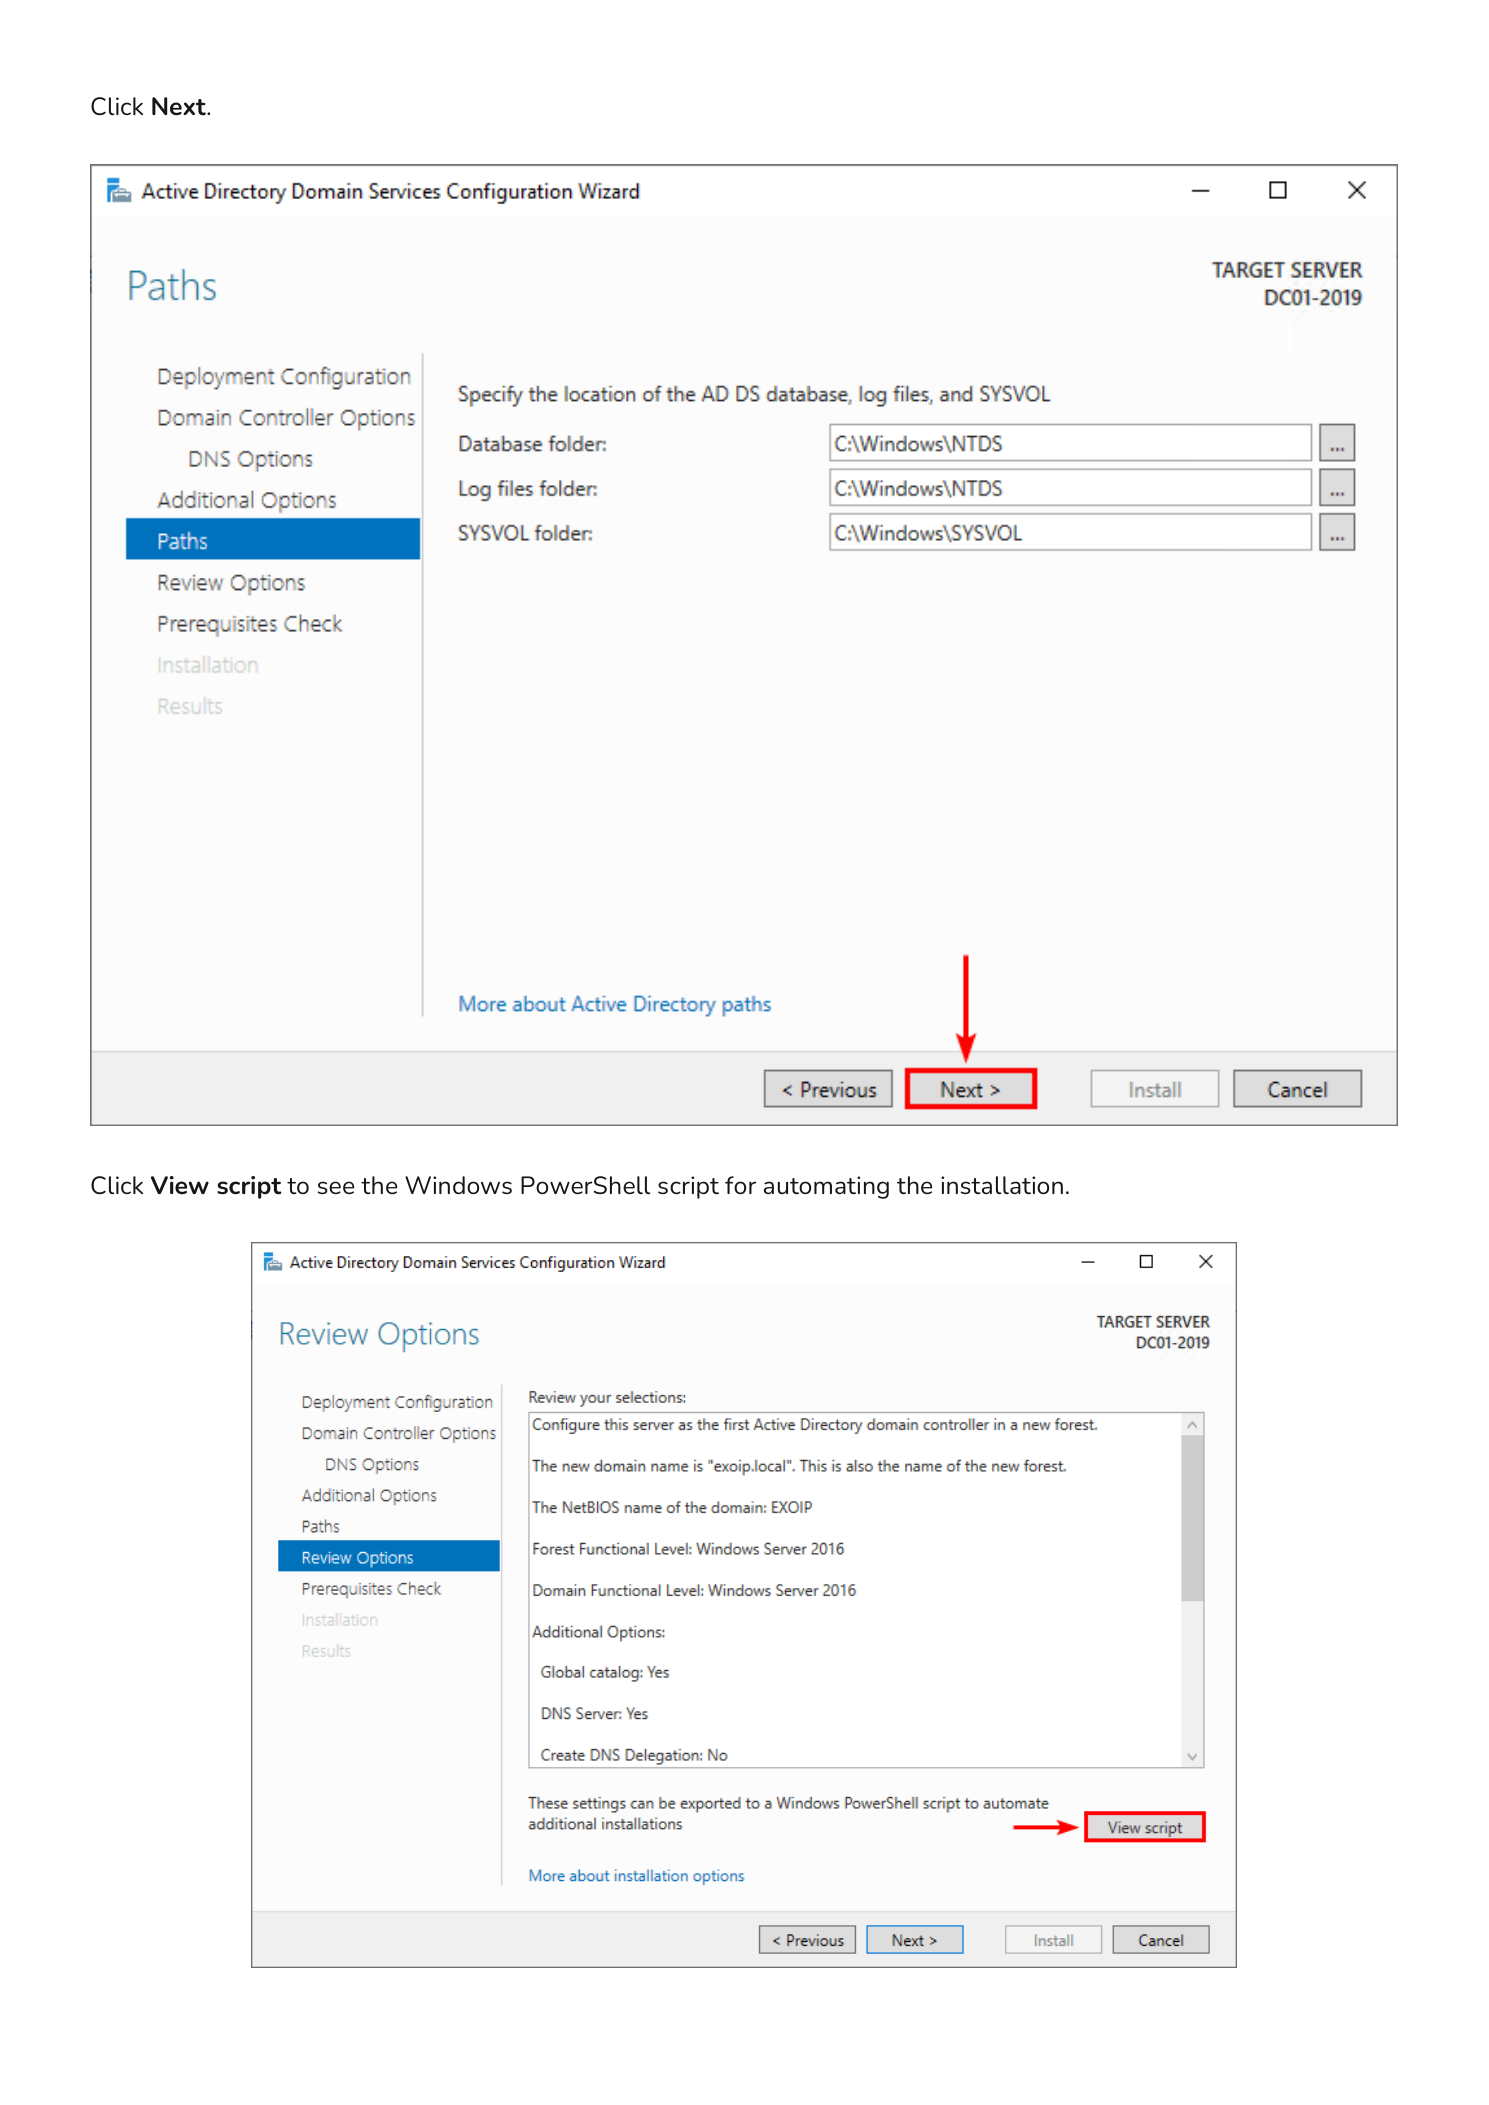
Step 9 — Review File Paths and the PowerShell Equivalent
The Paths page shows the default locations where the wizard will store the AD DS database, log files, and the SYSVOL share:
- Database folder:
C:\Windows\NTDS - Log files folder:
C:\Windows\NTDS - SYSVOL folder:
C:\Windows\SYSVOL
For most installations the defaults are fine. In a high-performance production deployment you may relocate these to dedicated volumes for I/O isolation, but for a lab or first DC the C: drive is acceptable. Click Next.
The Review Options page summarizes every choice you have made. Before clicking Next, click the View script button in the bottom-right.
Step 10 — Save the PowerShell Script
The View script button opens Notepad with the equivalent PowerShell command — typically an Install-ADDSForest call with all the parameters you just configured filled in. Save this file as a .ps1 script. The next time you need to deploy a Domain Controller, you can run the script unattended instead of clicking through the wizard manually.
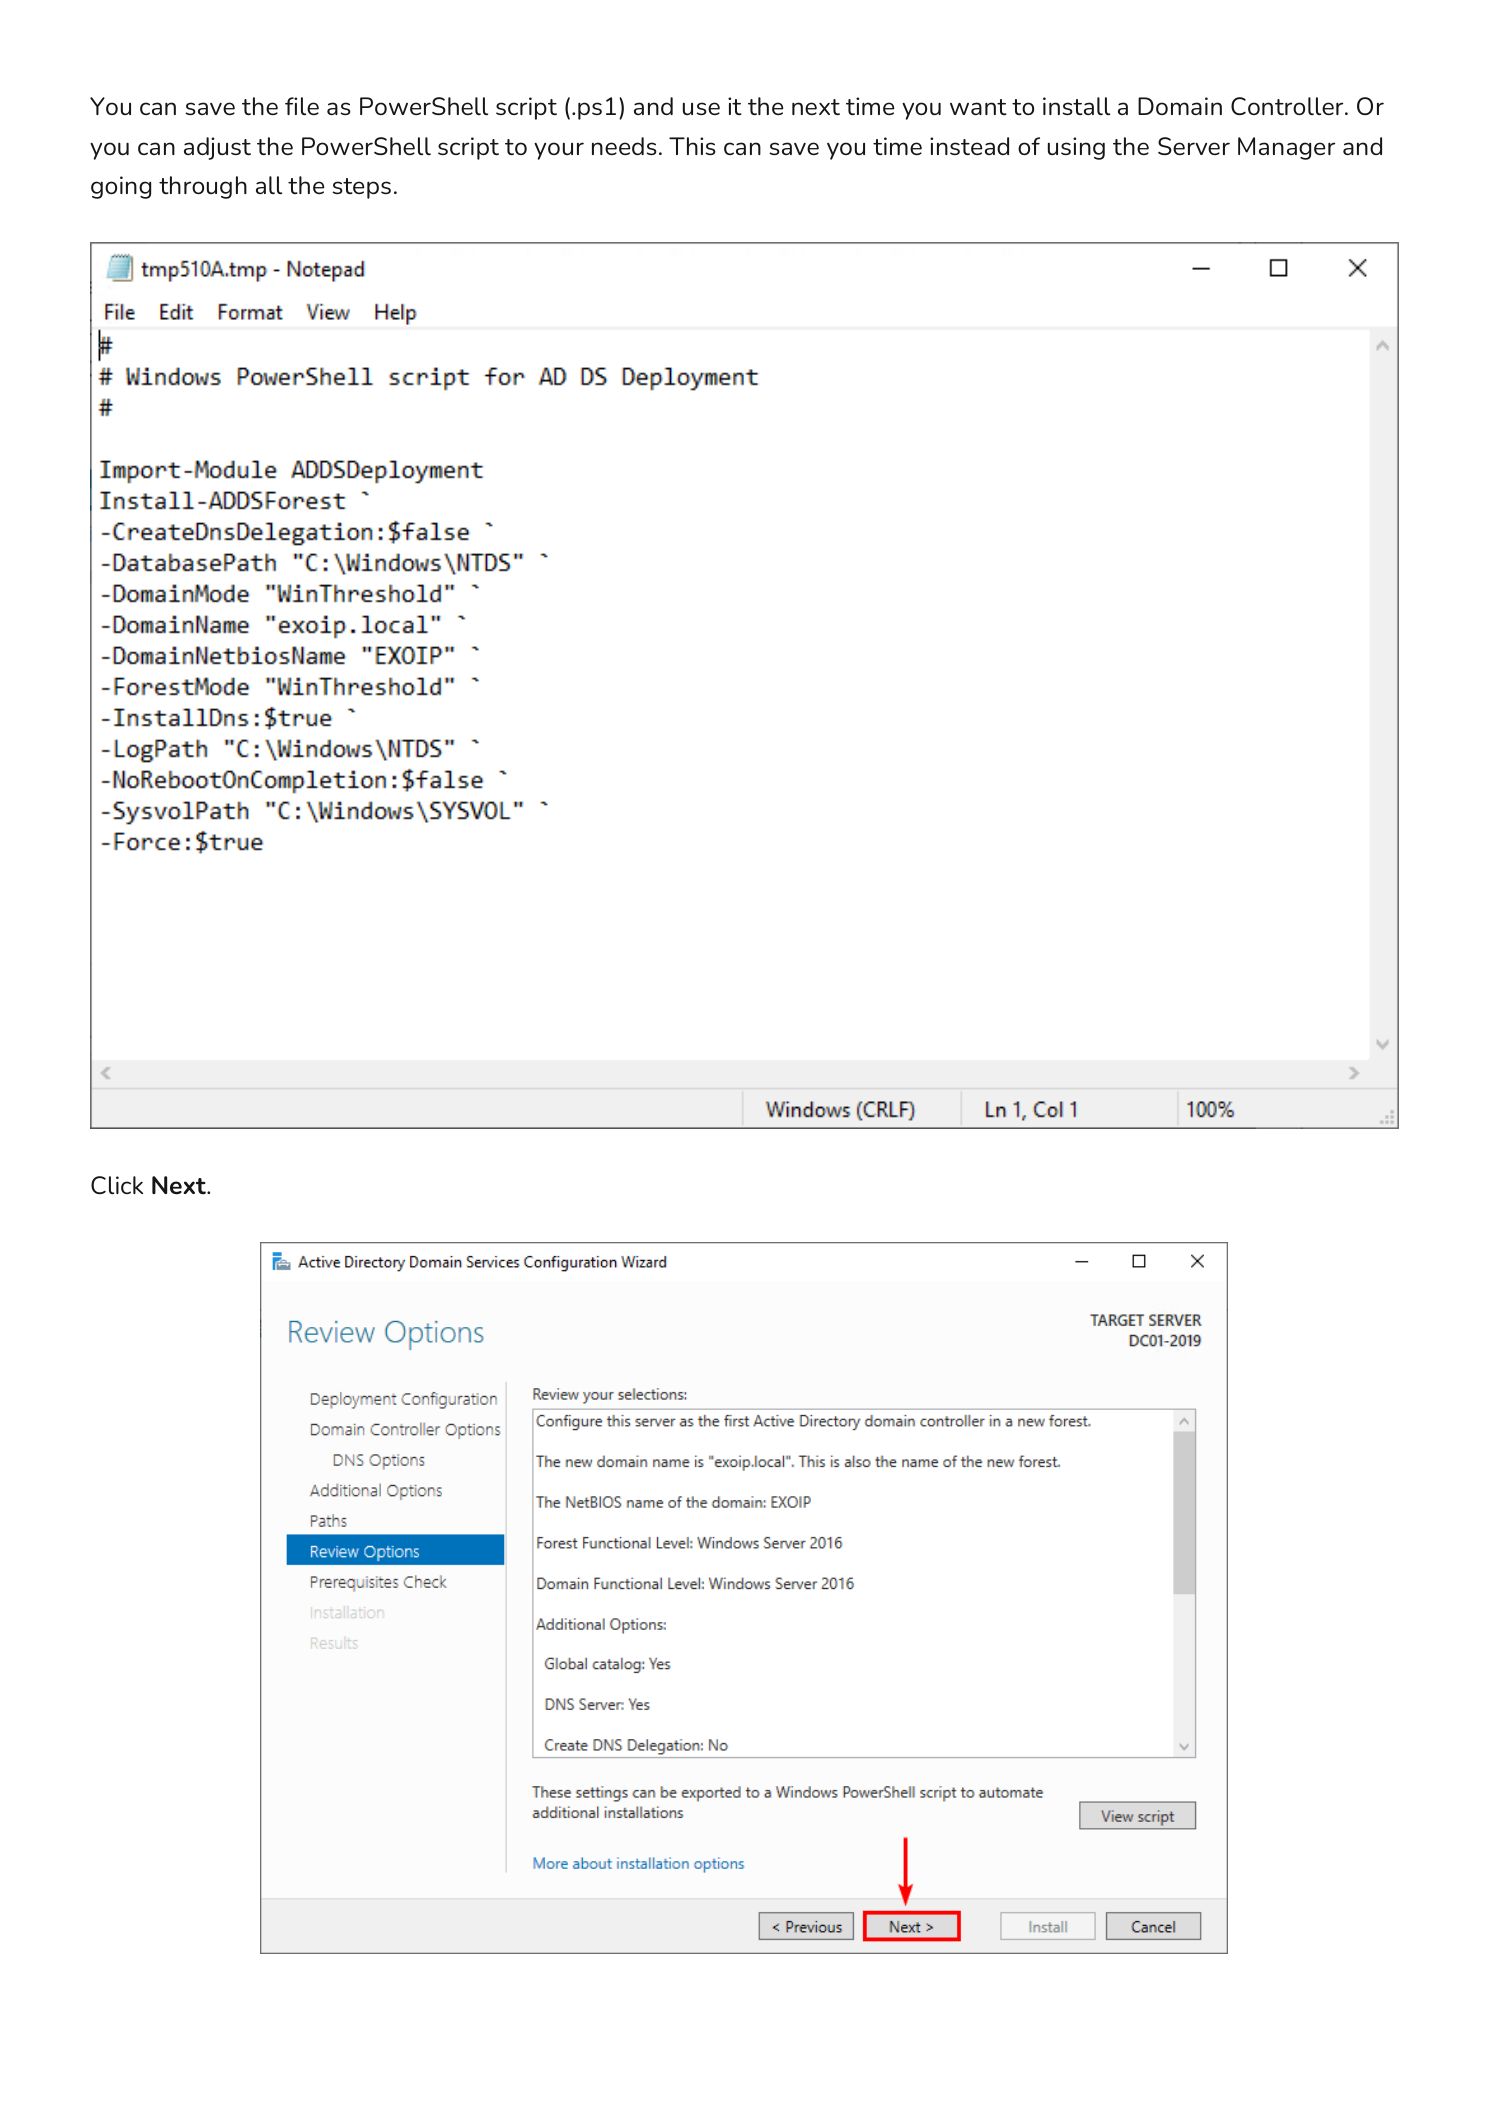
Close Notepad and click Next back in the wizard.
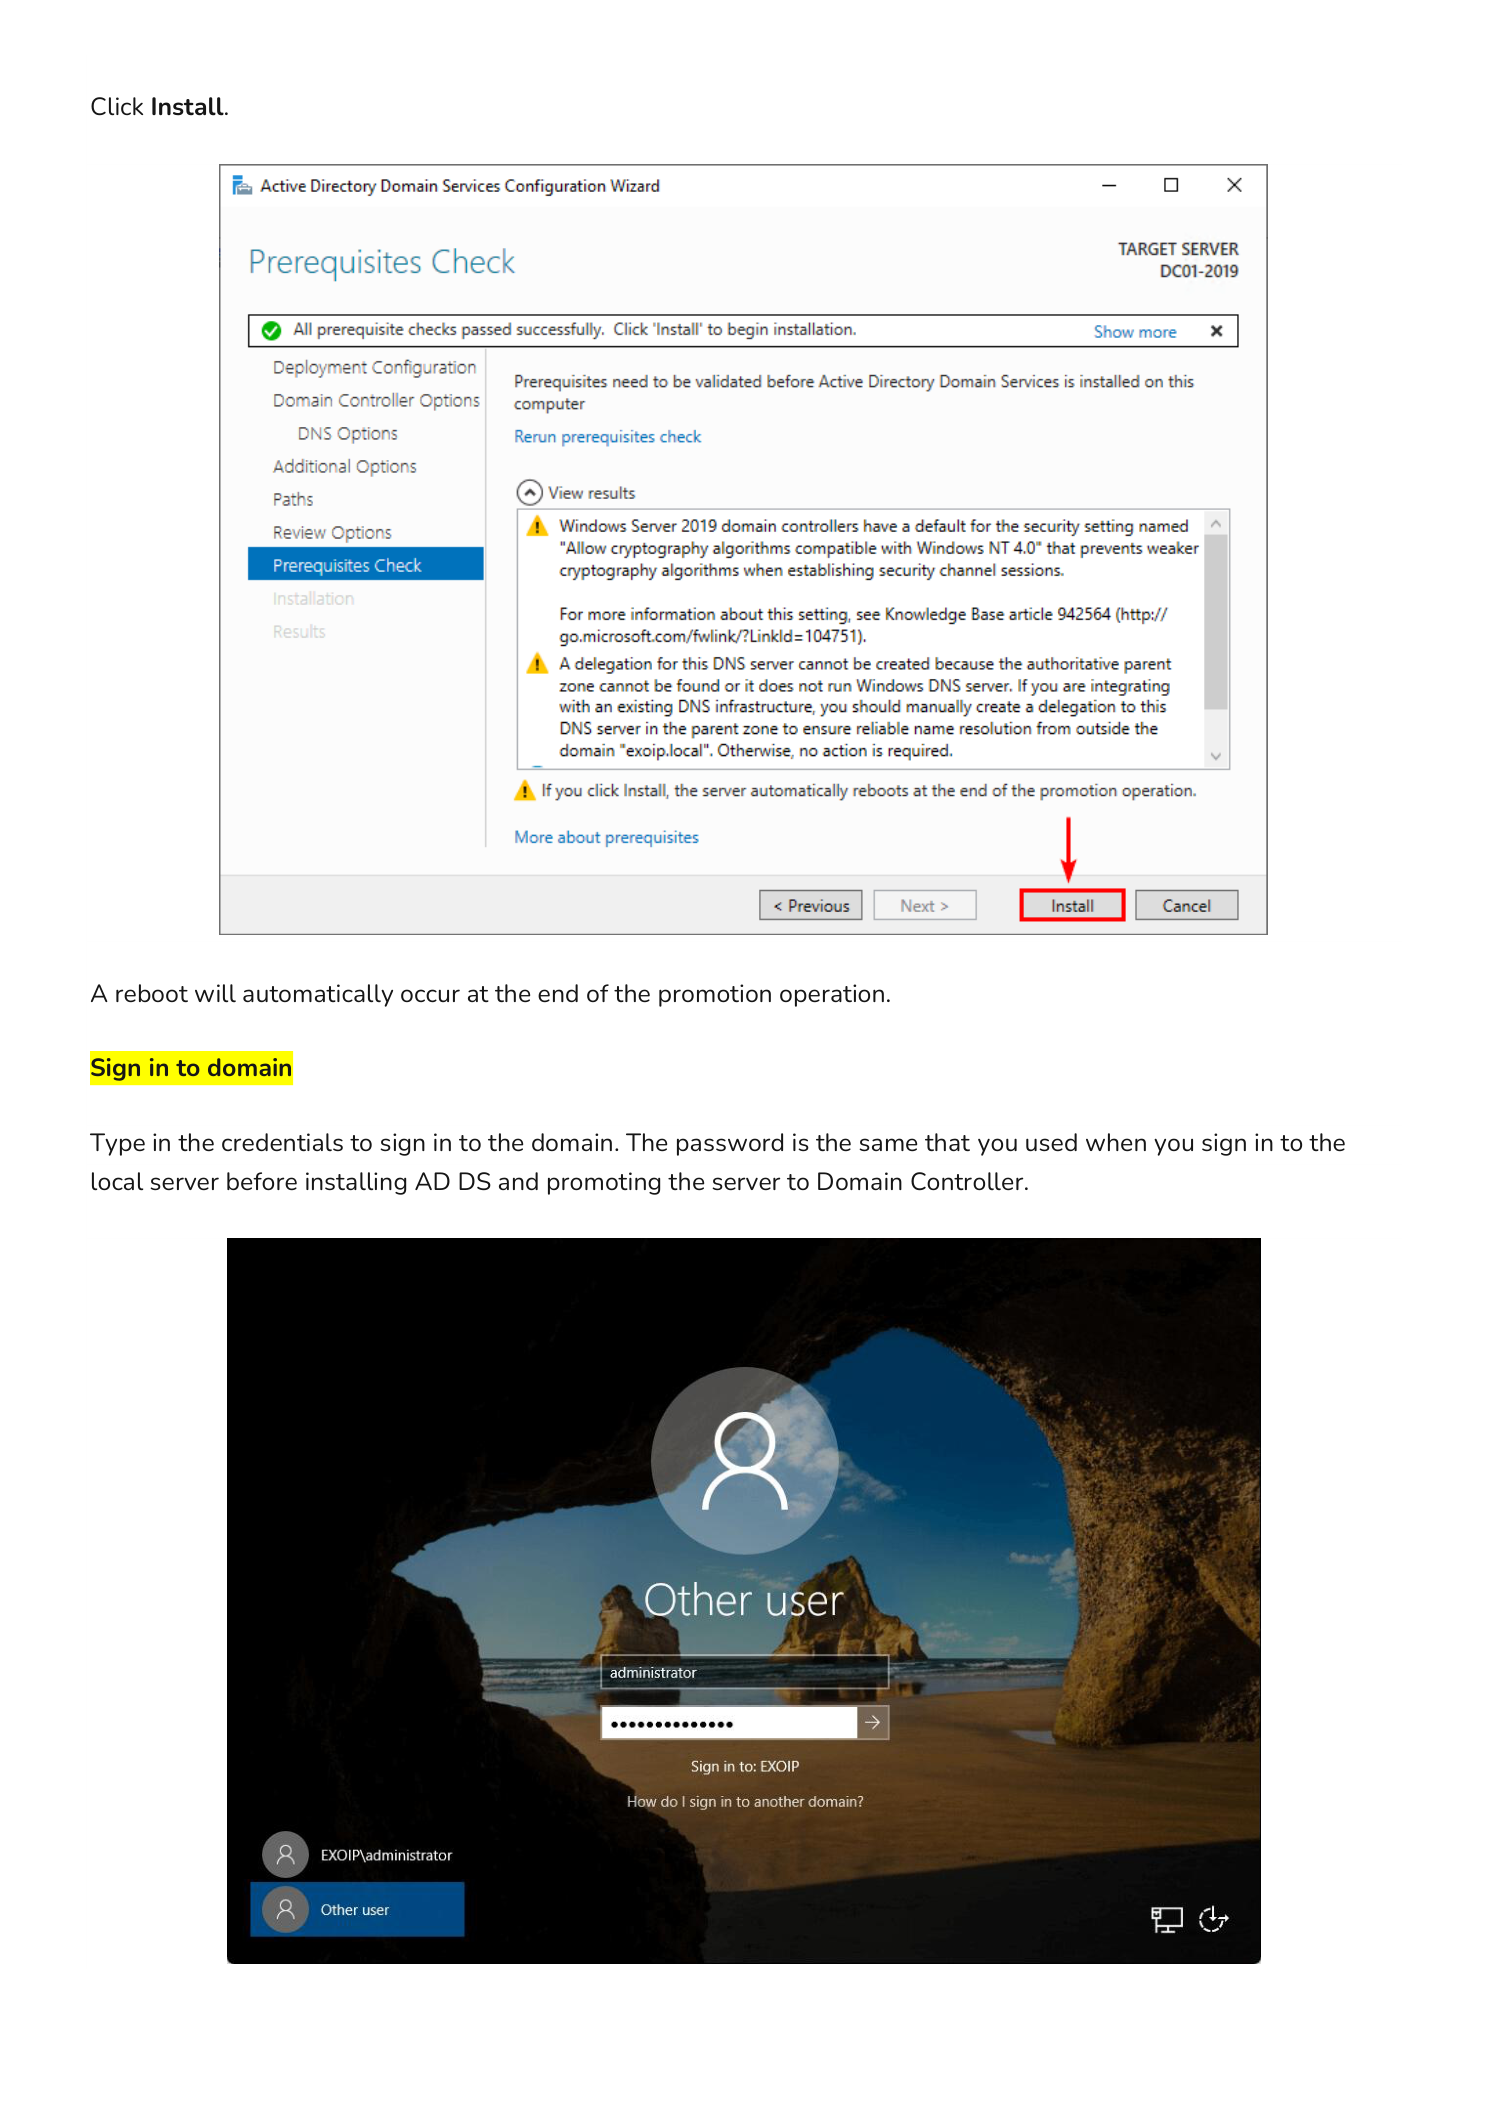
Step 11 — Run the Prerequisites Check and Install
The Prerequisites Check page runs a battery of sanity checks: DNS configuration, network connectivity, Administrator credentials, and so on. When it reports “All prerequisite checks passed successfully”, the green check mark appears at the top and the Install button activates. Click Install.
The promotion now runs end-to-end. It can take five to fifteen minutes depending on hardware. The server will automatically reboot at the end of the operation — this is normal and required.
Part 3 — Sign In to the New Domain
After the reboot, the Windows sign-in screen now belongs to the new domain. Type your credentials in DOMAIN\username format — for example INFOTECHNINJA\Administrator. The password is the same one you used to sign in to the local server before promotion (the local Administrator account is migrated to the domain Administrator account during forest creation).
Verifying the Domain Controller is Healthy
Once signed in, run a few quick checks from an elevated PowerShell prompt:
dcdiag /v— runs the full domain controller diagnostic suite; every test should return passedGet-ADDomain— returns the domain object; confirms AD is respondingGet-ADForest— returns the forest objectrepadmin /showrepl— useful later when you add a second DC to verify replication is healthy
What’s Next
You now have a working forest and a single Domain Controller. The very next things to plan for:
- Add a second Domain Controller for redundancy — never run a domain on a single DC in production
- Configure DNS forwarders so clients can resolve external internet names through the DC
- Create your Organizational Unit (OU) structure before you start creating user and computer objects
- Review the default Domain Password Policy and tighten it (or use Fine-Grained Password Policies)
- Plan your Group Policy strategy — settings, scope, and inheritance
Important Considerations
Never Use a Single Domain Controller in Production
A single-DC domain is a single point of failure for authentication, DNS, and Group Policy. The moment that DC goes offline, no one can log in and no domain-joined service can authenticate. Always plan to deploy a minimum of two DCs per domain, and run them on separate physical or virtualization hosts.
Choose Your Root Domain Name Carefully
The root domain name is effectively permanent — Microsoft does support domain renames but the process is invasive and frequently breaks dependent services. For production, use a real domain you own (for example corp.example.com) rather than a non-routable suffix like .local. The .local suffix conflicts with Bonjour/mDNS on Apple devices and creates problems with public certificates.
Protect the DSRM Password
The Directory Services Restore Mode password is your last-resort recovery mechanism. If both your DCs are corrupted and you need to restore from backup into DSRM, you cannot reset this password from inside Windows — you need the original. Store it in your team’s secrets manager or a sealed envelope in physical storage, and make sure more than one person knows where to find it.
Static IP, Always
A Domain Controller must have a static IPv4 address. If the DC’s IP ever changes, every DNS record pointing at it goes stale and clients cannot find the domain. Configure the static IP and matching DNS settings before you run the promotion wizard — the wizard expects to register itself in DNS at a fixed address.