Shared file servers fill up with the wrong things. Engineering shares accumulate gigabytes of MP3s and personal video, accounting shares grow a population of random executables, and the IT team finds out about it three years later when the LUN runs out of space. FSRM file screening is the “just don’t let it happen” control: rules that say “this folder doesn’t accept these file types,” enforced at write time on the file server itself. No client-side software, no group policy magic — the server returns an access-denied if you try to save something it’s configured to reject.
This walkthrough installs the FSRM role, builds a reusable File Screen Template, applies it to a folder as a File Screen, tests the block, and covers how to update or remove screens later. The three-tier architecture (File Groups → Templates → Screens) confuses people the first time they see it; the explanation in Step 3 is what most other guides skip.
What you need before starting
- A Windows Server with the File Server Resource Manager role available to install (Standard or Datacenter edition)
- The folder path you want to protect — a real shared folder, ideally on a separate volume from the OS
- Local administrator rights on the file server
- A list of the file types you want to restrict (or use the built-in groups: Audio/Video, Executables, etc.)
Step 1 — Install File Server Resource Manager
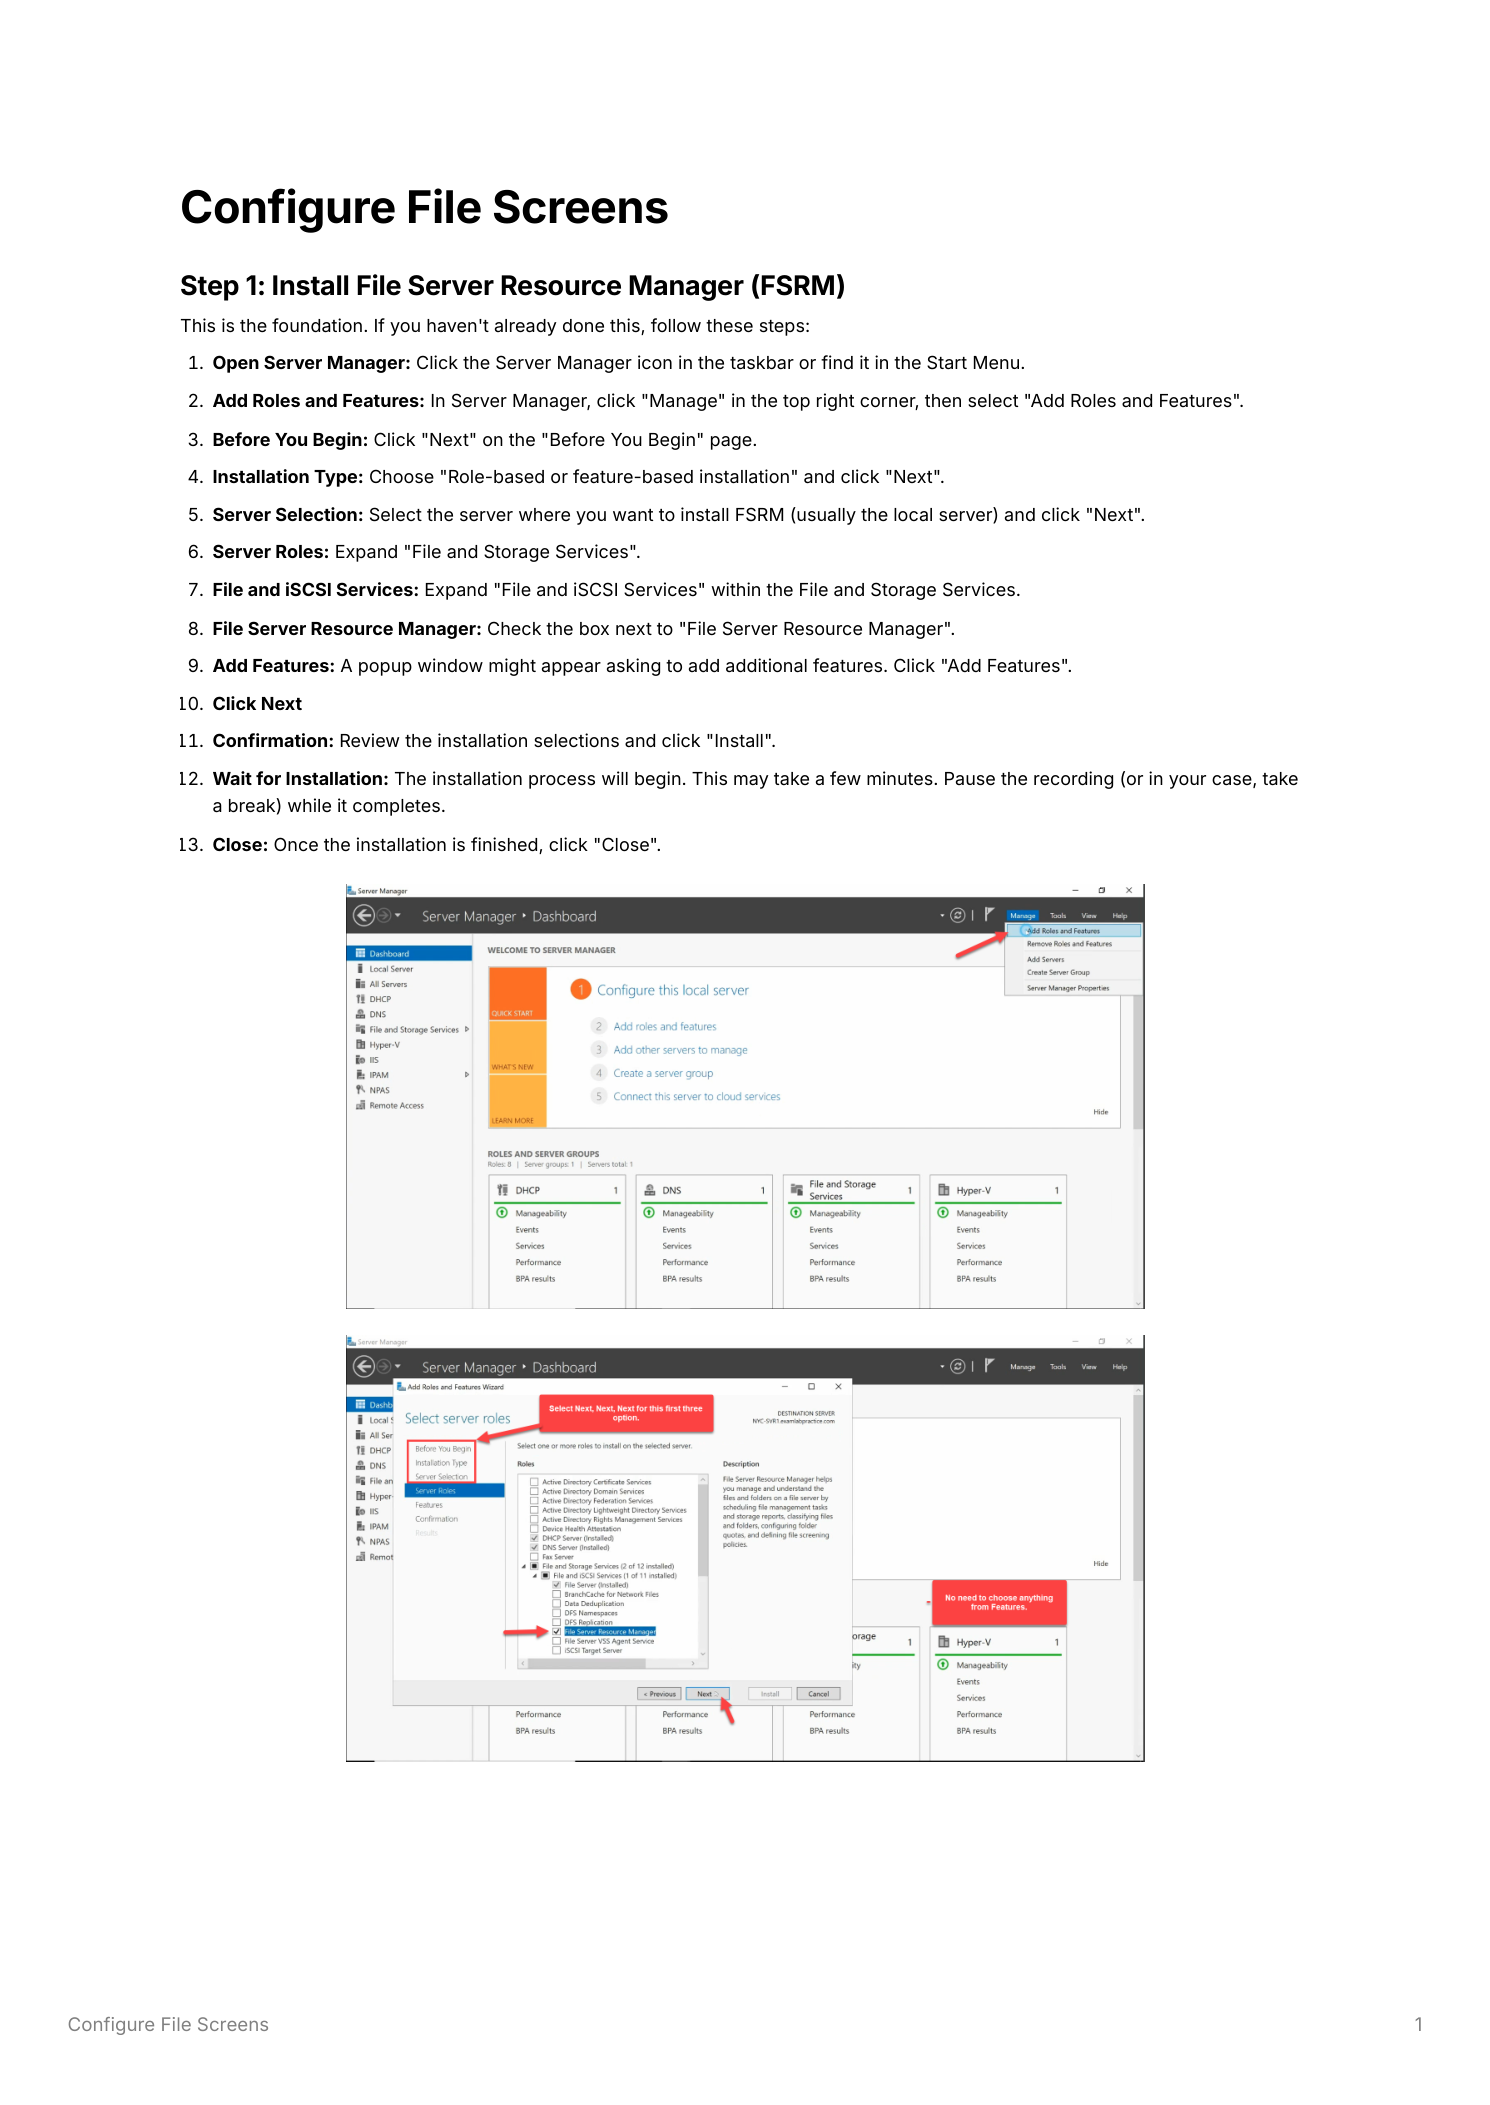
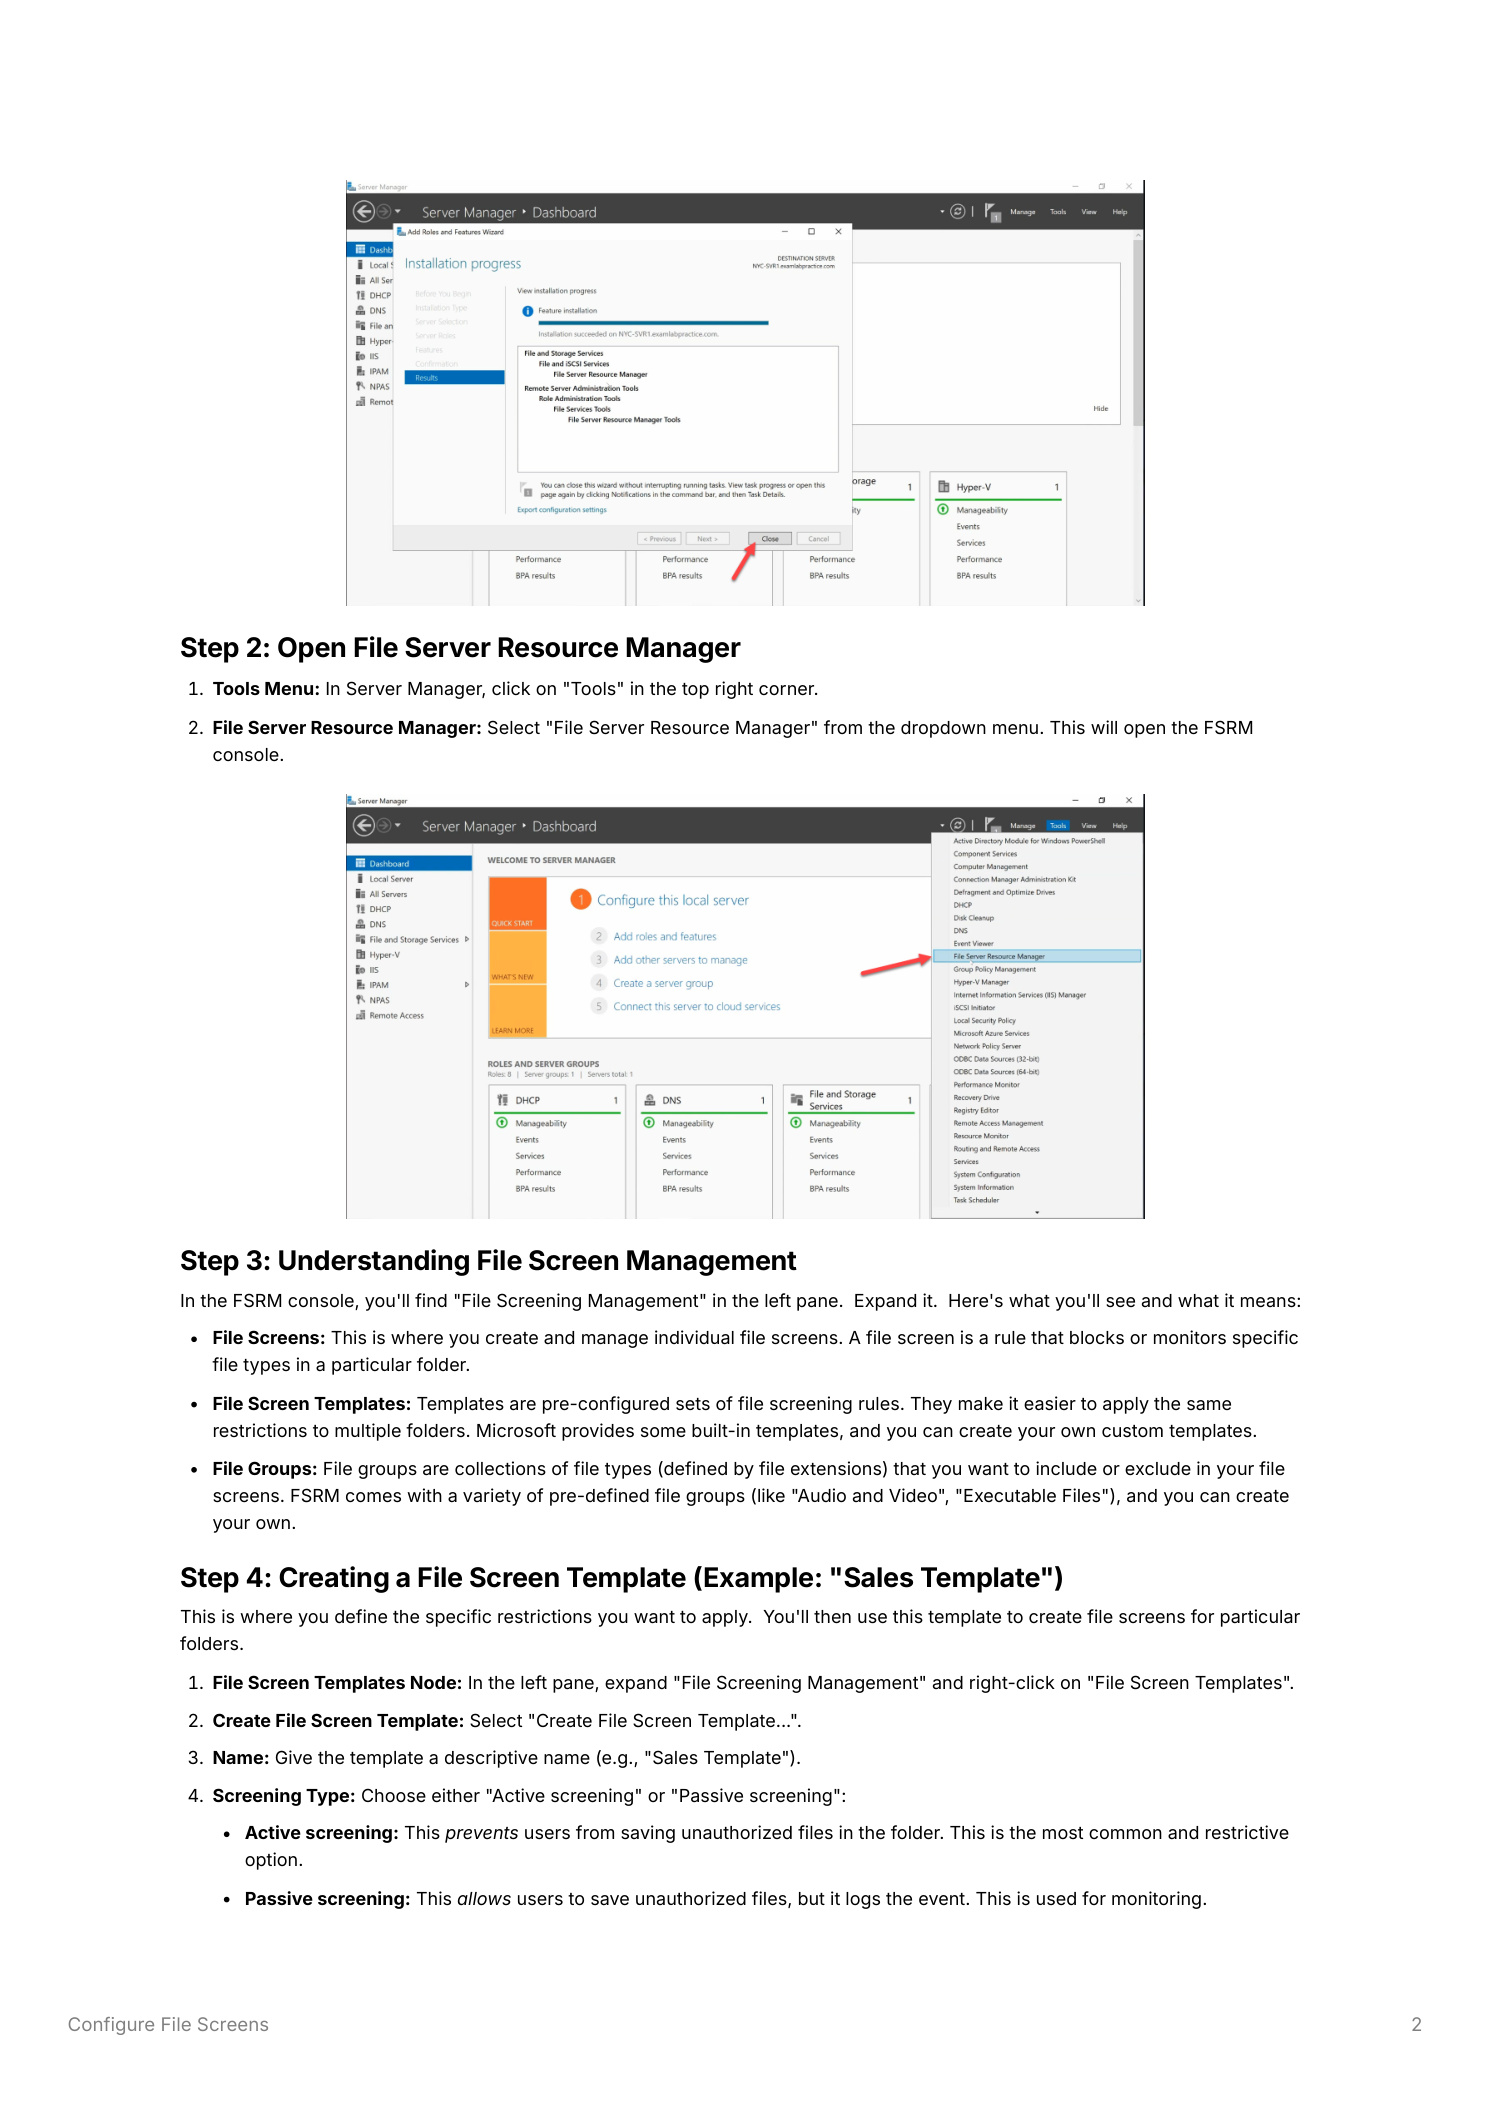
Open Server Manager > Manage > Add Roles and Features. Click through to Server Roles, expand File and Storage Services > File and iSCSI Services, and tick File Server Resource Manager. Accept the management tools when prompted. Click through Features (no extras), then Install. A few minutes later, click Close.
Step 2 — Open the FSRM console
From Server Manager > Tools > File Server Resource Manager. The console opens with a tree view of FSRM’s major features in the left pane. Expand File Screening Management to see the three nodes that matter for this walkthrough: File Screens, File Screen Templates, and File Groups.
Step 3 — The three-layer model in plain English
FSRM splits file screening into three layers. The naming is… not great, but the concept is clean once you see it:
- File Groups — lists of file extensions. Built-in groups include “Audio and Video Files” (.mp3, .avi, .wmv, .wav, .mov), “Executable Files” (.exe, .bat, .cmd, .msi), “Image Files,” etc. You can add custom groups for any pattern. File Groups define what file types exist for FSRM to think about.
- File Screen Templates — reusable bundles of screening rules. A template specifies the screening type (Active = block, Passive = log only), which File Groups it restricts, and what notifications fire on a violation. Templates define how to react to specific file types.
- File Screens — the actual enforcement objects on disk. A File Screen applies a template (or custom rules) to a specific folder path. File Screens decide where the rules are enforced.
The pattern is: build templates once, apply as File Screens to many folders. Edit the template later and every File Screen using it picks up the change.
Step 4 — Build a File Screen Template
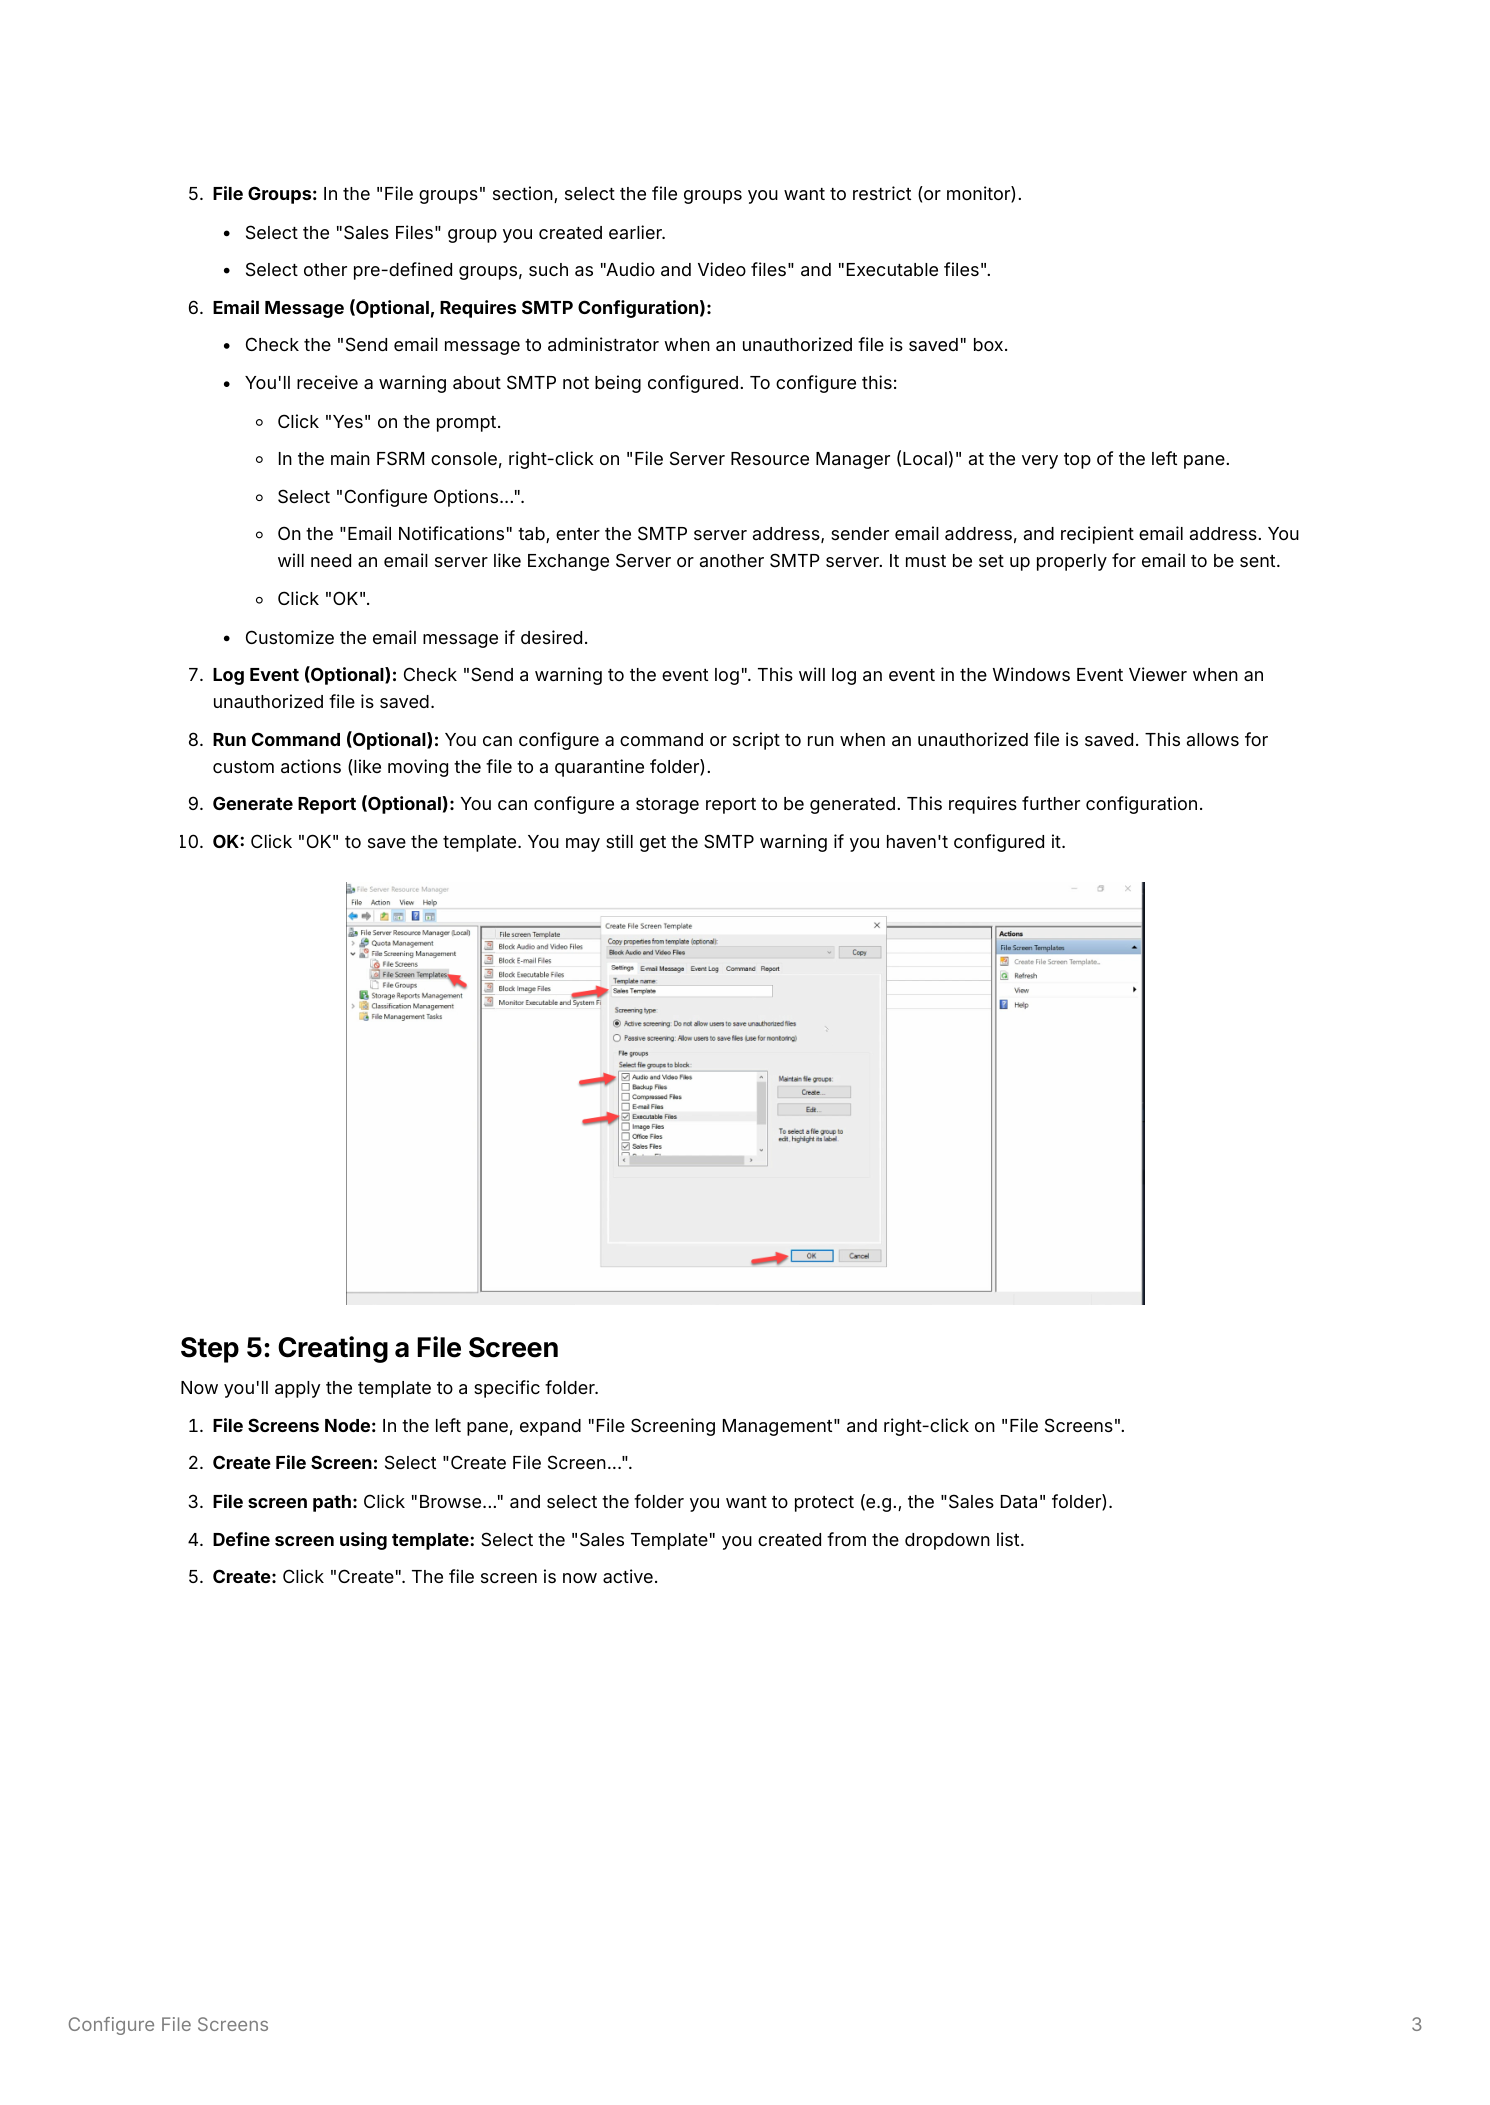
Right-click File Screen Templates > Create File Screen Template. On the Settings tab:
- Template Name — descriptive (“Sales Shared Folder Template”)
- Screening Type — Active screening blocks the save, returning access-denied to the client. Passive screening allows the save but logs it. Always start with Passive in production — you’ll discover legitimate use cases you didn’t expect, and Active blocking is disruptive without warning. Switch to Active after the warning period reveals what’s actually being saved.
- File Groups — tick the groups whose extensions you want to restrict. For a business shared folder, “Audio and Video Files” and “Executable Files” cover most of the common offenders.
The other tabs configure what happens on a violation:
- Email Message — email an admin (or the user) when a violation occurs. Requires SMTP configured under Action > Configure Options > Email Notifications. Without SMTP set, emails silently fail.
- Event Log — write a Windows event log entry for each violation. The cheapest auditing option; works without any infrastructure. Tick this even if you don’t enable email.
- Run Command — execute a script on violation (move the file to quarantine, alert a webhook, etc.)
- Generate Report — trigger a storage report for the violation event
Click OK. The template appears in File Screen Templates, ready to apply.
Step 5 — Apply the template as a File Screen
Right-click File Screens > Create File Screen:
- File screen path — Browse and pick the folder you’re protecting (e.g.
D:\Shares\Sales) - Define screen — pick Derive properties from this file screen template and choose your template from the dropdown
- Click Create
The File Screen appears in the File Screens node showing the folder path and template applied. Enforcement is immediate — no service restart, no replication delay. Any restricted file type written to that folder from this point on will be blocked (Active) or logged (Passive).
Step 6 — Test the block
Verify the screen actually works:
- Open File Explorer on a client (or the server itself), navigate to the protected folder
- Try to create or copy a file matching one of the blocked types —
test.mp3for Audio/Video,test.exefor Executables - With Active screening, the save fails with an access-denied message
- With Passive screening, the save succeeds but an event lands in Event Viewer > Windows Logs > Application with source SRMSVC
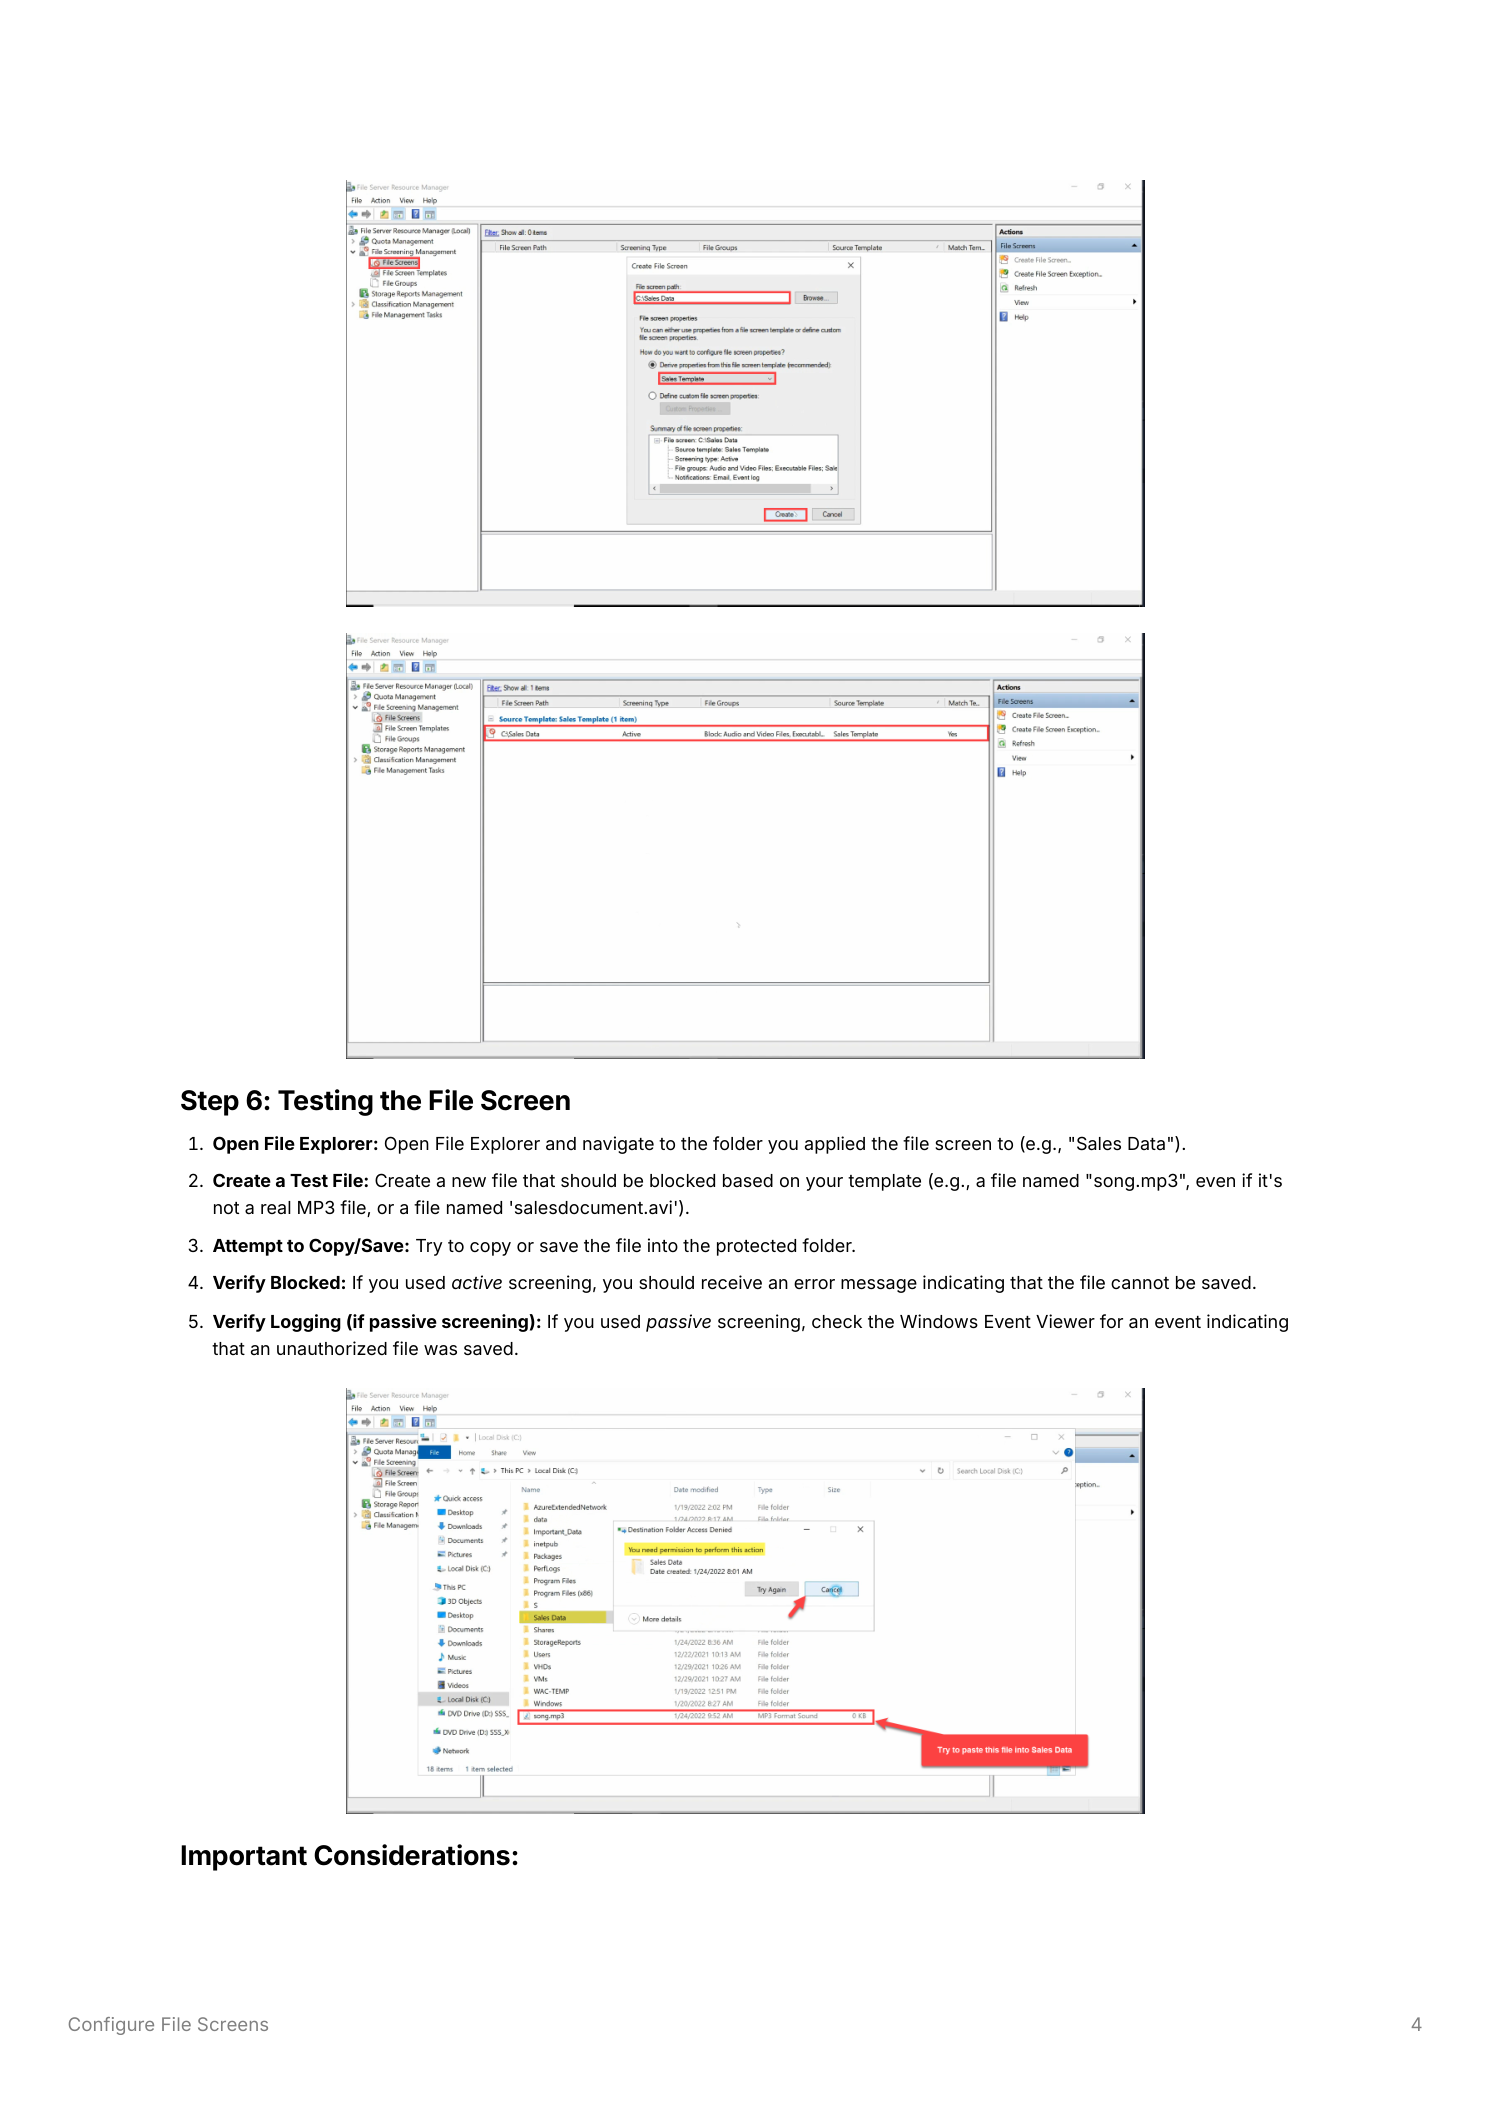
The error the client sees is a generic access-denied, not “FSRM blocked you” — from the user’s perspective it looks like a permissions problem. This is by design (the SMB protocol doesn’t have a “file type rejected” response code) but means you should communicate the screening policy ahead of time so users don’t open a permissions ticket.
Step 7 — Modify a screen or template later
Both screens and templates are editable any time:
- Edit a single File Screen — right-click in File Screens > Edit File Screen Properties. Same dialog as creation. You can switch templates, change to a custom configuration that’s specific to this folder, or flip between Active and Passive screening for testing.
- Edit a Template — right-click in File Screen Templates > Edit Template Properties. Changes propagate to every File Screen derived from this template. The dialog asks whether to update derived screens — usually yes, unless you’ve diverged some screens to custom configurations on purpose.
Template-driven editing is the whole point of using templates — one change updates dozens of folders at once. Per-folder custom configurations break that contract; use them sparingly.
Step 8 — Remove a File Screen
Right-click the screen in File Screens > Delete File Screen. Confirm. The folder is no longer subject to screening — saves of any type succeed immediately. The template stays in File Screen Templates and can be reapplied to any folder later.
Things that bite people in production
Always start in Passive mode
Active blocking from day one in a busy environment will generate a flood of helpdesk tickets and angry emails. Run Passive for at least a week, review the violations in Event Viewer, identify any legitimate use cases you missed, and only then flip to Active. The few minutes saved by skipping the Passive phase are not worth the user-relations damage of unexpected blocks.
Communicate before enforcing
Tell users about the policy before enabling Active screening. The error they see is a generic access-denied; without context, they assume it’s a bug or a permissions issue and open tickets. A one-paragraph announcement (“starting Friday, audio/video and executable files cannot be saved to the Sales share”) prevents the deluge.
SMTP must be configured for email to work
Email notifications require SMTP configured globally under Action > Configure Options > Email Notifications. Without it, the email tickbox in the template silently does nothing. Test by triggering a violation and checking that mail actually arrives — don’t rely on the configuration looking correct.
Templates beat per-folder customization
It’s tempting to create a one-off custom screen for “just this one folder.” Resist. The next request will be similar, then another, and now you have ten different configurations to maintain. Build templates that match common use cases (Sales Folder Template, Engineering Folder Template, Public Share Template) and apply consistently. Custom configurations should be the rare exception.
Verify File Groups don’t catch legitimate files
The built-in “Executable Files” group includes .msi, which is fine for blocking user-uploaded installers but might break a workflow where the IT team stages MSIs in a shared location for SCCM packaging. Walk the extension list in each File Group before applying a template — one unexpected extension can break an application workflow in ways that are very hard to diagnose later.
Where this fits
File screens are the access-control layer of FSRM. The companion piece is configuring FSRM quotas for the size-control layer — together they keep file shares manageable. For broader file-server hygiene see DFS file management for multi-server share presentation, Data Deduplication on Windows Server 2022 for storage-efficiency, and the broader Windows Server Administration pathway.