Tell a user the file they need is on \\SRV01\Common instead of \\SRV02\Common and you’ve already lost the morning. Multiply that by every share, every server, and every time you migrate data, and you’ve discovered why DFS exists. The Distributed File System collapses scattered shares behind a single, location-independent path users can actually remember — and DFS Replication keeps the underlying servers in sync so the location-independent path stays that way even when one server is down for patching.
This walkthrough builds a real-world DFS deployment end to end on two domain-joined Windows Servers (SRV01 and SRV02 in std.local): install the role services, create a domain-based namespace, expose the same folder from both servers as folder targets, fix the share-permission gotcha that bites everyone the first time, and configure a multipurpose replication group named Common_Rep so writes on either server land on both within seconds.
What you need before starting
- Two domain-joined Windows Server hosts (we use SRV01 and SRV02 in std.local)
- Domain Admin or Enterprise Admin rights for namespace and replication group creation
- A local
D:\Commonfolder pre-created on both servers — this is the data backing the share - Reliable network connectivity between the two members (DFS Replication doesn’t love unstable links)
Part 1 — Install the DFS role services
DFS Namespaces and DFS Replication are two separate role services under File and Storage Services > File and iSCSI Services. Both have to be installed on every server that participates in the namespace or the replication group — install them on SRV01 and SRV02.
Step 1 — Pick the role services in the wizard
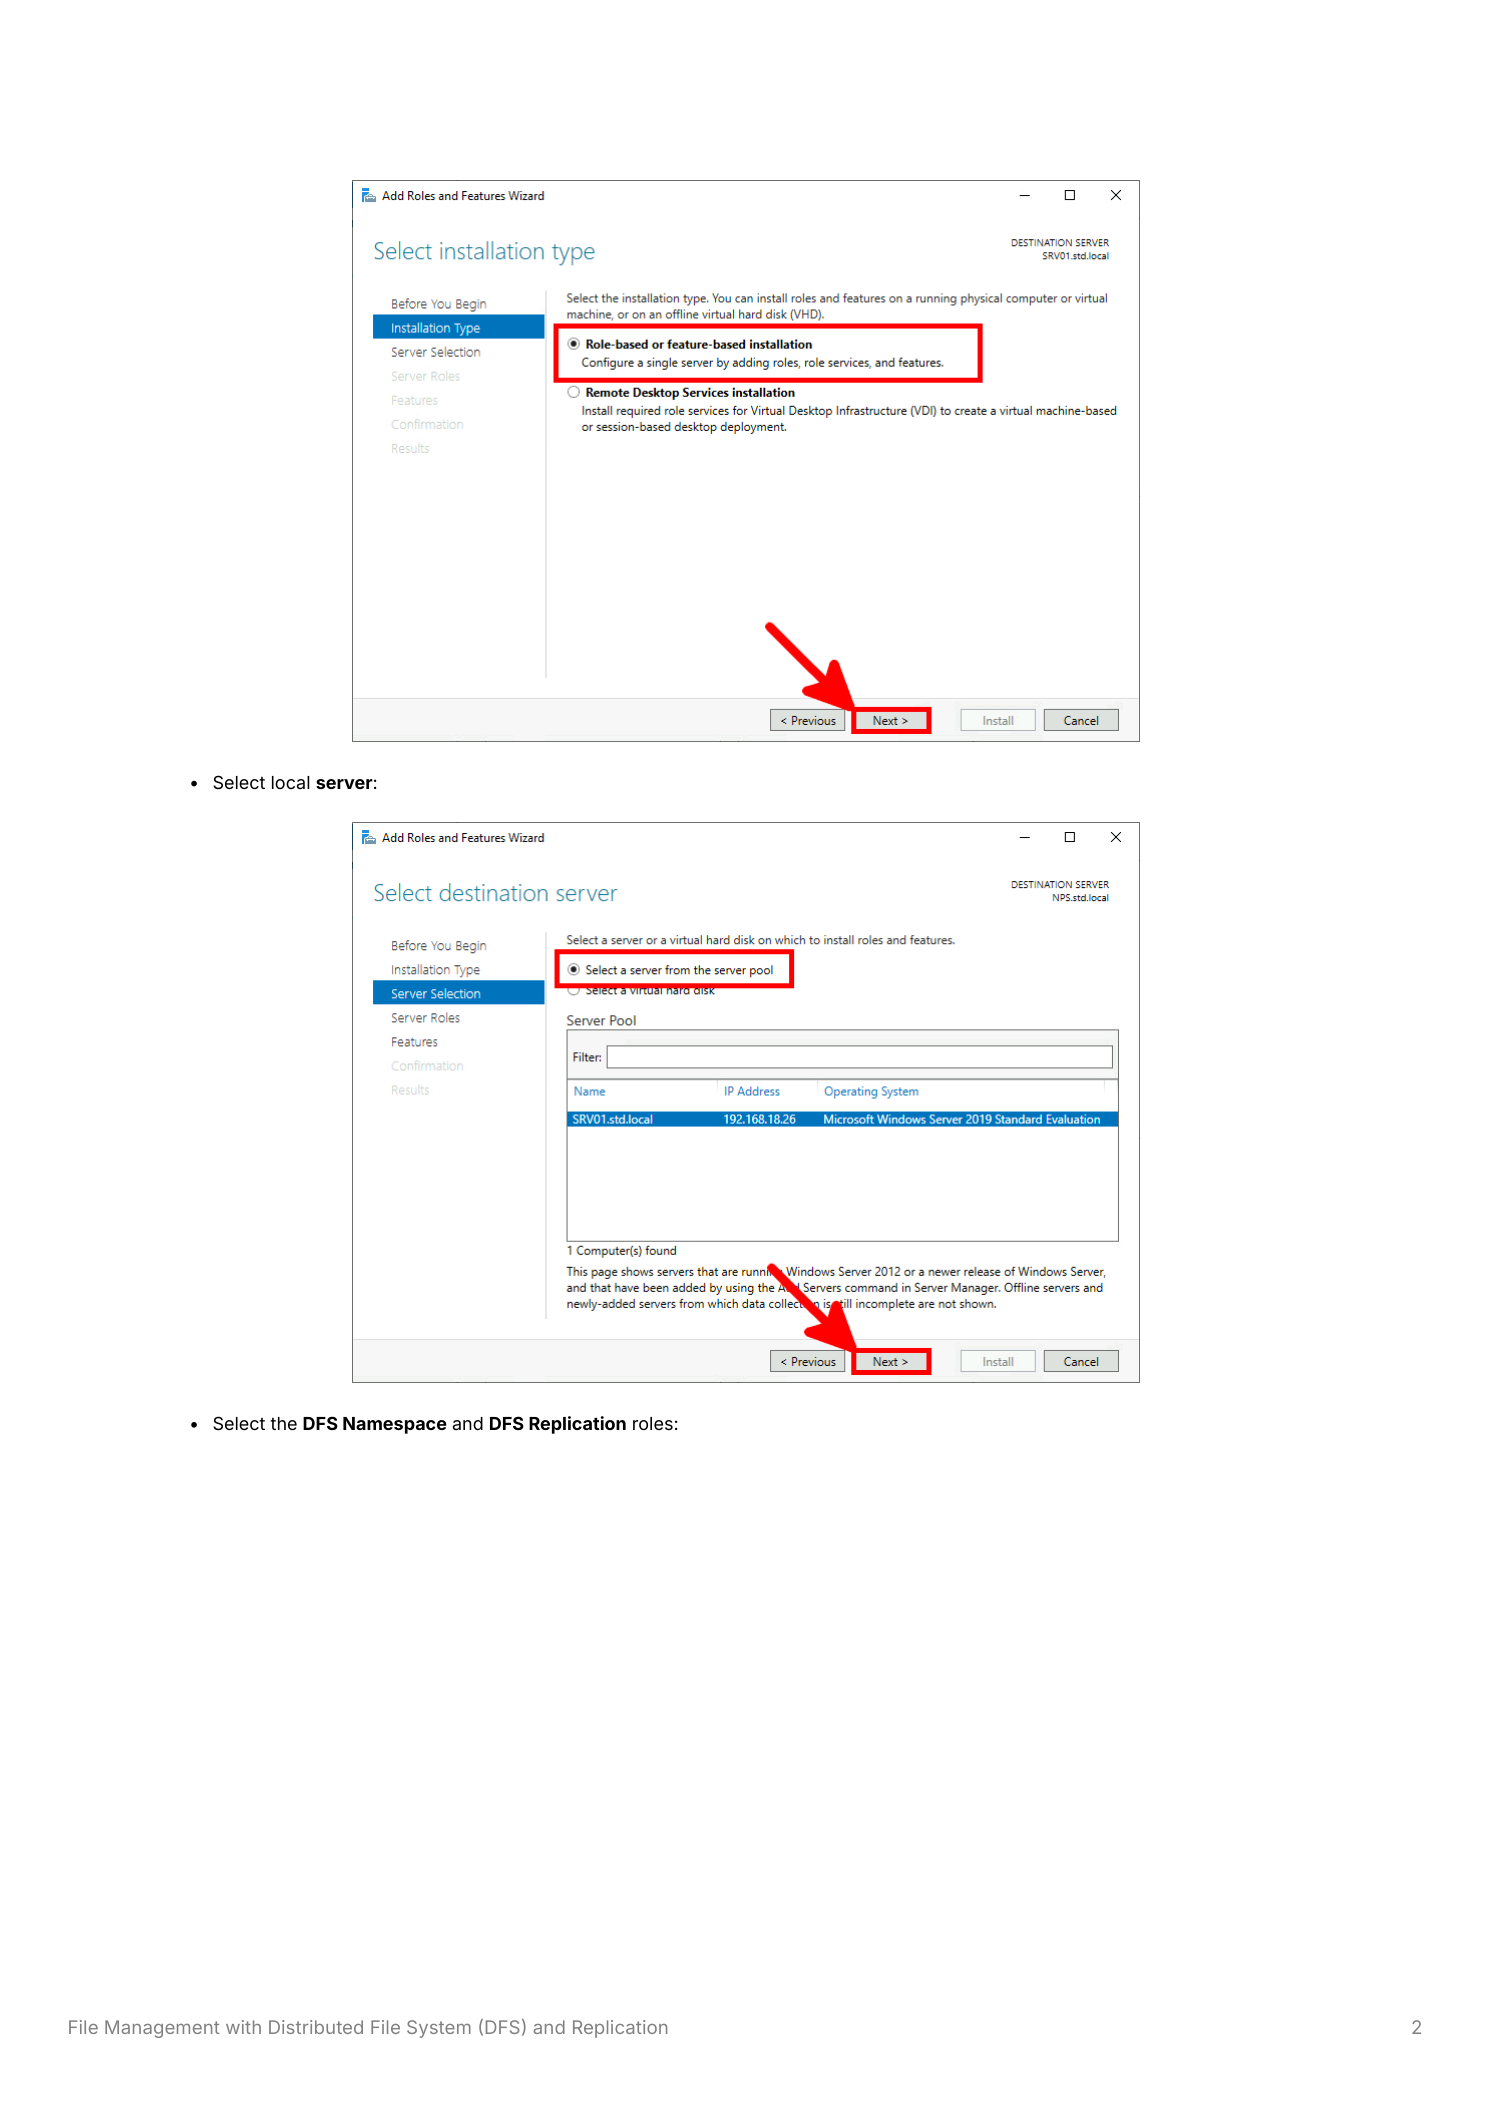
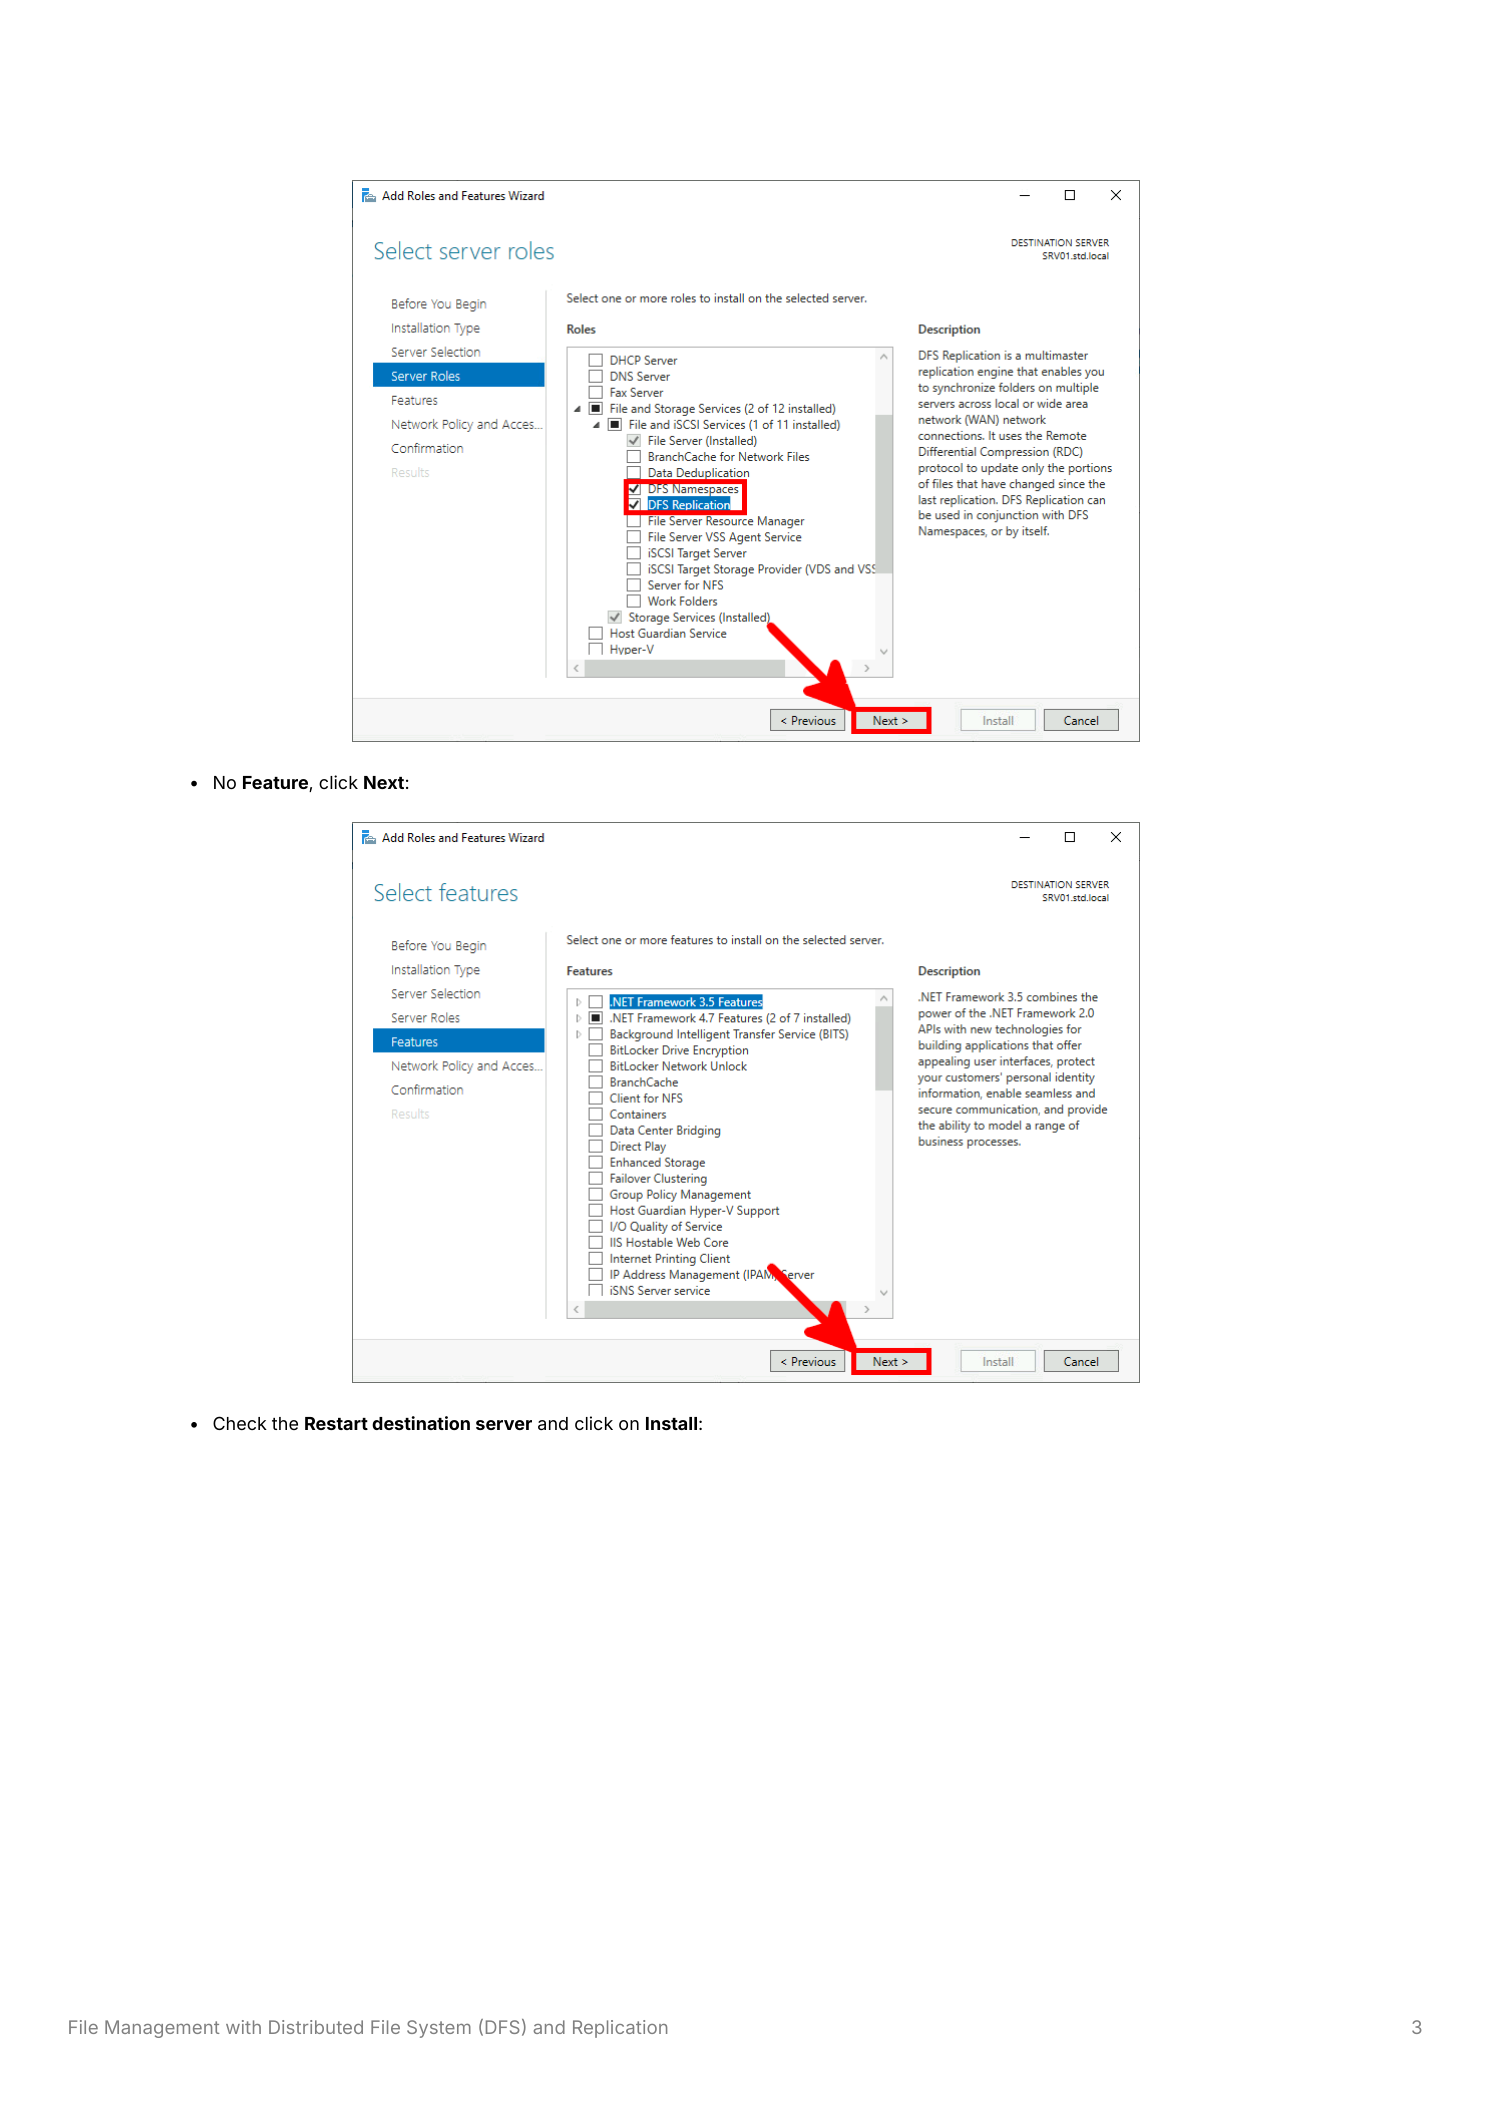
Open Server Manager > Manage > Add Roles and Features. Click through the wizard until you hit Server Roles, expand File and Storage Services > File and iSCSI Services, and tick both DFS Namespaces and DFS Replication. Let it add the management features when prompted.
Step 2 — Confirm and install on both servers
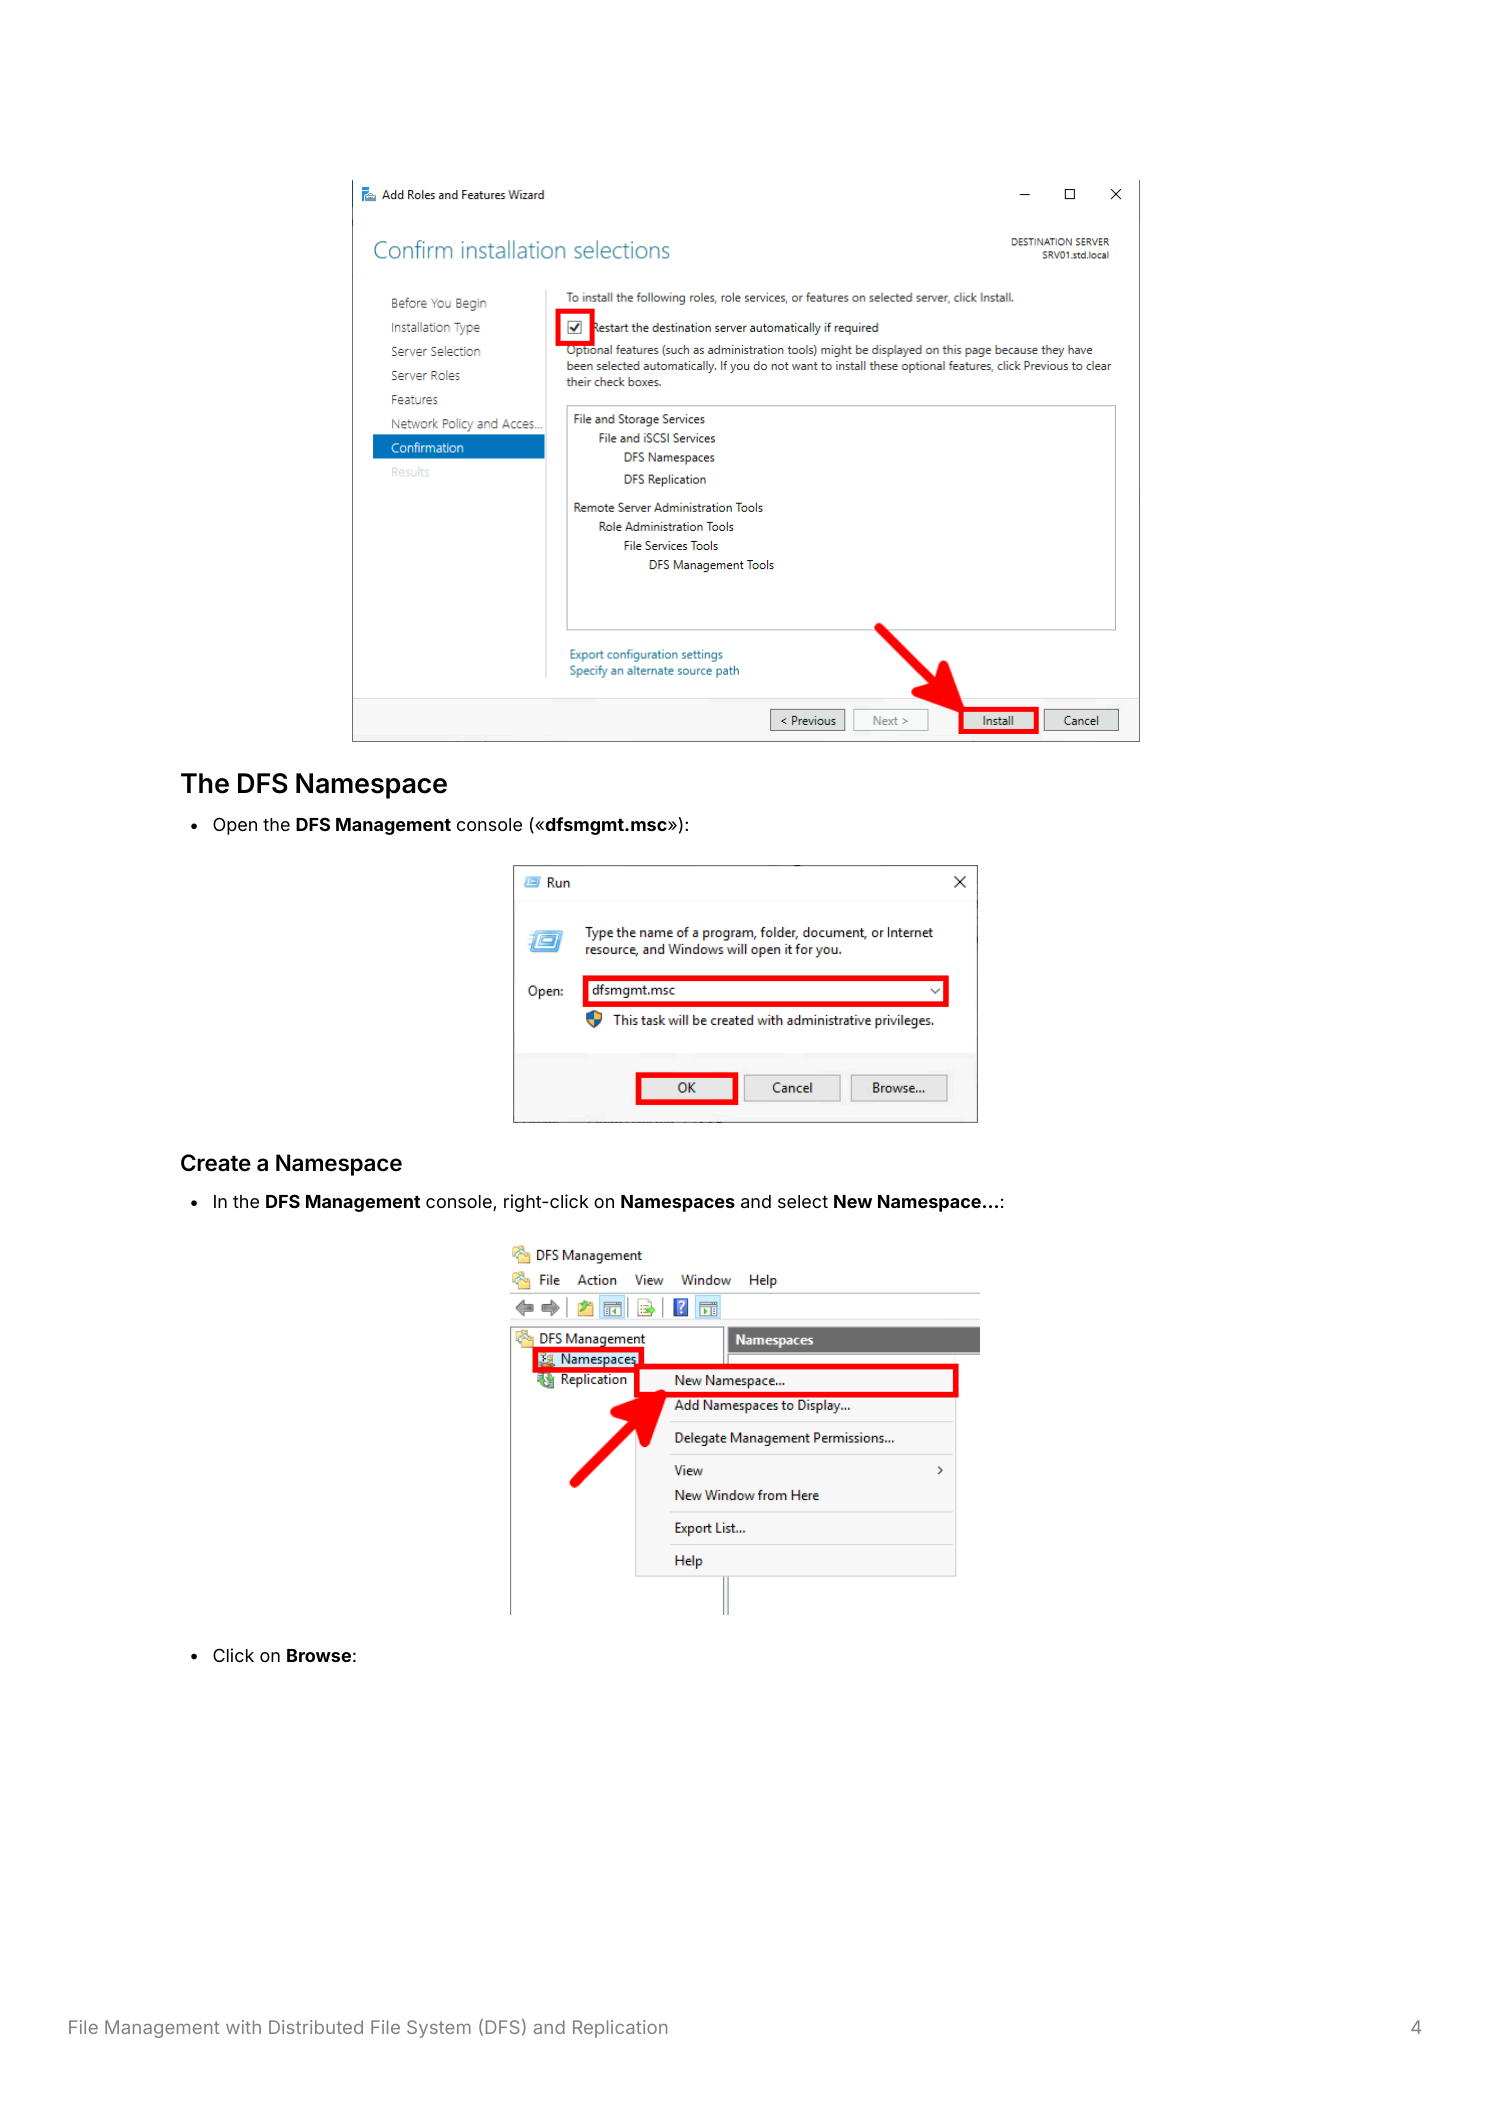
Review on the Confirmation page and click Install. The wizard installs the two role services and the DFS Management console. No reboot required. Repeat the installation on SRV02 before moving on.
Part 2 — Create the namespace
The namespace is the user-facing UNC path that hides which server actually holds the data. We’re building a domain-based namespace at \\std.local\share — AD-stored configuration plus support for multiple namespace servers, which is what makes it survive losing a host.
Step 3 — Open DFS Management
From Server Manager > Tools, launch DFS Management. The console’s left pane has two top-level nodes: Namespaces (the path you expose) and Replication (the data sync). Both are configured separately.
Step 4 — Launch the New Namespace Wizard
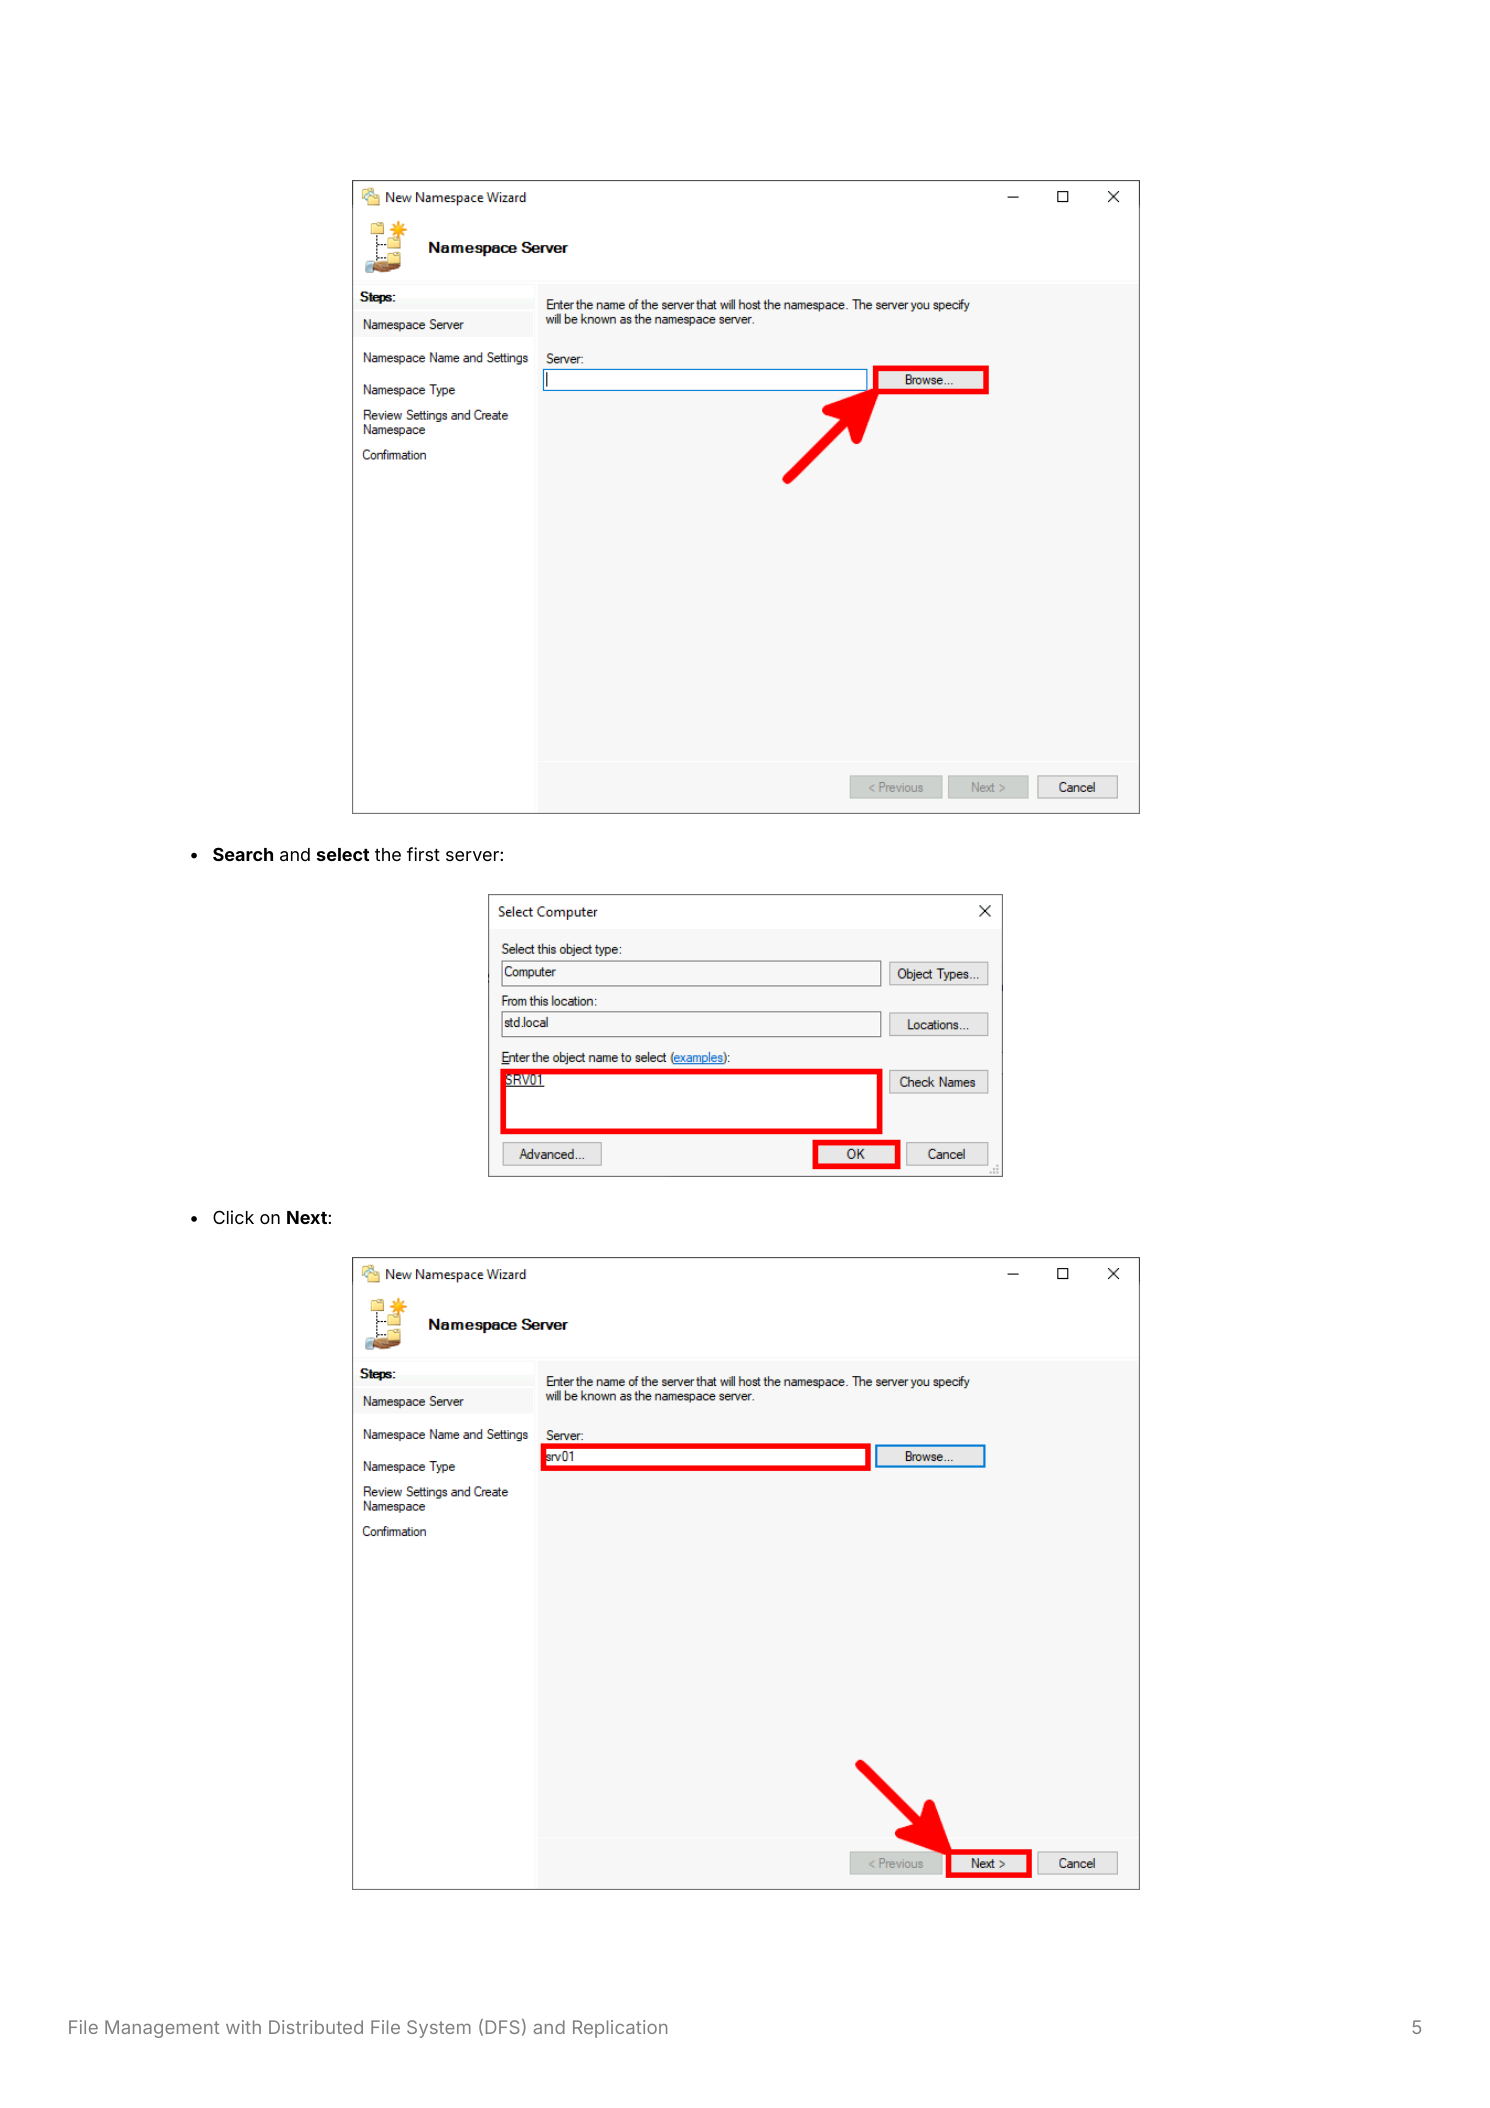
Right-click the Namespaces node and pick New Namespace. The first page asks for the server that will host the namespace root — enter SRV01 and click Next. We’ll add SRV02 as a second namespace server later.
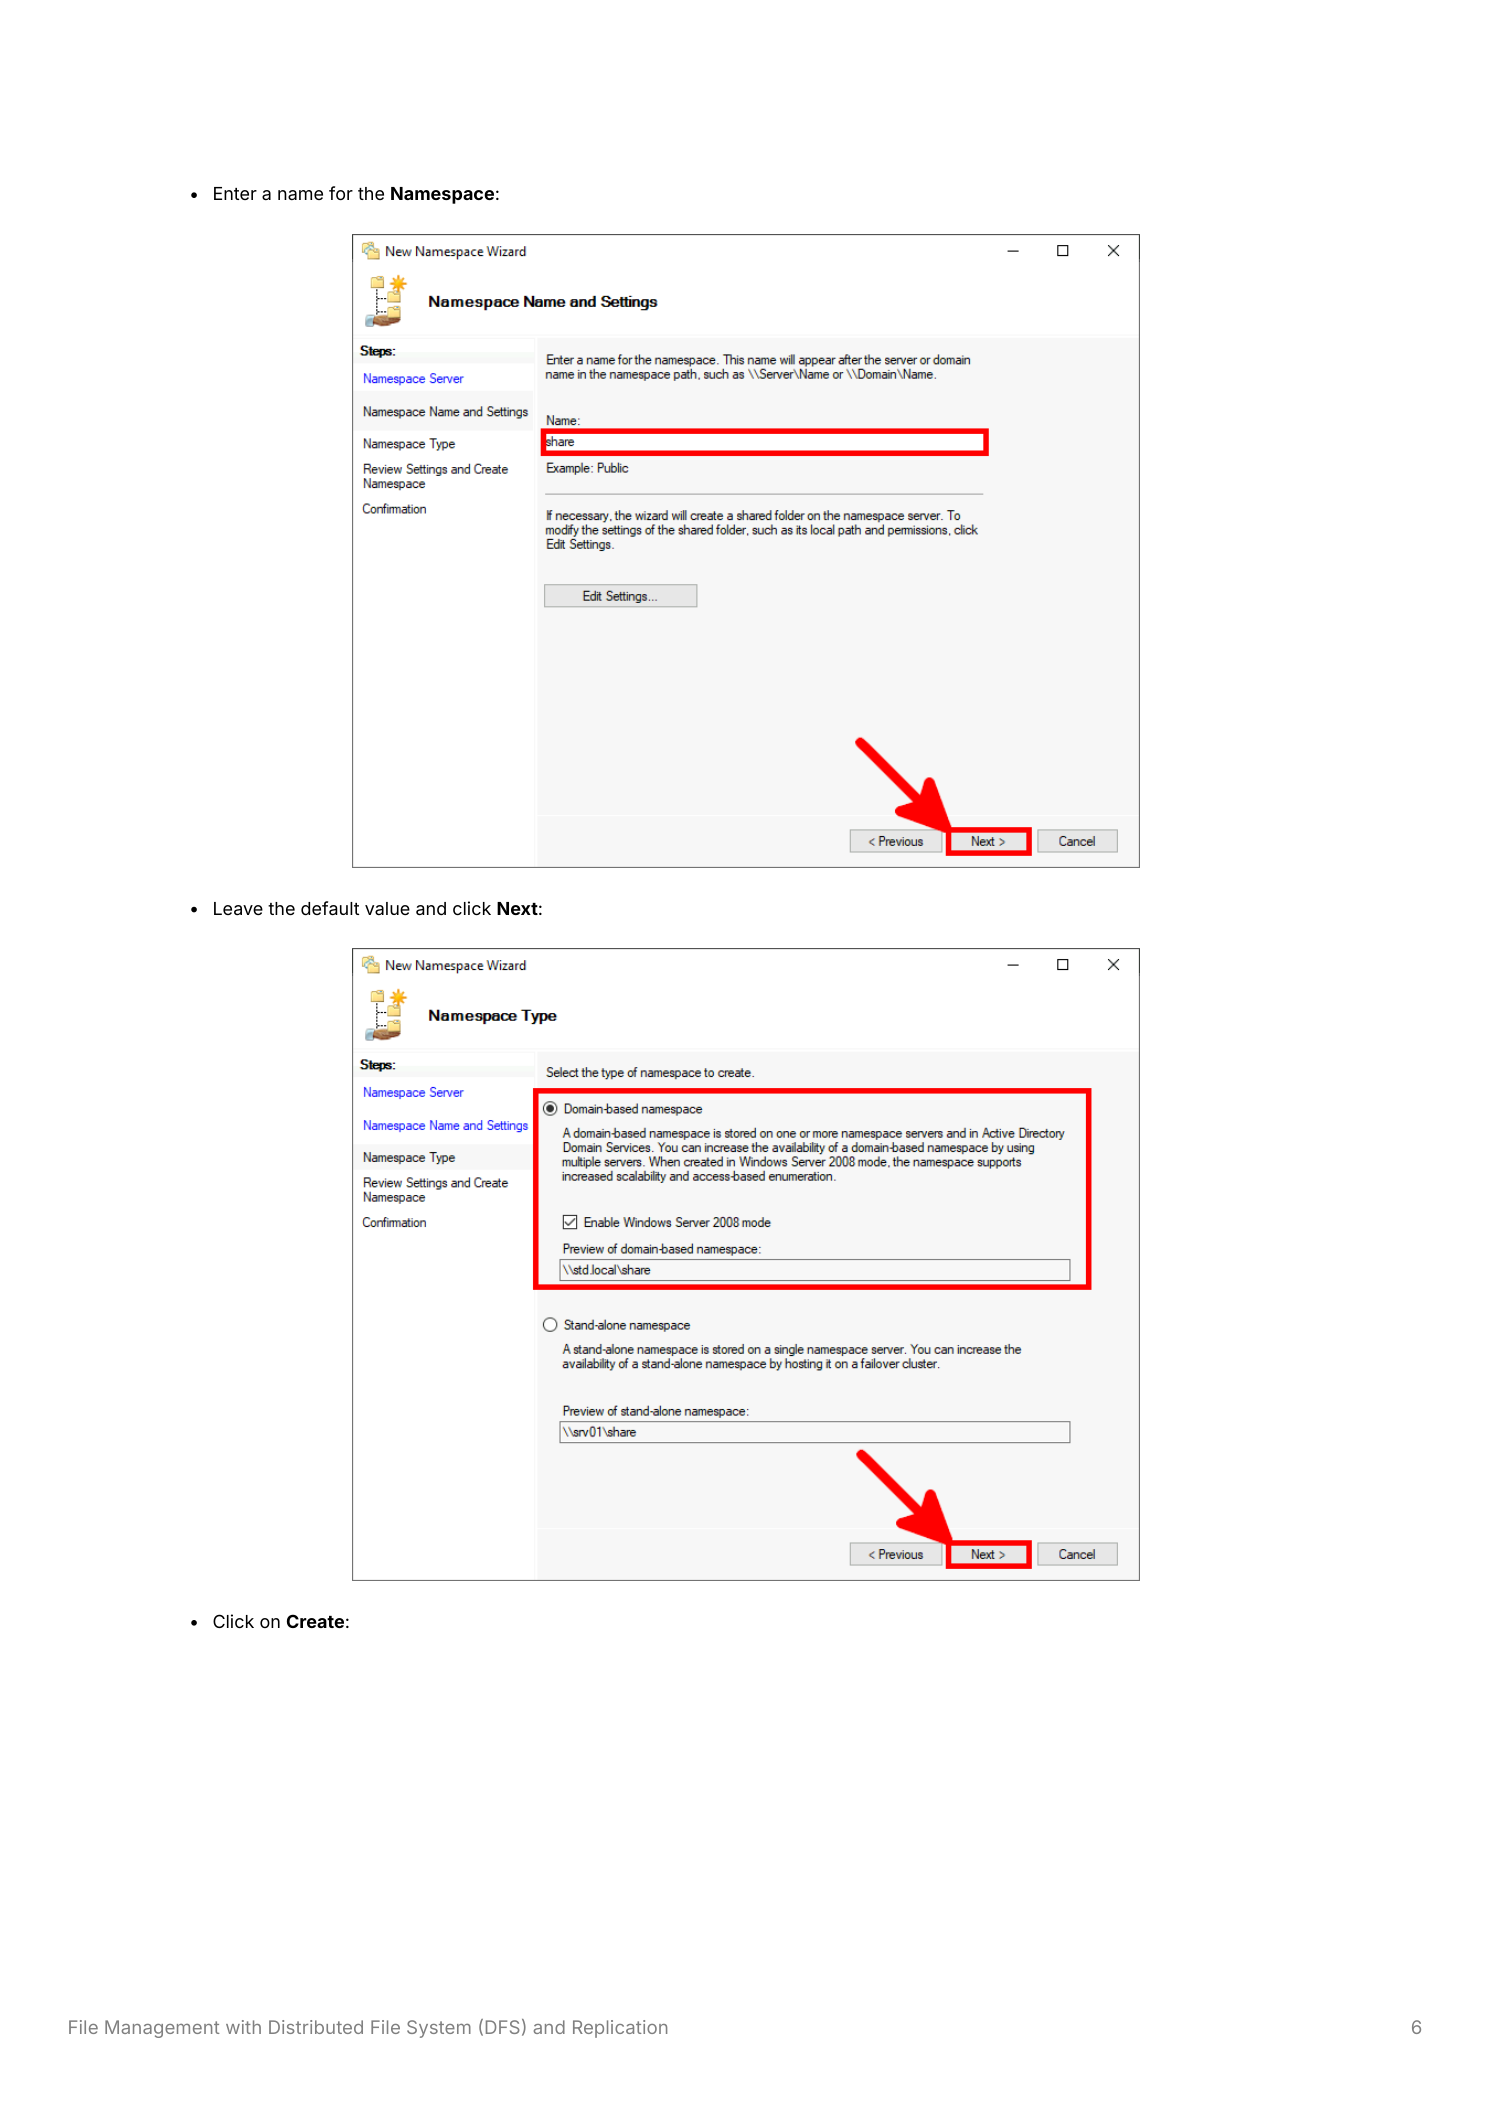
Step 5 — Name the namespace and pick the type
Enter share as the namespace name; the wizard previews the full path as \\std.local\share. On the Namespace Type page choose Domain-based namespace. Standalone namespaces are stored on a single server and can’t scale past it; domain-based namespaces live in AD DS and accept additional namespace servers as you grow.
Step 6 — Finish the wizard
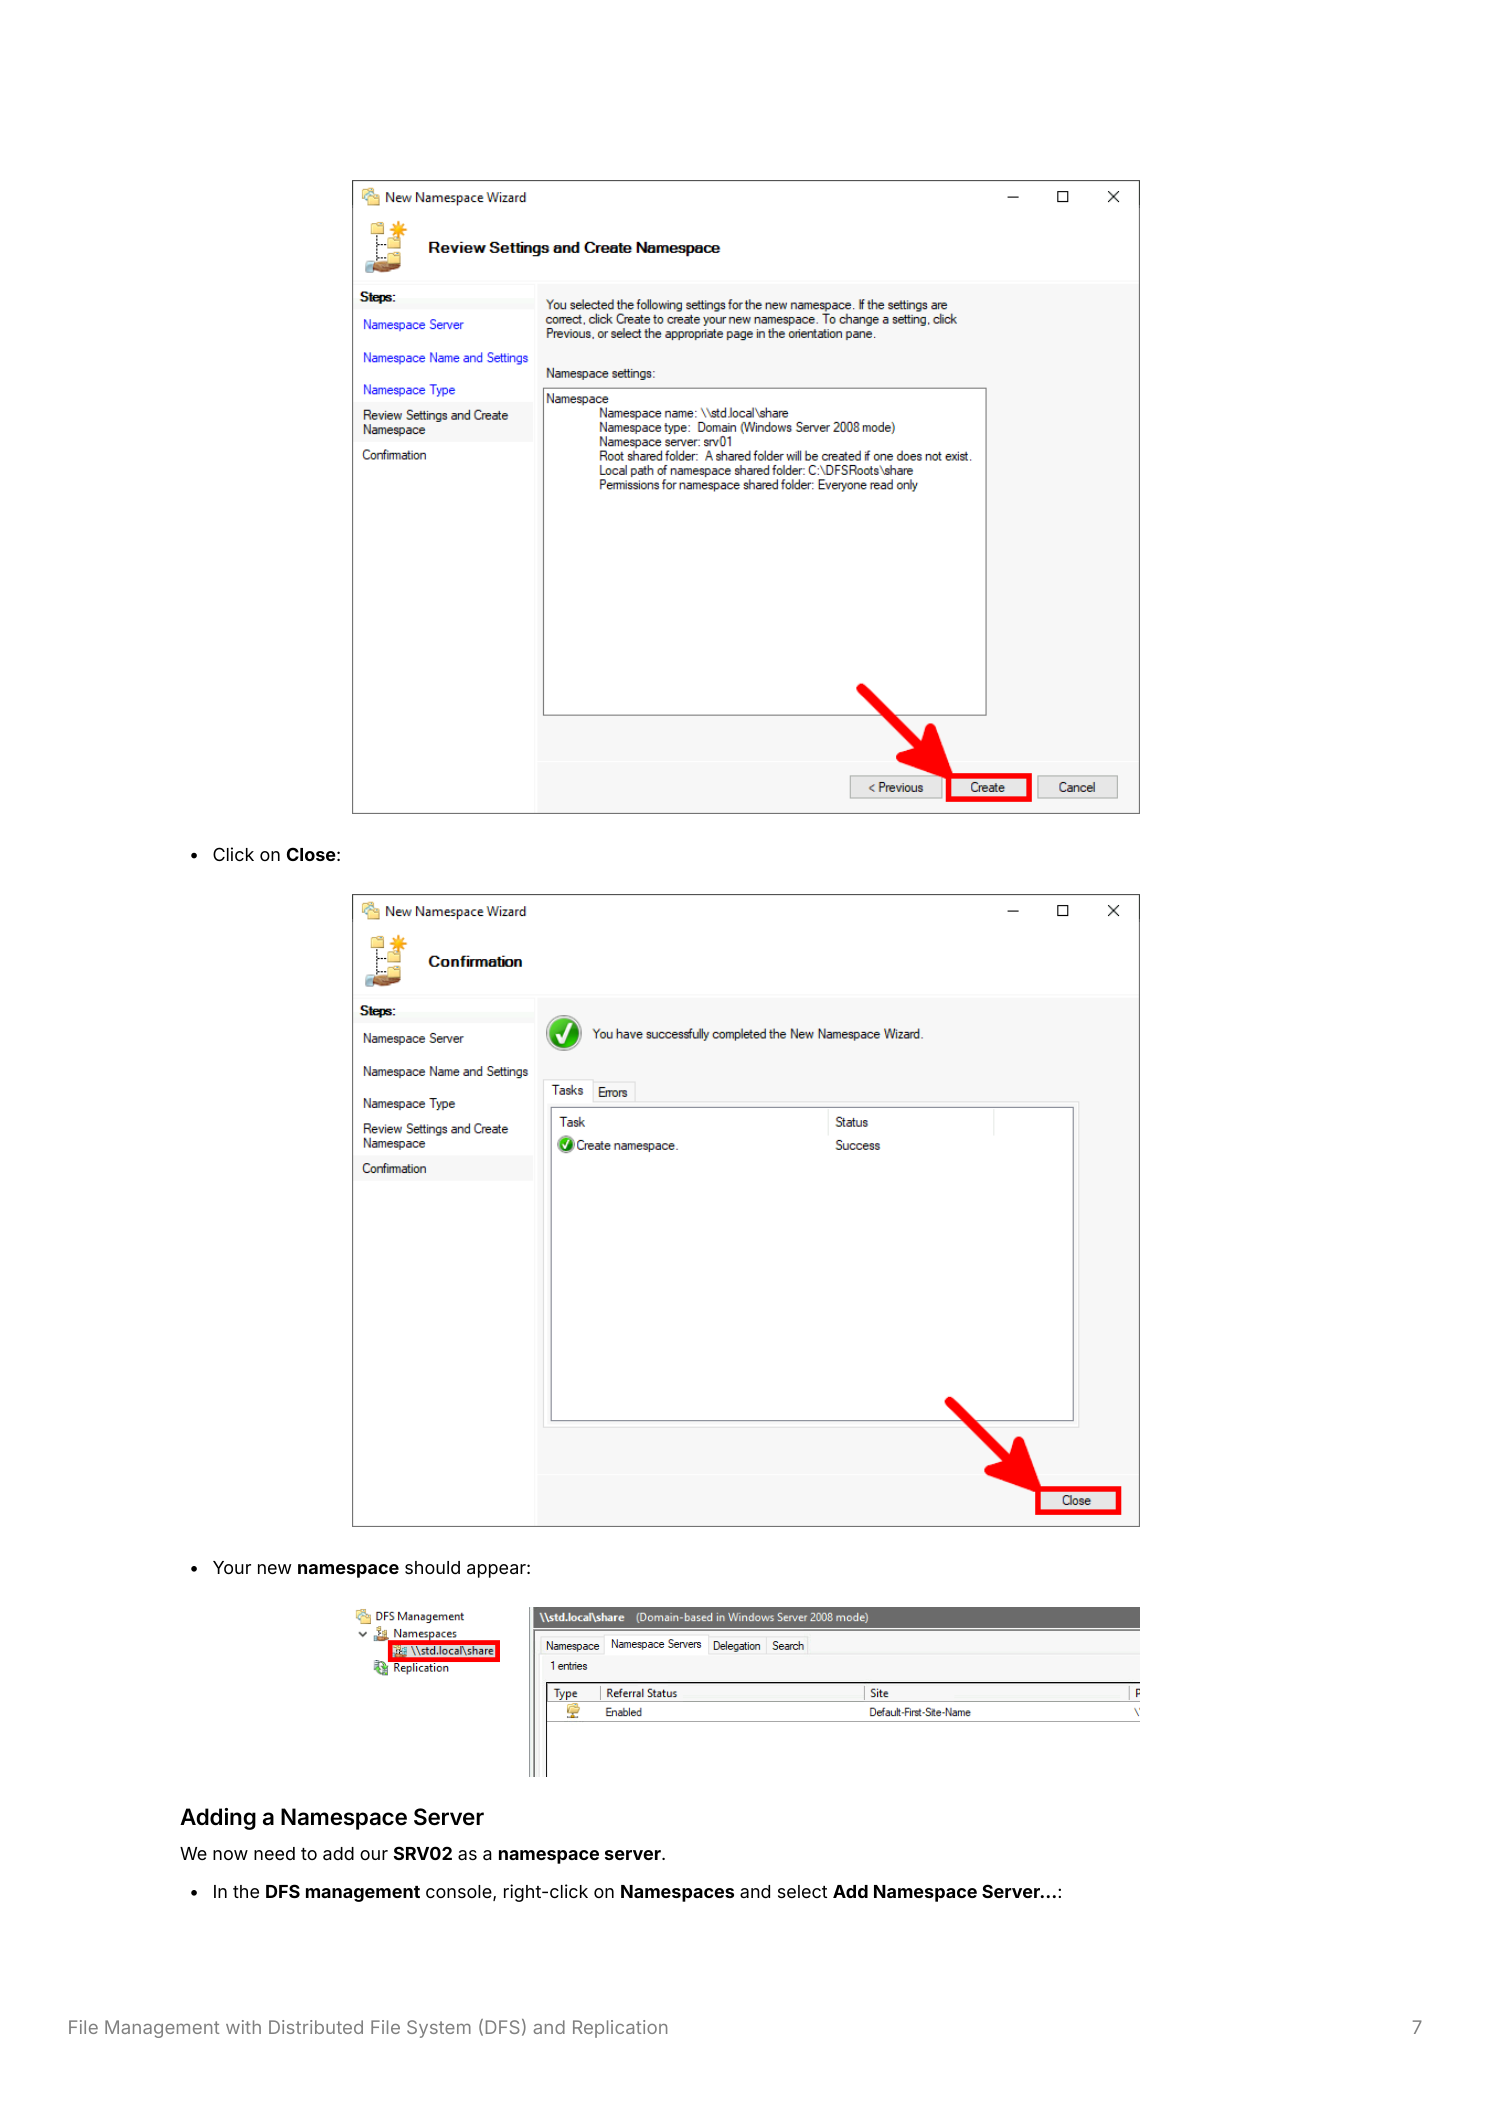
Review the summary, click Create, and the namespace appears in DFS Management under Namespaces. At this point \\std.local\share resolves but it’s empty — no folder targets have been added yet.

Part 3 — Add SRV02 as a second namespace server
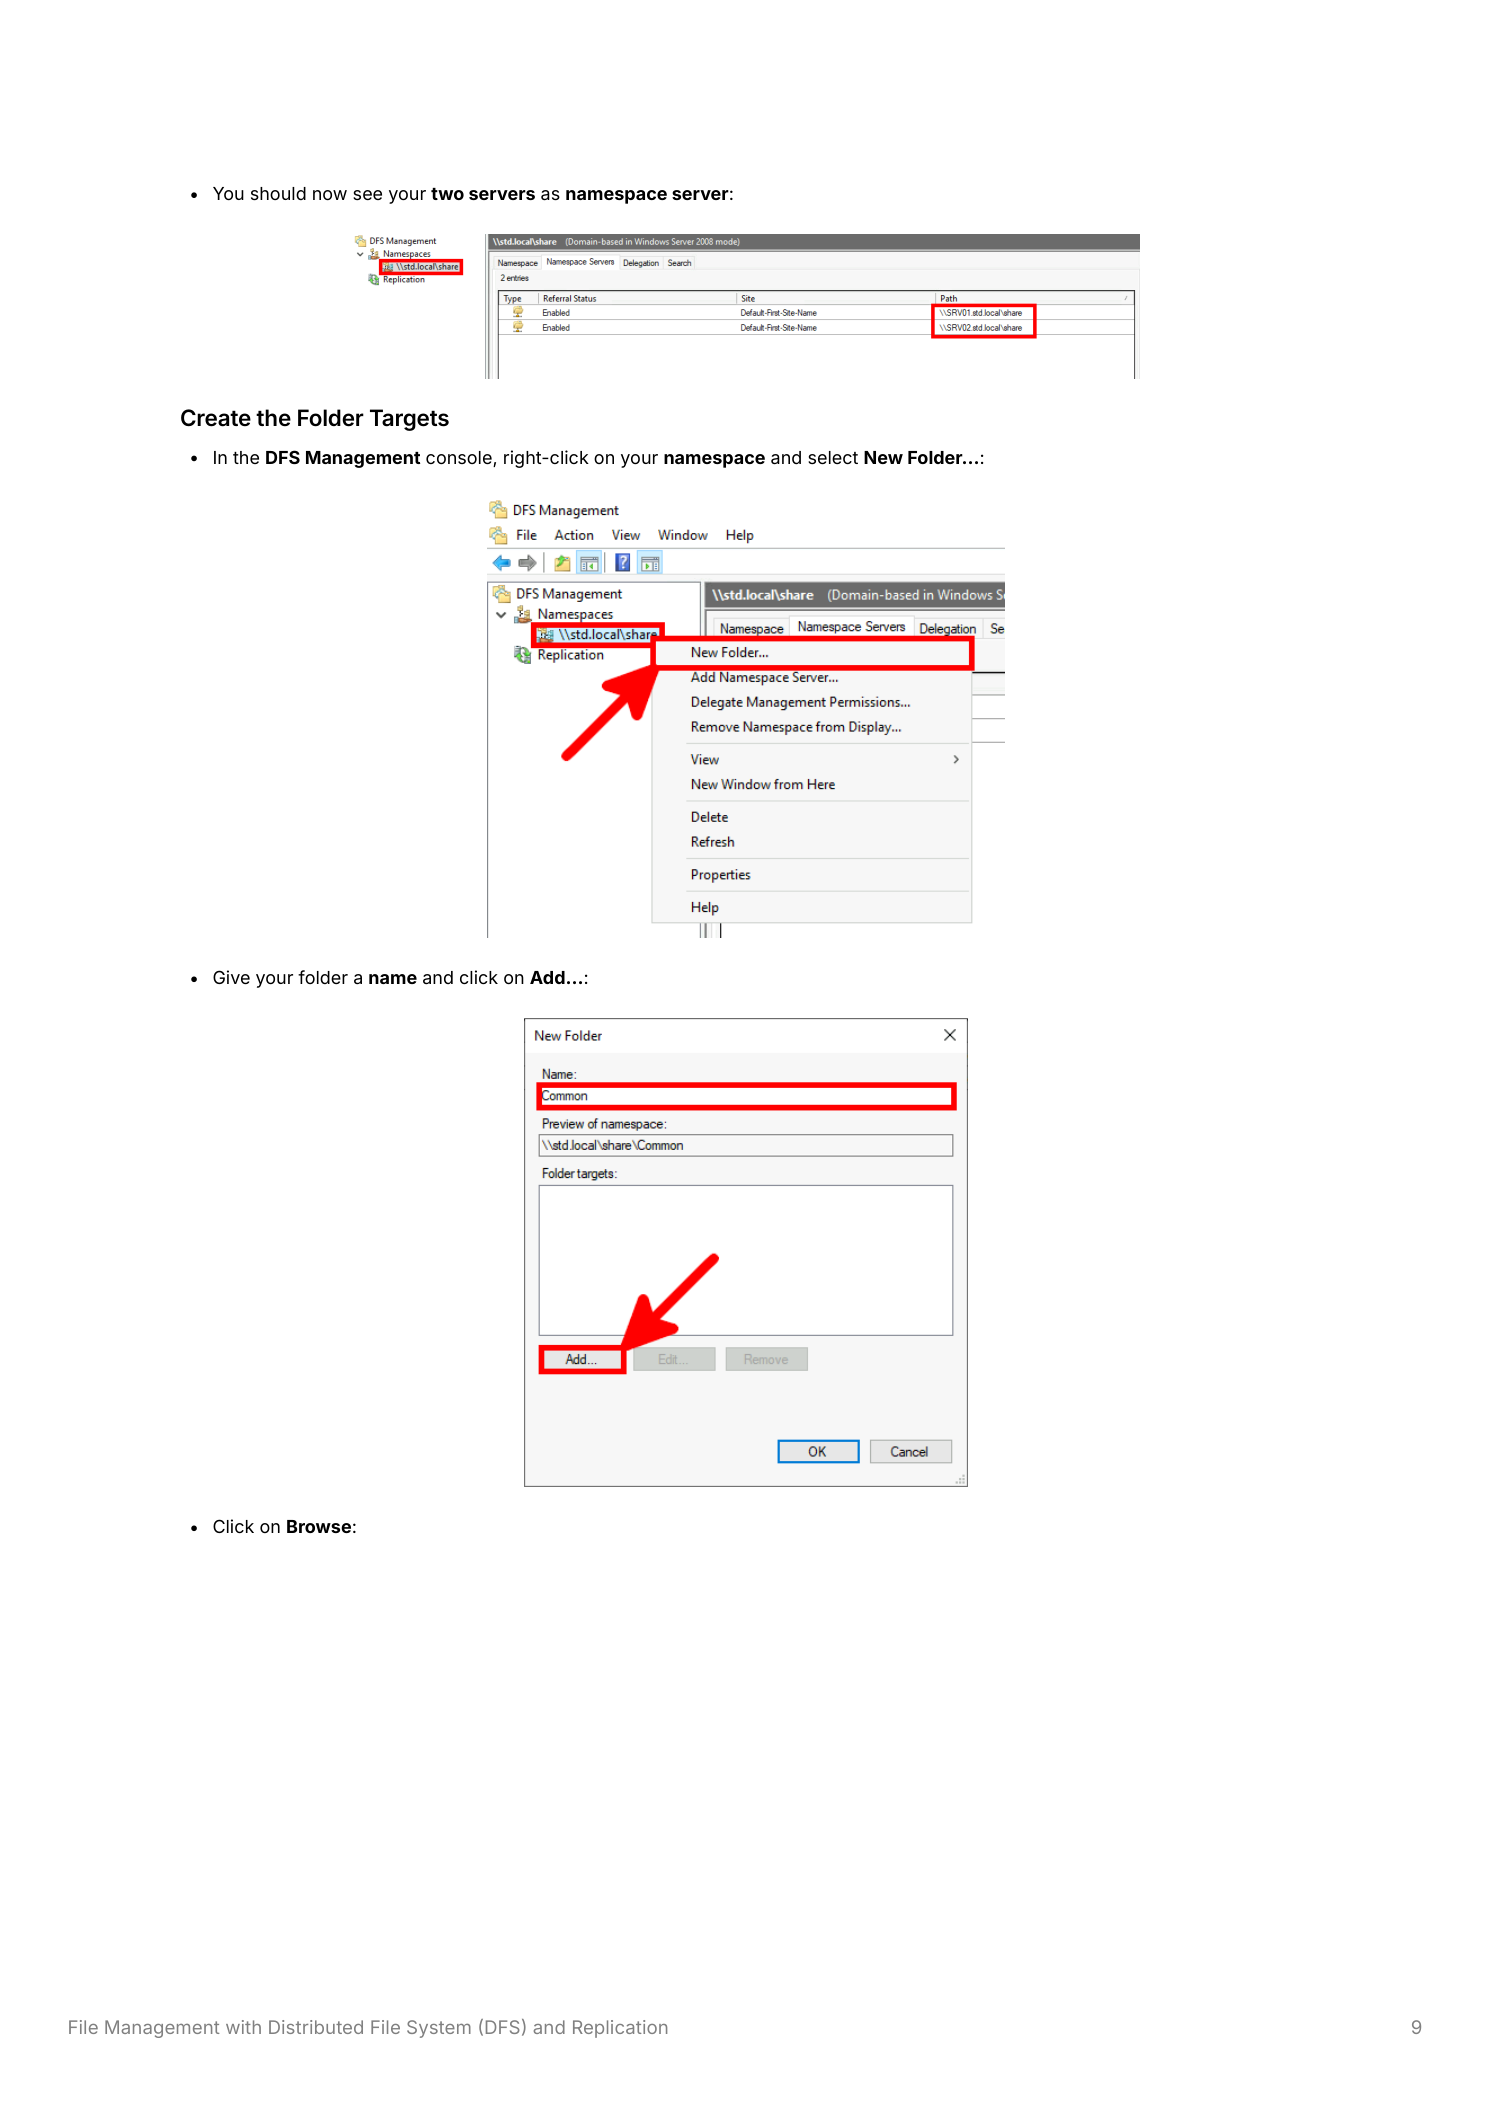
If SRV01 is the only namespace server and it goes down for patching, the entire namespace becomes unreachable — even if SRV02 still has the data. Add SRV02 as a second namespace server: right-click the namespace, pick Add Namespace Server, enter SRV02, and click OK. Both servers now appear under the Namespace Servers tab and clients are referred to whichever one is closer/responding.
Part 4 — Add the Common folder and back it with both servers
Folder targets are where the data actually lives. We’re creating a namespace folder called Common with two folder targets — one on each server. So \\std.local\share\Common resolves to either \\SRV01\Common or \\SRV02\Common depending on which namespace server the client was referred to.
Step 7 — Create the namespace folder
Right-click the namespace (\\std.local\share) and choose New Folder. Name it Common — the wizard previews \\std.local\share\Common. Then click Add in the Folder targets section to start defining where the data lives.
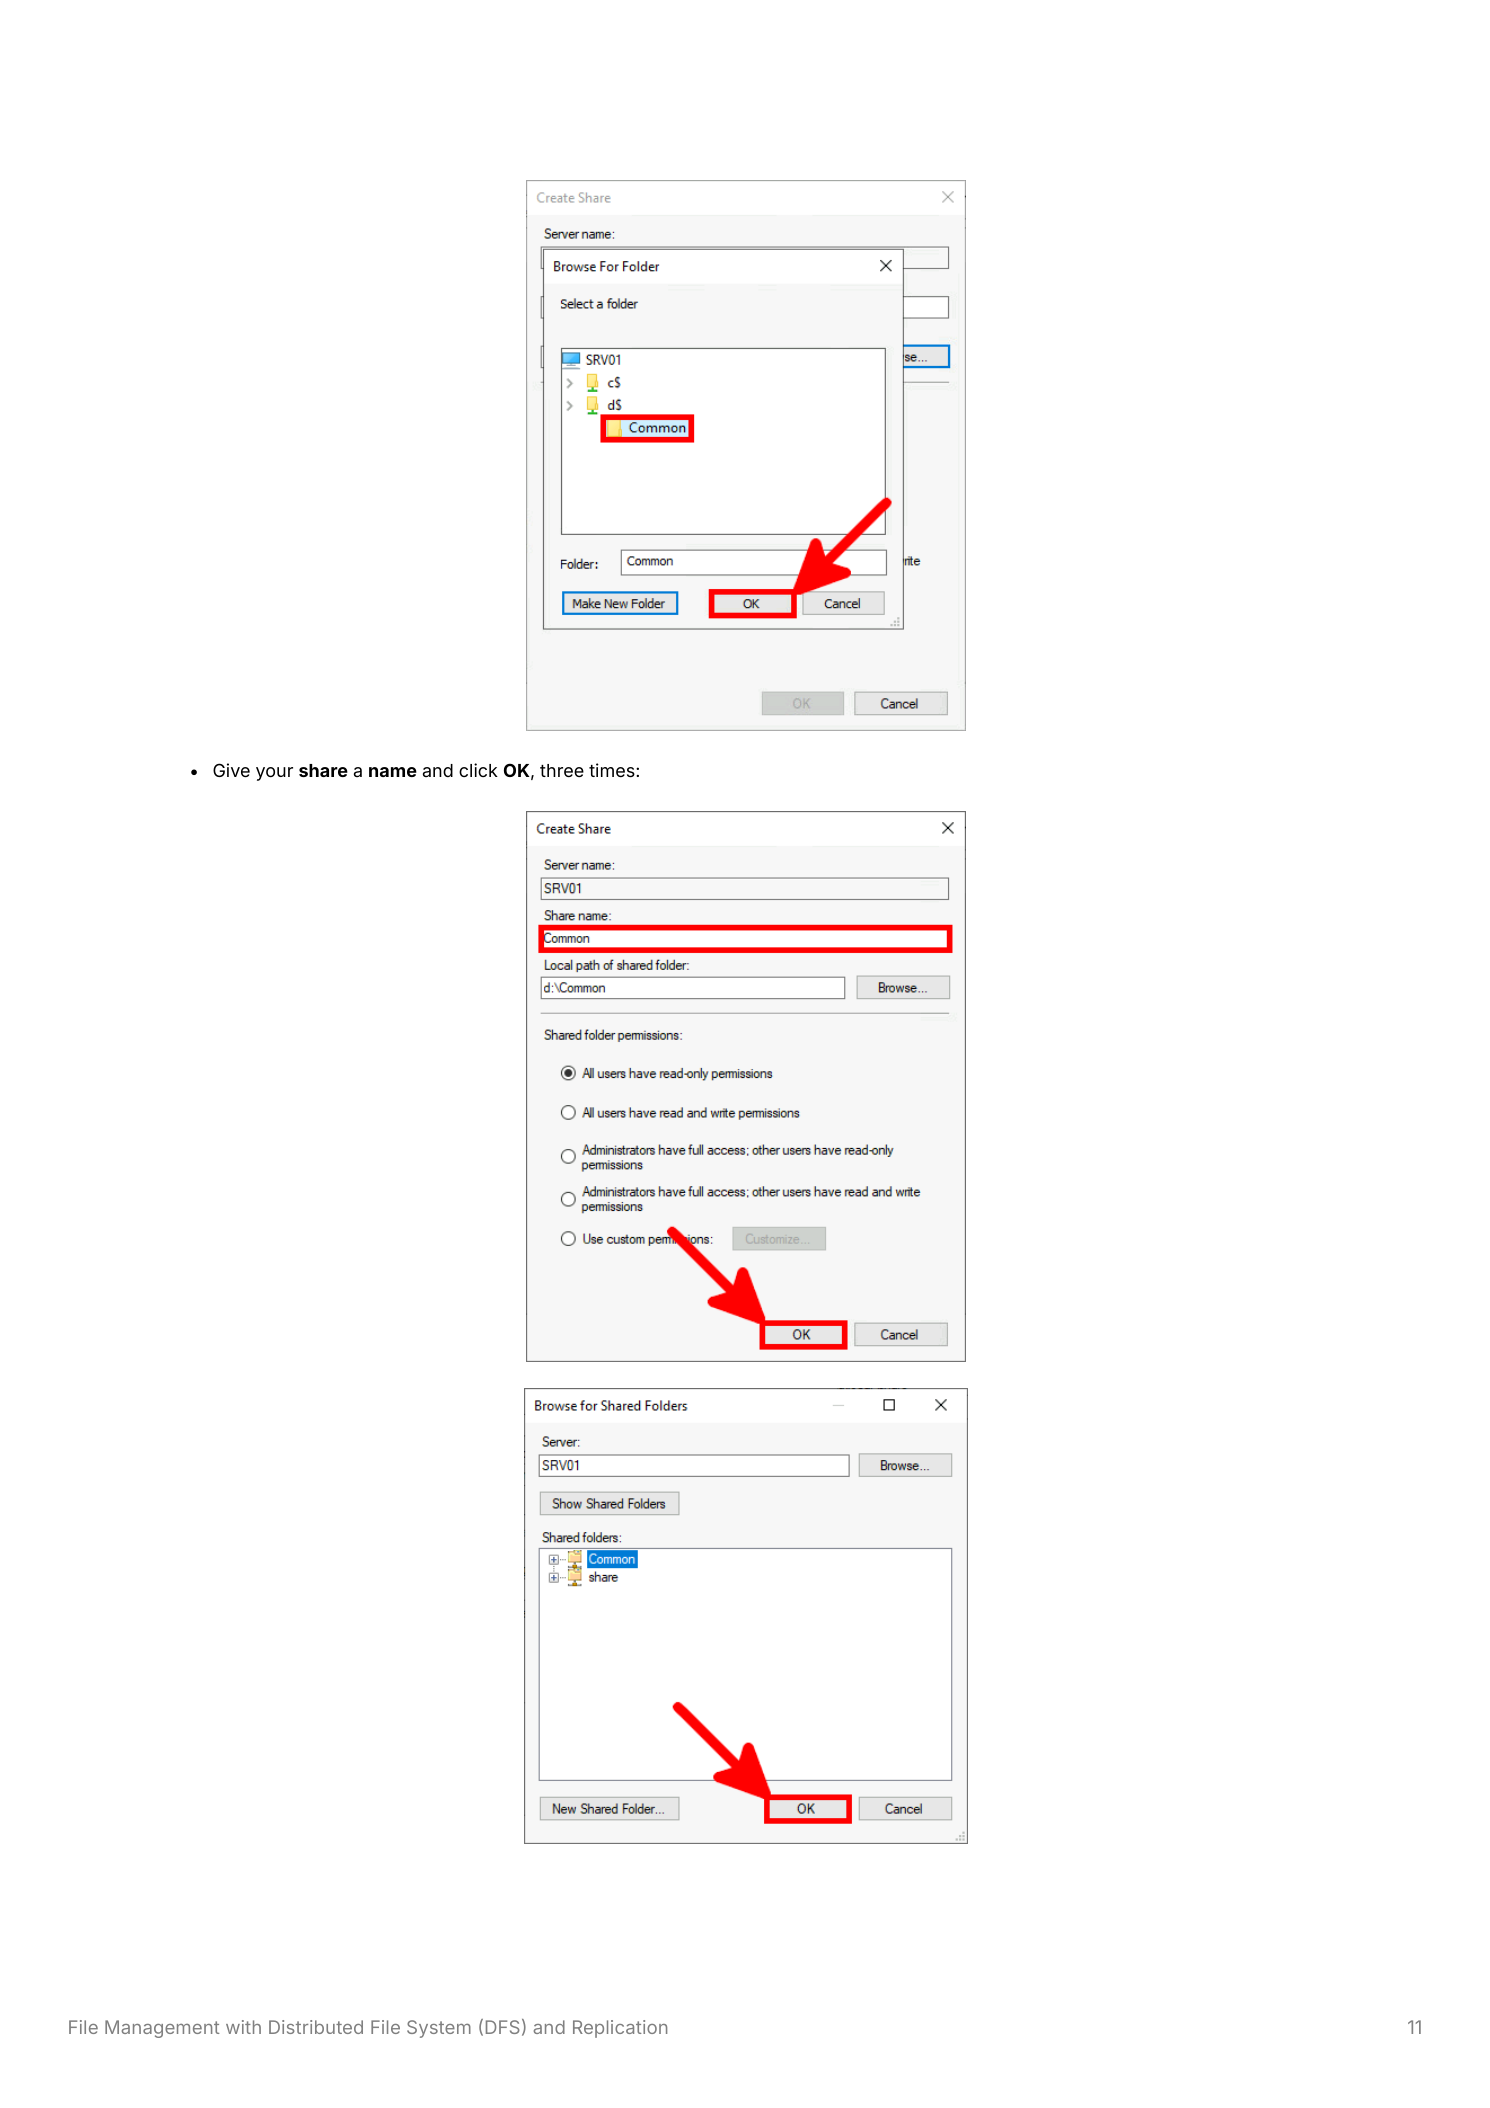
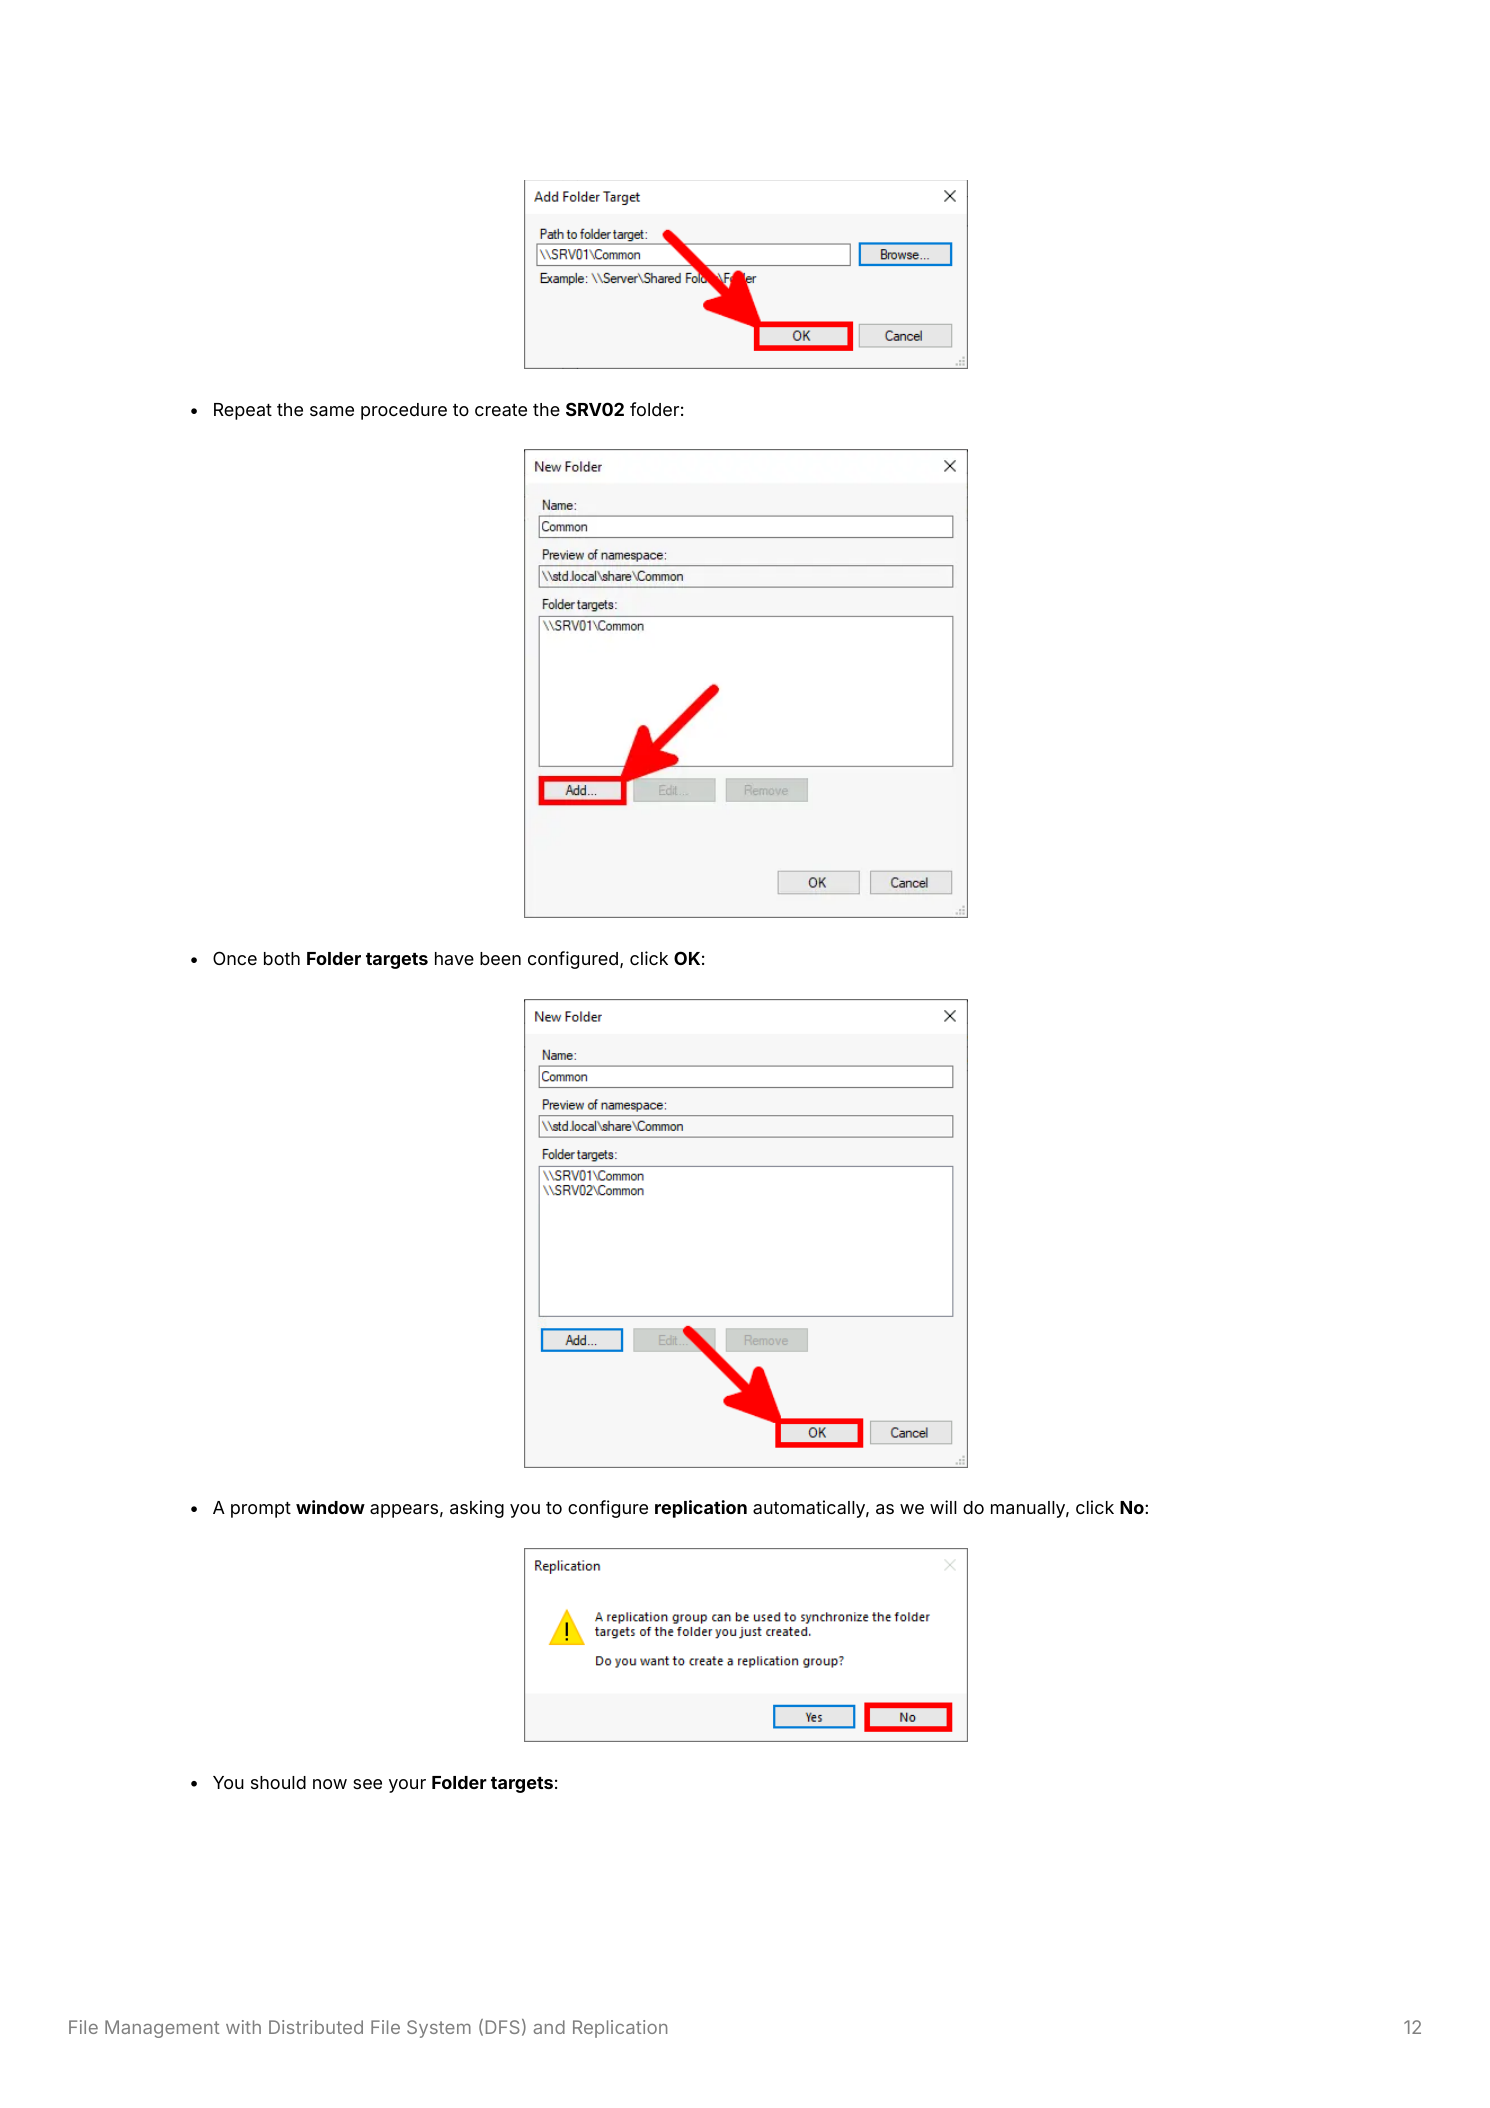
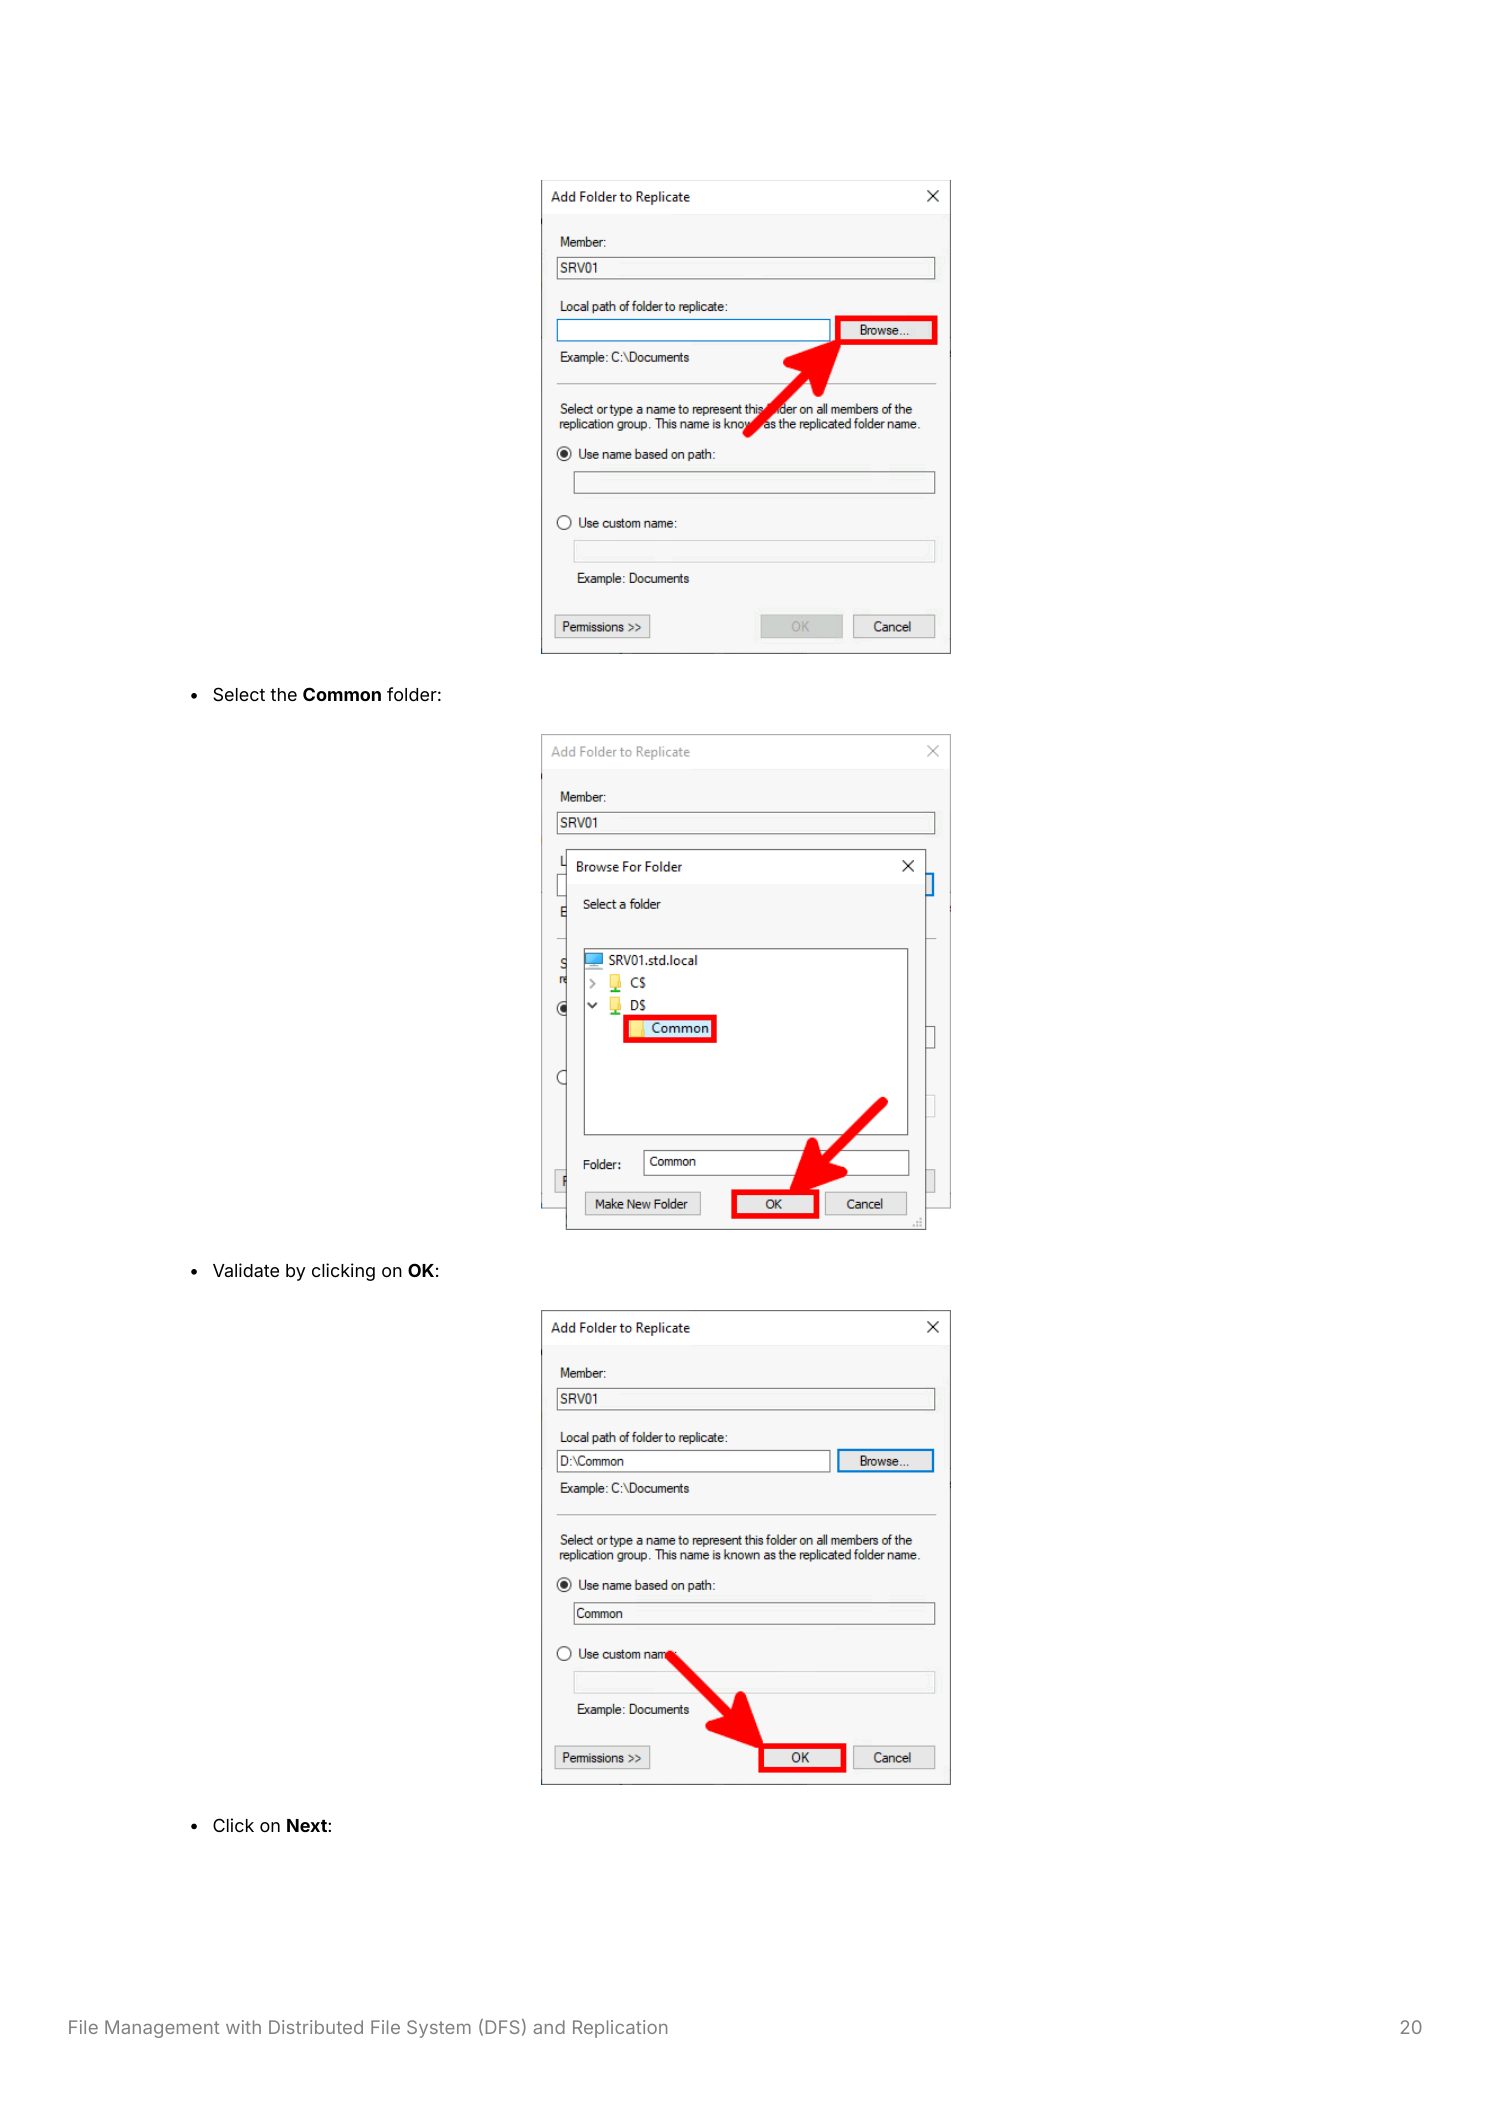
Step 8 — Add both folder targets
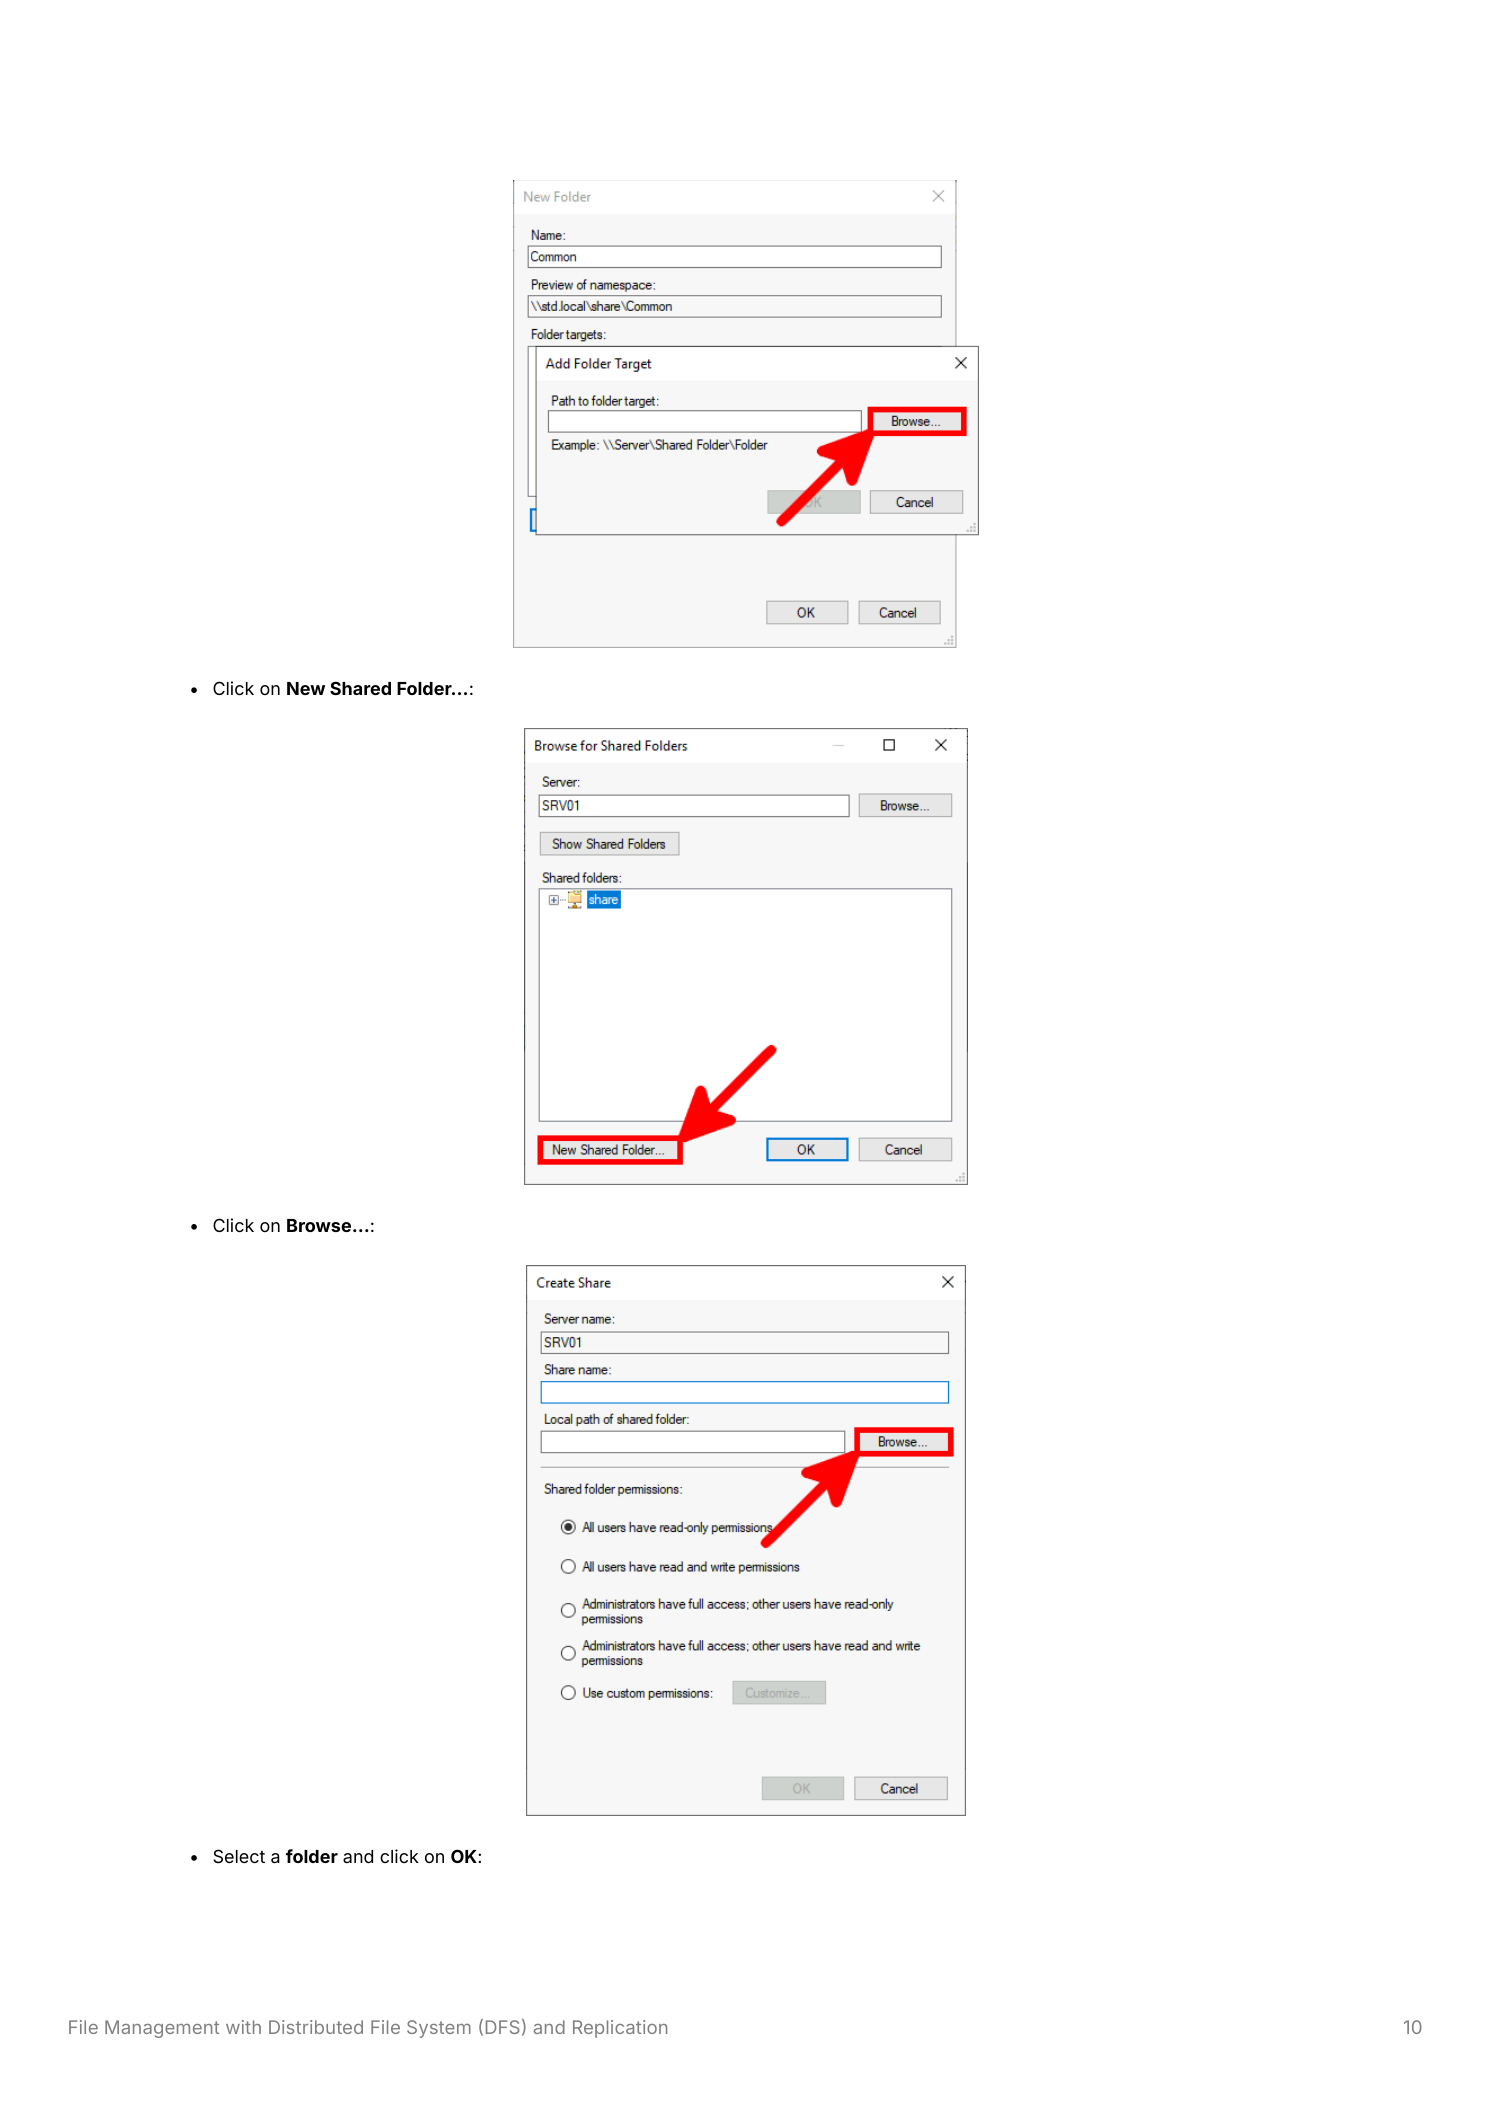
In the Add Folder Target dialog, click Browse, navigate to SRV01, and pick the Common folder under D drive. The wizard offers to create a network share for it — share name Common, local path D:\Common. Click OK through. Repeat for SRV02 so both servers expose \\srvNN\Common. When the wizard offers to create a replication group, click No — we’ll do that manually in Part 6 with proper control over the topology.
Part 5 — The share-permissions trap
This is the bit nobody warns you about. The shares the wizard auto-created grant Read to Everyone. Users see the namespace, can browse the folder, can’t write a single byte. Until you fix it on each underlying share, the namespace looks broken.
Step 9 — Reproduce the access-denied error
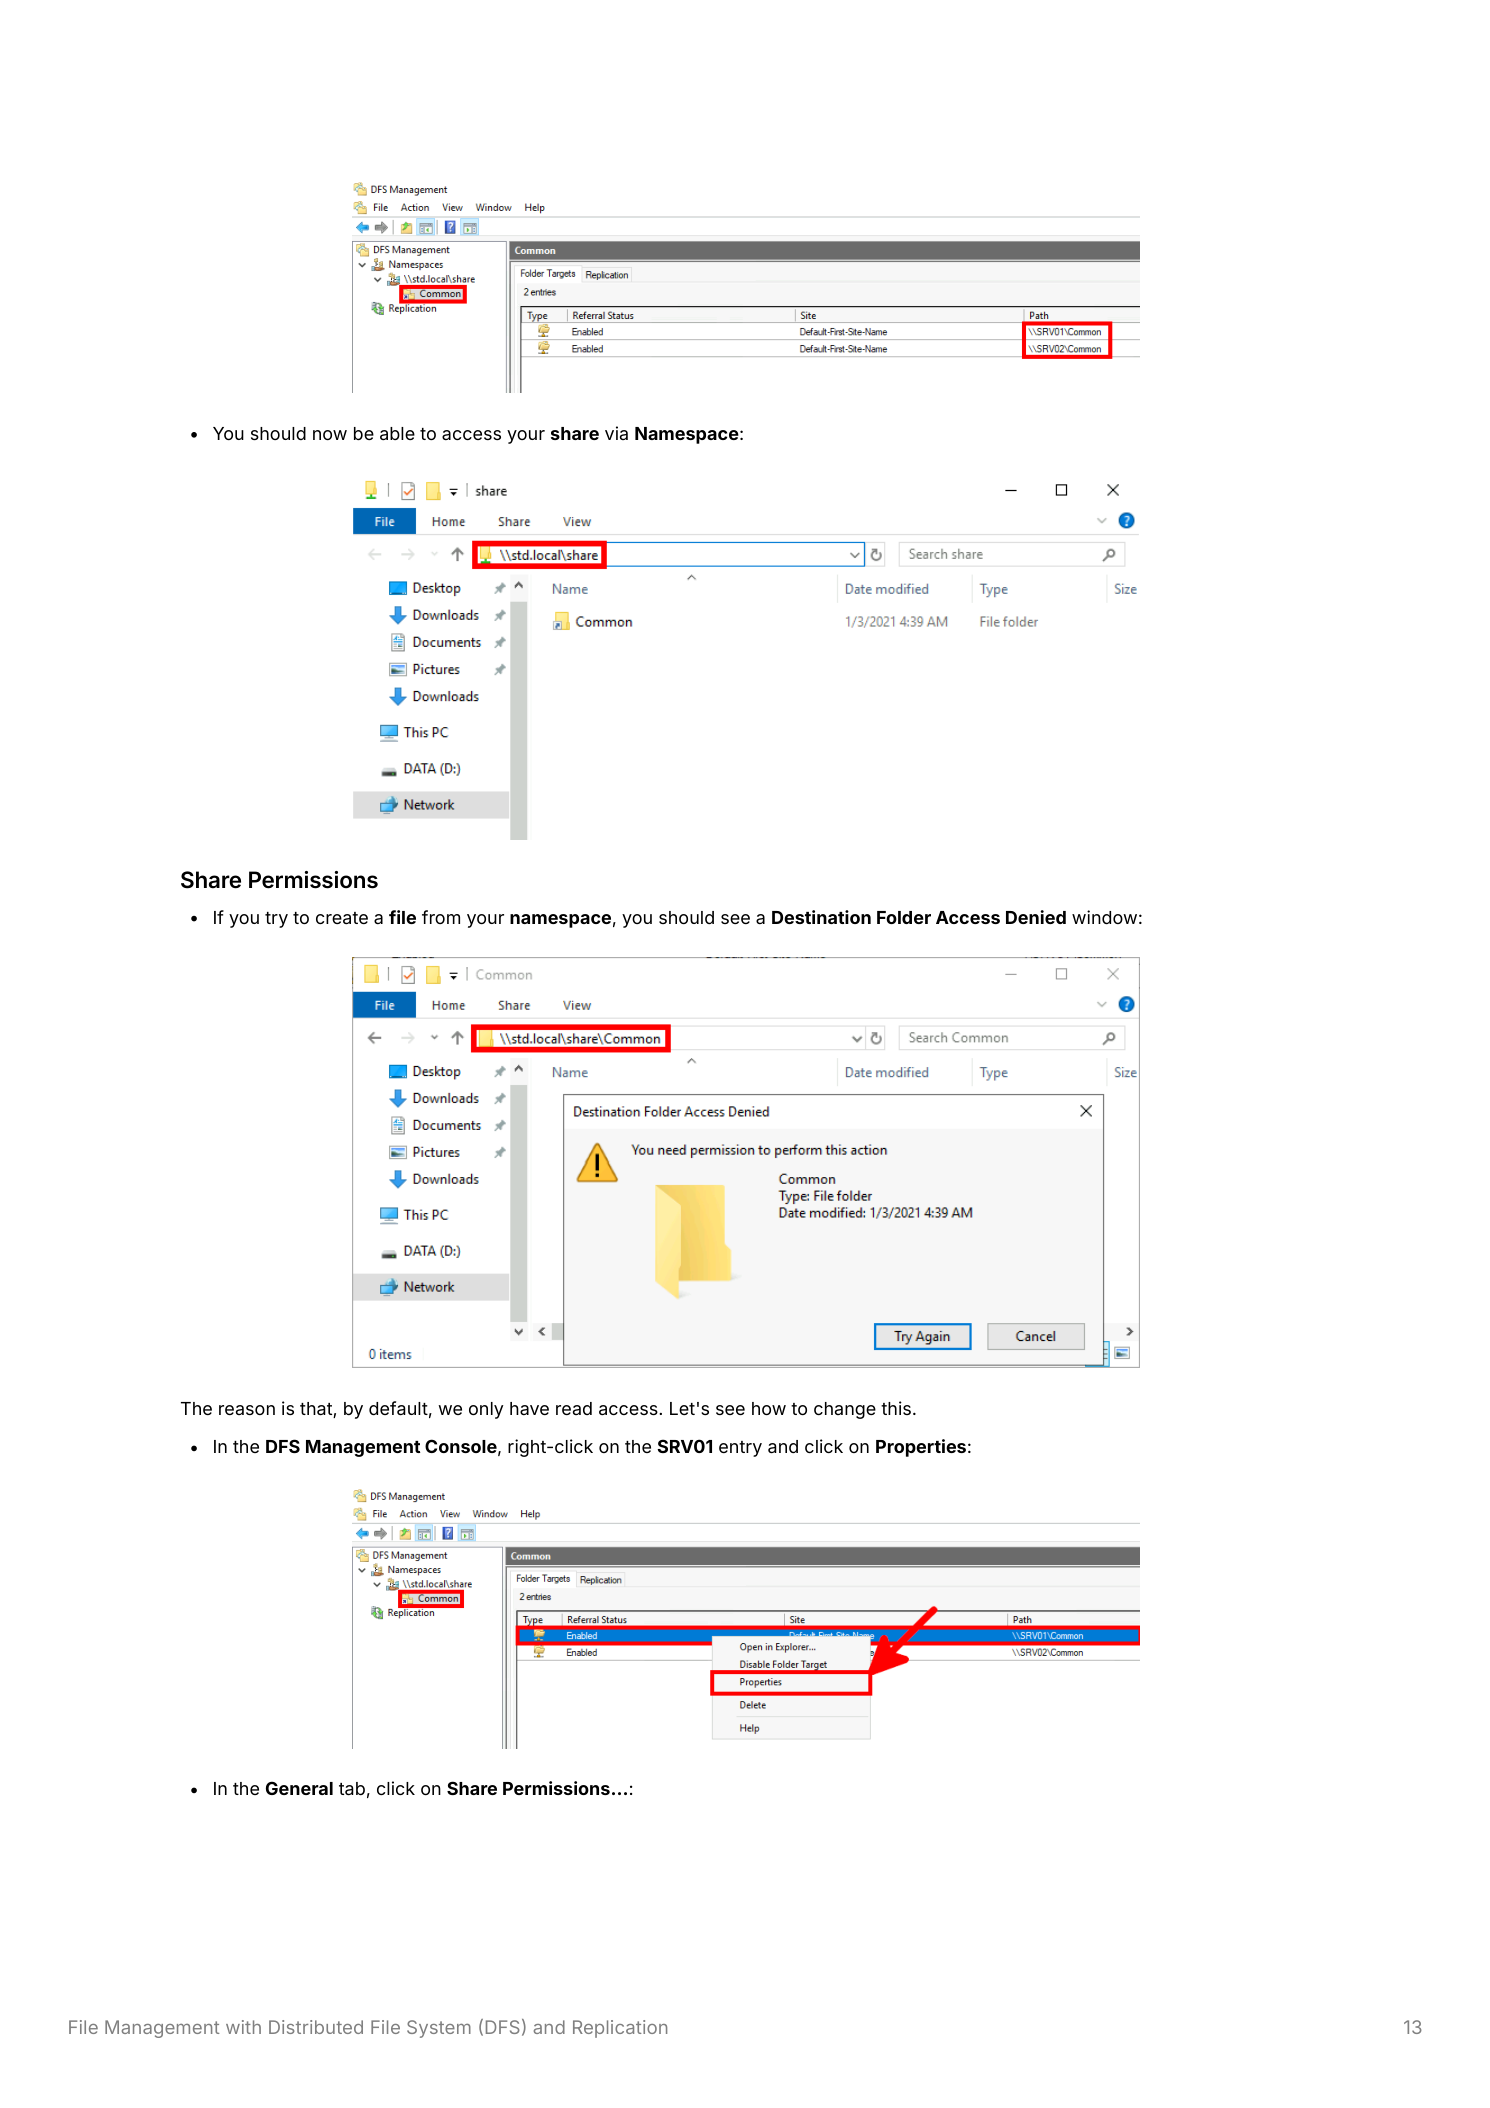
From a client, browse to \\std.local\share. The Common folder is visible. Try to create a file inside it — you get Destination Folder Access Denied. The fix is on the underlying share, not the namespace folder. Back in DFS Management, expand the namespace, right-click \\SRV01\Common in the folder targets list, and pick Properties.
Step 10 — Grant the share write permissions
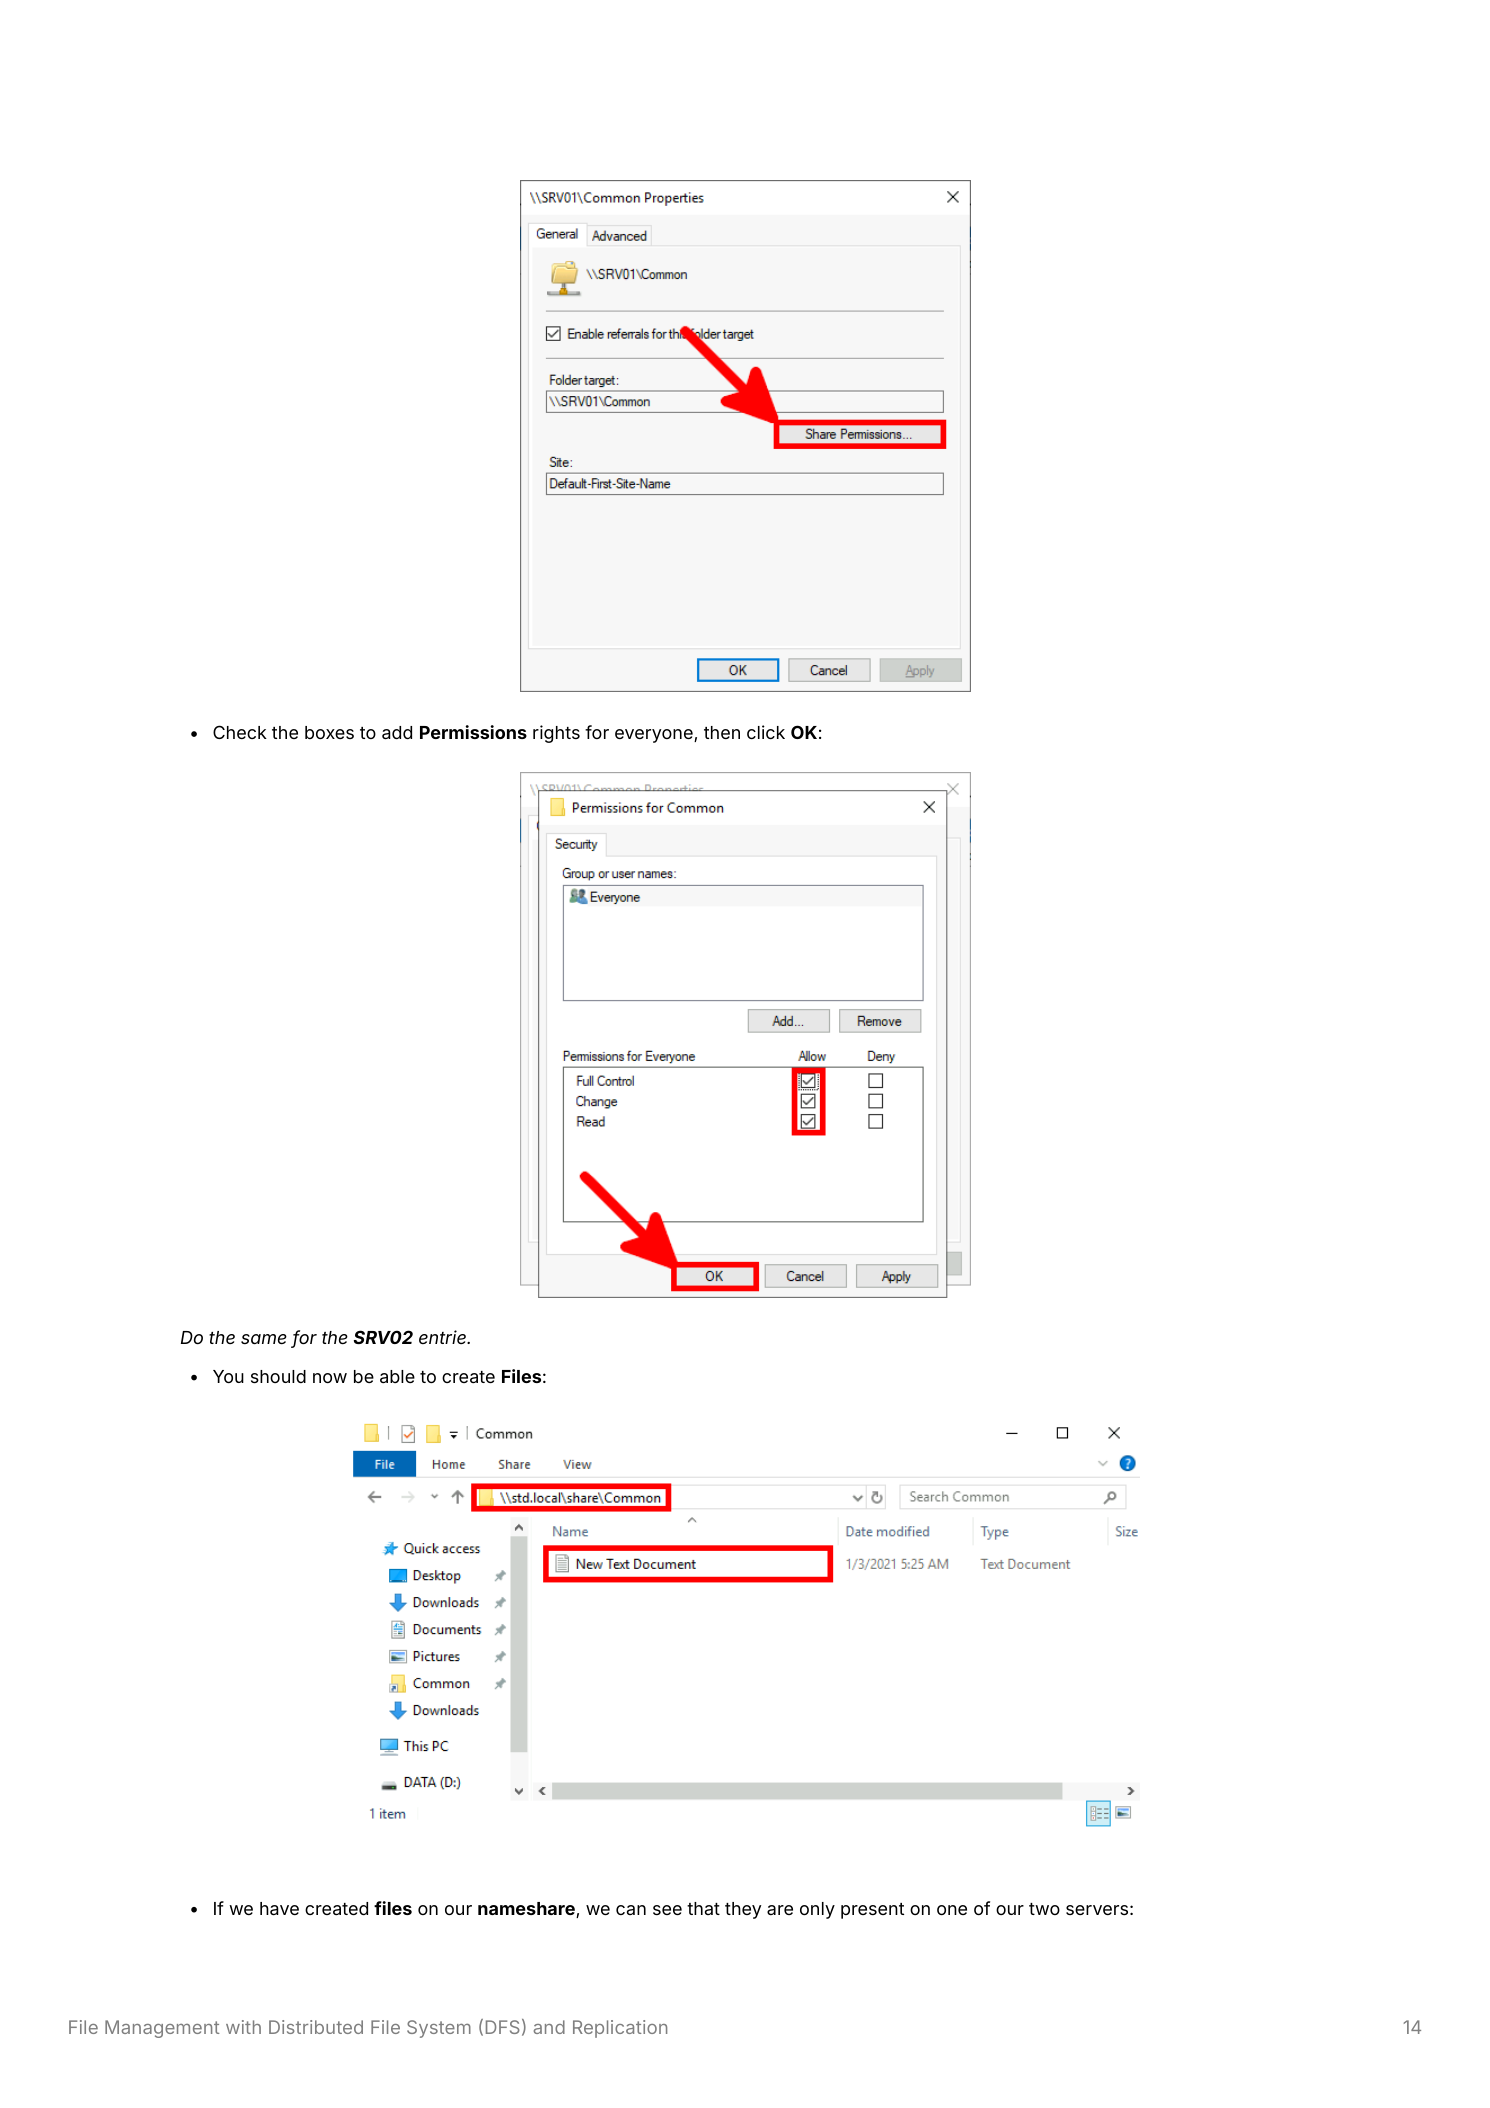
In Properties, click Share Permissions. Tick Full Control, Change, and Read for Everyone, then OK. Repeat the same on \\SRV02\Common. Once both folder targets have write permissions, the namespace becomes usable. (In production you’d typically grant Authenticated Users instead of Everyone, then layer NTFS ACLs on the underlying folder for fine-grained access — share permissions are the outer envelope only.)
Part 6 — Replicate Common between both servers
Right now, a write to \\std.local\share\Common only lands on whichever server the client was referred to — the other server’s copy diverges immediately. DFS Replication fixes that with a replication group: Common_Rep will keep D:\Common identical across SRV01 and SRV02 in near-real-time.
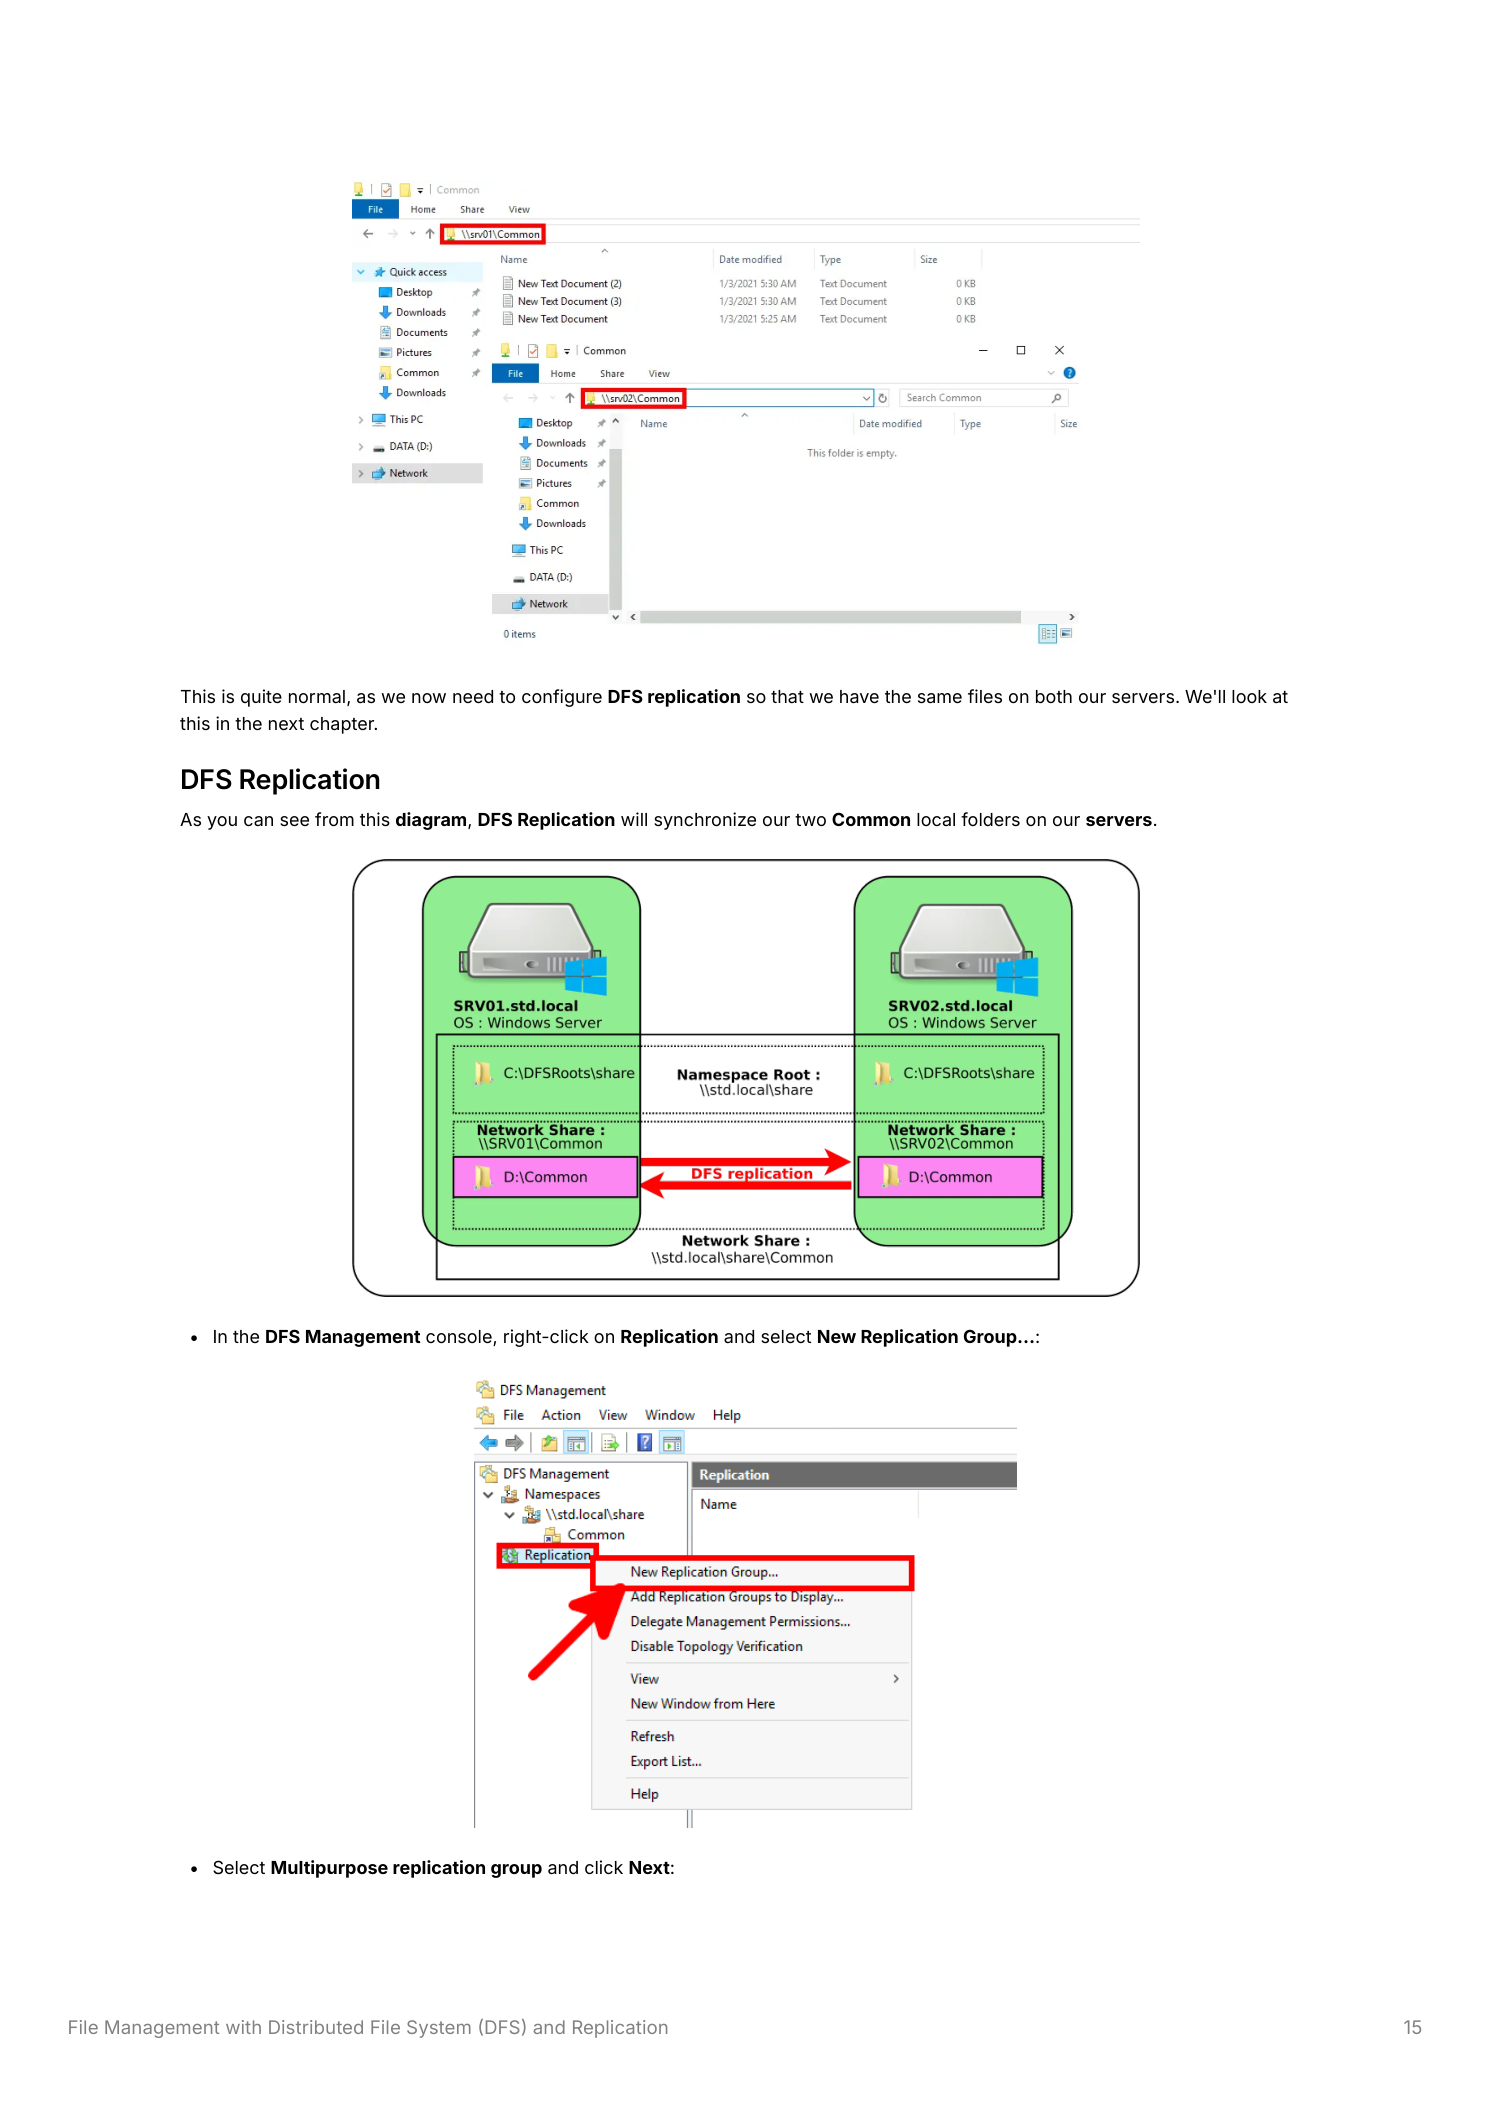
Step 11 — Create a multipurpose replication group called Common_Rep
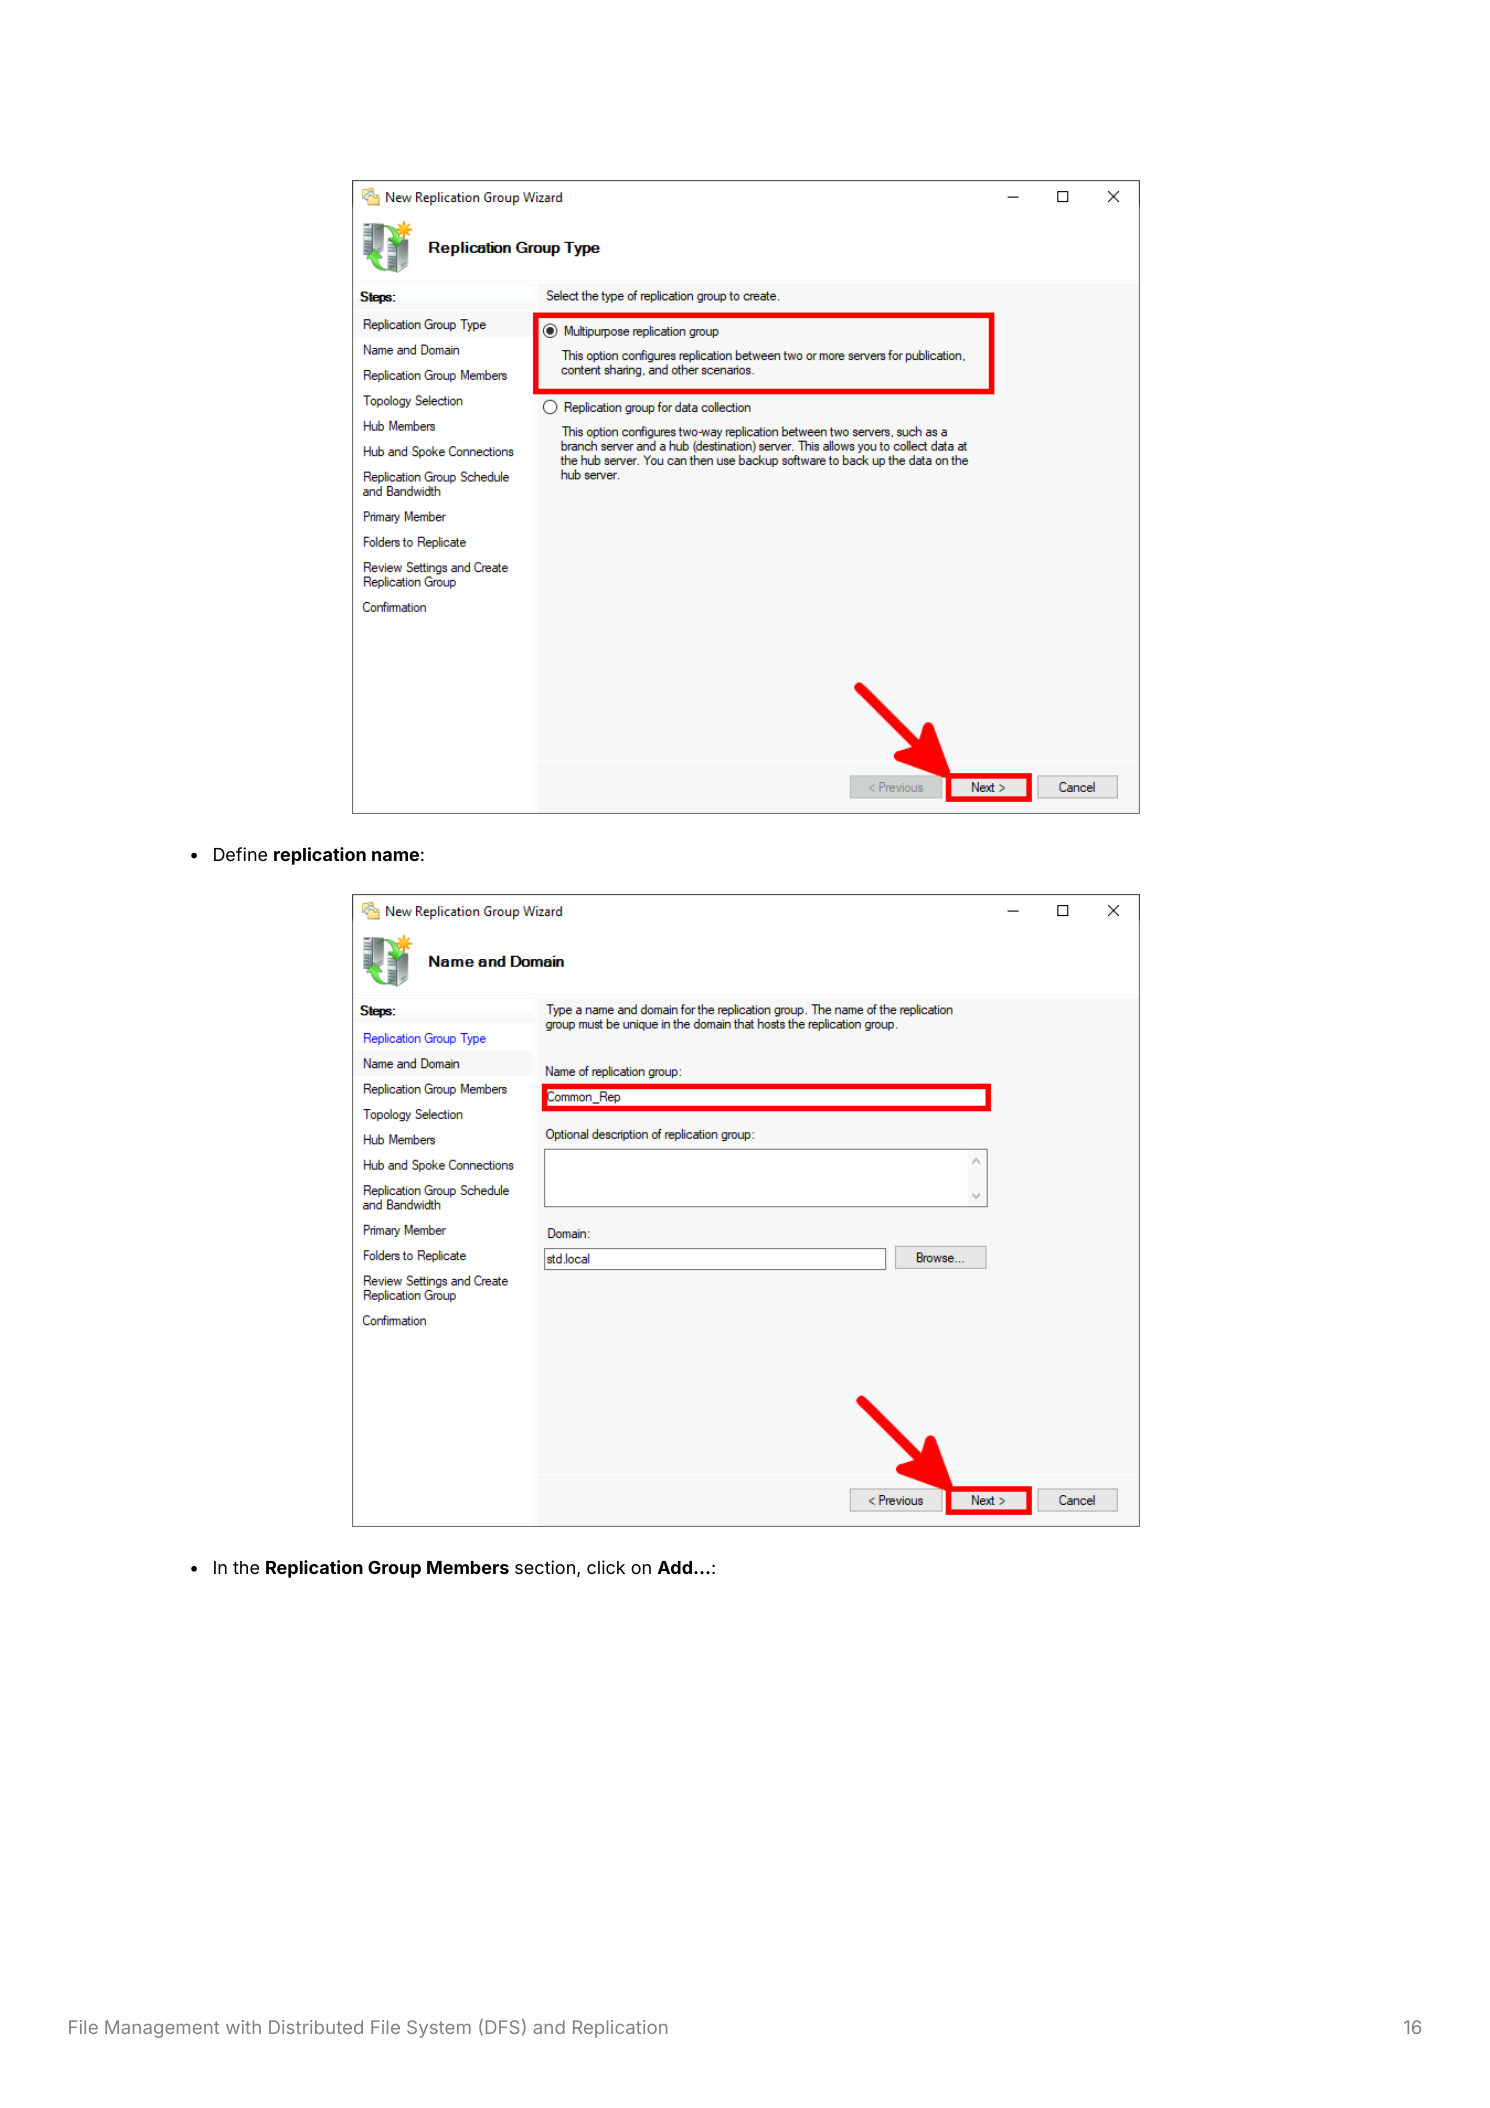
Right-click Replication > New Replication Group. Pick Multipurpose replication group (bidirectional sync between two or more members). Name it Common_Rep, confirm the domain is std.local, click Next.
Step 12 — Add SRV01 and SRV02 as members
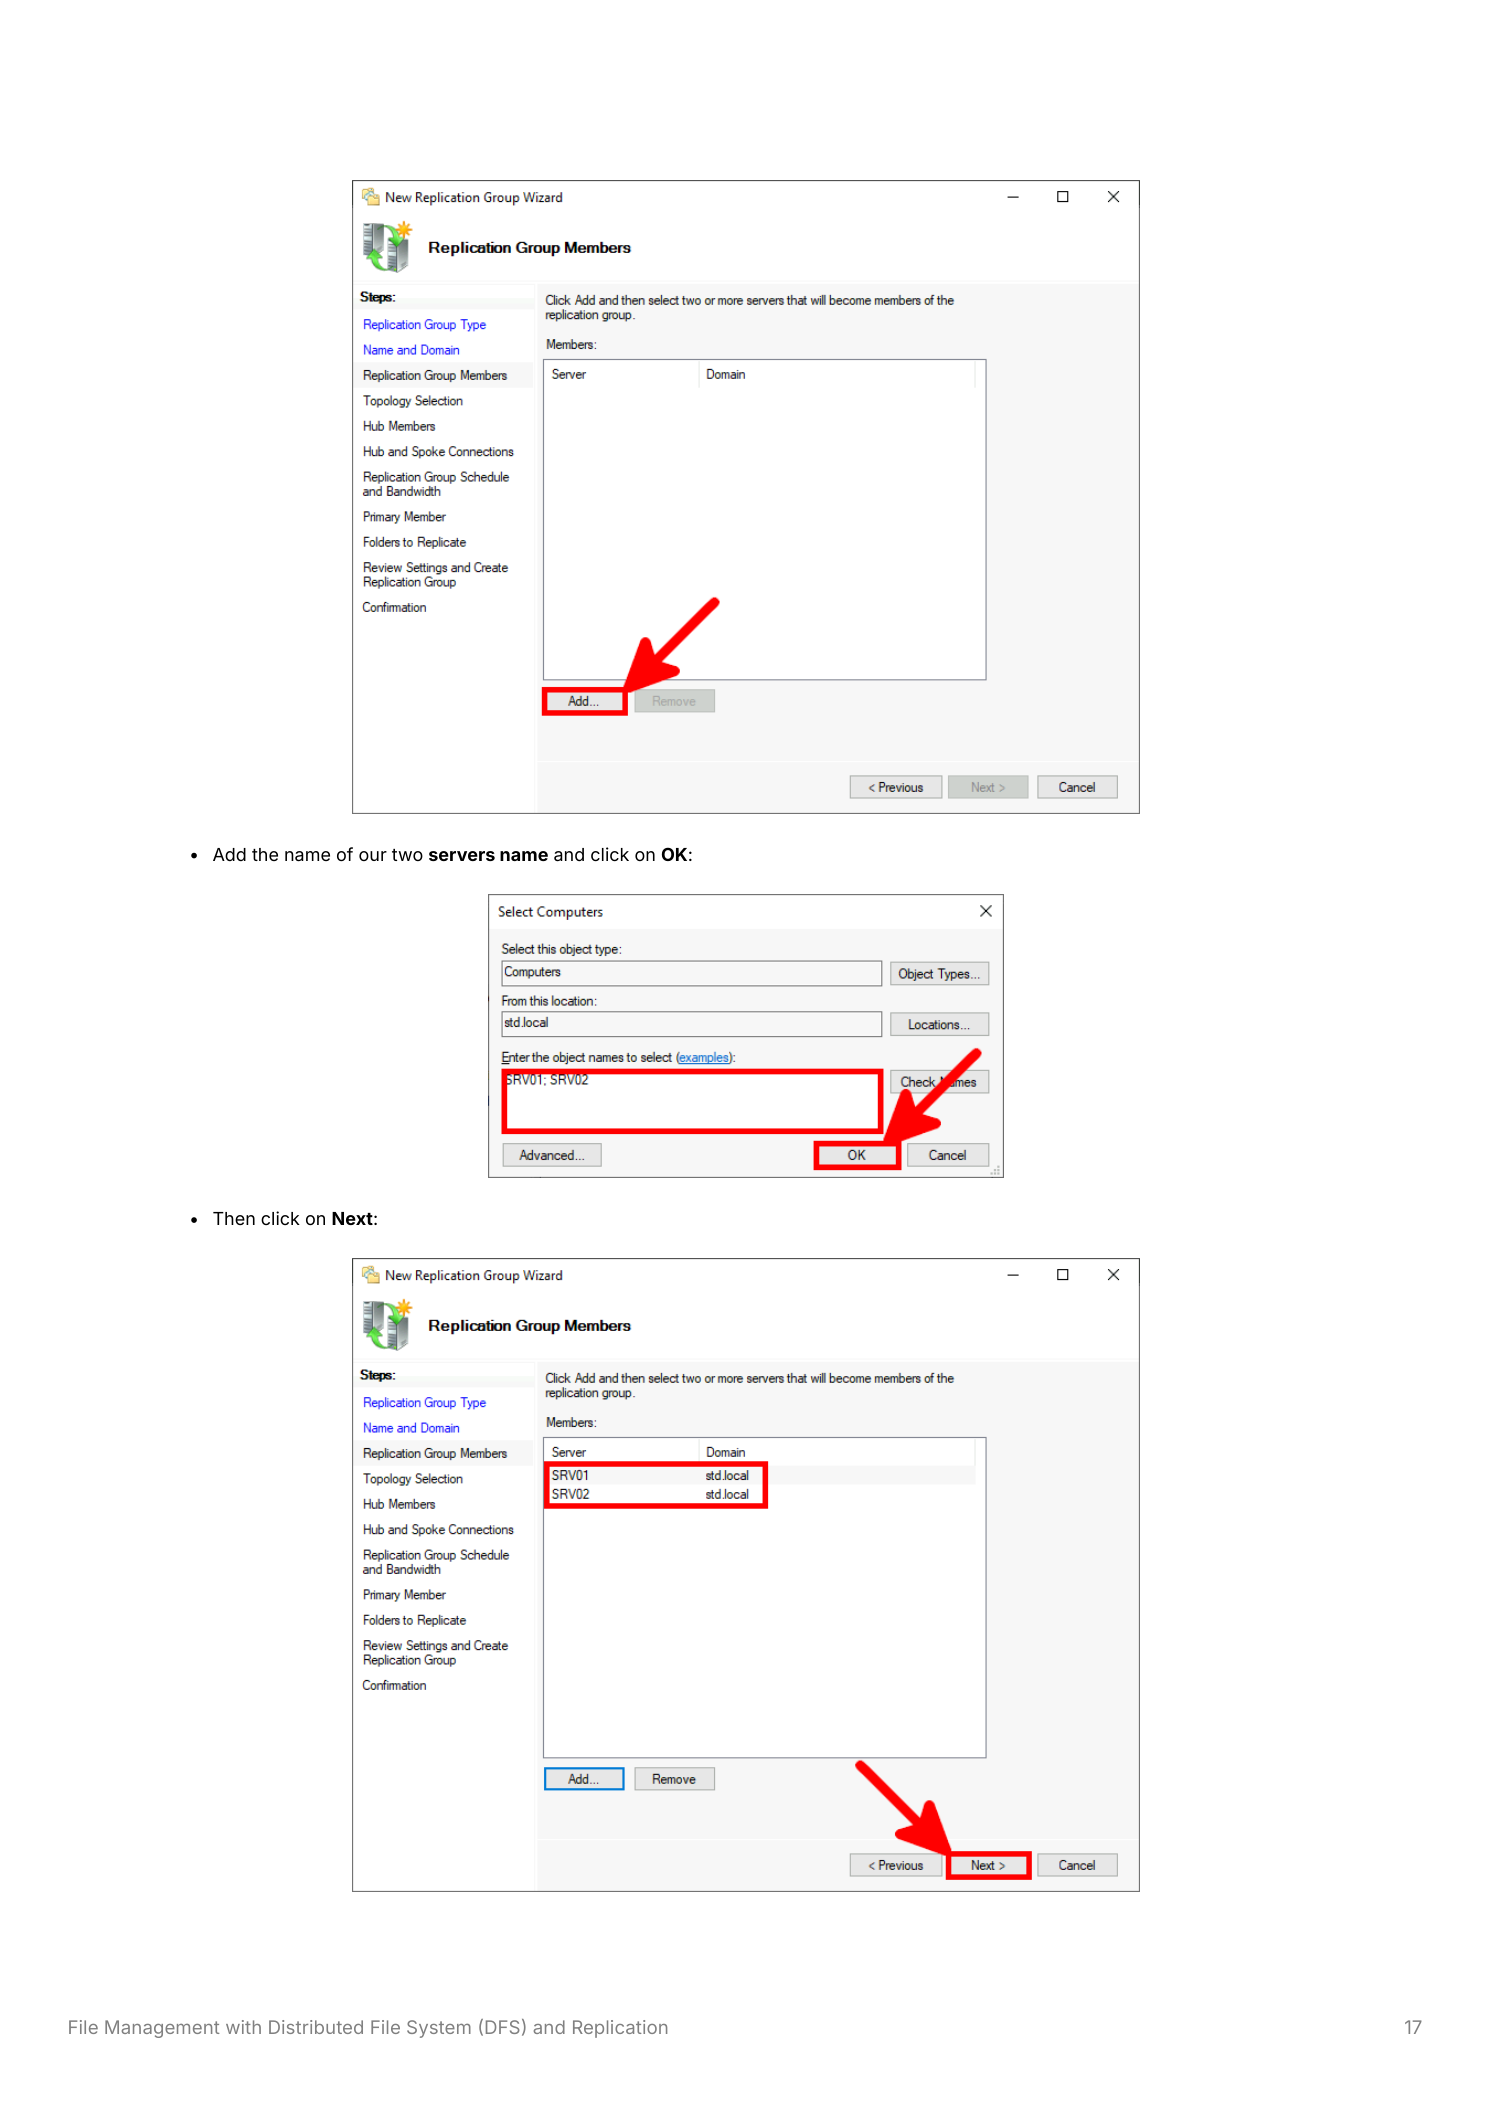
On the Replication Group Members page, click Add. In the Select Computers dialog type SRV01; SRV02, click Check Names, then OK. Both servers appear; click Next.
Step 13 — Topology and bandwidth
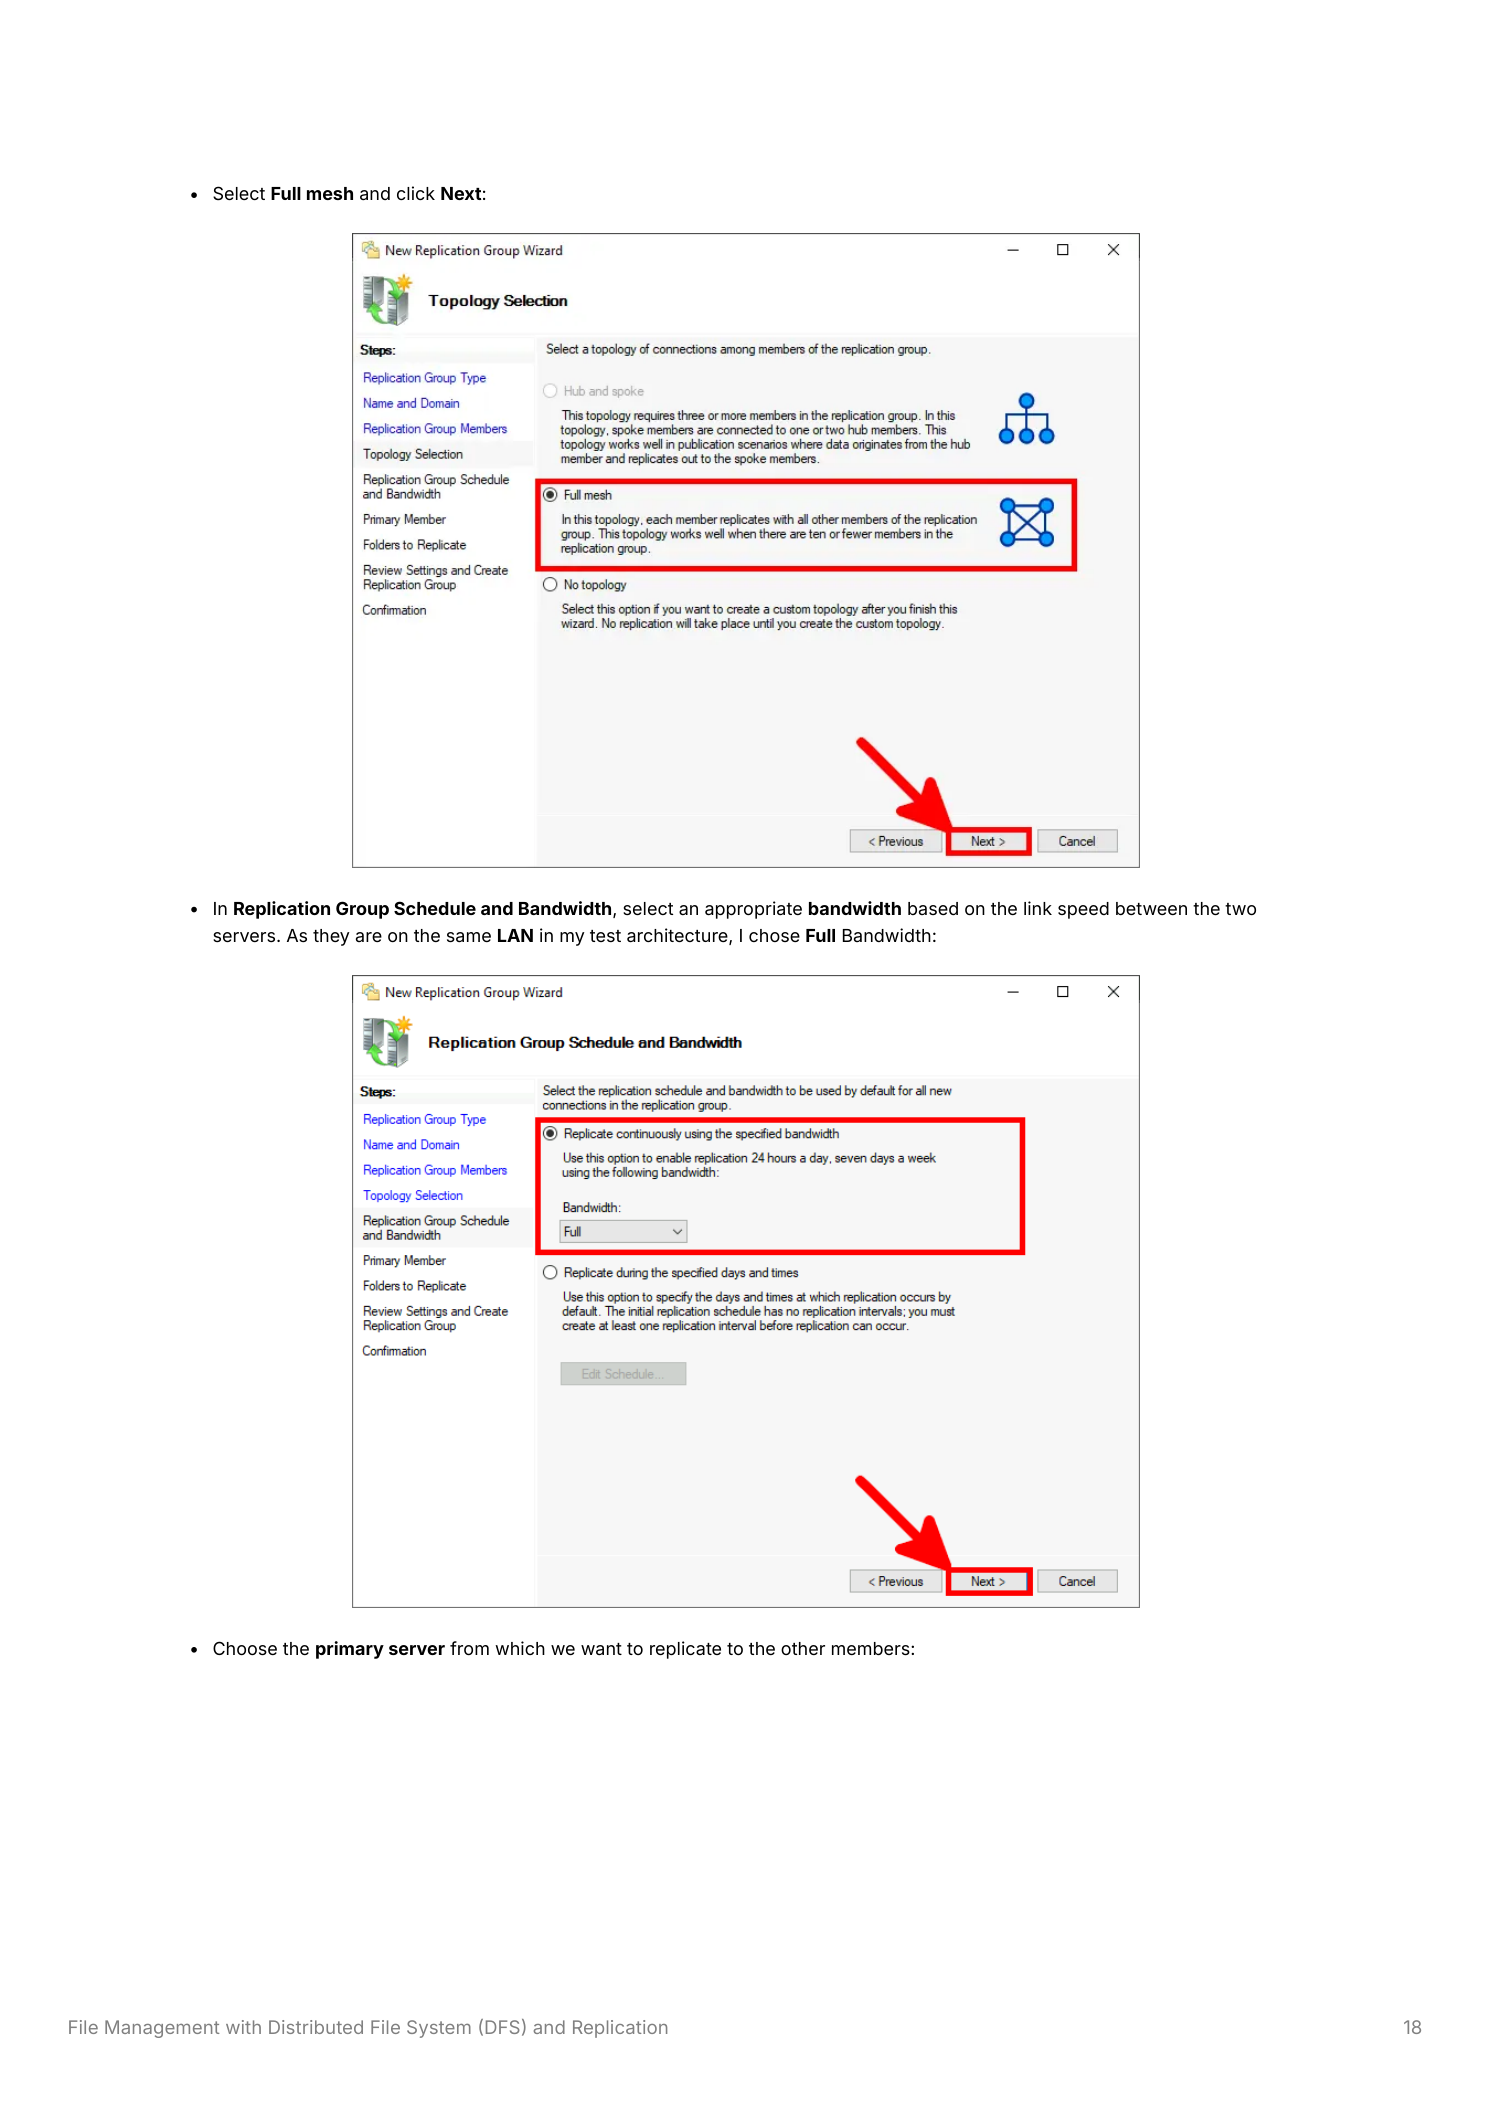
Pick Full mesh — with two members it doesn’t matter what you pick (full mesh and hub-and-spoke are equivalent for two), but full mesh leaves you room to add a third member without re-thinking the topology later. For the schedule, choose Replicate continuously using the specified bandwidth at Full. Same-LAN servers don’t need throttling. Over a WAN you’d cap bandwidth and possibly switch to scheduled replication.
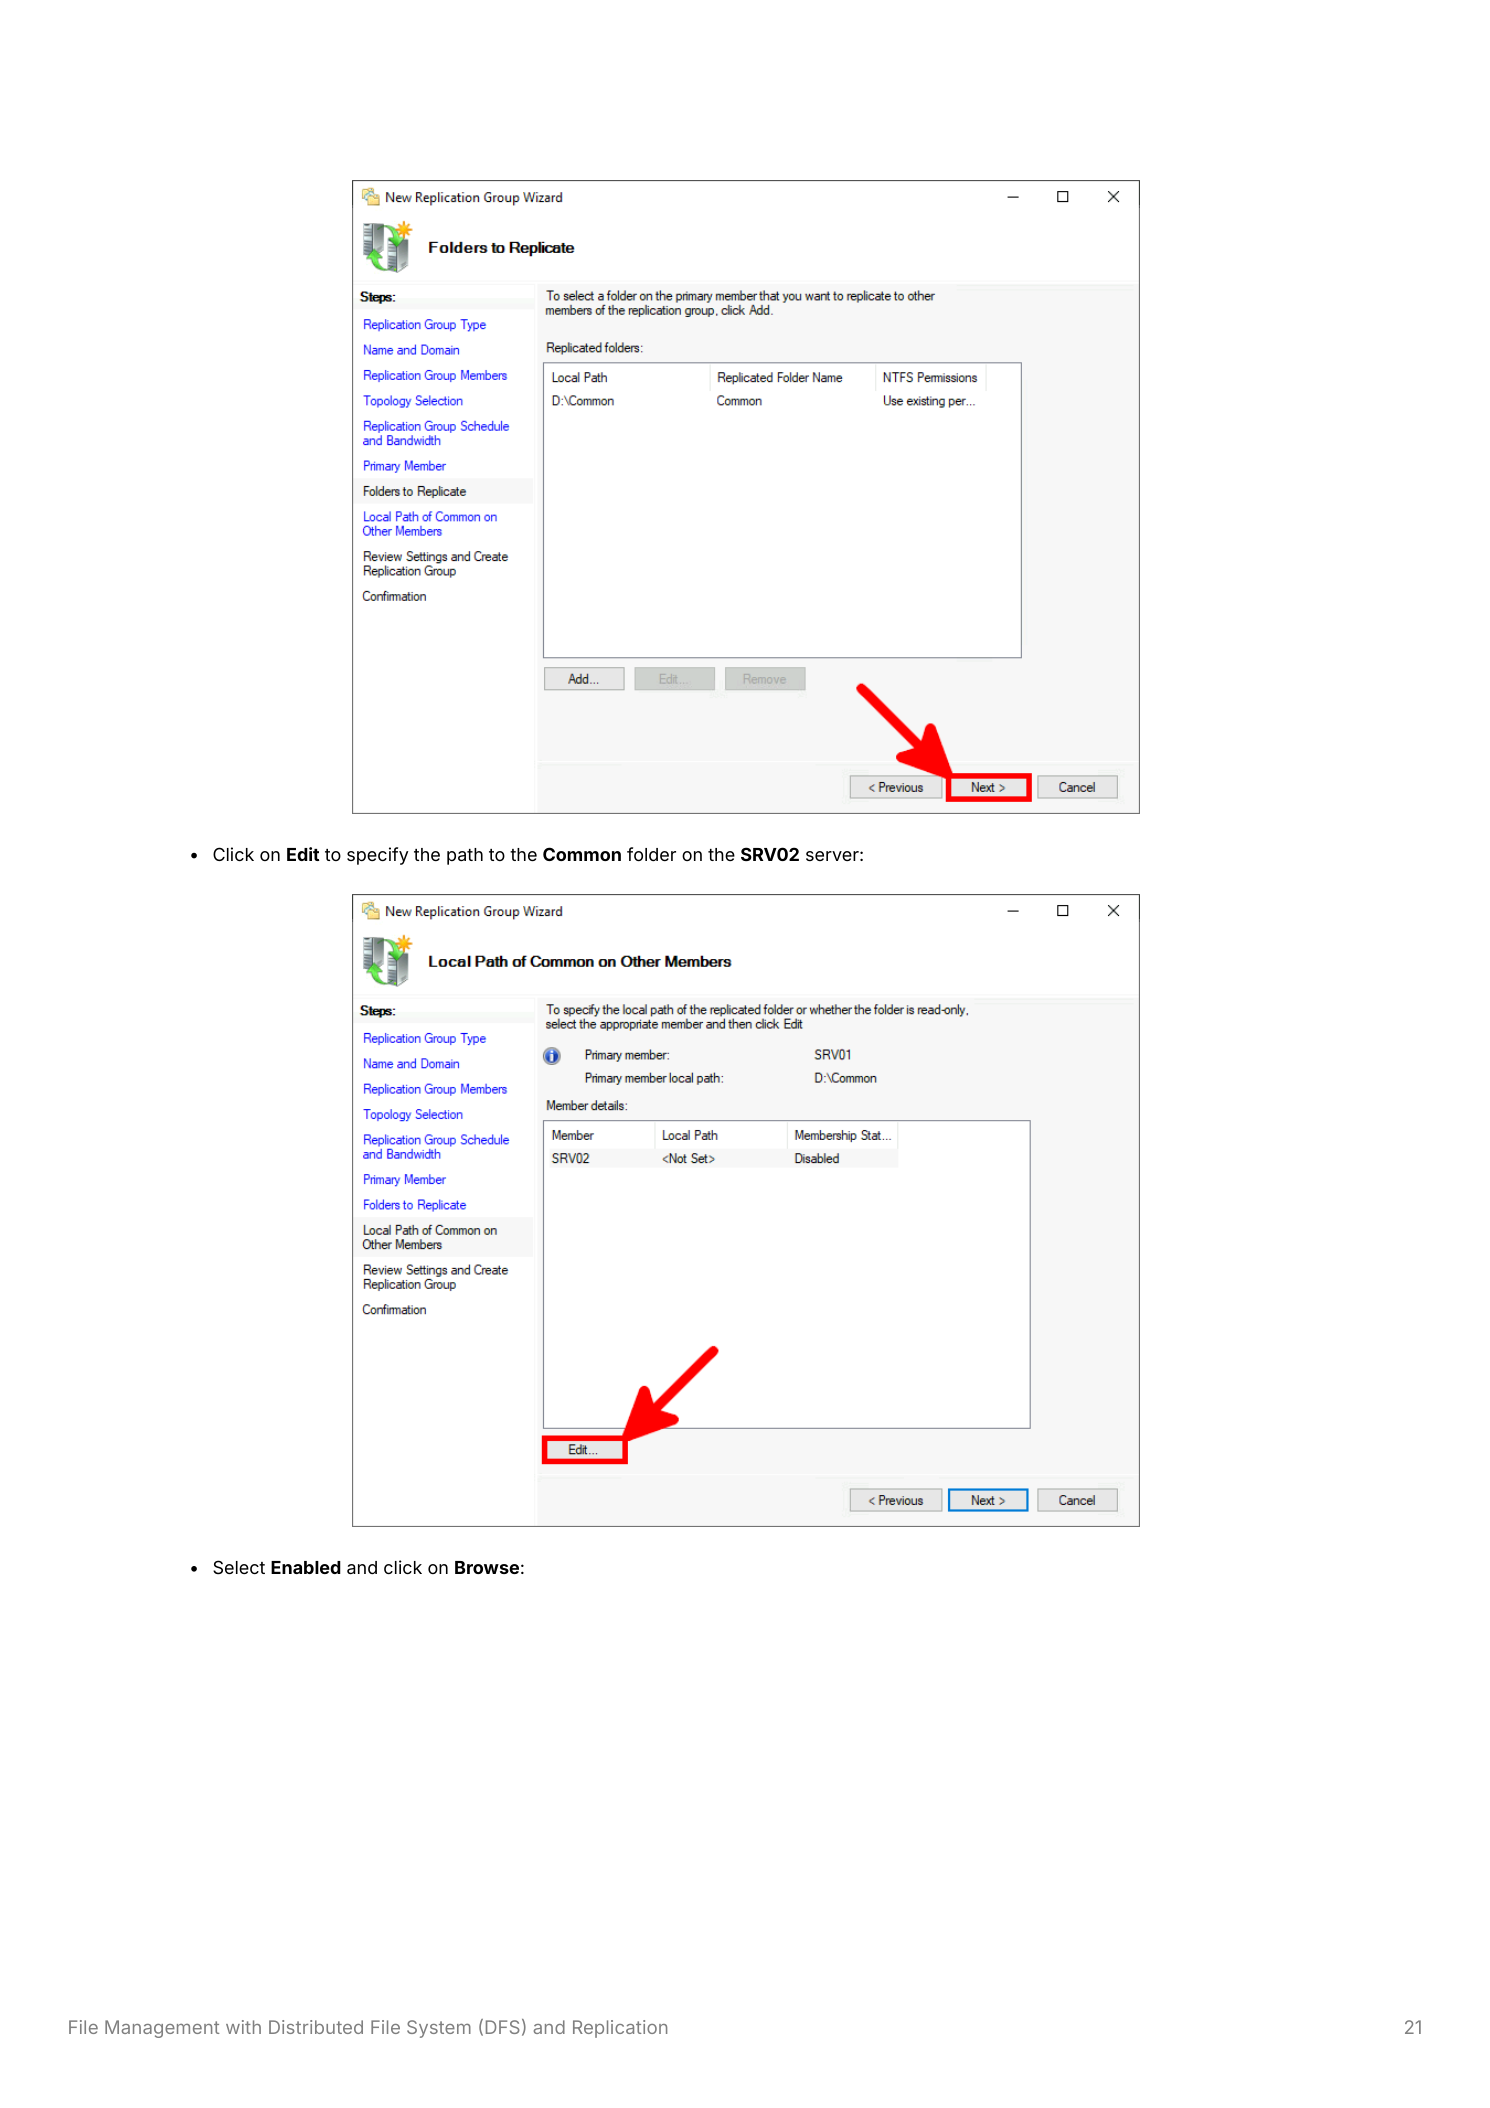
Step 14 — Pick the primary and the folder to replicate
On Primary Member, choose SRV01. The primary is the authoritative source for the initial sync — its files overwrite anything that already exists on the other members. (Get this wrong and you’ll wipe data. If both sides have files you need to keep, manually merge first, then create the replication group.) On Folders to Replicate, click Add, then Browse to D:\Common on SRV01.

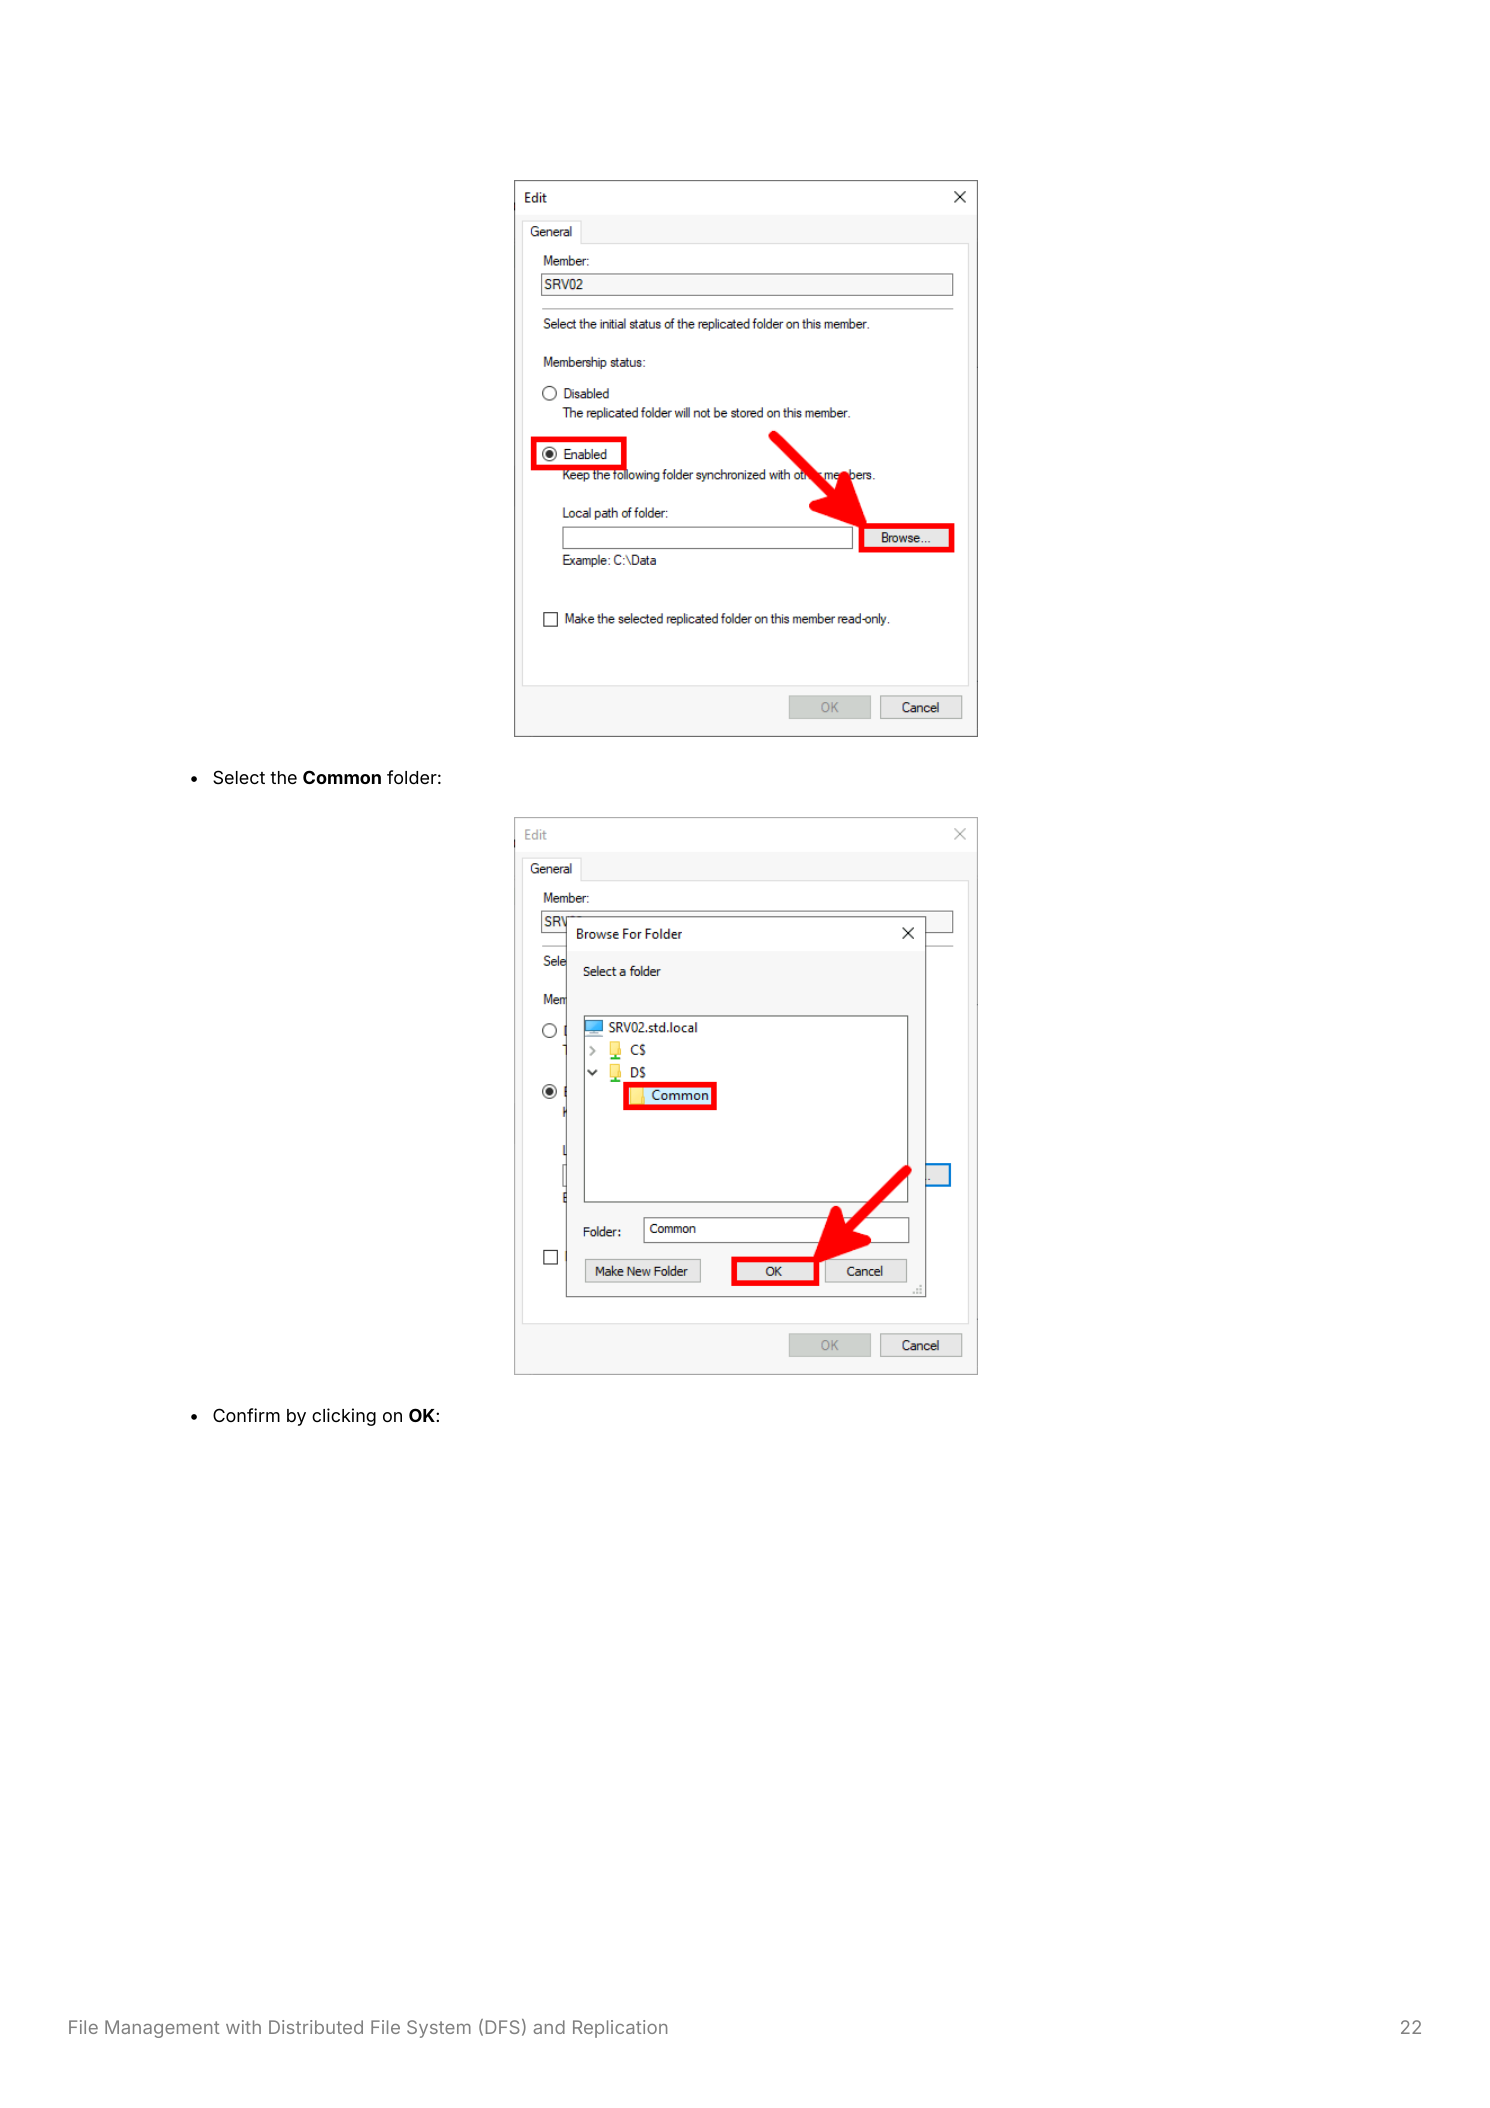
Step 15 — Tell SRV02 where its copy lives
The wizard now needs the local path on every other member. SRV02 starts at <Not Set> / Disabled. Click Edit, switch membership to Enabled, browse to D:\Common on SRV02, and click OK.
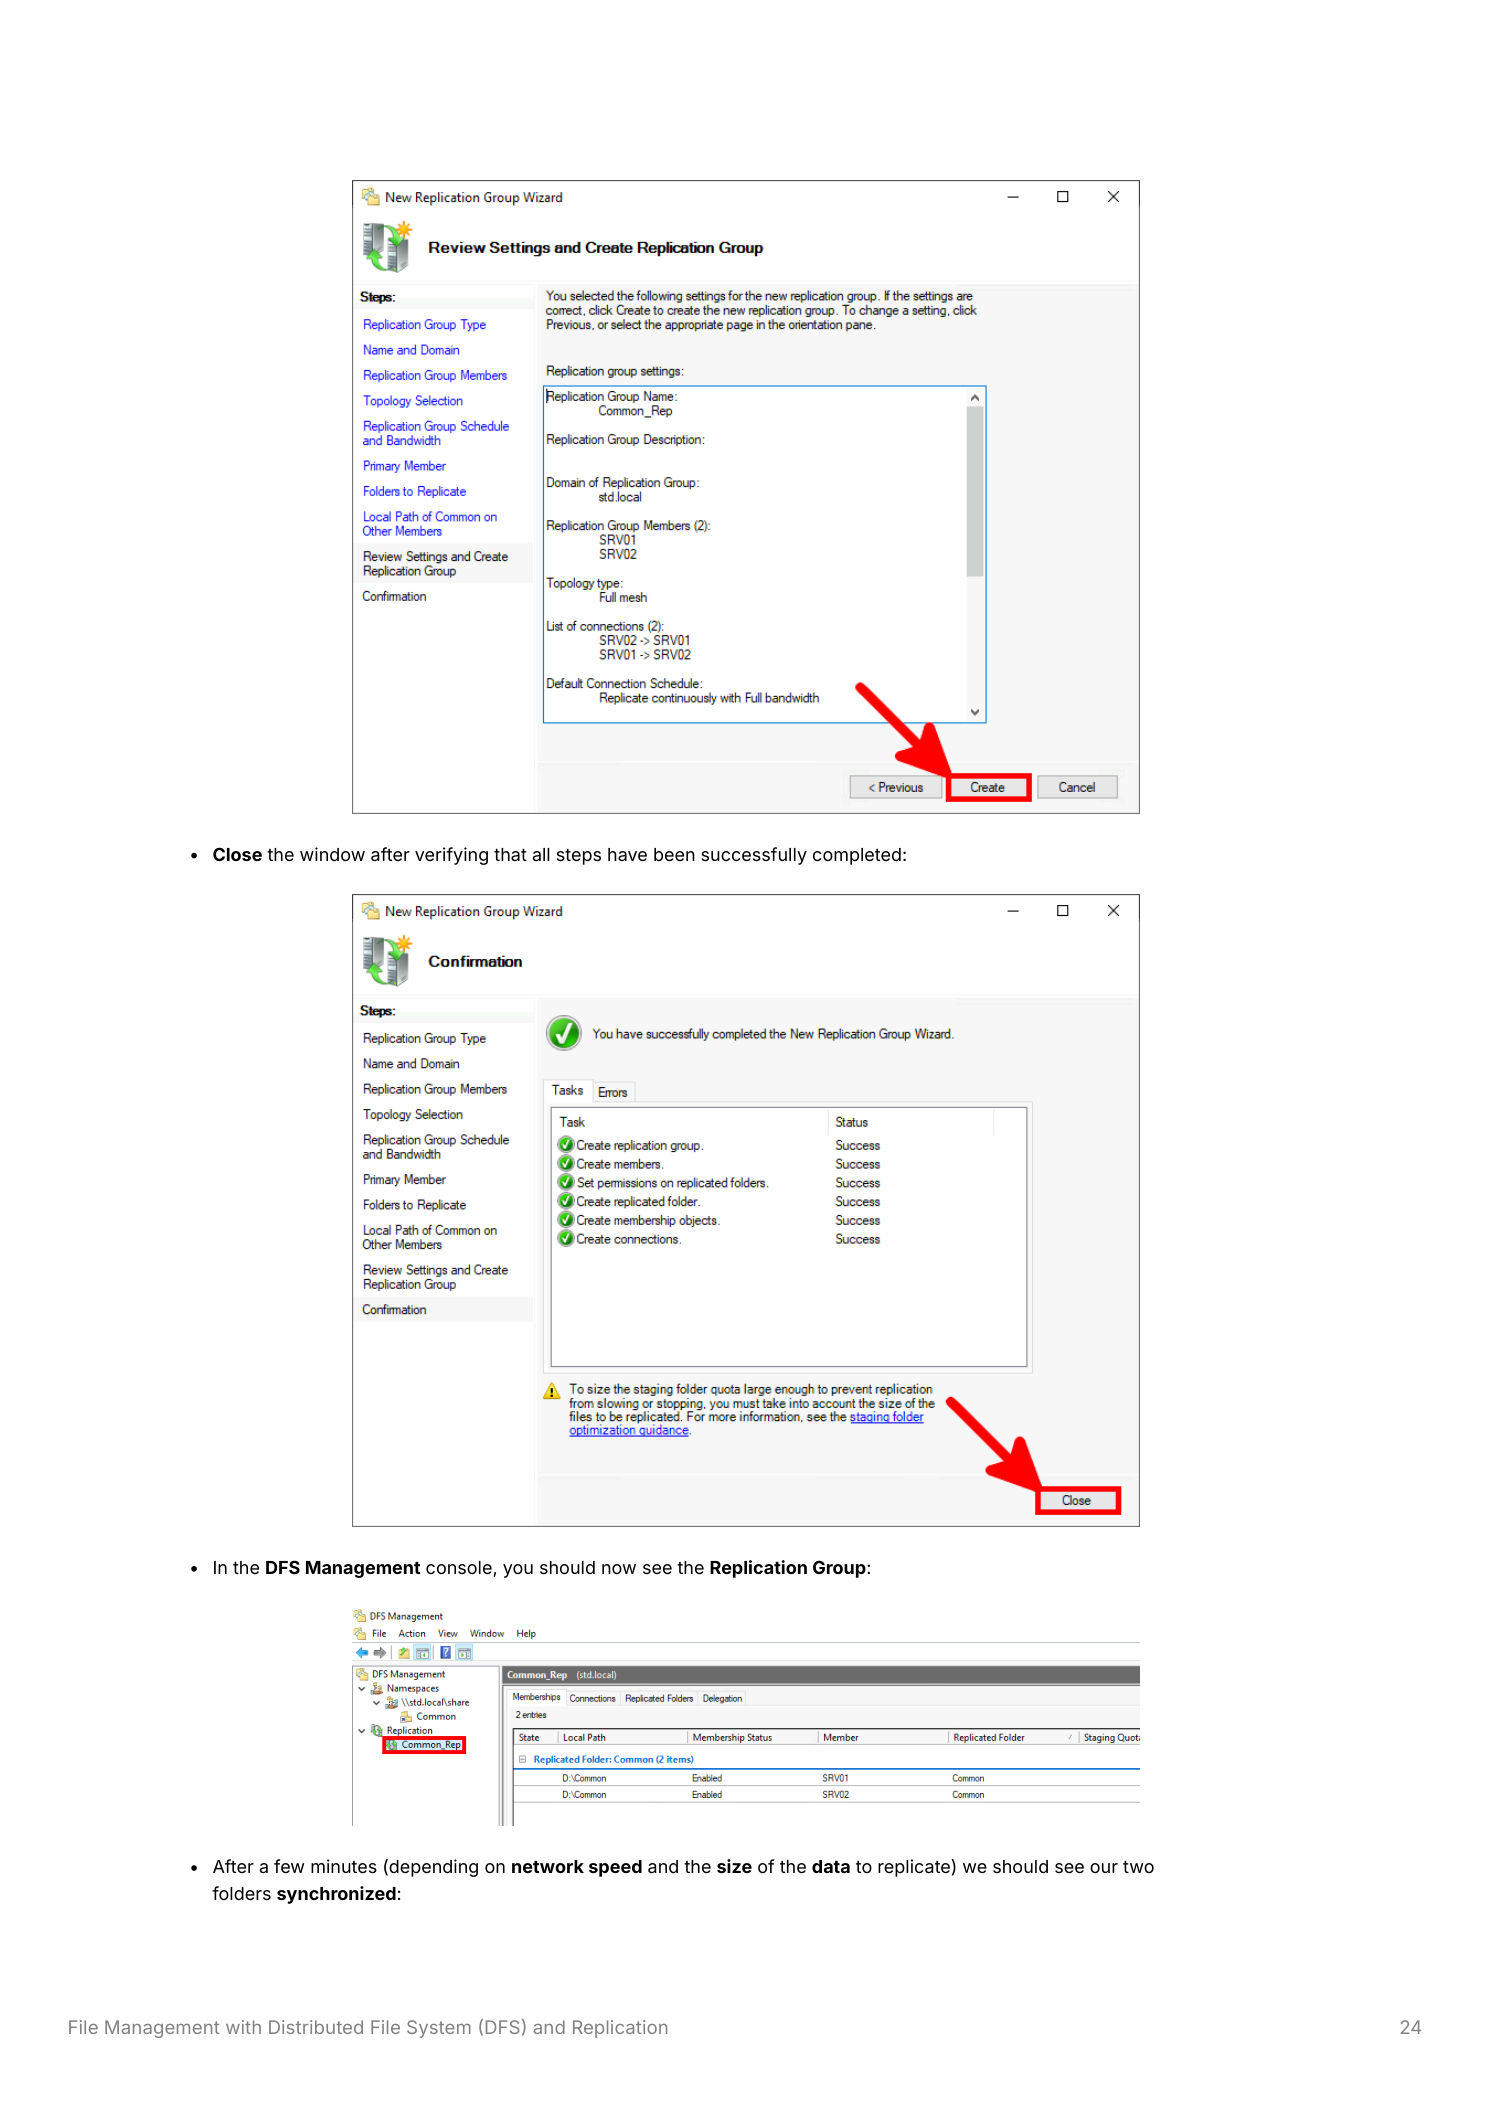
Step 16 — Create the group
SRV02 now shows D:\Common and Enabled. Review the summary on the next page, then click Create. The wizard runs through every configuration task; when the Confirmation page shows everything as Success, click Close.

Step 17 — Verify Common_Rep in DFS Management
Common_Rep now appears under the Replication node. Initial sync time depends on data volume and network speed — an empty share is done in seconds; a multi-TB share will take a while. Use the Memberships tab to watch each member’s status.
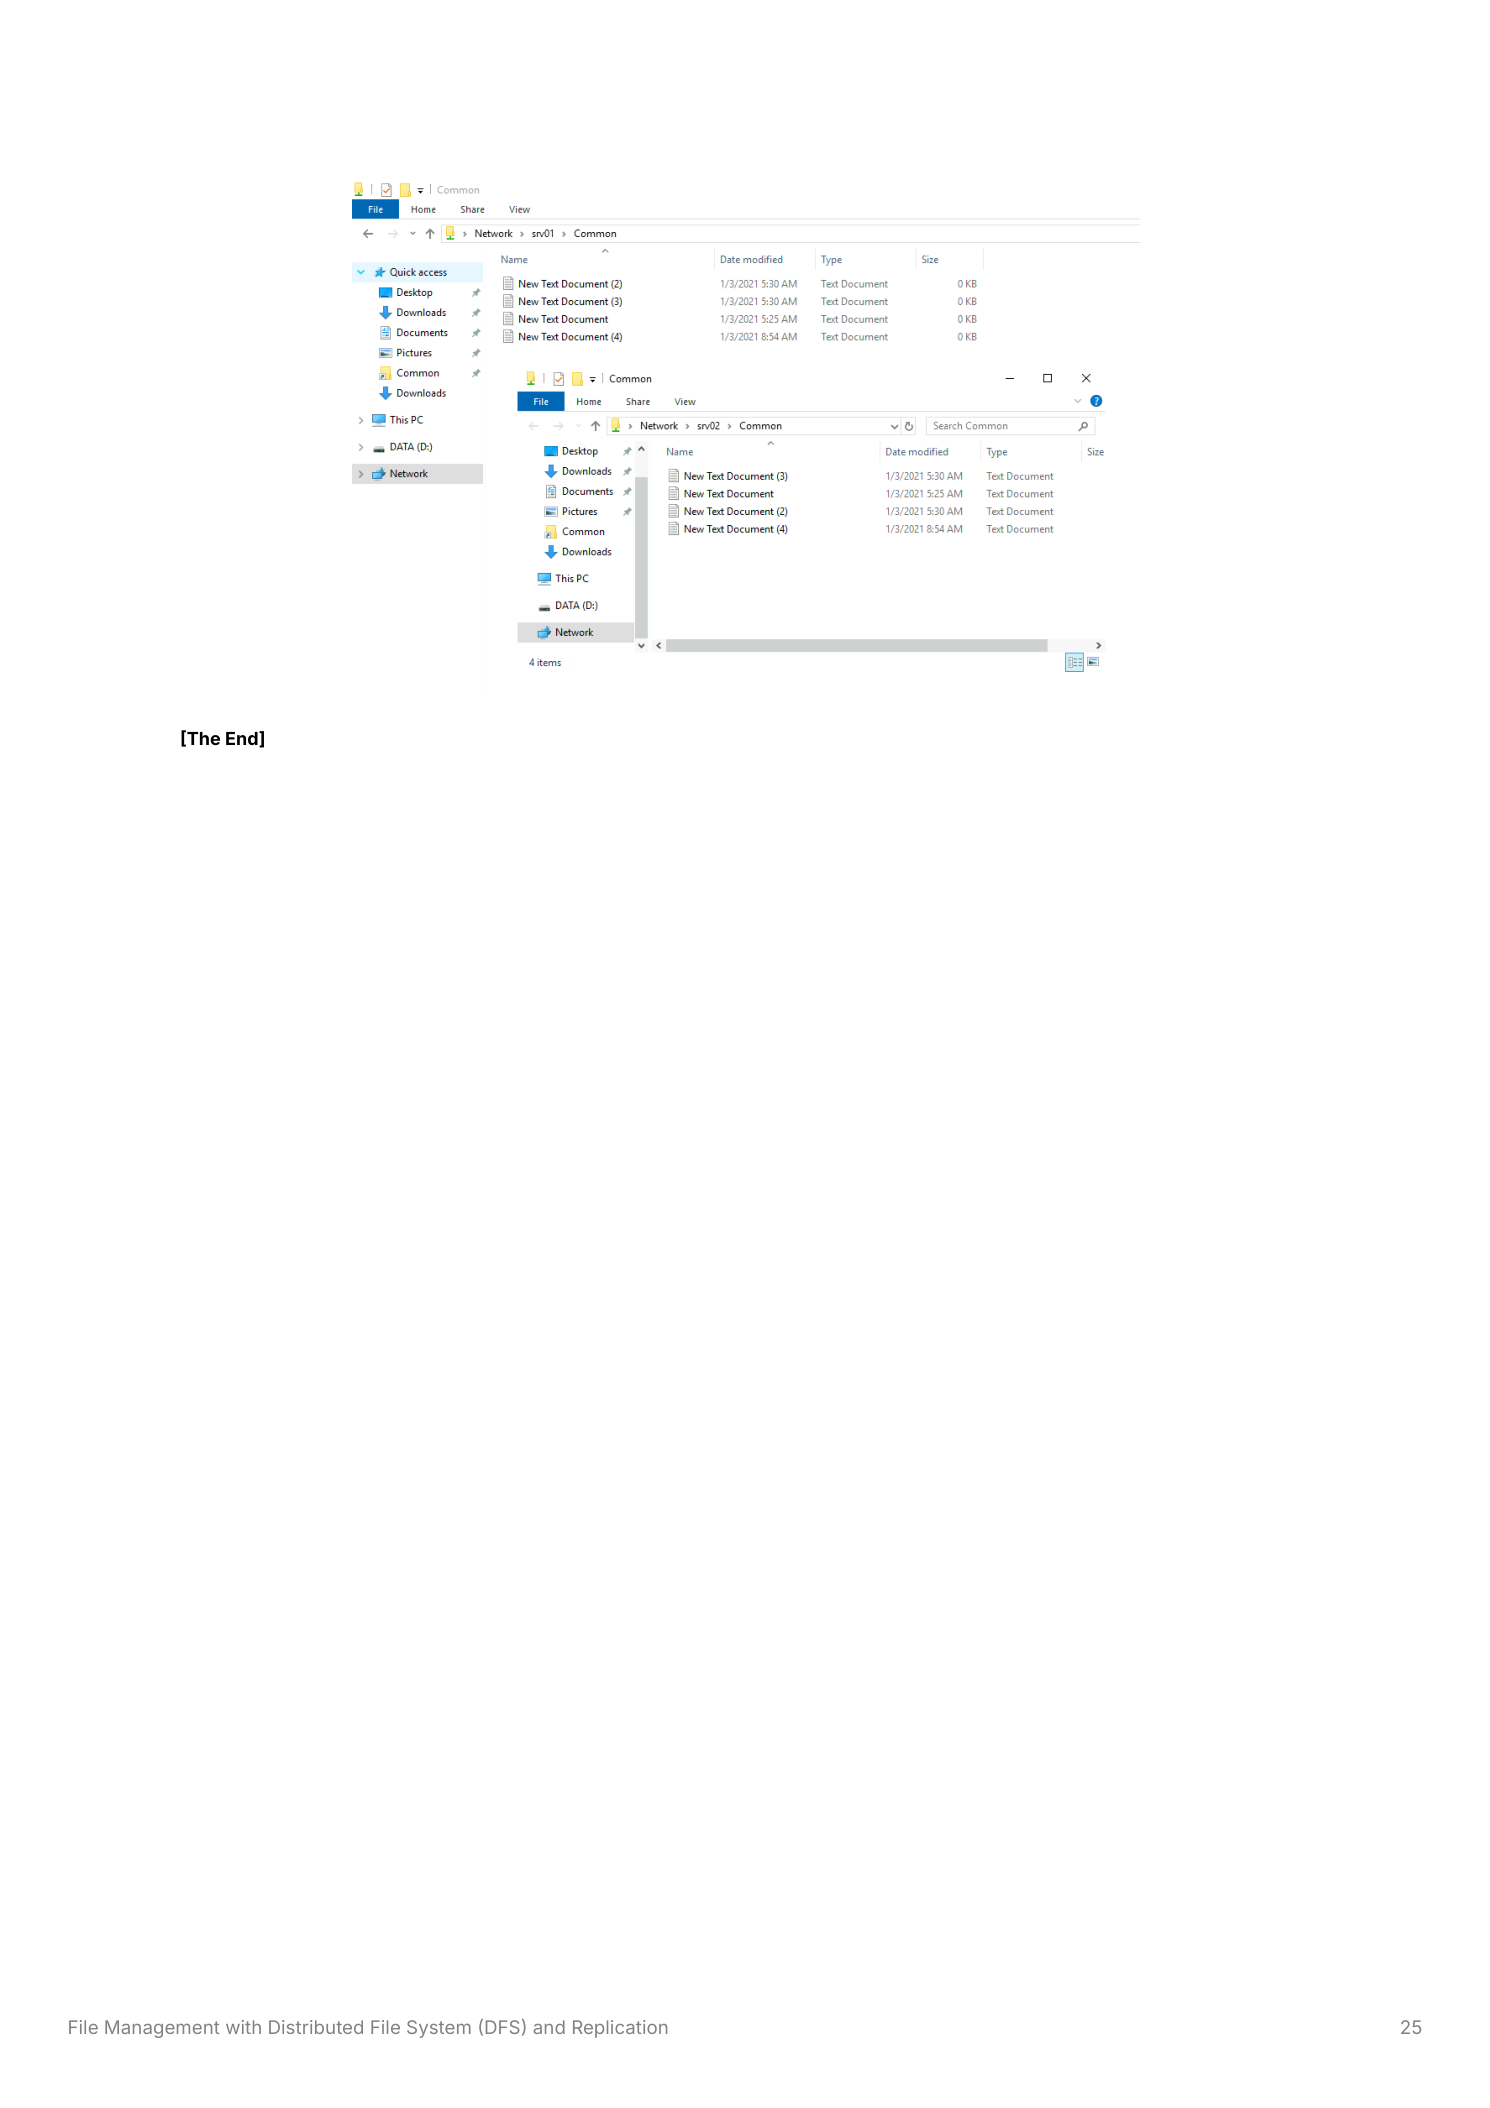
Step 18 — Confirm both servers see the same files
Wait a minute or two, then open File Explorer and visit \\SRV01\Common and \\SRV02\Common in two windows side by side. Files created on one side should appear on the other within seconds. The four-text-document example below shows it working — both servers hold the same files.
Things that bite people in production
The 4 GB staging quota
DFS Replication uses a per-member staging folder for in-flight files. The default quota is 4 GB. If your replicated folder contains files larger than that — VHDX files, SQL backups, large media — replication will stall. Bump the staging quota in the replication group member properties under Staging. The widely-cited rule of thumb is at least 32 GB, or the size of the 32 largest files in the replicated set, whichever is bigger.
Replication is fast, not synchronous
Continuous-mode DFS Replication on a LAN is near-real-time but not instantaneous. There’s always a window between “file written” and “file visible on the other member.” Don’t use DFSR as the sync layer for an active-active database or anything else that demands strong consistency — that’s a clustered file system’s job. For WAN replication add scheduled bandwidth caps so DFSR doesn’t starve out other traffic.
Domain-based namespaces need a working DC
Domain-based namespaces resolve through AD — if every reachable DC is down, the namespace is unreachable even when the file servers themselves are healthy. Branch sites with a single DC over a single WAN link are the usual failure mode here. Either deploy a local DC, or accept the dependency and plan accordingly.
Conflict resolution is “last writer wins”
Two users edit the same file on two different servers before replication has caught up. DFSR takes the most recent timestamp; the loser is moved to the hidden DfsrPrivate\ConflictAndDeleted folder on the affected member. Nothing is lost — but it is hidden, and nobody knows to look. If your environment has frequent concurrent writes from multiple sites, set up monitoring on that folder so conflicts get noticed before the user calls.
Where this fits
DFS is the file-presentation half of a multi-server share story. The other halves are FSRM quotas and file screens (so the share doesn’t become an unbounded data swamp), NTFS permissions (the actual access control under the share-permissions outer wrapper), and backup — DFSR is replication, not backup; ransomware encrypts both sides. For broader file-server hygiene see the Windows Server Administration pathway.