Why a Second Domain Name Lives Inside Active Directory
Most labs and most small organizations start their forest with a single Active Directory domain — infotechninja.local, infotechninja.local, whatever the original admin typed into the dcpromo wizard years ago. That name becomes the default User Principal Name (UPN) suffix for every account: jdoe@infotechninja.local, regardless of whether anyone actually owns or uses that domain on the public internet.
Then somebody buys a real domain. Or the company rebrands. Or you start planning the Microsoft 365 / Entra ID rollout and discover that Microsoft will not let you sync user logon names that end in .local, or end in a domain you cannot prove ownership of through public DNS. Suddenly the original UPN suffix becomes a liability and you need users to be able to sign in as jdoe@infotechninja.com — without renaming the entire forest.
The fix is the alternative UPN suffix. It is one of the smallest forest-wide changes you can make in Active Directory and it is the precondition for almost any hybrid-identity rollout, Exchange Online migration, or Seamless Single Sign-On (SSO) deployment. Two clicks in Active Directory Domains and Trusts, or one cmdlet in PowerShell, and every user in every domain of the forest can be assigned a UPN ending in the new suffix.
This article walks the full pipeline: the optional DNS Forward Lookup Zone, the registry of the suffix in AD Domains and Trusts, the assignment to a user, and the pre-flight you owe yourself before pointing Microsoft 365 at the result.
What an Alternative UPN Suffix Actually Changes
Two things are easy to confuse here. Adding an alternative UPN suffix does not:
- Rename the forest or any domain.
- Add a new Active Directory domain.
- Change the Kerberos realm or affect existing tickets.
- Create email addresses (that is the Exchange / M365 attribute, separate concern).
What it does: extend the list of suffixes the GUI and PowerShell will accept when an admin sets a user’s userPrincipalName attribute. Think of it as “telling AD that this string is a legal suffix.” Until you add it, the dropdown in ADUC > Account > User logon name only lists the existing AD domain(s). After you add it, the new suffix appears as an option for every account in the forest.
It is a one-line attribute change on the Partitions container of the configuration partition (specifically uPNSuffixes on CN=Partitions,CN=Configuration,DC=...). The change replicates forest-wide, which is exactly what makes it useful: one edit, every domain controller, every domain, every user.
Pre-Flight: Do You Need a DNS Zone First?
This is where most blog posts on the topic conflate two independent decisions. Be clear about which one you are making.
- You only need the UPN suffix. Users will sign in as
jdoe@infotechninja.comon-premises only. No hybrid sync, no Microsoft 365, no public mail flow. You do not need a DNS Forward Lookup Zone for this. The suffix is just a label that AD validates — it does not have to resolve. Skip to Step 2. - You plan to register the domain with Azure AD / Microsoft 365. Microsoft will perform domain ownership validation against your internet-facing public DNS for the registered domain — not the internal AD zone. The AD-integrated Forward Lookup Zone for
infotechninja.comis optional, and only matters if you want the same name to resolve internally too (split-brain DNS). Many organizations skip the internal zone entirely and let internal clients resolveinfotechninja.comvia the regular external resolvers. - You want internal services on the new name. If
portal.infotechninja.com,files.infotechninja.com, or anything else needs to resolve from inside the network and you do not own the public domain, then yes — create the internal Forward Lookup Zone so internal clients have records to hit.
The walkthrough below covers both the optional internal DNS zone (Step 1) and the required UPN suffix registration (Step 2). Skip Step 1 if your scenario is case 1 above.
Step 1 (Optional): Create the Internal Forward Lookup Zone
From the Domain Controller, open Server Manager > Tools > DNS. The console opens with the existing zones already listed under your DNS server’s node — in this lab, that is NYC-DC1 with the original infotechninja.local zone and the _msdcs zone underneath it.
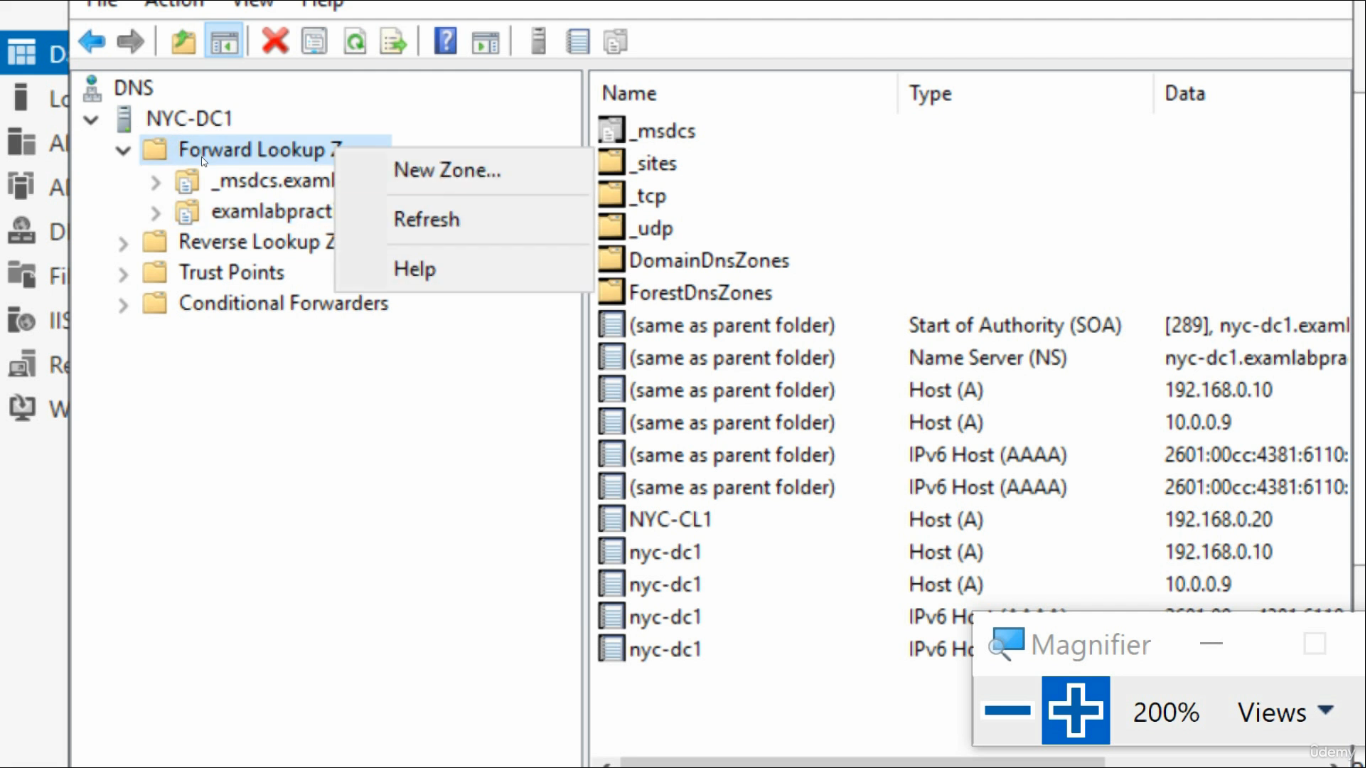
Right-click Forward Lookup Zones and choose New Zone…. The wizard walks five short prompts:
- Welcome. Click Next.
- Zone Type. Leave Primary zone selected. If your DNS server is AD-integrated, also leave Store the zone in Active Directory checked — this replicates the zone to every DC and means you do not babysit a zone file on disk.
- Replication Scope. If AD-integrated, the default (To all DNS servers running on domain controllers in this domain) is correct for most environments. Forest-wide replication is appropriate if you have multiple domains and want all of them to resolve the new name.
- Zone Name. Type the new domain —
infotechninja.com. Do not includewww.and do not put a trailing dot.
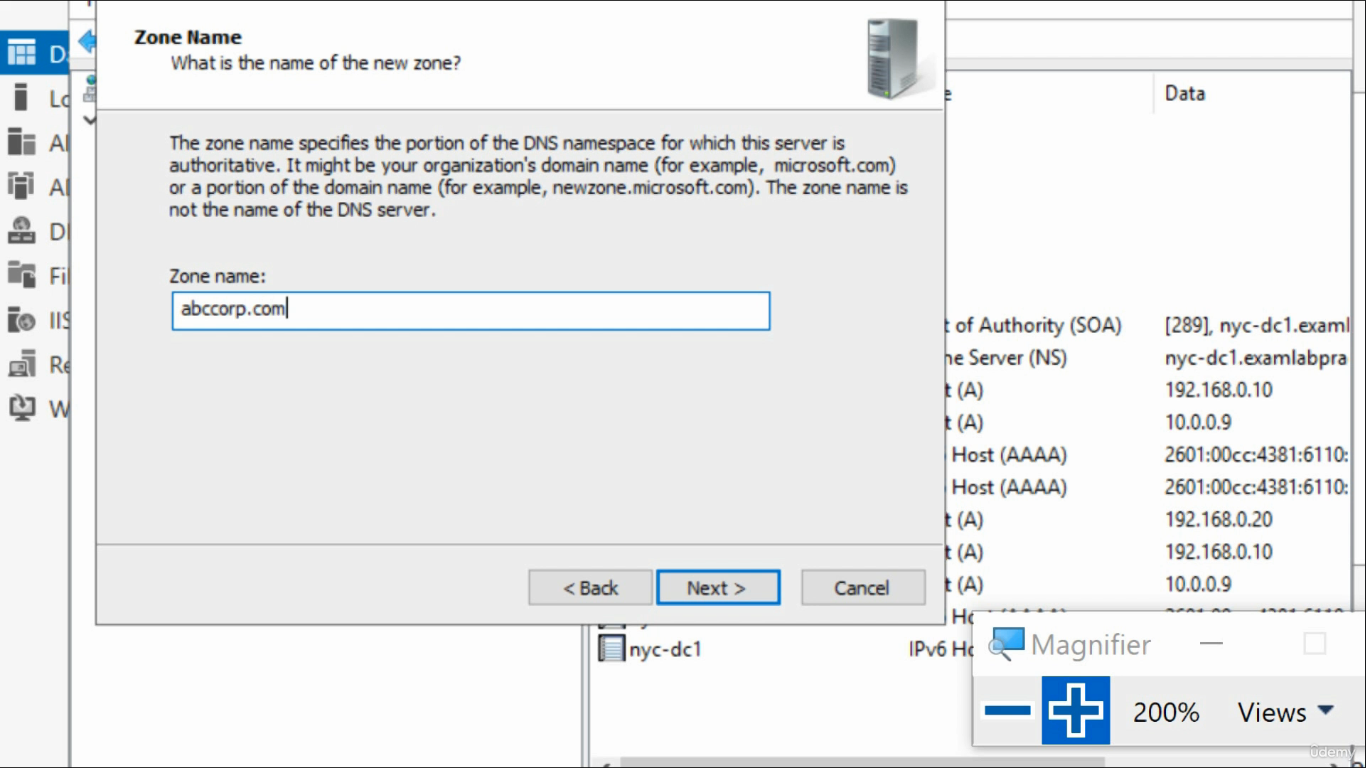
infotechninja.com) verbatim. The wizard will name the zone file infotechninja.com.dns by default.- Dynamic Update. For an AD-integrated zone, choose Allow only secure dynamic updates. For a non-AD-integrated zone, Do not allow dynamic updates is the safe default; you can always relax it later.
Finish the wizard. The new zone appears in the tree alongside the existing one. It is empty — create A, CNAME, MX, SRV records as needed, the same way you would for any other zone.
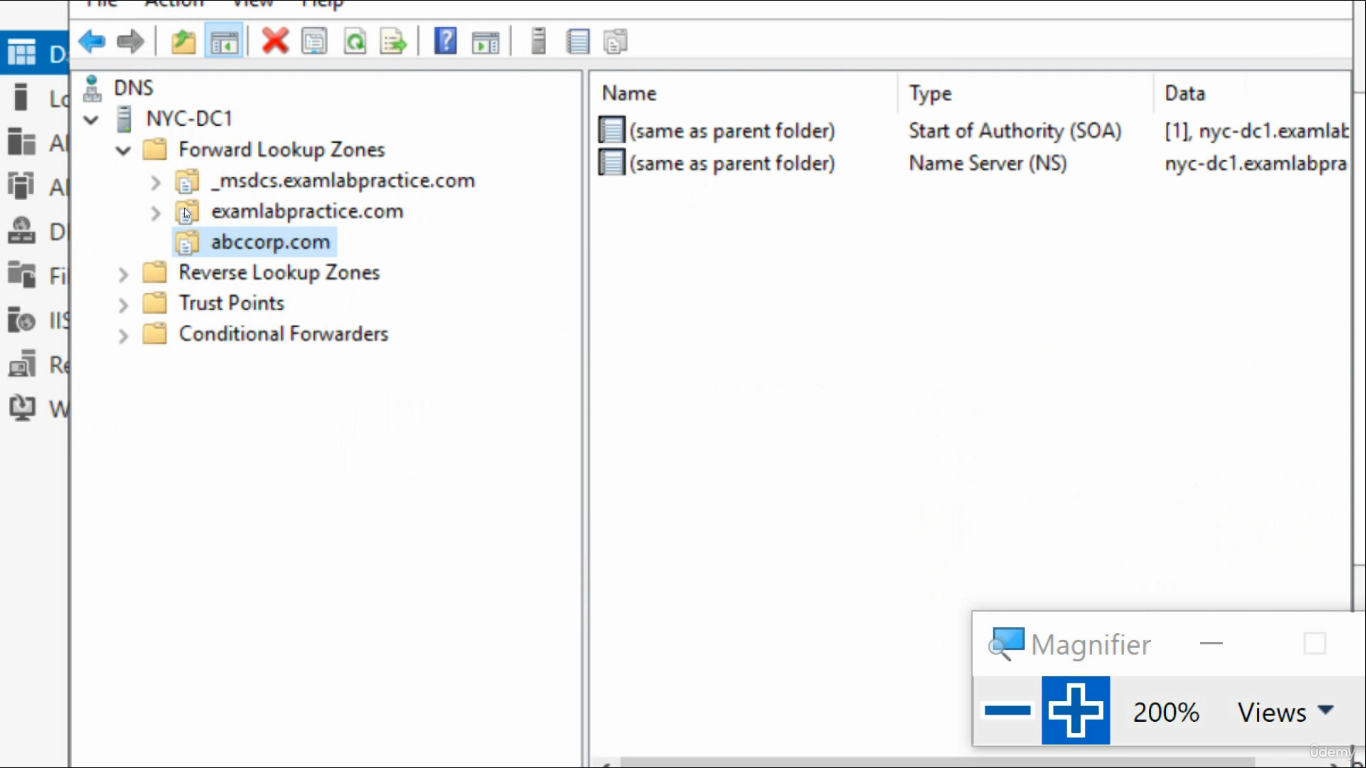
infotechninja.com Forward Lookup Zone now sits alongside the existing infotechninja.local — an empty zone, ready for records.That is the entire DNS step. It does not affect anything else; you can do it in production with no impact on existing services.
Step 2: Register the UPN Suffix in AD Domains and Trusts
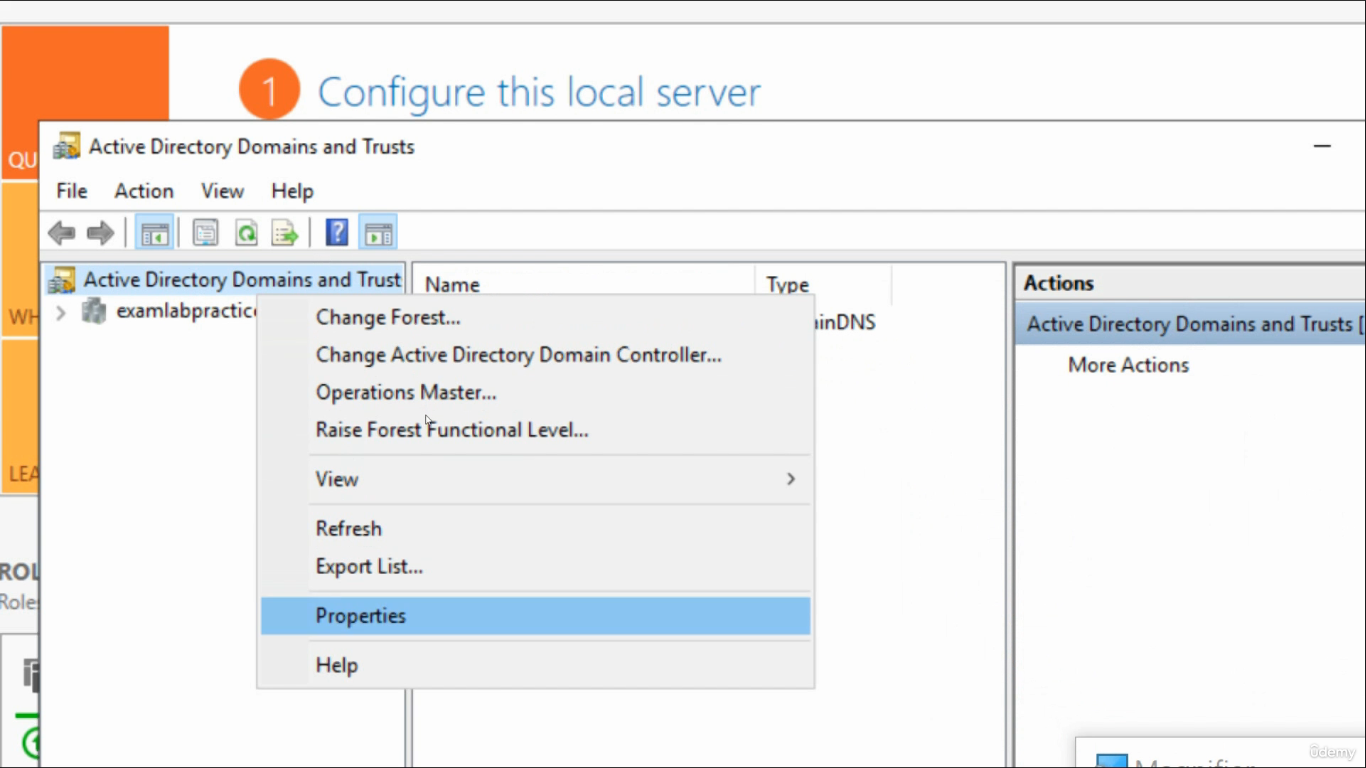
This is the step that actually matters. From the same Domain Controller, open Server Manager > Tools > Active Directory Domains and Trusts. The console opens with one node visible (the existing domain).
Right-click the top-level node labeled Active Directory Domains and Trusts — not the domain underneath it — and choose Properties. This is the most common click-the-wrong-thing mistake in this whole flow: properties on the domain node only shows that domain’s functional level, not the suffix list.
The Properties dialog opens on the UPN Suffixes tab (it is the only tab on this dialog). The page explains itself:
The names of the current domain and the root domain are the default user principal name (UPN) suffixes. Adding alternative domain names provides additional logon security and simplifies user logon names.
Type infotechninja.com into the Alternative UPN suffixes box, click Add, and the new suffix moves into the list below.
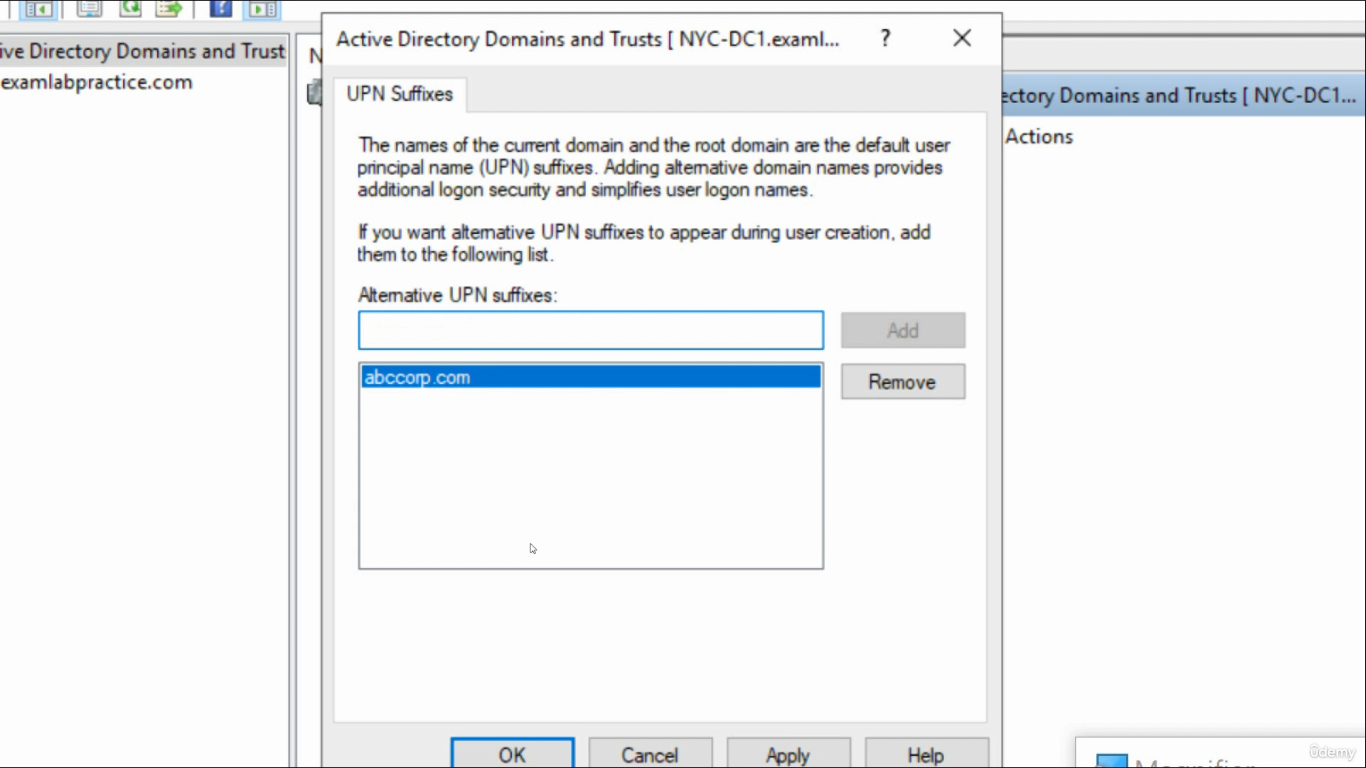
infotechninja.com into Alternative UPN suffixes, click Add, then OK. That single change unlocks the suffix forest-wide.Click OK. The change writes to the Configuration partition and replicates forest-wide. There is no progress bar; the change is small and replication usually finishes in seconds within a single site, minutes across sites.
Step 3: Assign the New UPN to a User
Open Active Directory Users and Computers. Find a user (here, jdoe), double-click to open the properties dialog, and switch to the Account tab.
The User logon name dropdown to the right of the username field now lists the new suffix:

infotechninja.com alongside the existing suffix — pick it to assign jdoe@infotechninja.com.Pick infotechninja.com from the dropdown. jdoe’s UPN is now jdoe@infotechninja.com. The pre-Windows 2000 logon name (INFOTECHNINJA\jdoe) is unchanged — that is governed by the NetBIOS domain name, not the UPN suffix, and is irrelevant to most modern apps.
Important behavior: the suffix change replaces the previous suffix; it does not stack. jdoe now signs in as jdoe@infotechninja.com, period. If you want users to be able to sign in with either suffix, you have a different problem — you need both UPNs as proxyAddresses on the user object (an Exchange / M365 concern), not the AD logon attribute.
Step 4 (Recommended): Do It in PowerShell Instead
The GUI is great for the first time you do this in a new environment. After that, PowerShell is faster, scriptable, and audit-friendly.
Add the suffix to the forest:
Set-ADForest -Identity (Get-ADForest).Name `
             -UPNSuffixes @{Add="infotechninja.com"}
Verify:
(Get-ADForest).UPNSuffixesAssign one user:
Set-ADUser -Identity jdoe -UserPrincipalName "jdoe@infotechninja.com"Bulk-assign every user in an OU (read carefully — this rewrites every UPN in the OU):
Get-ADUser -Filter * -SearchBase "OU=Sales,DC=infotechninja,DC=local" |
  ForEach-Object {
      $newUpn = "{0}@infotechninja.com" -f $_.SamAccountName
      Set-ADUser -Identity $_ -UserPrincipalName $newUpn
  }
For a complete bulk-rename pattern that handles edge cases (special characters, duplicate detection, before/after CSV reporting), see the dedicated walkthrough at Change Users UPN with PowerShell.
Step 5: Pre-Flight Before Microsoft 365 Hybrid
If the reason you added infotechninja.com as a UPN suffix is hybrid identity with Entra ID / Microsoft 365, the AD side is now ready. Three things still need to happen on the cloud side before you run Azure AD Connect for the first time, otherwise you will get domain-validation errors mid-sync:
- Verify domain ownership in Microsoft 365. In the M365 admin center, add
infotechninja.comas a domain. Microsoft asks you to publish a TXT record to the public DNS for the domain (the registrar’s zone, not your internal zone) and waits to see it. Until this verification passes, the domain is not usable for sync, mail, or sign-in. - Confirm every UPN you plan to sync ends in a verified domain. If even one user ends up with
userprincipalname=jdoe@infotechninja.local, that user will fail to sync. Audit before sync:Get-ADUser -Filter * -Properties UserPrincipalName | Where-Object { $_.UserPrincipalName -notmatch '@(infotechninja\.com|infotechninja\.local)$' } | Select-Object SamAccountName, UserPrincipalName - Decide your sign-in mode. Password Hash Sync, Pass-through Authentication, or Federation each have different infrastructure requirements. Seamless SSO is an add-on to PHS or PTA, not a replacement, and requires the AzureADSSO computer object in AD — created automatically by Azure AD Connect during setup.
Common Pitfalls
- Right-clicking the wrong node. Properties on the domain node shows functional levels and SIDs; properties on the top-level Active Directory Domains and Trusts node is where the UPN Suffixes tab lives. The two are visually similar one above the other in the same tree.
- Confusing UPN suffix with email domain. They are independent attributes.
userPrincipalNameis the AD logon attribute.mailandproxyAddressesare the email attributes. M365 cares about both but for different purposes — UPN for sign-in, proxyAddresses for mail routing. - Forgetting that the change is forest-wide. The suffix you add is available to every domain in the forest, not just the domain you ran the tool from. In a multi-domain forest this is usually what you want, but be aware that Domain Admins in any child domain can now assign that suffix to users in their domain.
- Trying to add a suffix that conflicts with an existing AD domain. If your forest already has a domain named
infotechninja.com, you cannot add it as an alternative suffix — AD already considers it a default. The dialog will reject the entry. - Assuming DNS validation propagation is instant. M365 domain verification can take from minutes to hours depending on the registrar’s TTL on the verification TXT record. Add the record, then go do something else for an hour.
- Removing the only suffix a user has. If you remove a UPN suffix that is currently in use by users, those users still have UPNs ending in that suffix — the constraint is only enforced at the moment of assignment. AD will let you orphan the suffix; the users keep working but the dropdown will not offer it for new users.
Conclusion
Two clicks (or one cmdlet) and an entire forest can issue logons under a new domain name. The mechanics are small; the implications are not — this is the change that gates almost every hybrid-identity story:
- Decide if you actually need the internal DNS zone (most hybrid scenarios do not).
- Register the suffix once in AD Domains and Trusts > Properties > UPN Suffixes, or with
Set-ADForest -UPNSuffixes @{Add="..."}. - Assign the new UPN to users individually in ADUC, or in bulk with
Set-ADUser. - Verify the public domain in Microsoft 365 before you run Azure AD Connect for the first time.
- Audit the resulting UPNs against your verified-domain list to catch any account whose UPN still ends in
.localor some other non-routable suffix.
Get those five right and the suffix change is invisible to existing users, ready for the new ones, and a non-event during M365 onboarding. Get them wrong and your first sync run becomes an ad-hoc renaming project for every user whose UPN you forgot to update.