Active Directory has its own model of your physical network, and if you don’t configure it, it assumes everything is one giant LAN with infinite bandwidth and zero latency. The result: a laptop in your Dallas office trying to authenticate against a domain controller in Birmingham over a slow WAN link, replication traffic flowing along the wrong paths, and Group Policy taking forever to apply. The fix is Active Directory Sites and Services — a topology layer that maps your real-world geography (sites), the connections between them (site links with explicit costs), and your IP addressing (subnets-to-sites) so AD knows which DC is “close” to any given client.
This walkthrough builds a complete three-site topology end to end for a fictional company with offices in New York, Dallas, and Birmingham. We create the sites, move the existing domain controller (NYC-DC1) into the right one, lay down three site links with cost values that reflect actual bandwidth, configure replication windows, map subnets to sites so DNS referrals work correctly, and cover the site link bridging behavior that’s a non-issue for most networks but matters for hub-and-spoke designs.
What you need before starting
- AD DS already installed and a functioning domain
- Domain Admin or Enterprise Admin rights (site topology lives in the configuration partition)
- A domain controller per site — either already promoted, or planned (DCs land in Default-First-Site-Name and get moved to the correct site after promotion)
- Documented IP subnet ranges per location (you can’t map subnets you don’t know)
Part 1 — Create the sites
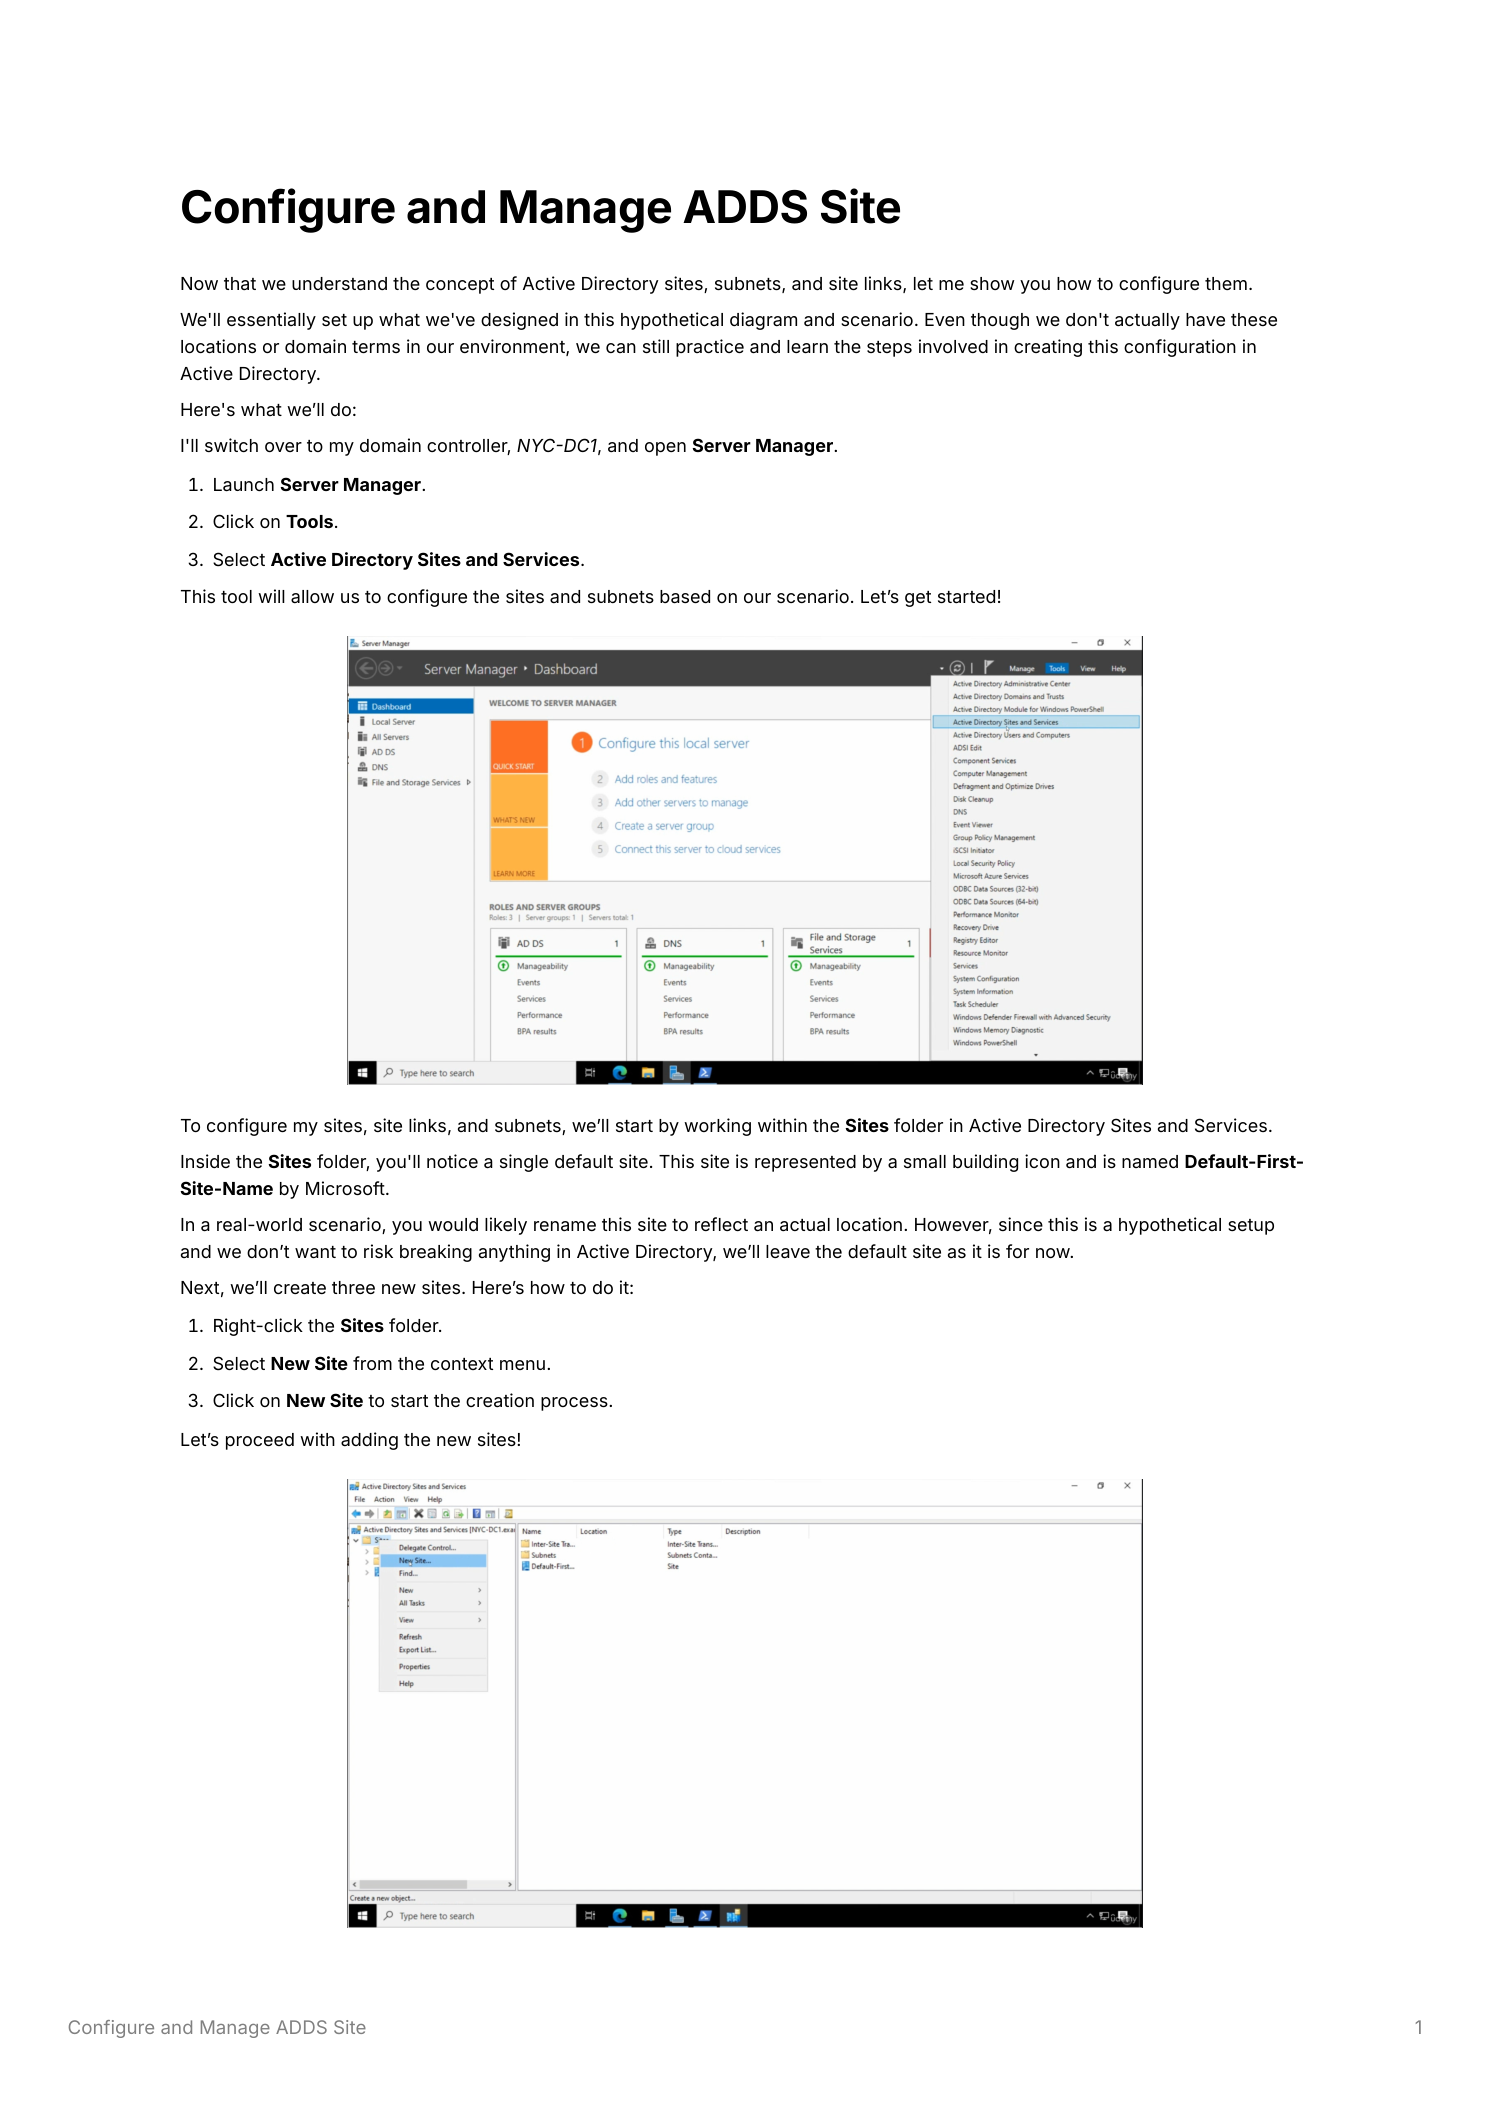
From Server Manager > Tools, launch Active Directory Sites and Services. Expand the tree and click the Sites folder. Out of the box you’ll see a single site — Default-First-Site-Name — and every DC in the forest currently lives there until you create more sites and move them.
Step 1 — Create the New York site
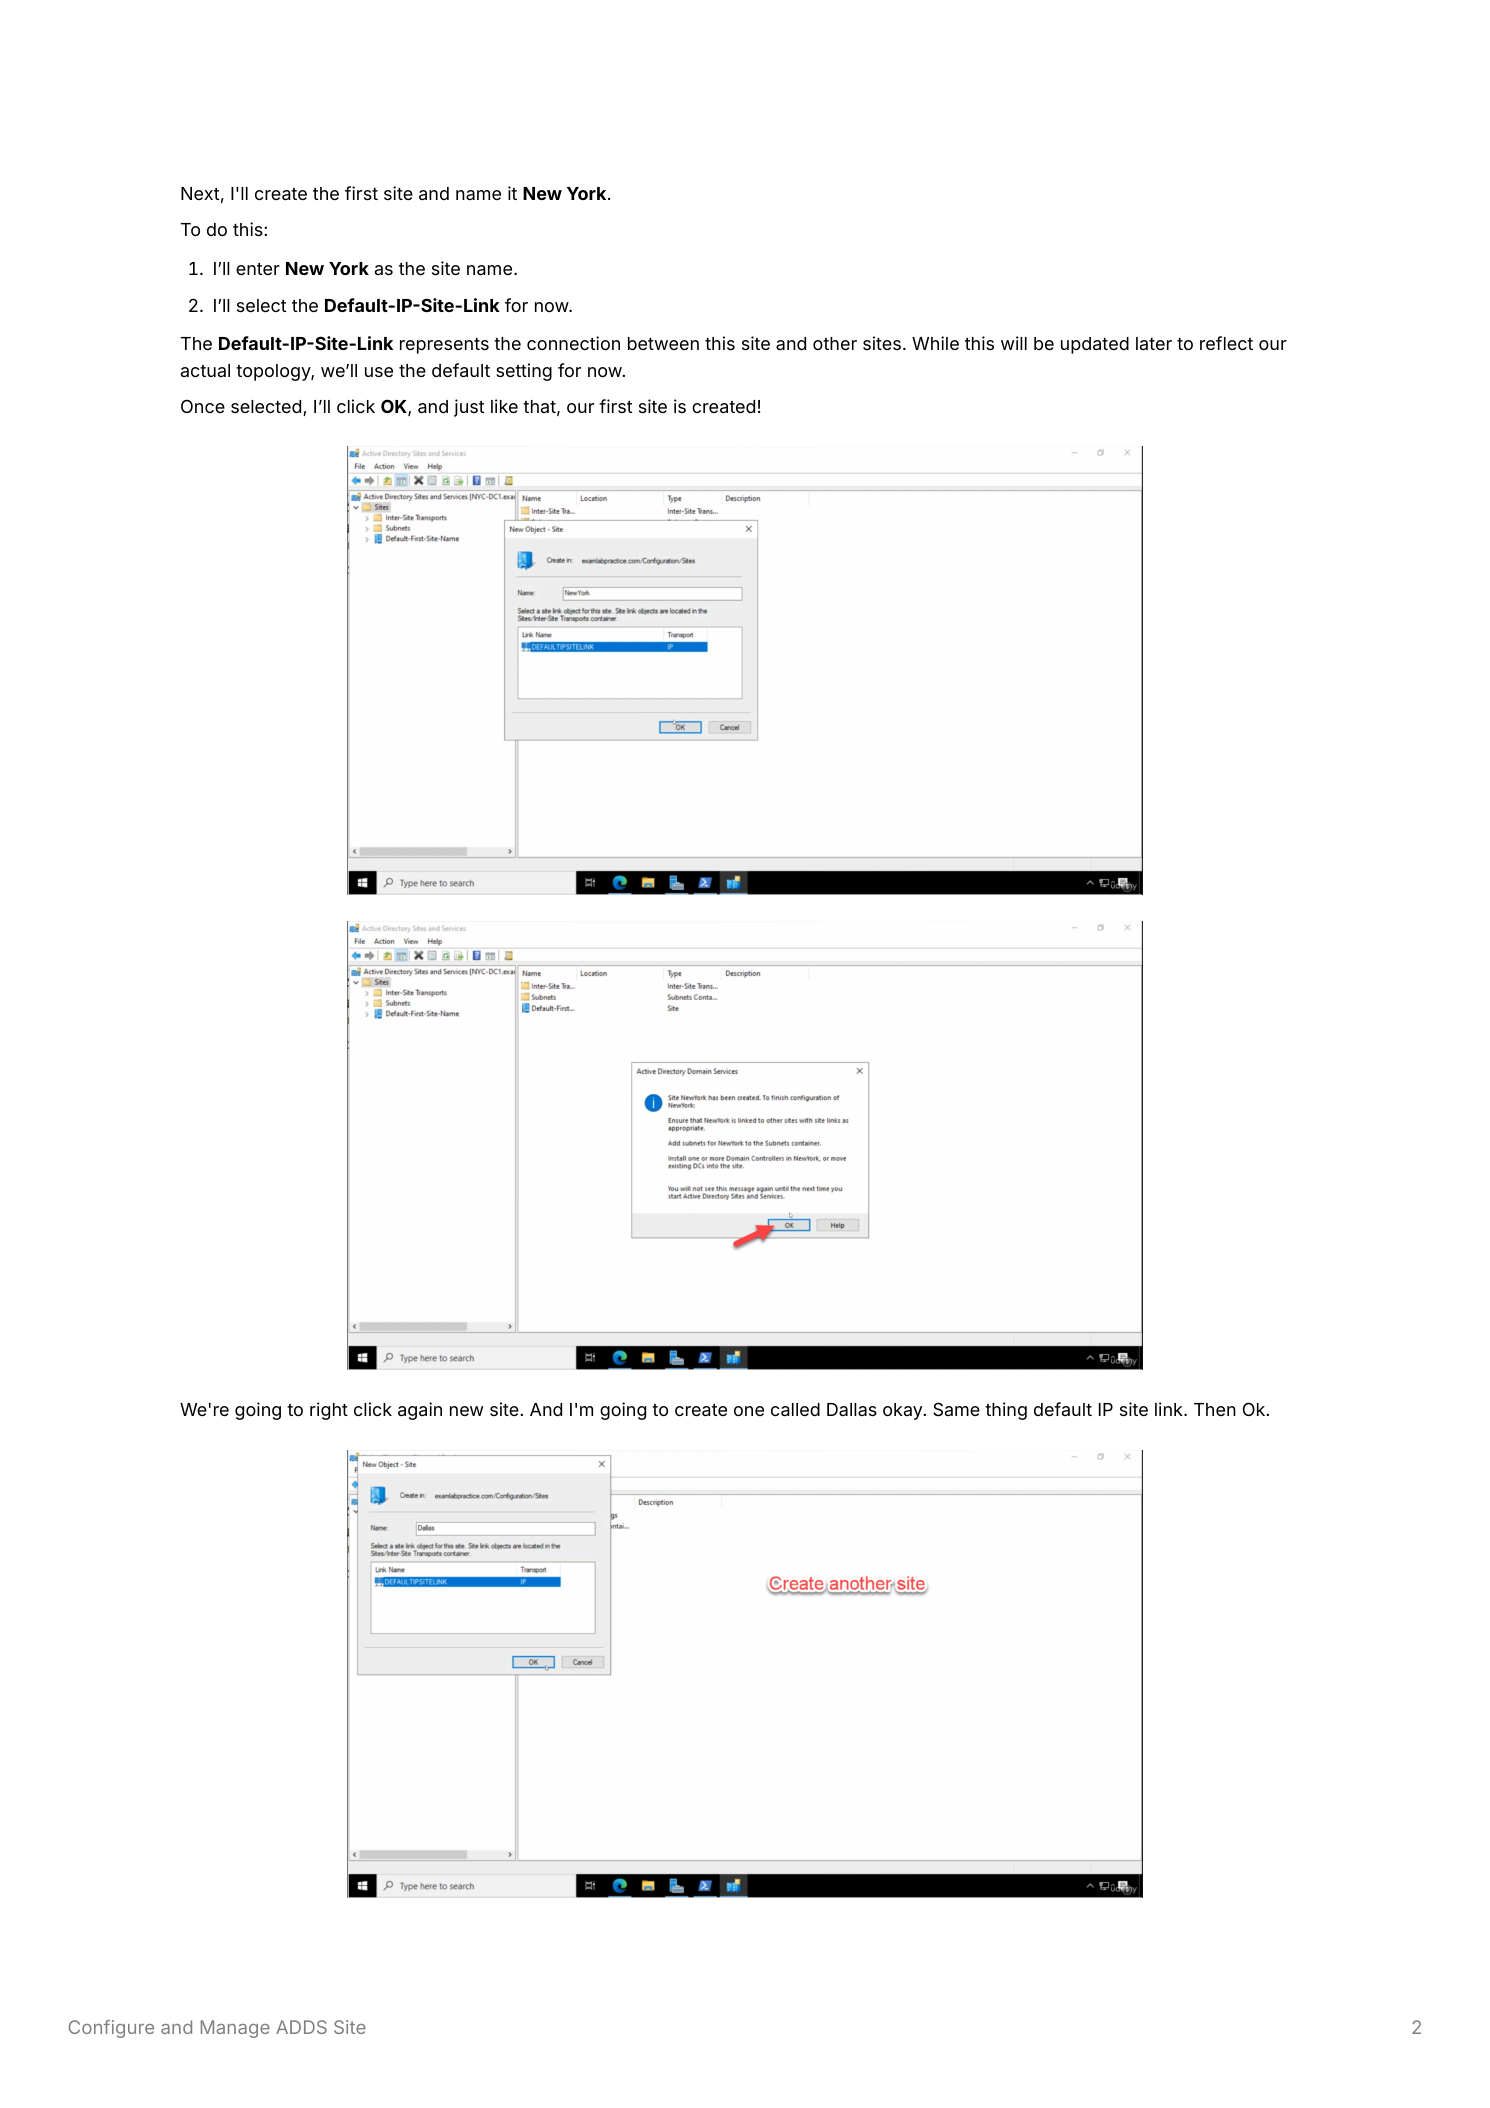
Right-click Sites > New Site. Name it New York. Pick Default-IP-Site-Link from the link list as a placeholder — we’ll replace it with proper named links in Part 3. Click OK. The confirmation reminder about adding subnets and moving DCs is exactly what we’re going to do; click OK to dismiss.
Step 2 — Create Dallas and Birmingham
Repeat the same procedure for Dallas and Birmingham, both attached to Default-IP-Site-Link for now. The Sites folder now lists all three new sites alongside the original.
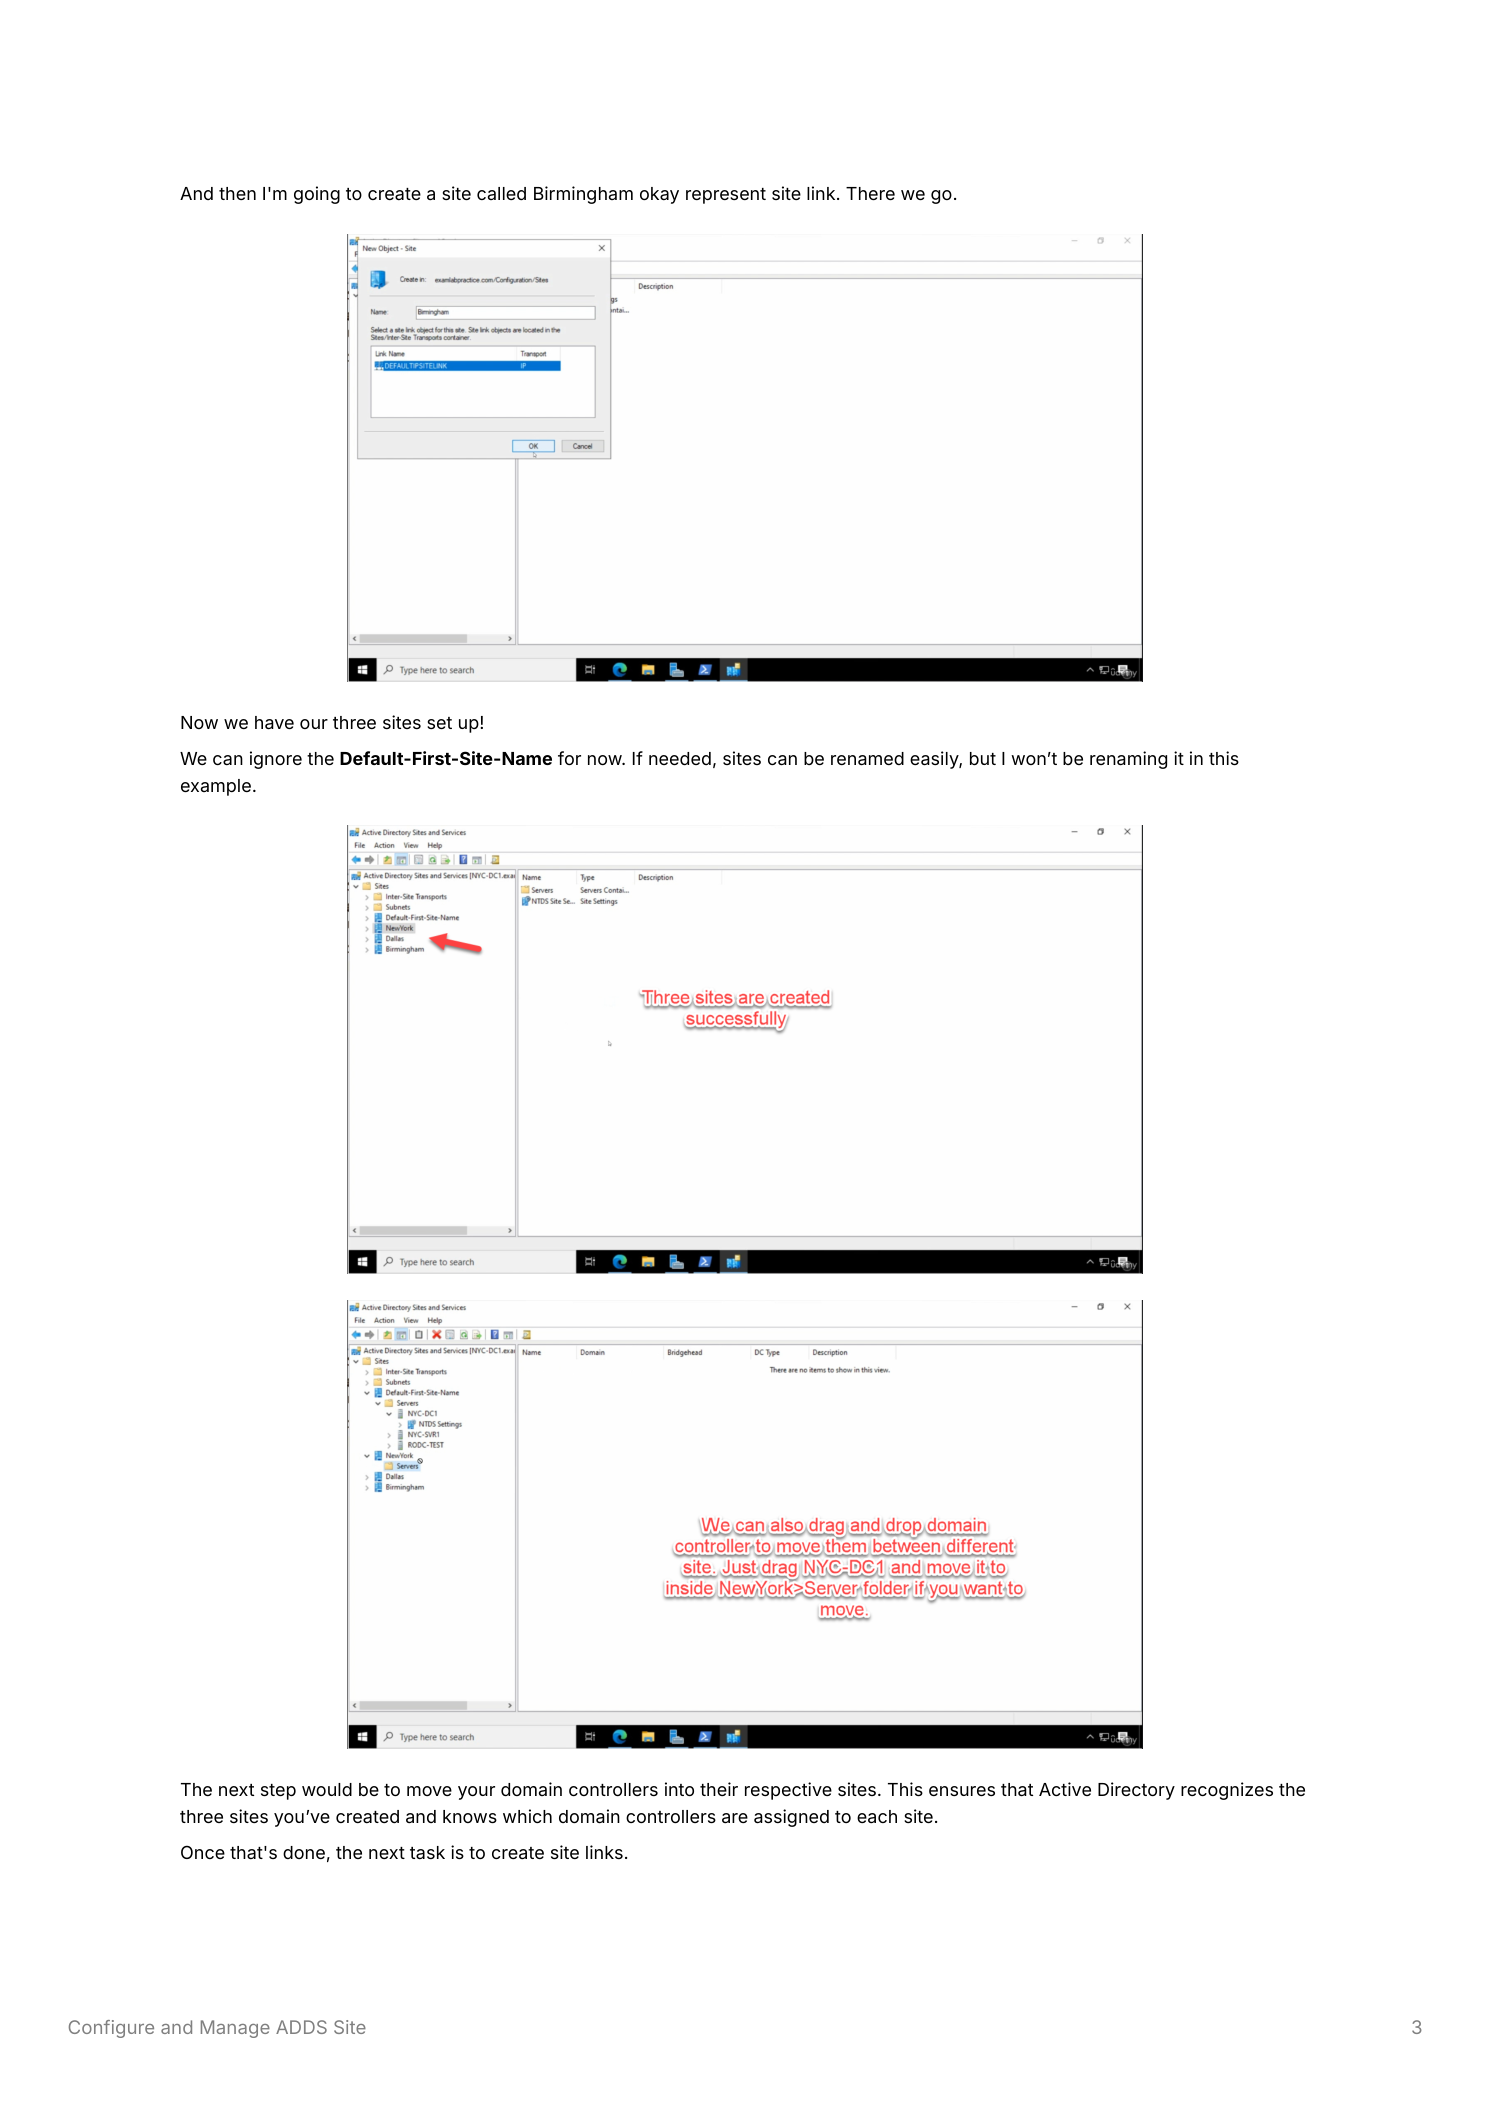
Part 2 — Move DCs into their sites
A DC’s site is what AD uses to advertise it via SRV records and to compute “closest DC” for client authentication. Until you move them, every DC remains in Default-First-Site-Name and clients across the forest will pick whichever DC’s SRV record they happen to resolve. Expand the source site > Servers, right-click the DC, pick Move, and choose its real site. Repeat for every DC. After the move, run nltest /dsgetsite on a client in each location to verify it’s being referred to the local site’s DC.
Part 3 — Create the site links
Site links describe which sites can replicate with which, and over what transport. The Inter-Site Transports node has two options:
- SMTP — legacy email-based transport from early AD; obsolete and not supported for most replication scenarios
- IP — the standard AD replication transport; this is what you want
Right-click IP > New Site Link for each link.
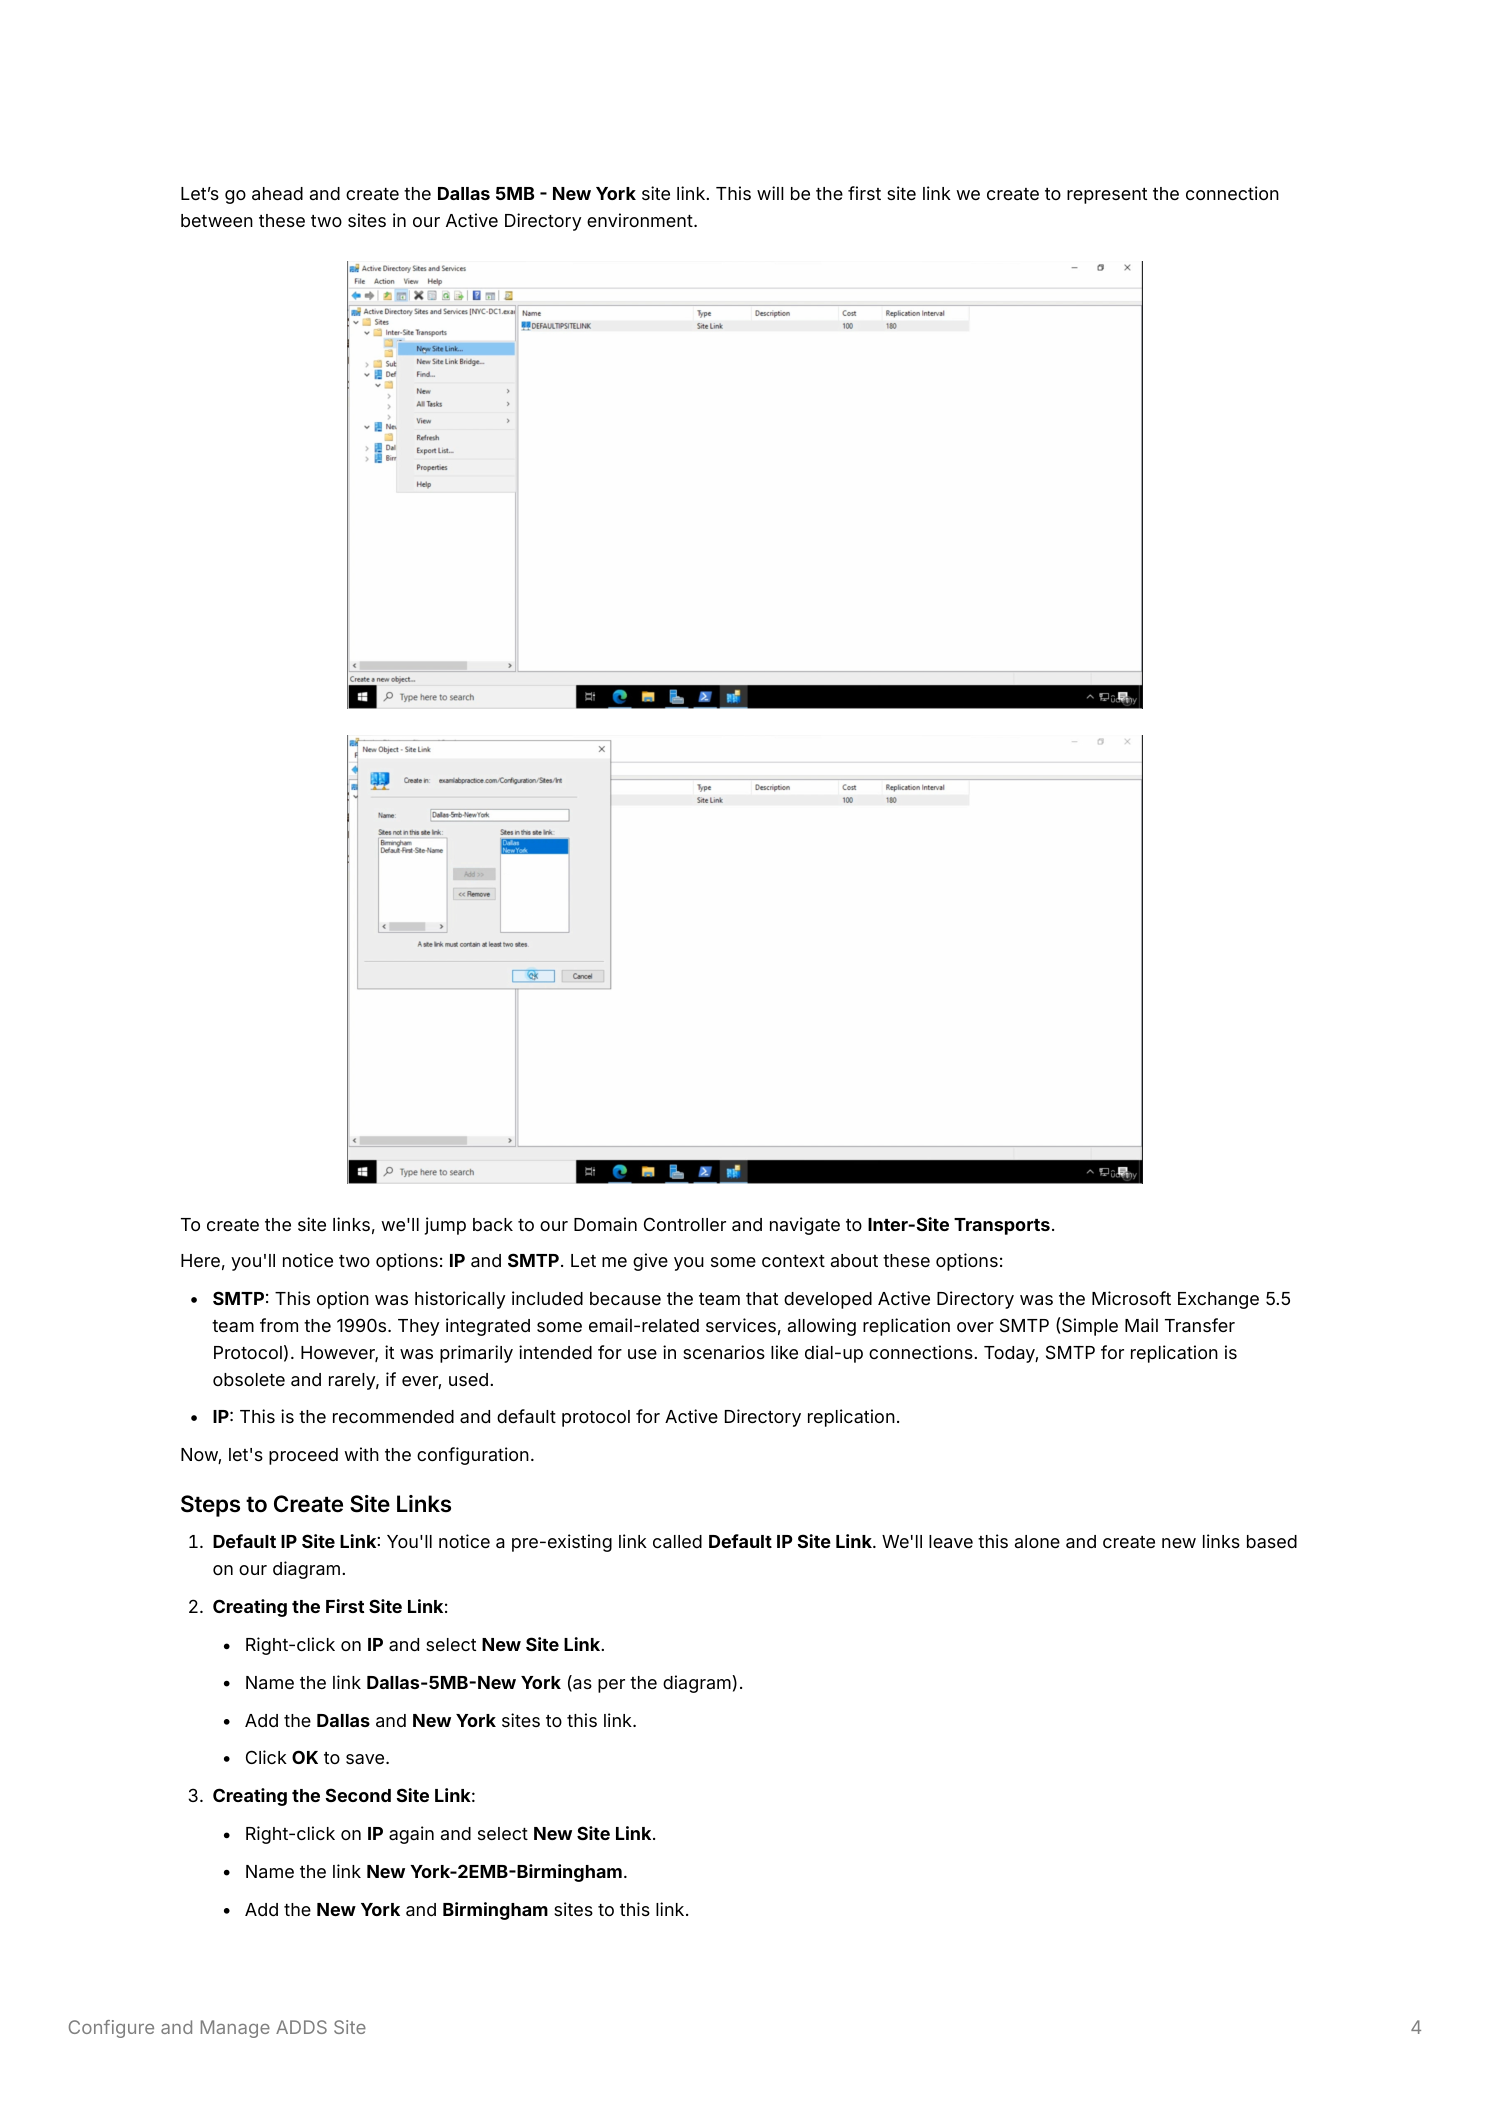
Step 3 — Three named site links
Naming convention here encodes both the endpoints and the link bandwidth, which makes the cost values obvious at a glance later:
- Dallas-5MB-New York — primary path, fastest WAN link
- New York-2EMB-Birmingham — secondary path, mid-bandwidth
- BRN-512K-Dallas — failover path, slow link, used only when the primary paths are down
For each: right-click IP > New Site Link, name it, add the two sites it connects, click OK.

Part 4 — Cost values that mean something
Site link cost is what AD’s Knowledge Consistency Checker (KCC) uses to compute optimal replication paths. Lower cost wins. Cost is not automatically derived from bandwidth — it’s an admin-assigned integer, and the absolute values don’t matter; what matters is the relative ordering. A common convention is to scale roughly inversely with link bandwidth:
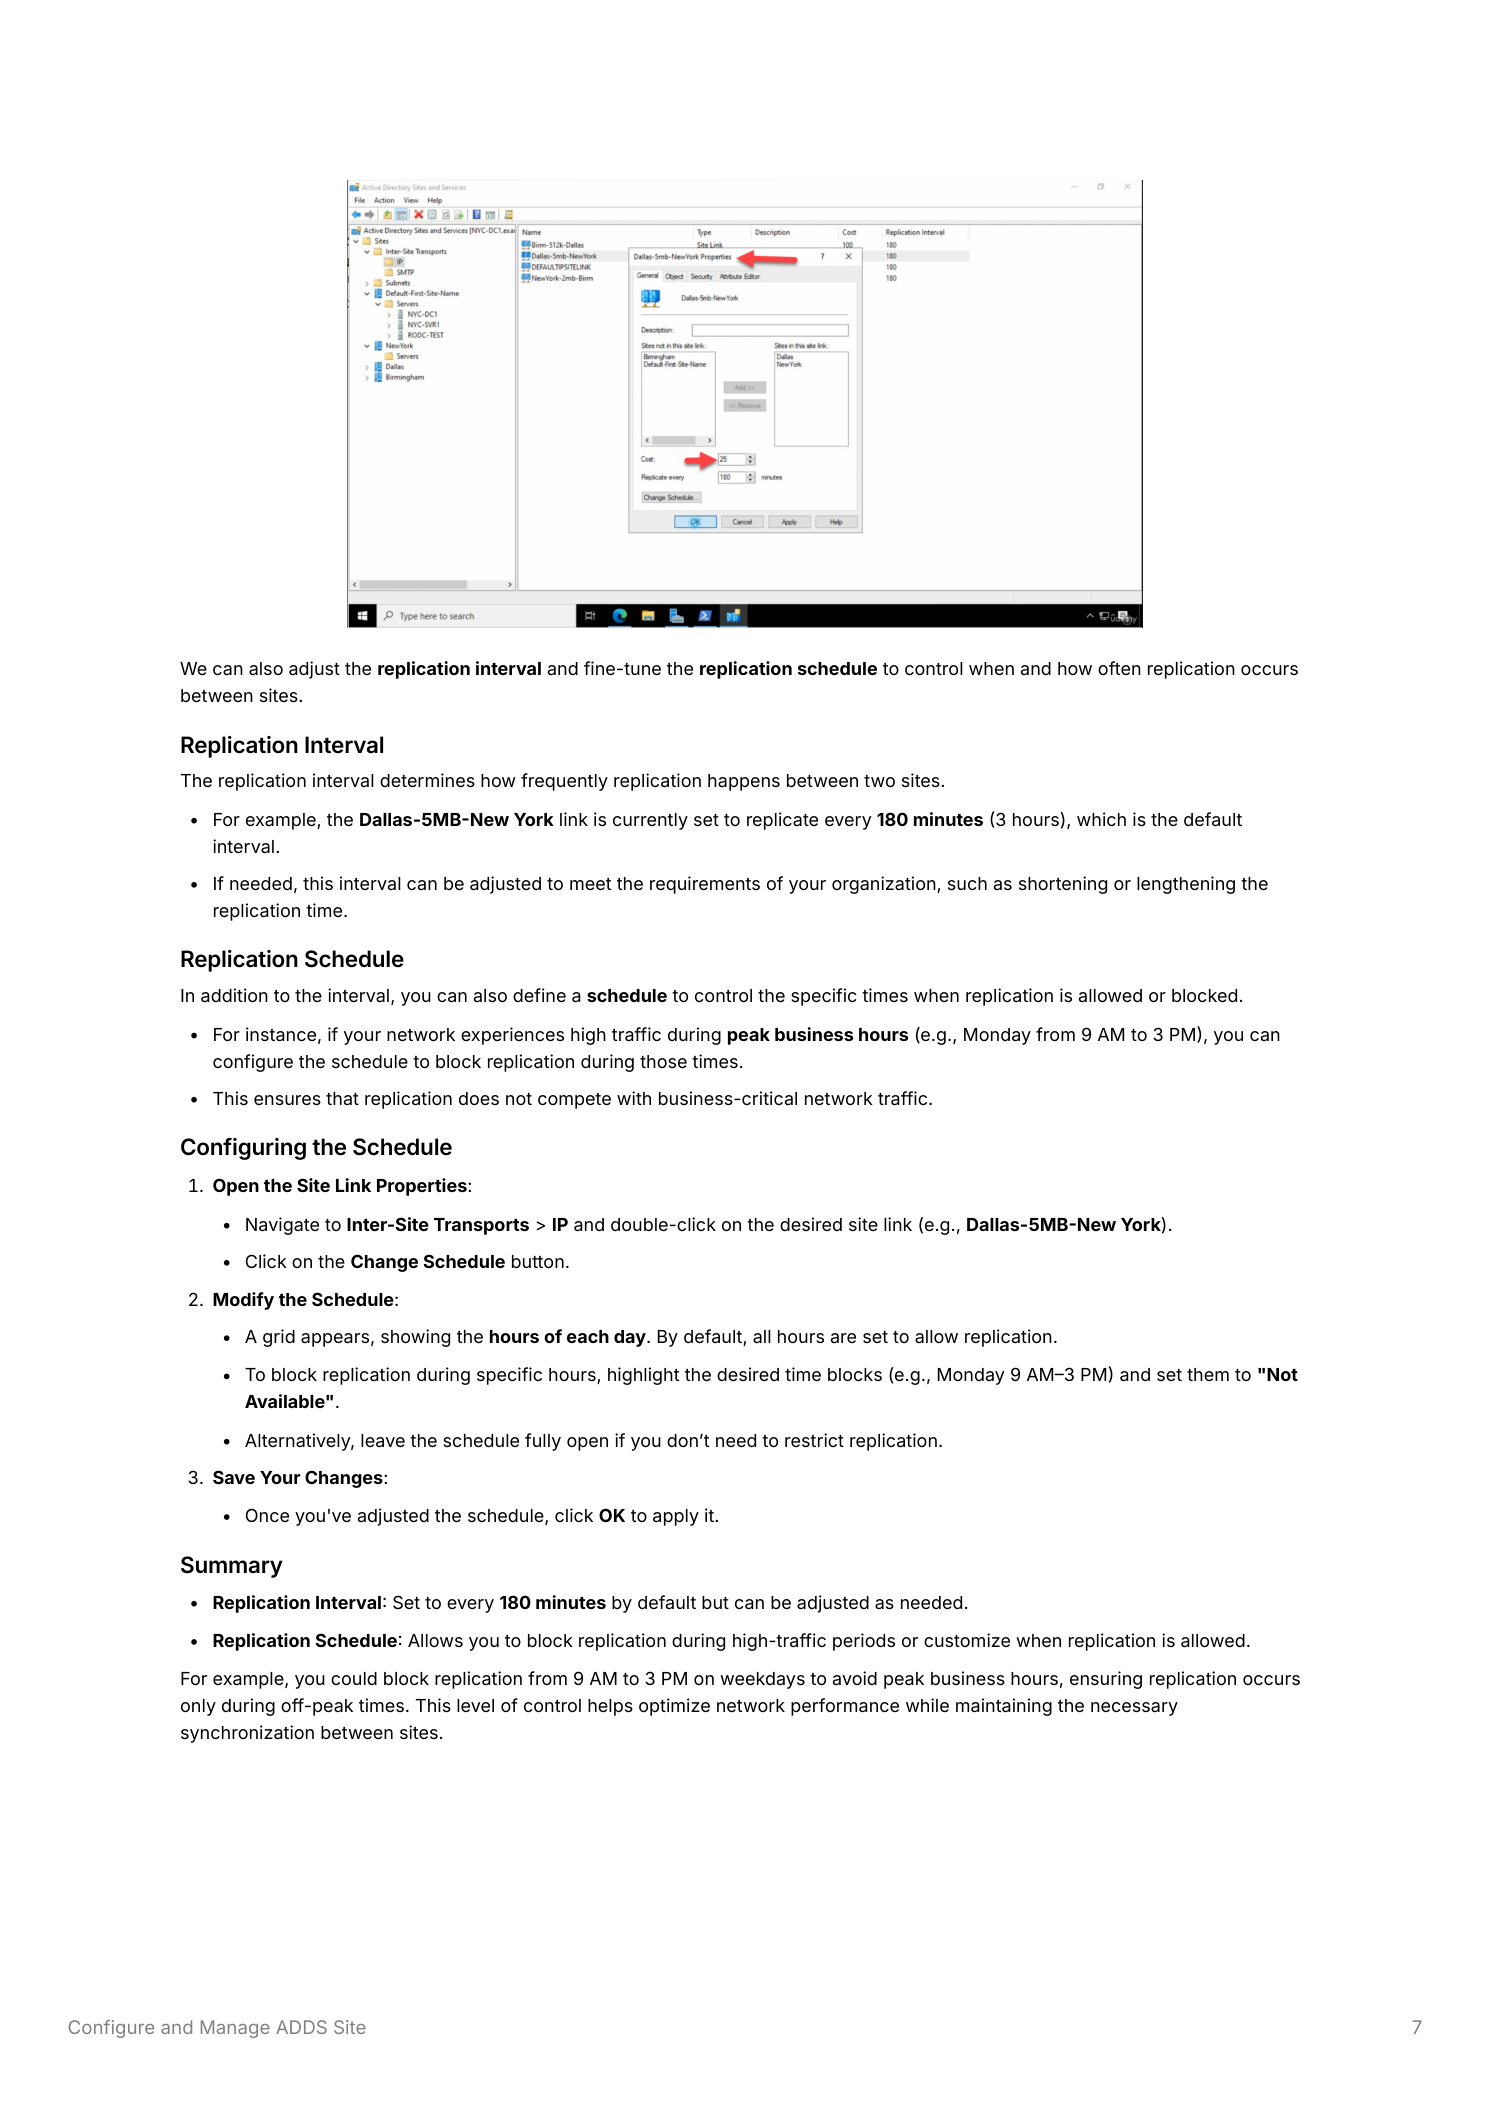
- Dallas-5MB-New York: Cost 25 — primary, fast and cheap
- New York-2EMB-Birmingham: Cost 100 — secondary
- BRN-512K-Dallas: Cost 400 — failover only
Set each: Inter-Site Transports > IP, double-click the site link, change Cost, click OK.

Part 5 — Replication interval and schedule
Two related settings on each site link control when replication happens.
The replication interval sets how often replication occurs along the link. Default is 180 minutes (3 hours). For LAN-class links you can drop it as low as 15 minutes; for genuinely slow WAN links you might raise it to keep bandwidth usage predictable. AD eventually-consistent replication tolerates this fine for normal directory changes — password resets and emergency changes use a different urgent-replication path that bypasses the schedule entirely.
The schedule grid
The Change Schedule grid lets you block replication during specific hours — useful when a WAN link is saturated by business-day traffic and you want replication to wait until evening. Open the site link properties > Change Schedule. The grid shows every hour of every day, all green by default (replication allowed). Click and drag to highlight hours, then pick Replication Not Available to block them. Most environments leave this fully open and rely on the interval; the schedule is for narrower bandwidth-management cases.
Part 6 — Map subnets to sites
This is the part that ties the topology to actual client behavior. When a client tries to find a DC, it does a DNS lookup against the SRV records and AD picks the “closest” DC by checking the client’s source IP against the subnet-to-site mapping. If the client’s subnet isn’t mapped, AD treats it as “site unknown” and picks any DC at random. A laptop in your Dallas office can end up authenticating against a Birmingham DC purely because nobody added the Dallas subnet here.
The subnet rules
- A subnet maps to exactly one site
- A site can have many subnets
- Subnets must not overlap across sites — behavior is undefined and undesirable
- Both IPv4 and IPv6 subnets are supported (configure both if your environment uses both)
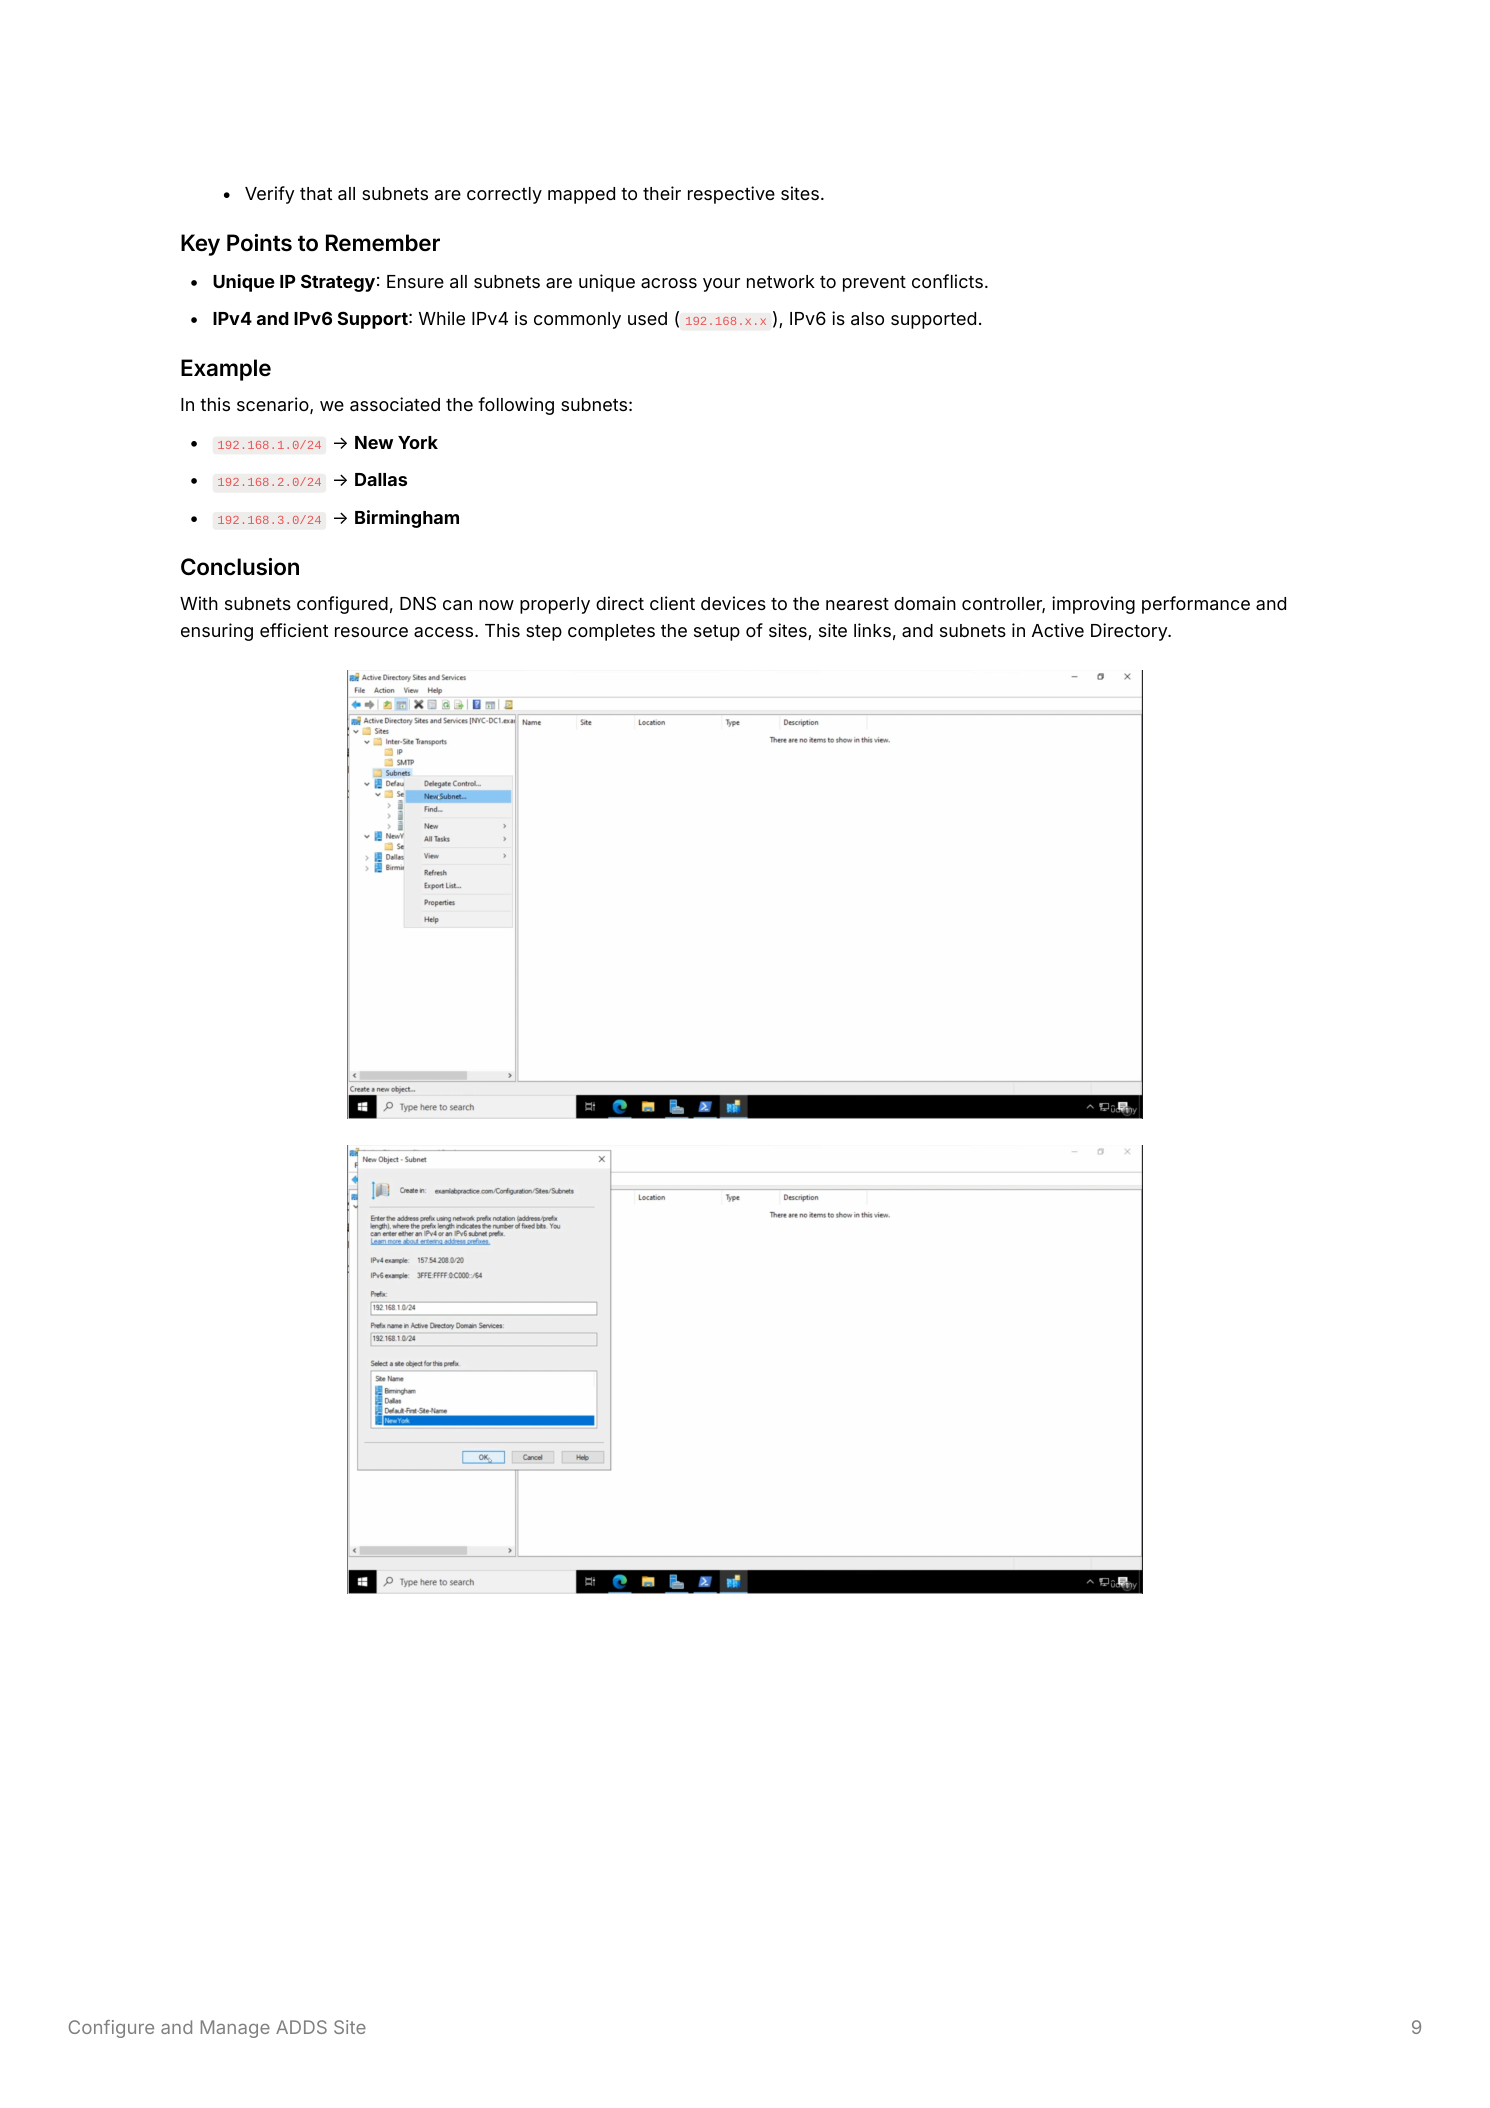
Step 4 — Add subnets
Right-click the Subnets folder in the left panel > New Subnet. Enter the prefix in CIDR notation, pick the associated site from the dropdown, click OK.
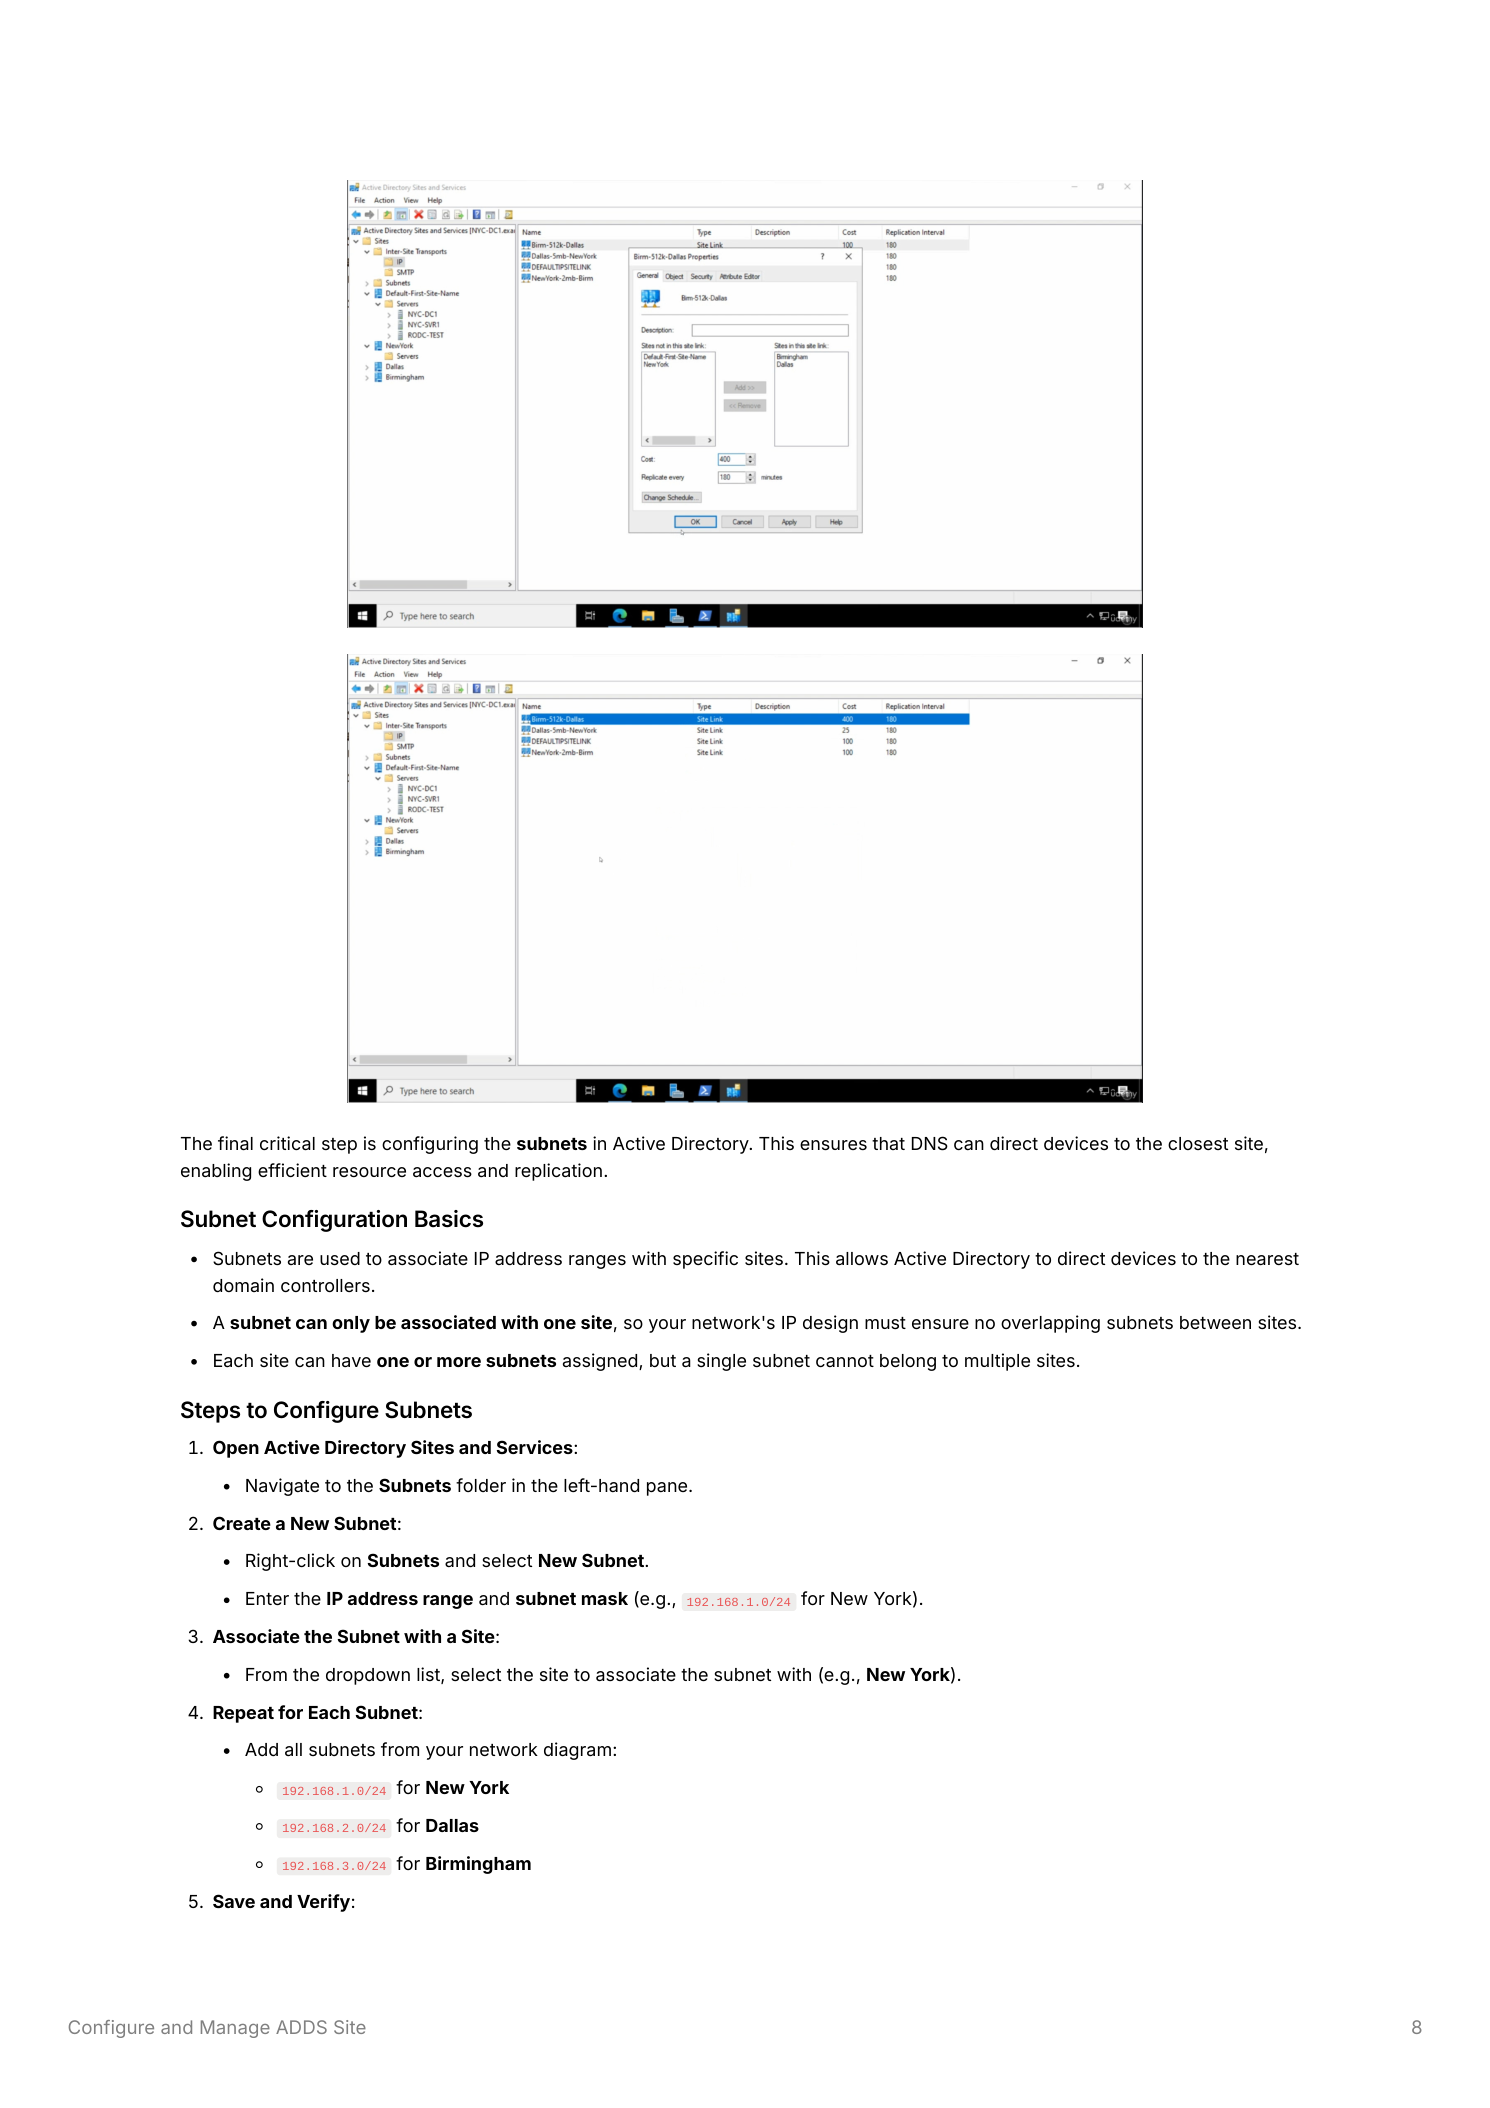
For our three-site lab:
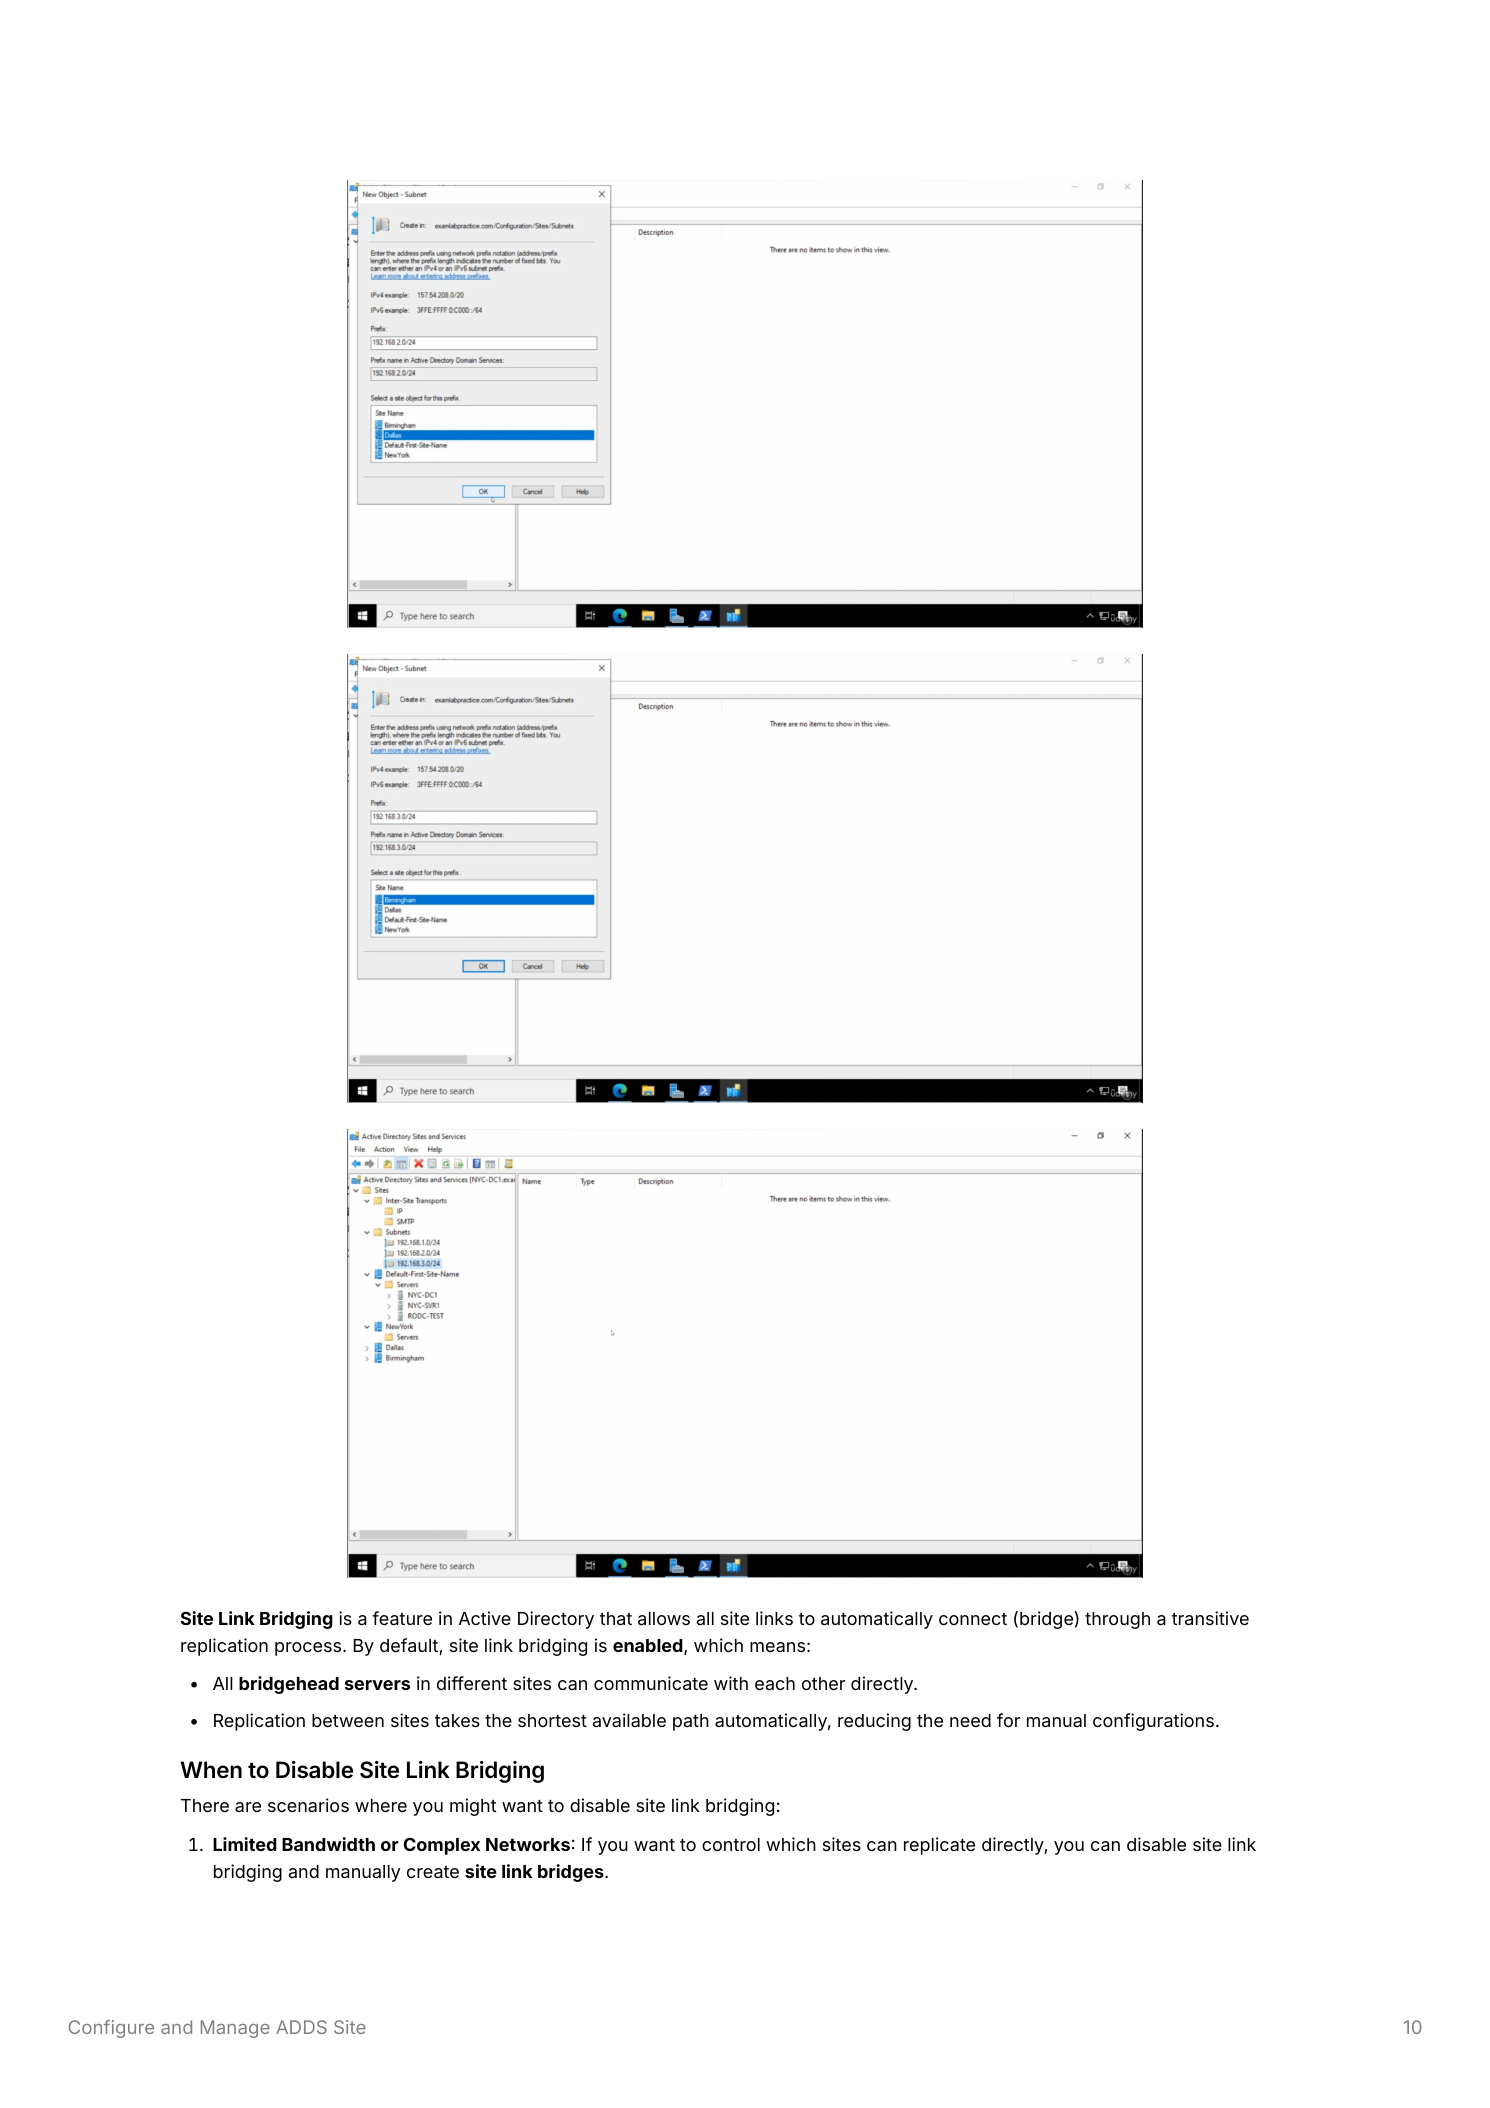
192.168.1.0/24→ New York192.168.2.0/24→ Dallas192.168.3.0/24→ Birmingham
Part 7 — Site link bridging
Site link bridging means “every site link is transitively connected to every other site link of the same transport.” Translation: even if there’s no direct Dallas-to-Birmingham site link, AD can still replicate between them by hopping through New York. This is enabled by default and is correct for most environments.
When to disable it
Two scenarios warrant turning bridging off:
- Hub-and-spoke topologies where you specifically don’t want spoke sites talking to each other — all replication should funnel through the hub for routing or auditing reasons
- Bandwidth-constrained meshes where transitive replication chooses paths your WAN can’t handle
How to disable bridging
Right-click Inter-Site Transports > IP > Properties. Untick Bridge All Site Links, click OK. This kills transitive bridging across the whole IP transport.
Custom bridges after disabling
With automatic bridging off, you can hand-pick which links are bridged together. Right-click IP > New Site Link Bridge, name it, add the specific site links you want bridged, click OK. The result: those links replicate transitively, but other links don’t. Granular control at the cost of more topology to maintain.

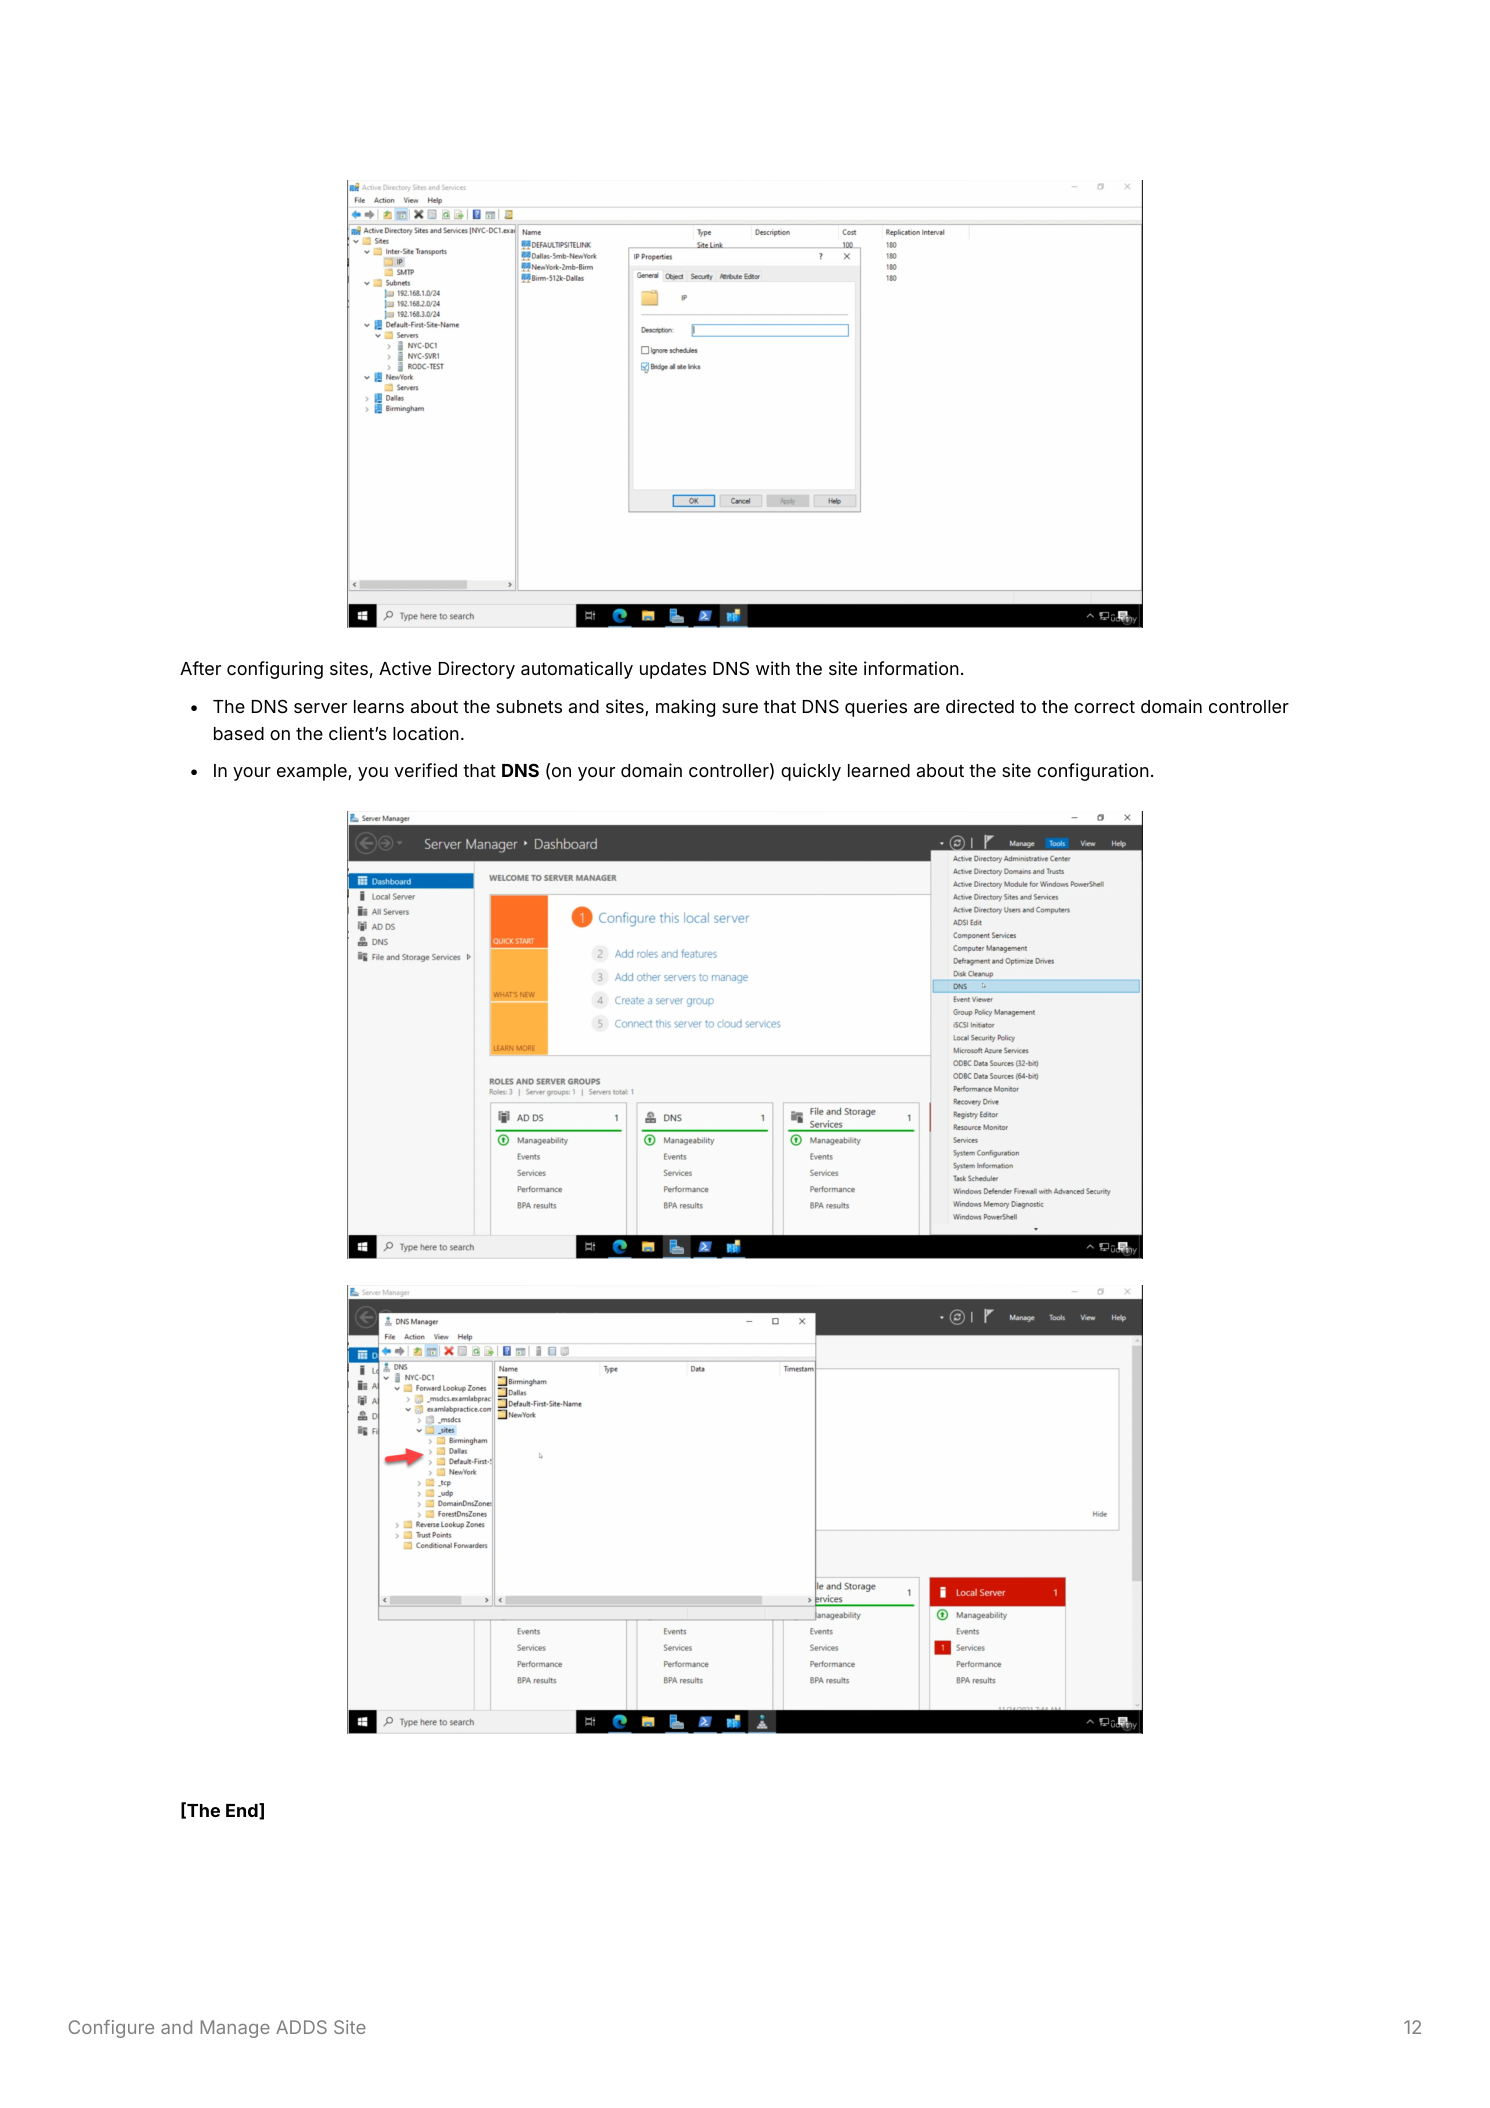
Verify it’s actually working
AD pushes the topology into DNS automatically — the per-site SRV records under _sites in your AD DNS zone are how clients pick a local DC. After the configuration settles, on a client in each location run nltest /dsgetsite — it should report the site the client’s subnet maps to. Run repadmin /showrepl on any DC to confirm replication is happening over the expected site links with the cost-based path you designed.
Things that bite people in production
Cost is administrative, not measured
AD doesn’t probe your WAN to figure out which link is faster. The cost number is whatever you assign. Pick a convention and document it — the “5MB” / “512K” embedded in our link names is one such convention; another common one is 1024 / Mbps. The values matter only relative to each other.
Default-First-Site-Name is a trap
Anything not explicitly assigned to a site lands here — new DCs after promotion, subnets you forgot to map, the lot. Either rename it to a real site you actually use, or get rigorous about moving objects out of it after creation. A “Default-First-Site-Name” with one DC and no subnets in a multi-site forest is a misconfiguration waiting to bite you the next time someone promotes a new DC.
Subnet overlap is undefined behavior
Two subnets covering overlapping address space mapped to different sites: AD picks one of them, and the choice isn’t guaranteed to be consistent. Use clean, non-overlapping prefixes and document the mapping in the same place you document your IP plan. /24 or larger gives you clean boundaries; smaller masks invite mistakes.
SRV record TTL
Site changes don’t take effect on clients until DNS records refresh. The default TTL is 600 seconds (10 minutes). After topology changes, give DNS a chance to propagate before declaring something broken — or shorten the TTL during planned cutovers.
Where this fits
Sites and Services is the foundation under everything that’s site-aware: Group Policy application, DFS Namespaces referrals, Exchange autodiscover, even Configuration Manager boundaries. For the next layer up see DFS file management (which uses site costs to pick the closest folder target) and the rest of the Active Directory pathway for multi-site replication topology, repadmin verification, and the broader site-design picture.