Without DHCP, every device on the network needs an IP address typed in by hand — doable for a half-rack of servers, completely impossible for an environment with laptops, phones, IoT devices, and meeting-room screens that come and go. The Windows Server DHCP role solves this end of the problem, but with a twist that catches first-time admins: simply installing the role isn’t enough. The server has to be authorized in Active Directory before it’s allowed to issue a single lease, and that authorization is what stops a rogue DHCP server — a misconfigured lab box, a deliberately malicious device — from breaking address assignment for the entire domain.
This walkthrough installs the role, sets up the static IP that DHCP servers absolutely require, runs the post-installation wizard that performs AD authorization, verifies the server is live, and ends with the steps to create the first scope. The authorization model and the two security groups it creates are explained along the way — both matter for how you delegate DHCP management later.
What you need before starting
- A Windows Server, preferably domain-joined (authorization works on standalone servers too, but you lose the rogue-server protection)
- Domain Admin rights (root domain) or Enterprise Admin rights (child domain) for the authorization step
- A planned static IP for the server (DHCP servers cannot run on DHCP-assigned addresses)
- A planned scope — subnet, range, exclusions, lease duration — you don’t need every detail upfront, but knowing the address plan helps
Why DHCP matters — the four parameters
DHCP automates the four pieces of network config that every device needs to communicate: the device’s own IP address, the subnet mask that defines the local network boundaries, the default gateway for traffic leaving that network, and the DNS servers for name resolution. Without DHCP, all four are manual on every device. With DHCP, devices boot, request a lease, receive all four parameters, and start working — the entire process is invisible to the end user.
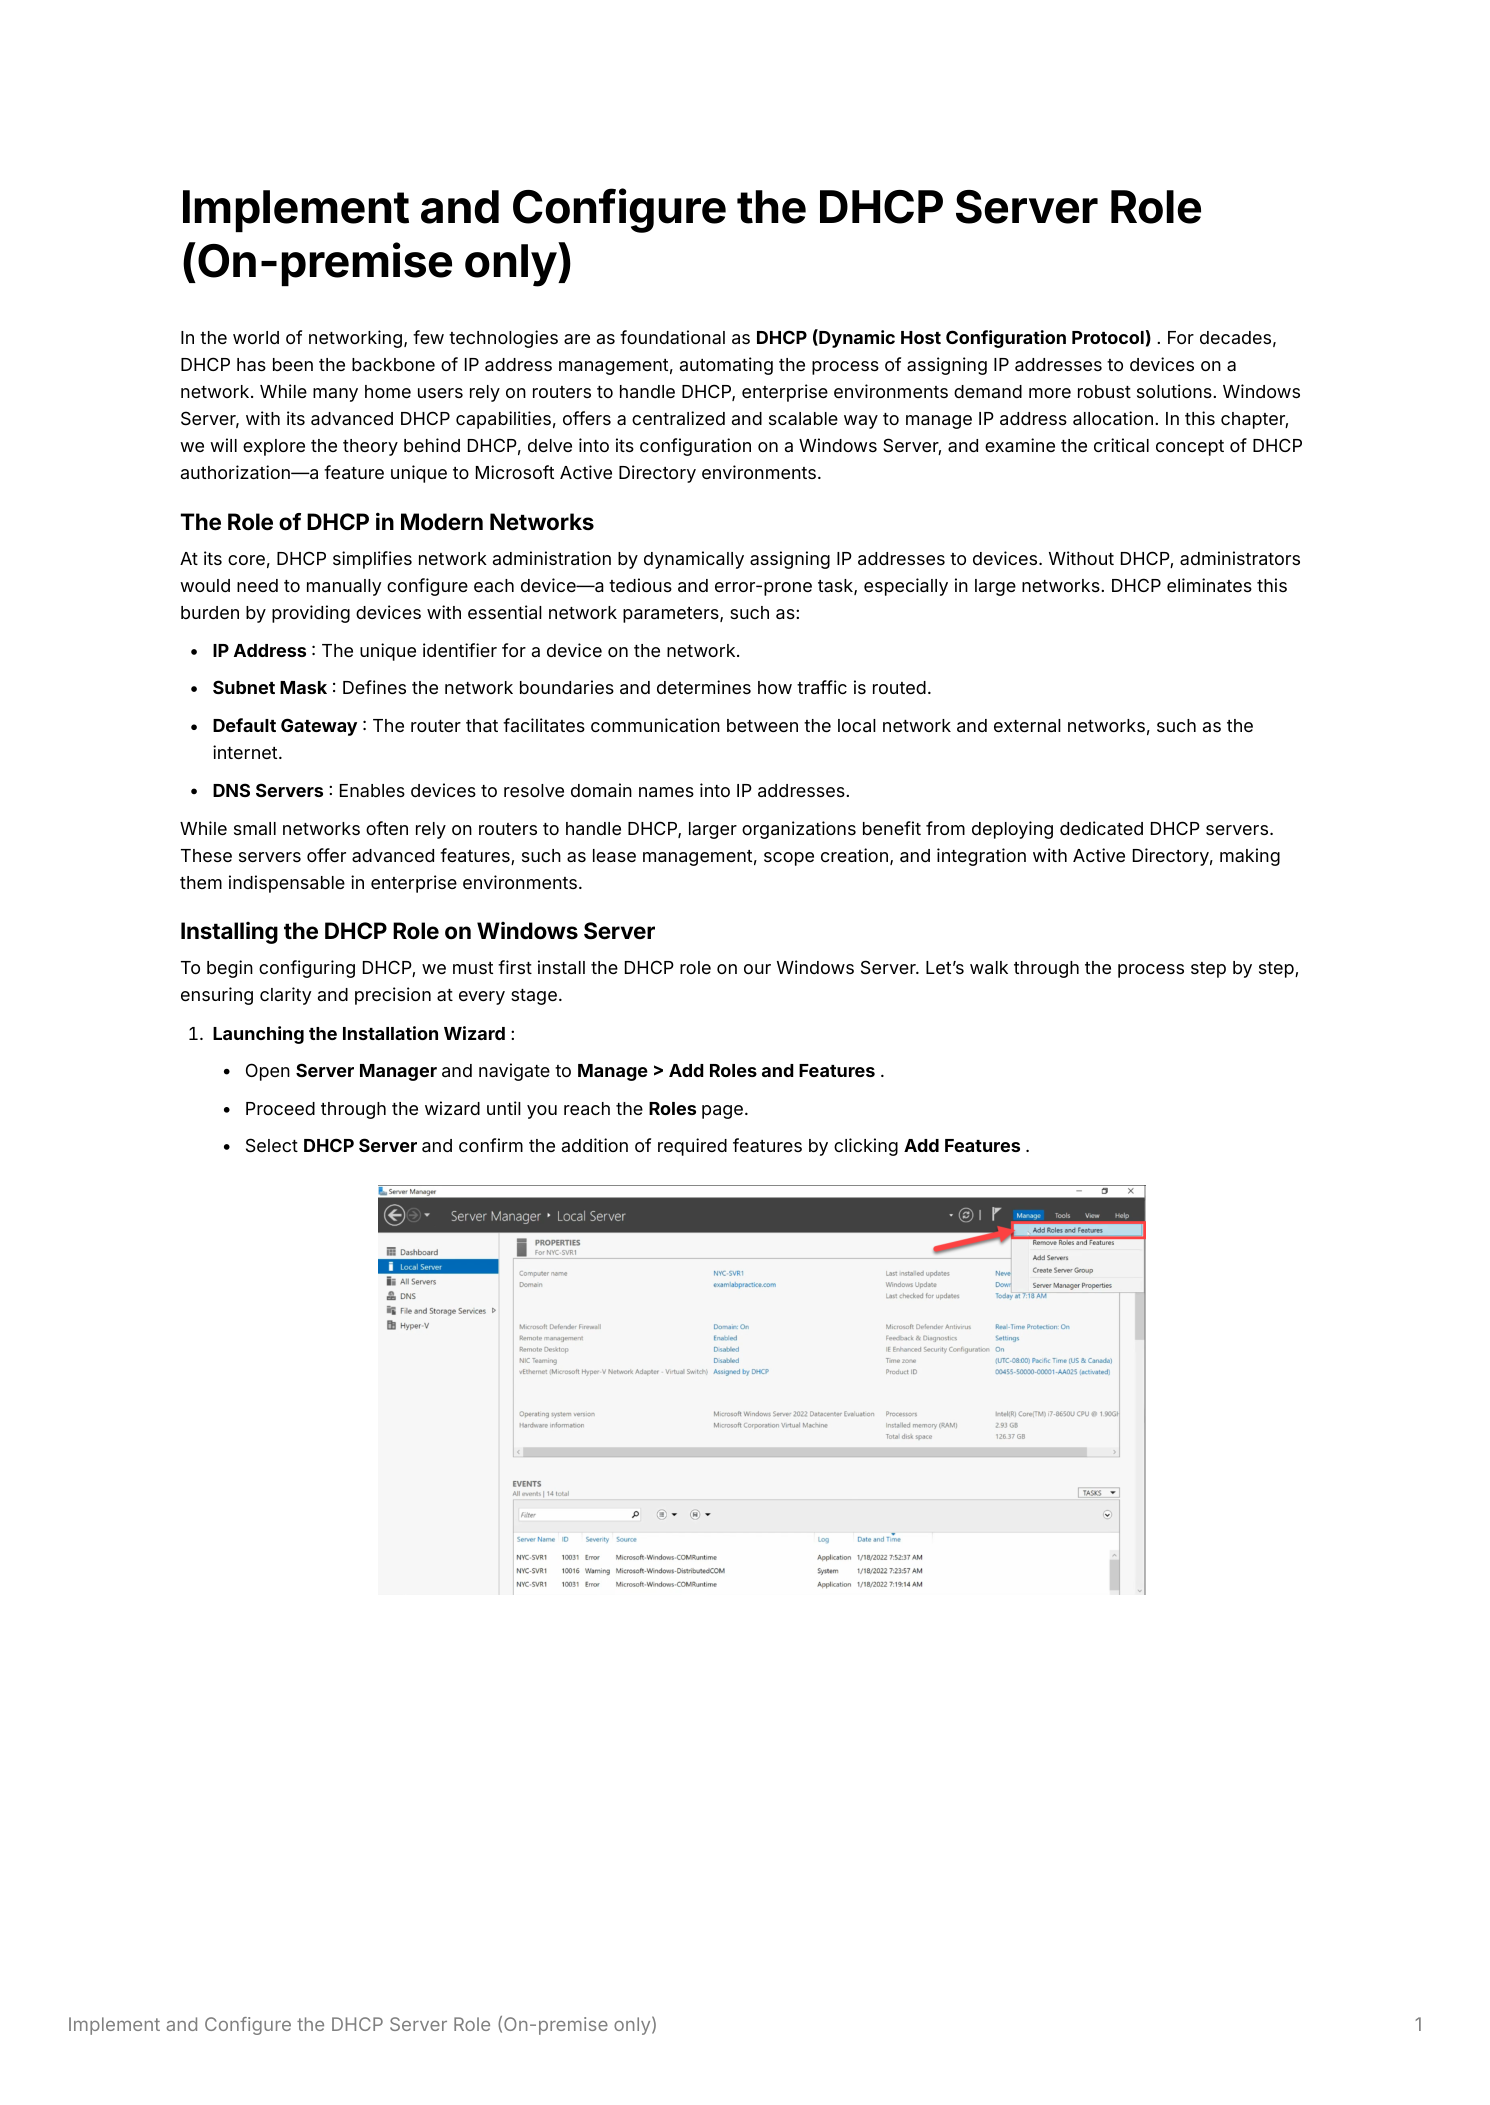
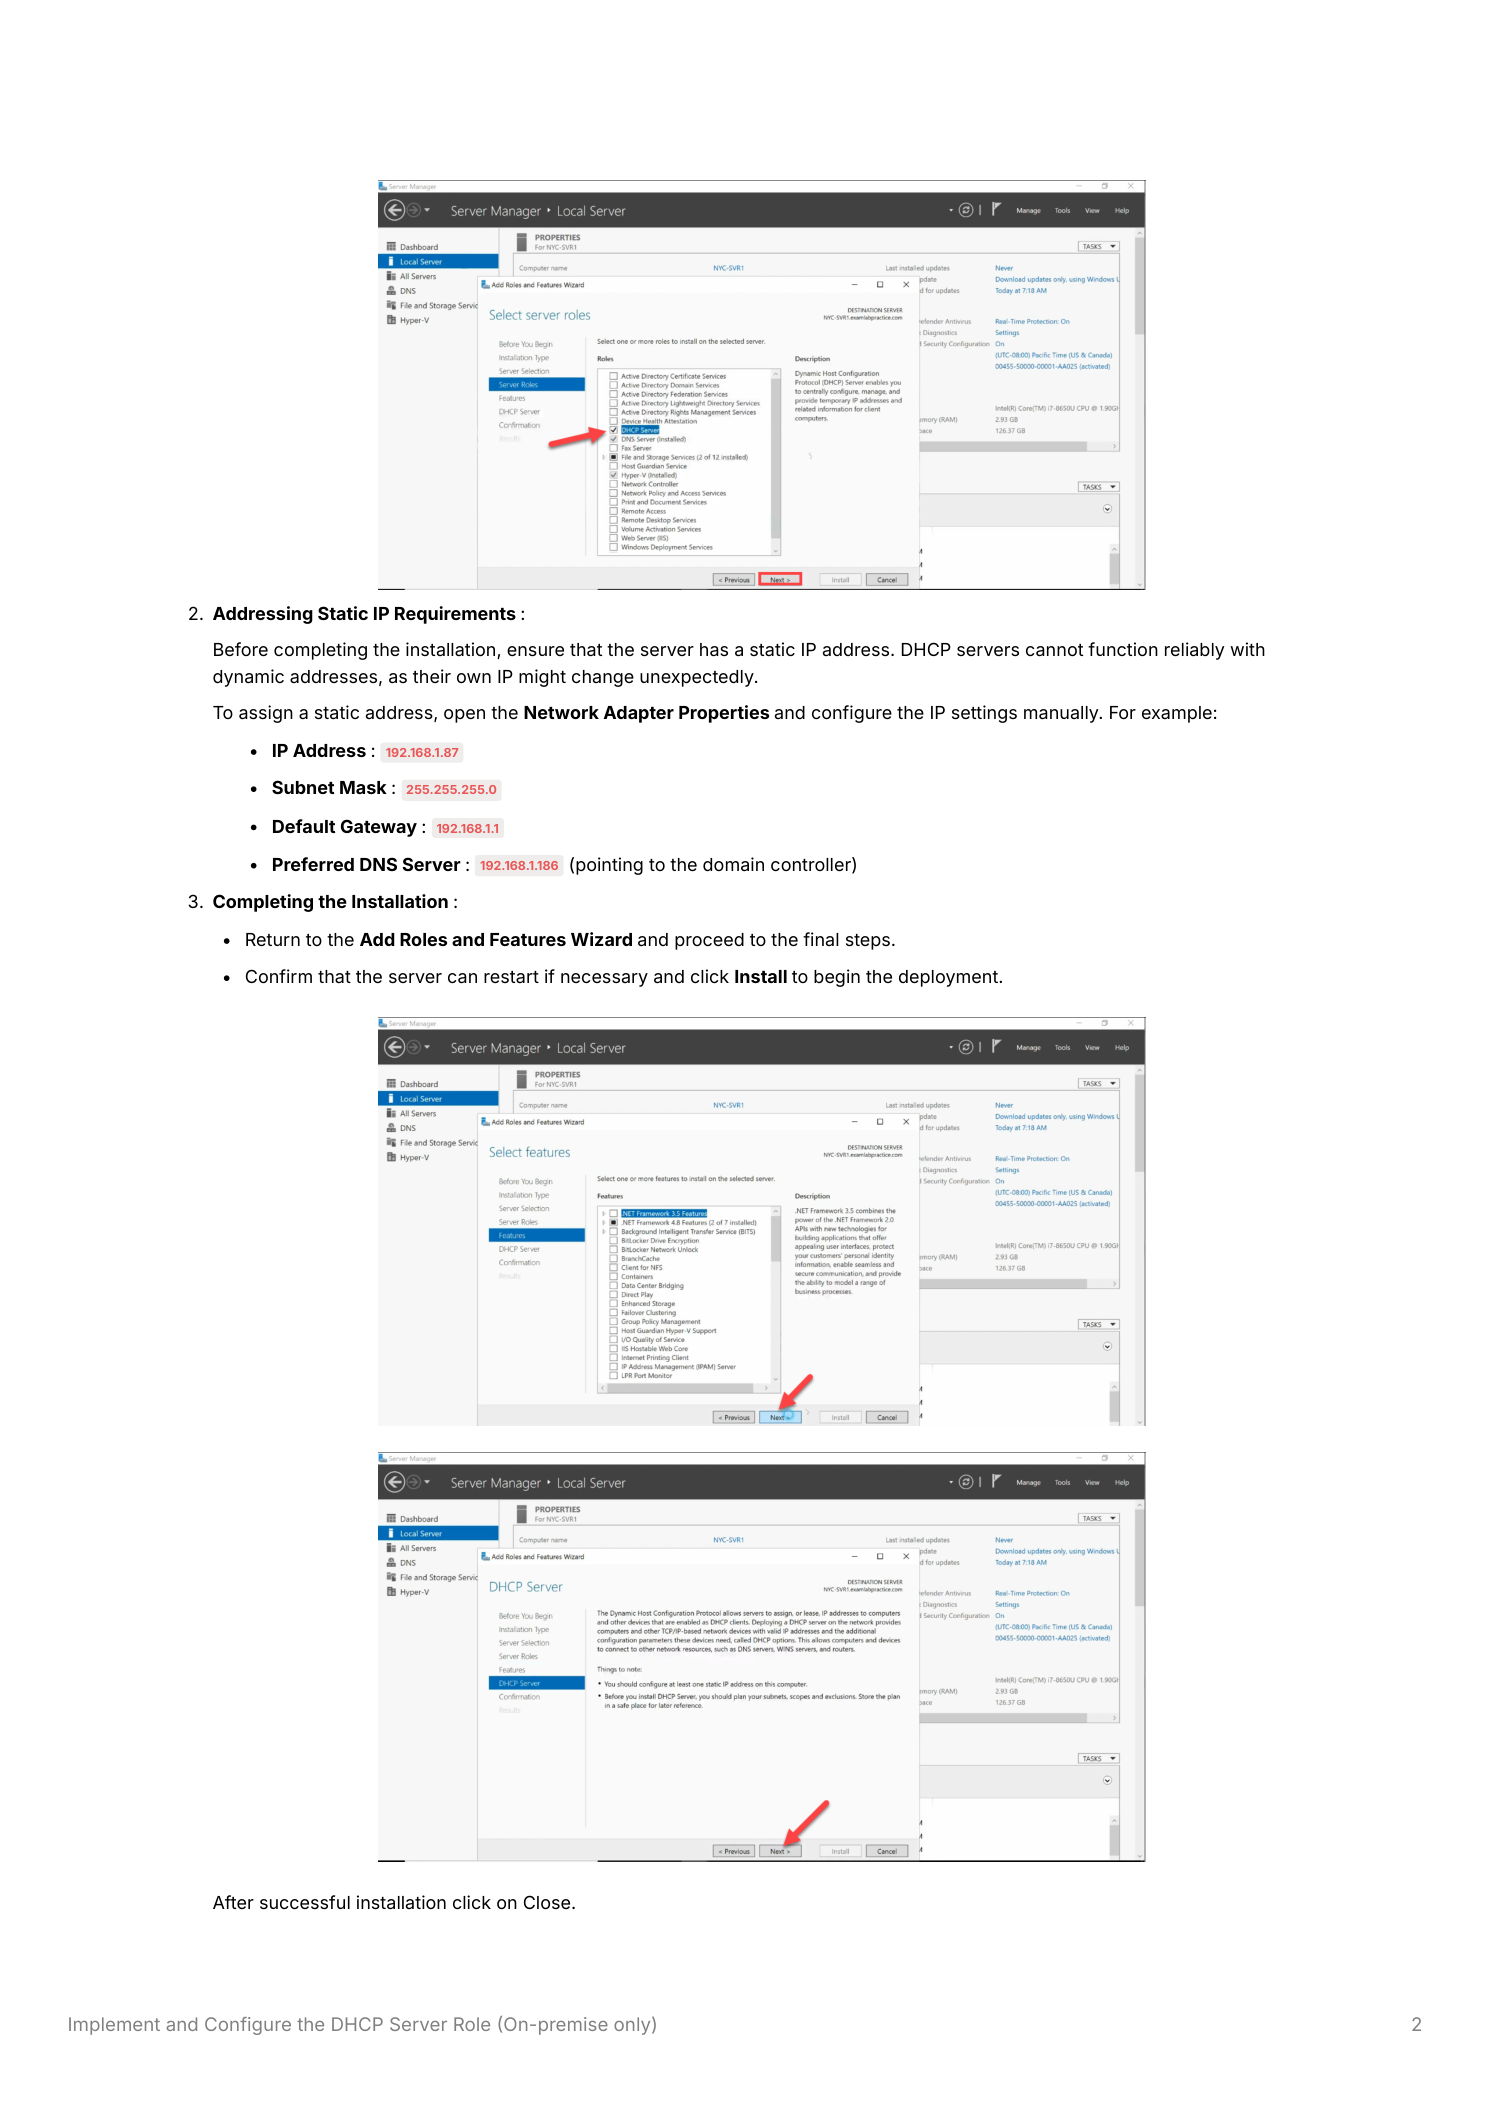
Step 1 — Install the DHCP Server role
From Server Manager > Manage > Add Roles and Features, click through to the Server Roles page and tick DHCP Server. Accept the prompt to add required management features. Continue through the wizard to Install.
Step 2 — Pin a static IP first
This isn’t a recommendation, it’s a hard requirement. A DHCP server cannot reliably hand out addresses if its own address keeps changing — clients that received leases pointing to 192.168.1.10 can’t renew them after the server moves to 192.168.1.42. Open Network Adapter Properties, configure IPv4 manually, and pick something in your management subnet outside any DHCP scope you plan to create. A typical layout in a domain environment:
- IP Address:
192.168.1.10 - Subnet Mask:
255.255.255.0 - Default Gateway:
192.168.1.1 - Preferred DNS:
192.168.1.1(the DC)
Once the static IP is set, finish the role-install wizard and reboot if prompted.
Step 3 — The authorization gate
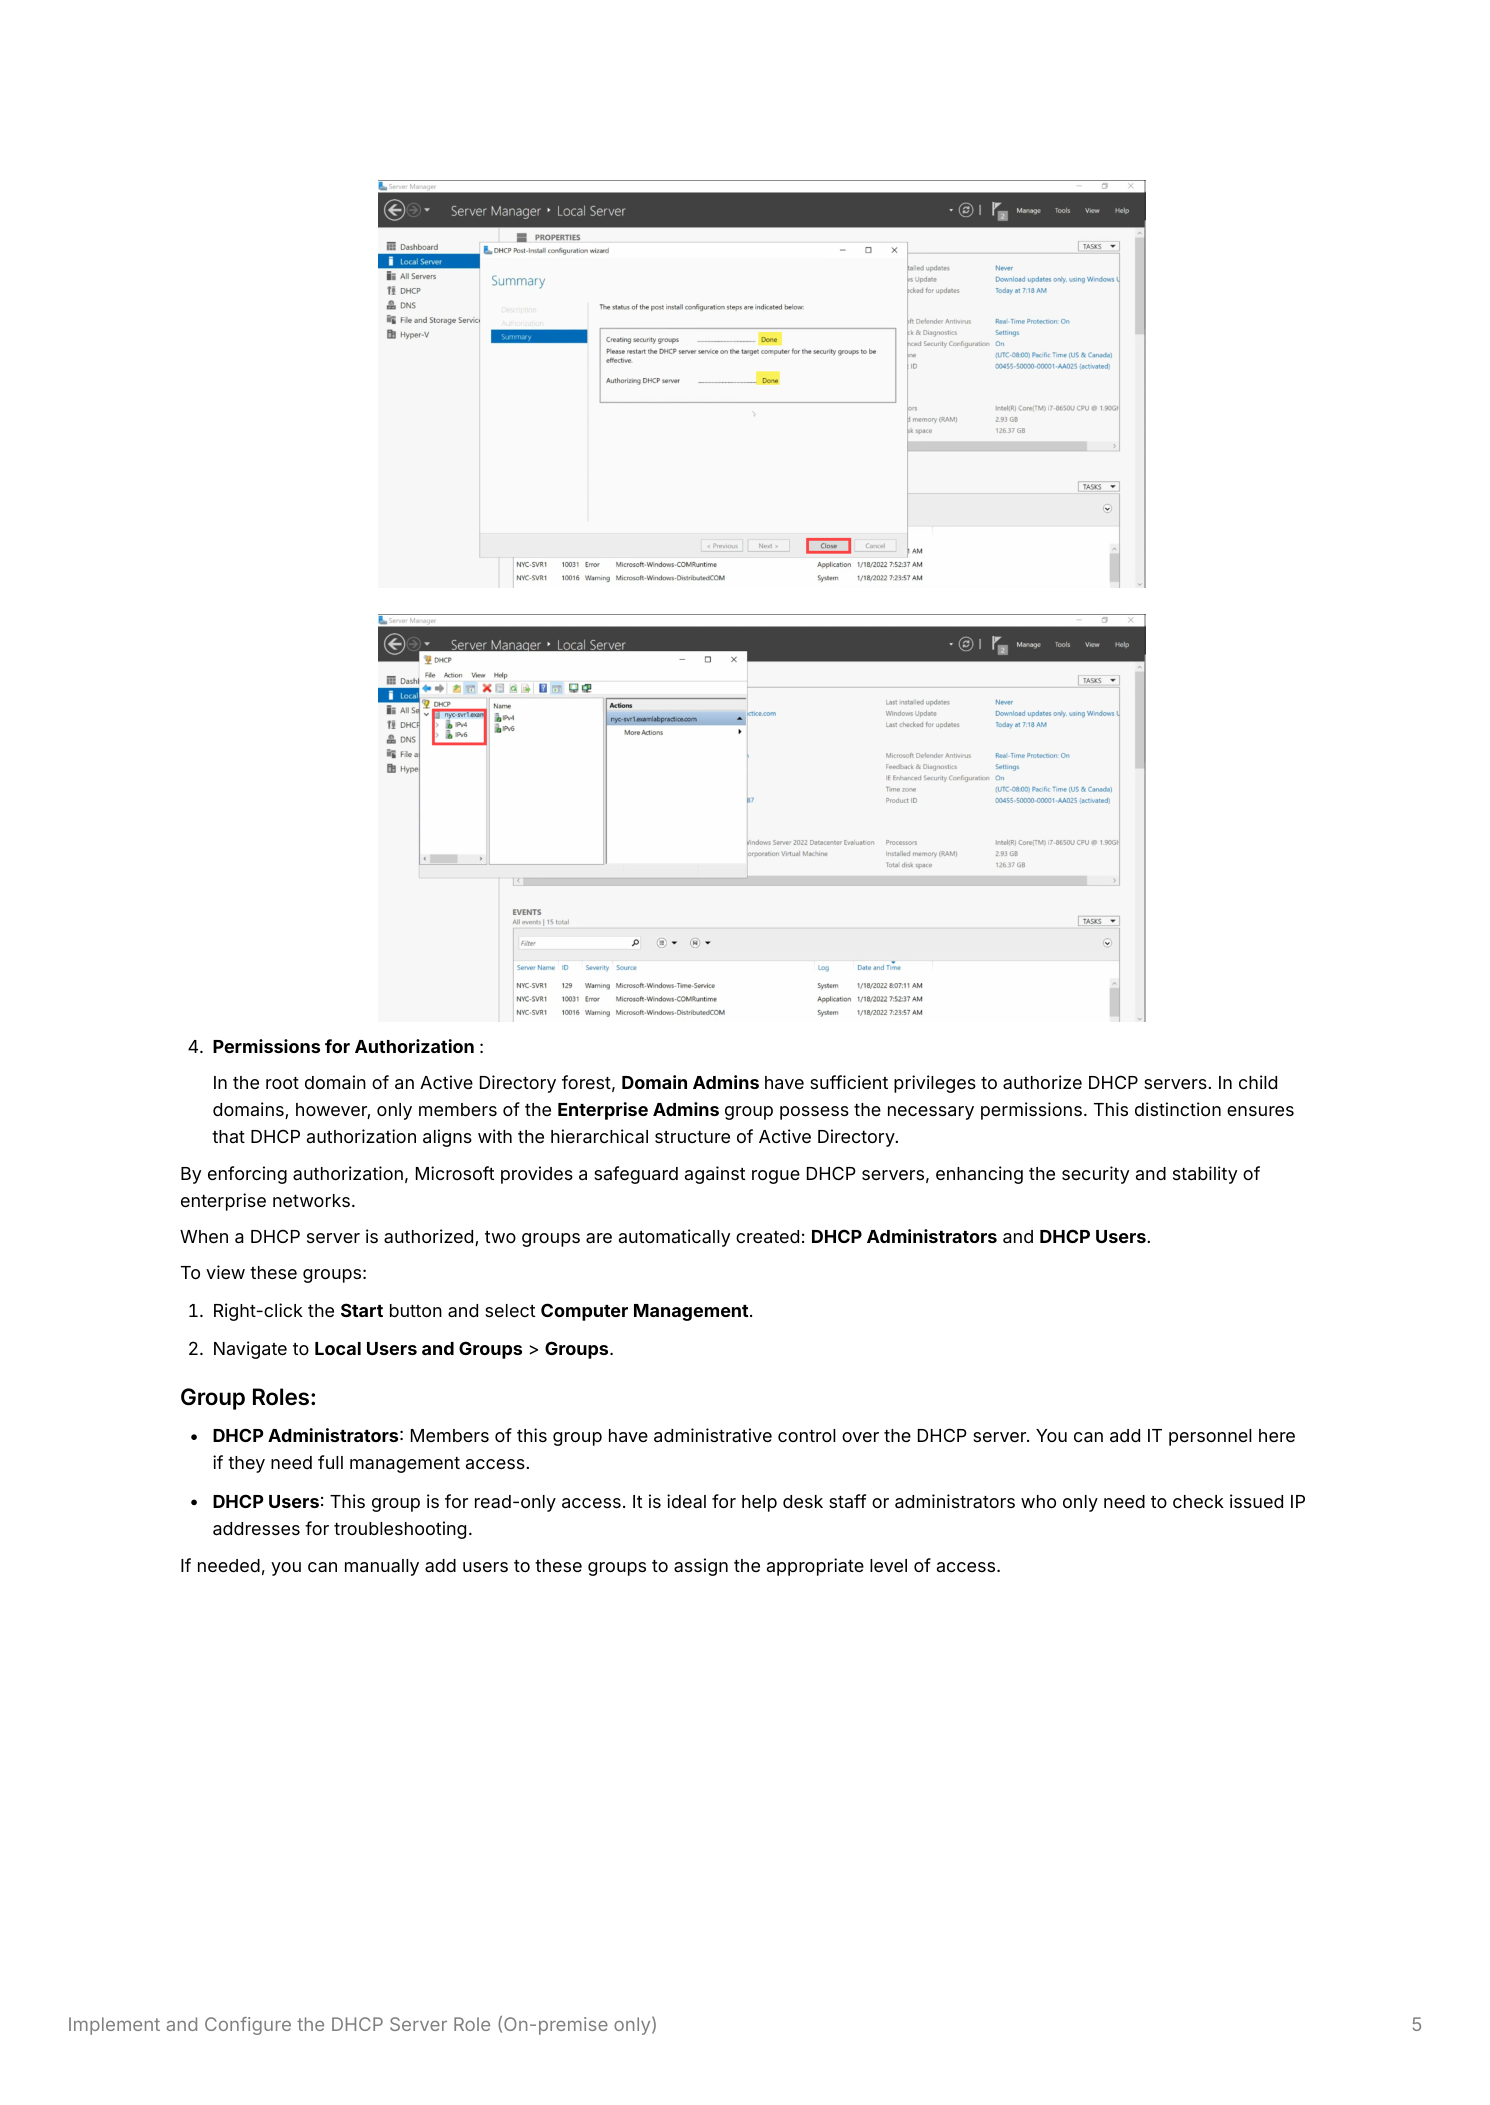
After install, the DHCP role appears under Server Manager > Tools > DHCP. Open the console and you’ll see red downward arrows next to the IPv4 and IPv6 nodes — the visual signal that the server isn’t authorized in AD and won’t issue a single lease until it is. Server Manager also shows a yellow warning flag in the notification area; click it and pick Complete DHCP Configuration to launch the post-install wizard.
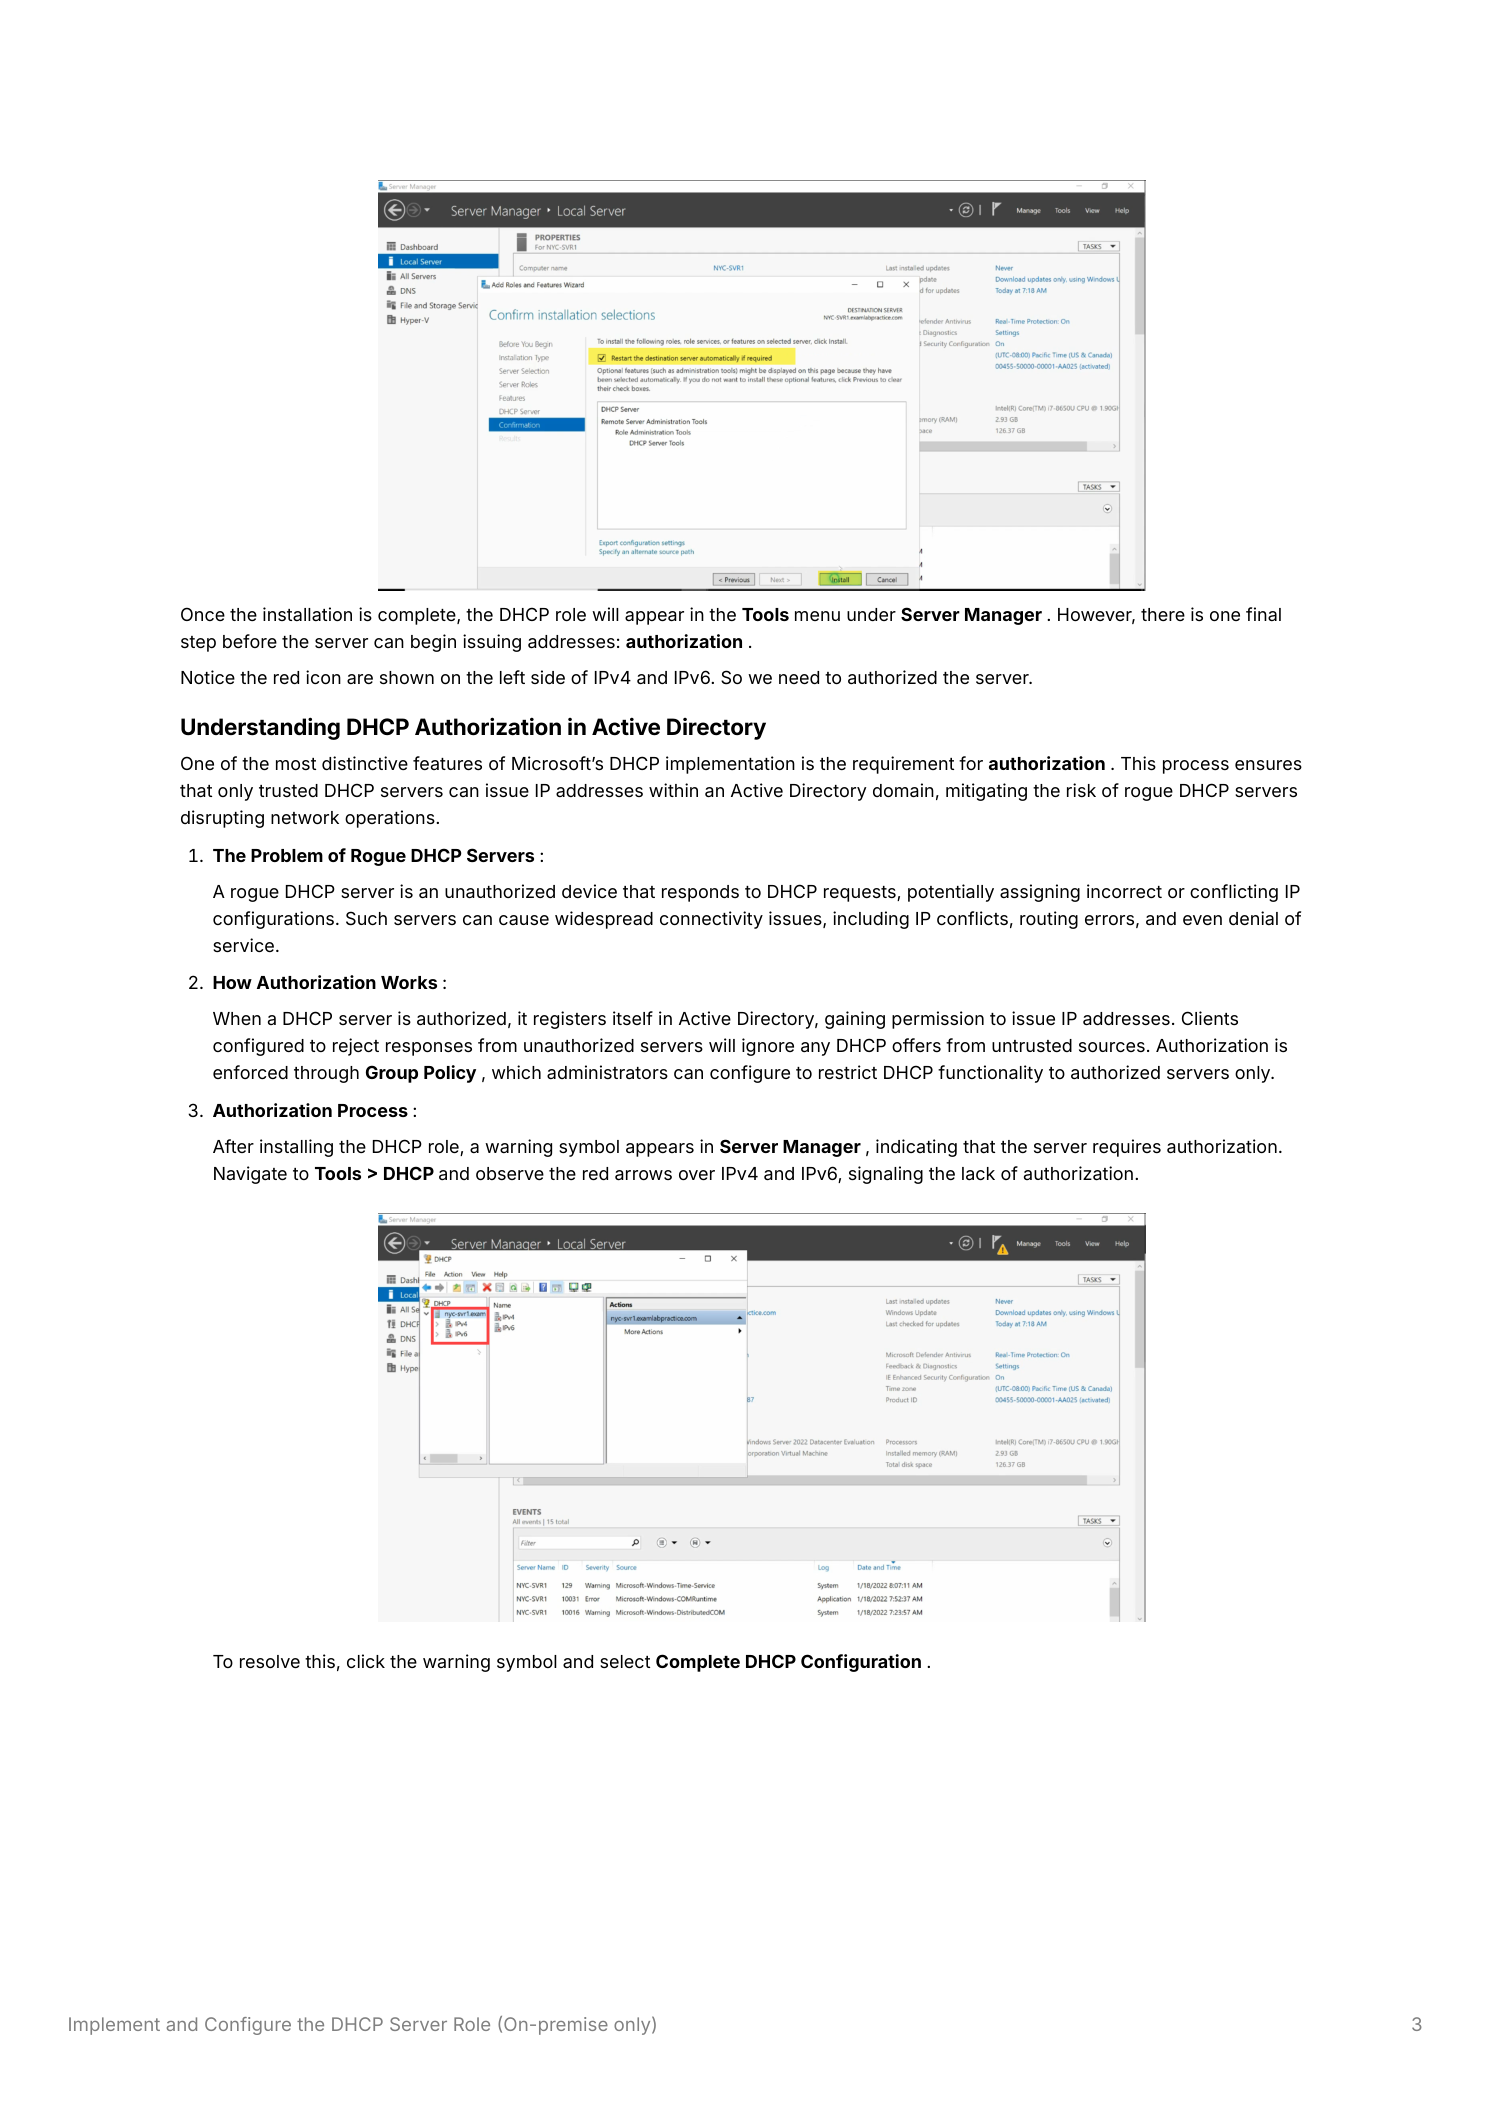
Why authorization exists
Active Directory tracks which DHCP servers are allowed to operate. AD-joined Windows DHCP servers check AD before responding to any DHCP request — if they’re not on the authorized list, they stay silent. This is the only line of defense Microsoft ships against rogue DHCP servers: a misconfigured router with DHCP enabled, an old Windows VM someone forgot to shut down, a deliberately malicious device handing out wrong gateway addresses. None of those should be able to break the network just by being plugged in. Authorization gives you that protection — on AD-joined Windows DHCP servers. (Linux DHCP servers and standalone Windows DHCP don’t honor this gate, so it’s not absolute — but for the AD-managed environment it removes the most common failure mode.)
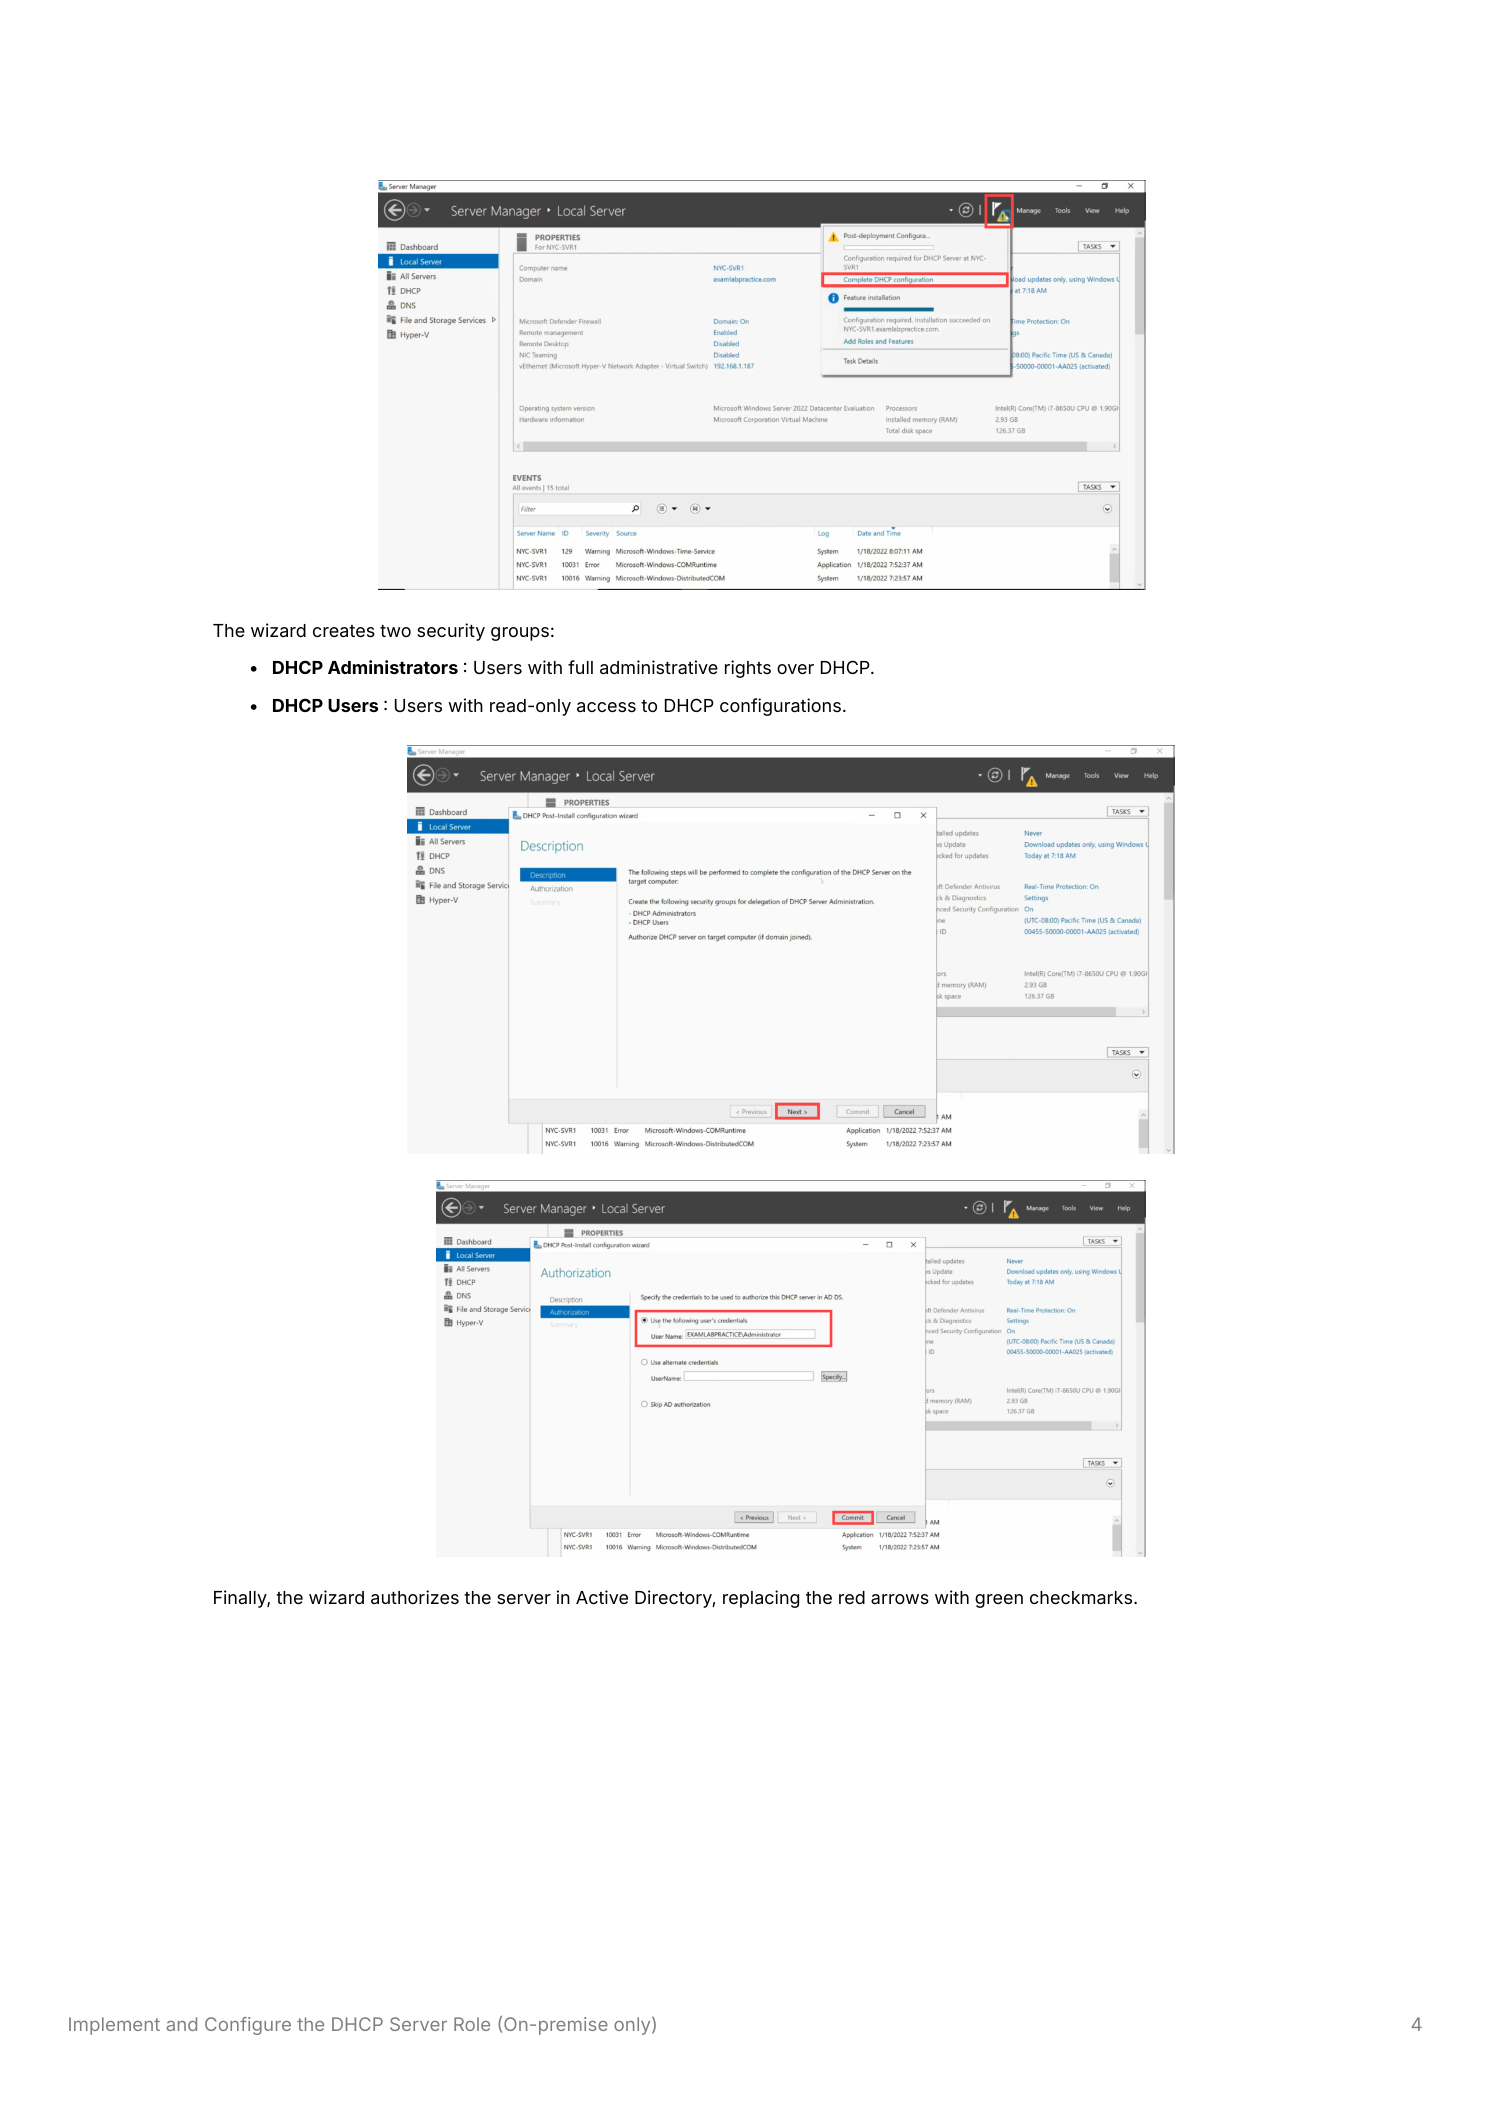
Step 4 — Run the post-installation wizard
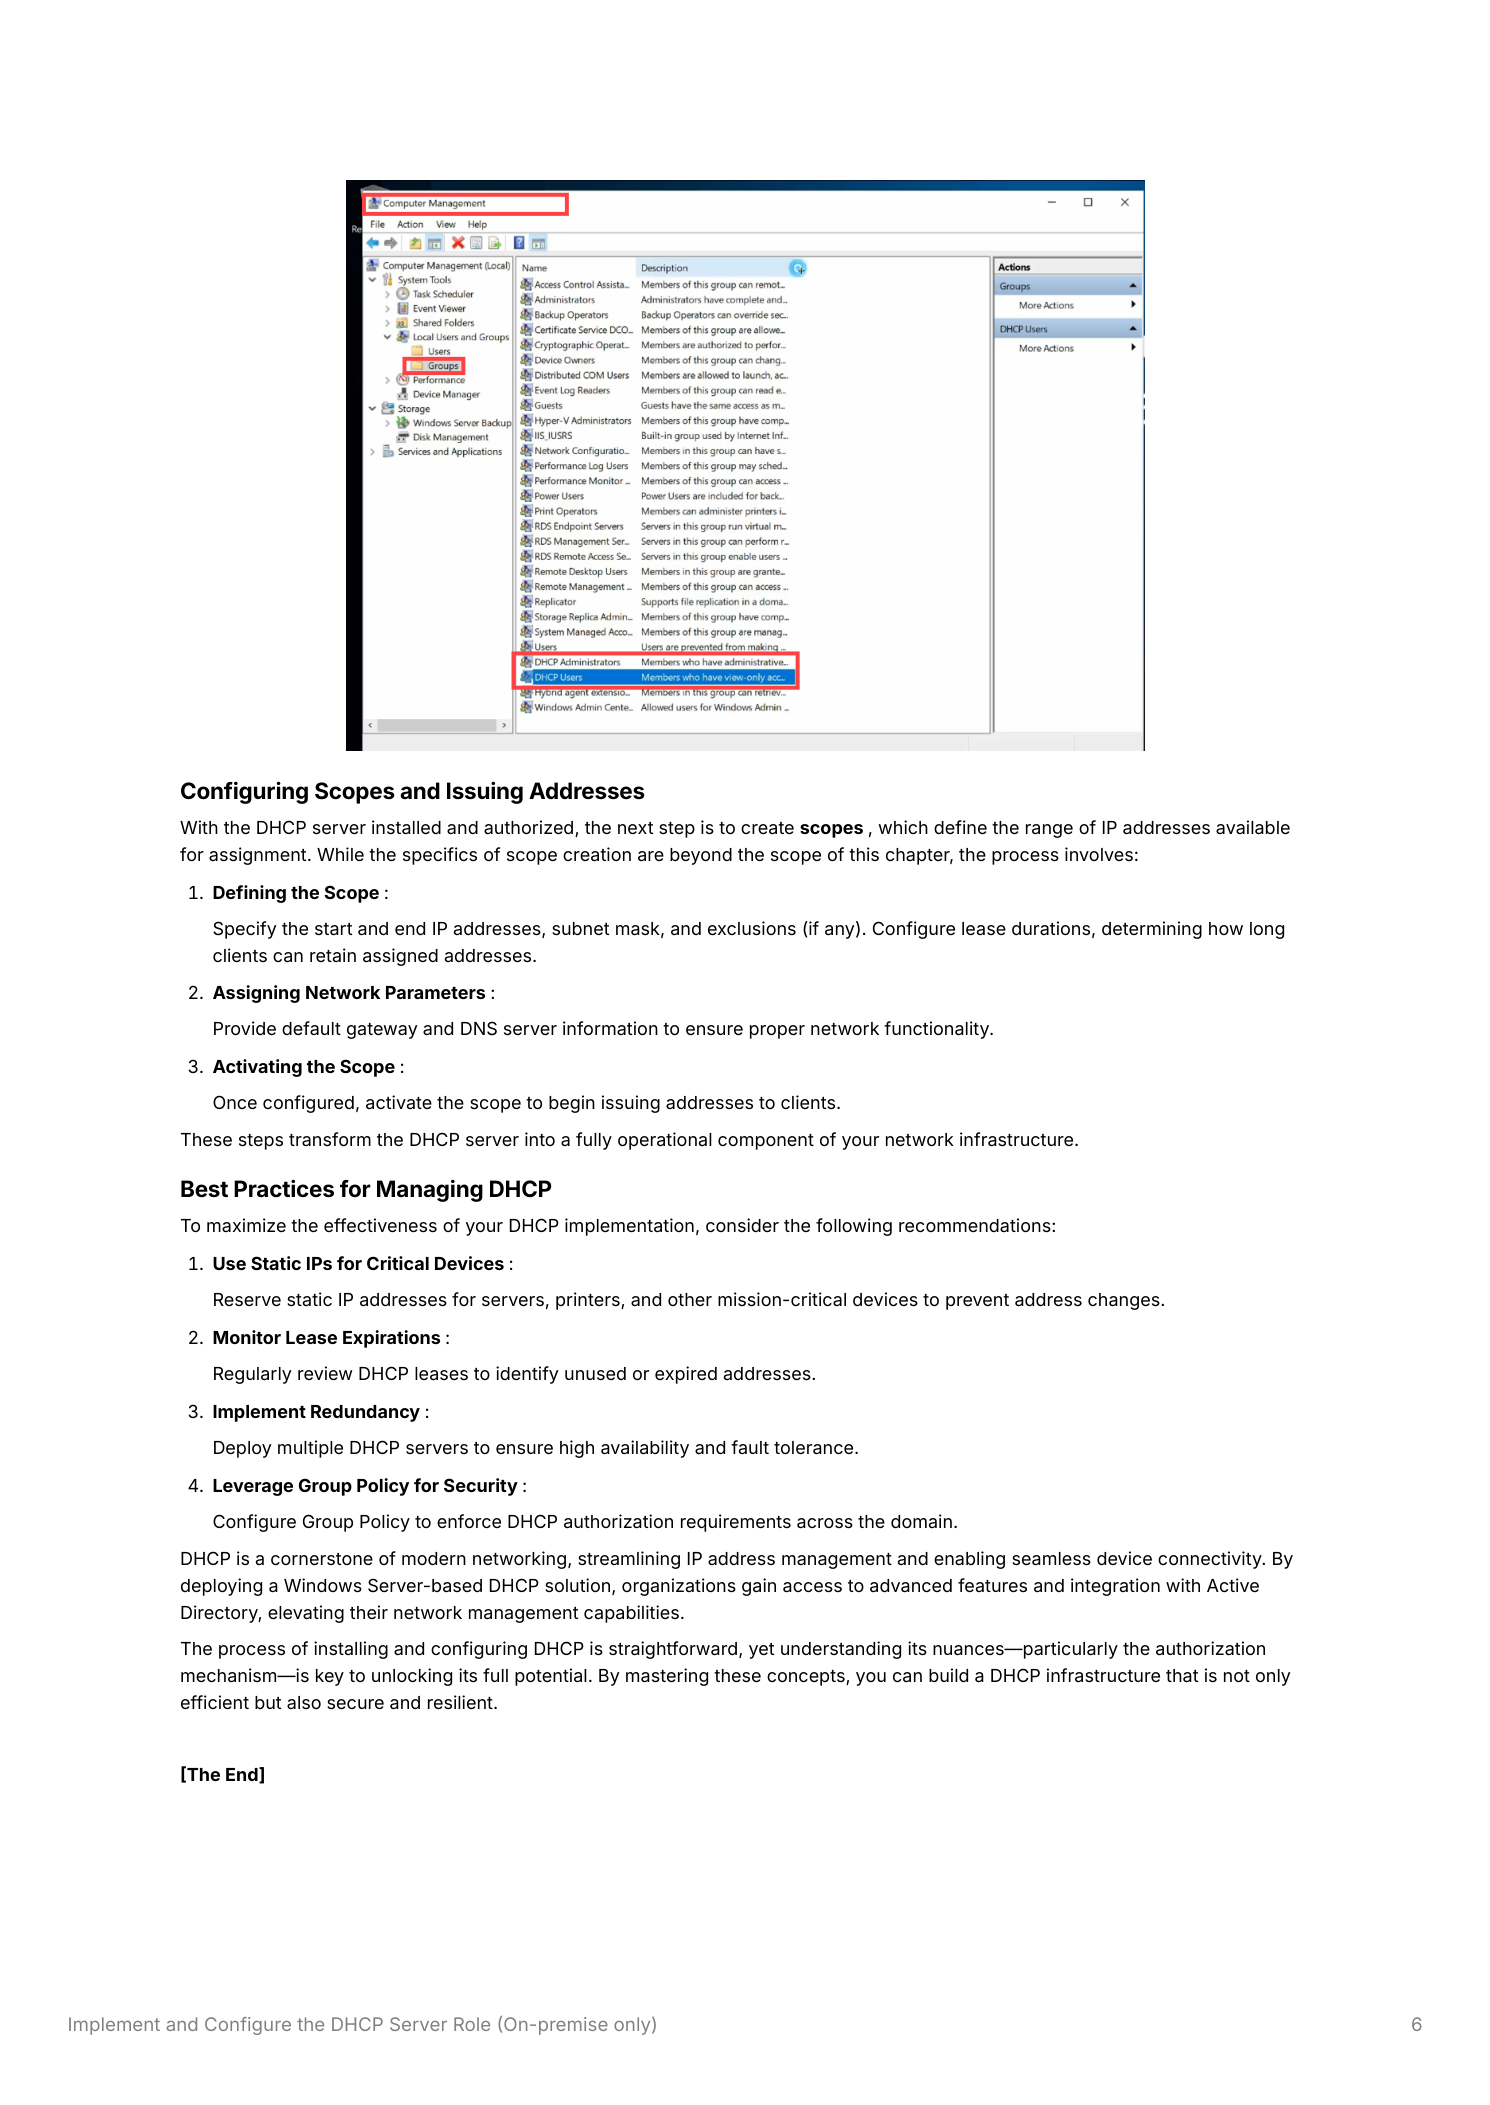
The DHCP Post-Installation Configuration Wizard does two things in one shot: creates the AD security groups for delegated DHCP management, and authorizes this DHCP server. Provide credentials with the right scope (Domain Admin in the root domain, Enterprise Admin in a child domain) and let it run. The wizard creates:
- DHCP Administrators — full management rights on this DHCP server
- DHCP Users — read-only access
Click Commit. The wizard completes; the server is now authorized.
Step 5 — Verify it took
Refresh the DHCP console. The IPv4 and IPv6 nodes should now show green upward arrows — the server is authorized and ready to issue leases. The Server Manager warning flag should clear. If the arrows are still red after a refresh, the wizard didn’t complete successfully — usually a credentials issue (wrong scope of admin rights for the domain hierarchy).
Step 6 — Create the first scope
Authorized but with no scopes, the server has nothing to hand out. A scope is the range of addresses the server is allowed to assign on a given subnet. In the DHCP console, right-click IPv4 > New Scope. The wizard walks you through:
- The address range — start and end IP, subnet mask, and any exclusions (sub-ranges within the scope reserved for static infrastructure)
- Lease duration — how long a client holds an address before needing to renew. Shorter (8 hours) for laptops/phones; longer (8 days) for servers and stable workstations
- Network parameters — the gateway and DNS server IPs that get handed to clients alongside the address
- Activate the scope — until activated, no leases are issued
For deeper coverage of scope configuration including exclusions, options, and superscopes, see creating and managing DHCP scopes.
Authorization scope follows the AD hierarchy
Who can authorize a DHCP server depends on which domain it belongs to:
- Root domain — Domain Admins can authorize. Forest-wide DHCP authorizations effectively flow from here.
- Child domains — Enterprise Admins are required. Child-domain Domain Admins cannot authorize their own DHCP servers without going up the chain.
This intentional limitation prevents local admins in child domains from rolling out unauthorized DHCP infrastructure that affects parent or sibling domains.
The two security groups in detail
The post-install wizard creates these locally on the DHCP server (under Local Users and Groups > Groups) for delegation:
- DHCP Administrators — full DHCP management rights: create/modify/delete scopes, configure options, view leases, change reservations. Add the IT staff who actually need to manage DHCP.
- DHCP Users — read-only. Add helpdesk staff and tier-1 troubleshooters who need to look up “which IP did this device get?” without rights to change anything.
Don’t add ordinary users to either group. Use these for delegation only.
Things that bite people in production
Reserve infrastructure addresses outside the scope
Servers, printers, network gear, and any other long-lived static device should sit on IPs outside any DHCP scope — or inside a scope with explicit exclusions for those addresses. Otherwise the static device’s IP can collide with a DHCP-issued lease, and conflict-resolution behavior is messy.
Monitor scope utilization before exhaustion
Scopes don’t announce themselves when they fill up — clients just start failing to obtain leases. Watch the per-scope utilization in the DHCP console (or via IPAM, which aggregates all scopes across all servers) and grow scopes before they hit 90%.
Always plan for failover
A single DHCP server is a single point of failure. New clients can’t boot, existing clients can’t renew, and the symptom looks like a network outage from the user’s perspective. Build redundancy upfront with DHCP failover — load-balance or hot-standby, both supported natively, no extra license required.
Authorize standalone DHCP servers separately
If you’re running DHCP outside an AD environment (lab, branch site without AD, isolated network), the authorization gate doesn’t apply — standalone DHCP servers issue leases without any AD check. See standalone DHCP server configuration for that path.
Where this fits
This is the foundation. Once the role is installed and authorized, see creating DHCP scopes, DHCP IP reservations, DHCP high availability, and the broader DNS, DHCP & Networking pathway. For larger environments where you’re managing dozens of scopes across multiple servers, IPAM aggregates everything into a single management console.