Installing the DHCP Server role and authorizing it in AD gets you a server that’s allowed to hand out leases — but it won’t hand out a single one until you give it a scope. The scope is the actual contract: this address range, this subnet mask, these network parameters (gateway, DNS), this lease duration. Every subnet that wants dynamic addressing needs its own scope; every scope needs to be activated before it does anything useful.
This walkthrough covers the full lifecycle — create with the New Scope Wizard, exclude addresses already in static use, set scope options, activate, then the operational stuff: viewing leases, modifying scope properties after creation, grouping multiple scopes under a superscope for multinet networks, and watching utilization so you don’t get caught at exhaustion.
What you need before starting
- A working DHCP Server — installed, AD-authorized, with green arrows in the console (covered in implementing the DHCP server role)
- The address plan for the subnet: range start/end, subnet mask, gateway IP, DNS server IPs, any static-IP devices that need to be excluded
- An idea of lease duration that fits the client mix on this subnet (wired servers vs. wireless laptops are very different)
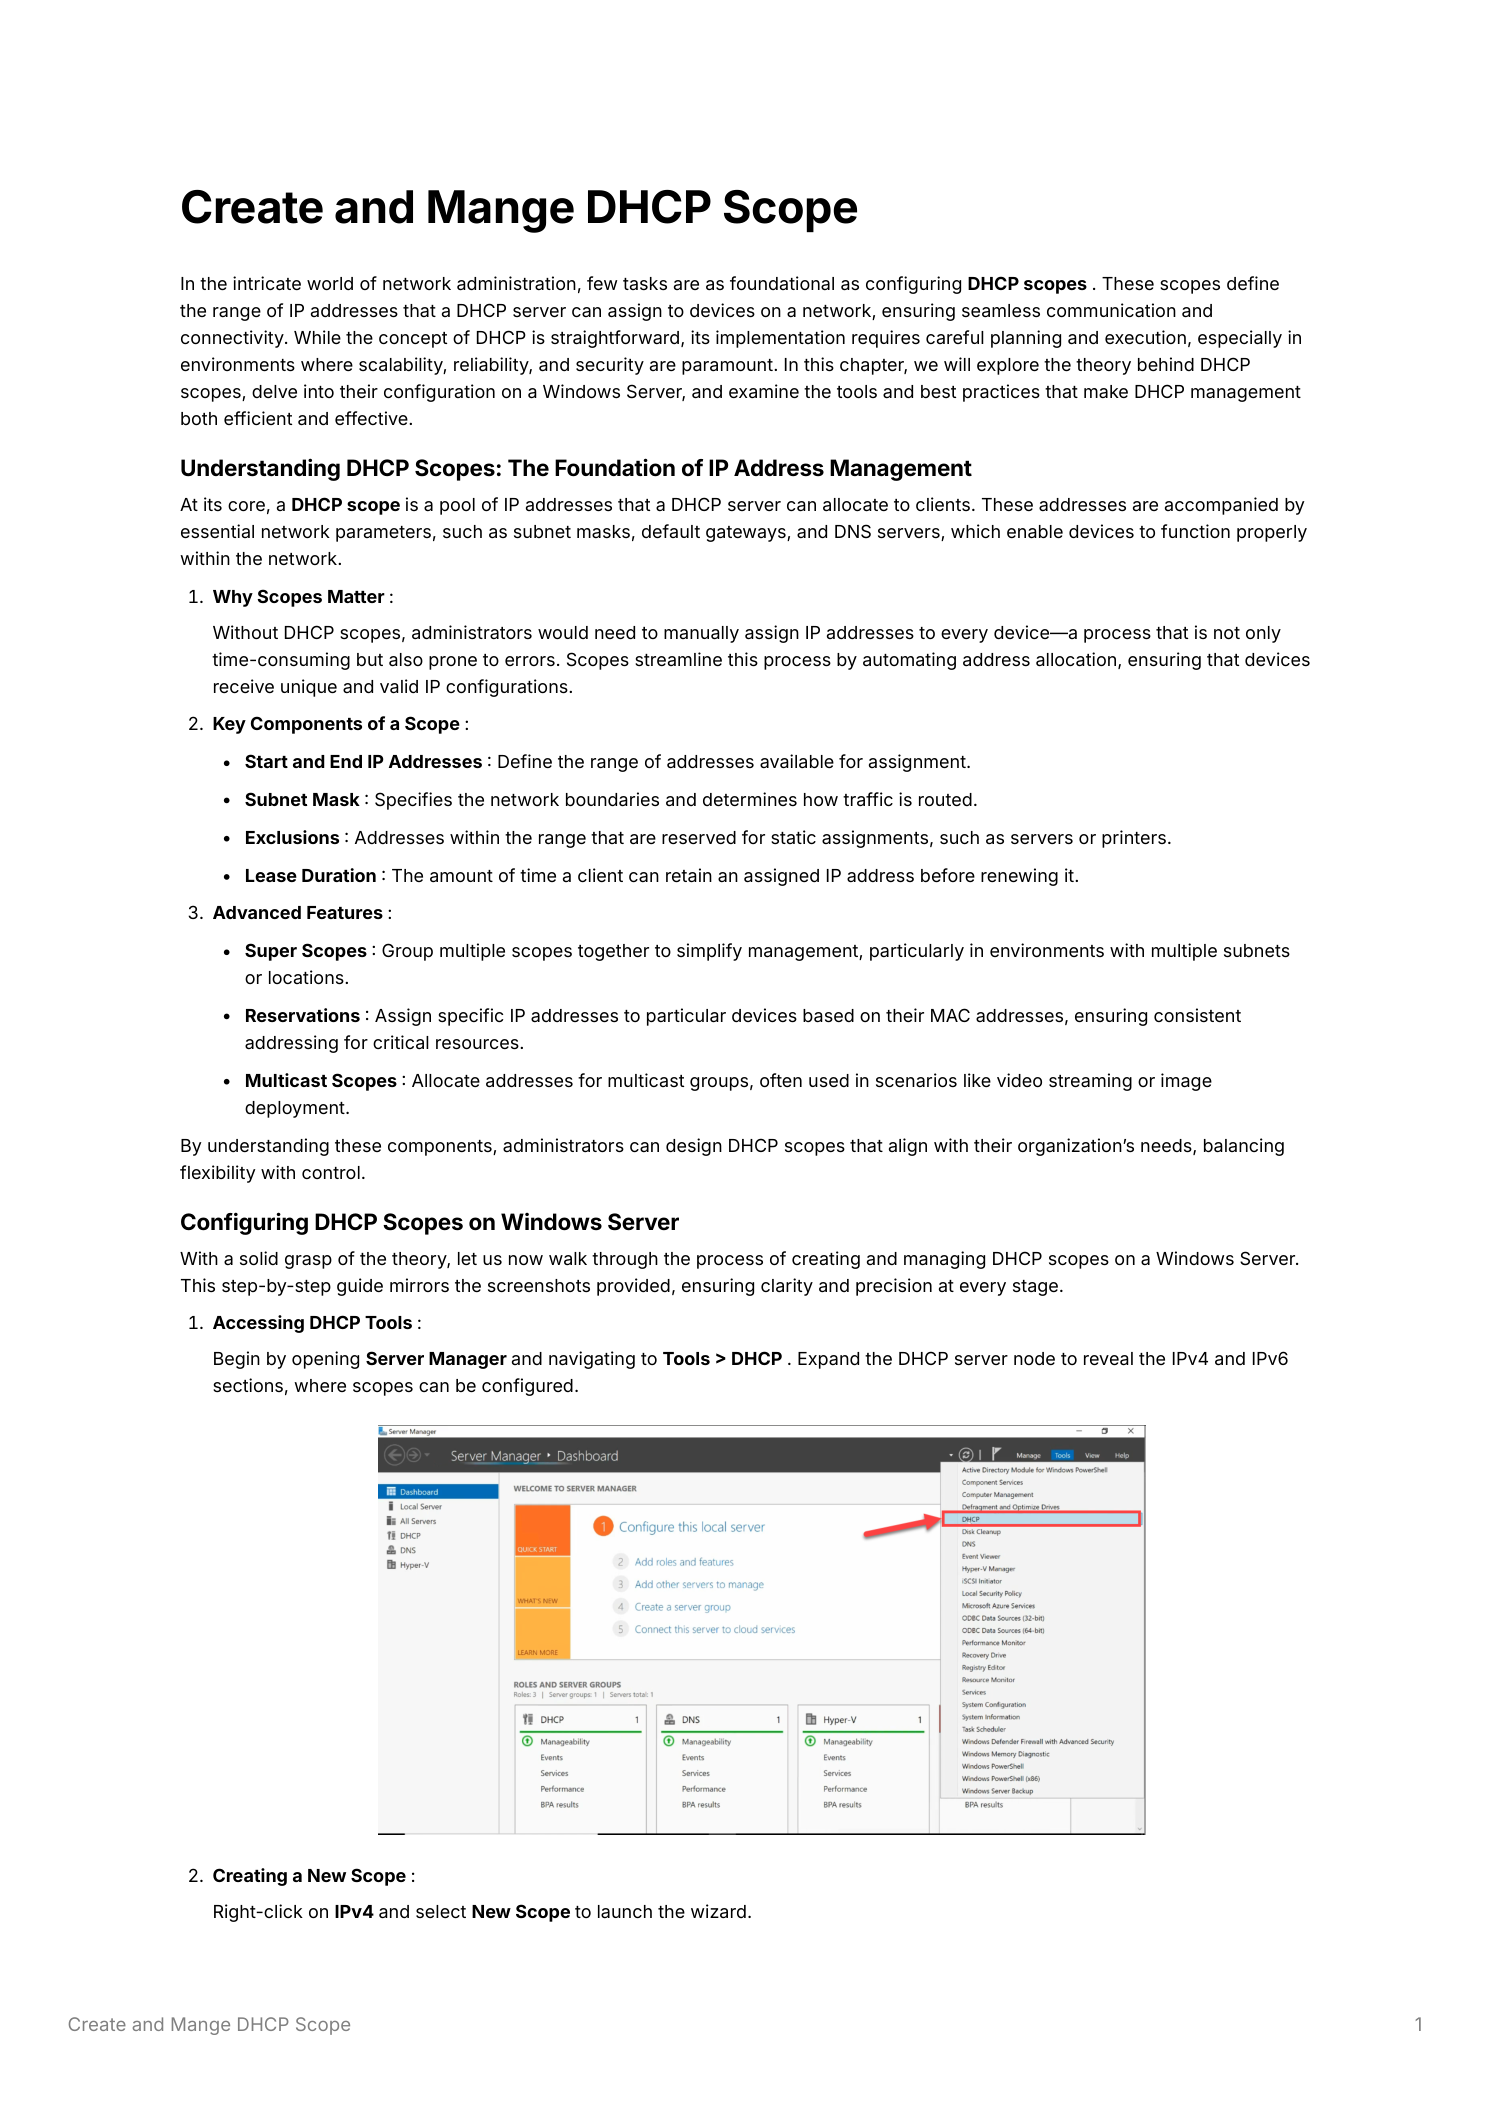
Step 1 — Launch the New Scope Wizard
Open the DHCP console (Server Manager > Tools > DHCP), expand the server node, right-click IPv4, pick New Scope. The wizard opens at the Scope Name page. Use a Name that identifies the subnet at a glance — in environments with multiple scopes you’ll thank yourself later. “LAN Scope 192.168.1.x” is more useful than “Scope 1.” The Description field is optional but useful for documenting what subnet/site/purpose the scope serves.
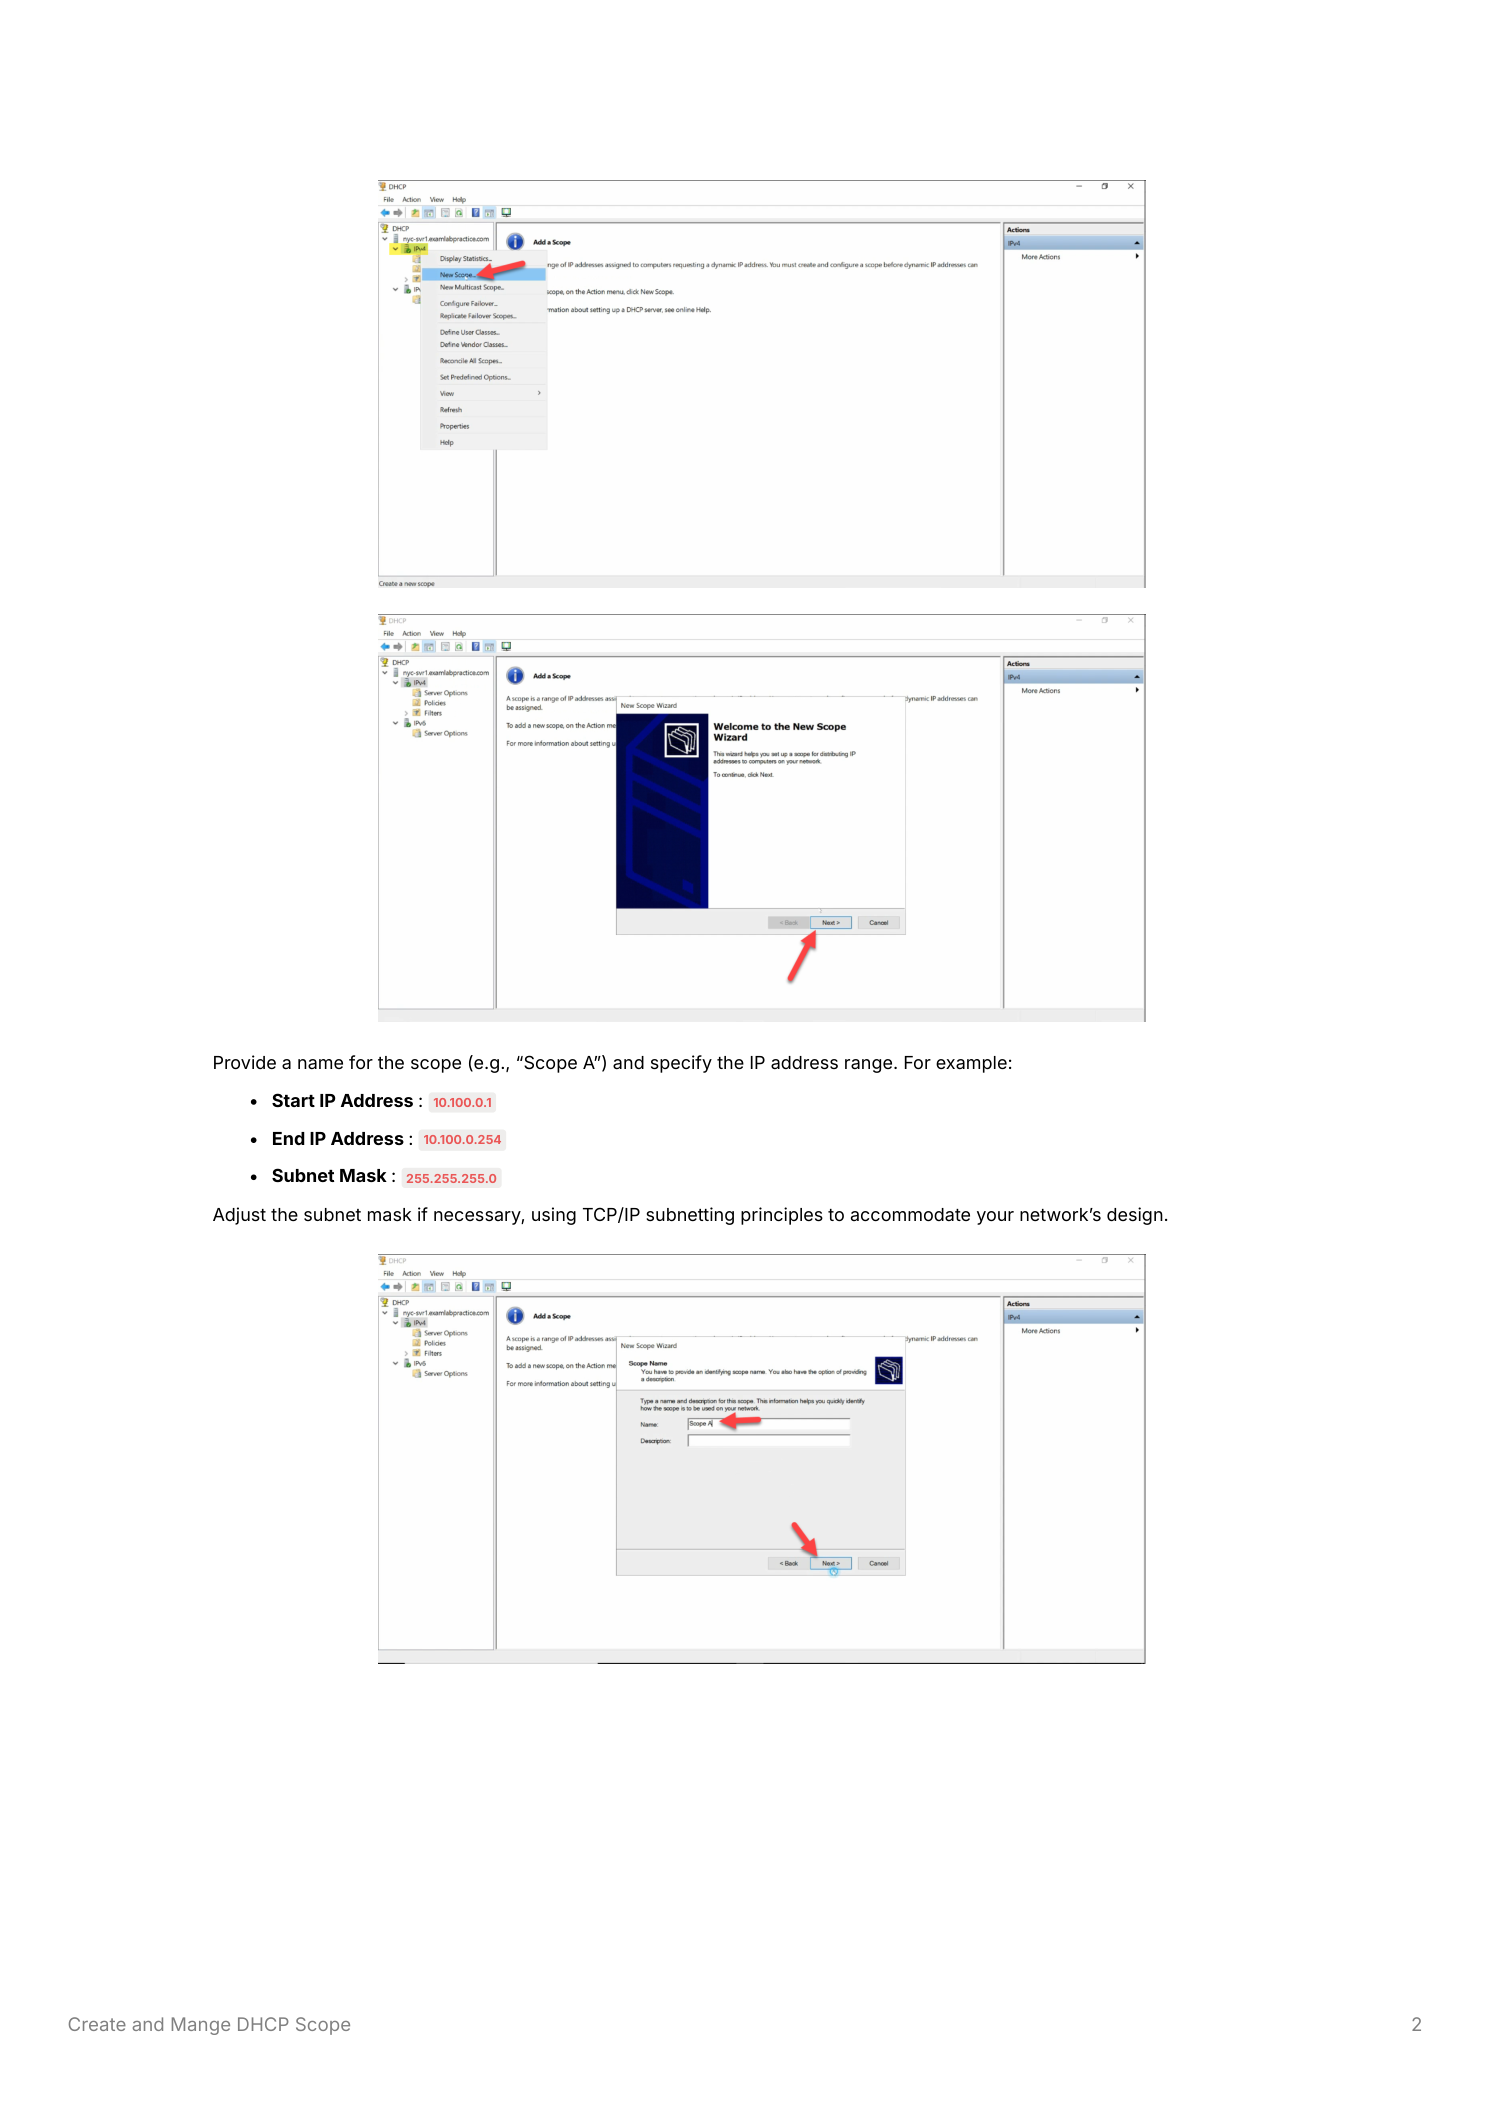
Step 2 — Define the address range
Enter the Start IP Address and End IP Address that the server will draw from. The subnet mask defaults based on the IP class but you can override it — explicitly set 255.255.255.0 (or whatever applies) so there’s no ambiguity. A range like 192.168.1.100–192.168.1.200 with /24 mask gives you 101 usable addresses.
Don’t make the range cover the whole subnet. Leave room outside the pool for static-IP devices — servers, printers, network gear, anything that doesn’t play DHCP. The convention many environments follow is “low addresses for infrastructure, high addresses for DHCP” (e.g. .1–.50 static, .100–.200 DHCP, gap in the middle for future static).
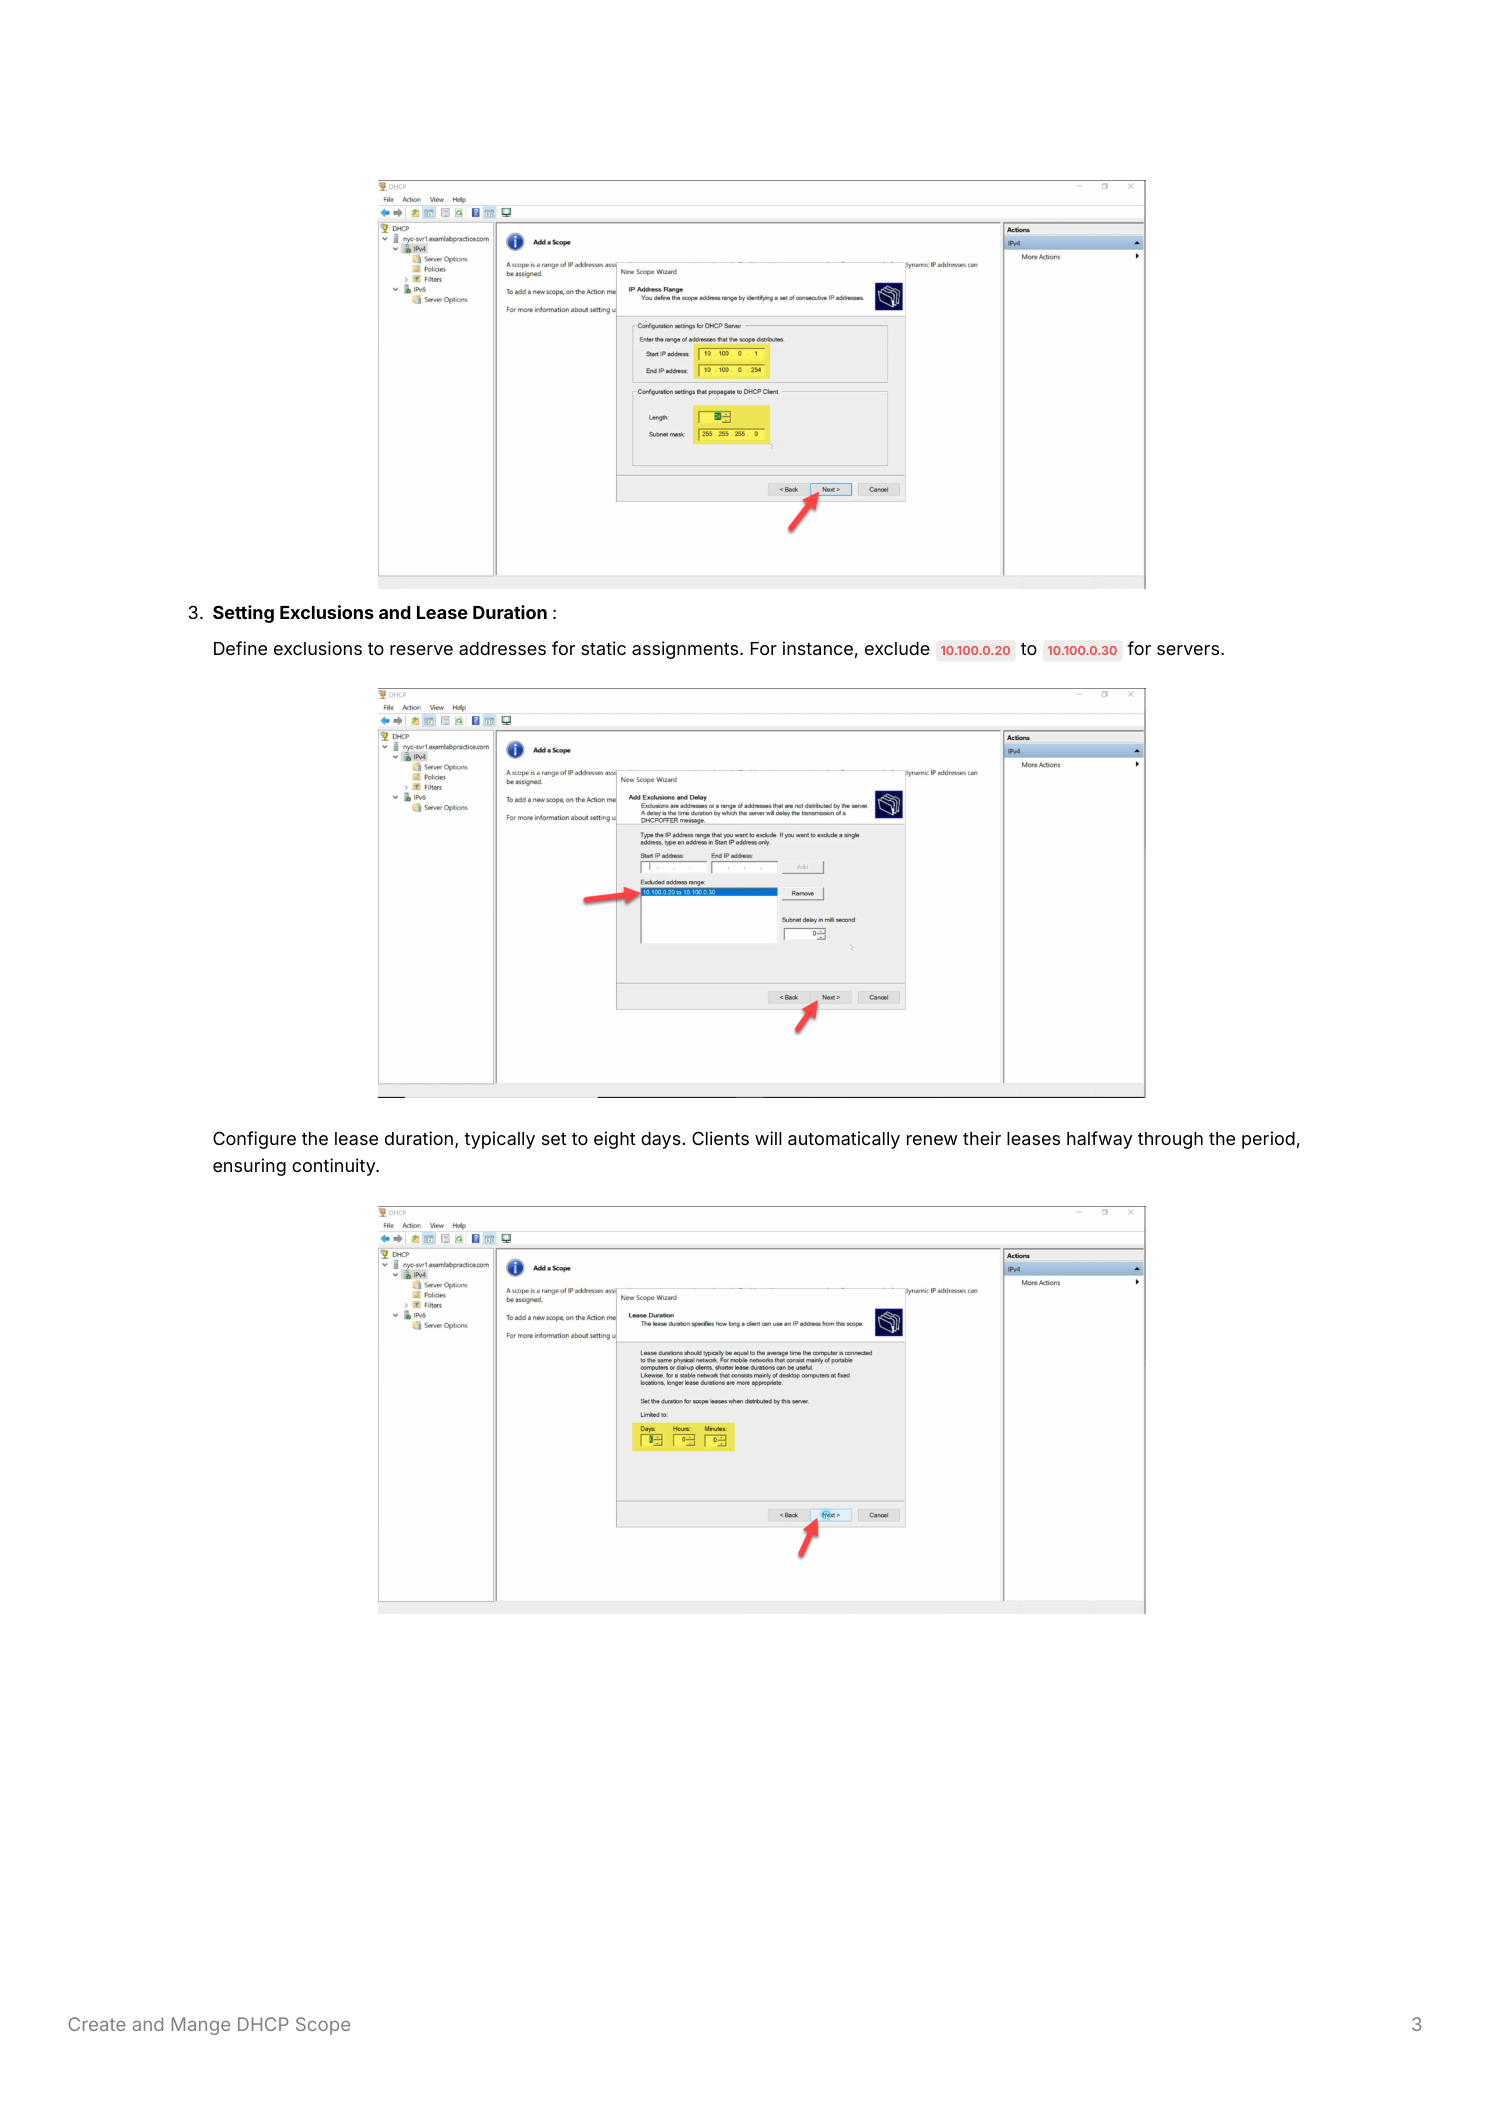
Step 3 — Exclusions and lease duration
Even within the scope range, some addresses are already spoken for — static devices that happen to live in the middle of your DHCP range. Add them as exclusions: 192.168.1.100–192.168.1.110 reserved for printers and switches, for instance. The DHCP server will skip those addresses entirely when handing out leases.
Below exclusions, set Lease Duration. Defaults to 8 days, which is right for stable wired clients. For wireless networks with high client turnover (guest WiFi, mobile devices, BYOD), drop it to 8 hours so addresses recycle quickly and the scope doesn’t fill with stale leases from devices that left an hour ago. For DMZ or guest networks where you specifically want to limit how long an address persists, even shorter (1–2 hours) is reasonable.
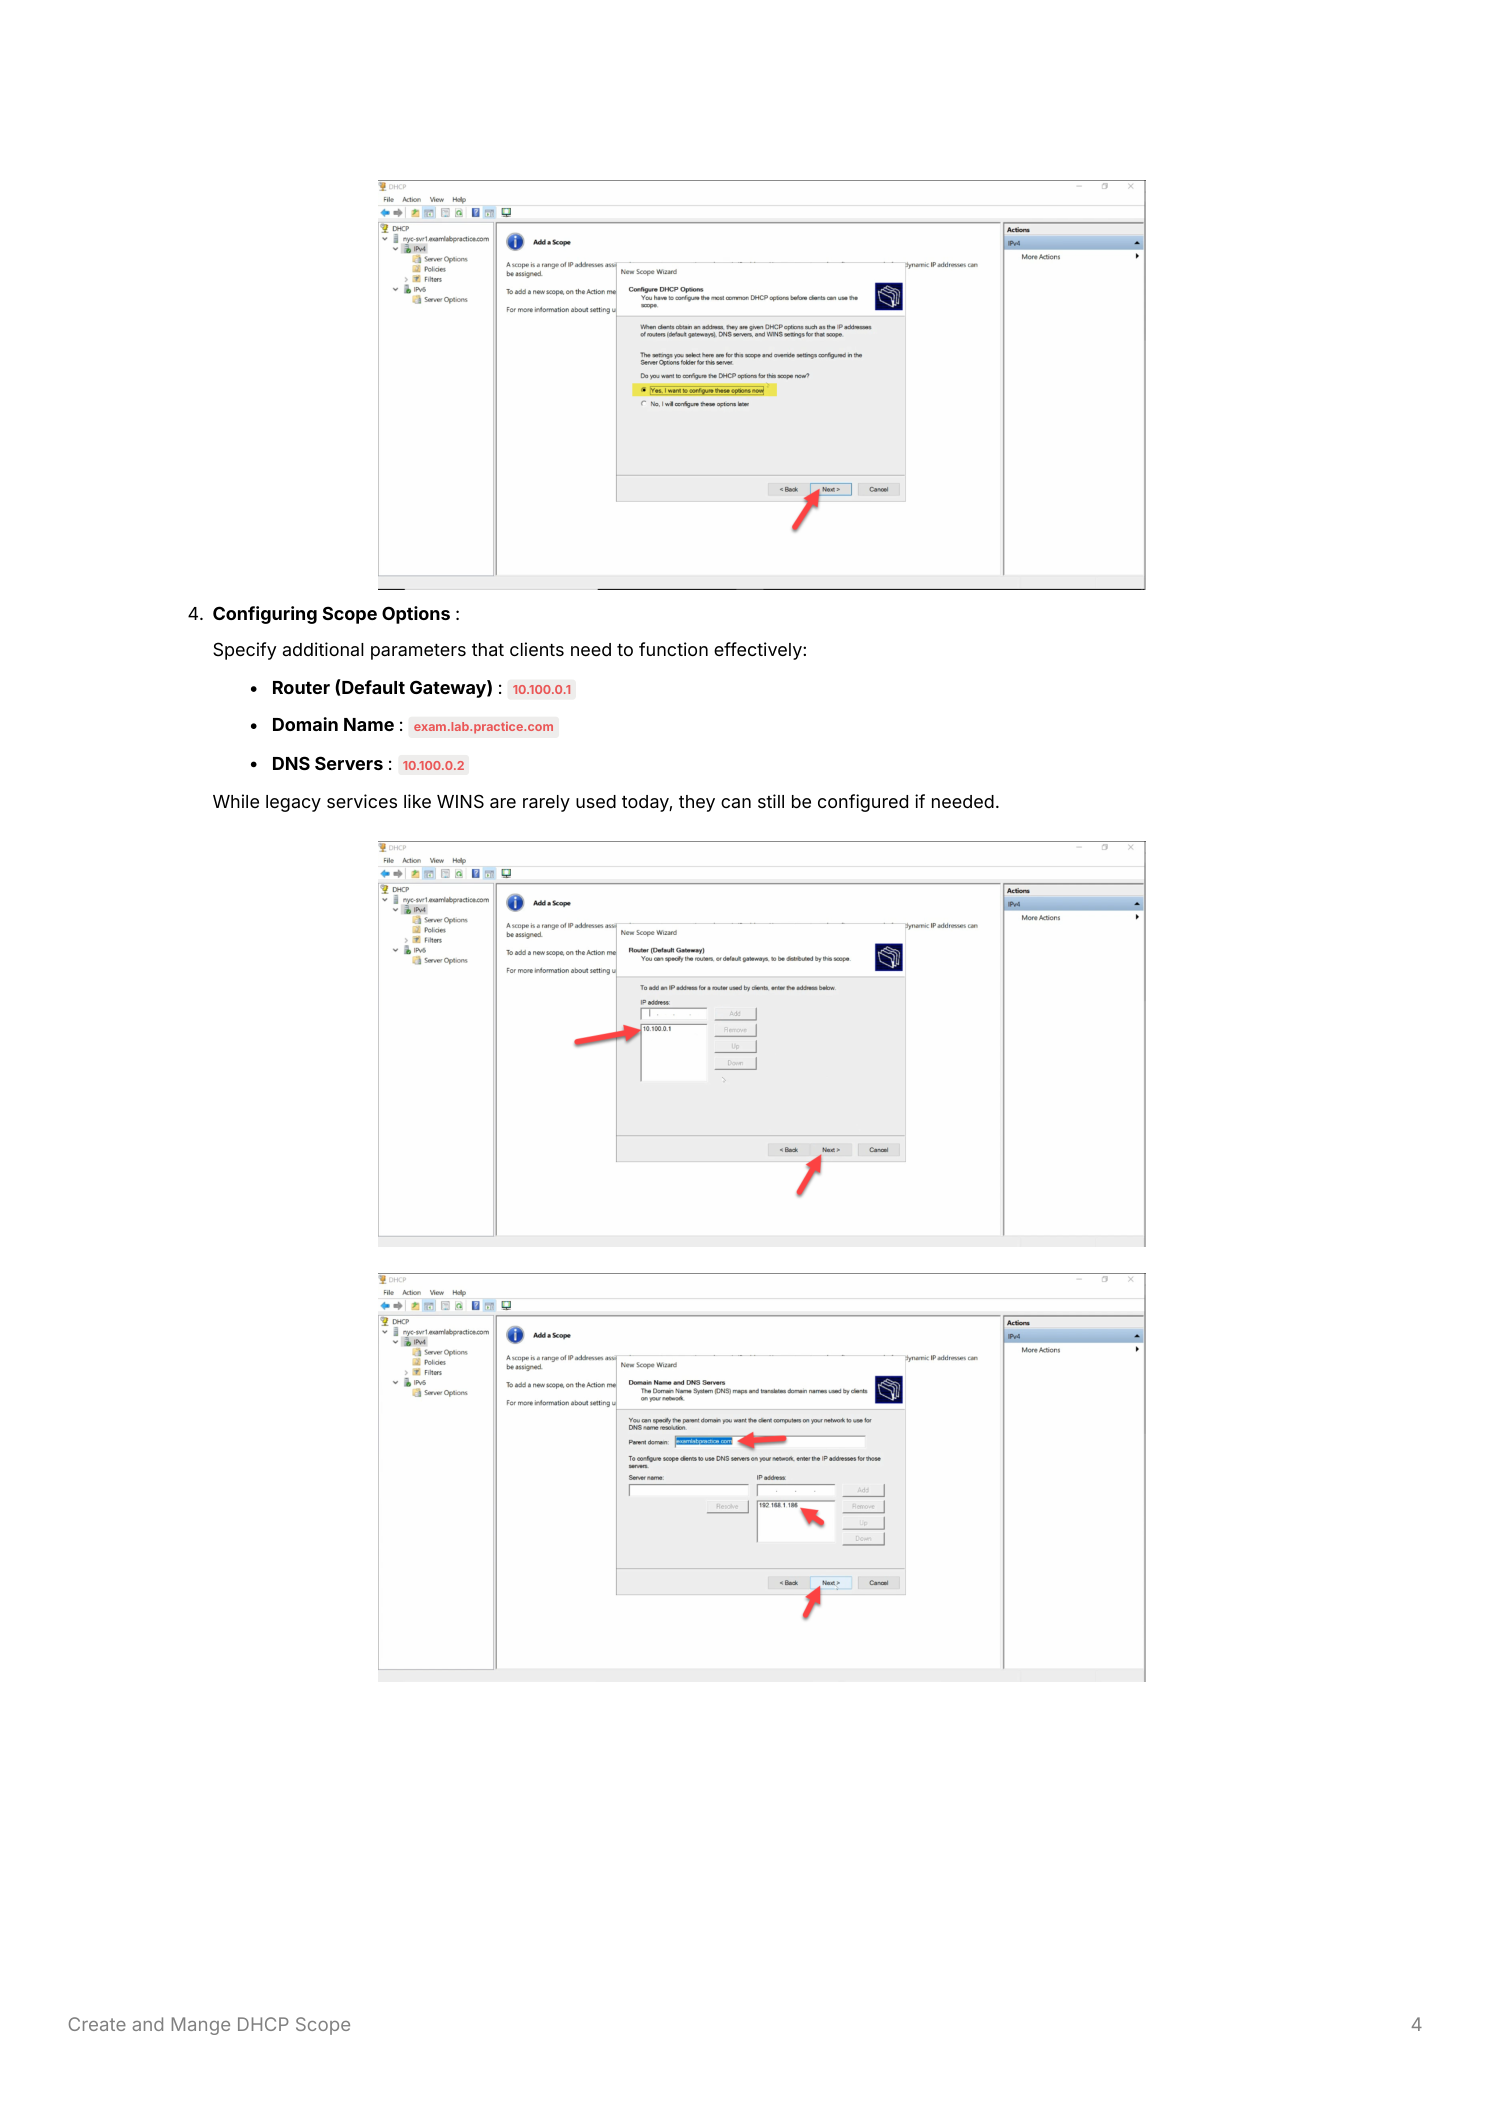
Step 4 — Scope options (gateway and DNS)
Scope options are the additional network parameters the server hands out alongside the IP address itself. The two essential options the wizard prompts for:
- Default Gateway (Router) — the router IP for traffic leaving this subnet (e.g.
192.168.1.1). Click Add after typing. - DNS Servers — parent domain plus DNS server IPs. List your AD DCs that run DNS, in order of preference.
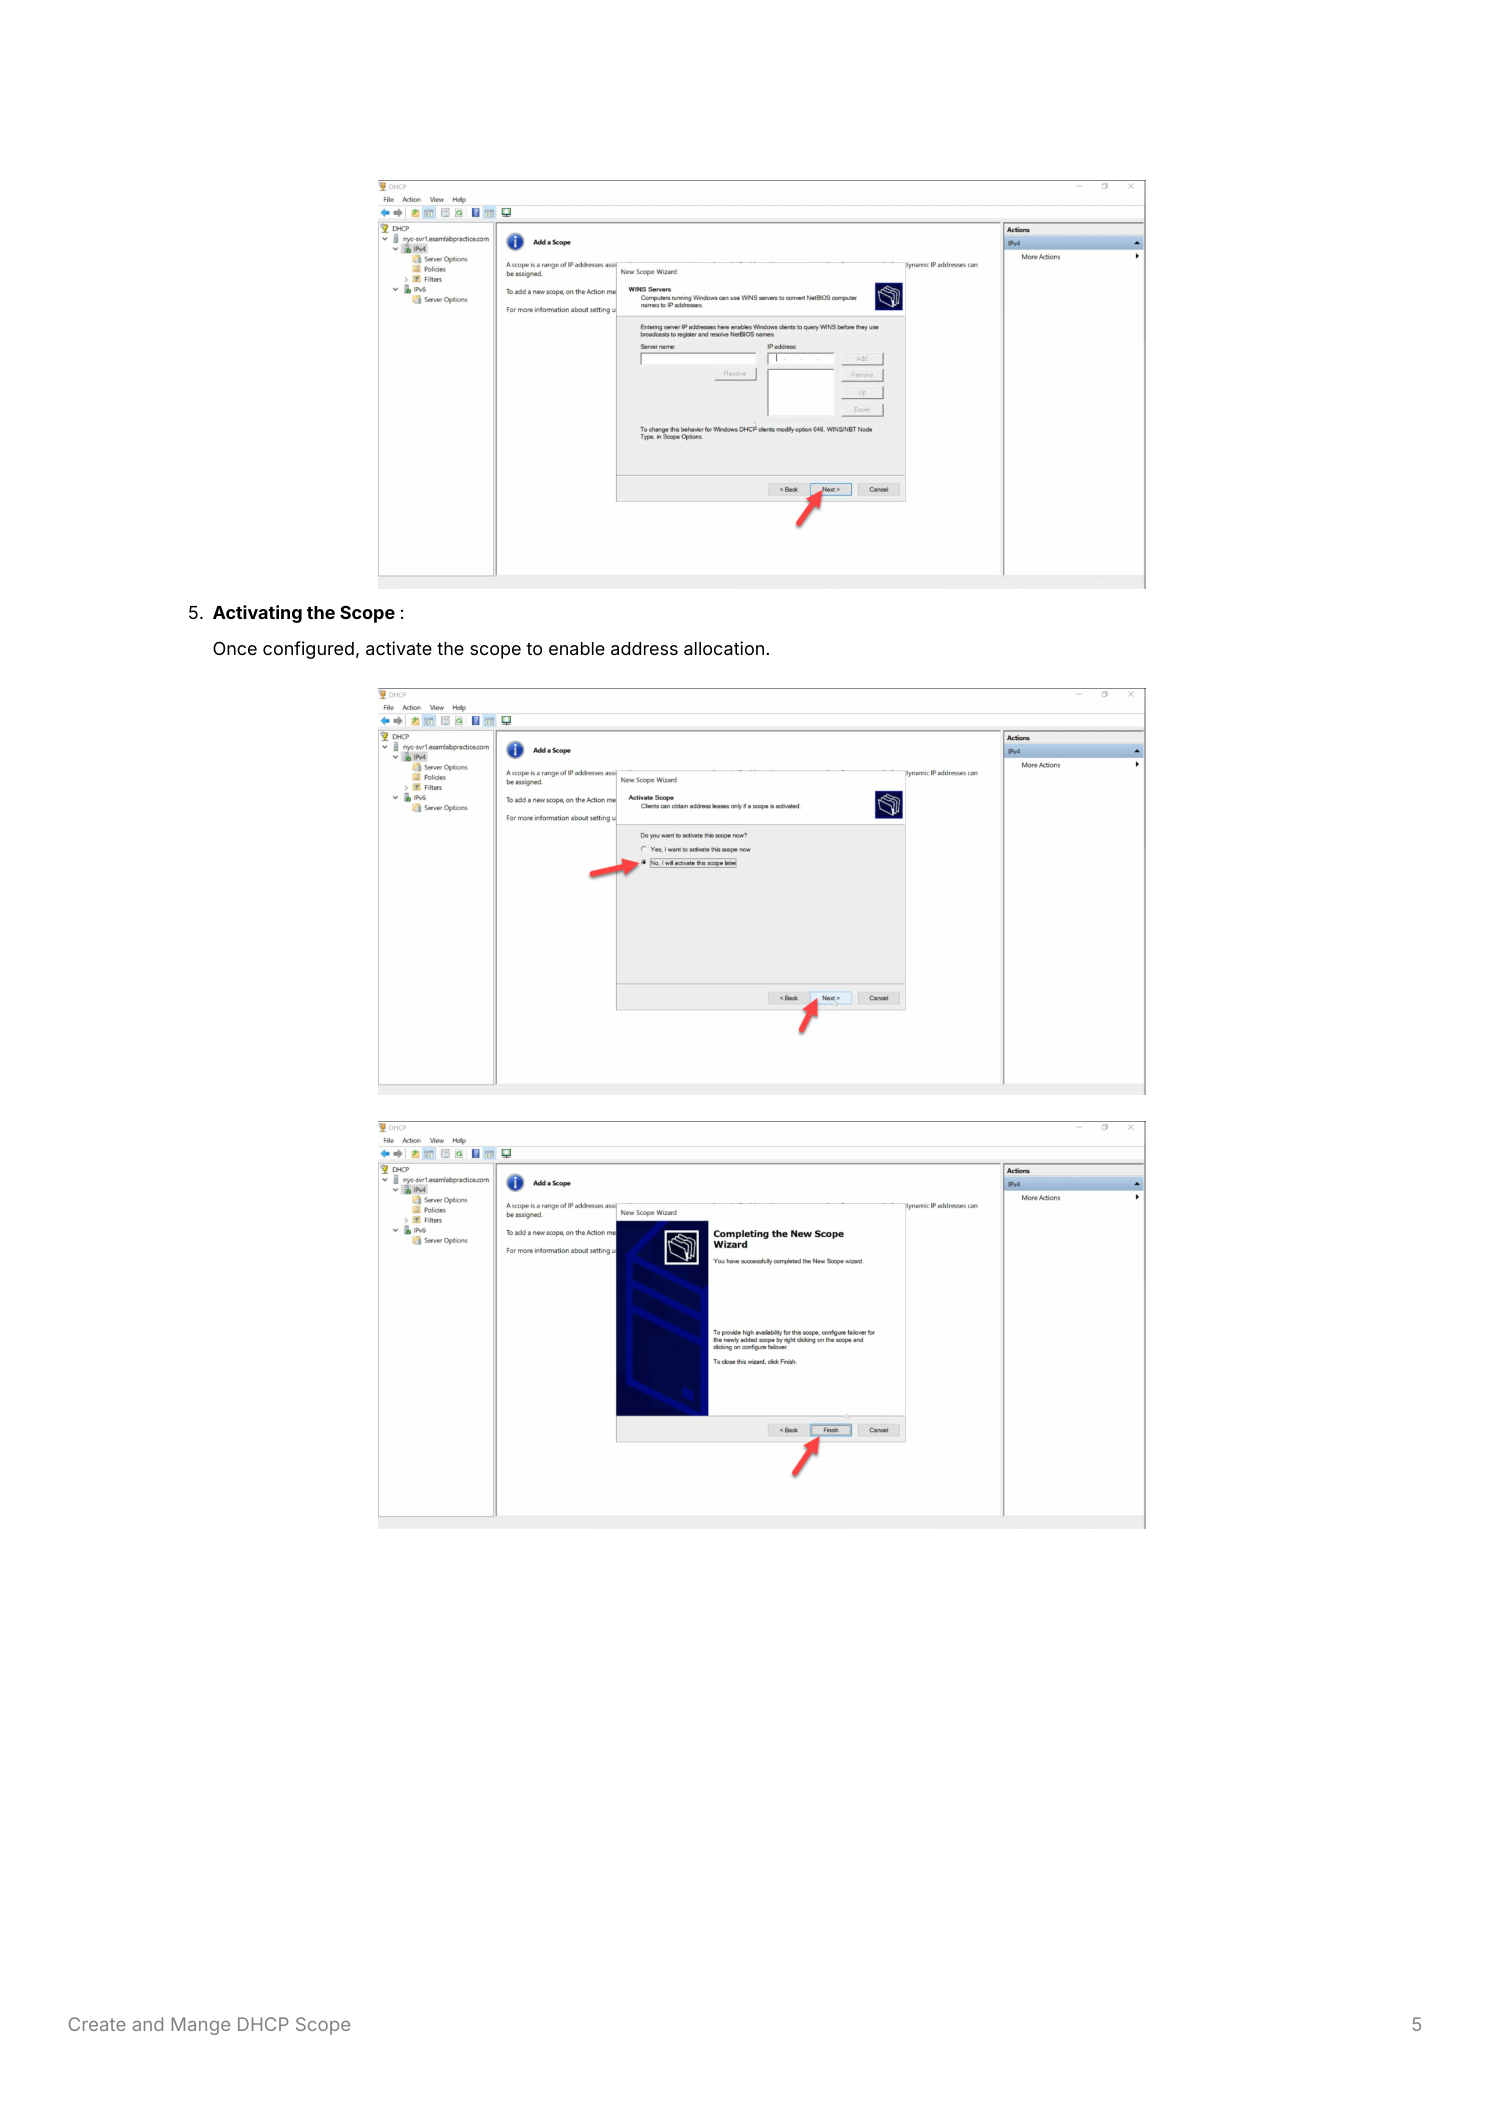
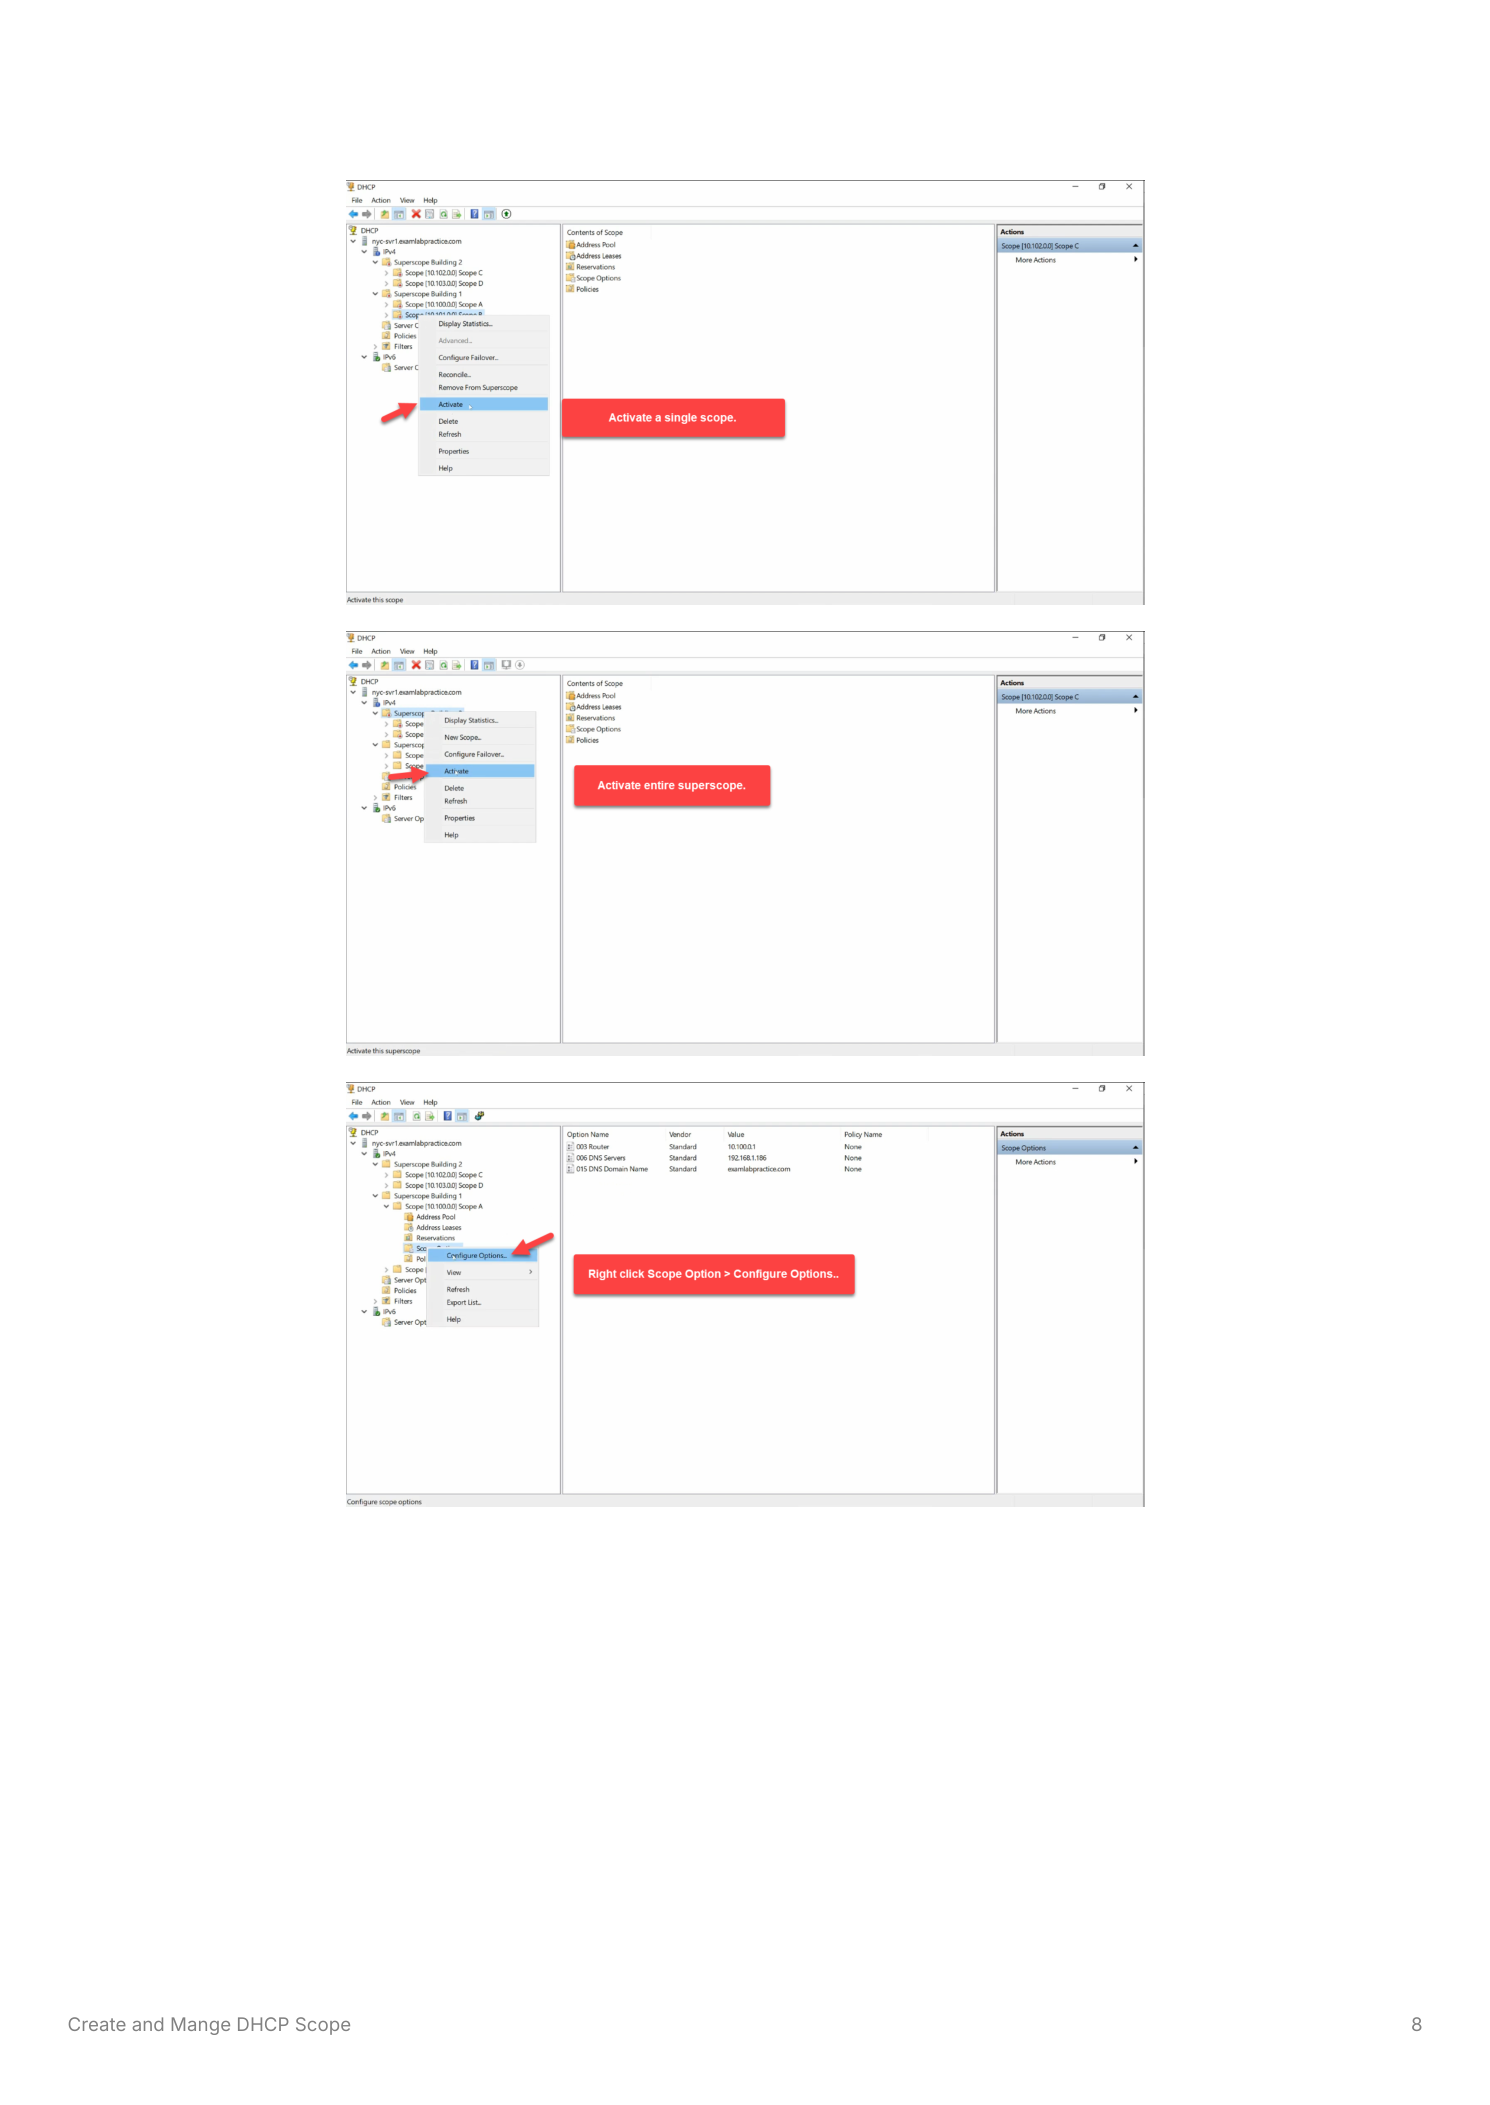
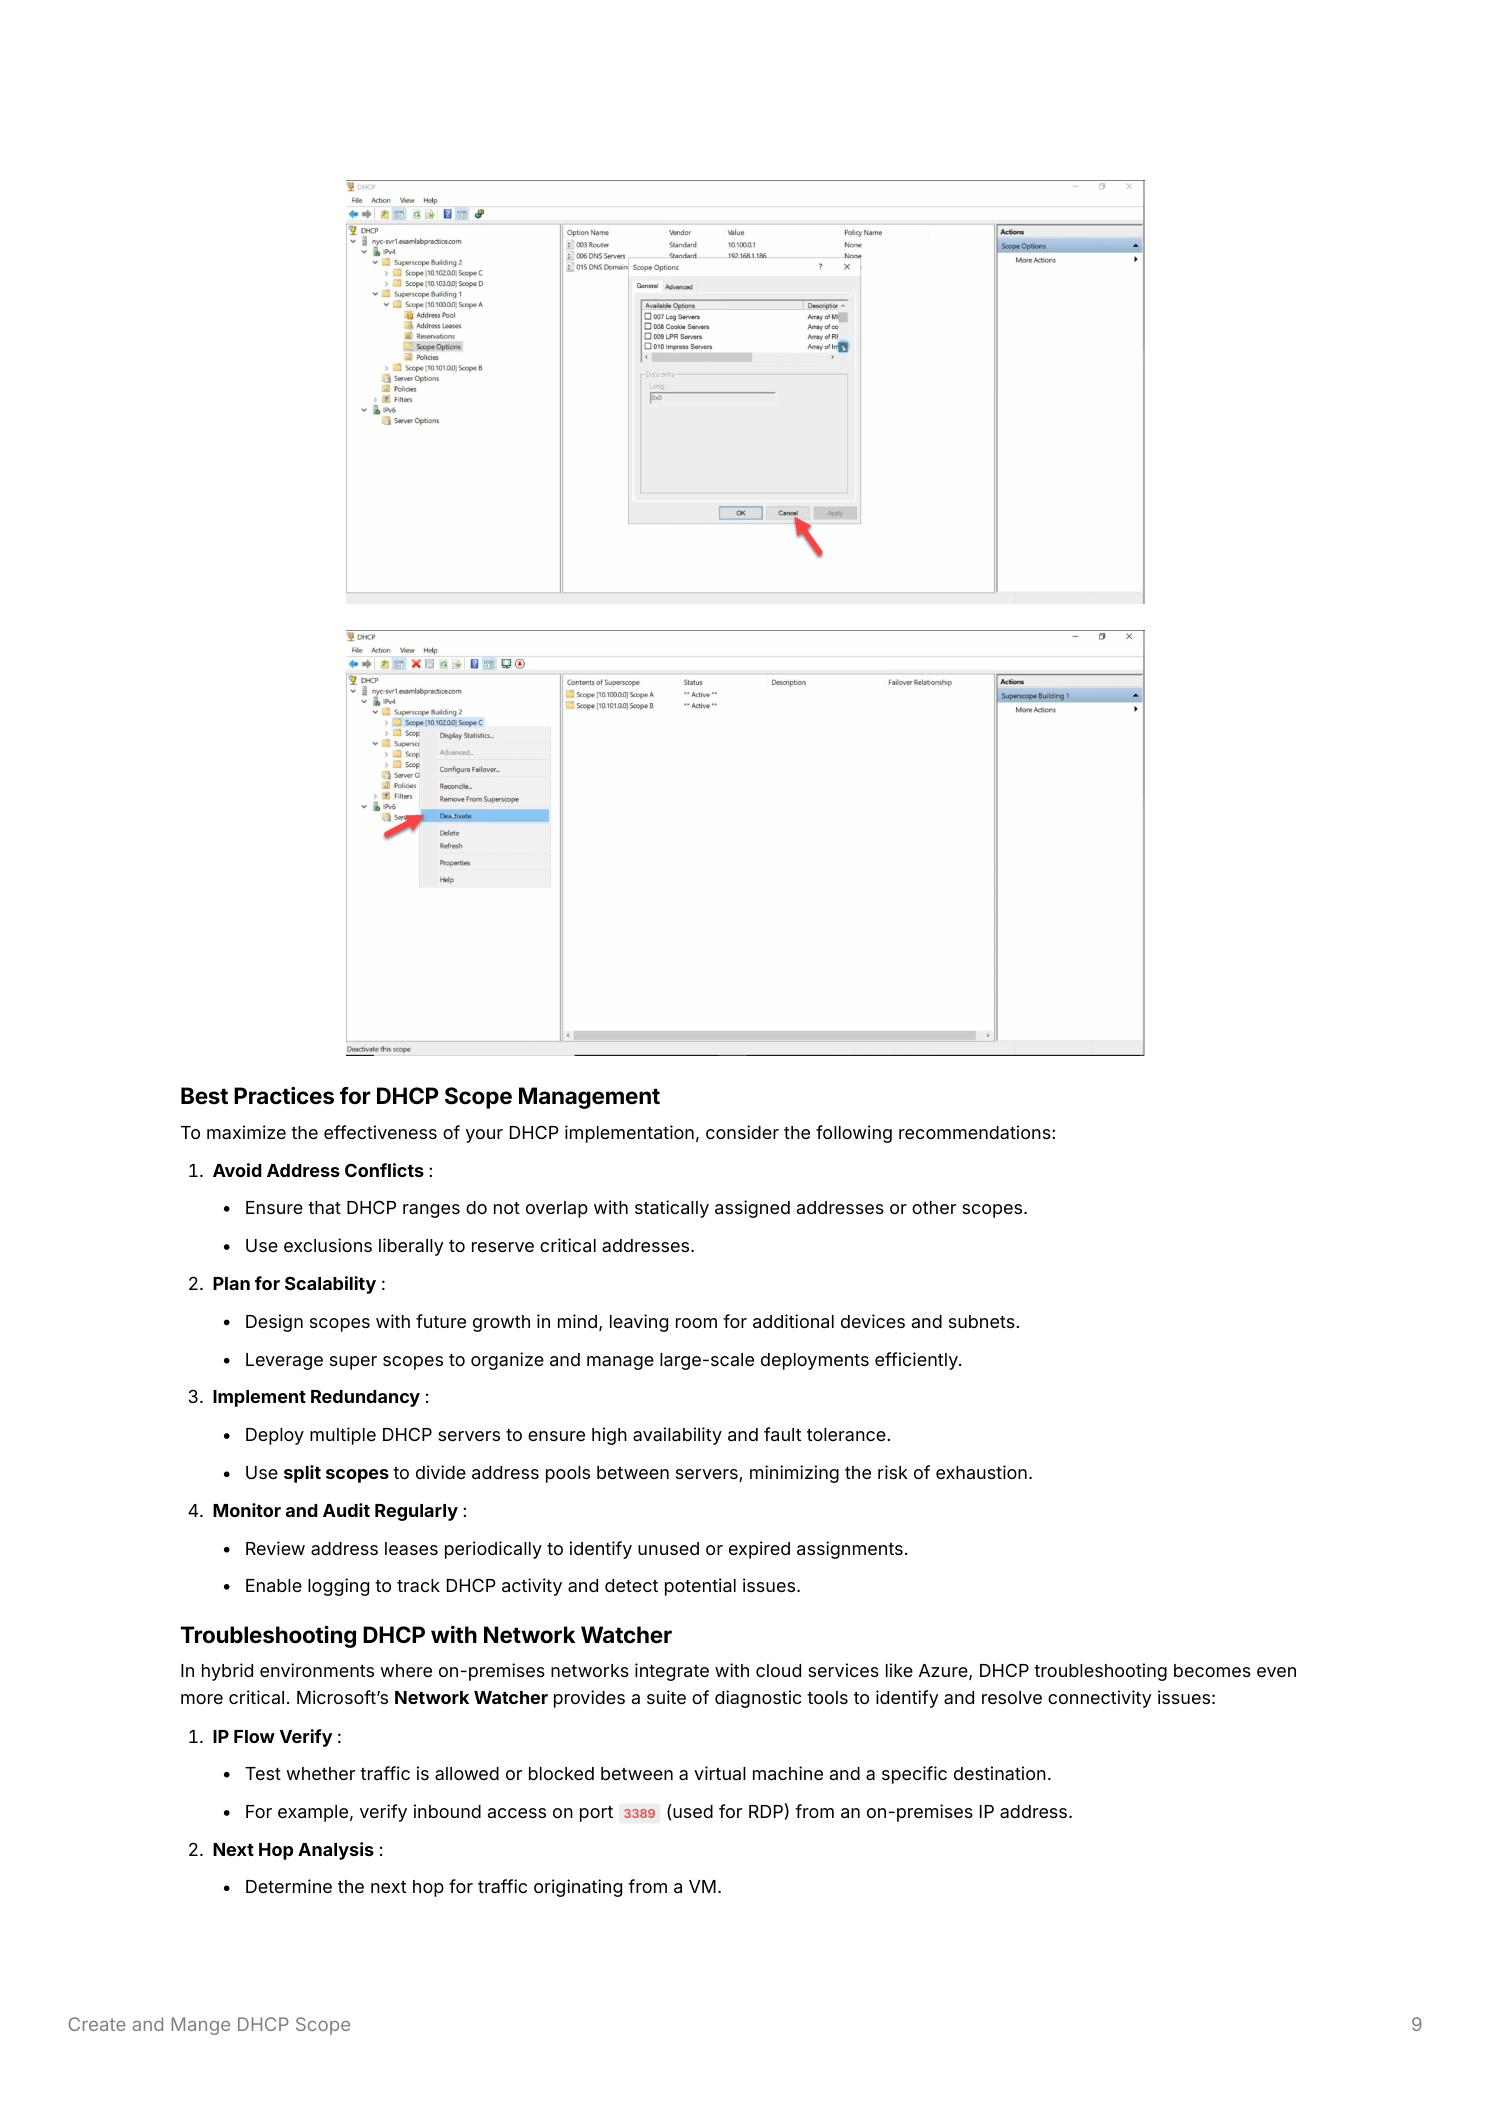
You can also configure other options after scope creation by right-clicking Scope Options > Configure Options. Common additions: WINS servers (rare in modern environments), NTP server (option 042), and TFTP server (option 066) for PXE boot.
Step 5 — Activate the scope
The wizard’s last page asks whether to activate now or later. Pick Yes if you’re ready to start handing out leases; pick No if you want to review the scope first or you’re staging changes for a maintenance window. Inactive scopes are visible in the console but won’t respond to client requests until activated — right-click the scope > Activate when ready.
Once active, the scope appears under IPv4 with its full configuration: address pool, exclusions, scope options, and (as clients connect) the lease list.
Step 6 — Watch leases as clients connect
Active scopes accumulate leases — one per client that obtained an address. Expand the scope > Address Leases. Each row shows:
- Client IP Address — the assigned address
- Name — the client’s hostname
- Lease Expiration — when the lease expires (clients renew at half the lease duration; if renewal fails, the client keeps trying until expiration)
- Type — dynamic lease or reservation (see DHCP IP reservations for the latter)
- Unique ID — the client’s MAC address; the actual identity DHCP uses to track leases

Step 7 — Modify scope properties after the fact
Scope settings aren’t locked at creation. Right-click the scope > Properties to adjust the IP range, lease duration, or description — the same fields the wizard configured. Scope options (gateway, DNS, etc.) live separately under Scope Options > Configure Options. Changes take effect for new leases immediately; existing leases pick up the new options at their next renewal cycle.
Important caveat: modifying the IP range to shrink the pool can put existing leases outside the new range. They’ll keep working until they expire, then fail to renew. Plan range shrinks for off-hours and force release before changing the range to avoid client confusion.
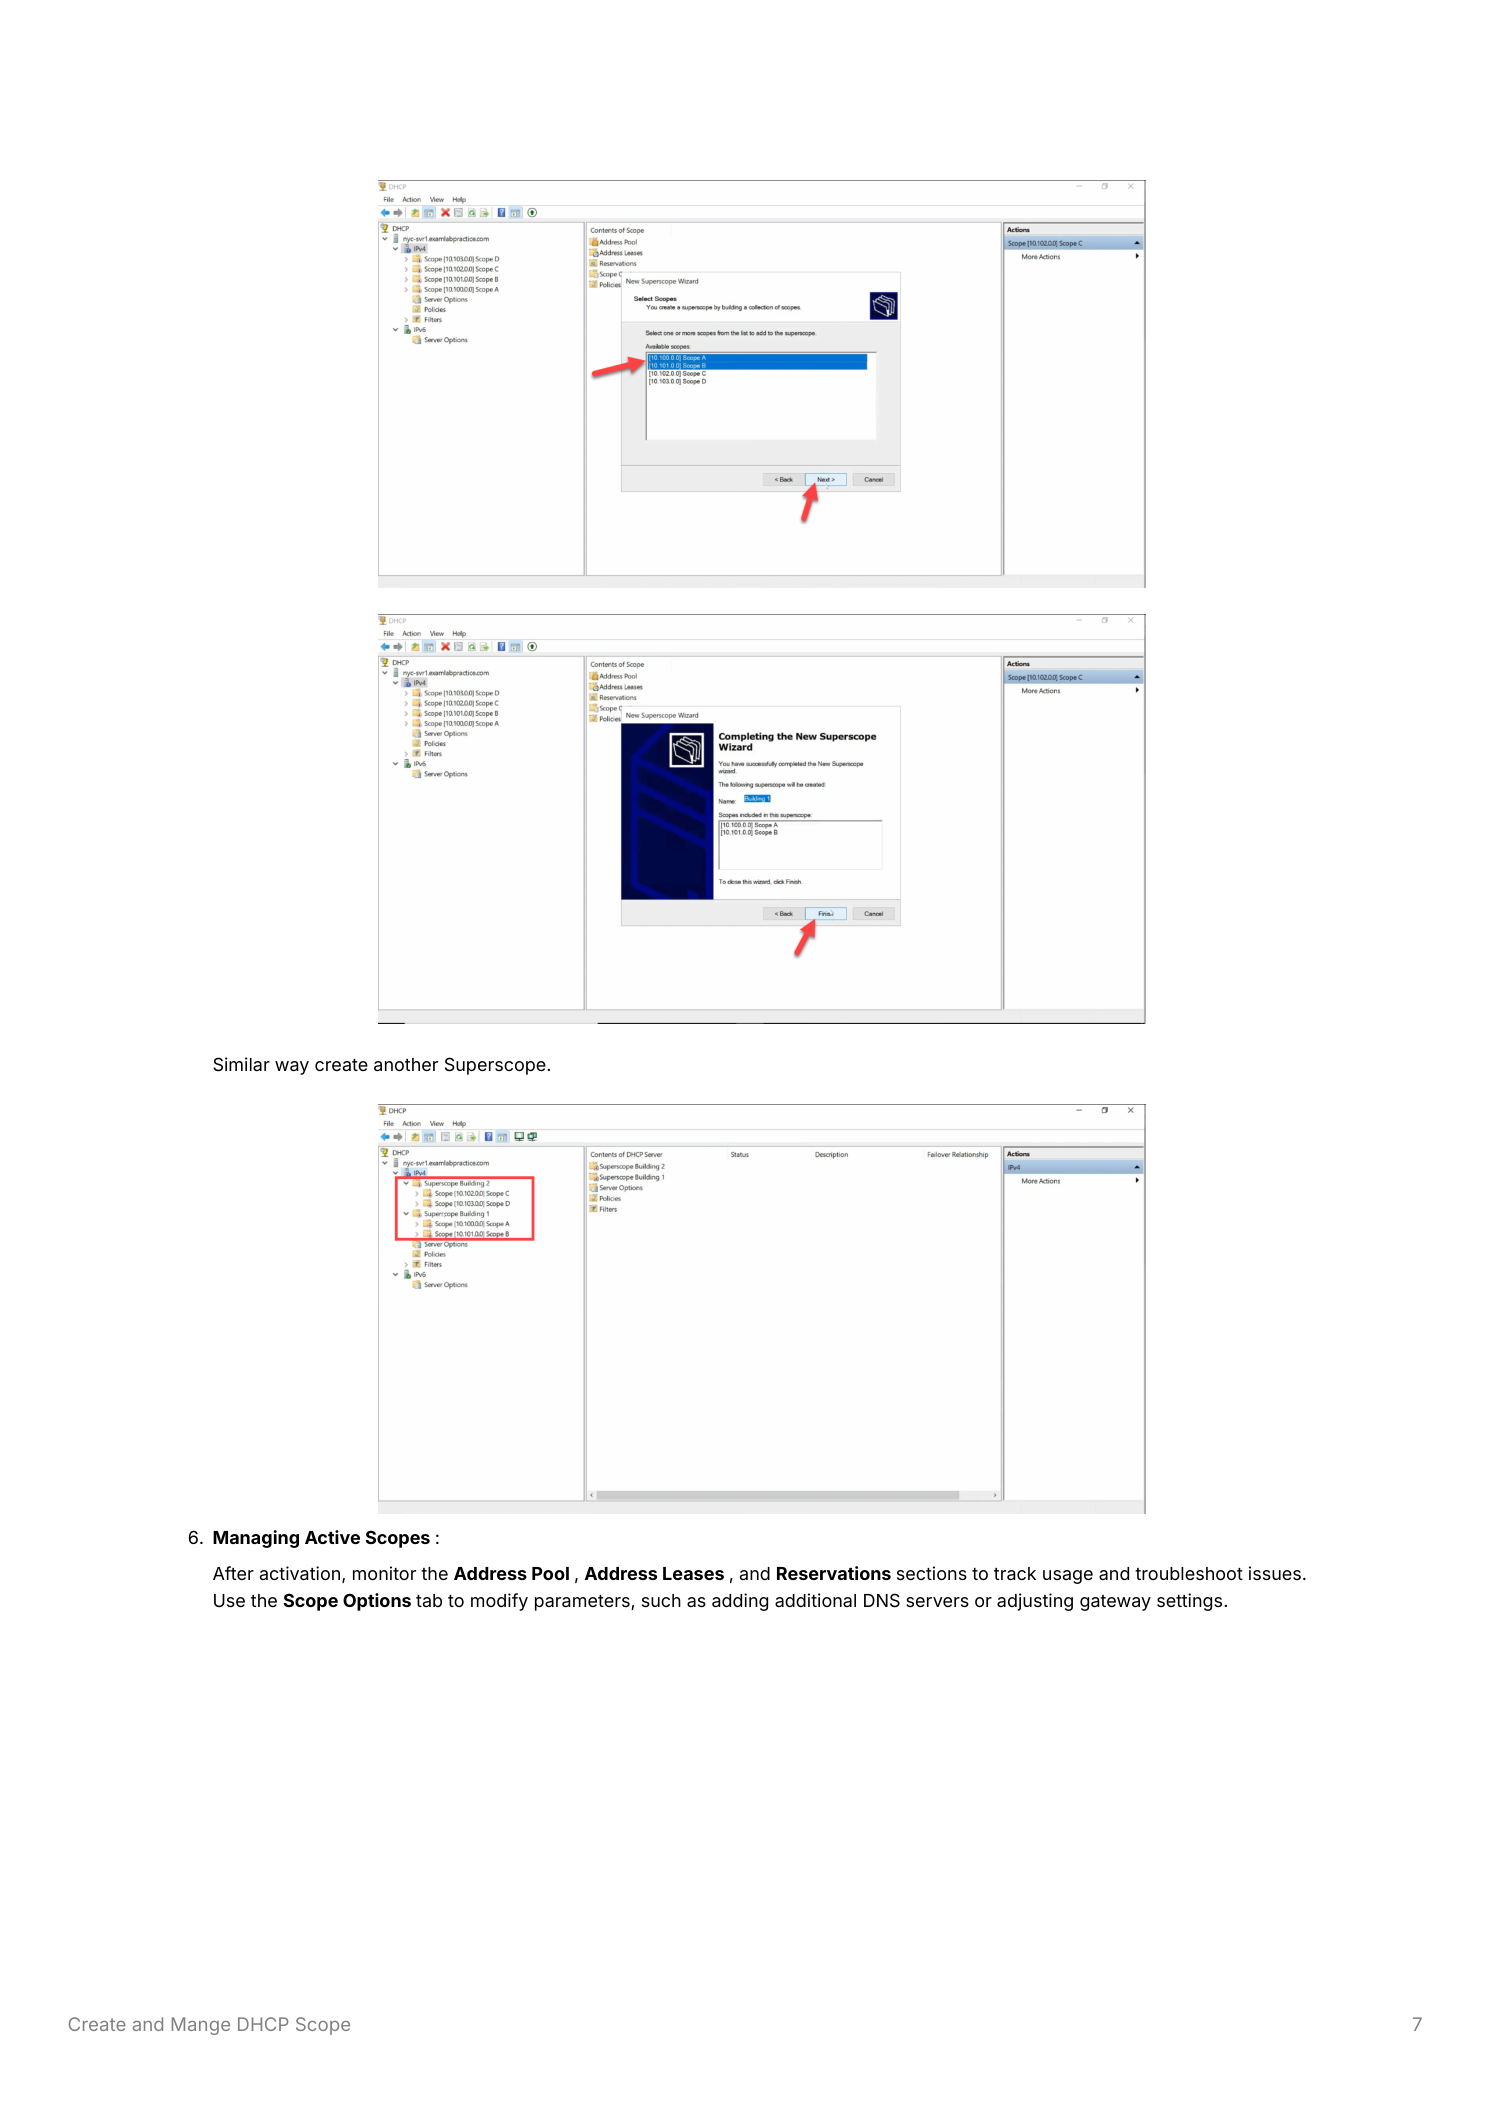
Step 8 — Group scopes with a superscope (multinet networks)
A superscope is a logical container that groups multiple child scopes for combined administration. The classic use case is a multinet — one physical network segment carrying multiple logical IP subnets, common in environments that grew past their original /24 and added a parallel subnet on the same VLAN to expand address space without re-IPing everything.
Right-click IPv4 > New Superscope, name it, pick which existing scopes to include. The superscope appears as a parent node with its members listed beneath. Activating or deactivating the superscope hits all member scopes simultaneously — useful for synchronized maintenance.
Step 9 — Monitor utilization before exhaustion
The DHCP console’s built-in stats are how you catch a scope that’s about to fill up. Right-click the scope > Display Statistics:
- Total Addresses — full count of addresses in the range
- In Use — active leases right now
- Available — not yet assigned or expired
- Excluded — carved out by exclusion ranges
The number that matters is Available / Total. When that drops below 20%, the scope is “getting full” — expand the range or add a new scope before it hits zero, because at zero, new clients fail to obtain leases and the symptom looks exactly like a network outage from the user’s perspective. For environments with many scopes across many DHCP servers, IPAM aggregates this view across the whole estate.
Things that bite people in production
Size scopes with headroom
Allocate more addresses than current need suggests — growing a scope later can require briefly deactivating it, which interrupts lease renewals. Headroom on day one is cheap; an emergency scope expansion at 4pm on a Friday is not.
Exclude before you static-assign
Add exclusions for any range used by static devices before activating the scope. Otherwise the DHCP server will happily issue those addresses to dynamic clients while the static device is briefly offline, and the IP conflict won’t surface until the static device comes back.
Reservations beat manual static for printers and similar
For devices that need a fixed IP but where you don’t want to maintain manual static config (printers, IoT, branch routers): use DHCP reservations. The device uses DHCP normally, but its MAC always receives the same IP. Centralized management, no risk of conflicting with the dynamic pool.
Lease duration matters more than you think
Long leases on a wireless network or guest VLAN means addresses are tied up for days after the device left. Short leases on stable wired clients means more renewal traffic with no benefit. Match lease duration to actual client turnover — it’s the single most-tuned scope setting in real environments.
Where this fits
Scopes sit on top of the DHCP Server role install. The companion pieces are DHCP IP reservations for fixed addresses, DHCP high availability so the scope keeps issuing leases when one server fails, standalone DHCP for non-AD environments, and the broader DNS, DHCP & Networking pathway. For multi-server environments, IPAM centralizes scope management.