The Active Directory Recycle Bin is a safety net — deleted objects sit in the Deleted Objects container for 180 days (the default tombstone lifetime) before garbage collection sweeps them away. Most days you want exactly that. But every so often a compliance request or a data-retention obligation lands on your desk that says “account X must be unrecoverable, today,” and the safety net becomes a problem. The Active Directory Administrative Center will not help you there. Permanent deletion before tombstone expiry is PowerShell-only.
This walkthrough shows why the GUI can’t do it, then walks through the two-step PowerShell pattern: find the object safely, then remove it irreversibly.
What you need before starting
- AD Recycle Bin enabled on the domain (the deleted object has to be actually in the bin, not garbage-collected past tombstone)
- Windows Server 2012 or later for ADAC; Windows Server 2008 R2 works for the PowerShell side
- Domain Admin rights (Recycle Bin objects sit in a privileged container)
- Active Directory PowerShell module (
RSAT-AD-PowerShell) loaded
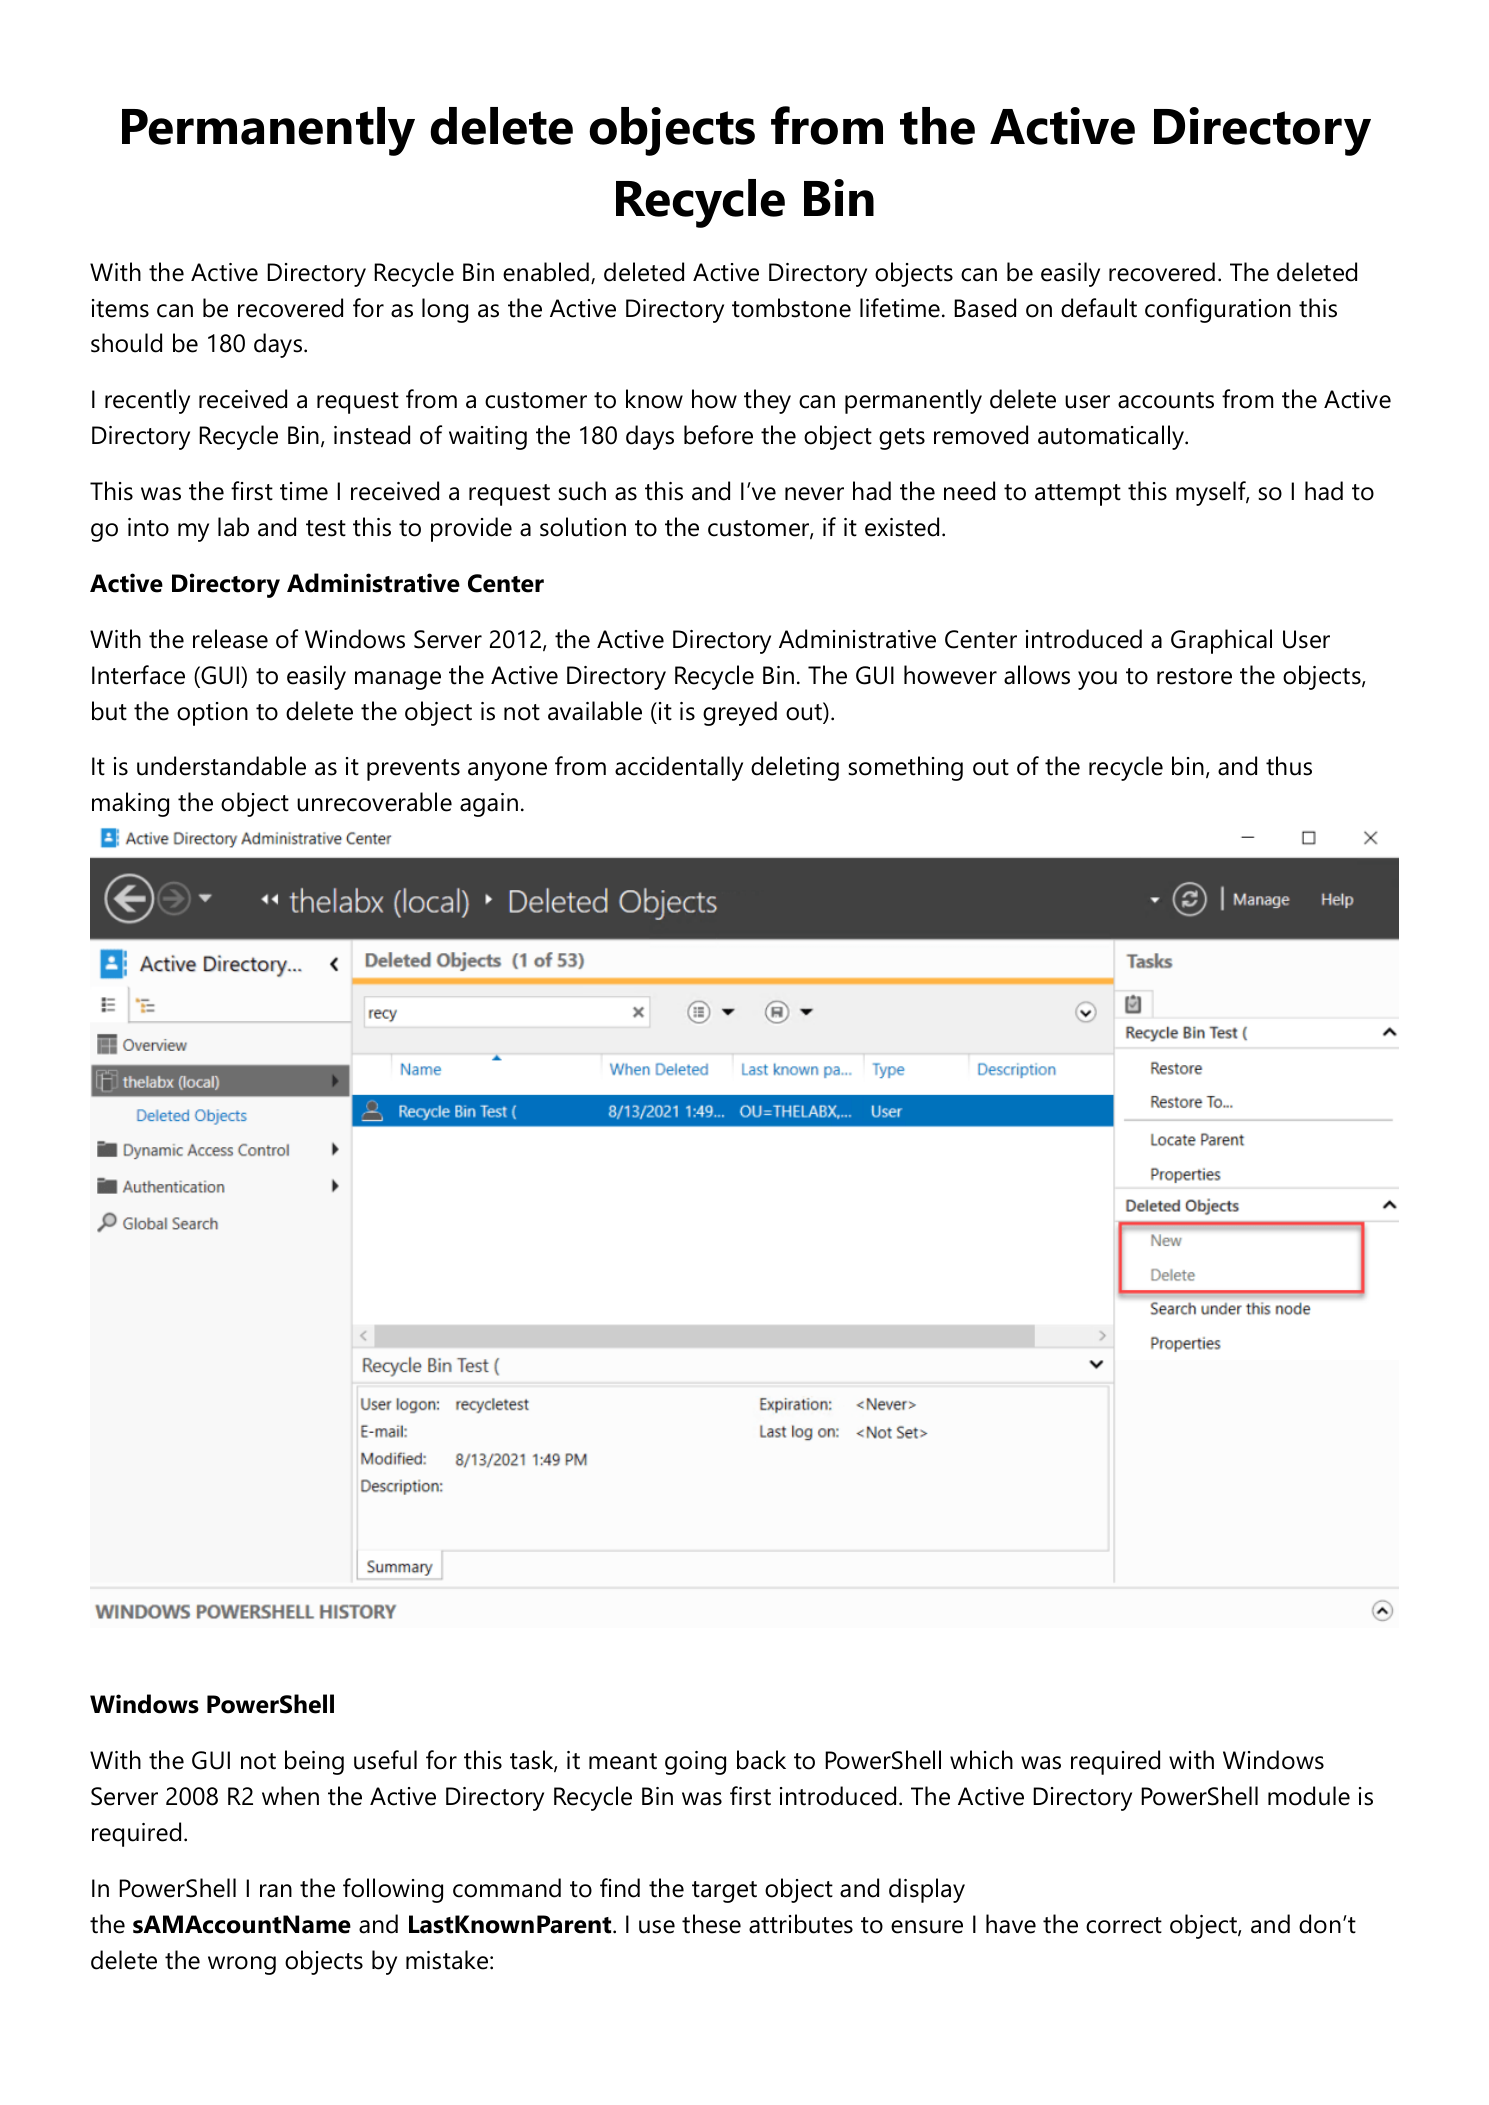
Why ADAC won’t do it
Open the Active Directory Administrative Center, browse into the Deleted Objects container, and select any deleted object. The Tasks panel offers Restore, Restore To…, and Properties. Delete is greyed out. This isn’t a permissions issue or a missing feature toggle — ADAC was deliberately built without a hard-delete option for Recycle Bin objects. Microsoft’s reasoning was “the Recycle Bin exists to prevent accidental loss; a one-click hard-delete in the GUI would defeat the point.” Whether you agree or not, the fix is to drop into PowerShell.
Permanent delete the right way (PowerShell)
The pattern is two steps: find the object, verify it’s the one you want, then remove it. Don’t skip the verification step. Once Remove-ADObject commits, the object is gone — no second Recycle Bin to fall into.
Step 1 — Locate the deleted object
Open an elevated PowerShell session. If the AD module isn’t auto-loaded, run Import-Module ActiveDirectory. Search the Deleted Objects container with Get-ADObject and the -IncludeDeletedObjects switch — without that switch, the cmdlet pretends the bin doesn’t exist:
Get-ADObject -Filter {isDeleted -eq True -and Name -like "*recycle*"}
    -IncludeDeletedObjects -Properties * |
    Format-List name, samaccountname, lastknownparent
Read the output before typing anything else. The two attributes that matter are:
- sAMAccountName — preserved unchanged from the original account, the safest identifier to target
- lastKnownParent — the OU the object was deleted from. Cross-reference this against the original account’s expected location to confirm you’ve got the right object
If the filter returns multiple objects, narrow it further. If it returns the wrong object, fix the filter before continuing — do not run the next step against an unverified target.
Step 2 — Remove the object
With the right sAMAccountName in hand, run the deletion. Note the filter switches from Name to samaccountname — the Recycle Bin appends a GUID to the original CN to prevent name collisions, so Name matches are unreliable; sAMAccountName is preserved verbatim:
Get-ADObject -Filter {isDeleted -eq True -and samaccountname -eq "recycletest1"}
    -IncludeDeletedObjects | Remove-ADObject
PowerShell prompts for confirmation. Read the prompt — the object DN is shown there, and that’s your last sanity-check before commit. Type Y and Enter. If nothing comes back, the delete succeeded.
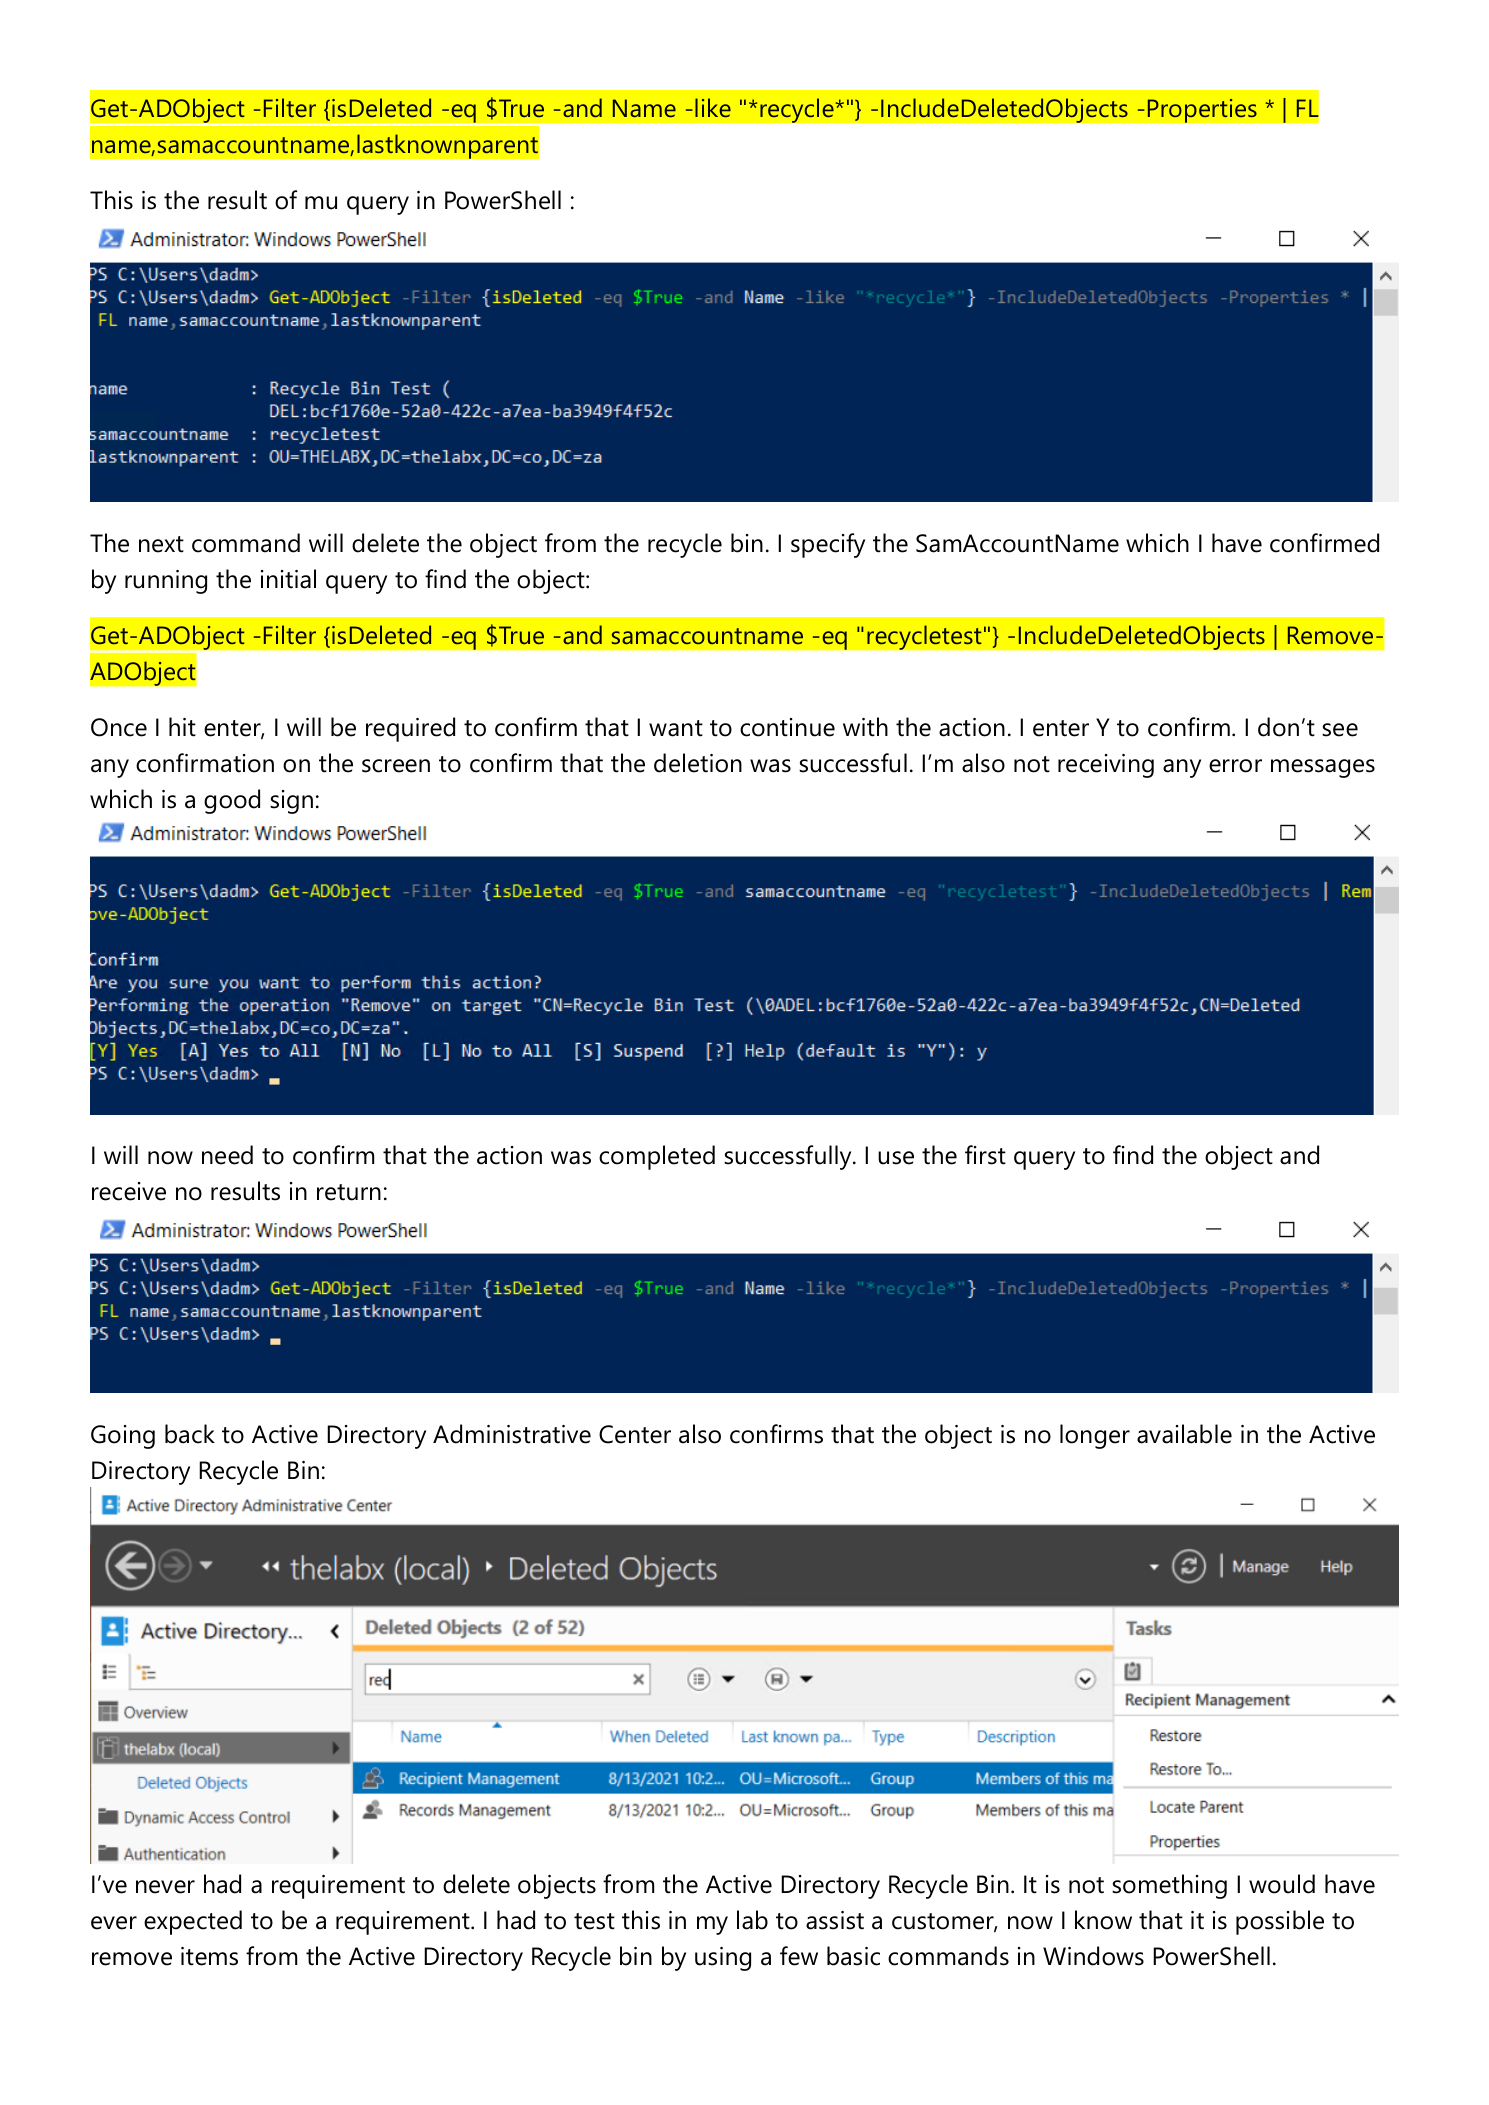
Step 3 — Verify it’s really gone
Re-run the same Get-ADObject filter from Step 1. Empty output confirms the object is no longer anywhere in AD — not in any OU, not in the Recycle Bin, not pending garbage collection. Cross-check in ADAC by refreshing the Deleted Objects container; the entry should be gone there too.
What to watch out for
This is a one-way door
There’s no second Recycle Bin behind the Recycle Bin. Once Remove-ADObject commits, recovery requires a full authoritative restore from a backup taken before the delete — which is a multi-hour outage event for the domain in most environments. Always verify the target attributes (sAMAccountName, lastKnownParent, distinguished name in the prompt) before typing Y. A change ticket reference in your shell history is cheap insurance.
Filter on sAMAccountName, not Name
The bin renames deleted objects by appending \0ADEL:<GUID> to the original CN to keep the LDAP namespace from collapsing on delete. Name matches against that mangled value; sAMAccountName is preserved as-is. Always anchor your delete filter to sAMAccountName for users and computers, or to distinguishedName if you’re working with non-account objects (groups, OUs, contacts).
Don’t suppress the confirmation prompt
You can pass -Confirm:$false to skip the prompt — don’t, in interactive sessions. The prompt is the last line of defense against typo-driven deletions, and it costs you exactly one keystroke. Reserve -Confirm:$false for audited automation scripts where the input has already been validated upstream.
Audit who did this
Permanent deletes show up in the Security event log on the DC that processed the change — if you have AD auditing configured. If you don’t, see enabling Active Directory auditing; this is exactly the kind of irreversible operation you want recorded with the operator account, time, and target object DN, especially in regulated environments.
Where this fits
Permanent delete is the inverse of recovery. The companion piece is restoring AD objects from the Recycle Bin — if you find yourself reaching for hard delete by reflex, double-check it isn’t actually the restore-from-bin path you want. For broader Recycle Bin lifecycle (enable, retention period tuning, garbage collection scheduling), see the Active Directory pathway for the rest of the picture.