You need to give a Hyper-V guest more storage. Two paths get you there: create a VHDX file on the host and attach it to the VM, or claim a real physical disk on the host and pass it directly through. The VHDX path is what most people want; pass-through is for the specific cases where direct block access matters. This post walks both, calls out where they diverge, and points out which one to pick when.
Pick the path before you start
The two paths share most of the prep but diverge at one critical step (Offline-on-host). Pick before you start so you don’t do a step that locks you into the wrong path.
VHDX file (the default for 95% of cases)
Create a .vhdx file on the host filesystem; attach it to the VM via the SCSI controller; the guest sees a normal disk and initializes/formats it like any other.
Why this is the default:
- Portable. The VHDX file moves with the VM via Storage Migration / Live Migration. Cross-host operations work normally.
- Backup-friendly. Backup software can grab the .vhdx from the host filesystem.
- Snapshots work. Hyper-V checkpoints capture the VHDX state.
- Easy capacity changes. Resize the VHDX (Resize-VHD) and grow the volume inside the guest.
Trade-offs: ~3–5% I/O overhead vs raw block, 64 TB practical cap, guest can’t access SMART or firmware-level features.
Physical pass-through (specific cases)
Take a real disk Offline on the host; attach it to the VM via the SCSI controller; the guest gets exclusive raw block access.
Why pick this:
- Maximum I/O performance. No hypervisor file-system layer in the path.
- SMART, NVMe namespaces, vendor-specific commands. The guest can issue them directly to the device.
- Very large disks. Beyond what’s practical to manage as a VHDX.
- Compliance scenarios where a specific physical disk must be dedicated to a specific VM.
Trade-offs: tied to a specific host (no Live Migration), no Hyper-V checkpoints, no backup-via-host-filesystem. The disk MUST stay Offline on the host while the VM is using it.
Step 1 — open Disk Management on the host
Both paths start here. Press Win+R, type diskmgmt.msc, Enter. (Or right-click Start > Disk Management.)
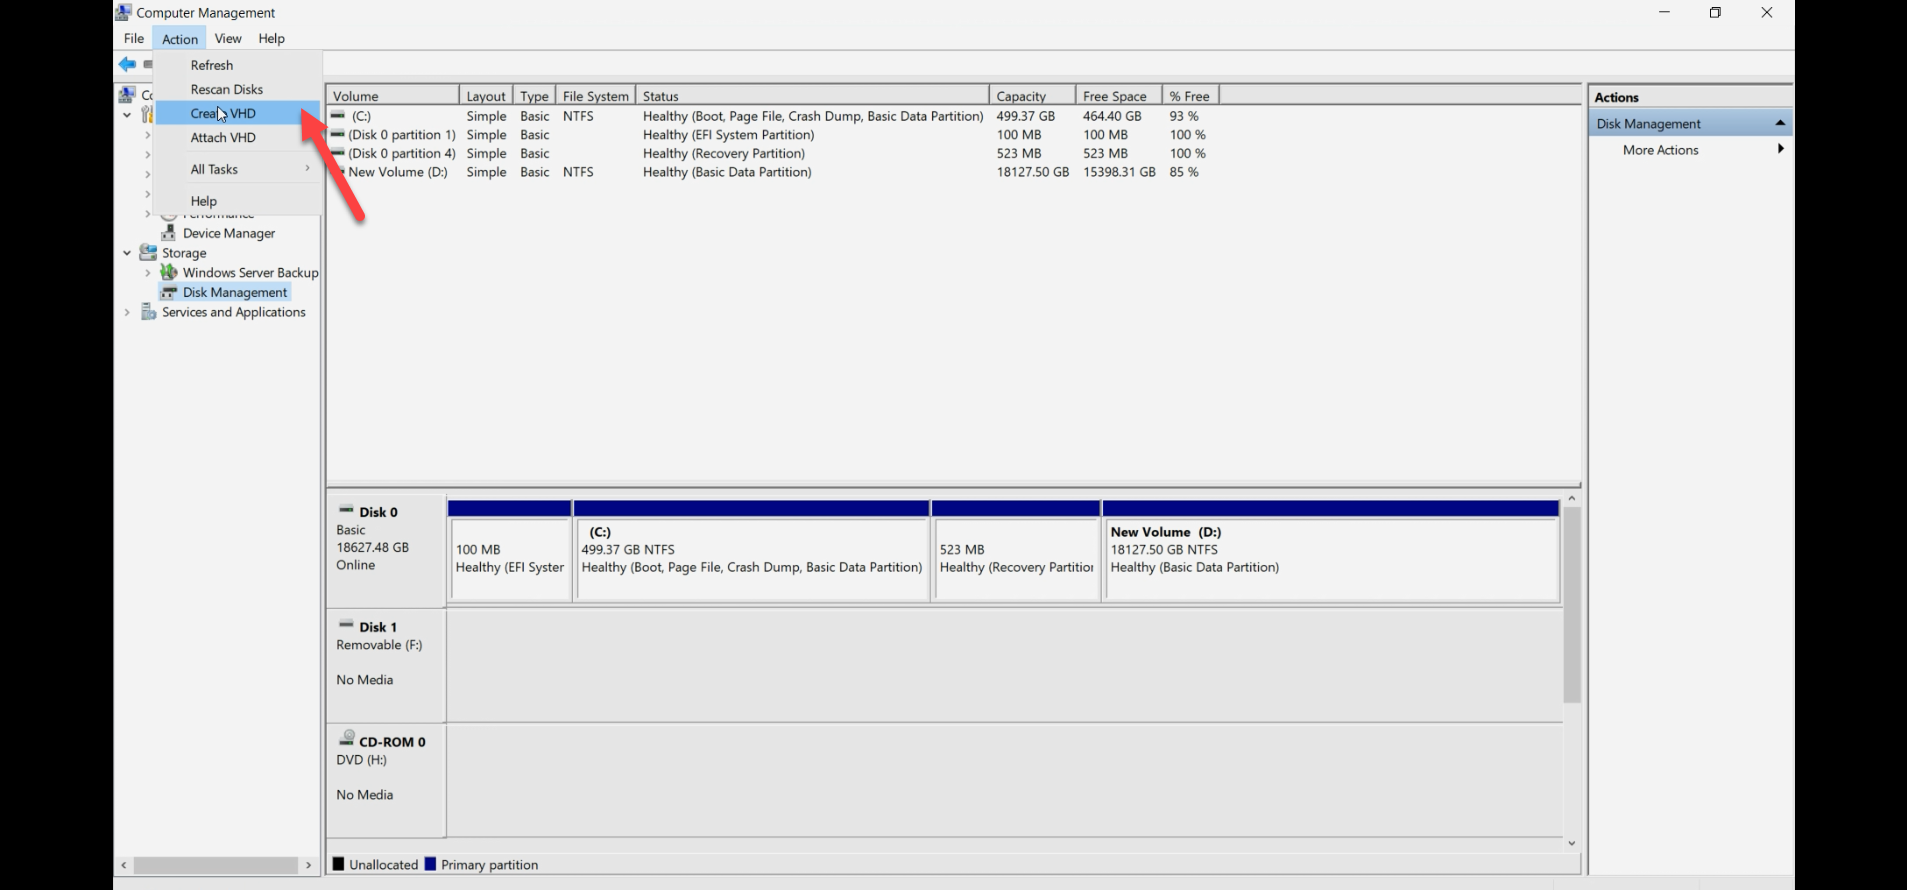
diskmgmt.msc). This is the operations console for both paths — create-VHDX-file lives here AND the pass-through prep happens here.Disk Management lists all disks the host can see. Note which Disk N is the new disk you want to use — you’ll reference it in the next steps.
Path A — VHDX file (recommended)
Step A2 — create the VHDX file
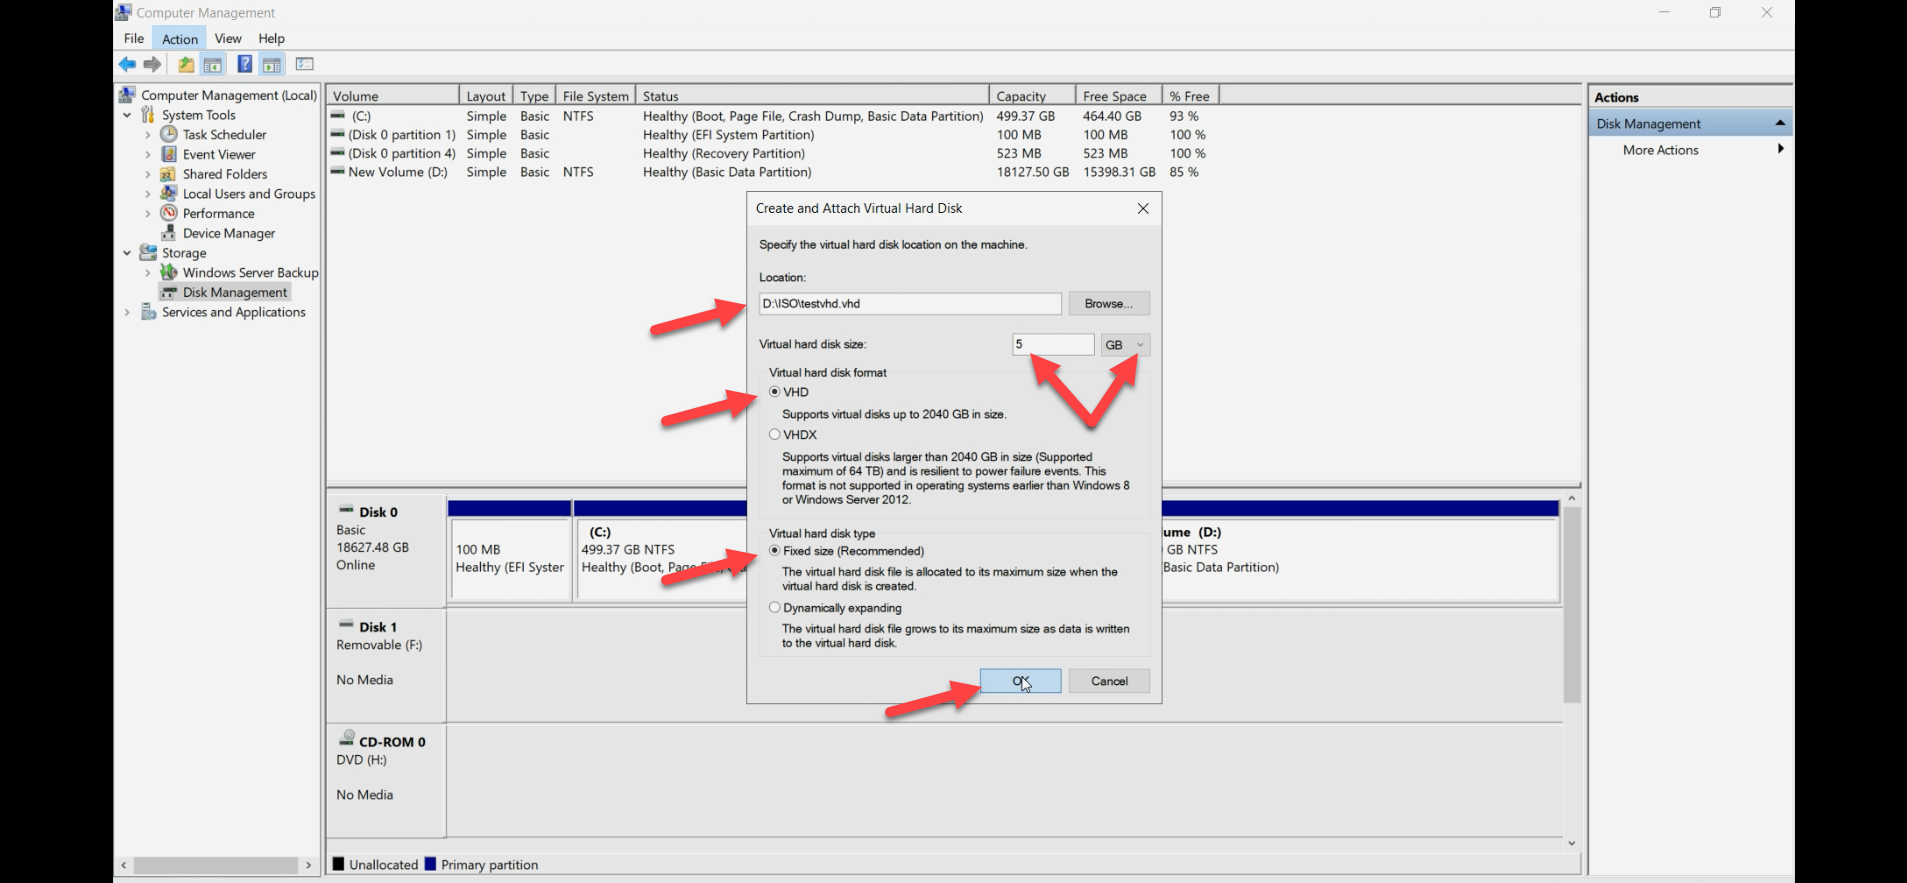
Action menu > Create VHD. The dialog asks for:
- Location: browse to a folder on a host drive with capacity. Convention:
D:\VMDisks\<vm-name>\<disk-purpose>.vhdx(e.g.D:\VMDisks\WS2022\data.vhdx). - Disk format: VHDX. Not VHD — VHD is legacy, 2 TB cap, no resilience features.
- Disk size: the maximum you want this disk to grow to (or be, if Fixed).
- Disk type:
- Fixed size — pre-allocates the full size on disk. Predictable performance; no I/O stalls when the file extends. Use for production database disks and other latency-sensitive workloads.
- Dynamically expanding — grows on demand up to the size limit. Saves space upfront. I/O can stall briefly when the file extends. Use for general-purpose disks where occasional latency spikes are acceptable.
OK. The VHDX file is created and Disk Management shows the new disk.
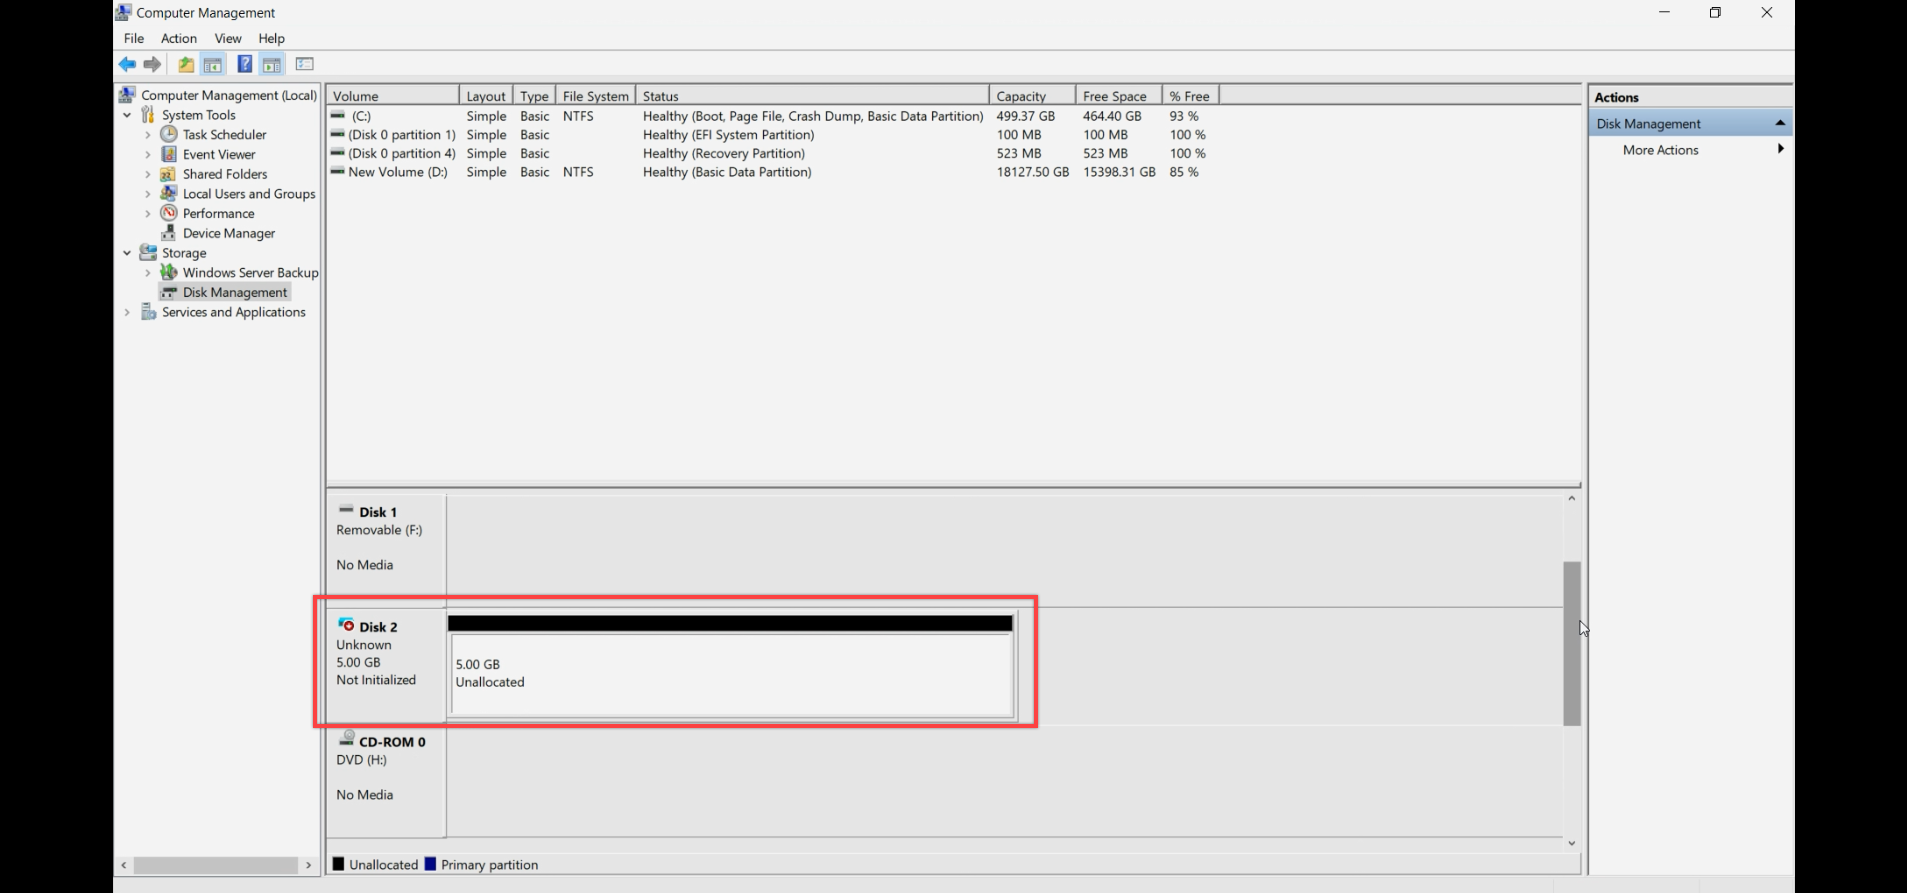
The new disk shows as Offline, Unknown, Not Initialized, with the full space unallocated.
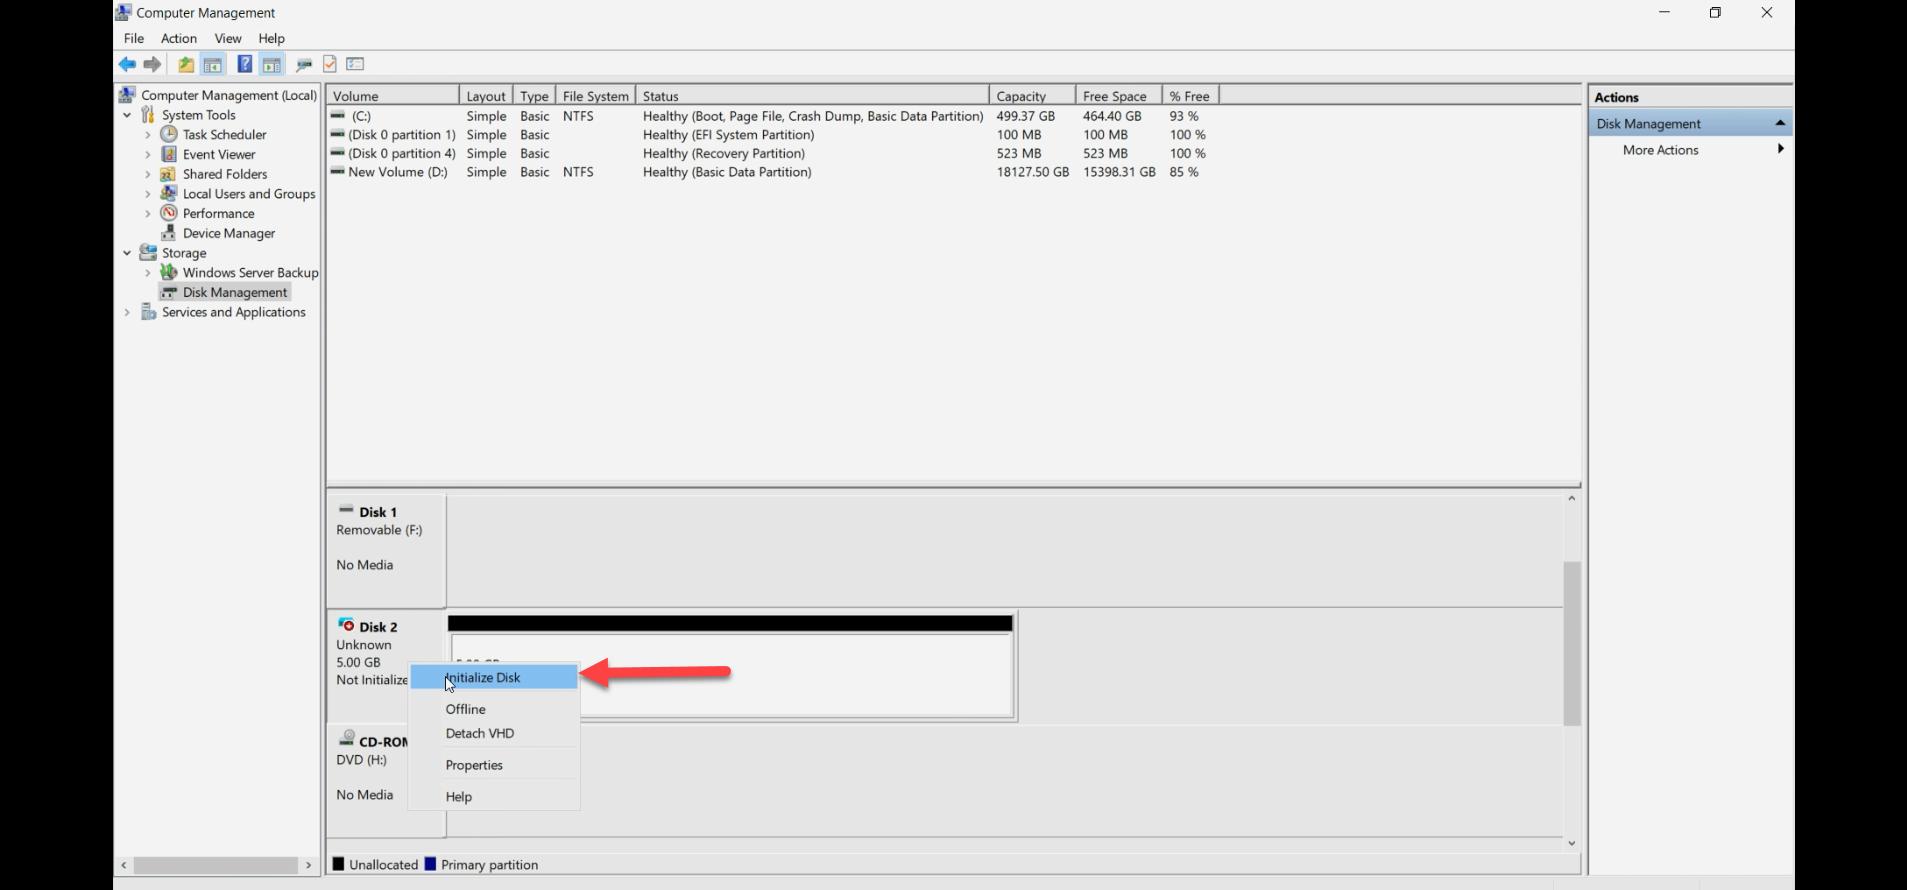
Step A3 — (optional) initialize on host OR jump straight to attach
For VHDX files, you can either initialize/format on the host BEFORE attaching to the VM, or attach raw and let the guest do it. Both work. Most people prefer to let the guest do it — cleaner mental model, fewer states to track.
If you initialize on the host: right-click disk number > Initialize Disk > pick MBR or GPT (GPT for >2TB or modern systems). The disk becomes Online, Initialized, Empty.
Step A4 — attach the VHDX to the VM
Hyper-V Manager > right-click VM > Settings.
In the Settings dialog, expand SCSI Controller (NOT IDE — IDE is legacy and can’t hot-add). Click Hard Drive > Add.
Pick Virtual hard disk. Browse to the .vhdx file you created. Apply, OK.
Inside the guest, open Disk Management. The new disk shows up. If you didn’t initialize on the host, do it here: Initialize, partition, format. Done.
Path B — physical pass-through
Step B2 — ensure the disk is unallocated on host
The disk should appear in Disk Management. If it’s a brand new disk, it’s already in the right state. If it has existing volumes from a previous use, you have a choice:
- Leave the volumes intact — the guest will see them and can mount them.
- Clear them on the host first — right-click each volume > Delete Volume. Then the guest gets a blank disk.
Whichever you pick, do NOT format on the host with the intent of having the guest use it as a fresh disk — pick one or the other.
If the disk is in the Initialize Disk prompt and you’re going pass-through, you can either initialize (harmless) or skip. Most importantly: don’t format and put data on it on the host then expect the guest to use it as fresh.
Step B3 — take the disk Offline on the host
This is the load-bearing step. Right-click the Disk N number on the left side > Offline. Confirm. The disk state changes to Offline.

Without this step, Hyper-V refuses to attach the disk as a pass-through — the host still has it claimed, and two owners would mean filesystem corruption.
Step B4 — attach the disk to the VM
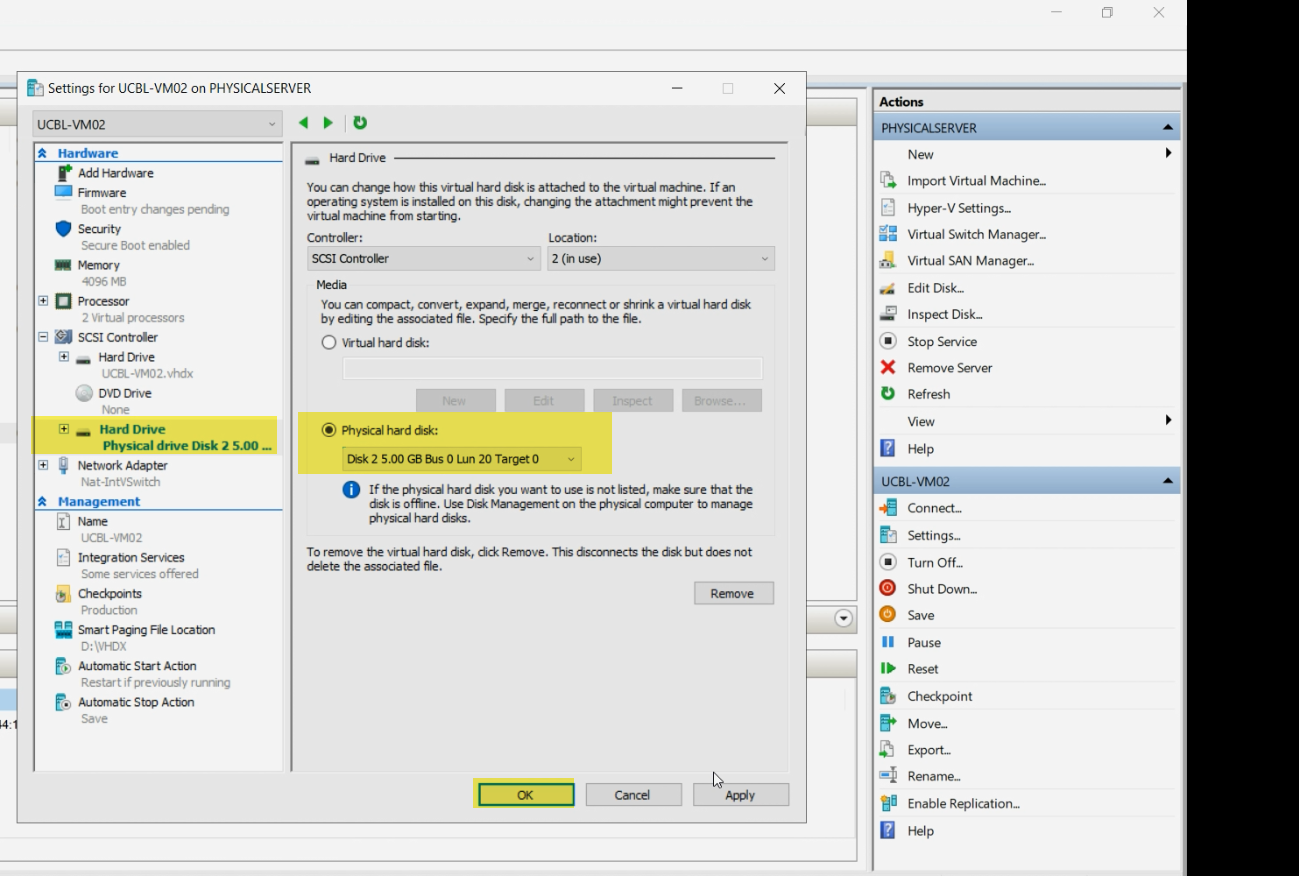
Hyper-V Manager > right-click VM > Settings > expand SCSI Controller > Hard Drive > Add.
This time pick Physical hard disk. The dropdown lists Offline disks on the host — pick the one you just took offline. Apply, OK.
If the dropdown is empty or doesn’t show your disk, the disk isn’t Offline. Go back to Step B3 and confirm.
Step 5 — use the disk inside the guest
Same final step regardless of path. Power on the VM (or hot-add to a running VM via the SCSI controller).
Inside the guest, open Disk Management (diskmgmt.msc). The new disk shows up. Initialize, partition, format as needed. From the guest’s perspective, the disk behaves like any other — the path A vs path B distinction is invisible to it.
Verify
- From the guest: the disk is visible in Disk Management, partitioned, and accessible from File Explorer.
- From the host (pass-through path): the disk should remain Offline. Do NOT bring it Online while the VM is using it — both sides writing to the same blocks corrupts the filesystem.
- From the host (VHDX file path): the .vhdx file is locked open by the Hyper-V process while the VM is running. You won’t be able to delete or move it — that’s expected.
Detach / rollback
If you change your mind:
- Shut down the VM (or use the SCSI controller’s hot-remove if the guest supports it).
- VM Settings > SCSI Controller > select the Hard Drive entry > Remove.
- For pass-through: Disk Management on host > right-click disk > Online. The host can use it again.
- For VHDX file: the .vhdx file remains on the host. Delete if you don’t need it; or attach to a different VM.
Things that bite people
Picking IDE instead of SCSI
IDE Controller is offered in VM Settings for compatibility with very old VMs. It can’t hot-add disks (need to power off the VM to add) and can’t do pass-through. Always pick SCSI Controller for new disks. Use IDE only if you’re forced to (Generation 1 VM with a legacy OS that doesn’t support SCSI for boot — rare nowadays).
Disk not Offline when attempting pass-through
Pass-through dropdown in VM Settings is empty or doesn’t show your disk. The disk isn’t Offline. Go back to Disk Management, confirm Offline state, and refresh the VM Settings dialog.
Bringing pass-through disk Online while VM is using it
The classic data-loss scenario. Both host and guest think they own the disk; both write to it; filesystem corruption is immediate and total. NEVER bring a pass-through disk Online on the host while the VM is running. If you really need the host to access the data, shut down the VM first.
VHDX format vs VHD
VHD is the legacy format from Hyper-V’s first version — 2 TB cap, no resilience features, no shared-VHDX support. VHDX is the modern format — 64 TB cap, resilient to power failures, supports sharing for guest clusters. There’s no scenario in modern Windows Server where you’d intentionally pick VHD.
Fixed-vs-Dynamic confusion in production
Dynamic VHDX seems attractive (saves space) but the file extends on every write that needs more space. Each extend triggers a brief I/O stall. For databases or other latency-sensitive workloads, this shows up as periodic spikes in tail latency. Fixed VHDX pre-allocates everything — no extends, no stalls, but you commit the storage upfront. For production, default to Fixed for performance-critical disks.
Forgetting that pass-through disks don’t live-migrate
You’re running production on a VM with a pass-through disk and decide to live-migrate it to another host. Live Migration fails because the pass-through disk is bound to the source host’s physical hardware. You either accept that this VM is permanently tied to this host, or you migrate the data off the pass-through disk into a VHDX first, then live-migrate.
VHDX file location matters for backup
Backup software needs to be able to find and snapshot the .vhdx file. Putting VHDX files in random locations confuses backups. Standardise on a path convention (e.g. D:\VMDisks\<vm-name>\) and stick to it across all hosts.
Snapshots are bigger than they look
Hyper-V checkpoints work on VHDX files (not pass-through). Each checkpoint creates a differencing disk that grows as the VM writes. A long-lived checkpoint on a busy VM eats storage fast. Delete checkpoints (and let them merge) once you’re done with them; don’t let them accumulate.
Where this fits
Adding a disk to a VM is one of the most common Hyper-V operations — you’ll do it dozens of times across the life of any deployment. For broader Hyper-V context, see the Hyper-V Virtualization pathway — this post sits alongside VM creation, storage migration, and the live-migration topics. The next post in the pathway covers the related conversion case: VHD to VHDX conversion.