The primary host is gone. Power outage, hardware failure, ransomware that took out the SAN, fire in the rack — doesn’t matter what; the workload is down and the primary isn’t coming back in any reasonable time. This is the scenario Hyper-V Replica was actually built for: bring up the replica from the latest available state, accept whatever data loss the asynchronous interval bought you, and get the business back running. This is Part 4 of the Hyper-V Replica series, completing the lifecycle that started with Part 1 (setup), continued with Part 2 (drill), and covered the controlled-handover case in Part 3 (planned failover). Part 4 is the emergency button.
What “unplanned” really means
Three failover types in Hyper-V Replica, with very different commitments:
| Type | Primary state | Data loss | Auto-reverse |
|---|---|---|---|
| Test failover | Running | None — never commits | N/A — nothing to reverse |
| Planned failover | Alive, gracefully shut down first | Zero (final sync) | Optional via checkbox |
| Unplanned failover (this post) | Dead/unreachable | Up to one full interval (5 min default) | None — manual only |
The data loss in unplanned failover is whatever the primary wrote between its last successful replication cycle and the moment it died. With the default 5-minute interval, expect 0–5 minutes of data loss. With a 30-second interval, 0–30 seconds. With 15 minutes, 0–15 minutes. This is the RPO you signed up for in Part 1; this is the moment it gets cashed in.
The split-brain problem and the WMI check
Unplanned failover triggers from the REPLICA side — you’re acting as if the primary doesn’t exist. But what if the primary is actually still up, just unreachable from the replica due to a network partition? Bringing up the replica without confirming would result in TWO VMs running with the same identity (same hostname, same IP, same AD computer object). Both write to their respective disks; both think they’re the authoritative copy. When the network partition heals, you have two divergent versions of the workload and no clean way to merge them. This is the classic split-brain problem.
Hyper-V’s safeguard: before activating the replica, the failover wizard does a WMI (Windows Management Instrumentation) call to the original primary. Three outcomes:
- Primary responds and reports the VM is running. Wizard refuses to proceed — you’re about to cause split-brain. Either the primary isn’t actually dead, or you’re looking at a network partition. Investigate before forcing.
- Primary responds and reports the VM is off. Wizard proceeds — the original is gracefully unavailable, no split-brain risk.
- Primary doesn’t respond at all. Wizard proceeds — the primary is genuinely unreachable, which is exactly the scenario unplanned failover was built for.
The WMI check is a safety net, not a guarantee. If a network partition is the cause and you absolutely must fail over (no time to wait), you can override after acknowledging the warning — but be prepared to do split-brain reconciliation when the partition heals.
Prerequisites
- Hyper-V Replica configured per Part 1, with deltas flowing reliably until the primary’s death.
- Replica host (HVHost02) accessible — if you can’t reach the replica, you don’t have DR.
- (Recommended) Multiple recovery points enabled, so you can pick an older one if the latest looks corrupt (e.g. a ransomware infection that hit just before the primary died).
- External vSwitch on the replica host with the matching name, so the new primary can reach the production network when it boots.
The intent is “none” — unplanned failover is for chaos, so prereqs were satisfied during setup, not at the moment of disaster. If you’re missing any of the above when the primary dies, you’re going to have a much worse day than you needed to.
Step 1 — verify replica health on HVHost02
Even in an emergency, take 30 seconds to confirm the replica is in a useful state. If it’s been showing Health: Critical for two days, the data on it is two days stale — the failover will still work but the data loss will be much more than your configured RPO suggests.
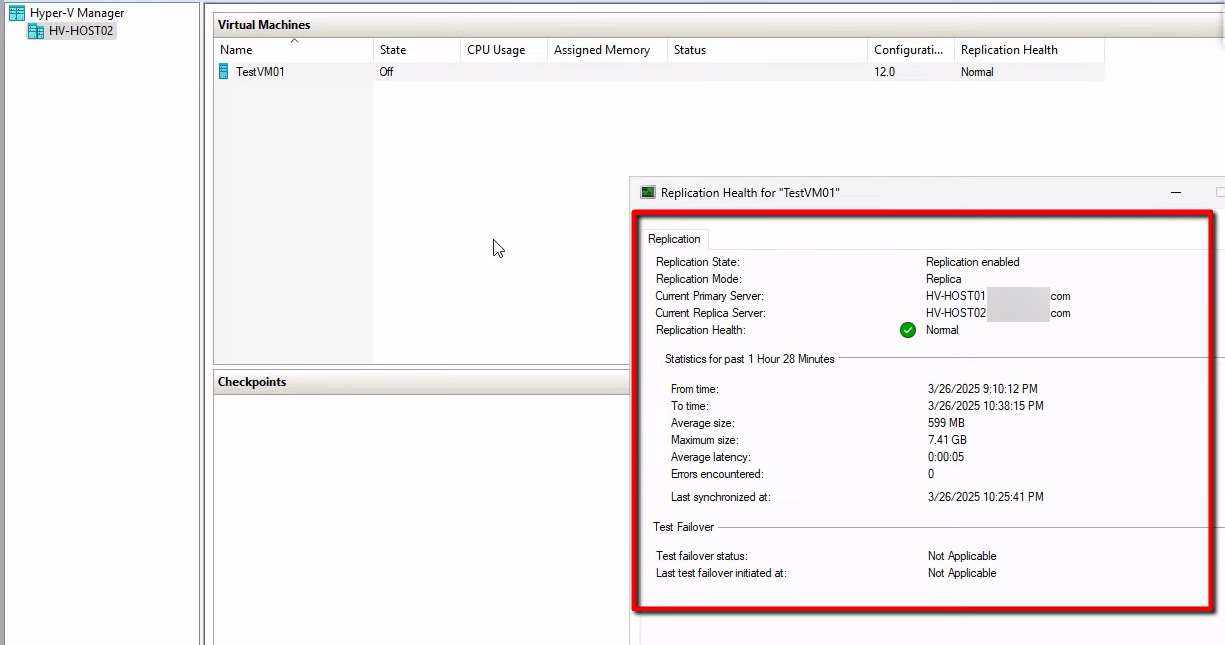
On HVHost02, right-click the replica VM > Replication > View Replication Health. Confirm:
- Mode: Replica server
- Health: Normal (anything else means stale data and bigger data loss)
- Last replication time: as recent as possible — ideally within your configured interval
If health is Warning or Critical, document this for the post-incident review — you’ll want to know why replication wasn’t healthy before the disaster. Proceed anyway if the workload needs to come back.
Step 2 — trigger the unplanned failover
On HVHost02, right-click the replica VM > Replication > Failover. (Note: not “Planned Failover” or “Test Failover” — just “Failover” on the replica side. Different wizard from Part 3.)
A warning popup appears: “Don’t proceed unless the primary VM has failed.” This is the “are you sure” gate. In a real disaster, click through. In a non-disaster (you’re testing or experimenting), STOP and use Test Failover from Part 2 instead.
Choose the recovery point
If you enabled additional recovery points in Part 1, the dropdown shows multiple options:
- Latest — most recent replicated state (up to 5 min stale by default). The right answer for most disasters.
- Older points — for ransomware rollback (revert to before the infection) or for cases where the latest is corrupted.
For routine disasters (hardware failure, power outage), Latest is correct. For ransomware-style scenarios, you may want to roll back to a known-good state from before the encryption started — this is when the historical recovery points pay off.
Initiate
Click Failover. The wizard:
- Runs the WMI check against the original primary (split-brain prevention — see above).
- Activates the chosen recovery point on the replica.
- Auto-starts the VM (replica becomes new primary).
Total time: typically under a minute, plus VM boot time. If the WMI check blocks you (primary is reachable and reports VM running), either: (a) the primary isn’t actually dead — investigate; (b) you’re seeing a network partition — consider implications before forcing; (c) you have a different problem.

Once the VM is Running, you can connect to it. Update DNS or load balancer to point users at the new primary’s IP if applicable.
Step 3 — explore the post-failover options
The replica is now active. Right-click the VM > Replication submenu:

Four key options:
Cancel Failover
Reverts the failover — the VM goes back to its pre-failover state (replica VHDX, cold). Use this if the recovery point you picked turned out to be bad (app crashes, data corruption, missing recent transactions). After Cancel, you can retry with a different recovery point.
Cancel only works while the recovery-point checkpoint is still attached. Once you commit (via Remove Recovery Points), Cancel disappears from the menu — the failover is permanent at that point.
Reverse Replication
Manually configures the OLD primary as the new replica destination, with deltas now flowing from this host (new primary) back to the old primary (now replica). Use this ONLY if the old primary recovers — if it’s truly gone, skip Reverse and go straight to Remove Replication / Remove Recovery Points.
The Reverse Replication wizard is the same as the manual flow shown in Part 3: pick the new replica destination, match the original connection params, run an initial sync from the new primary back to the old.
Remove Recovery Points
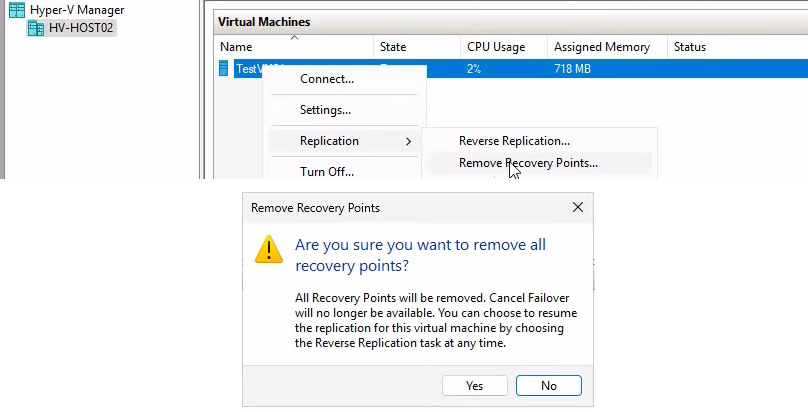
Merges the recovery-point checkpoints into the base VHDX. After this, the VM has a single clean VHDX with no checkpoint chain.
Important consequence: after Remove Recovery Points, you can no longer Cancel Failover. The failover state is committed.
Run this once you’re confident the recovery point you chose is good (apps work, data is consistent, users are happy). For very large VMs, the merge can take a while — it’s a bulk disk operation.
Remove Replication
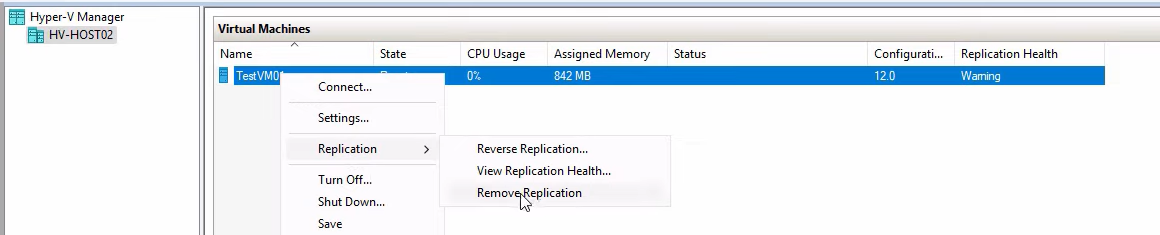
The most aggressive cleanup — tears down the replication relationship entirely. Use this when:
- The original primary is permanently lost (not coming back)
- You’ve already committed Recovery Points
- You don’t intend to use this VM as a replica source for some other host immediately
After Remove Replication, the VM’s Replication health shows Not Applicable and the relationship is gone. To re-establish DR, configure a new replica target (a new host, or a rebuilt original primary) and run Enable Replication again.

Step 4 — smoke test the failed-over VM
Before declaring the failover successful, prove the VM is functional. Connect to it (right-click > Connect) and run a quick test.
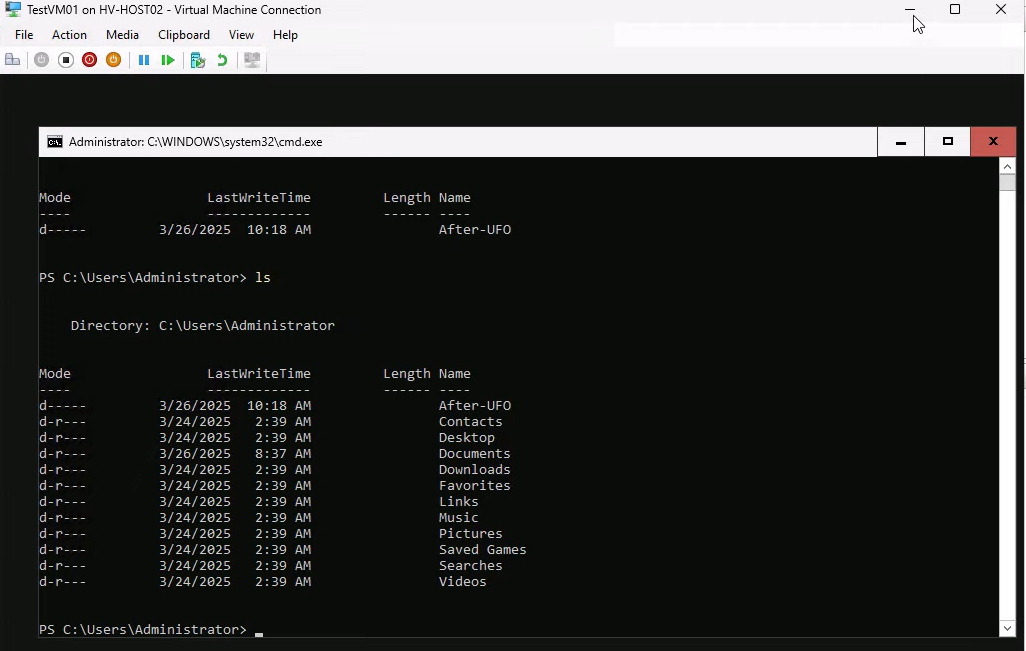
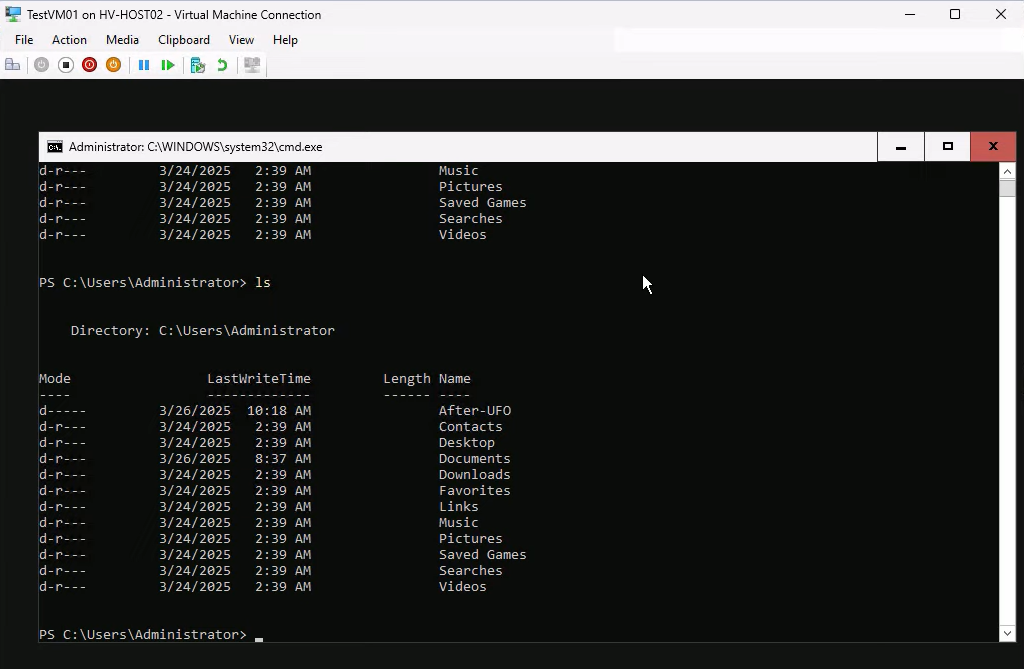
Demo command sequence:
mkdir afterUFO— create a marker folder.ls— confirm the folder exists.
The exact command doesn’t matter; what matters is that you’ve confirmed the disk is writable, the filesystem is healthy, and the OS is responsive. For real workloads, run something more meaningful:
- Database VMs: connect locally with SSMS or psql, run a SELECT against a recent table, verify row counts.
- App servers: start the app service, hit localhost in a browser, run a synthetic transaction.
- File servers: browse the share, open a recent file, verify content.
- DCs: verify AD database queries work via dsa.msc; check sysvol presence; do NOT promote (it would try to write back to the (now-gone) AD topology).
After Remove Recovery Points, re-verify
Reconnect after Remove Recovery Points — the test artifact (afterUFO folder) should still be present. This confirms the checkpoint merge committed cleanly without losing data.
What to do AFTER the dust settles
The failover got the workload back online. Now the operational follow-up:
Document the incident
Capture what happened, what you did, what worked, what didn’t. The data-loss window matters — if you lost 4 minutes of data because the primary died right before a 5-min sync, that’s the post-incident lesson (and possibly justification for moving to a 30-second interval going forward).
Rebuild DR
The new primary has no replica protecting it. Pick a new replica target:
- Rebuild the original primary host and use it as the new replica.
- Provision a new third host and configure it as the replica.
- If you’re running on shared infrastructure that already has its own DR, accept that this VM is now without Hyper-V Replica protection and rely on the underlying platform’s DR (e.g. cluster failover, snapshot replication).
Whatever you pick, run Enable Replication on the new primary VM (Part 1 wizard) to re-establish DR. Don’t leave production running without a replica for any longer than absolutely necessary.
Verify the data
Reconcile what was lost. Run reports against your monitoring systems for the period between the last successful replication and the failover. Customer-facing transactions in that window may need manual replay or apology emails. Internal logs may need to be re-derived from upstream sources.
Things that bite people
Triggering Unplanned Failover when the primary is actually alive
Network partition between sites; you assume the primary is dead and trigger Unplanned. The WMI check might or might not catch this depending on what kind of partition it is. Result: split-brain. Both VMs running, both writing, both think they’re authoritative. Recovery requires picking ONE version and discarding the other — data loss is bigger than just the RPO. Always investigate the apparent failure before triggering Unplanned; if there’s ANY chance the primary is reachable from somewhere (different network path, console access, BMC), check first.
Picking the wrong recovery point under pressure
You hit a ransomware encryption event right before the primary died. The latest recovery point on the replica contains the encrypted state. Failing over to Latest means activating the encrypted VM. Use older recovery points to find the last clean state — this is exactly what additional recovery points are for. If you didn’t enable them in Part 1, you don’t have this option in the moment of crisis.
Not testing the VM before declaring success
Failover completes. VM shows Running. You assume it works and move on. Hours later, the database is unable to start because the recovery point captured it mid-transaction and crash-recovery is taking forever. Always smoke-test before declaring done; for databases specifically, test a query before going home.
Forgetting Remove Recovery Points
The failover is committed (apps work, users are happy), but you didn’t Remove Recovery Points. The checkpoint chain stays attached to the VM. Storage usage grows; performance degrades over time; manageability drops. Always Remove Recovery Points once you’re confident the failover is the right one.
Removing Replication too early
The opposite mistake — Remove Replication right after the failover, before confirming the original primary is permanently lost. If the primary recovers an hour later, you can’t Reverse Replication; you have to set up Replica from scratch on the (now-recovered) primary. Wait until you’re sure before Removing Replication.
Forgetting to update DNS / load balancer
VM is up on the new primary, but users still try to connect to the old primary’s IP. From the user’s perspective, the failover didn’t work. Use low-TTL DNS records OR front the VM with a load balancer that has its own VIP and just changes the backend pool member.
Failing to communicate the data-loss window
Users assume zero data loss because “we have replica.” The truth is the data loss is your RPO interval. Communicate this proactively post-incident: “Anything you saved in the 5-min window before the outage may need to be re-entered.” Better to set expectations than to have users discover lost data through real work.
Where this leaves the series
Series complete. Part 1 stood up the replica relationship in a domain. Part 2 rehearses it safely. Part 3 handles controlled handovers. Part 4 (this post) is the emergency button. Run Part 2 quarterly so when you eventually need Part 4, you’re executing a familiar procedure under stress instead of figuring out the wizard for the first time.
For broader Hyper-V context, see the Hyper-V Virtualization pathway — this 4-part series sits alongside the storage migration, shared-nothing live migration, and other Hyper-V operational topics.