You stood up Hyper-V Replica in Part 1. Bytes are flowing from the primary host to the replica host every five minutes. The replica VM exists on HVHost02 in a turned-off state, supposedly ready to take over if the primary disappears. The obvious question: does it actually work? You will find out when the primary disappears for real — or you can find out beforehand, in a controlled drill, without touching production. That’s what Test Failover is for. This is Part 2 of 4 in the Hyper-V Replica series; Parts 3 and 4 cover the actual failover operations (planned and unplanned). Part 2 is the drill you should run BEFORE you ever rely on Parts 3 or 4.
What Test Failover actually does
Hyper-V doesn’t boot the real replica VM during a test. It creates a lightweight clone:
- Take a checkpoint of the current replica VHDX state.
- Create a new VM (named testVM01-Test — the original name plus “-Test”) on the replica host.
- Attach a differencing disk to the new VM. The differencing disk’s parent is the checkpoint from step 1; reads come from the parent, writes land in the child.
- Wire the new VM’s network adapter to an isolated virtual switch (you pick this in advance) so its network can’t reach production.
- Hand control back to you. Start the test VM, log in, click around, run smoke tests.
While you’re doing that, the original replica VM is unchanged. Replication from the primary continues to flow into it every 5 minutes. The drill is invisible to production users and to the replication infrastructure. When you stop the drill, Hyper-V deletes the test VM, the checkpoint, and the differencing disk in one operation. The replica goes back to exactly its pre-drill state.
The whole flow is safe by design: copy-on-write at the disk layer, network isolation at the switch layer, and an explicit Stop operation that cleans up everything. Run it as often as you want; quarterly is the conventional cadence in regulated environments.
Why isolated network matters
If you boot the test VM on the production network, very bad things happen:
- IP collision. The test VM has the same IP as the real (still-running) primary VM. Network confusion, dropped packets, intermittent failures for real users.
- Active Directory conflict. A test domain controller starts replicating to real DCs. A test member server tries to register itself in DNS. Your real AD topology gets corrupted by a workload that was supposed to be air-gapped.
- App writes leak. The test VM’s database connects back to a production database server, your test queries land in production tables, and now you have data integrity to recover from.
The isolated network solves all of these by physical impossibility. A vSwitch with no uplink to the physical NIC genuinely cannot reach the outside world — the test VM’s packets have nowhere to go.
Prerequisites
- Hyper-V Replica configured per Part 1: primary host (HVHost01) with the source VM, replica host (HVHost02) with the corresponding cold replica.
- Both hosts in one Hyper-V Manager (right-click in nav tree > Connect to Server).
- An isolated internal virtual switch on the replica host. Create via Hyper-V Manager > Action > Virtual Switch Manager > New > Internal > name it (e.g. Test-Isolated). Internal type means host + guests can talk; no uplink to physical NIC means no path to the outside.
- Replication health = Normal on both sides. Verify before starting (next step).
Step 0 — verify replication health on both sides
Before any failover (test or real), confirm replication is actually working. Skipping this is the most common source of misleading drill results: you boot a stale replica that’s missing recent changes, and you mistakenly conclude that DR is fine when actually you’ve just verified yesterday’s data.
Primary side
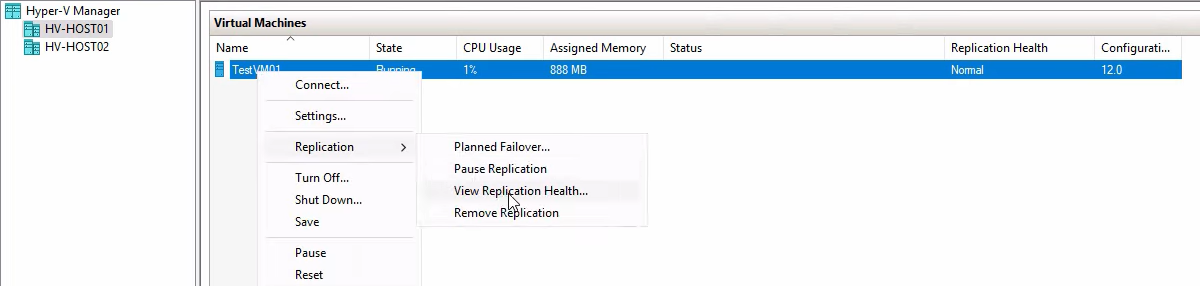
On HVHost01, right-click the source VM > Replication > View Replication Health.
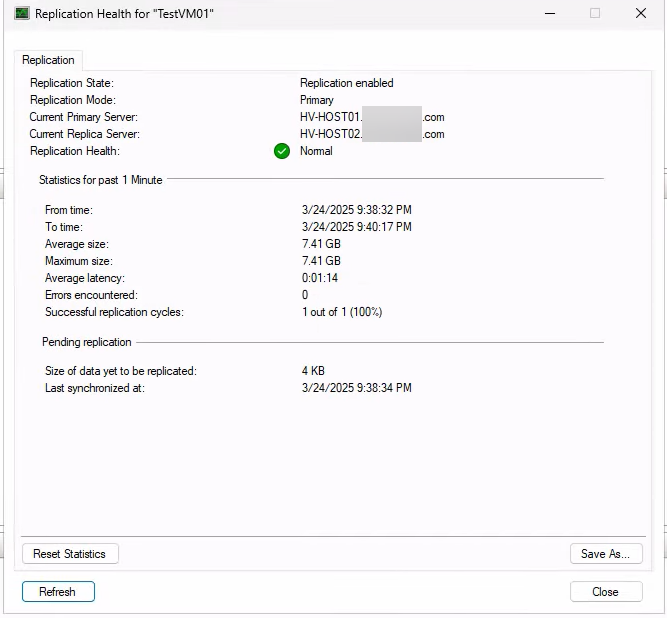
Expected: Replication enabled, Primary server, Health: Normal. Anything else — Warning, Critical, errors — means deltas aren’t flowing cleanly. Fix that before running the drill so the drill actually tests current data.
Replica side
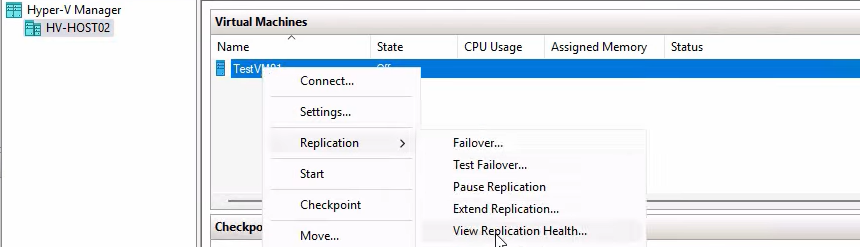
On HVHost02, right-click the replica VM > Replication > View Replication Health.
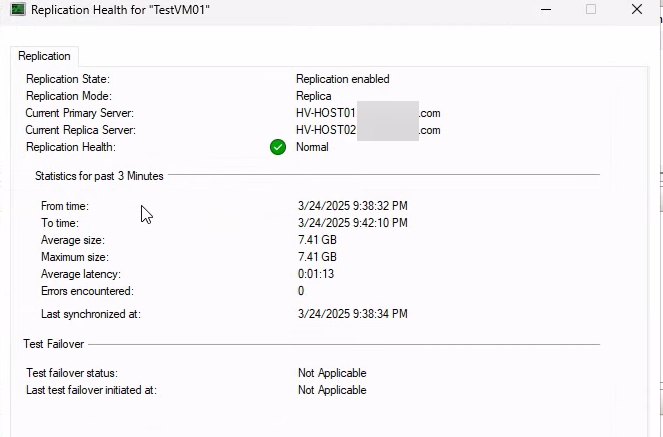
Expected: Replica server, primary host listed, Health: Normal. Both sides must agree.
Step 1 — configure the test network adapter
The test failover wizard uses a per-VM setting that points at the isolated switch. Configure it once per VM that you might want to test.

On HVHost02, right-click the replica VM > Settings.
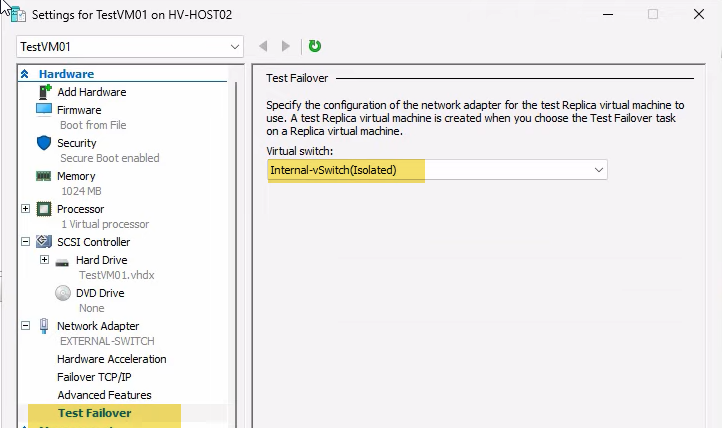
Expand Network Adapter > click Test Failover. Pick the isolated internal switch from the dropdown. Click OK.
This setting is per-VM and persists. Subsequent test failovers for this VM use the same isolated switch automatically — you don’t need to redo this every time.
Step 2 — trigger the test failover
On HVHost02, right-click the replica VM > Replication > Test Failover. The Test Failover dialog opens.
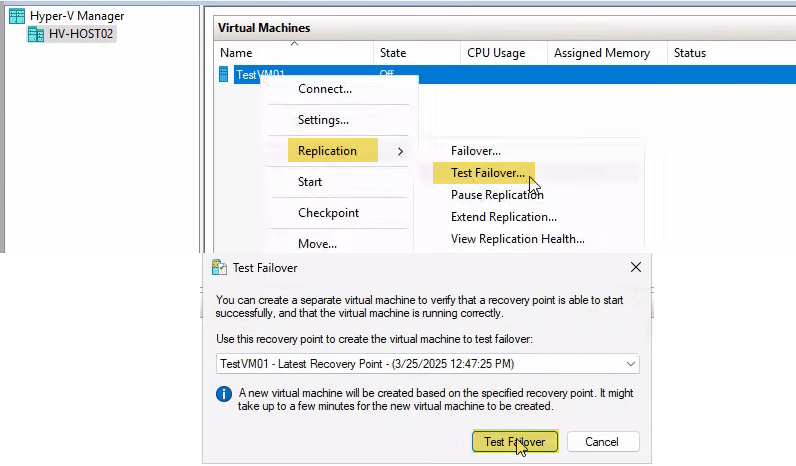
Pick the recovery point. Two options:
- Latest recovery point — the standard choice. Tests against the most recent replicated state (5 minutes old at most, in the default config).
- An older recovery point — only available if you configured additional recovery points in Part 1. Useful for testing whether you can roll back to a specific historical state (ransomware drill: “can we recover to before the infection?”).
Click Test Failover. Hyper-V creates a checkpoint of the replica VHDX, builds a new VM named testVM01-Test, attaches a differencing disk pointing at the checkpoint, and wires the test NIC to your isolated switch. Whole thing takes seconds.
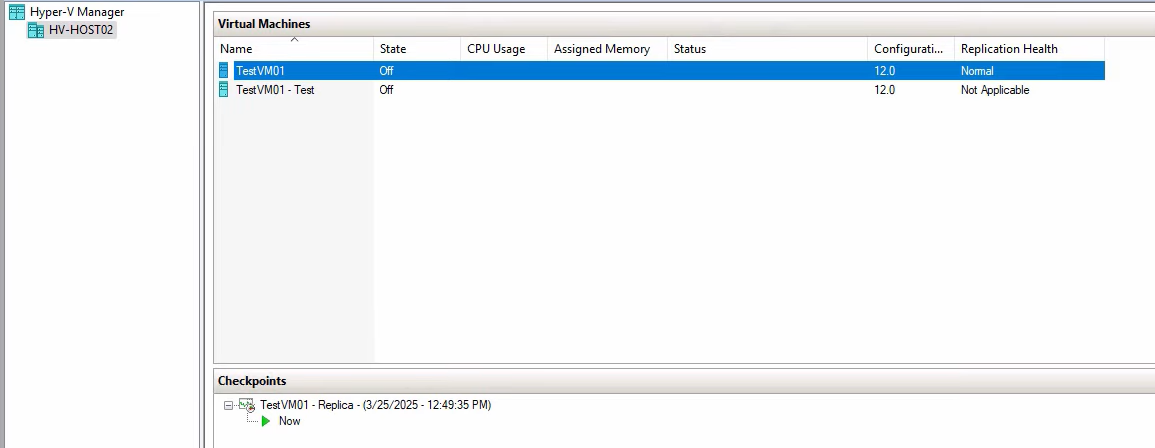
The new test VM appears in Hyper-V Manager alongside the original replica. The original replica is still cold, still receiving 5-min deltas from the primary. The test VM is cold, ready to be started.
Step 3 — verify the disk chain (optional but instructive)
If you want to see how the linked-clone trick works under the hood, inspect the disk:
- Right-click testVM01-Test > Settings > Hard Drive > Inspect Disk.
- Click Inspect Parent. The parent is the original replica VHDX file.
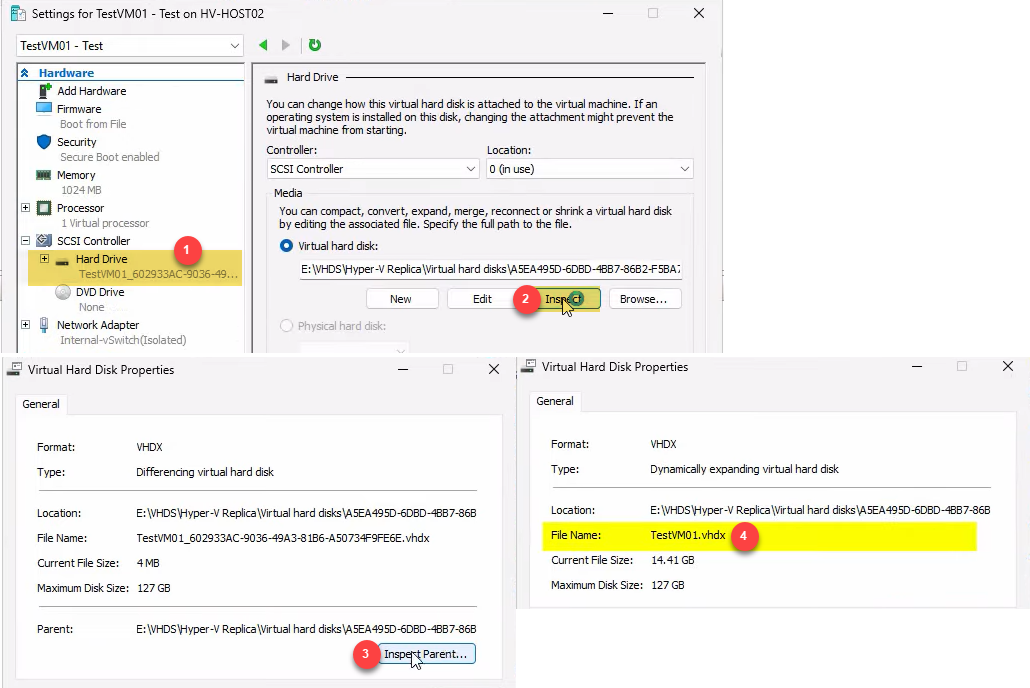
This is the differencing disk relationship: the test VM’s disk is a child that points at the replica’s disk as its parent. Reads come from the parent (or from the child if a write has happened to that block); writes go only to the child. The parent is read-only during the test, which is what makes the operation safe.
Step 4 — start the test VM and run smoke tests
Right-click testVM01-Test > Start. Wait for it to boot (a regular VM boot — not instant; depends on VM size and storage speed).
Right-click > Connect to open the VM console. Log in with whatever credentials work on the original VM — same OS, same accounts, same everything because the VHDX is a copy of the real replica.
Run your smoke tests:
- Does the OS boot cleanly? (No blue screens, no error pop-ups during login.)
- Are the expected services running? (Open Services.msc; the apps you care about should be in Running state.)
- Can the apps function in isolation? (For a database VM, can you connect locally and run a SELECT? For a web app, can you hit localhost?)
- Are recent transactions present? (Pull up a record you know was committed in the last hour and verify it’s there in the test copy.)
Document the results. For a quarterly DR drill, this is the evidence: a screenshot of the test VM running with a recent transaction visible. Compliance auditors love this.
Don’t worry about side effects. Anything you do in the test VM (log in, change a setting, write a file) lands in the differencing disk and gets discarded when you stop the failover. The original replica is unaffected.
Step 5 — stop the failover and clean up
When you’re done testing, clean up. The cleanup happens via the SAME right-click action you used to start the test, but on the ORIGINAL replica (not the test clone).

Right-click the ORIGINAL replica VM (testVM01, NOT testVM01-Test) > Replication > Stop Test Failover.
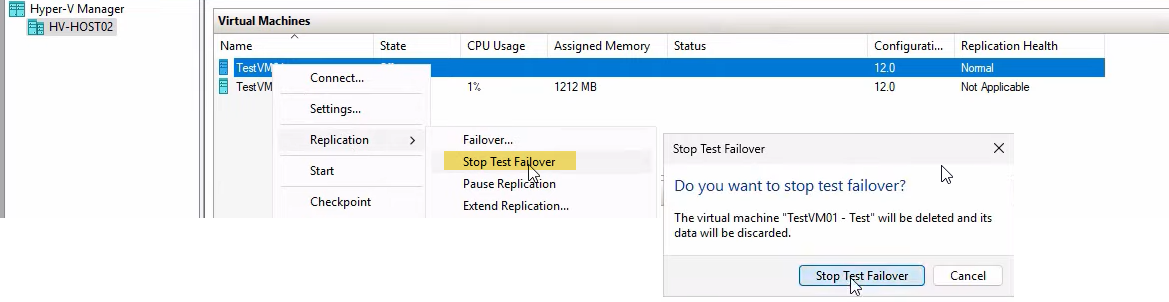
Confirm the prompt. Hyper-V deletes the test VM, the checkpoint it was built on, and the differencing disk all in one operation.
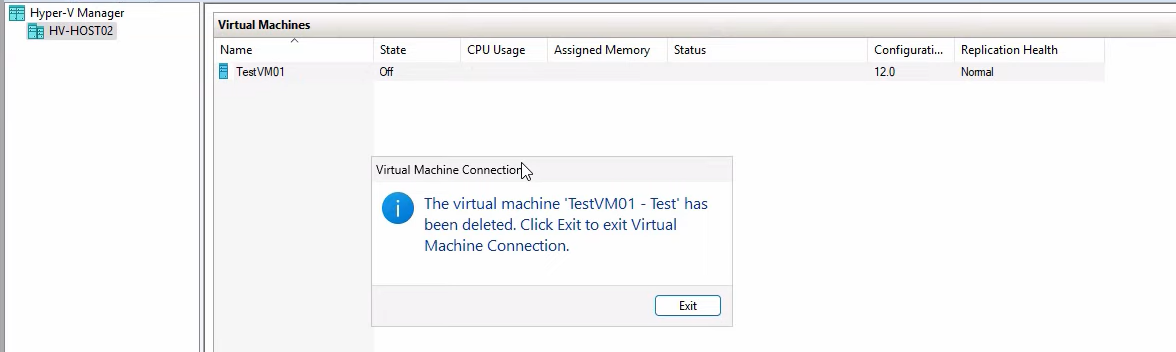
Confirmation dialog: testVM01-Test has been deleted. Click Exit. The replica returns to exactly its pre-drill state — same VHDX, same Replication enabled status, same health. The next 5-min replication delta from the primary lands as if nothing happened.
Things that bite people
Test VM bound to the production network
You forgot to configure the Test Failover network setting in Step 1. The test VM boots, gets an IP via DHCP from your real network, and within seconds an IP collision with the real primary VM tanks production traffic. STOP the test failover immediately if you notice this; reconfigure the test NIC to an isolated switch; do the drill again.
Manual deletion of test artifacts
You delete the test VM via right-click > Delete instead of via Stop Test Failover. The differencing disk and checkpoint stay behind, orphaned. Worse: the original replica thinks a test failover is still in progress, and replication may pause until you fix the state. Always use Stop Test Failover to clean up; never manually delete.
Drill confirmed nothing because health was Critical going in
You skipped Step 0 (the health check). Replication had been broken for two days due to a network blip. The test failover spun up two-day-old data. Tests passed (the OS booted, services started) but the data was stale. Real failover later would have lost two days of changes. Always verify health = Normal BEFORE the drill.
Test VM is missing the same hardware as the primary
If your VM uses pass-through hardware, GPU partitioning, or a specific physical disk, the test VM on the replica host needs the equivalent hardware available. If it’s not, the test VM boots in a degraded state — the OS comes up but specific apps fail. Don’t draw conclusions about apps that depend on hardware unless the replica host has matching hardware.
Application-consistent recovery wasn’t actually configured
You enabled additional recovery points in Part 1 but forgot to enable application-consistent (VSS) snapshots. All your recovery points are crash-consistent. For most apps that’s fine; for SQL Server with autocommit transactions in flight, the test VM may need to do crash recovery on boot. Document this so it doesn’t surprise you in a real failover.
Test failover during a maintenance window on the primary
If the primary host is rebooting (planned maintenance) at the same time as your test failover, replication is paused on the source side. The replica still has the latest delta from before the maintenance, so the test still works — but if you’re doing the drill specifically to test “what if the primary just died,” do it during normal operation, not during maintenance.
Forgetting to document the drill
The drill itself is the easy part. The audit value is in the documentation: date, who ran it, what the test VM showed, pass/fail, any anomalies. Without that paper trail, the drill is operationally useful but doesn’t satisfy compliance requirements. Build a simple template (date, version, notes) and fill it in every time.
Cadence and what to test for
Quarterly is the standard cadence for production systems. Run it more often during the first month after setup (validate the configuration), after any significant change to the protected VM (OS upgrade, app version bump), and after any significant change to the replication infrastructure (Hyper-V upgrade, network reconfiguration).
What to actually test, by VM type:
- Domain controllers — verify AD database can be queried via dsa.msc; check sysvol presence; do NOT promote the test DC or it’ll try to write back to the (isolated) network expecting peers.
- Database servers — connect locally with SSMS or psql, run a SELECT against a recent table, verify the row count matches what production showed an hour ago.
- Application servers — start the app service, hit localhost in a browser, run a synthetic transaction.
- File servers — browse the share locally, open a recent file, verify content.
For all types: log in as a normal user (not just admin) to catch credential or profile issues that don’t surface for admin accounts.
Where this fits in the series
Part 2 is the drill; Parts 3 and 4 are the real thing. Part 3: Planned Failover walks the controlled handover from primary to replica during maintenance windows (graceful shutdown, final sync, replica becomes primary). Part 4: Unplanned Failover covers the “primary is dead” emergency scenario where you bring up the replica from the latest available recovery point and accept whatever RPO you have.
Run Part 2’s drill quarterly so when you eventually need to do Part 3 or Part 4, you’re executing a familiar procedure under stress instead of figuring out the wizard for the first time. For broader Hyper-V context, see the Hyper-V Virtualization pathway.