You set up Hyper-V Replica in Part 1 and proved it works via a quarterly drill in Part 2. Now the moment comes: you actually need to move the workload off the primary host. The primary is still alive — you just need to take it down for maintenance, hardware refresh, or a planned site migration. This is the Planned Failover scenario: a controlled, choreographed handover with zero data loss because you do a final sync before flipping. Part 4 in this series covers the unplanned scenario where the primary is already dead and zero data loss isn’t on the table.
What planned failover actually does (vs the other failover types)
| Scenario | Primary state | Data loss | Use case |
|---|---|---|---|
| Test failover (Part 2) | Still running | None — test never commits | Quarterly DR drill, validate config |
| Planned failover (this post) | Alive, gracefully shut down | Zero (final sync first) | Maintenance windows, planned migrations |
| Unplanned failover (Part 4) | Dead/unreachable | Up to one full interval (5 min default) | Real disaster, primary is gone |
Planned failover is the “best” failover — it’s the only one with zero data loss — but you only get to use it when the primary is still cooperative. If the primary is already a smoking crater, you’re in Part 4 territory.
The choreography
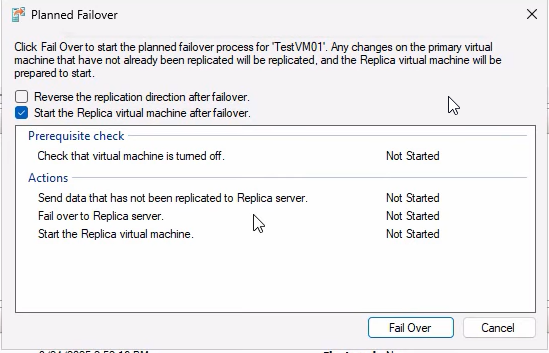
The Planned Failover wizard performs four operations in order:
- Verify prerequisites. Replication must be Healthy. The primary VM must be in the Off state (graceful shutdown). The replica must be reachable.
- Final sync. Hyper-V copies any remaining deltas from the (now-stopped) primary VM to the replica. Because the VM is off, no new writes are happening, so this sync is the LAST one needed and it has zero data loss.
- Role flip. The replica VM’s metadata is updated to mark it as the new primary. The original primary’s VM is marked as no-longer-primary (becomes the new replica role-wise, though it stays cold).
- Start the new primary. If you ticked the auto-start checkbox, the new primary VM boots automatically. Users can connect once the OS is up and the network is reachable.
Total downtime: from the moment you click Failover until the new primary is fully booted. For most VMs that’s seconds to a few minutes — mostly bounded by the OS boot time, not by Hyper-V.
The auto-reverse option (and why you should use it)
The wizard has a checkbox: “Reverse the replication direction after failover.” What it does: after the failover completes, automatically configure the OLD primary as the NEW replica, with deltas now flowing in the opposite direction (new primary → old primary).
If you DON’T tick it: replication enters a paused/warning state after failover. You have to manually run the Reverse Replication wizard before DR is restored. During that gap, the workload is unprotected — if the new primary fails before you finish the reverse, you have no replica.
If you DO tick it: replication continues protecting the workload immediately, just in the new direction. No manual intervention needed.
For real-world production: always tick auto-reverse. The manual demo in this post is to show what the wizard is doing under the hood; for actual operations the auto path is right.
Prerequisites
- Hyper-V Replica configured per Part 1.
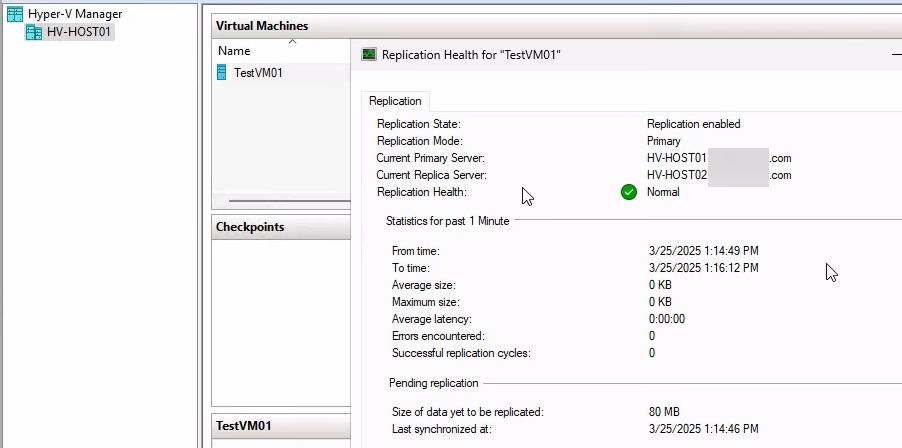
- Replication health = Normal on both sides. Verify before starting (right-click VM > Replication > View Replication Health).
- Primary VM is currently running but you’re ready to shut it down.
- An external (production-facing) virtual switch exists on the replica host with the same name as on the primary. The replica VM’s production NIC will use this switch when it boots as the new primary.
- For domains, both hosts in the same AD. Same prereqs as the original setup.
Do a Test Failover (Part 2) first if you haven’t in the last few months. The drill catches network/cert/auth issues without committing.
Step 1 — graceful shutdown of the primary VM
Open Hyper-V Manager on HVHost01. Right-click the VM (testVM01) > Shut Down.
Critical: use Shut Down, NOT Turn Off. Shut Down sends an ACPI shutdown signal to the guest OS, which closes apps cleanly and flushes data. Turn Off pulls the power immediately, leaving dirty state on disk. The final sync (next step) only has zero data loss if the VM was shut down cleanly.
Wait for the VM’s status to show Off before continuing. Could take 30 seconds to a few minutes depending on what’s running inside.

Step 2 — trigger the planned failover
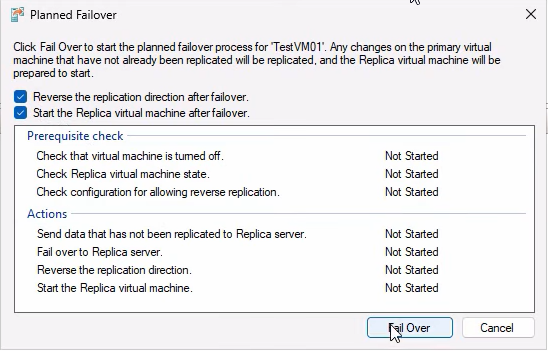
Right-click testVM01 (still on HVHost01) > Replication > Planned Failover.
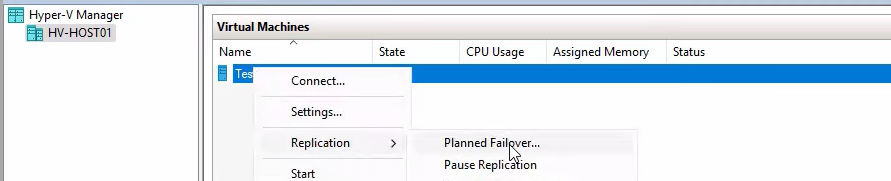
The wizard opens with two checkboxes and an Actions pane.
Checkboxes:
- Reverse the replication direction after failover — tick this for production use (auto-restore DR in the new direction). For this demo we’ll leave it unticked to show the manual reverse process in Step 3.
- Start the replica VM after failover — tick this so the new primary boots automatically. If you leave it unticked, the failover completes but the new primary is in the Off state — you have to start it manually before users can connect.
Click Failover. Watch the progress:
- Final sync — deltas flow to the replica.
- Primary VM confirmed off.
- Replica VM activated as new primary.
- (If checkbox ticked) New primary boots.
If the wizard refuses with a “Prerequisites not met” error, the most common causes are: replication health was not Normal, primary VM is not in the Off state, or replica is unreachable. Check Event Viewer at Applications and Services Logs > Microsoft > Windows > Hyper-V-Replica for the specific error.

After completion, switch to HVHost02 in Hyper-V Manager. testVM01 is now Running there. Open Settings > Network Adapter and confirm it’s on an external vSwitch (NOT the isolated test switch from Part 2). Update your DNS records or load balancer to redirect users to the new primary’s IP if necessary.
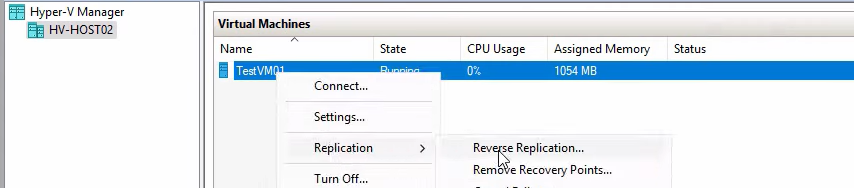
Step 3 — manually reverse replication (only if you didn’t auto-reverse)
If you ticked auto-reverse in Step 2, skip this section. Otherwise, replication is currently in a paused/warning state and you need to fix it before the workload is protected again.
Confirm the warning state
On HVHost02 (new primary), right-click testVM01 > Replication > View Replication Health. Status: Warning, replication stopped. Expected. Close.
Run the Reverse Replication wizard
Right-click testVM01 > Replication > Reverse Replication.
Click Next on the intro.
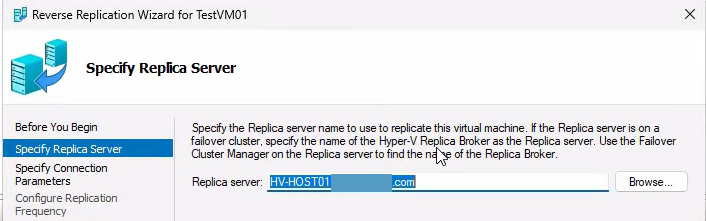
Specify the new replica server — HVHost01 (the former primary). It auto-fills. Next.
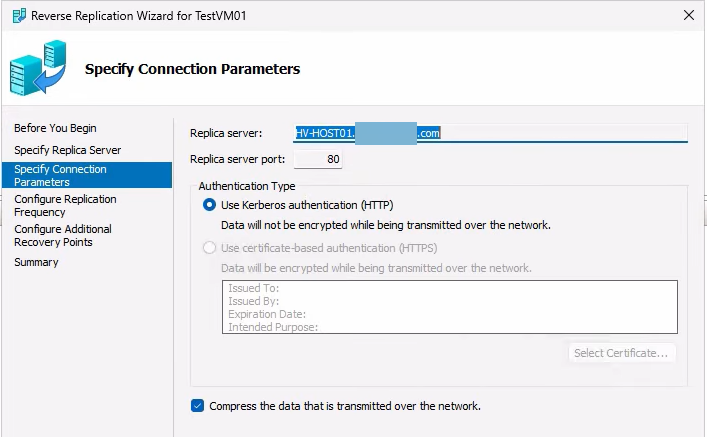
Connection parameters — match the original setup (HTTP, Kerberos, Compress data). If you mismatch any of these, the wizard fails at validation. Refer back to your Part 1 config if unsure.
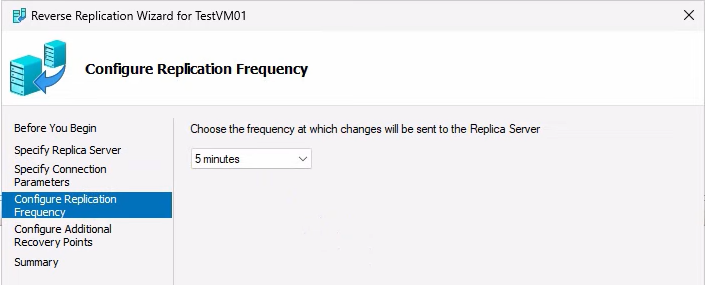
Replication frequency — same as before (5 min default).
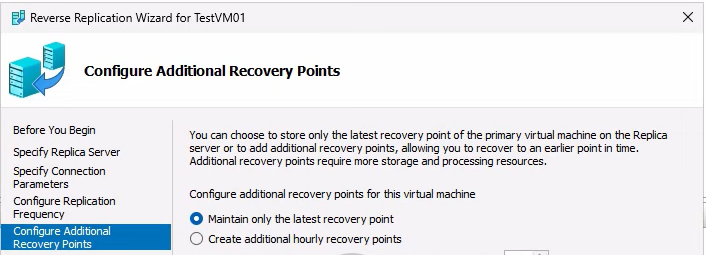
Recovery points config — same as before (latest-only for the lab demo).
Click Finish. The wizard performs an initial sync from the new primary (HVHost02) to the new replica (HVHost01). Since the VM was just shut down on HVHost01 a few minutes ago and is largely unchanged, the sync is quick.
Verify the new health
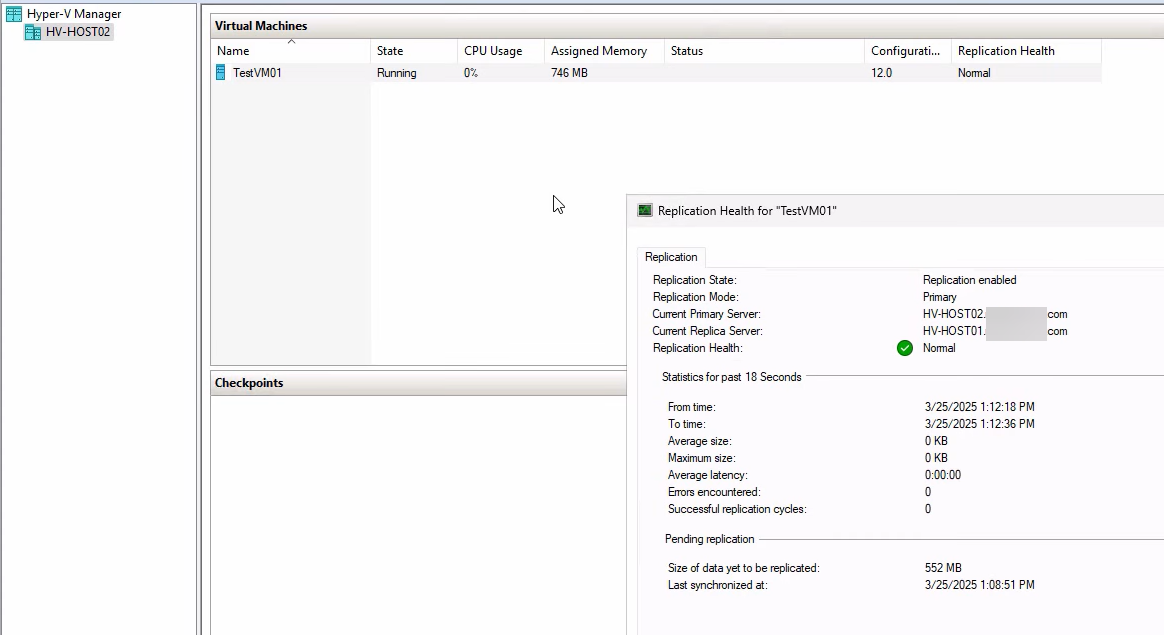
Right-click testVM01 on HVHost02 > Replication > View Replication Health. Now: Primary mode, Health Normal. Replication is flowing in the new direction. Both sides are protected again.
Auto-reverse does steps 5–10 here for you in one click. For production, just tick the box; the manual flow above is to show what the auto-reverse is actually doing.
Step 4 — failback (when maintenance is done)
Maintenance on HVHost01 finishes. You want the workload back on its original home. Failback is the same flow as failover but in reverse roles:
Graceful shutdown on the current primary (HVHost02)

Right-click testVM01 on HVHost02 > Shut Down. Wait for Off.
Planned Failover (HVHost02 → HVHost01)

Tick BOTH checkboxes this time:
- Reverse the replication direction after failover — ALWAYS tick on failback. After failback you want DR running in the original direction (HVHost01 → HVHost02) automatically.
- Start the replica VM after failover — tick so the original primary boots automatically.
Click Failover. Wait for completion.
Verify on HVHost01

The VM is Running again on the original primary. Network adapter is on the external switch, users connect normally. Maintenance window is officially over.
Final health check: Right-click VM > Replication > View Replication Health. Primary mode, Health Normal. Round-trip complete.
Things that bite people
Using Turn Off instead of Shut Down
The wizard refuses with a “Prerequisites not met” error if the VM was Turned Off rather than Shut Down (because the final sync can’t happen cleanly). Always use Shut Down. If you accidentally Turned Off, start the VM, let it come up, log in to confirm it’s healthy, then Shut Down.
Skipping the auto-reverse checkbox in production
You forget to tick “Reverse the replication direction after failover” and treat it as a one-time operation. The workload is now unprotected because replication is in a stopped state. If the new primary fails before you manually reverse, you have no replica. ALWAYS tick auto-reverse for production.
Forgetting to update DNS / load balancer
Failover succeeds, the new primary is up and running, but users still try to connect to the OLD primary’s IP because DNS still points there. Symptoms: users see the workload as down even though it’s actually up on the new primary. Either update DNS proactively, use a low-TTL record so propagation is fast, or front the workload with a load balancer that has its own VIP and just shifts the backend pool members.
Replica host doesn’t have an external vSwitch with the matching name
The new primary’s NIC tries to connect to a vSwitch that doesn’t exist on the replica host. The VM boots but has no network. Standardise vSwitch names across both hosts BEFORE you ever need to fail over.
Connection parameter mismatch on Reverse Replication
The Reverse Replication wizard fails because you picked HTTPS instead of HTTP, or the wrong port, or skipped the Compress checkbox. Match the original Part 1 setup exactly — or use auto-reverse and not have to think about it.
VM size makes failover slow
For a multi-hundred-gigabyte VM, the boot phase of the failover takes several minutes (just OS startup time, not Hyper-V). Communicate the expected downtime to users in advance — “up to 5 min outage during the maintenance window” is far better than “the system is broken”.
Failback skipped because “it’s working fine on the replica”
You do the failover, everything works on HVHost02, you don’t bother failing back. Months later you realize HVHost02 was supposed to be the disaster recovery host and you’ve been running production on it the entire time without a backup. Always plan the failback — it’s the second half of the maintenance window.
App-consistent recovery wasn’t enabled
If you have apps that need application-consistent recovery (databases, Exchange) and you didn’t enable VSS in Part 1, the failover may bring the VM up with the database in crash-recovery mode. Usually fine, but worth knowing in advance so you don’t panic when the database log shows recovery messages on first start.
Where this fits
Part 3 is the controlled-handover scenario. Part 4 covers the emergency case (Unplanned Failover) where the primary is already dead and you have to bring up the replica from the latest available recovery point with whatever RPO you have. Together with Part 1 (setup) and Part 2 (drill), this completes the Hyper-V Replica lifecycle for the domain-based configuration. For broader Hyper-V context, see the Hyper-V Virtualization pathway.