Hyper-V Replica is the built-in DR layer in every Hyper-V install. Configure it once and Hyper-V asynchronously copies a VM’s disks to a second standalone host every few minutes; if the primary disappears you fail over to the cold replica and resume operations with at most a few minutes of data loss. This is Part 1 of a 4-part series covering the domain-based recipe (Kerberos auth over HTTP), which is dramatically simpler than the workgroup recipe (covered separately in the workgroup post) because AD provides the trust anchor automatically. Parts 2–4 cover Test Failover, Planned Failover, and Unplanned Failover — the operations you actually use the replica for. This post sets everything up.
How replica differs from live migration
Worth being explicit because the names get confused:
- Live Migration — moves a RUNNING VM between hosts, both ways, with seconds of perceived downtime. Both hosts are typically online during the operation. Used for maintenance, load balancing, host upgrades. Covered in the previous Hyper-V posts in this pathway.
- Hyper-V Replica — copies a RUNNING VM to a COLD copy on a second host. The replica stays off, ready to be brought up if the primary fails. One-way by default; configurable failback. Used for disaster recovery, NOT for migration.
You configure both if you want both: live migration for planned operations, replica for disaster scenarios.
Domain version vs workgroup version
Both versions of Hyper-V Replica do the same thing functionally; the difference is how the two hosts authenticate to each other:
| Aspect | Domain (this post) | Workgroup (separate post) |
|---|---|---|
| Auth protocol | Kerberos via AD | Self-signed certs via TLS |
| Default port | HTTP/80 | HTTPS/443 |
| Cert generation | Not needed | New-SelfSignedCertificate per host |
| Trust setup | Automatic via AD | Manual: copy test root to Trusted Root store |
| Registry tweaks | None | DisableCertRevocationCheck = 1 |
| Setup steps | ~6 | ~12 |
The domain version is roughly half the work. If you have AD available, use it.
Prerequisites
- Two Hyper-V hosts, both running Windows Server 2012 R2 or later (demo uses Server 2025)
- Both hosts joined to the SAME AD domain (or to domains with a trust relationship)
- Network connectivity between the hosts; TCP 80 (HTTP) or TCP 443 (HTTPS) open in both directions
- Storage on the replica host with capacity for the full set of VHDX files
- The VM you want to protect has no checkpoints (snapshots). If it does, merge them first via right-click VM > Delete Checkpoint > Apply now.
Demo setup: HVHost01 (primary) and HVHost02 (replica), both joined to infotechninja.local domain. Test VM is named “test VM01”.
Step 1 — configure the replica role on HVHost02
Start with the replica side — the host that will RECEIVE replicas.
- Open Hyper-V Manager. Right-click the host name (HVHost02) in the navigation tree > Hyper-V Settings.
- Navigate to Replication Configuration.
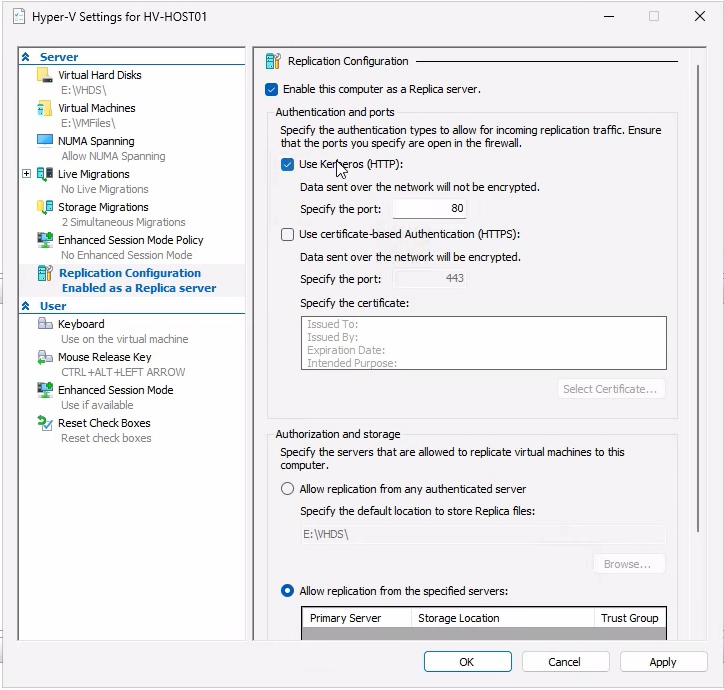
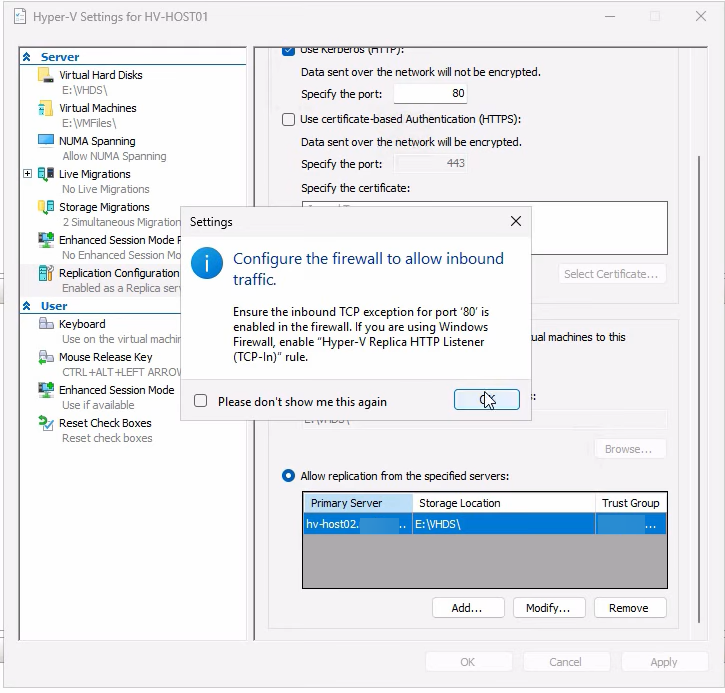
- Tick Enable this computer as a Replica server.
- For the authentication protocol, tick Use Kerberos (HTTP) — the default port 80 is exposed in this mode.

- Authorization: pick Allow replication from the specified servers (more secure than “any authenticated server”).
- Click Add. Enter the primary host’s FQDN (HVHost01.lab.com), browse to a storage path with capacity for the replicated VHDX (e.g.
E:\Replicas), and set a trust group name (any string, e.g. “lab.com”). The trust group lets you logically group hosts that should be able to replicate among each other.
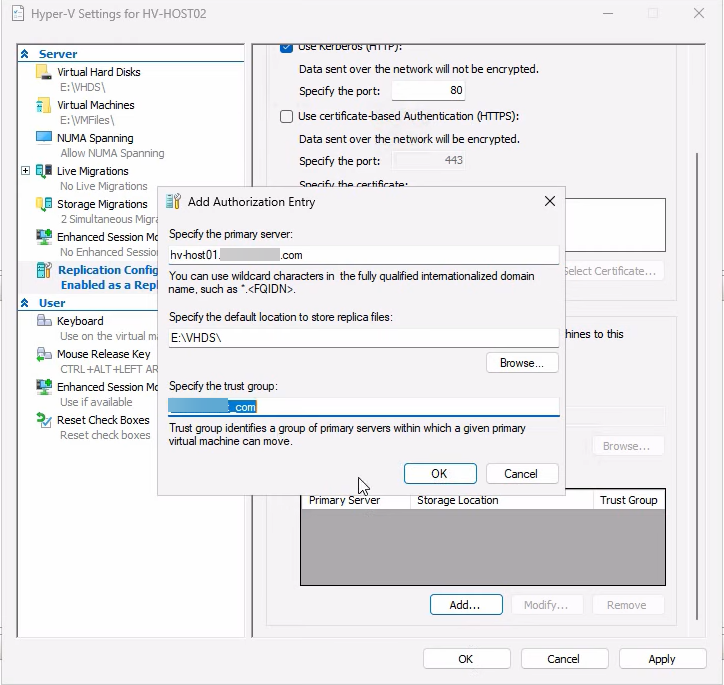
- Click OK to save the entry, then Apply on the main dialog.
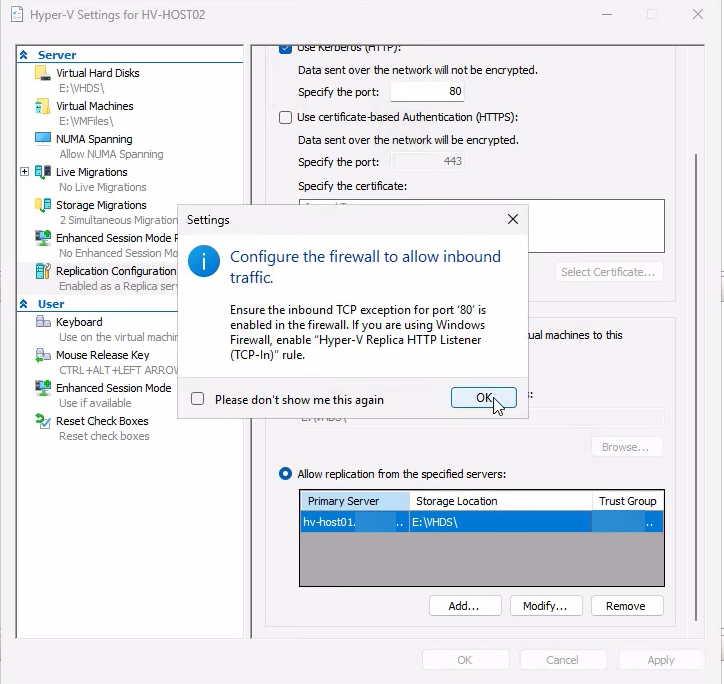
Hyper-V shows a firewall reminder — it does NOT auto-enable the rule on this dialog; you have to do it manually in the next step. The reminder is easy to dismiss and forget. Don’t.
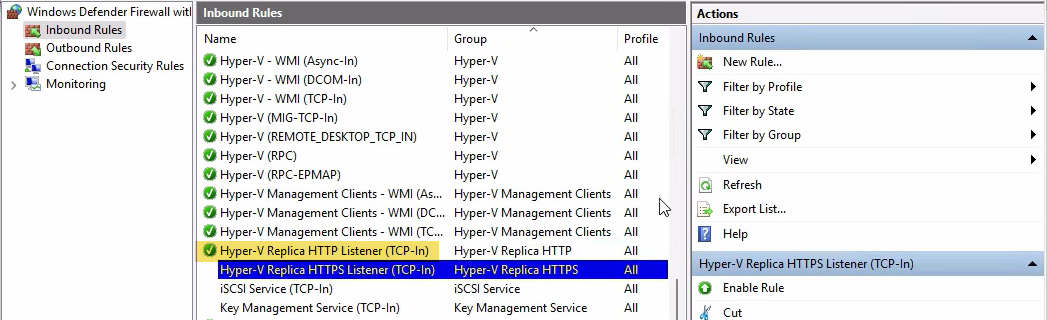
Enable the firewall rule on HVHost02
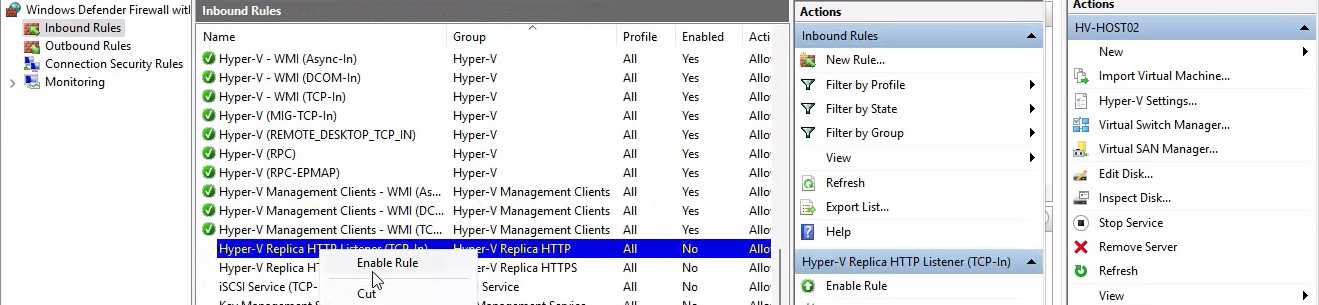
Open wf.msc > Inbound Rules. Find Hyper-V Replica HTTP Listener (TCP-In) > right-click > Enable Rule.
The HTTPS Listener rule (TCP 443) is for cert-based auth and stays disabled in the Kerberos recipe.
Step 2 — mirror the configuration on HVHost01
For two-way trust (which enables failback after recovery), do the same on the primary host. The configuration is symmetric — HVHost01 needs to know HVHost02 is authorized as a replica destination AND as a potential primary (for failback after a real failover).

Same Replication Configuration page, same Kerberos auth.
Add HVHost02 as the authorized server. Same storage path convention. Same trust group name (must match between paired hosts).

Apply, dismiss the firewall reminder.
Enable the HTTP Listener firewall rule on HVHost01 too. Bilateral.
Step 3 — consolidate both hosts in one Hyper-V Manager
For the next step you’ll be jumping between hosts, so connect to both from one console:
From Hyper-V Manager (on either host or a workstation with RSAT), right-click in the navigation tree > Connect to Server > type the second host’s name. Both hosts now appear in one tree.
Step 4 — enable replication for a specific VM
Host-level configuration is done. Now enable replication on the VM you want to protect. Run this on the PRIMARY host (HVHost01) for the VM (test VM01).
Make sure the VM has no checkpoints first. Right-click VM > Delete Checkpoint > Apply now if it does. Replicas need a clean single-VHDX setup.
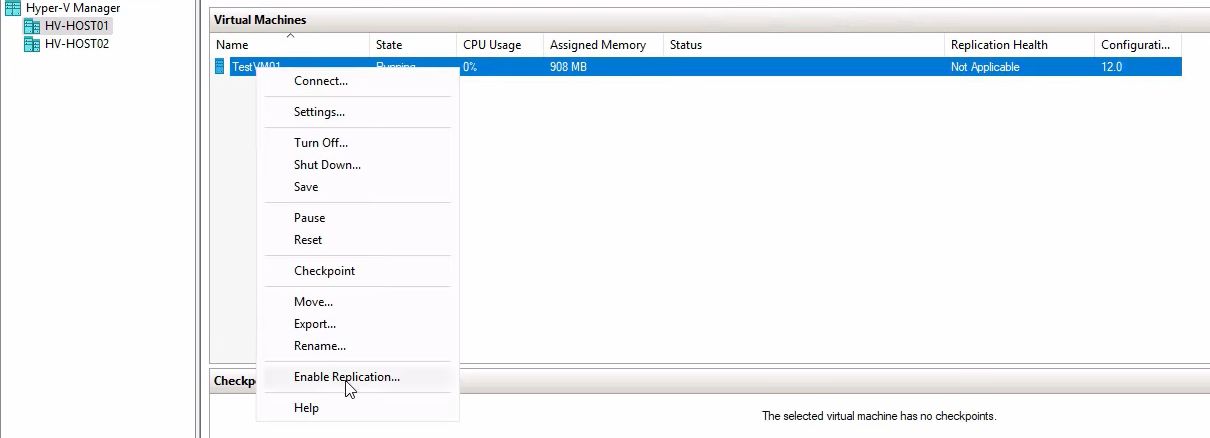
Right-click the VM > Enable Replication. The Enable Replication wizard opens. Click Next on the intro.
Specify Replica Server
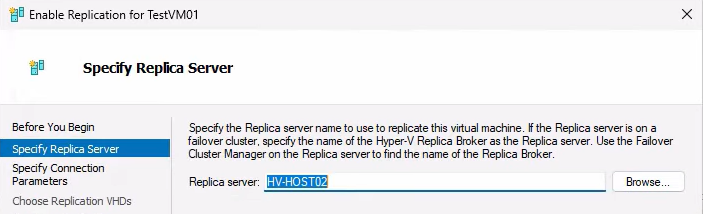
Type the destination FQDN (HVHost02.lab.com). Click Check Names (or just Next); if AD/DNS resolves it, the wizard advances.
Specify Connection Parameters
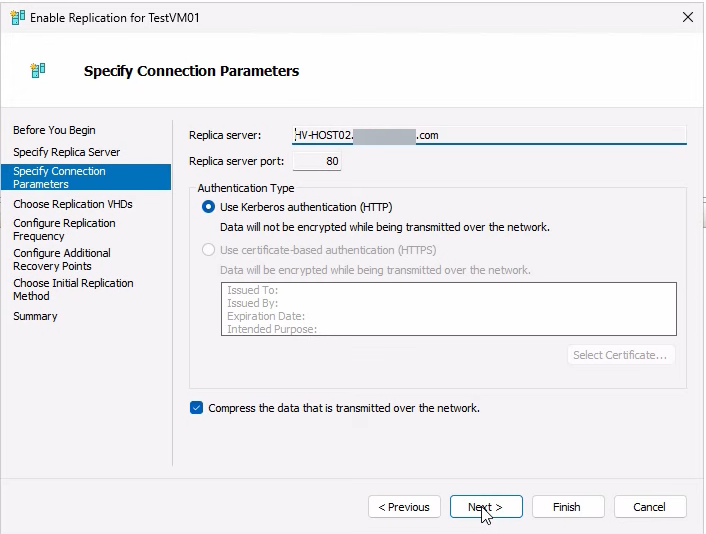
Pick HTTP + Kerberos (matching what you configured in Steps 1–2). Port 80 displayed. Tick Compress data — trades a bit of CPU for substantial bandwidth savings, almost always worth it.
Choose Replication VHDs
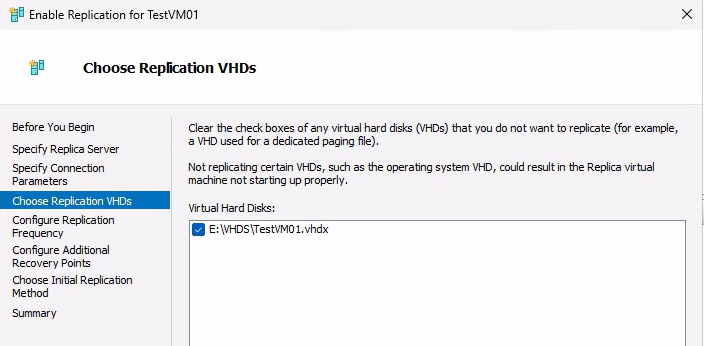
Pick which VHDs to replicate. Default is all attached disks; uncheck only if you have a scratch/temp disk you don’t care about.
Configure Replication Frequency
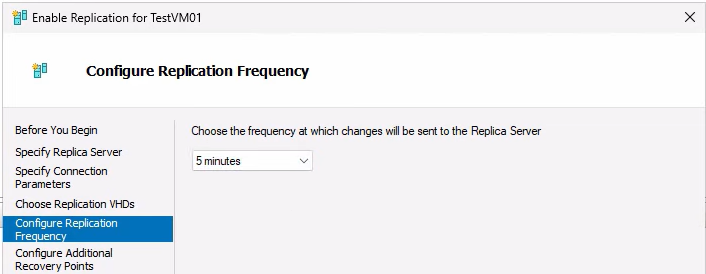
Default 5 minutes. The interval determines max RPO (worst-case data loss = duration of one full interval). 30 seconds is for very low-RPO needs and uses noticeably more bandwidth; 15 minutes is for low-priority workloads where 15 minutes of data loss is acceptable.
Configure Recovery Points
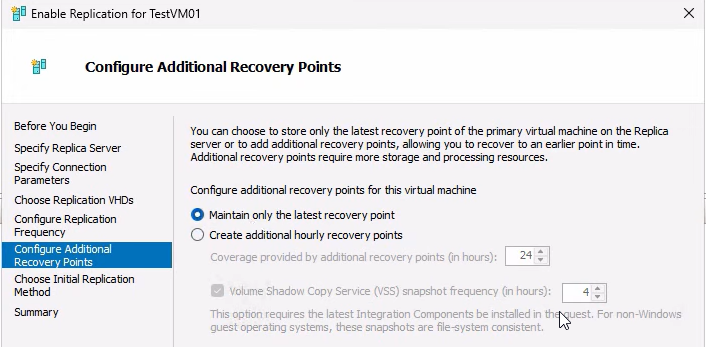
Two options:
- Maintain only the latest recovery point — simplest, most space-efficient. Failover gives you the latest replicated state.
- Configure additional recovery points — retain N historical snapshots for rollback (useful for ransomware recovery: revert to a clean point from before infection). Configure VSS interval to make every Nth point application-consistent (database-aware) instead of crash-consistent. Requires Hyper-V Integration Services in the guest.
Demo uses latest-only. For lab use, fine. For production protecting databases or critical apps, retain at least 24 hourly points and enable app-consistent snapshots every few hours.
Initial Replication Method
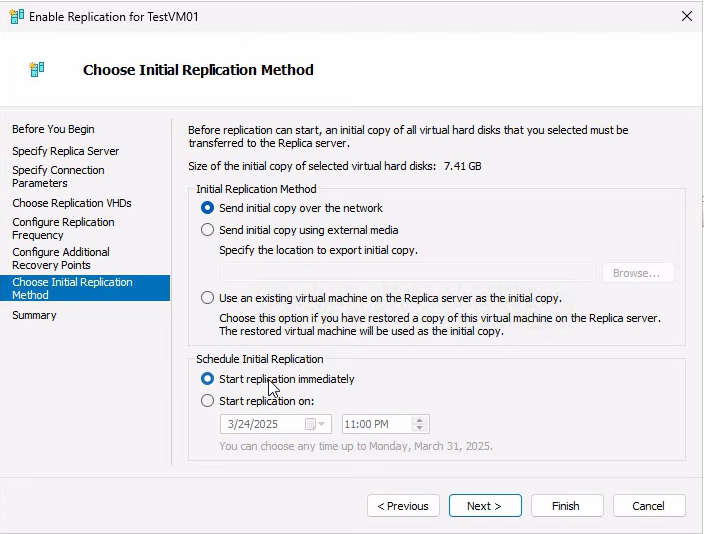
Three options:
- Send initial copy over the network — default; works for small to medium VMs. Schedule it to start immediately or defer to off-hours.
- Send initial copy using external media — for large VMs over slow links. Export the VHDX to a USB drive, ship it to the replica site, import on the destination. Subsequent deltas use the network as normal.
- Use an existing virtual machine on the Replica server — if you’ve already restored a recent backup of the VM on the replica side, use it as the seed instead of doing a full transfer.
Demo: over the network, immediately. Click Next, review the summary, Finish.
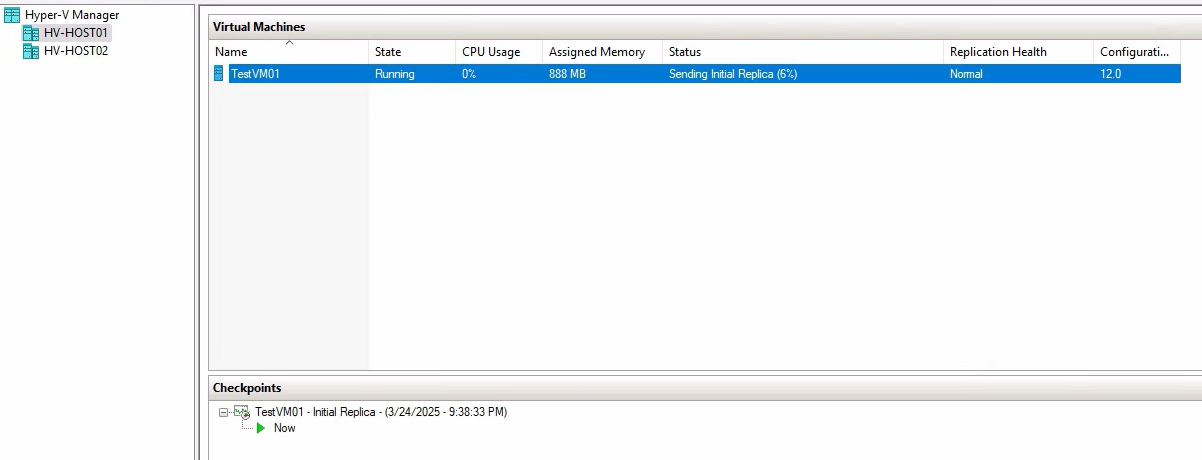
Monitoring the initial sync
The bulk transfer starts immediately. On the primary host, the VM’s status changes to Sending initial replica:
On the replica host, the same VM appears with status Receiving changes:
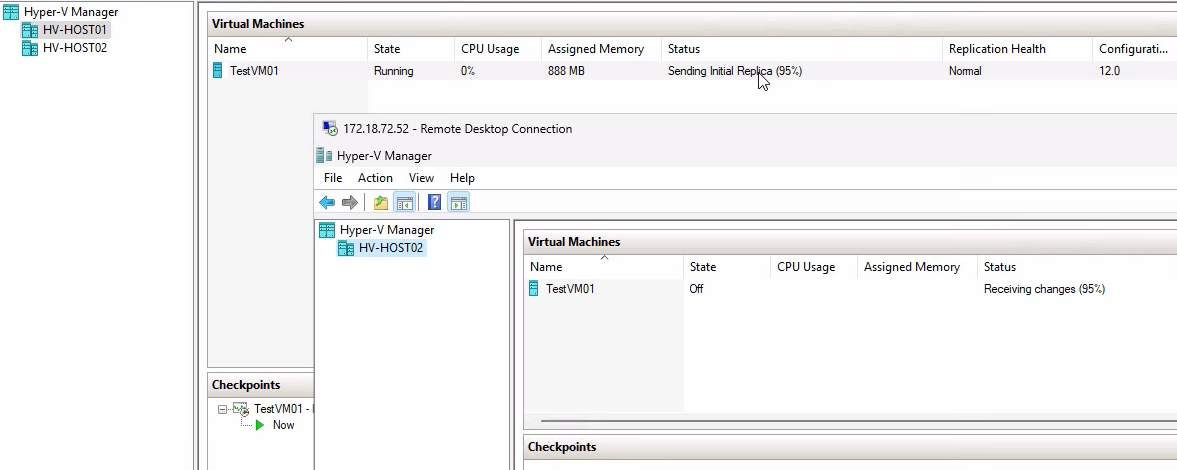
For a 50 GB VHDX over 1 Gbps Ethernet, expect ~10 minutes for the initial sync. Larger VMs scale roughly linearly. Once initial sync completes, both VMs settle to Replication enabled and replication runs at the configured interval (5 min default).
Verify replication health
After initial sync settles, verify health on both sides:
Primary side
Right-click the VM on HVHost01 > Replication > View Replication Health:
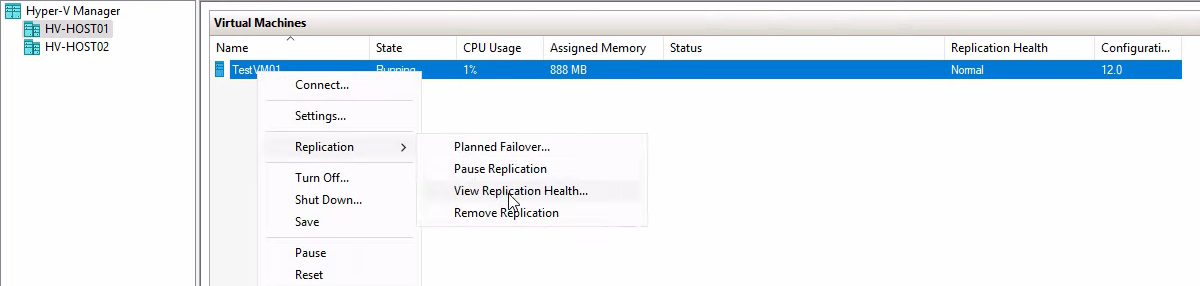
Expected output: Replication enabled, Primary server, Health: Normal. Click into the details for per-disk stats:
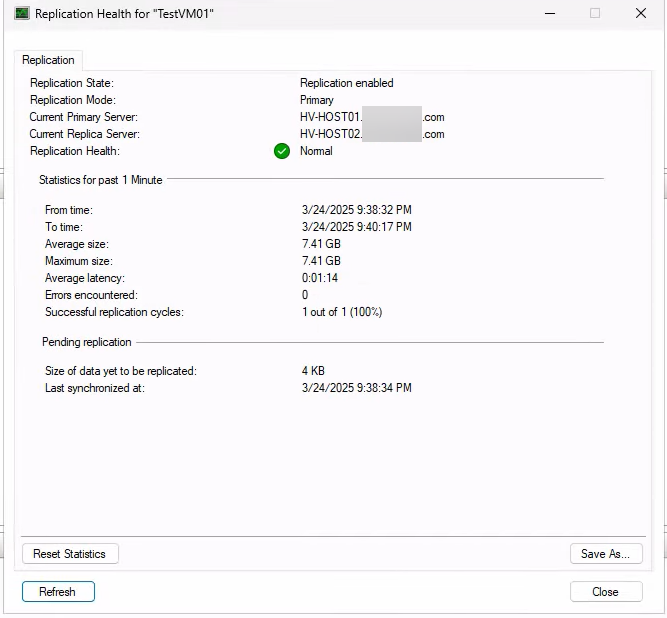
Stats include: last replication time, average data sent per cycle, errors (if any). Production monitoring: alert on Health != Normal and on average replication size spiking (could indicate a write-heavy workload outpacing the interval).
Replica side
Right-click the same VM on HVHost02 > Replication > View Replication Health:
Expected: Replica server, primary host listed, Health: Normal. Detailed view:
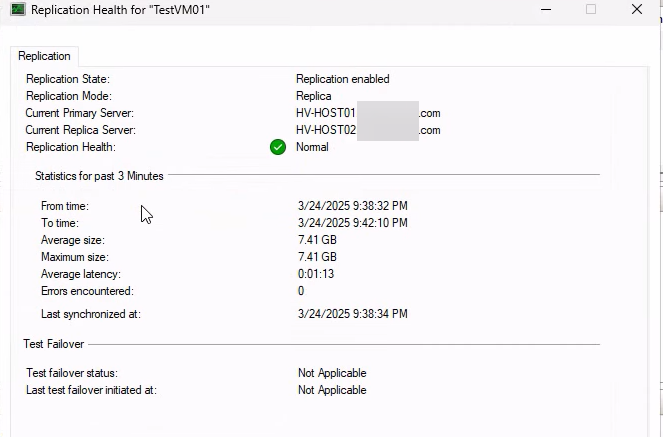
Recovery points retained, VSS interval, last sync time. The recovery-points count tells you how many historical snapshots are available for failover (not just the latest).
Where this leaves you
At this point: replication role enabled on both hosts, the test VM’s VHDX has been copied to the replica host, and 5-min deltas are being shipped continuously. The replica VM exists on HVHost02 in a turned-off state, ready to be brought up via failover if needed.
The next 3 posts in this series cover the failover operations — the actual reason you set this up:
- Part 2: Test Failover — spin up a temporary clone of the replica without affecting the primary. The DR drill operation. Run this every quarter to verify the recovery actually works before you need it.
- Part 3: Planned Failover — gracefully stop the primary, sync remaining changes, start the replica as the new primary. Zero data loss. Used for maintenance windows or planned host migrations.
- Part 4: Unplanned Failover — the primary is dead. Activate the replica from the latest replicated state. RPO = up to one full interval (5 min worst case in this configuration). Used in actual disaster scenarios.
Things that bite people during configuration
Forgetting to enable the firewall rule
The Replication Configuration dialog warns about it but doesn’t enable the rule for you. Symptoms: replication setup appears to succeed but initial sync never starts. Fix: wf.msc > Inbound Rules > Hyper-V Replica HTTP Listener > Enable.
Trust group name mismatch
The trust group name on the primary’s authorization entry must match the one on the replica’s authorization entry for the paired host. Mismatches cause replication to fail with an authorization error. Pick a single trust group name for the entire fleet and use it everywhere.
One-way authorization
You configure the replica to allow the primary as a source, but forget to configure the primary to allow the replica as a source for failback. Initial replication works fine; failback after a real failover doesn’t. Fix it before you need it — configure both hosts authorized to receive from each other from the start.
VM has checkpoints when you try to enable replication
Wizard refuses with an unhelpful error. Merge checkpoints first: right-click VM > Delete Checkpoint > Apply now (on the active checkpoint to merge it down).
Initial replication is slow because of bandwidth
For a multi-hundred-gigabyte VM over a slow link, the initial replication takes hours or days. Use the “external media” option: Hyper-V exports the VHDX to a USB drive, you ship the drive to the replica site, import it on the destination, and only deltas need to traverse the network from then on.
Recovery points eat more space than expected
Each recovery point stores deltas, not full copies, so 24 retained points doesn’t mean 24x storage. But for very write-heavy VMs, the deltas add up. Monitor the replica storage and adjust retention if you’re running low.
Application-consistent snapshots fail without VSS in the guest
If you enable app-consistent snapshots but the guest doesn’t have Hyper-V Integration Services running, the snapshots silently fall back to crash-consistent. Verify Integration Services is installed and the VSS Hyper-V provider is registered inside the guest before relying on app-consistent recovery points.
Where this fits
This is Part 1 of a 4-part Hyper-V Replica series in the Hyper-V Virtualization pathway. The companion workgroup post covers the same setup with self-signed cert auth instead of Kerberos. For broader Hyper-V context including VM creation, golden images, storage, and live migration, see the rest of the pathway.