Hyper-V Replica is the built-in disaster-recovery layer that ships with every Hyper-V install. It asynchronously copies a VM’s disks (and optionally point-in-time snapshots) to a second standalone Hyper-V host so you can fail over if the primary disappears. In a domain environment, the auth between the two hosts uses Kerberos — easy because AD does the heavy lifting. In a workgroup, you don’t have AD, so Kerberos isn’t available and you fall back to mutual cert authentication over HTTPS:443. This post covers the workgroup path end-to-end: hosts file, DNS suffix, self-signed cert with manual trust, registry tweak to disable revocation checking, replica role configuration, and finally enabling replication on a VM. It’s more steps than the domain version but every step is mechanical — nothing gets clever.
Why workgroup needs certs at all
The replication channel between primary and replica is mutually authenticated — each host must prove it is who it says it is. In a domain, the proof is a Kerberos ticket from a domain controller both hosts trust. In a workgroup there’s no shared trust anchor, so each host presents a TLS certificate that the other host validates against its local Trusted Root store. Self-signed certs work for this if (and only if) the test root that signed them lives in BOTH hosts’ Trusted Root Certification Authorities store, AND the cert subject matches each host’s FQDN, AND certificate revocation checking is disabled (since self-signed certs have no CRL endpoint to check against).
Three constraints. Get all three right and replication works. Get any one wrong and replication fails with cryptic Event Viewer entries that don’t obviously point at the cert.
Prerequisites
- Two standalone Hyper-V hosts in the SAME workgroup (or different workgroups, doesn’t matter — the cert chain provides the trust)
- TCP 443 open between them in both directions
- Administrator rights on both hosts
- The VM you want to replicate has NO checkpoints (snapshots). If it does, merge them first via Hyper-V Manager > right-click VM > Delete Checkpoint > pick Apply now. Replicas don’t play nicely with chains of differencing disks.
- Both hosts on the same network or with appropriate firewall rules end-to-end
Two hosts in the demo: HyperVHost01 (primary) and HyperVHost02 (replica). Substitute your actual hostnames everywhere.
How replication actually works
Hyper-V Replica is asynchronous — it does not block VM writes waiting for the replica to confirm. The primary host queues changes and ships them to the replica at a configured interval (default 5 minutes; options 30s, 5m, 15m). The replica applies them to its copy of the VM’s VHDX, then maintains a series of point-in-time recovery points so you can roll back to a known-good state during a failover.
Two flavours of recovery point:
- File-consistent (crash-consistent) — the default. The replica VHDX is consistent at the filesystem level; if you boot it, it’s as if the VM had crashed and rebooted. Most workloads recover fine from this; databases may need to do crash-recovery on startup.
- Application-consistent — uses VSS in the guest to flush in-memory state to disk before the snapshot. SQL, Exchange, anything that talks to VSS gets a clean point. Requires Hyper-V Integration Services running in the guest. Configurable interval (every Nth recovery point becomes app-consistent).
For lab and small-business use, file-consistent is fine. For databases under any non-trivial load, enable app-consistent at least every few hours.
Step 1 — static name resolution via the hosts file
Workgroup hosts can’t resolve each other by name (no DNS). Add static entries to the hosts file on BOTH hosts.
- Open elevated PowerShell or Terminal (Admin).
notepad C:\Windows\System32\drivers\etc\hosts- Add lines like:
192.168.1.10   HyperVHost01.lab.com
192.168.1.11   HyperVHost02.lab.com
Use FQDNs (with a suffix like lab.com) — the cert subject in Step 3 must match these. Save and close.
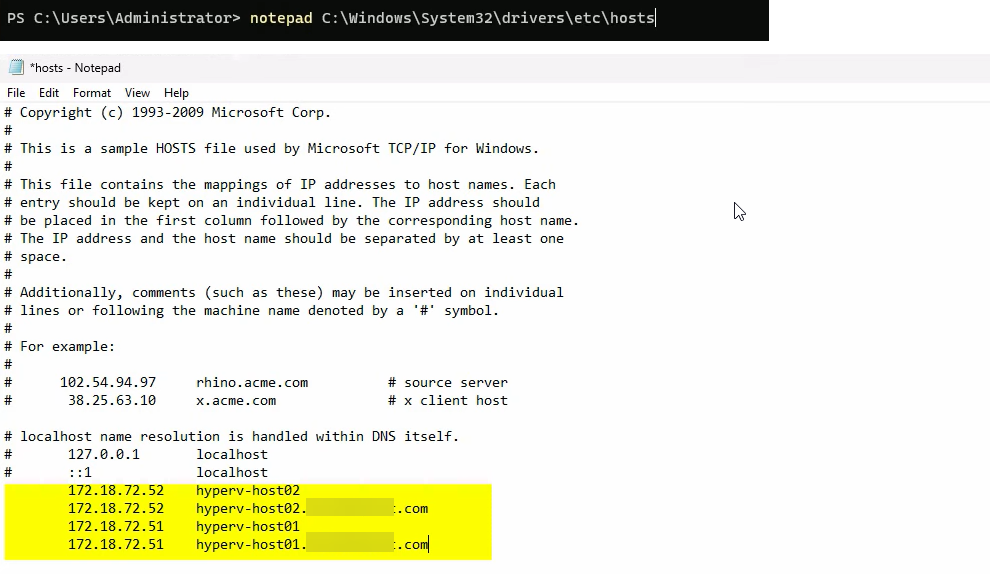
Repeat on the other host. Each host gets BOTH entries (its own + the other one). Verify with ping HyperVHost02.lab.com — the FQDN should resolve to the IP you wrote.
Step 2 — set the Primary DNS Suffix and reboot
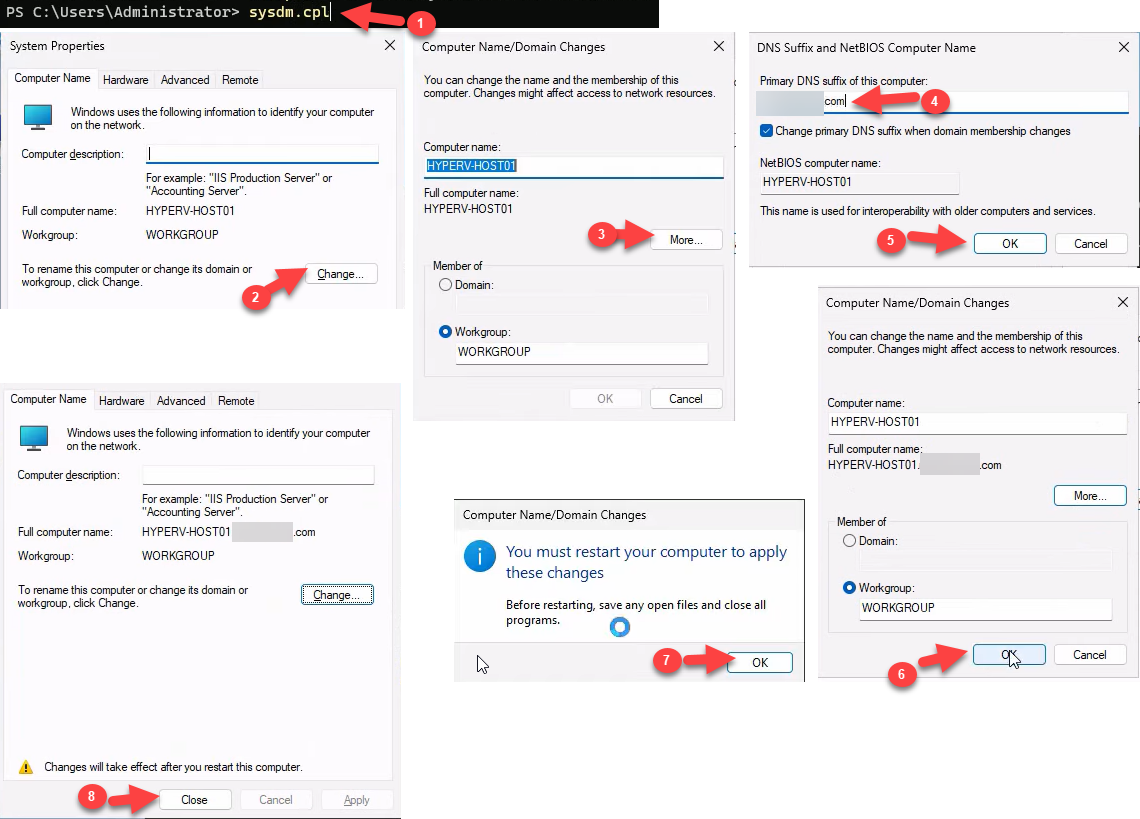
The host needs to report its full name as something.lab.com (or whatever suffix you used in the hosts file). Set the primary DNS suffix:
sysdm.cpl(Win+R then type) > System Properties.- Click Change next to the computer name.
- Click More.
- In Primary DNS suffix of this computer, type your suffix (e.g. lab.com).
- OK twice, then Close.
- Restart the host (
Restart-Computer).
After the reboot, verify the new FQDN:
$env:COMPUTERNAME    # short name
hostname             # short name, but...
[System.Net.Dns]::GetHostByName($env:COMPUTERNAME).HostName    # FQDN
The FQDN should be HyperVHost01.lab.com (or your equivalent). This must match the certificate subject in the next step.
Step 3 — create and trust a self-signed certificate
This is the meat of the workgroup setup. Three sub-steps: generate, copy the test root to Trusted Root, verify trust.
Generate the cert
In elevated PowerShell, on each host:
New-SelfSignedCertificate -DnsName "HyperVHost01.lab.com" -CertStoreLocation "Cert:\LocalMachine\My" -TestRoot -NotAfter (Get-Date).AddYears(5)(Replace the DnsName with the host’s actual FQDN.) Critical: the -TestRoot parameter is what makes Hyper-V willing to accept the cert. Without it the cert generates fine but Hyper-V Replica refuses it because it can’t chain the cert to a recognised root. With -TestRoot, the cmdlet ALSO drops a “CertReq Test Root” cert into the Intermediate Certification Authorities store — that’s the root you’re going to manually trust in the next sub-step.
Manually trust the test root
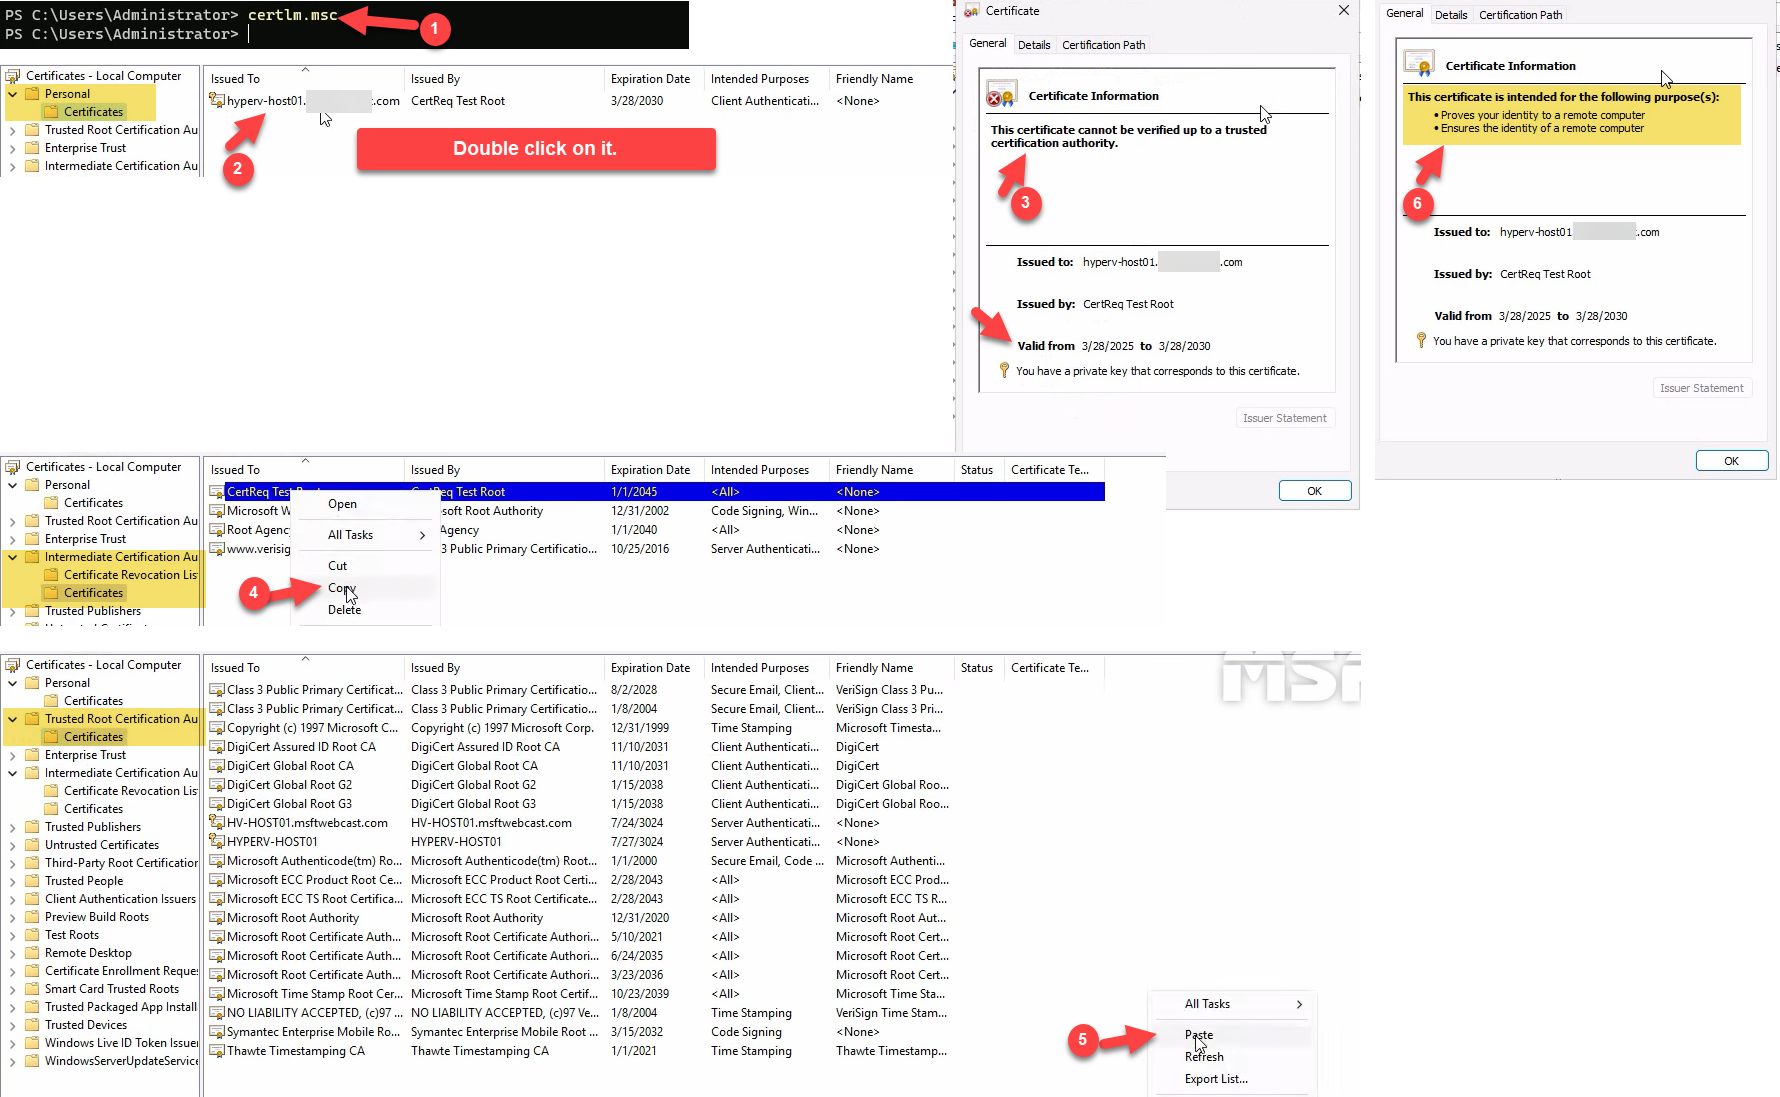
- Open the Local Computer certificate store:
certlm.msc - Expand Personal > Certificates. Your new cert is here, with subject matching the FQDN. Double-click it — it shows as untrusted at the moment.
- Expand Intermediate Certification Authorities > Certificates. Find CertReq Test Root. Right-click > Copy.
- Expand Trusted Root Certification Authorities > Certificates. Right-click > Paste. The test root now lives in the trusted store.
- Back in Personal, reopen your cert — it should now say “This certificate is OK” (no warnings). Note the expiration date.
Repeat the entire Step 3 on the other host with its own FQDN.
Step 4 — disable certificate revocation checking
Self-signed certs don’t have a CRL endpoint, so Windows’ default behaviour of checking revocation status fails closed (rejects the cert). Disable revocation checking specifically for Hyper-V Replica:
- Open Registry Editor (
regedit). - Navigate to
HKLM\SOFTWARE\Microsoft\Windows NT\CurrentVersion\Virtualization\Replication. The Replication subkey may not exist if you haven’t enabled the replica role yet — create it if missing (right-click parent > New > Key). - Create or set a DWORD value named DisableCertRevocationCheck, value 1.
- Close Registry Editor.

Reboot the host:
Restart-Computer
The reboot is mandatory — the Replication service caches the revocation-check policy at startup and won’t pick up the new value until the service restarts (cleanest via reboot).
Repeat on the other host.
Step 5 — enable the replica role in Hyper-V Settings
Now configure the replica role on the destination host (HyperVHost02 — the one that will RECEIVE replicas). For a bidirectional setup (where either host can be primary or replica for different VMs), repeat this step on both hosts.
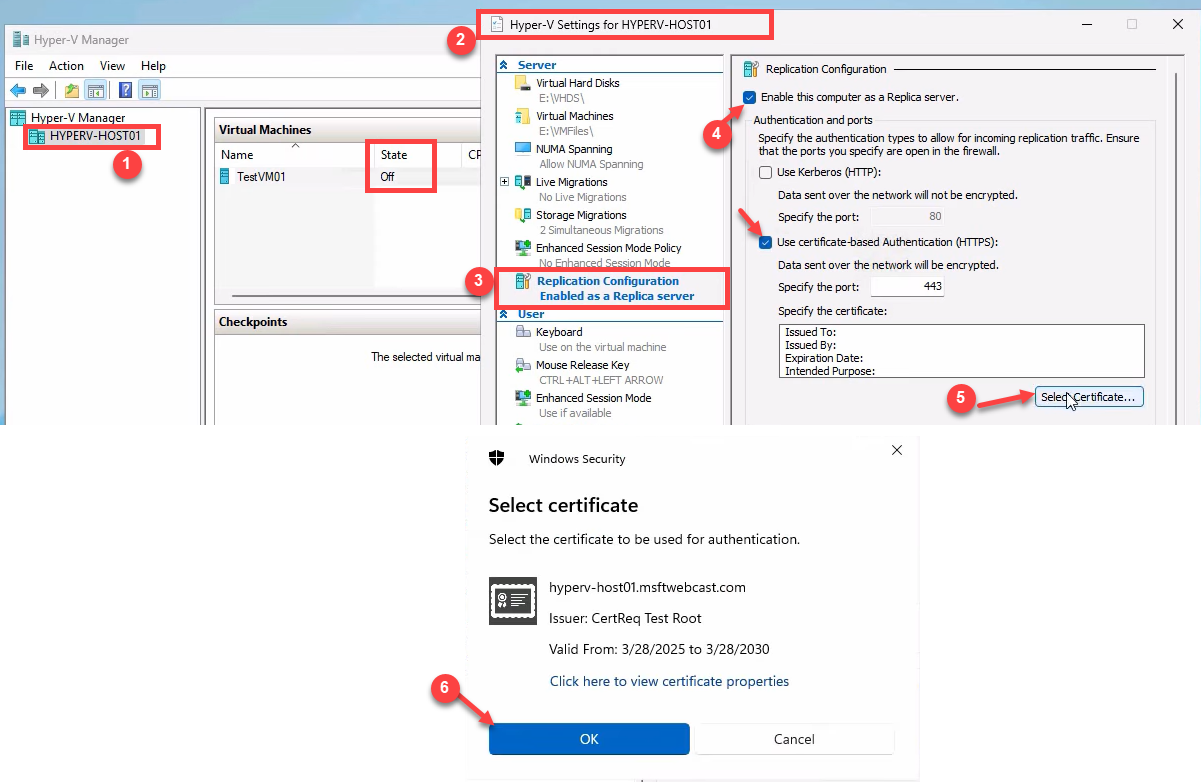
- Open Hyper-V Manager.
- Right-click the host name in the navigation tree > Hyper-V Settings.
- Navigate to Replication Configuration.
- Tick Enable this computer as a Replica server.
- Tick Use certificate-based Authentication (HTTPS).
- Click Select Certificate and pick the cert you generated in Step 3. (If your cert doesn’t appear in the picker, the trust chain isn’t valid — recheck Step 3.)
Lower section, Authorization and storage:
- For lab use, pick Allow replication from any authenticated server.
- For production, pick Allow replication from specified servers and explicitly add each primary host’s FQDN.
- Set the storage path to a folder on a drive with enough capacity for the replicated VHDXes (e.g.
D:\Replicas).
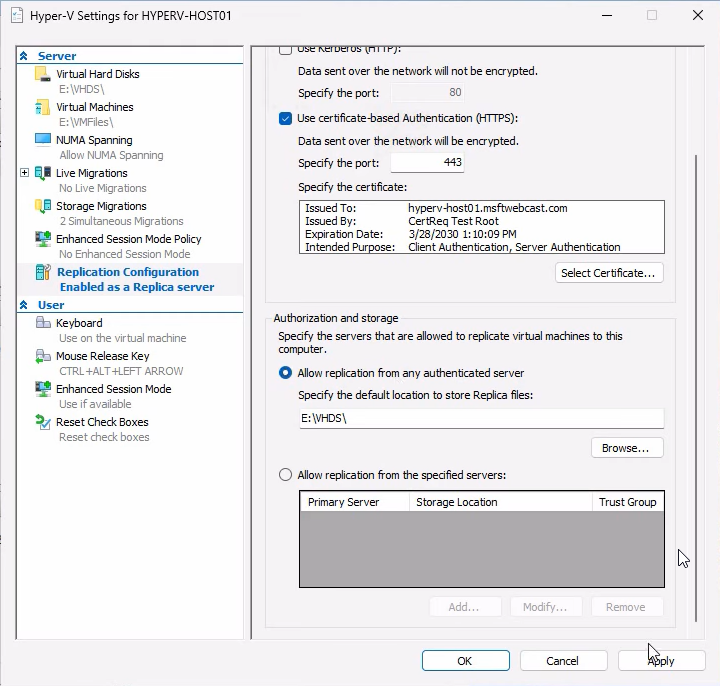
Click Apply. Hyper-V offers to enable the firewall rule for the HTTPS Listener — click OK to allow.
Verify the firewall rule
Open wf.msc > Inbound Rules. Find Hyper-V Replica HTTPS Listener (TCP-In) and confirm it’s enabled (right-click > Enable Rule if not).
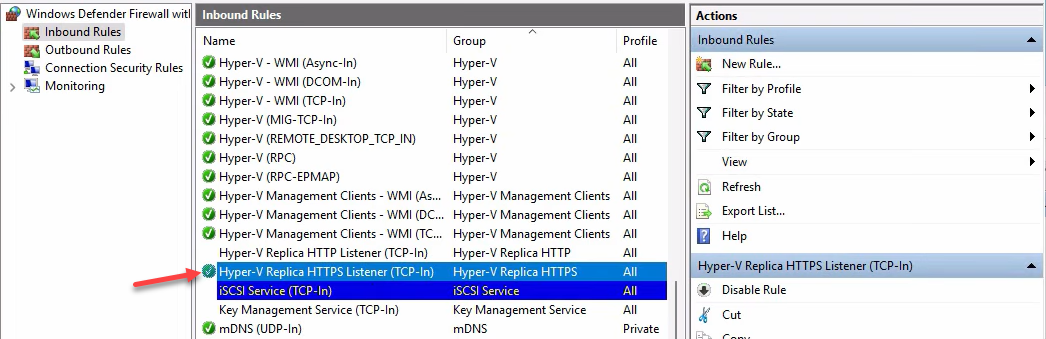
The HTTP Listener rule (port 80) is for Kerberos-mode replication and is not needed in workgroup mode — leave it disabled.
Step 6 — enable replication on the VM
This is the only step you do ONCE on the PRIMARY host (HyperVHost01) for the specific VM you want to protect.
Make sure the VM has no checkpoints. If it does, right-click the VM > Delete Checkpoint > Apply now (or use Remove-VMSnapshot in PowerShell). Replicas need a clean single-VHDX setup.
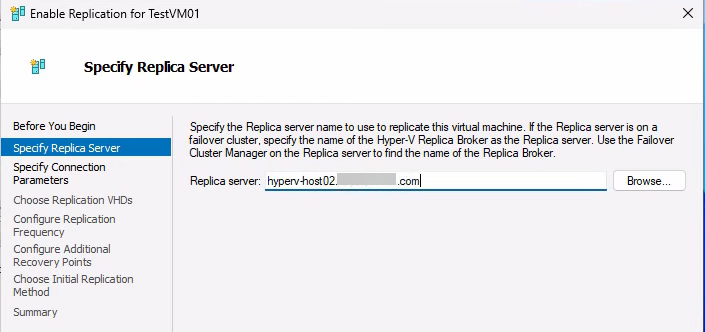
- In Hyper-V Manager on the primary, right-click the VM (e.g. TestVM01) > Enable Replication.

Click Next on the intro page.
- Specify Replica Server: type the FQDN of the destination (e.g. HyperVHost02.lab.com). Click Next.
- Specify Connection Parameters: pick HTTPS auth, port 443, and the cert from Step 3. The wizard validates against the destination here — if cert validation fails, recheck Step 3 and Step 4 on the destination host.
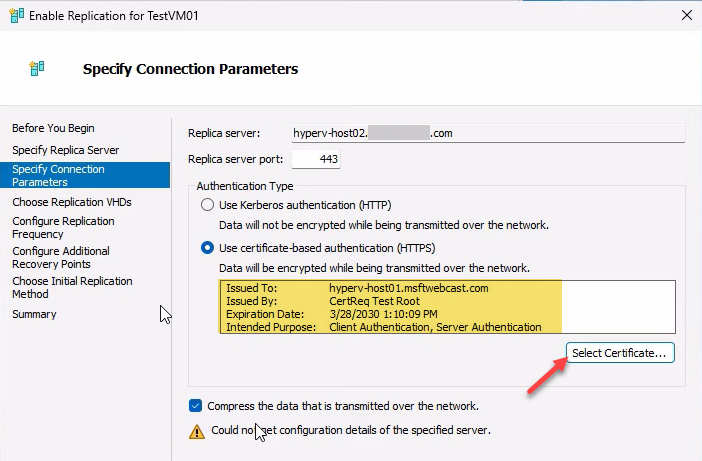
- Compress data: tick the box. Saves bandwidth without much CPU cost. Next.
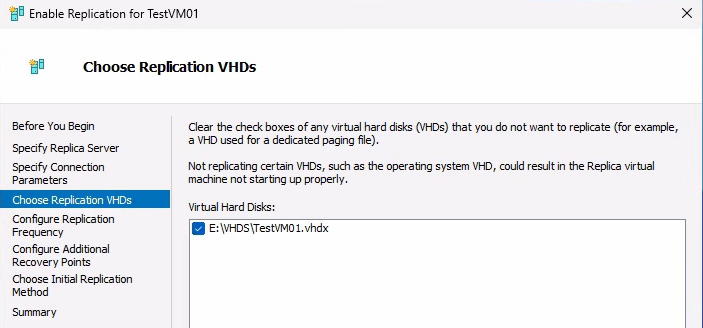
- Choose Replication VHDs: usually all of them. Uncheck only if you want to omit specific disks. Next.
- Configure Replication Frequency: 5 minutes is the sensible default. 30 seconds is for very low-RPO needs and chews more bandwidth. 15 minutes is for low-priority workloads. Next.
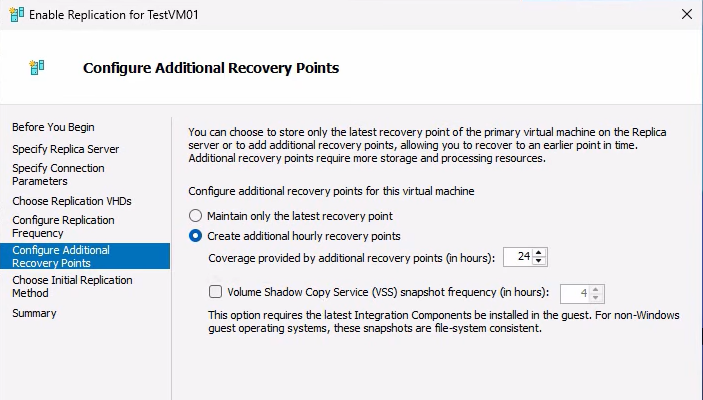
- Configure Recovery Points: for simple labs, default. For richer recovery options, raise the additional-recovery-points slider so the replica retains historical points (useful for ransomware rollback). Enable application-consistent if your workload talks to VSS (SQL, Exchange). Next.
- Initial Replication Method: over the network is fine for small VMs. For large VMs, choose “Send initial replica using external media” and ship a USB drive with the VHDX export — saves hours of network time.
- Summary > Finish. Replication starts.
Watch the VM’s state in Hyper-V Manager — on primary it shows Sending initial replica; on replica it shows Receiving changes. Once initial replication completes, the steady state is health = Normal and replication runs at the configured interval.
Verify and monitor
After initial replication completes:
- On primary: right-click the VM > Replication > View Replication Health. Should show: Replication enabled, Primary server, Health: Normal. Stats include last replication time, average replication size, longest write latency.
- On replica: same right-click > View Replication Health. Should show: Replica server, with the primary’s FQDN listed. Health: Normal.
If anything other than Normal shows up, check Event Viewer at Applications and Services Logs > Microsoft > Windows > Hyper-V-VMMS > Admin. Common errors:
- “The certificate is not trusted” — revisit Step 3 (cert in Trusted Root)
- “Revocation status of the certificate could not be determined” — revisit Step 4 (registry + reboot)
- “The remote computer was not found” — revisit Step 1 (hosts file entries on BOTH sides)
- “The host name in the certificate is invalid” — revisit Step 2 (DNS suffix matches cert subject)
Recovery points: how the math actually works
The recovery-points UI is genuinely confusing the first time you see it — the FAQ section in the source post addresses three common questions. Here’s the short version:
Does 24 recovery points mean 24x the storage?
No. Recovery points are differential, not full copies. Hyper-V uses copy-on-write under the hood — each point only stores the BLOCKS that changed since the previous point. A VM that’s mostly idle generates tiny deltas; one under heavy write load generates bigger ones. Total replica storage = full VHDX size + sum of deltas across retained points. For most workloads, retaining 24 hourly points adds 10–30% on top of the base VHDX size, not 24x.
If replication frequency is 5 min, doesn’t a 24-hour retention window mean huge RPO?
RPO and recovery-point retention are independent settings. RPO = how often replication copies changes (5 min in this example). Retention = how many historical points are kept on the replica for rollback purposes. A typical setup: 5-min RPO + 24 hourly recovery points retained. That means: under normal failover you recover to the latest replicated state (5 min behind primary). For ransomware rollback, you can also recover to any point up to 24 hours back. The 24-hour retention is for AUDIT and ROLLBACK; it doesn’t change RPO.
What if I only keep the latest recovery point?
RPO is determined by replication frequency, not retention. If frequency = 5 min, RPO is 5 min regardless of how many historical points you retain. Latest-only is the simplest and most space-efficient configuration; it just means you can’t roll back to a point in the past during failover — you can only resume from the most recent replicated state.

Things that bite people
Cert subject doesn’t match FQDN
You generate a cert with DnsName = “HyperVHost01” (no suffix) but the host is configured with DNS suffix “lab.com” so it reports as HyperVHost01.lab.com. Cert validation fails because the subject doesn’t match. Fix: regenerate the cert with the full FQDN as DnsName.
Forgetting to copy the test root on the OTHER host
Each host has its own self-signed cert. Each host generates its OWN test root (via -TestRoot). For mutual auth to work, host A must trust host B’s test root and vice versa. If you only configure trust on one side, replication fails at the auth step. Verify on each host that the trusted root store contains entries from both sides.
Forgetting the reboot after the registry change
You set DisableCertRevocationCheck = 1 and immediately try to enable replication. It fails with a revocation-check error. The registry value is correct but the running Replication service hasn’t reloaded. Reboot. (Restarting just the VMMS service might work; reboot is reliable.)
Trying to enable replication on a VM with checkpoints
Replicas need a clean single-VHDX setup. Checkpoints create chains of differencing disks; the wizard refuses with an unhelpful error. Merge checkpoints first via Hyper-V Manager > right-click VM > Delete Checkpoint > Apply now (do this on the active checkpoint to merge).
Bandwidth-bound initial replication
For a multi-hundred-gigabyte VM over a slow link, the initial replication can take days. Use the offline initial replication option: Hyper-V exports the VHDX to external media, you ship the drive to the replica site, import it, and replication starts from the imported state. Subsequent deltas use the network as normal.
Firewall on the OUTBOUND side
Most attention goes to the inbound HTTPS Listener rule on the replica side. Forgotten: the primary host also needs OUTBOUND TCP 443 allowed if its outbound firewall is restrictive. Check both directions if replication can’t establish.
Time skew between hosts
Cert validation is sensitive to clock differences. If primary and replica disagree on the time by more than ~5 minutes, validation can fail with cert-validity errors. Both hosts should sync to a common NTP source (workgroups can’t use the AD time hierarchy — configure w32time to point at pool.ntp.org or your internal time source).
Cert expires after 5 years (or whatever you specified)
Self-signed certs created with this recipe have an explicit expiration. After it expires, replication fails. Set a calendar reminder for 11 months before expiration to regenerate the cert (and re-add the new test root to the trusted store on both hosts).
Where this fits
Hyper-V Replica in workgroup mode is the standard DR pattern for small businesses, branch offices, and lab environments where a full domain isn’t justified. The certificate-trust gymnastics in this post are the price of admission for skipping AD. For broader Hyper-V context, see the Hyper-V Virtualization pathway — this post is the start of a 5-part Hyper-V Replica series (Parts 2–5 cover test failover, planned failover, and unplanned failover). For the Active Directory alternative path that uses Kerberos instead of certs, see the Active Directory pathway.