Two standalone Hyper-V hosts. No SAN, no Cluster Shared Volume, no shared anything — each host has its own local storage. A VM on the source host needs to end up on the destination host with the workload still running. The Microsoft answer to this scenario is Shared Nothing Live Migration: a feature that copies the VM’s memory state AND its storage over plain Ethernet, using iterative memory sync to minimise the pause at cutover. The VM moves while it’s running. Users connected to it lose somewhere between zero and a handful of pings; everything else is invisible. This post covers the end-to-end recipe: prerequisites, configuring both hosts, setting up Kerberos constrained delegation, and walking the Move wizard.
Where this fits in the Hyper-V move family
- Live Migration — clustered hosts that share storage (CSV or SMB share). VM state moves between cluster nodes; the storage stays put. Fast (memory only) but requires shared storage.
- Storage Migration — same host, different disk. Storage moves; the VM stays on the same host. Covered in the previous post in this pathway.
- Shared Nothing Live Migration — this post. Two standalone hosts, no shared storage. Both memory AND storage transfer over the network. Slower than regular Live Migration (storage is the bottleneck) but doesn’t need a SAN.
- Quick Migration — legacy clustered failover with a brief suspend. Rarely the right choice in modern deployments.
Shared Nothing is what you reach for when you have two non-clustered Hyper-V hosts in the same domain and need to move a workload between them — for hardware maintenance, decommissioning a host, balancing load, or migrating to a newer Windows Server version.
How the iterative memory sync actually works
The migration is conceptually simple but worth understanding because it explains why the cutover is short:
- Round 1. The source host snapshots the VM’s starting memory state and copies the entire RAM contents to the destination over the live-migration network. The VM keeps running on the source the whole time. This round is the slowest — minutes for a multi-gigabyte VM — and during it the running VM is dirtying memory pages.
- Round 2. The source identifies which pages were modified during Round 1 and copies only those (the “dirty pages”) to the destination. Smaller delta, much faster — seconds rather than minutes. The VM is still running and still dirtying pages.
- Round N. Repeat — copy whatever was dirtied during the previous round. Each round is smaller than the last because the rate of new dirtying is roughly constant while the round time keeps shrinking.
- Cutover. When the dirty-page delta is small enough that copying it would take less than a couple of seconds, the source briefly pauses the VM, transfers the final delta plus the storage that hasn’t finished copying yet, and the destination starts running the VM. The source releases its copy.
The cutover pause is what determines the user-visible downtime. For most workloads it’s 1–3 lost pings — brief enough that TCP connections survive without reset. For very memory-intensive workloads (a database under heavy write load) the iterative copy can fail to converge, and the cutover takes longer. Newer Windows Server releases handle this better than older ones (the demo here uses Server 2025).
Prerequisites — check ALL of these before starting
Missing any of these causes the migration to fail somewhere between “clear error message” and “mysterious silent stall.” Verify before you start.
Domain membership
Both hosts MUST be in the same Active Directory domain, or in domains that have a trust relationship. Workgroup hosts can’t do Shared Nothing. The domain identity is the basis for the Kerberos authentication that authorises the cross-host transfer.
Network connectivity
Plain Ethernet between the two hosts. No special cables, no dedicated VLAN required for the basic case — though for production you’d typically dedicate a separate NIC and VLAN to the live-migration traffic so it doesn’t compete with guest traffic. Faster networks (10 Gbps over 1 Gbps) cut the migration time roughly proportionally.
Processor compatibility
Both hosts should have the same CPU vendor (all Intel or all AMD). Different vendors cause the running VM to crash on cutover because the CPU instruction set the guest is using might not exist on the new host. If the hosts genuinely are different vendors, enable Processor Compatibility in the VM’s settings (Hyper-V Manager > VM Settings > Processor > Compatibility) BEFORE starting the migration. This makes the VM advertise a lowest-common-denominator CPU to the guest, slightly reducing performance but allowing cross-vendor migration.
Identical virtual switch names
The vSwitch the VM is connected to on the source host must have an identically-named vSwitch on the destination host. Mismatch = the migration pauses partway through and prompts you to choose a destination switch. For a one-off it’s annoying; for scripted migrations it’s a hard fail. Standardise switch names across all hosts in your environment.
Resources on the destination
The destination host needs enough free RAM, CPU capacity, and storage to accept the VM. Hyper-V doesn’t check this in the wizard before starting — you can kick off a migration that runs for 20 minutes and then fails because the destination doesn’t have disk space. Check capacity manually before clicking Finish.
Firewall
The Live Migration traffic uses RPC + dynamic ports + port 6600 for Kerberos auth. Both hosts need their Windows Firewall configured to allow this. The Hyper-V management role installs the necessary firewall rules but they may be disabled by default; verify with Get-NetFirewallRule -DisplayGroup “Hyper-V”.
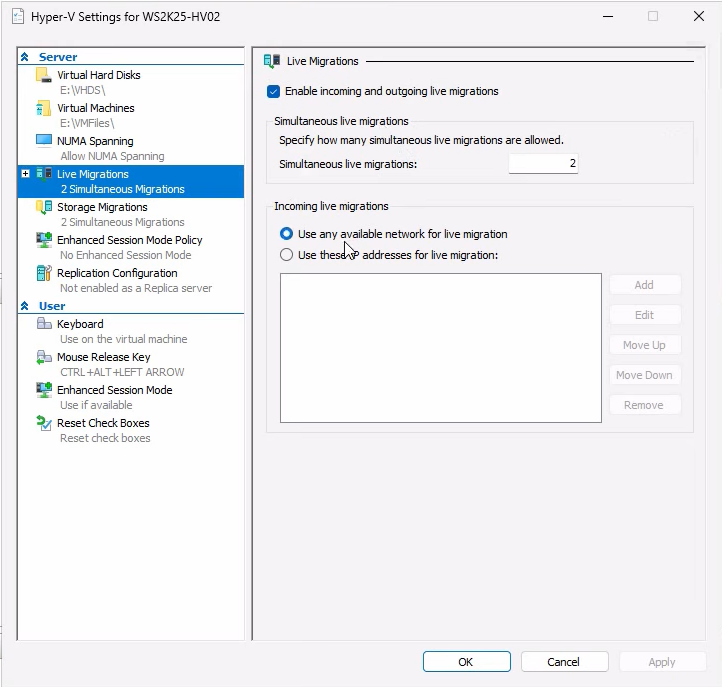
Step 1 — enable Live Migration on both hosts
This is per-host configuration. Do it on the source AND on the destination — the settings must match.

Open Hyper-V Manager on each host. Right-click the host name in the navigation tree (NOT a VM) and select Hyper-V Settings. Live Migration is a host-level setting, not a per-VM setting.
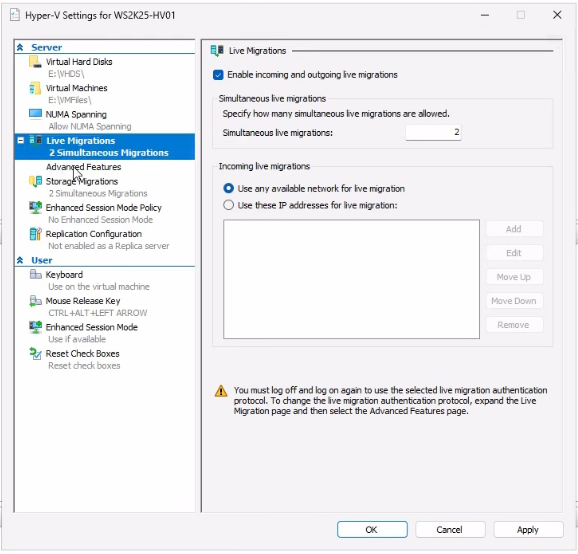
Navigate to the Live Migrations page in the Hyper-V Settings dialog:
- Tick Enable incoming and outgoing live migrations.
- Set Simultaneous live migrations to 2 (the default). Raise this if you have plenty of network bandwidth and want to migrate multiple VMs in parallel; lower it if you’re bandwidth-constrained.
- For the Incoming live migrations network selection, pick Use any available network for live migration for the simple case. For production, click Use these IP addresses for live migration and add the IP of the dedicated migration NIC — this prevents migration traffic from competing with guest traffic.
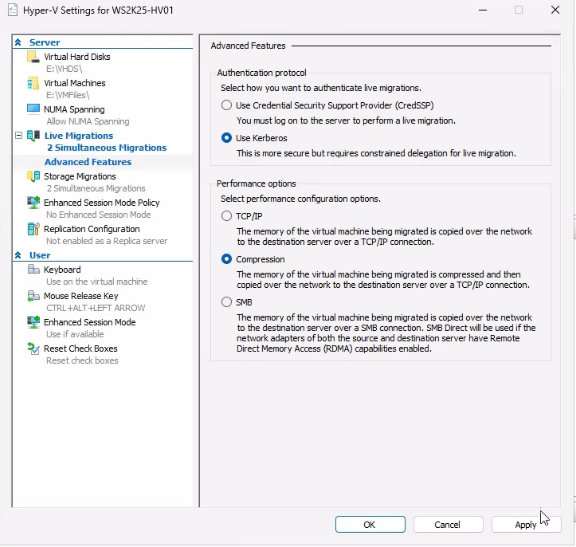
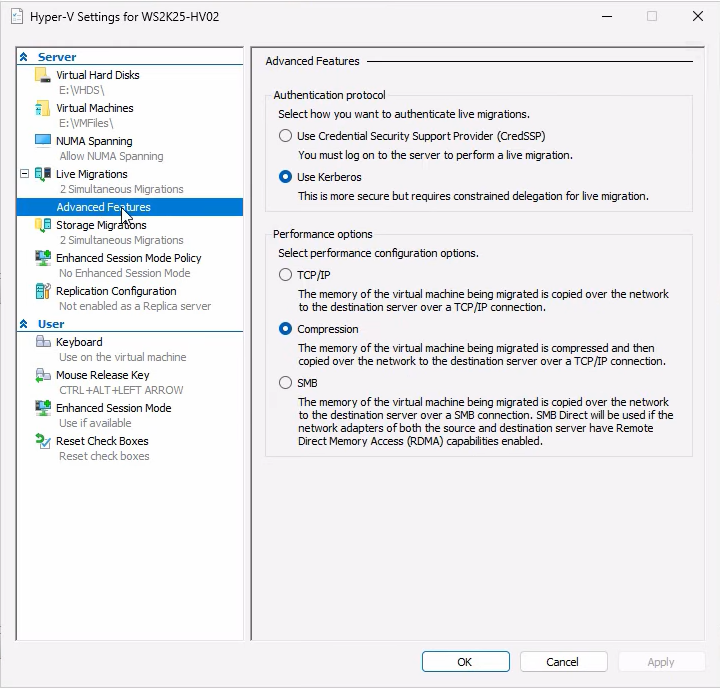
Expand Live Migrations and click Advanced Features:
- Authentication protocol: switch from CredSSP (default) to Kerberos. CredSSP works but requires you to be RDP’d into the source host whenever you trigger a migration (the credentials get forwarded from your interactive session). Kerberos uses the host computer accounts and works for unattended scripted migrations — but it requires constrained delegation set up in AD, covered in the next step.
- Performance options: keep Compression enabled. The host CPU compresses the data stream before sending, which trades a little CPU for a lot of network bandwidth. Use SMB instead if you have RDMA-capable NICs and want to push max throughput; use None only on networks that are already faster than the host CPU can compress.
Click Apply and OK. Repeat on the other host with identical settings.
Step 2 — configure Kerberos constrained delegation in AD
Required if and only if you picked Kerberos in Step 1. Skip this if you’re using CredSSP. (For production, just use Kerberos — CredSSP is OK for one-offs but it’s clunky.)
Constrained delegation lets the destination Hyper-V host “act on behalf of” the source host’s services during the migration. Without it, Kerberos can’t carry the necessary tokens across the host boundary.
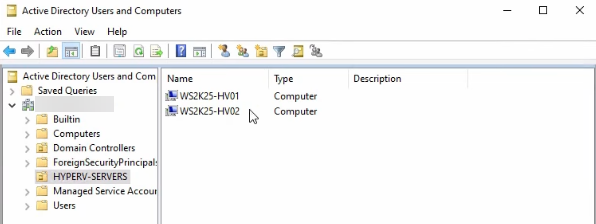
Open Active Directory Users and Computers on a domain controller. Find the computer objects for both Hyper-V hosts. They live in the Computers container by default; if you’ve organised them into a Hyper-V Servers OU or similar, look there.
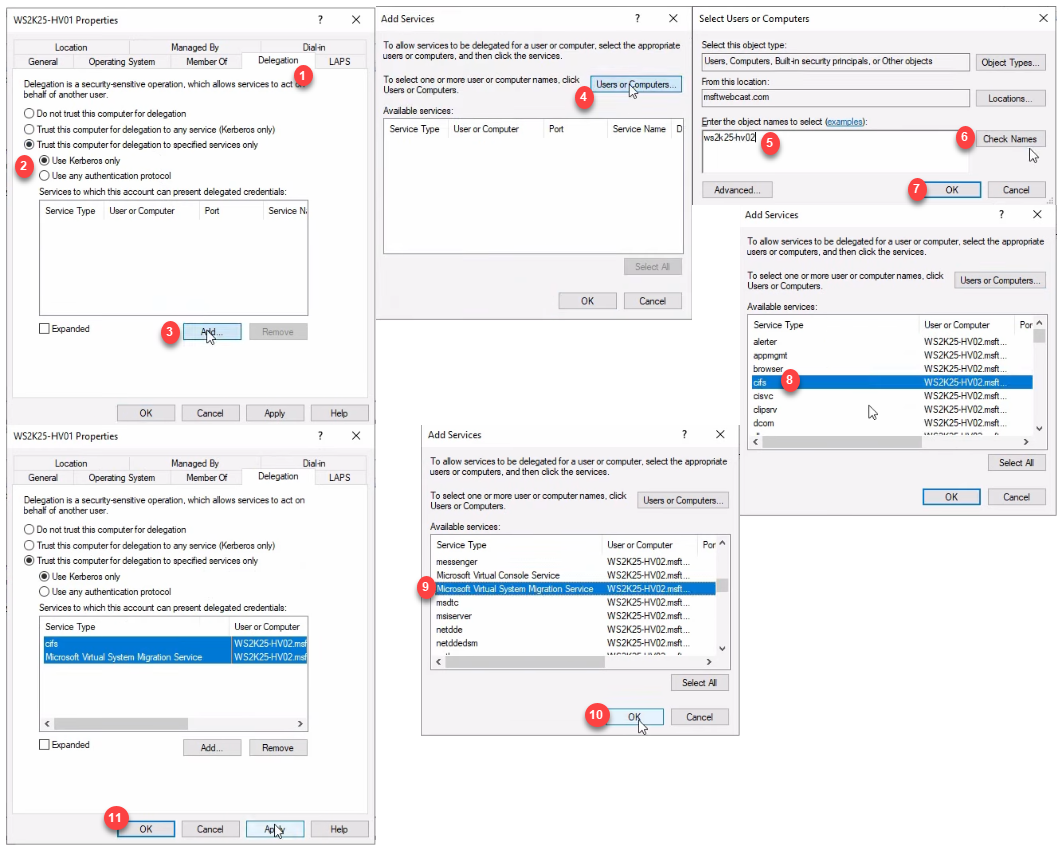
For the source host (HV01 in the demo):
- Right-click the computer object > Properties > Delegation tab.
- Select Trust this computer for delegation to specified services only.
- Choose Use Kerberos only.
- Click Add > Users or Computers.
- Type the destination host’s name (HV02 in the demo) and click OK.
- From the service list, select cifs (for the file copy) AND Microsoft Virtual System Migration Service (for the VM state transfer). Both services are required.
- Click OK > Apply > OK.
Now do the SAME on the destination host (HV02), but pointed at the source host (HV01). The trust must be MUTUAL — both directions. Forgetting to configure the reverse direction is the single most common Kerberos-mode migration failure.
After making the delegation changes, wait a few minutes for AD replication or restart the Hyper-V hosts to ensure they pick up the new tokens. Test with klist on each host to see whether the delegation tickets are present.
Step 3 — verify both hosts before migrating
Always cross-check before kicking off a migration. From the source host’s Hyper-V Manager, connect to the destination:
Right-click anywhere in the navigation tree > Connect to Server > type the destination hostname. After connecting, both hosts appear in the same Hyper-V Manager window.
Open Hyper-V Settings on the destination host (right-click its name in the tree > Hyper-V Settings) and verify:
- Live Migrations enabled? ✓
- Same network selection? ✓
- Kerberos as authentication protocol? ✓
- Compression enabled? ✓
Also confirm both hosts have a vSwitch with the EXACT same name as the one your VM is connected to on the source. Open Virtual Switch Manager on each host to compare.
Step 4 — start a continuous ping for downtime monitoring
Before triggering the migration, set up the downtime monitor in a separate window. From any machine that can reach the VM, start a continuous ping against the VM’s IP:
ping 10.10.10.10 -t(Replace 10.10.10.10 with the actual VM IP.) Leave this window visible alongside Hyper-V Manager throughout the migration. Expected result: 0–3 lost pings during the cutover, then back to normal.
Step 5 — trigger the migration
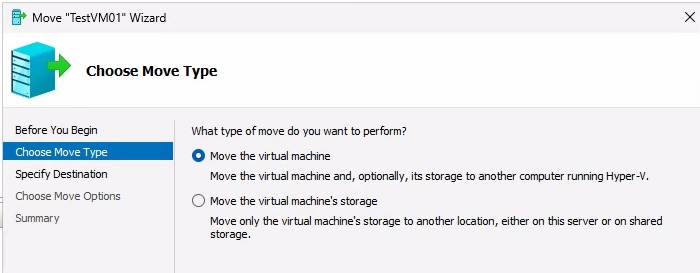
From Hyper-V Manager on the source host, right-click the running VM > Move. The wizard opens.
- Click Next on the intro page.
- On Choose Move Type, pick Move the virtual machine. (The other option is Move VM storage to a new location, which is the same-host scenario covered in the previous post.) Click Next.
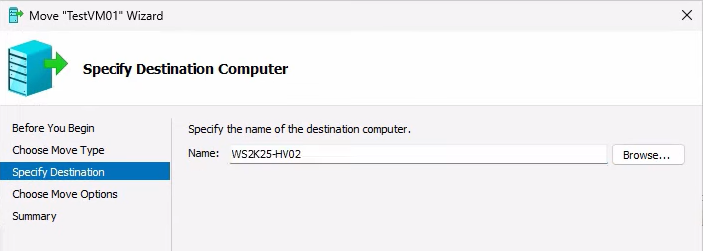
On Specify Destination Computer, type the destination hostname and click Check Names. If it underlines, AD resolves the name — click OK > Next. If it doesn’t resolve, fix the DNS issue before continuing.
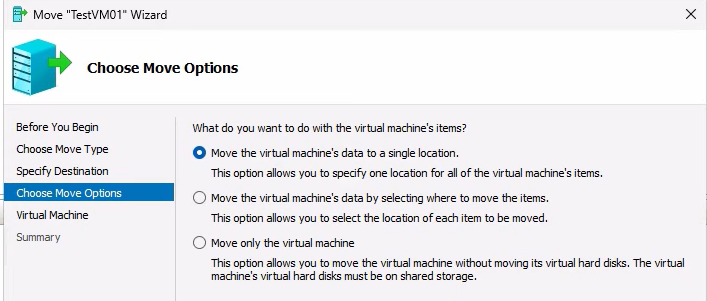
On Choose Move Options, three options:
- Move the VM’s data to a single location — pick this for the simple case. Everything goes to one folder on the destination.
- Move the VM’s data by selecting where to move each item — tiered storage on the destination; specify VHDX path separately from config path.
- Move only the virtual machine — for cases where the destination has shared storage already. Doesn’t apply to Shared Nothing because there IS no shared storage.
Pick the first option.
Browse to a folder on the destination (e.g. E:\HyperVMs) and confirm. Review the summary — source path, destination host, destination path, move mode — and click Finish to start.
Step 6 — watch the migration progress

Hyper-V Manager shows Moving virtual machine and storage in the Status column with a percentage. Time to complete depends on:
- VM size — both RAM (one-time copy plus iterative deltas) and storage (the full VHDX has to traverse the network).
- Network bandwidth — the storage transfer is bandwidth-bound. 1 Gbps Ethernet on a 60 GB VHDX = ~10 minutes minimum, plus the memory sync and the protocol overhead. 10 Gbps cuts this dramatically.
- VM activity level — an idle VM converges quickly because there’s no dirty-page churn. A heavily-loaded database VM might take longer in the iterative phase if dirty-page rate keeps the round count high.
Throughout the percentage climb, the VM is still running on the source. Users connected to it don’t notice anything. The ping window stays unbroken.
Step 7 — verify after the migration

When the migration completes, the VM disappears from the source host’s VMs pane and appears running on the destination host. Source-side cleanup happens automatically — the source releases storage and removes the VM from its inventory.
Cross-check:
- The VM is in the Running state on the destination.
- The IP didn’t change — the guest’s network configuration is unchanged.
- The ping window shows 0–3 lost pings around the cutover and then resumes normal replies.
- RDP or SSH into the guest works the same way it did before. Existing TCP connections survived (worth testing with a long-lived SSH session).
Stop the ping with Ctrl+C and look at the statistics summary — the lost-packet count quantifies the downtime.
Things that bite people
Forgetting the reverse delegation in AD
You configure HV01 to delegate to HV02 and run the migration. It fails partway through with a Kerberos error. The fix: configure HV02 to delegate to HV01 as well. The delegation is mutual; both hosts need to trust the other for both services (CIFS + Microsoft Virtual System Migration Service).
Different vSwitch names
Source vSwitch is named “LAN”; destination vSwitch is named “Internal”. Migration pauses partway through with a prompt asking which destination switch to use. For a one-off it’s annoying. For scripted migrations it’s a hard fail. Standardise vSwitch names across all hosts before starting any production migrations.
Mixed CPU vendors
Source is Intel; destination is AMD. The running VM crashes on cutover because the CPU instructions the guest was using don’t exist on the destination CPU. Either match CPU vendors or enable Processor Compatibility on the VM’s Processor settings BEFORE the migration. The compat mode hides advanced instructions from the guest, costing a small amount of performance but allowing cross-vendor migration.
Insufficient destination capacity
Hyper-V doesn’t check before kicking off the migration whether the destination has enough RAM/CPU/storage. Migration runs for 20 minutes, then fails at the cutover step because the destination ran out of disk. Check capacity manually before starting; for production scripts, query Get-VHD on the source and Get-Volume on the destination to confirm headroom programmatically.
Live-migration network competing with guest traffic
If you picked “use any available network” in Step 1 and the host has only one NIC, the migration traffic competes with whatever else is using the NIC — including the guest you’re trying to migrate. Symptoms: the migration is much slower than expected; guest performance degrades during the migration. Fix: dedicate a separate NIC for live-migration traffic and select it explicitly in Hyper-V Settings.
VM has differencing disks pointing at a parent on the source
If the VM has differencing disks (snapshots/checkpoints), the parent VHDX has to move with them. If the parent is in a different folder than the differencing disks, the wizard sometimes gets confused about where to put each piece. Cleanest fix: merge checkpoints (Remove-VMSnapshot) before migrating so there’s a single VHDX file to move. If you really need the checkpoints preserved, plan the destination layout carefully so all related VHDXes land in the same folder.
Anti-virus on the destination scanning incoming files
Some AV products scan the VHDX as it’s being received on the destination, slowing the transfer significantly and occasionally locking the file long enough to fail the cutover. Either exclude the destination Hyper-V folder from the AV scanner OR schedule the migration for a maintenance window when AV impact is acceptable.
The cutover pause is longer than expected
For very write-heavy VMs (busy SQL Server, heavily loaded application servers), the iterative copy may fail to converge — each round’s delta is too big to copy faster than new dirty pages accumulate. Hyper-V eventually triggers a longer cutover pause to finish. Mitigation: schedule the migration during a low-traffic window, or accept the longer downtime. Newer Windows Server versions are more aggressive about converging the iterative copy.
Where this fits
Shared Nothing Live Migration is the day-to-day workhorse for moving VMs between standalone Hyper-V hosts. Combined with the Storage Migration walk in the previous post, this completes the “moving VMs around” story for non-clustered Hyper-V deployments. For broader Hyper-V context including VM creation, golden images, checkpoints, and the rest of the lifecycle, see the Hyper-V Virtualization pathway. For the Active Directory plumbing this depends on (computer accounts, constrained delegation, Kerberos), see the Active Directory pathway.