Why FSRM Quotas Beat NTFS Quotas
NTFS has had its own quota system since Windows 2000. You right-click a volume, open Properties > Quota, and set a per-user limit. It works, but it has two limitations that bite quickly in any real file-share environment: it scopes to the entire volume, and it scopes to users rather than to folders.
File Server Resource Manager (FSRM) is the answer to both. It is a Windows Server role that sits on top of NTFS and adds folder-level quotas, file-screening, automatic classification, and storage reports. The piece that gets the most use is the quota system — you can put a 500 MB limit on D:\Departments\Sales, a 50 GB limit on D:\Projects, and a 1 TB limit on D:\Backups, all on the same volume, with different notification thresholds for each.
This article walks through installing FSRM, creating a custom quota template, applying that template to a folder, testing that the quota actually blocks writes, and the PowerShell equivalents that let you script the same thing across many folders. The screenshots are taken on Windows Server 2022; the procedure is identical on 2016 / 2019 / 2025.
Pre-Flight: Install the FSRM Role If It Is Not Already There
FSRM is part of the File and Storage Services role, but it is an optional role service. Add it once with PowerShell:
# Install FSRM + the management tools (RSAT for FSRM)
Install-WindowsFeature -Name FS-Resource-Manager -IncludeManagementTools

# Verify
Get-WindowsFeature FS-Resource-Manager | Select Name, InstallState
The install is non-disruptive and does not require a reboot — the new File Server Resource Manager service starts immediately and the snap-in shows up under Server Manager > Tools.
Step 1 — Open the FSRM Console
From Server Manager, click Tools in the top-right and choose File Server Resource Manager:
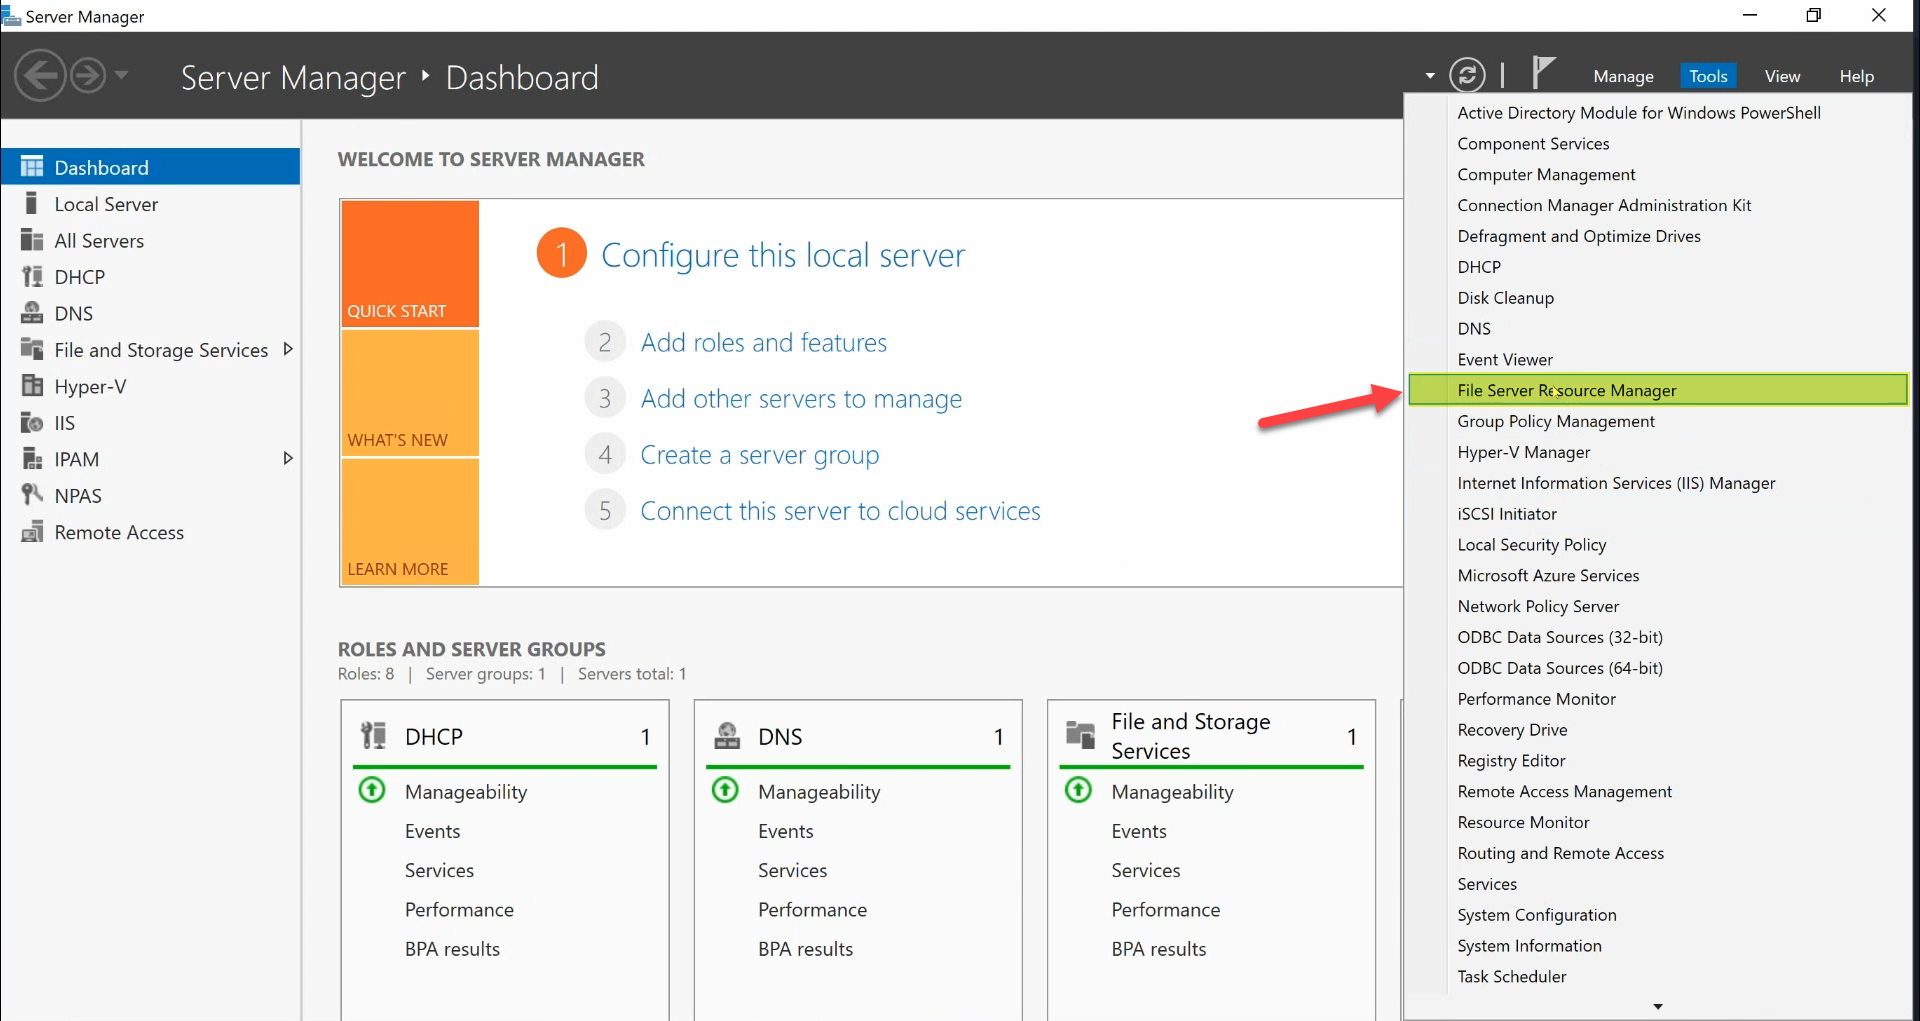
The console opens with five top-level nodes: Quota Management, File Screening Management, Storage Reports Management, Classification Management, and File Management Tasks. Everything in this article lives under the first one.
Step 2 — Tour Quota Management
Expand Quota Management in the left pane. Two children appear:
- Quotas — the actual quotas applied to specific folders. Empty on a fresh install.
- Quota Templates — named, reusable definitions of limit + thresholds + notifications. Built-in templates (
100 MB Limit,200 MB Limit,2 GB Limit,5 GB Extended Limit, etc.) are pre-populated.
The split is intentional: create the template once, apply it to many folders. Edit the template later and every folder using that template inherits the new limit or notification settings — that is the operational win versus configuring each folder one-off.
Step 3 — Create a Custom Quota Template
Right-click Quota Templates > Create Quota Template…. The dialog has the following fields, top to bottom:
- Copy properties from quota template (optional). Pick an existing template to start from. Leave blank for a fresh definition.
- Template name. A short identifier (e.g.
500 MB Limit). This is what you select later when applying. - Description (optional). Free text. Useful for “why does this template exist?”
- Space limit. The actual size cap. Pick a number and a unit (KB / MB / GB / TB).
- Quota type. Two options that matter:
- Hard quota. Writes that would exceed the limit are refused by the file system. Windows reports the same “not enough space” error a full disk would. This is what you want for production folders.
- Soft quota. Writes are allowed, but FSRM logs / e-mails / reports as if the limit were hit. This is the right pick for monitoring an existing folder before you switch to hard enforcement.
- Notification thresholds. Click Add… to configure what happens at a given % of the quota. The dialog has four tabs (E-mail, Event Log, Command, Report) that you can mix and match. The classic configuration is warn at 85% via Event Log + e-mail, and error at 95% via Event Log only.
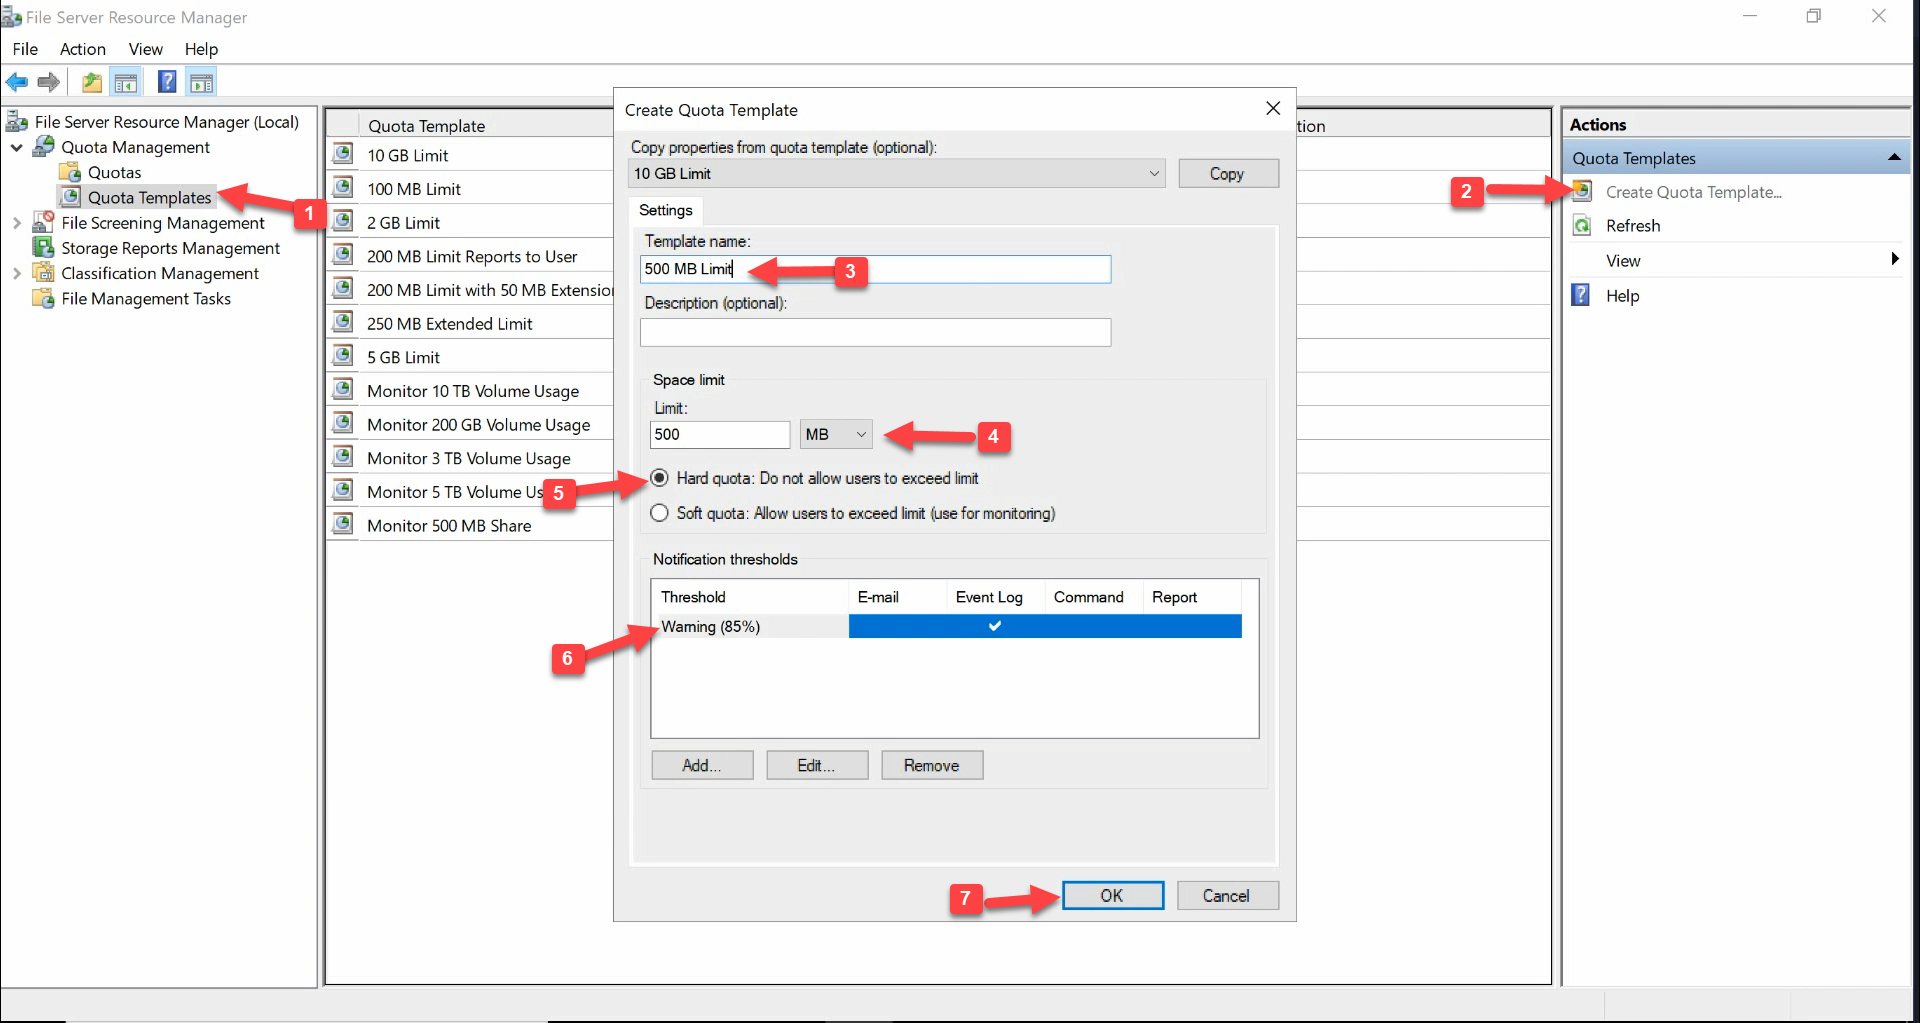
500 MB Limit, (3) Description, (4) Space Limit 500 MB, (5) Hard quota selected, (6) Notification thresholds (85% Warning), (7) OK.The dialog above shows the seven things to set: (1) confirm Quota Templates is selected, (2) Template name 500 MB Limit, (3) Description, (4) Space Limit 500 MB, (5) Hard quota selected, (6) one notification threshold at 85% Warning, (7) OK. Click Create when done; the template appears in the list.
Step 4 — Apply the Template to a Folder
Now create the actual quota by applying the template to a path. Right-click Quotas > Create Quota…:
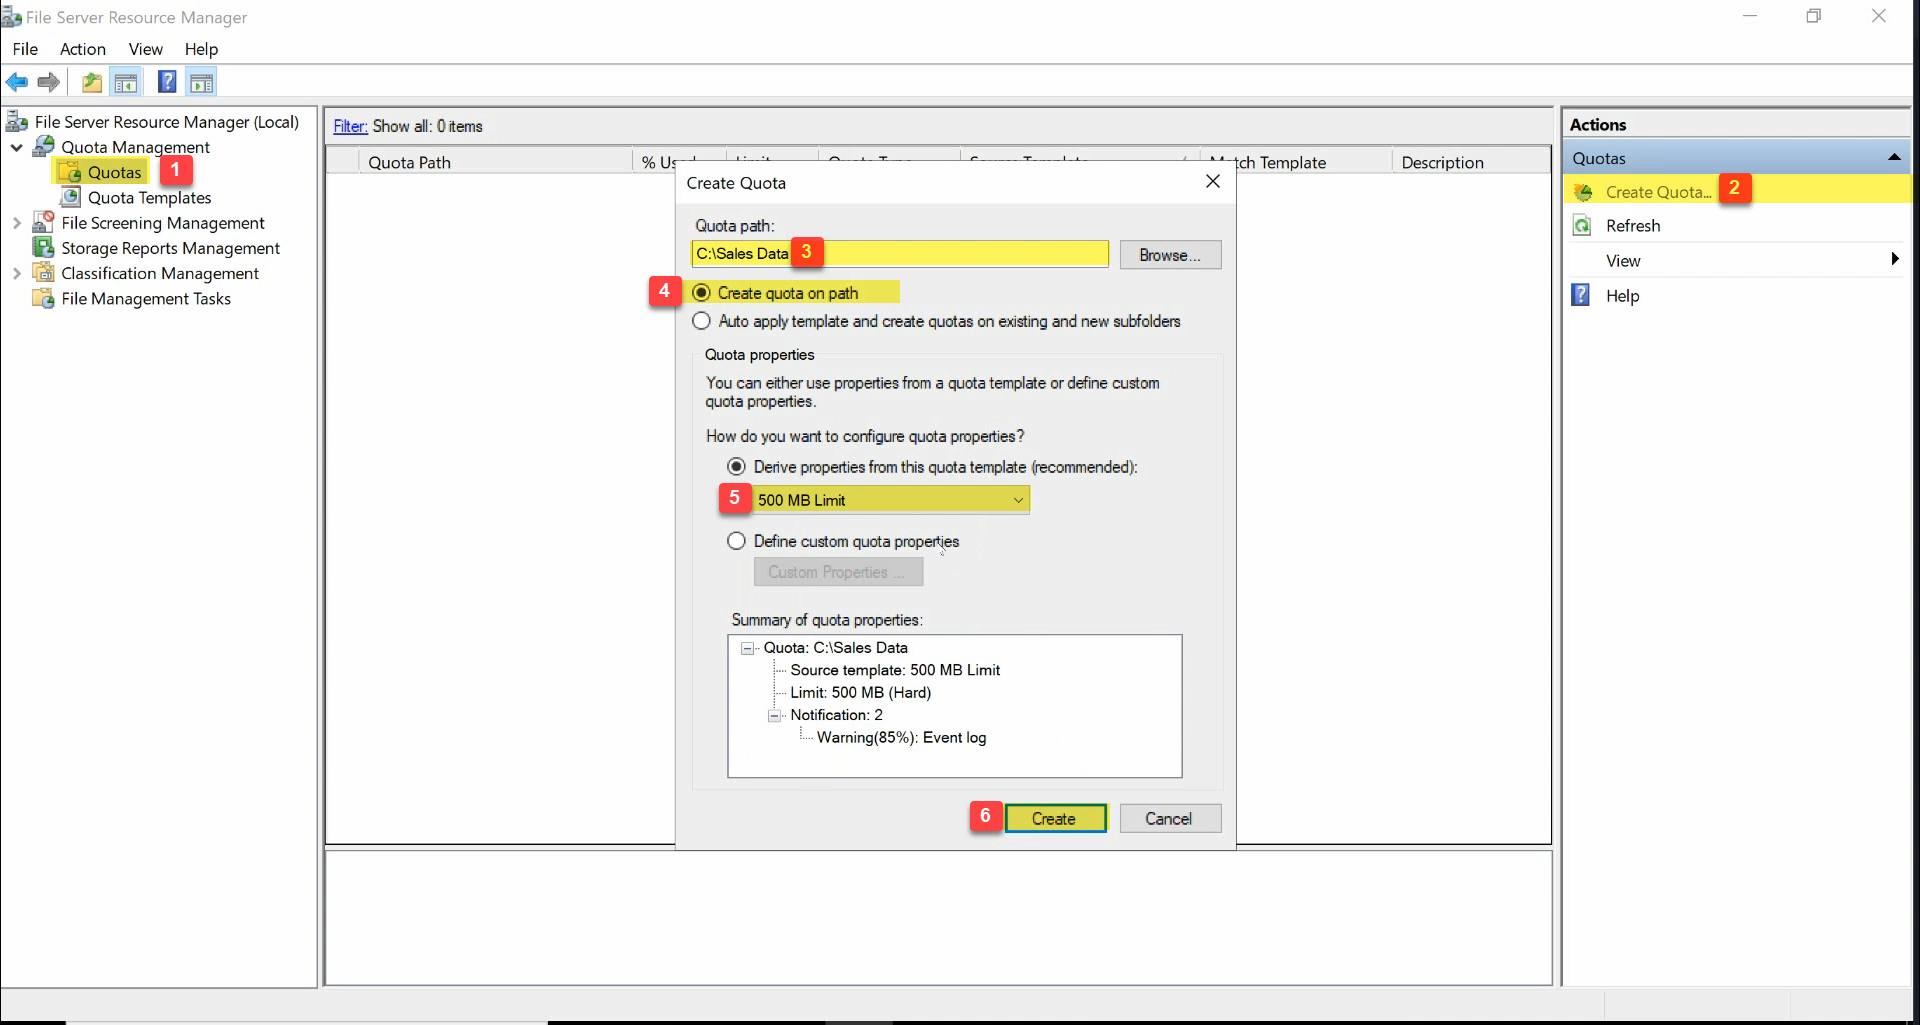
C:\Sales Data, (3) Create quota on path, (4) Derive properties from this quota template set to 500 MB Limit, (5) Create.- Quota path — click Browse and pick the folder (here,
C:\Sales Data). - Create quota on path vs. Auto apply template and create quotas on existing and new subfolders:
- Create quota on path — the quota applies to the picked folder only.
- Auto apply — the same quota is also applied to every subfolder, now and in the future. Powerful but dangerous: if you turn this on at
D:\Departmentswith a 5 GB template, every department subfolder gets a 5 GB cap whether anybody intended it or not. Use it where you actually want that — e.g., a per-user home-folder root where every user gets the same individual quota.
- Derive properties from this quota template (recommended) — pick the template you created (
500 MB Limit). The summary pane previews what is about to be applied. - Click Create.
The new quota appears in the Quotas list:
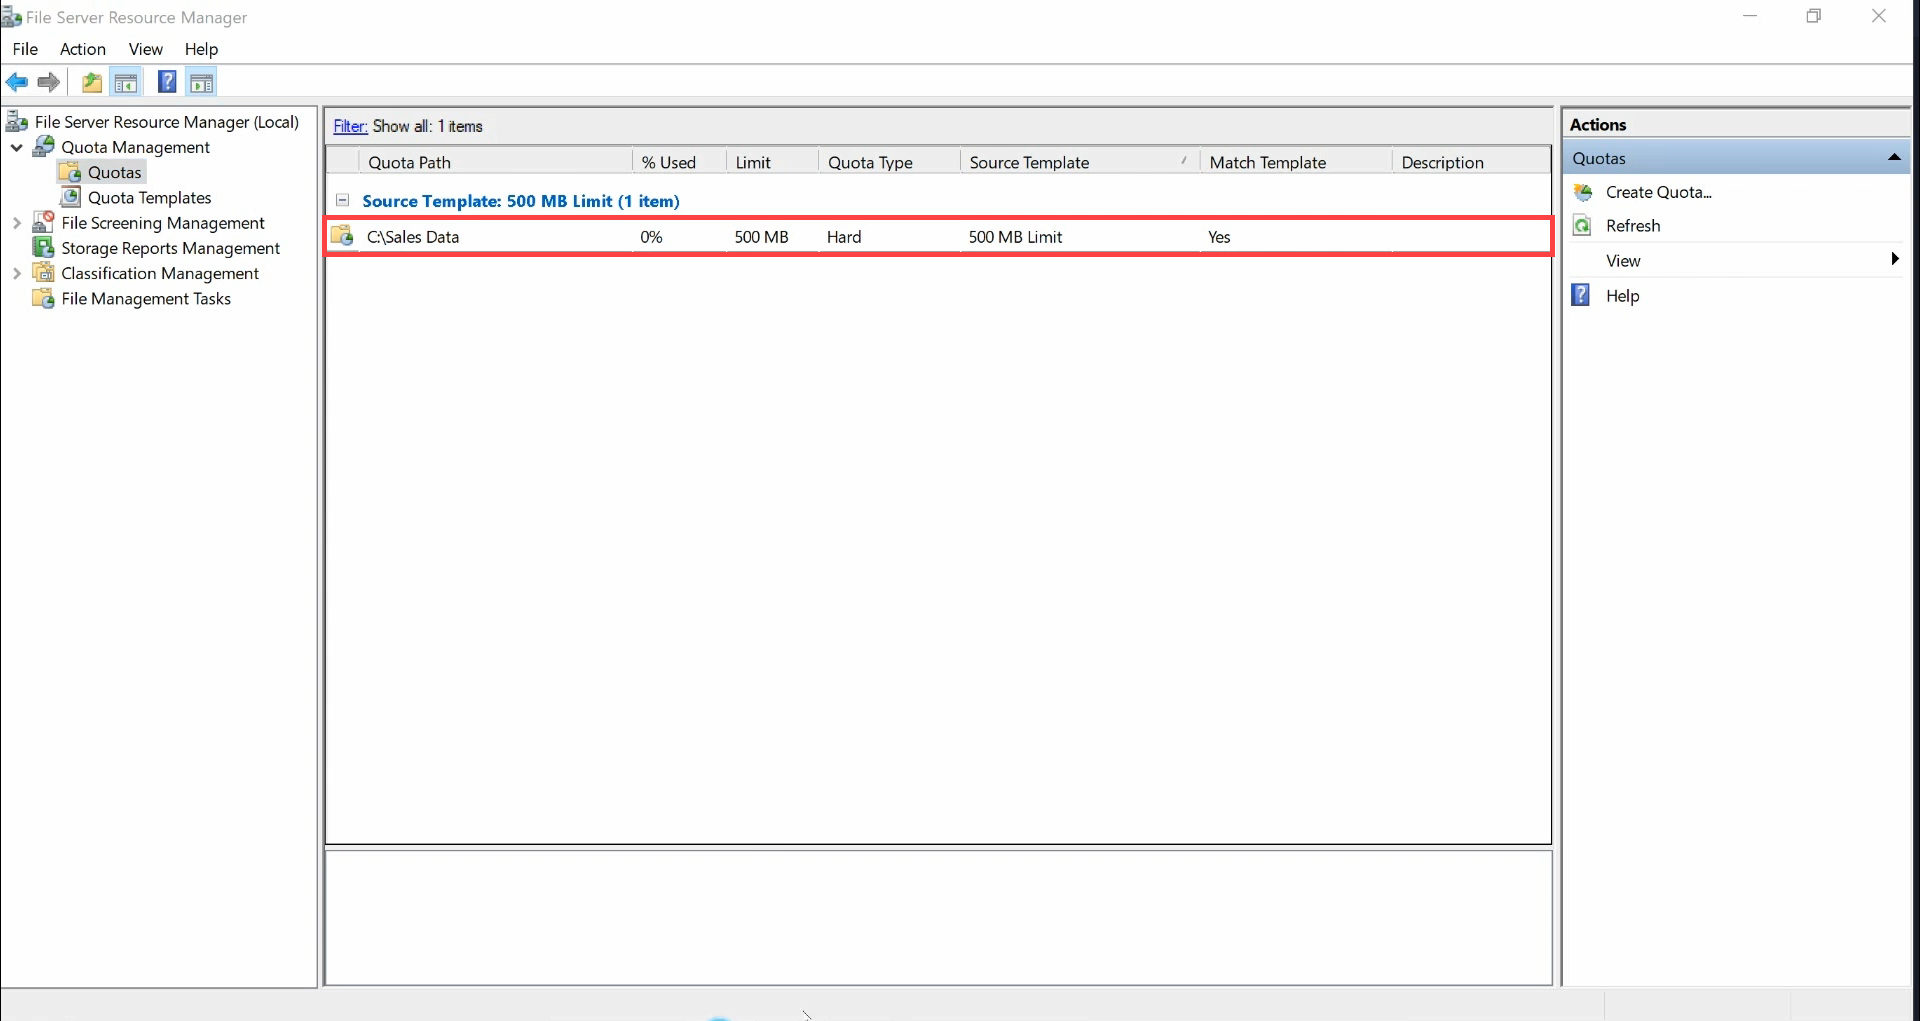
C:\Sales Data — 0% used, 500 MB limit, Hard, sourced from 500 MB Limit template, matches template Yes.Columns to read:
- Quota Path — the folder under enforcement.
- % Used — live consumption against the limit.
- Limit — the cap (500 MB).
- Quota Type — Hard or Soft.
- Source Template — which template the quota was derived from.
- Match Template — Yes means the quota currently matches the template definition. If you edit the template later this column tells you which quotas are still in lock-step.
Step 5 — Test That the Quota Actually Blocks Writes
Open File Explorer, browse to C:\Sales Data:
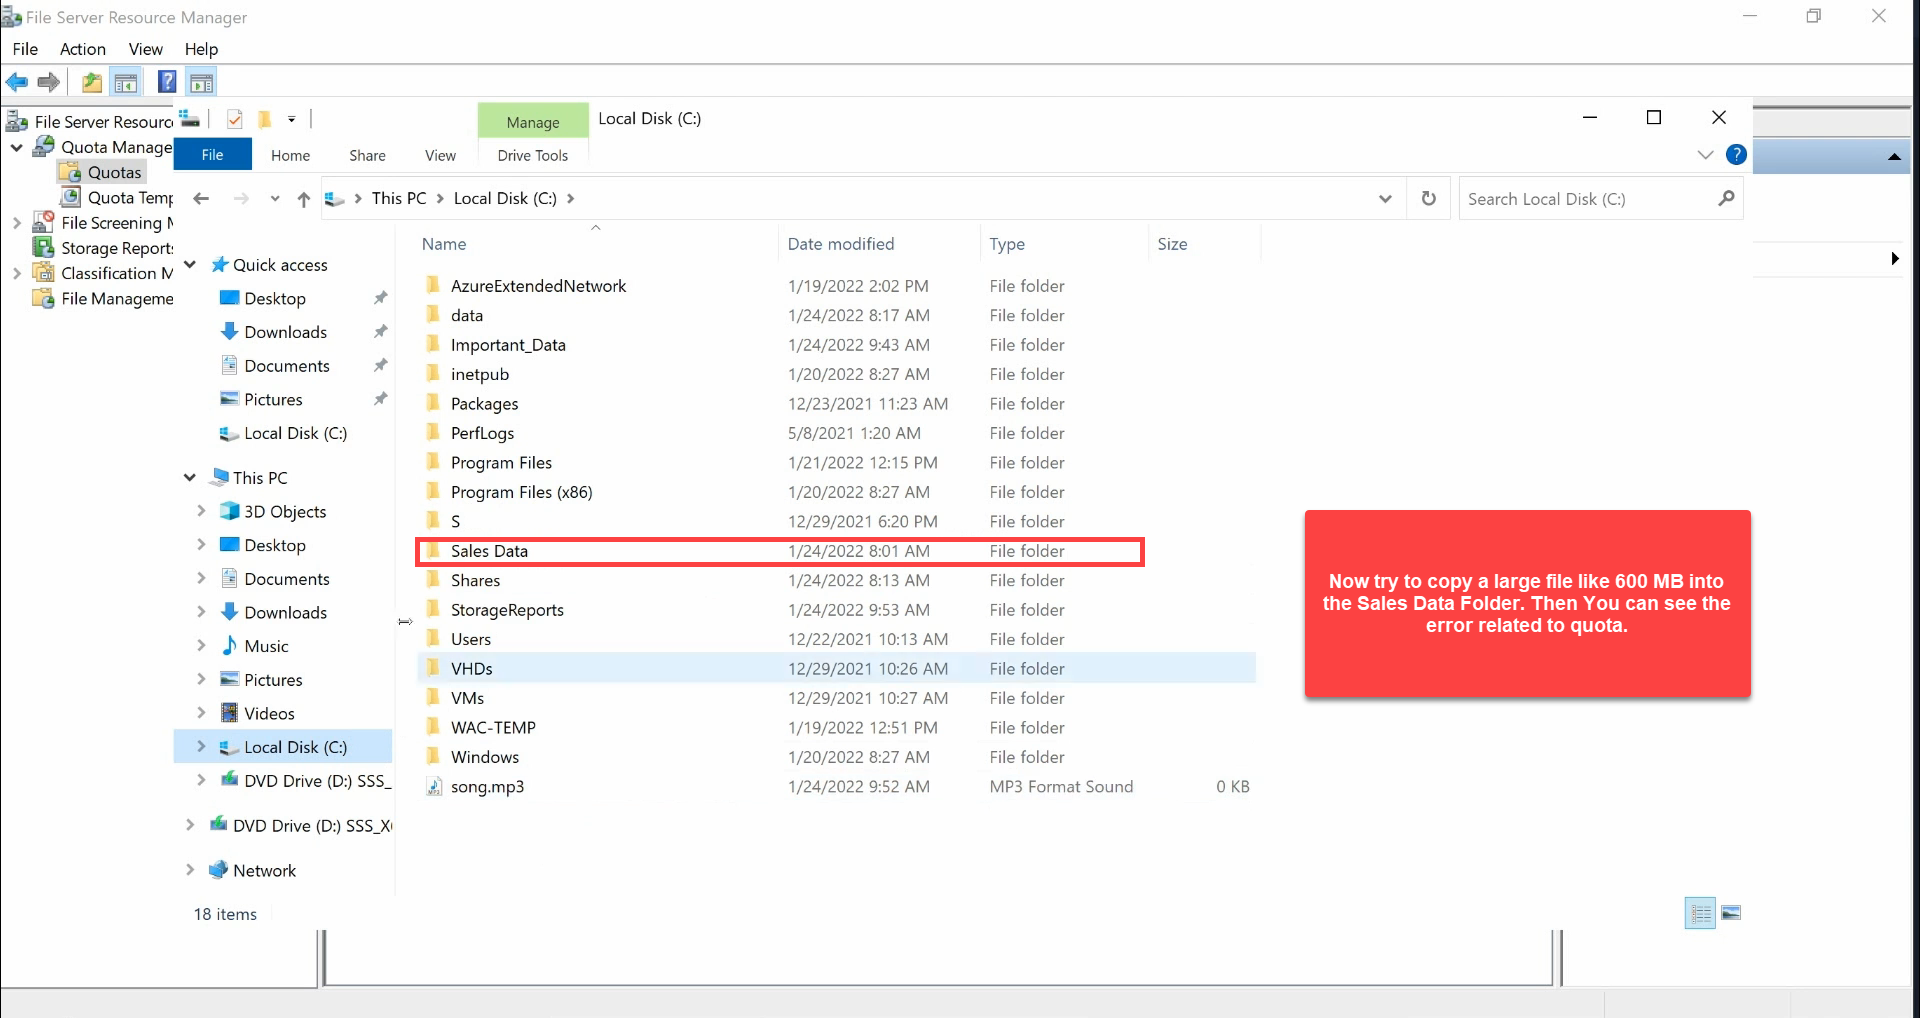
C:\Sales Data from File Explorer.Try to copy a file or folder larger than the 500 MB limit. Windows reports a familiar “not enough space” error:
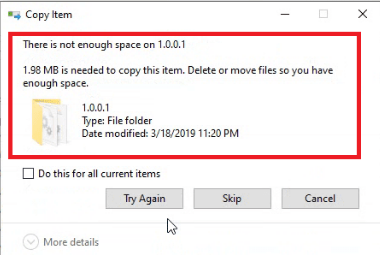
That is the FSRM hard quota refusing the write at the file-system layer. The error message is the same one users see when a real disk is full — intentionally so, because the protocol-level response (NTFS_STATUS_DISK_FULL) is identical, and any application that handles “disk full” will handle a quota rejection without code changes.
If you configured a soft quota instead, the copy succeeds — check the FSRM event log for the threshold notification, the Quota list’s % Used column to confirm it crossed the threshold, and your e-mail inbox if you wired SMTP.
The PowerShell Equivalent
Everything above is one-liners with the FileServerResourceManager module:
# 1. Create the template
$thresh = New-FsrmQuotaThreshold -Percentage 85 -Action @(
    New-FsrmAction -Type Event -EventType Warning -Body "Quota 85% reached on [Quota Path]"
)
New-FsrmQuotaTemplate `
    -Name "500 MB Limit" `
    -Description "500 MB hard quota with warning at 85%" `
    -Size 500MB `
    -Threshold $thresh

# 2. Apply the template to a path
New-FsrmQuota `
    -Path "C:\Sales Data" `
    -Template "500 MB Limit"

# 3. Inspect what is in place
Get-FsrmQuotaTemplate
Get-FsrmQuota | Select-Object Path, Size, Usage, Template, MatchesTemplate

# 4. Apply the same template across many folders
Get-ChildItem "D:\Departments" -Directory | ForEach-Object {
    New-FsrmQuota -Path $_.FullName -Template "500 MB Limit"
}
For day-two operations, the cmdlets that do the heavy lifting are:
Set-FsrmQuotaTemplate— edit a template; every quota withMatchesTemplate=$trueupdates with it.Set-FsrmQuota— edit one specific quota (breaks the template link, setsMatchesTemplate=$false).Remove-FsrmQuota— remove the quota, leave the folder contents alone.Update-FsrmQuota— force a recalculation if the % Used column gets out of sync (rare).
NTFS Quotas vs. FSRM Quotas: When to Use Which
- NTFS quotas — per user per volume. Fine for “every user gets 10 GB on the user volume”. The user identity is the key; folder structure does not matter.
- FSRM quotas — per folder. Fine for “the Sales Data share is capped at 500 MB regardless of who fills it”. The path is the key; user identity does not matter.
You can run both at the same time on the same volume — they enforce independently. In practice, most modern deployments use FSRM only and ignore the NTFS quota subsystem entirely, because folder-scoped limits map better onto how shared file servers are actually organized.
Common Pitfalls
- Auto-applied template at the wrong root. “Auto apply template” on
D:\caps every folder on the volume at the template size. Use it only at a level where you genuinely want every child folder to have the same individual quota (per-user home roots, per-team project roots), never at a generic share root. - Hard quota on a folder that already exceeds the limit. The quota does not shrink existing data — it just refuses new writes once the cap is hit. If a 600 MB folder gets a 500 MB hard quota, the existing files stay; new writes fail. Users notice quickly. Audit folder size first with
(Get-ChildItem $path -Recurse | Measure-Object Length -Sum).Sum / 1MBbefore applying a hard quota. - Soft quota notifications without SMTP configured. The default e-mail action requires SMTP settings on the FSRM server. Configure them in FSRM > Right-click > Configure Options > Email Notifications first, or your warnings vanish silently.
- Editing a quota directly instead of the template. Once you click Edit Quota Properties on a single quota and change the size, that quota’s
MatchesTemplateflips to No. Future template edits skip it. To re-link, delete the quota and recreate from the template. - Forgetting that NTFS-level inheritance can hide quota errors. If a user lacks write permission on the path, they get an Access Denied before FSRM has a chance to enforce the quota — the quota is doing its job, but the error message is misleading. Confirm the user has write access if you suspect quota issues are masquerading as permission problems.
- FSRM service stopped. If SrmSvc is not running, quotas stop enforcing — writes succeed past the limit until the service restarts and re-evaluates. Confirm
Get-Service SrmSvcis Running on the file server. The service should be set to Automatic and is by default.
Conclusion
One template, one path, one click on Create — FSRM gives you folder-level storage limits with the same enforcement teeth as a full disk. The wins compound when you script it: New-FsrmQuotaTemplate + New-FsrmQuota in a Foreach loop and you have hundreds of department-share quotas in seconds, all matching one canonical template that you edit in one place when policy changes.
If you also want to control which file types users can save into a folder (block .exe, allow .xlsx), the same FSRM console has File Screening Management — same template-then-apply pattern, just for extensions. And if you want a forest-wide picture of where storage is going, Storage Reports Management generates the “largest files” / “quota usage” reports on a schedule.