Why You Want the Windows Firewall On
Every modern Windows Server ships with the host-based Windows Defender Firewall enabled by default. Despite that, the most common change a fresh-install lab admin makes is to disable it — usually because the firewall is blocking some test traffic and turning it off is the fastest way to make the test pass. The lab works, the firewall stays off, and three weeks later that “temporary” lab box is in production with a wide-open inbound surface.
The Windows Firewall does meaningful work on a server. It blocks inbound RPC, SMB, RDP, WinRM, and a hundred other services from networks that have not been explicitly allowed. It is the difference between a freshly-installed Windows Server being safe to put on an internet-facing subnet and being root-able in twenty minutes by anything scanning port 445. Even on internal-only servers, it is the second-line defence after a network perimeter that occasionally has a hole.
This article shows the smallest, scriptable way to turn the firewall back on with PowerShell — one cmdlet per profile, one cmdlet to verify — plus the per-profile and per-rule controls you actually use day-to-day.
The Three Firewall Profiles
Windows Firewall does not have one global on/off switch. It has three independent profiles, and each connection on the box is assigned to one of them based on the network category Windows detects:
- Domain — in effect when the host can authenticate to a Domain Controller for the AD domain it is joined to. This is the LAN profile for domain members.
- Private — user-tagged “Private network”. Used for trusted home / lab networks. Less restrictive than Public; more restrictive than Domain.
- Public — the default for any network not categorized as the above two. Wi-Fi at airports, coffee shops, hotel networks. Strictest defaults.
You can have all three active simultaneously if the server has multiple network adapters on different network types. The firewall enforces each profile independently against the traffic flowing on whichever adapter is in that profile. Enabling the firewall almost always means enabling all three; disabling for testing often means just turning off the one profile your lab traffic is on.
Step 1 — Get the Current State
Open Windows PowerShell as administrator and read the per-profile state with Get-NetFirewallProfile:
Get-NetFirewallProfile | Format-Table Name, EnabledOn a freshly-disabled server, the output looks like:
Name      Enabled
----      -------
Domain      False
Private     False
Public      False
Three False rows means the firewall is off across the board. The MMC view (Windows Defender Firewall with Advanced Security) shows the same thing:
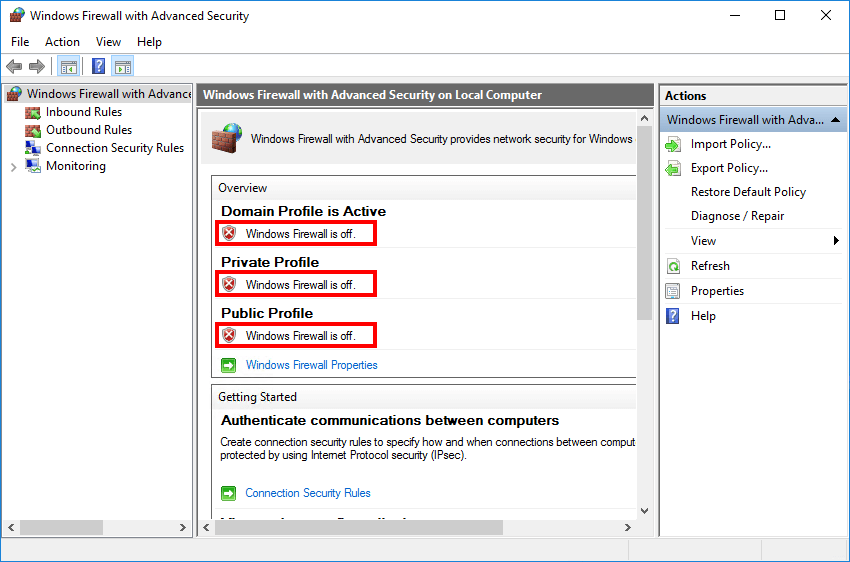
The red X next to each profile is the GUI’s blunt confirmation that nothing is being filtered. Get-NetFirewallProfile is the same data without the GUI. For a richer view that includes inbound / outbound default actions, notification settings, and log file paths:
Get-NetFirewallProfile | Format-List Name, Enabled,
    DefaultInboundAction, DefaultOutboundAction,
    LogFileName, LogMaxSizeKilobytes, LogAllowed, LogBlocked,
    NotifyOnListen, AllowUnicastResponseToMulticast
Step 2 — Enable All Three Profiles
One cmdlet, three profiles, done:
Set-NetFirewallProfile -Profile Domain, Public, Private -Enabled TrueThe change takes effect immediately — the firewall service starts enforcing rules on every connection in any of the three profiles before the cmdlet returns. There is no reboot, no service restart needed.
To enable just one profile (e.g. Public on a server you are putting in a DMZ but leaving Domain off because no DC is reachable):
Set-NetFirewallProfile -Profile Public -Enabled TrueOr use -Name * instead of -Profile if you prefer the more verbose form — both target the same set of profile objects:
Set-NetFirewallProfile -Name Domain,Private,Public -Enabled TrueStep 3 — Verify
Re-run the read cmdlet:
Get-NetFirewallProfile | Format-Table Name, EnabledYou want to see True on every row:
Name      Enabled
----      -------
Domain       True
Private      True
Public       True
The MMC view confirms the same with green checks on every profile:
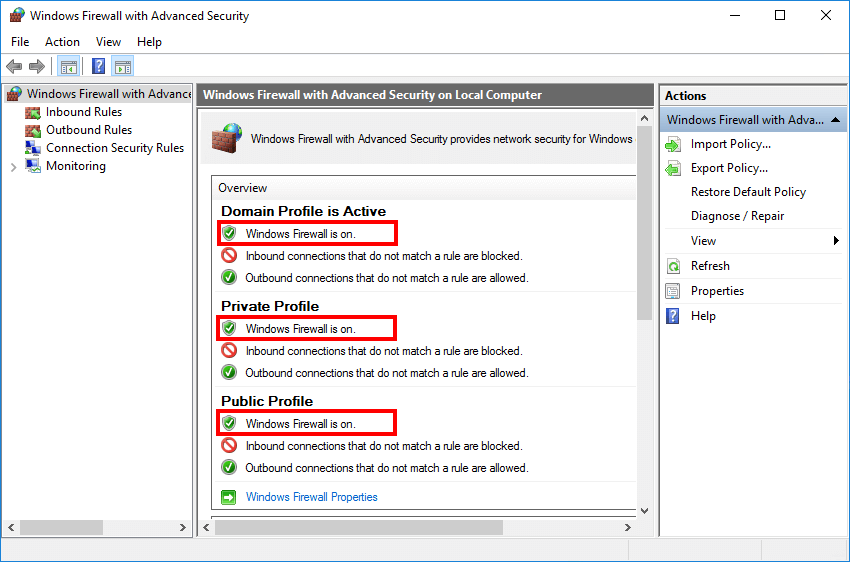
The text under each profile in the MMC also tells you the default inbound and outbound actions:
- Inbound connections that do not match a rule are blocked — the secure default. Anything you have not explicitly allowed is denied.
- Outbound connections that do not match a rule are allowed — the practical default. Most services need to talk out; the firewall does not block outbound traffic by default.
Beyond On/Off — Useful Configurations
Once the firewall is on, the same Set-NetFirewallProfile cmdlet sets the rest of the profile’s configuration. Pick the profile, set the property:
# Enforce strict outbound default on the Public profile
Set-NetFirewallProfile -Profile Public -DefaultOutboundAction Block

# Enable logging of dropped packets across all profiles
Set-NetFirewallProfile -Profile Domain,Private,Public `
    -LogAllowed False `
    -LogBlocked True `
    -LogMaxSizeKilobytes 32767 `
    -LogFileName '%systemroot%\system32\LogFiles\Firewall\pfirewall.log'

# Disable the "new program is trying to listen" popup on the Public profile
Set-NetFirewallProfile -Profile Public -NotifyOnListen False

# Allow unicast responses to multicast / broadcast (useful for some discovery protocols)
Set-NetFirewallProfile -Profile Domain -AllowUnicastResponseToMulticast True
For a clean reset of one profile back to defaults:
Set-NetFirewallProfile -Profile Public -Enabled NotConfiguredNotConfigured defers to whatever Group Policy says; in the absence of GPO it falls back to the Windows-default True.
Per-Rule Operations
Profile-level on/off is one half of the firewall. The other half is the rule list — thousands of inbound and outbound rules that decide which traffic types are allowed for which programs/ports/services. The cmdlets that work with rules:
# List rules currently enabled and inbound
Get-NetFirewallRule -Direction Inbound -Enabled True |
    Select-Object DisplayName, Profile, Action, Direction

# Allow inbound TCP 3389 (RDP) from the Domain profile only
New-NetFirewallRule `
    -DisplayName 'Allow RDP - Domain' `
    -Direction Inbound `
    -Action Allow `
    -Protocol TCP `
    -LocalPort 3389 `
    -Profile Domain

# Disable a rule by display name (more readable than by Name GUID)
Disable-NetFirewallRule -DisplayName 'File and Printer Sharing (Echo Request - ICMPv4-In)'

# Look up an existing rule by display-name pattern
Get-NetFirewallRule -DisplayName '*Remote Desktop*' |
    Select-Object DisplayName, Enabled, Action, Profile, Direction
For a fresh install, the dozens of pre-installed Microsoft inbound rules cover the basics — SMB, ICMP, RDP, RPC, WinRM, and so on — but they are mostly disabled until you turn them on with Enable-NetFirewallRule or via the Windows Defender Firewall with Advanced Security MMC.
Common Pitfalls
- Turned the firewall off “just for testing”. The single most common mistake. Turn it back on the moment the test ends —
Set-NetFirewallProfile -Profile * -Enabled Trueis one line; making it part of the test cleanup is one habit. - Disabled only one profile. If your network adapter is on the Public profile and you disable Domain, your tests still fail. Read which profile your active adapter is on with
Get-NetConnectionProfilebefore turning anything off. - Forgot Group Policy. If the server is domain-joined and Group Policy enforces firewall settings, your local
Set-NetFirewallProfilechange is overwritten on the next GPO refresh. Checkgpresult /h $env:TEMP\gpresult.htmlto see if a Computer Configuration GPO is setting the firewall state. - Block-all-outbound surprise. Setting
-DefaultOutboundAction Blockon the Public profile, then enabling that profile, can take the box offline if the active connection is on Public and you have not added explicit allow rules for the protocols you need (DNS, NTP, HTTPS for updates, AD traffic, etc.). Test on a console session you can recover from physically. - Looking at the wrong “firewall”. Windows has two: the host firewall (this article) and the IPsec policy / connection security rules. Both share the MMC and PowerShell module.
Get-NetFirewallProfilereads the host firewall;Get-NetIPsecRulereads IPsec / connection security. They are independent. - Older cmdlets still in muscle memory.
netsh advfirewall set allprofiles state onstill works on every modern Windows Server, but theNetSecuritymodule is the supported replacement. Use the cmdlets in scripts;netshis fine for quick interactive use.
Conclusion
One cmdlet to read the state, one cmdlet to enable everything, one cmdlet to verify:
Get-NetFirewallProfile | Format-Table Name, Enabled
Set-NetFirewallProfile -Profile Domain, Public, Private -Enabled True
Get-NetFirewallProfile | Format-Table Name, Enabled
Bake those three lines into your post-install configuration script for every new Windows Server you build, and the firewall is never the thing that gets forgotten in the lab-to-production handoff. The default ruleset is sensible; the default state should be enabled; and that should not be a thing you remember to do — it should be a thing the script does for you.