Account Lockout Policy is the AD setting that converts a brute-force password-guessing attack from “eventually wins” into “locks the account out and stops.” Three knobs — threshold, reset counter, lockout duration — configured once at the domain level via Group Policy and applied to every user account in the domain. The defaults are wide open (no lockout); the right configuration is a five-minute change in Default Domain Policy that closes one of the most common AD attack paths.
This article configures account lockout end to end on Windows Server 2022 + a Windows 10 client: edit Default Domain Policy, set the three core values, optionally protect the built-in Administrator from lockout, force the policy to apply with gpupdate /force, demonstrate by deliberately locking a test user, then unlock from ADUC.
The Three Settings
All under Computer Configuration › Policies › Windows Settings › Security Settings › Account Policies › Account Lockout Policy:
- Account lockout threshold — how many consecutive failed sign-in attempts trigger a lock. Default is 0 (no lockout, ever — the brute-force vulnerability default). Recommended: 5 for general use; lower for high-value environments. Microsoft Security Compliance Toolkit baselines for Server 2022 set this at 10.
- Reset account lockout counter after — how long (minutes) of no failed attempts before the failed-attempt counter resets to zero. Default is 30 minutes. Important: this only resets the counter, it does not unlock an already-locked account.
- Account lockout duration — how long (minutes) the account stays locked after threshold is hit. Default is 30 minutes. Setting 0 means the account stays locked indefinitely until an admin manually unlocks it — the safer choice for production because it forces incident review.
Setting threshold to a non-zero value automatically suggests reasonable defaults for the other two (typically 30 / 30). Accept the suggestion or override.
The Domain-Wide Constraint
Account Lockout Policy is domain-scoped, not OU-scoped. Only one set of values applies per domain, and the policy must live at the domain root — the Default Domain Policy GPO is where Microsoft expects it. Putting these settings in an OU-linked GPO does nothing for user accounts in that OU; only the domain-root setting wins.
This is one of the few exceptions to the “don’t modify the default GPOs” rule. Account Lockout, Password Policy, and Kerberos Policy all belong in Default Domain Policy because of the domain-scope requirement. Other settings should still go in custom GPOs.
For per-OU or per-user differentiation you need Fine-Grained Password Policy (FGPP), which uses Password Settings Objects (PSOs) attached to specific users / groups. FGPP is a separate topic; covered in another article.
Pre-flight
- Domain Admin credentials on the DC.
- A Windows 10 / 11 client domain-joined for the test (otherwise you can simulate from the DC itself, but a real client is better).
- A test user account whose lockout you can comfortably trigger and unlock without affecting production.
- Decide on the three values before starting. Common production triple: 5 / 30 / 30 or 10 / 15 / 30; high-security: 3 / 60 / 0.
Step 1: Open Default Domain Policy for Editing
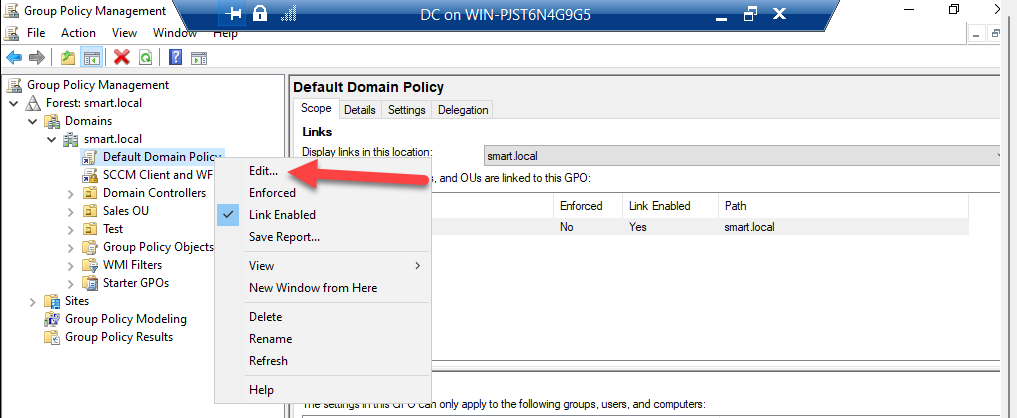
Open Server Manager › Tools › Group Policy Management. Expand the domain → Group Policy Objects. Right-click Default Domain Policy → Edit:
Step 2: Navigate to Account Lockout Policy
In the editor, drill to:
Computer Configuration
Policies
Windows Settings
Security Settings
Account Policies
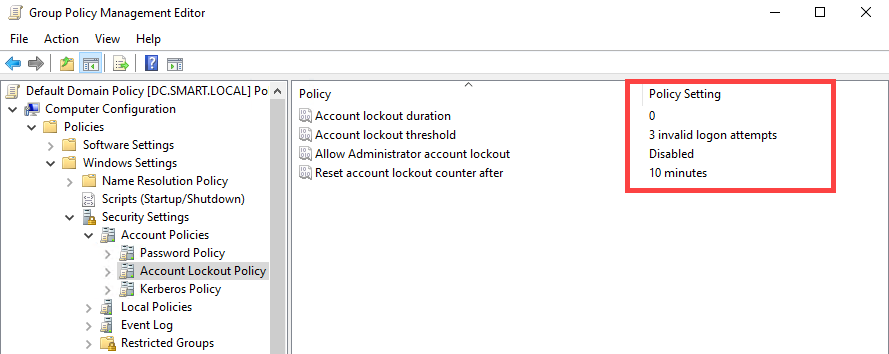
Account Lockout PolicyThree (or four, on Server 2022) settings appear: Account lockout duration, Account lockout threshold, Reset account lockout counter after, and Allow Administrator account lockout.
Step 3: Set Account Lockout Threshold
Double-click Account lockout threshold. The dialog asks for the number of failed attempts. Enter 5. Click Apply.
Windows pops up a confirmation suggesting 30 minutes for both Reset account lockout counter after and Account lockout duration. Click OK to accept the suggested defaults; you can override either afterwards.
Step 4: Set Reset Account Lockout Counter After
Double-click Reset account lockout counter after. Enter 30 minutes (or whatever fits your operational pattern). Click Apply → OK.
The counter only resets between failed attempts — if a user fails twice and waits 30 minutes, the counter goes to zero. If the user fails three more times after that wait, the counter is at 3, not 5, so they have not yet hit threshold.
Step 5: Set Account Lockout Duration
Double-click Account lockout duration. Enter 0 for “manual unlock only”, or any other minute value for self-clearing lockouts.
The trade-off: 0 forces a help-desk ticket / admin review for every lockout, which surfaces real attacks but also creates ticket volume for legitimate fat-finger lockouts. 30 minutes self-clears, which is friendlier to users but lets a brute-force attempt resume after every 30-minute pause. Pick based on how loud you want lockouts to be.
Step 6: Disable Administrator Account Lockout (Recommended)
Double-click Allow Administrator account lockout. Set to Disabled:
This setting governs the built-in Administrator account specifically. Leaving it Enabled (the default in newer Windows) means a sustained brute-force against the well-known Administrator account name can lock the most-privileged account in the directory — which is also the break-glass account you might need to recover from the lockout. Disabling protects you from being locked out of your own DC.
This does not exempt the Administrator account from Password Policy or other security controls; only the lockout-on-failed-attempts behaviour. Pair with strong rotation, a vault, and use the account only for break-glass.
Step 7: Confirm GPO Link
Default Domain Policy is already linked at the domain root by default — you should not need to do anything here. Confirm by selecting the domain in GPMC and looking at the Linked Group Policy Objects tab; Default Domain Policy should be at Link Order 1.
Step 8: Apply Immediately with gpupdate
GPO updates push every 90 minutes by default plus a +/- 30-minute jitter. To apply immediately on the test client, open an elevated Command Prompt or PowerShell and run:
gpupdate /forceWait for Computer Policy update has completed successfully and User Policy update has completed successfully. Account Lockout is a Computer Configuration setting, so Computer Policy is the one that matters.
Step 9: Test by Locking the Account
On the Windows 10 client, lock the screen (Win+L) or sign out. At the login screen, enter the wrong password 5 times for the test user. After the 5th failure, the next correct or incorrect password attempt produces:
The referenced account is currently locked out and may not be logged on to.
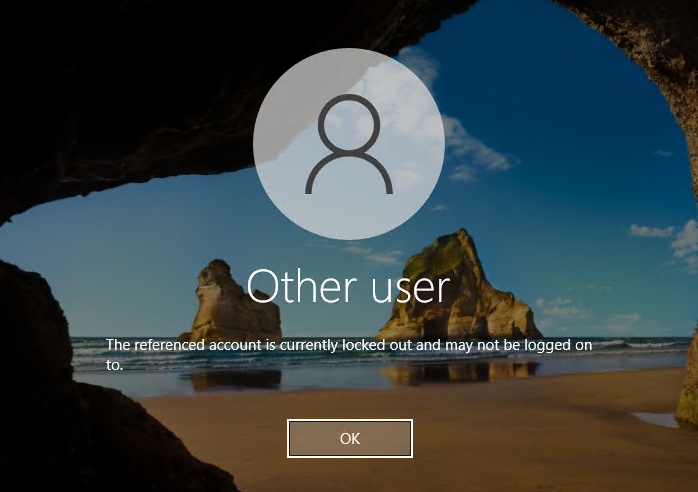
This is the lockout policy working. Even with the correct password, the account stays locked for the duration you configured (or indefinitely if you set 0).
From the DC side, you can also see locked accounts via PowerShell:
# All currently-locked accounts
Search-ADAccount -LockedOut |
    Select-Object SamAccountName, LockedOut, AccountLockoutTime
Step 10: Unlock the Account
If you set Account lockout duration to a non-zero value, the account self-unlocks after that interval expires. To unlock immediately:
Via ADUC: Open Server Manager › Tools › Active Directory Users and Computers. Find the locked user. Right-click → Properties → Account tab. Check Unlock account. Click Apply → OK:
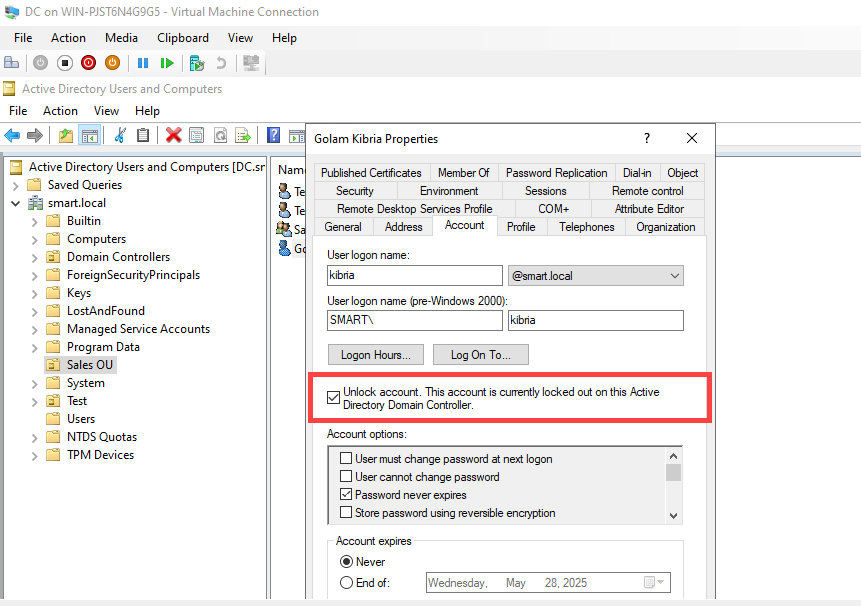
Unlock-ADAccount -Identity <user>.Via PowerShell (faster for help-desk scripting):
Unlock-ADAccount -Identity usernameAfter unlocking, the user can sign in immediately with the correct password. The Account properties no longer report the lockout state:
Monitoring and Auditing
The whole point of lockout is to surface attacks. Pair the policy with audit logging so locked accounts produce useful security events. Configure Audit Account Lockout in the Advanced Audit Policy (see the Advanced Audit Policy article) and watch for these events on the DC’s security log:
| Event ID | What it means |
|---|---|
| 4625 | An account failed to log on (the events leading up to a lockout) |
| 4740 | A user account was locked out (the lockout event itself) |
| 4767 | A user account was unlocked |
Forward these to a SIEM and configure detections: a single 4740 might be a fat-finger; a wave of 4625s followed by 4740 is an attack worth investigating. The SubjectUserName field on a 4740 event identifies the locked account; the CallerComputerName field identifies the workstation the failed attempts came from.
Common Pitfalls
- Setting threshold to 0. The default is 0, which means “no lockout, ever.” Easy to miss because the dialog accepts 0 without warning — verify with
Get-ADDefaultDomainPasswordPolicyor by re-opening the dialog. - Putting the policy in an OU-linked GPO. Account Lockout is domain-scoped; OU-linked settings are silently ignored. Always edit Default Domain Policy.
- Threshold too low. Threshold of 3 with a 30-minute reset means a forgetful user with caps-lock on locks themselves out before they realise it. Even high-security environments rarely go below 5 because the help-desk volume of self-inflicted lockouts becomes unmanageable.
- Lockout duration of 0 with no monitoring. Manual-unlock-only is the safer setting if you actually review the lockouts. If lockouts pile up unattended, users churn through tickets and hate you. Pair with help-desk runbook + monitoring or set duration to a non-zero value like 15 minutes.
- Forgetting to disable Administrator account lockout. The well-known Administrator name is constantly under brute-force probing on internet-exposed AD environments. Without the “Disable” setting, a sustained attempt locks your break-glass account. Always disable, then rotate the password and limit usage to break-glass.
- Confusing per-user with per-domain. Account Lockout is per-domain. To exempt service accounts or apply different lockout values to specific users, you need Fine-Grained Password Policy (PSOs), not the standard Account Lockout Policy.
Conclusion
Account Lockout Policy is one of the cheapest, highest-impact security configurations in AD. Three settings in Default Domain Policy, applied domain-wide in five minutes, and brute-force becomes detectable instead of silent. Pair with audit logging (event ID 4740) and a SIEM forwarding rule, disable Administrator lockout to protect your break-glass, and the next time someone runs hydra against your VPN-exposed RDP gateway, you find out about it from a security alert — not from a compromised account log entry months later. For per-user or per-OU differentiation, layer Fine-Grained Password Policy on top.