SAN built in Part 3; now we connect the nodes to it. The iSCSI initiator on each node binds to its Storage NIC, discovers the target portal, logs in, and sees the LUNs. Critical: only Node-01 brings the disks online and formats them — Node-02 must leave them Offline / Reserved. The cluster service takes over ownership in Part 5.
The cardinal rule
In a Windows Failover Cluster, only one node owns a disk at a time. The cluster service flips ownership atomically on failover. If you forcibly bring a disk online on Node-02 while Node-01 already owns it, both nodes write to the same filesystem simultaneously — and within seconds you have unrecoverable corruption.
This is the most dangerous mistake in cluster setup. The wizard won’t stop you. The disks will look like they need formatting on Node-02 and you’ll be tempted. Don’t.
Phase 1 — Node-01 (the formatter)
Discover the target portal
Sign in to Node-01. Server Manager > Tools > iSCSI Initiator. If prompted to start the service, Yes (and let it set to auto-start).
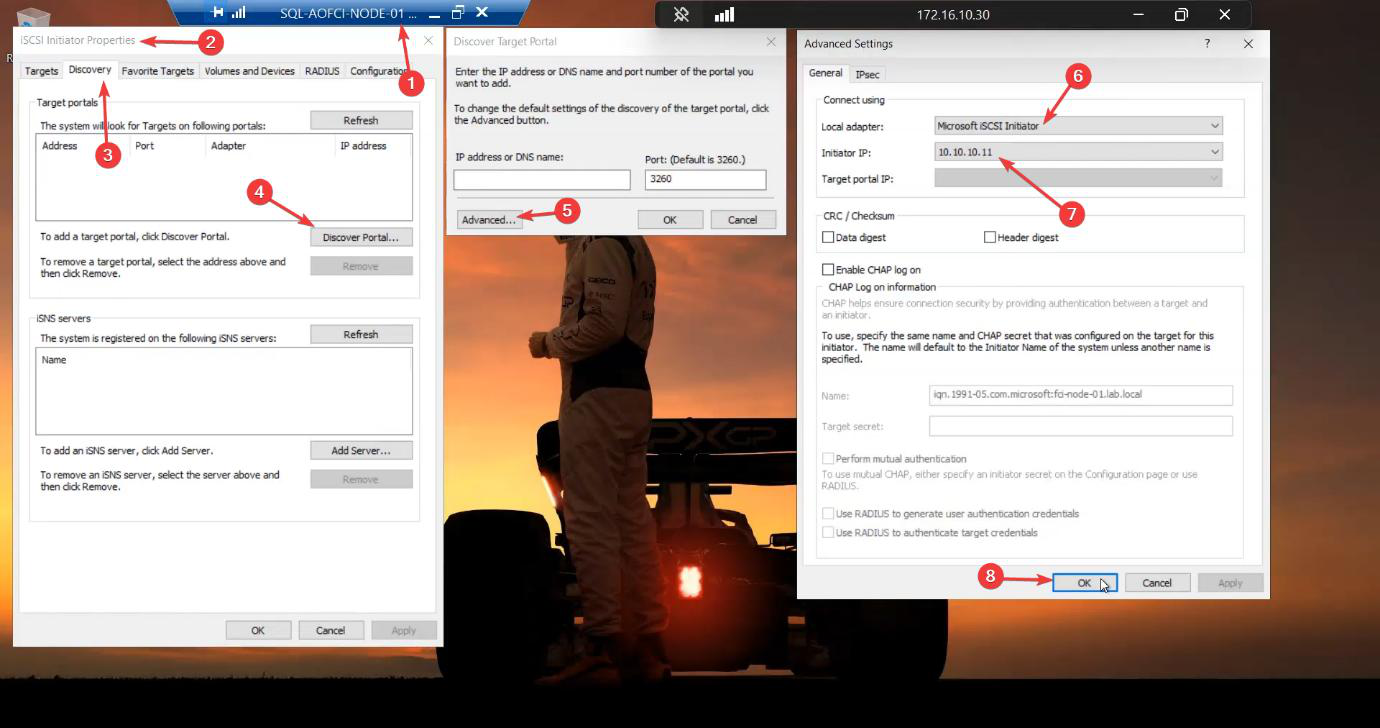
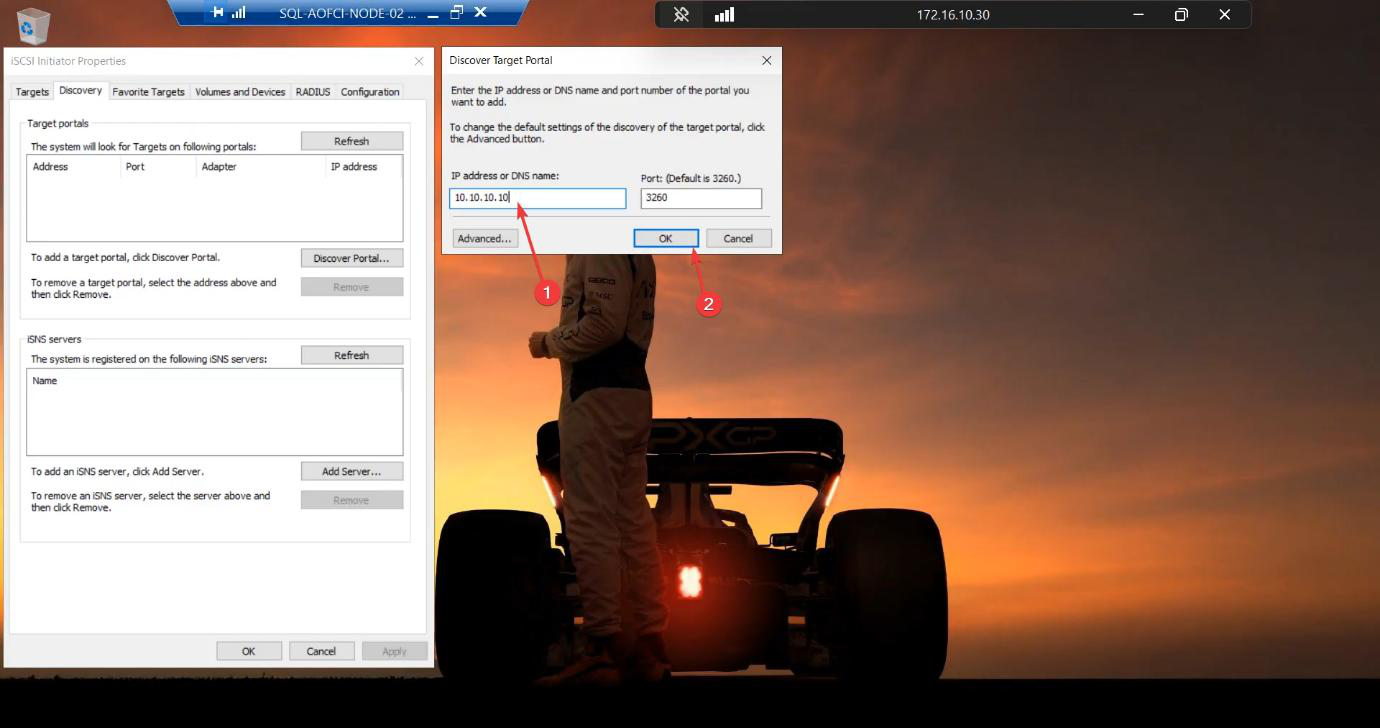
10.10.10.11 (the Storage NIC). Without this, Windows uses any/Public NIC and storage traffic ends up on the wrong wire.Discovery tab > Discover Portal > Advanced. This Advanced step is where most lab guides go wrong — without it, Windows picks any NIC for iSCSI traffic and you end up sending storage data over the public NIC. Set:
- Local Adapter: Microsoft iSCSI Initiator
- Initiator IP:
10.10.10.11(Node-01’s Storage NIC)
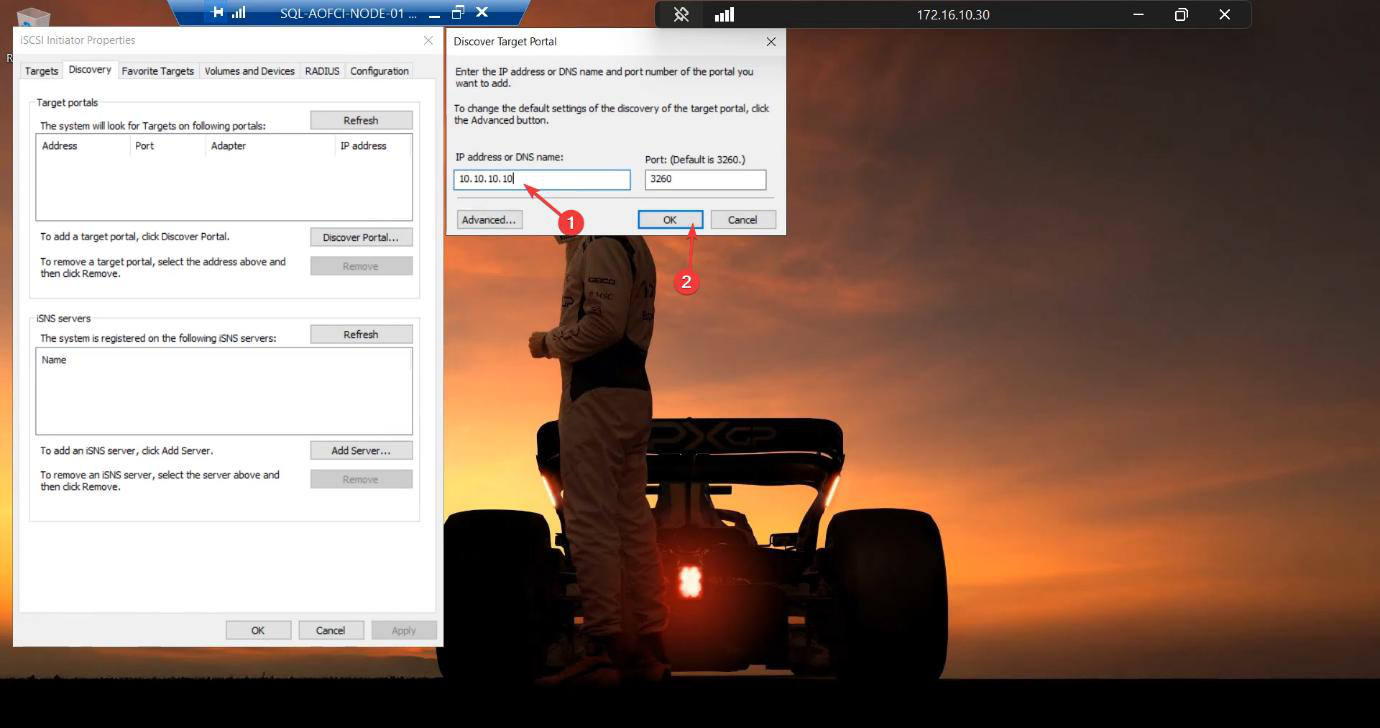
10.10.10.10. The SAN.Back in the Discover Target Portal dialog, enter the SAN’s storage IP: 10.10.10.10. OK.
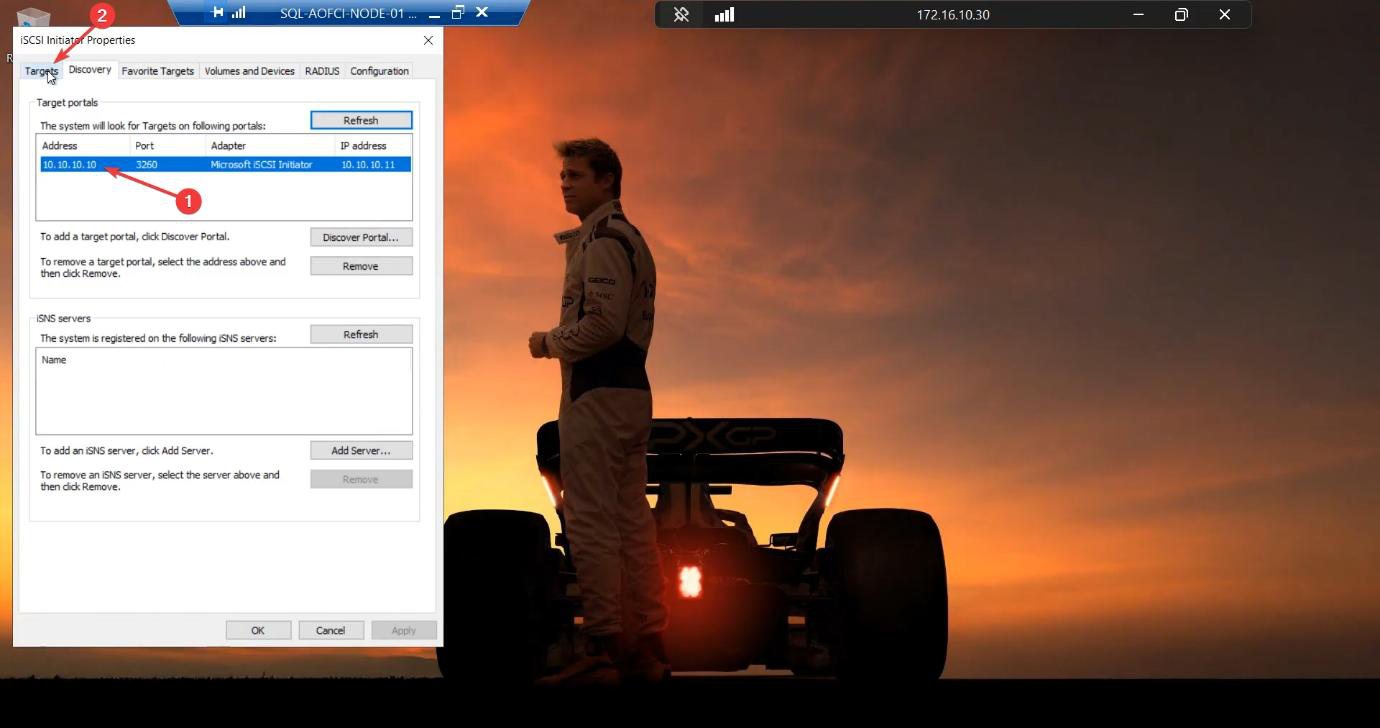
Discovery succeeds. The target portal is registered.
Connect to the target
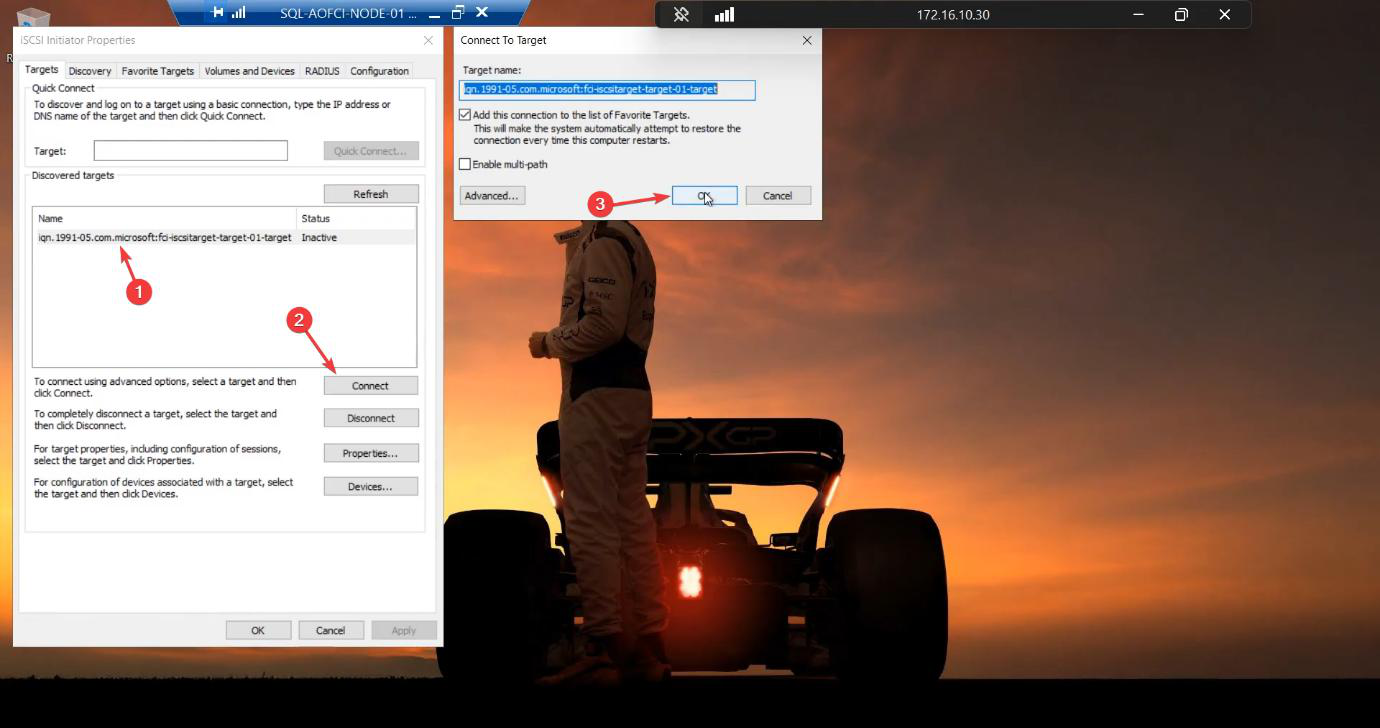
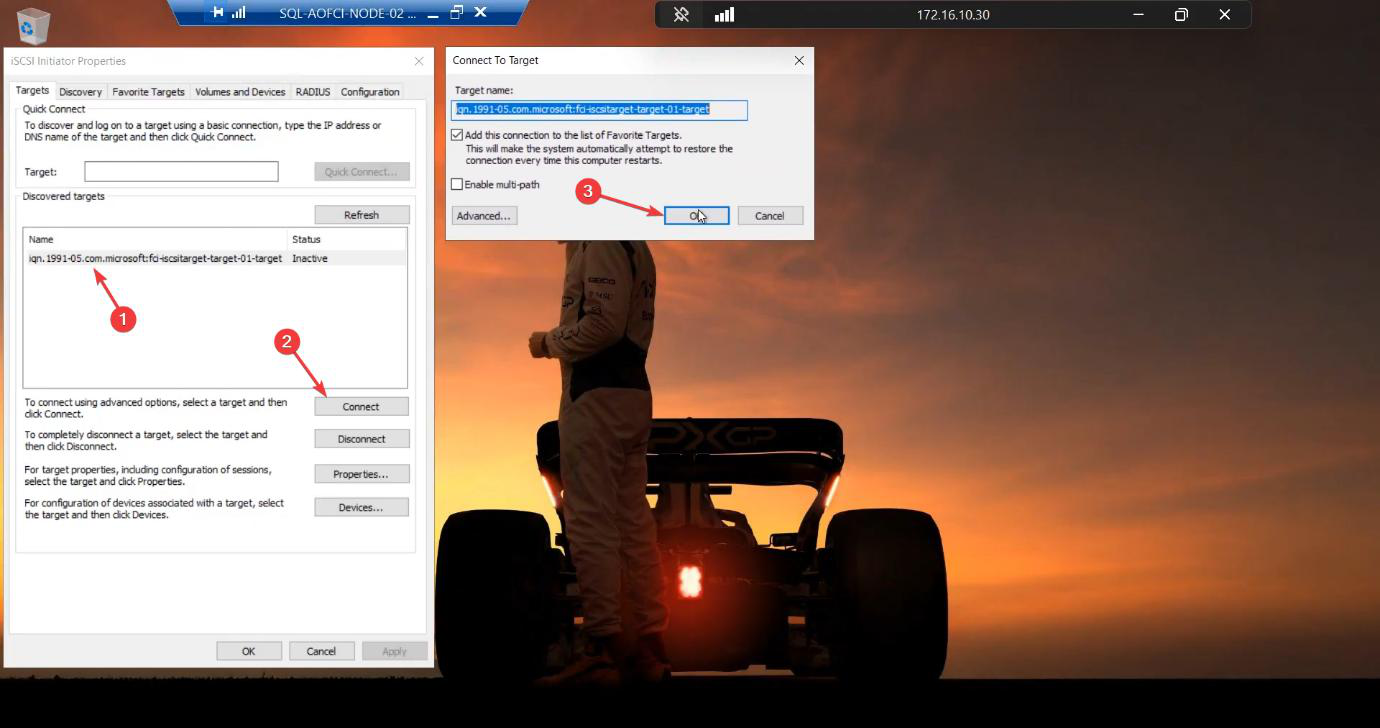
Targets tab. Target-01 shows status Inactive. Select > Connect. Tick “Add this connection to the list of Favorite Targets.” Without this, the connection won’t auto-reconnect after reboot and your cluster comes up missing its shared storage — not fun to debug.
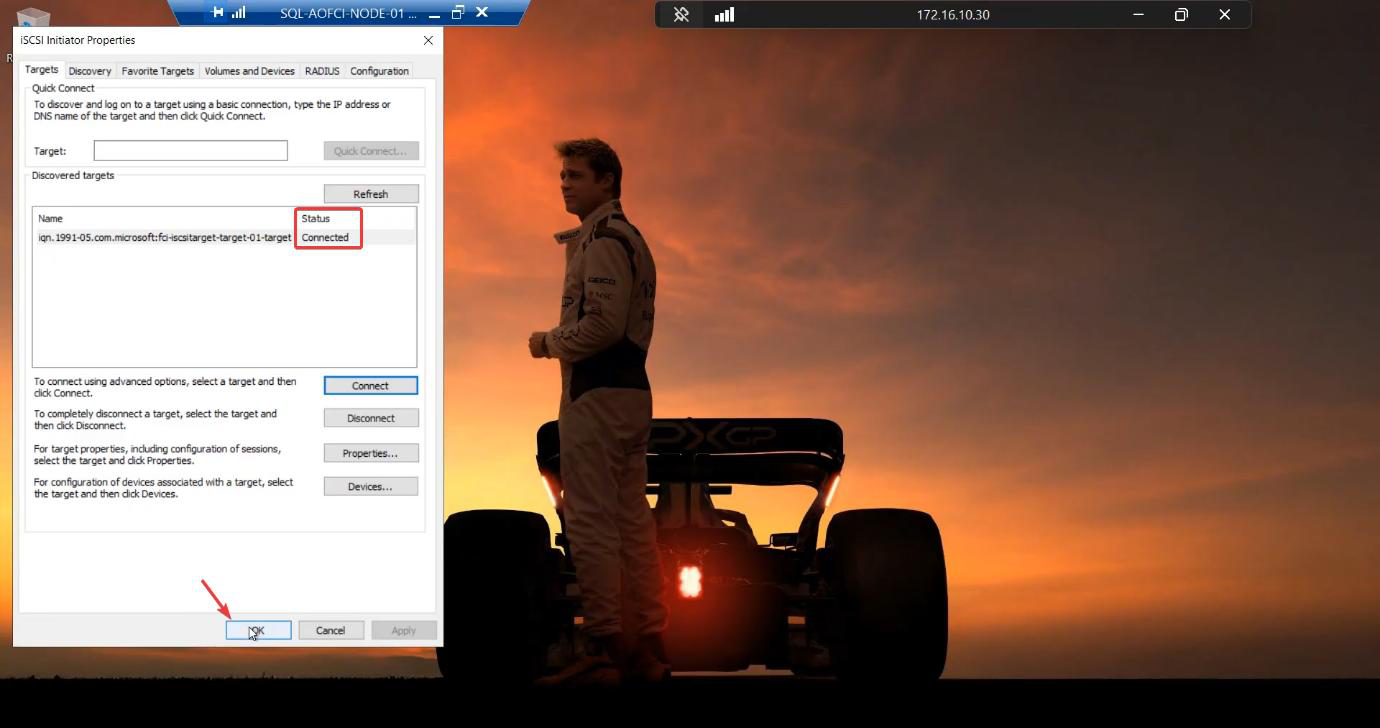
Status: Connected. Two LUNs are now visible to Node-01.
Online + initialize + format (Node-01 ONLY)
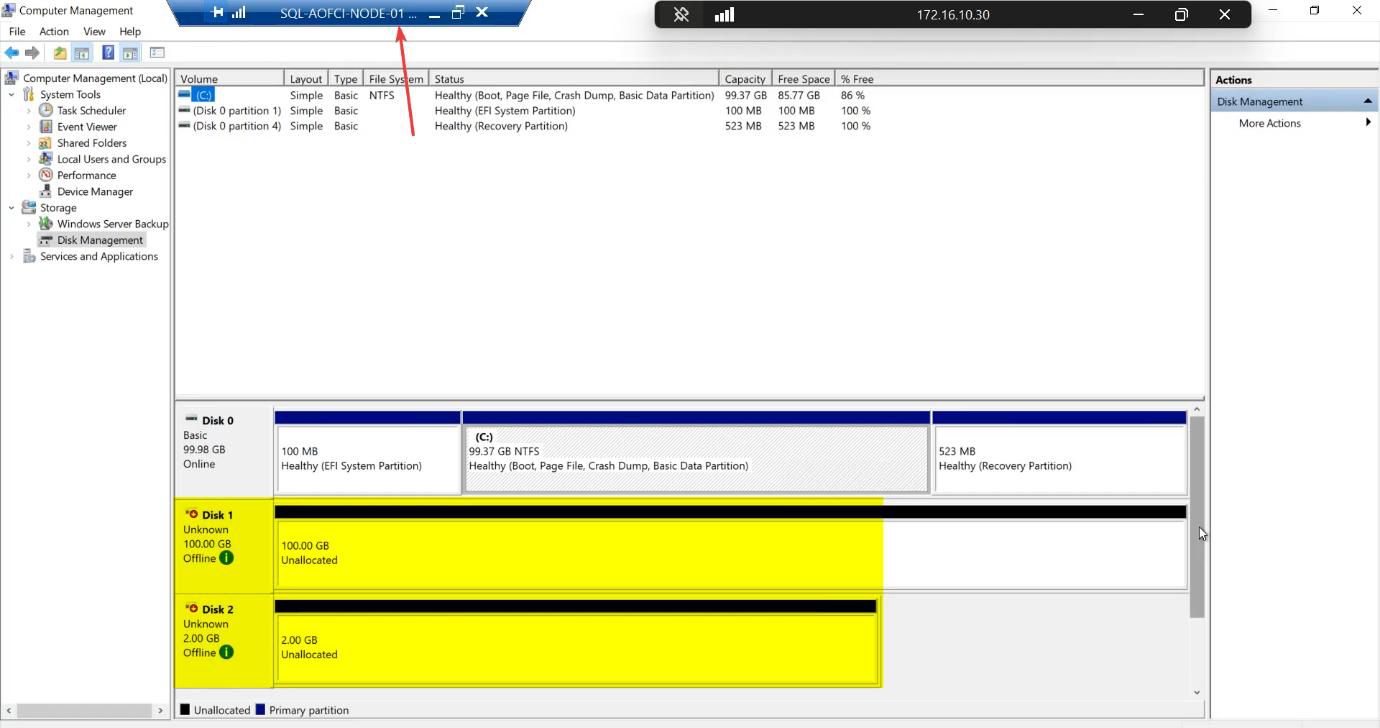
diskmgmt.msc). Two new disks appear: 100 GB and 2 GB. Both Offline + Unknown by default.Open diskmgmt.msc. Two new disks: 100 GB and 2 GB. Both Offline + Unknown.
For each disk:
- Right-click > Online
- Right-click > Initialize Disk — choose GPT (modern standard, supports >2 TB)
- Right-click the unallocated space > New Simple Volume
- Format as NTFS, assign drive letter (e.g., S: for SQL-Data, Q: for Quorum)

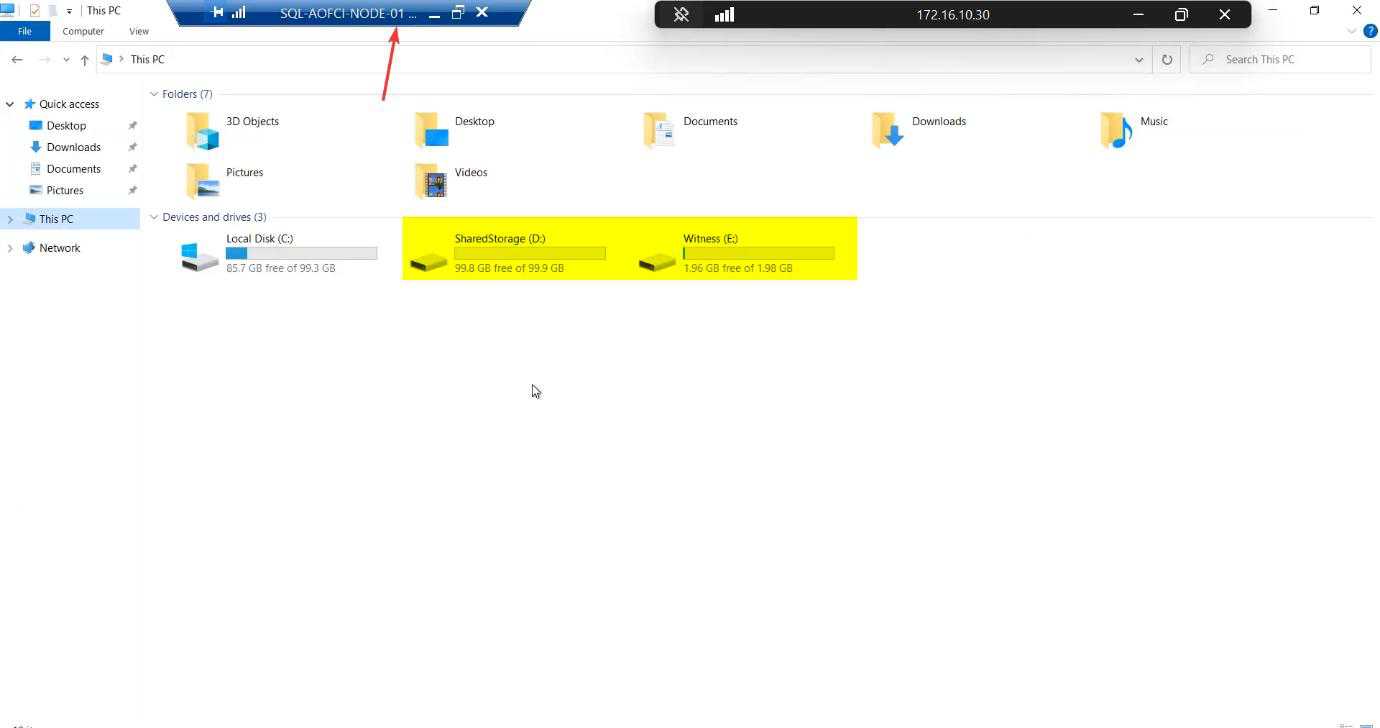
File Explorer confirms both drives mounted on Node-01.
Phase 2 — Node-02 (the bystander)
Same initiator setup, different IP
Sign in to Node-02. Server Manager > Tools > iSCSI Initiator.
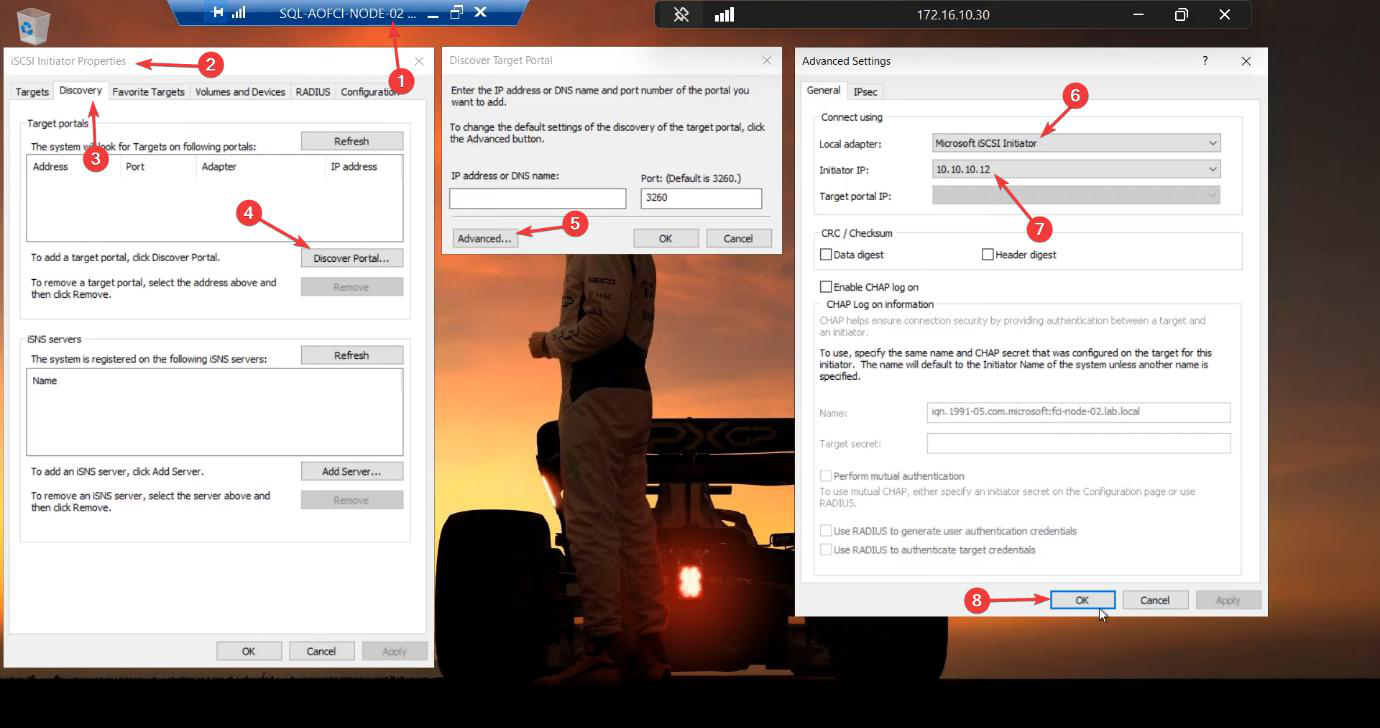
10.10.10.12 (Node-02’s Storage NIC).Discover Portal > Advanced > Initiator IP 10.10.10.12 (Node-02’s Storage NIC).
10.10.10.10. Same target. Both nodes connect to the same shared LUNs — that’s the point of FCI.Target portal: 10.10.10.10. OK.
Targets tab > Connect > tick Favorite. Status: Connected.
Verify disks (and LEAVE THEM ALONE)
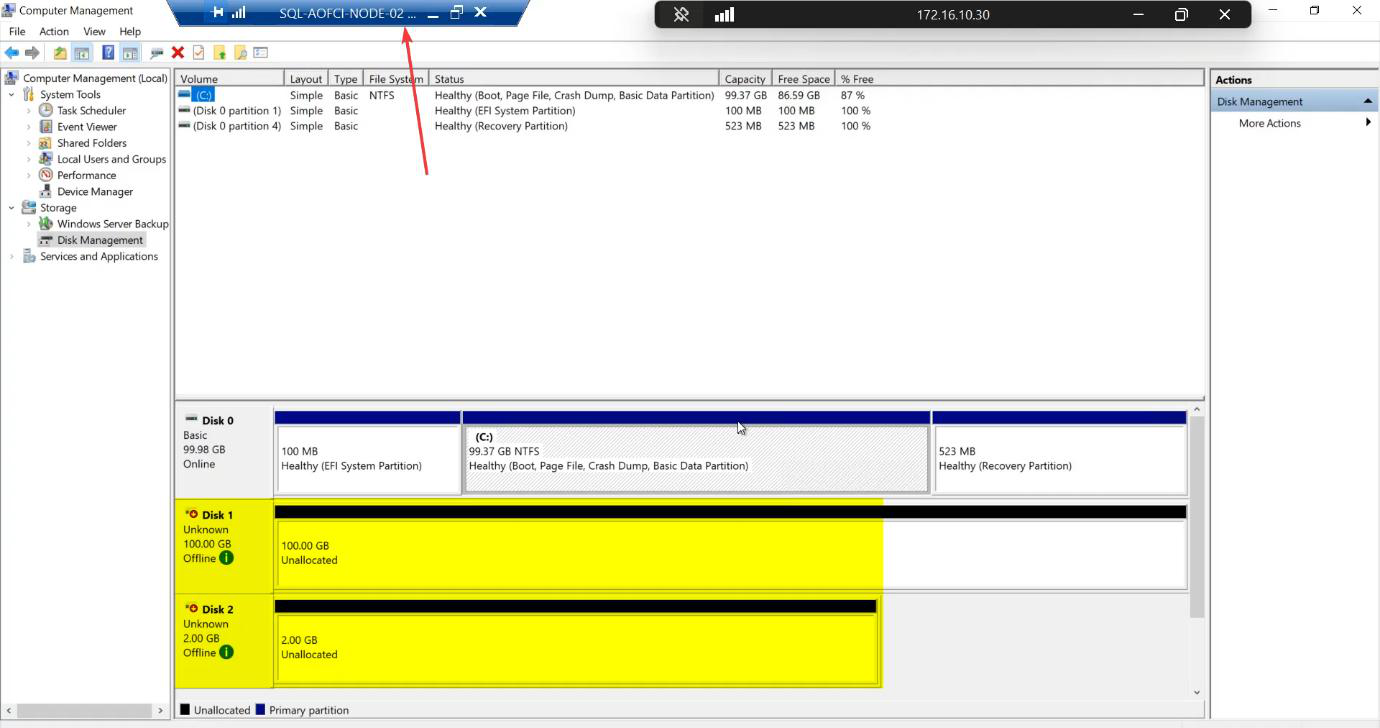
Disk Management on Node-02. Same two disks visible — SQL-Data and Quorum-Witness. Status: Offline / Reserved.
STOP. Do not bring online. Do not format. Close diskmgmt.msc and walk away.
The Reserved status means “another initiator currently owns this disk.” Windows is correctly telling you it’s not safe to write. The Cluster Service (installed in Part 5) will take over orchestrating which node owns the disks at any moment.
Phase 3 — verify on the SAN side
Switch to the iSCSI-Target VM.
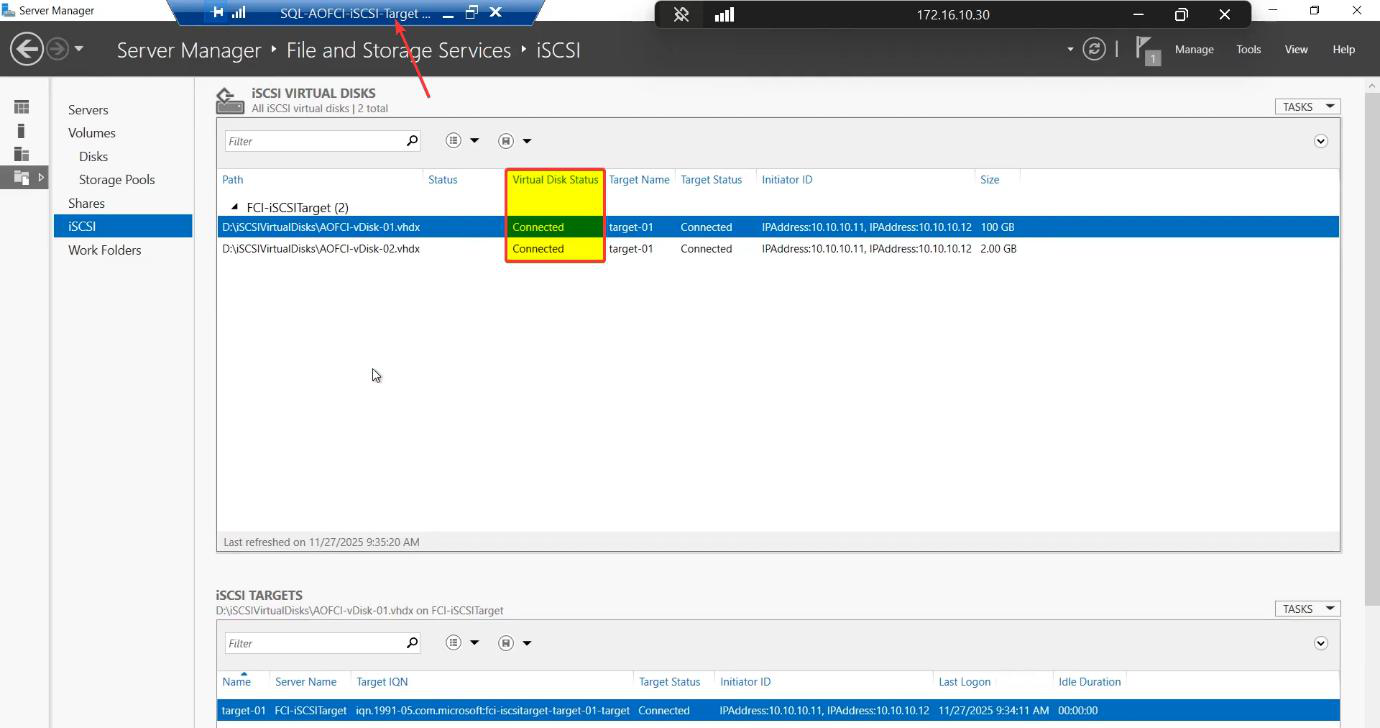
Server Manager > File and Storage Services > iSCSI > Target-01. Status: Connected.

Right-click Target-01 > Properties > Initiators tab.
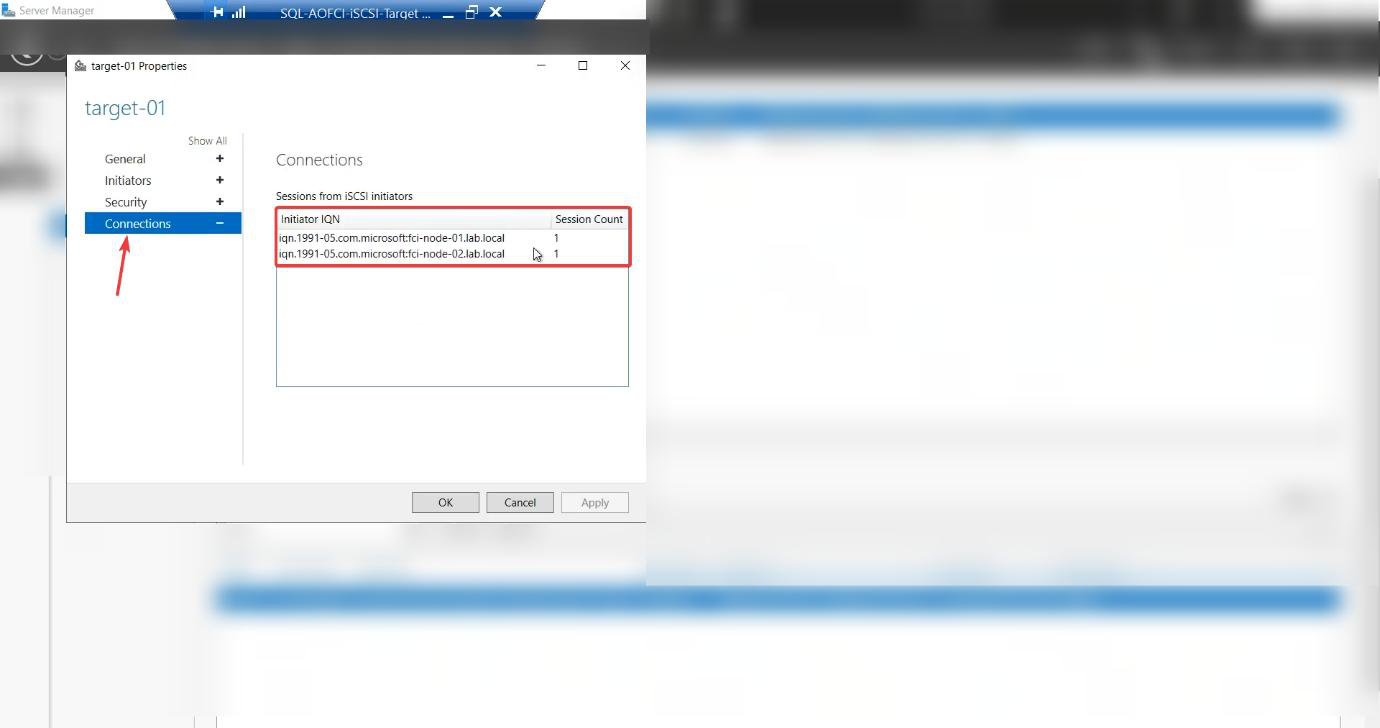
Two initiators listed — one IQN per node. Both N1 and N2 are logged in. Storage and compute layers are wired together. Cluster validation can now run in Part 5.
Things that bite people in this part
Initiator IP not set explicitly
The most common configuration error. You hit Discover Portal, type the SAN IP, hit OK. Looks fine — until your storage traffic goes over the public NIC, competing with backups and AD replication. Latency spikes mysteriously. Always go through Advanced and set Initiator IP to the Storage NIC explicitly.
Forgetting Favorite Targets
Easy to miss the tickbox during Connect. Result: the iSCSI session establishes once but doesn’t auto-reconnect after reboot. Cluster Service starts, can’t see the shared storage, marks the cluster role failed. Tick the box.
Bringing disks online on Node-02
Already covered above. Worth repeating: do not. If you accidentally did this, the safest recovery is to take the disks offline on Node-02, reboot N2, and let Node-01’s ownership reassert. If both nodes wrote during the overlap, restore from backup — the filesystem is corrupted.
Drive letters drift after failover
If you assign drive letter S: on Node-01 but the same letter is in use by something else on Node-02 (e.g., a CD-ROM drive at S:), the cluster failover assigns a different letter on Node-02. SQL Server — configured to look at S: — can’t find its data files. Standardise drive letter usage across nodes BEFORE assigning cluster letters.
Firewall blocks iSCSI
Windows Firewall on a fresh Server install enables iSCSI rules by default, but if you’ve hardened the firewall manually, ports 3260 (TCP) and the Microsoft iSCSI Initiator Service rules need to be allowed.
SAN restart drops sessions
If the iSCSI Target VM is rebooted after Phase 1, the initiator sessions drop. Favorites Targets reconnects them automatically — but it can take 60-90 seconds. Plan SAN maintenance windows accordingly.
What’s next
Compute ↔ storage wired. Part 5 installs the Failover Clustering feature, runs cluster validation (the official Microsoft “is this design supported?” check), and creates the cluster object in AD. See the full series at SQL Server Clustering pathway.