File shares grow weird over time. Five years of marketing PDFs, the same 80MB sales-deck template saved three hundred times by three hundred people, log archives that are functionally identical until the timestamp on row 14. Data Deduplication is Windows Server’s answer: a background process that finds repeated chunks across all files on a volume and stores each unique chunk exactly once. The post-deduplication file system looks identical to applications — same file names, same paths, same content when you open them — but the actual on-disk footprint can drop 30–70%.
This walkthrough installs the role, enables dedup on a non-system volume with the General Purpose File Server profile, configures the schedule (avoid the “background optimization” trap), runs an initial pass, and verifies savings with Get-DedupStatus. The crucial “don’t enable this on databases or VHDX files” warning lives in the gotchas at the end — read it before pointing dedup at a production share.
What you need before starting
- A Windows Server 2022 (or 2019/2016) member server, joined to the domain, acting as a file server
- A non-system volume (e.g. D:) holding the file share content — you cannot dedup the system drive
- Local administrator rights
- Workload understanding — do not enable dedup on volumes hosting SQL databases, virtual machine VHDX files, or WSUS content (see gotchas)
Install the Data Deduplication role
The role is a sub-component of File and Storage Services. From Server Manager > Manage > Add Roles and Features:
- Click Next through Before You Begin
- Pick Role-based or feature-based installation, Next
- Select the local server, Next
- Expand File and Storage Services > File and iSCSI Services
- Tick Data Deduplication; accept any feature prompt
- Click through, then Install
- Close when done

Or in PowerShell:
Install-WindowsFeature -Name FS-Data-DeduplicationOpen the Volumes view
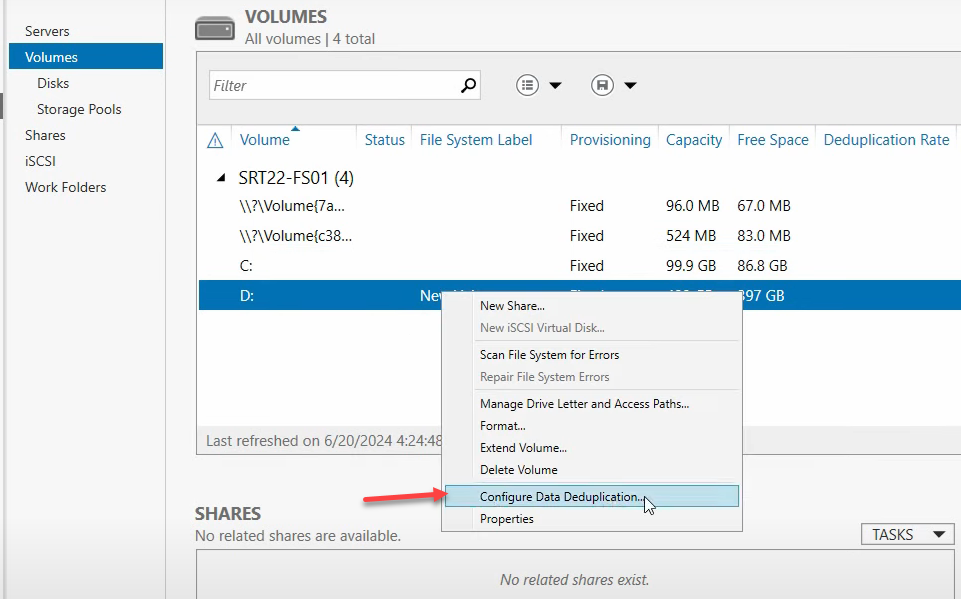
From Server Manager > File and Storage Services > Volumes. Every volume on the server is listed. The system drive (C:) is greyed out for dedup — you can’t enable it there. Pick the volume hosting your file share data (D: in this walkthrough).
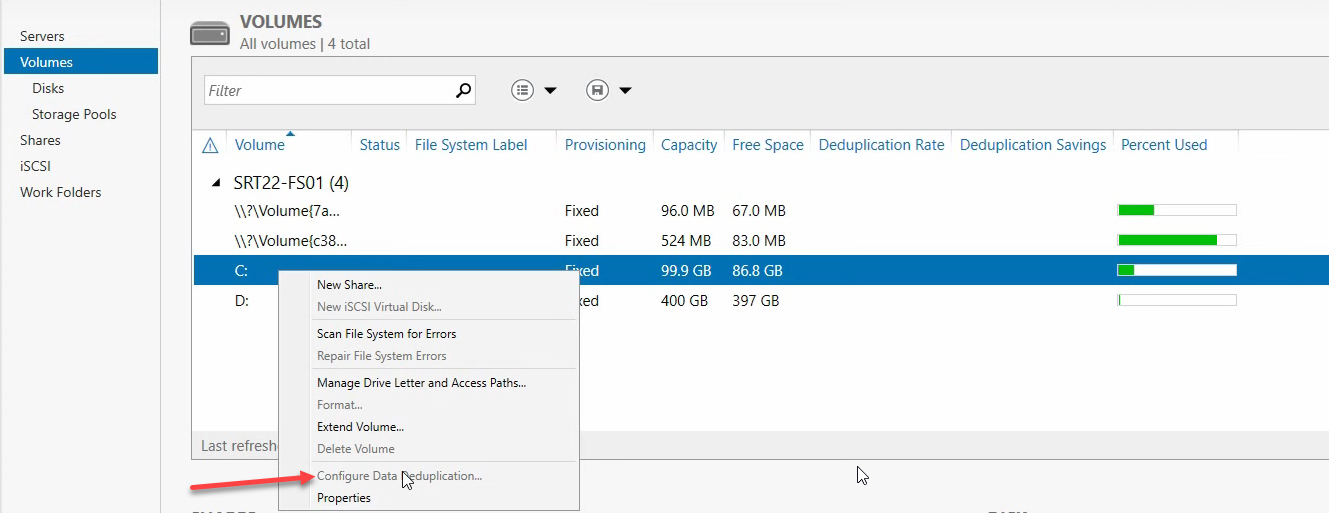
Enable dedup on the data volume
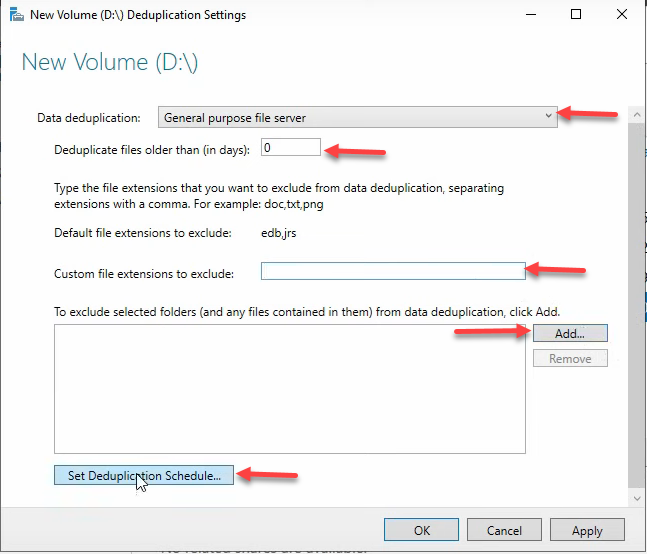
Right-click Volume D > Configure Data Deduplication. The dialog asks for the Usage Type:
- General purpose file server — the default and right answer for user file shares (documents, spreadsheets, archives). Optimization runs at file age 3 days.
- Virtual Desktop Infrastructure (VDI) server — tuned for VDI deployments where many VMs share nearly identical OS images. Don’t pick this unless that’s actually your workload.
- Backup — tuned for backup snapshots with small daily deltas. Pick this for backup target volumes.
For a normal file share, pick General purpose file server.
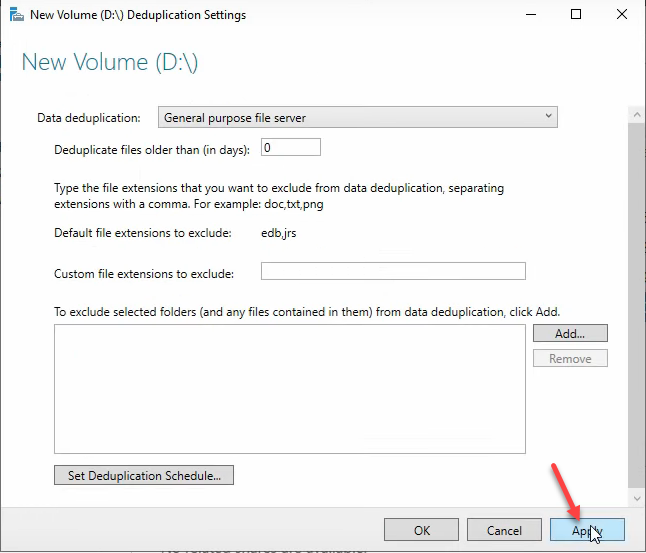
File age and exclusions
Two settings shape what gets deduplicated:
- Deduplicate files older than — how stale a file must be before dedup processes it. Default 3 days is right for production — you don’t want dedup competing with users actively editing today’s files. 0 days deduplicates immediately, useful for testing or for backup volumes where files don’t change after creation.
- File extensions to exclude — types where dedup is unlikely to find savings and just wastes CPU. Already-compressed formats are the obvious candidates:
.png,.jpg,.zip,.iso,.7z,.mp4,.mp3. Compression has already collapsed the redundancy dedup looks for. - Folders to exclude — specific paths to skip. Useful for temp folders, scratch directories, anything you know dedup wouldn’t help with.
The deduplication schedule (skip background, configure throughput)
Dedup runs as background jobs. Two scheduling models, and only one of them is appropriate for production:
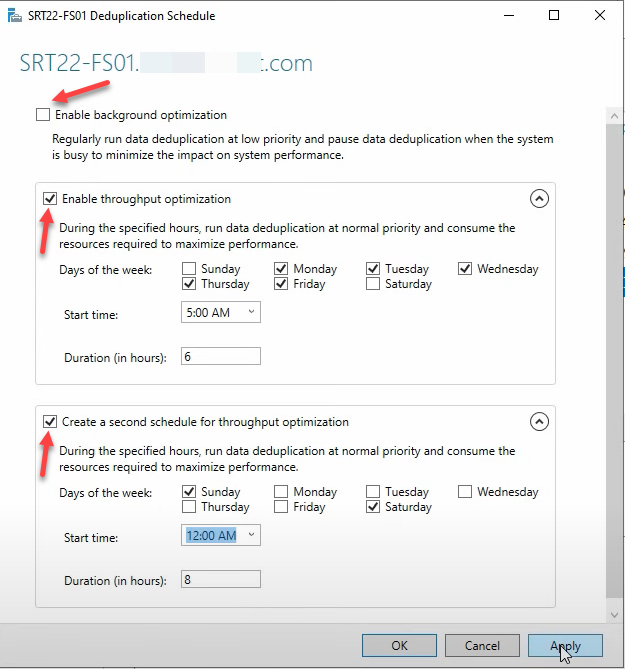
Background Optimization — uncheck this on busy servers
Runs hourly at low priority, claims to pause when other work needs the resources. In practice, on a busy file server it still measurably degrades I/O latency for end users. Microsoft’s docs are diplomatic about this; field experience is consistent: uncheck Enable Background Optimization on production file servers. Use Throughput Optimization instead.
Throughput Optimization — configure two windows
Higher-priority scheduled runs that complete more work in less time, scheduled for off-hours. The pattern most environments converge on: one window for weekday early mornings, one longer window for weekends.
Window 1 — Weekday early mornings
- Enable
- Start: 5:00 AM
- Days: Monday–Friday
- Duration: 6 hours (5:00 AM – 11:00 AM)
Window 2 — Weekend overnight
- Enable
- Start: 12:00 AM
- Days: Saturday, Sunday
- Duration: 8 hours (12:00 AM – 8:00 AM)
Adjust to your environment’s actual quiet hours — an EU-headquartered shop and a US-headquartered shop have different idle windows. The point is to never run dedup throughput jobs while users are actively touching the volume.
Apply the configuration
Click Apply > OK, then Apply > OK on the parent dialog. Dedup is now enabled and scheduled. Server Manager’s Volumes view will show the Data Deduplication Rate column populated for the volume after the first pass completes.

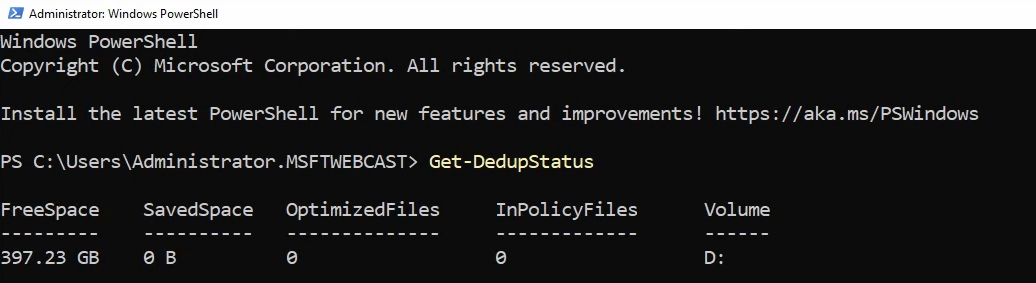
Check status from PowerShell
Open elevated PowerShell:
Get-DedupStatusThe output shows the volume, savings rate (%), saved space, and the timestamp of the last optimization run. Right after enabling, expect zeros — nothing has run yet.
Force a dedup pass to test
Don’t wait for the schedule to validate the configuration — force a manual pass:
Start-DedupJob -Volume D: -Type OptimizationThe job runs in the background. Initial pass time depends on volume size and content — expect 10–60 minutes for a few hundred GB of typical file-share content.

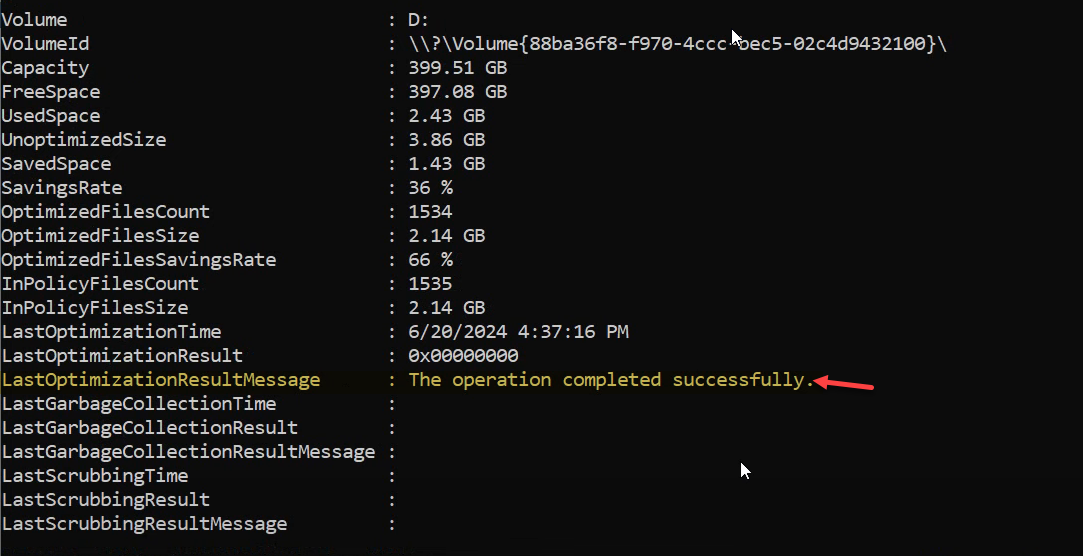
Verify the savings
After the manual job completes, re-run:
Get-DedupStatusExpect real numbers now — the example shows a 36% deduplication rate and 1.43 GB saved on the test volume. For deeper detail:
Get-DedupStatus | Format-ListThe most useful field is LastOptimizationResultMessage — if it reads “The operation completed successfully,” everything ran clean. Anything else is a hint about what went wrong; investigate before assuming the schedule will work.


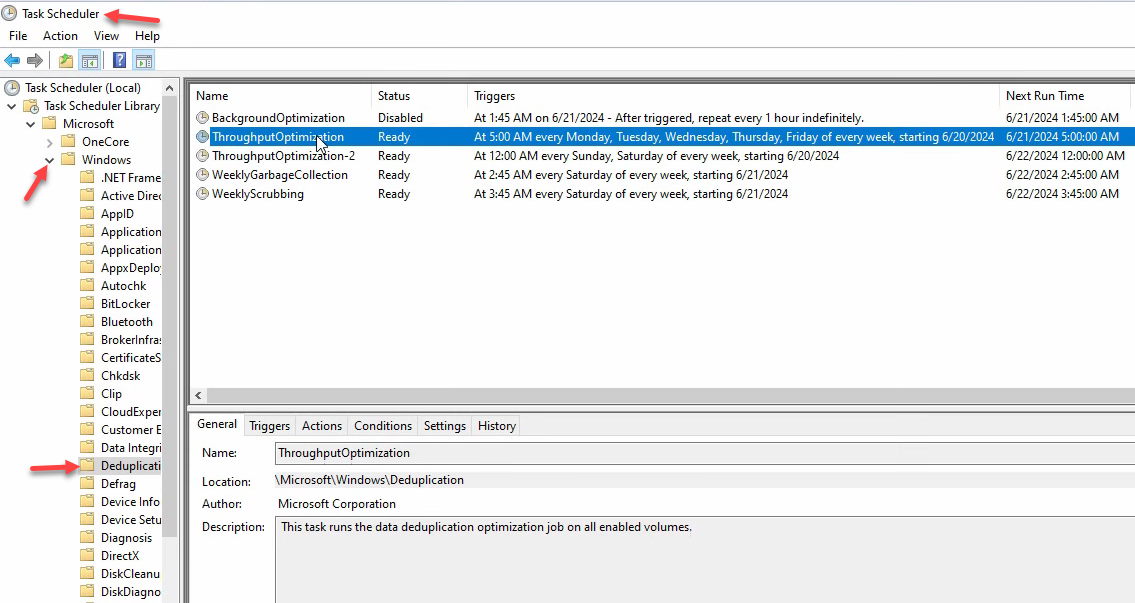
The scheduled tasks under the hood
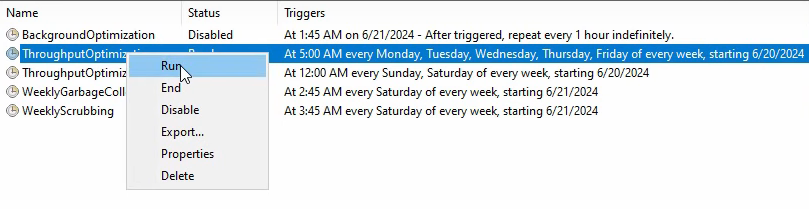
Open Task Scheduler > Task Scheduler Library > Microsoft > Windows > Deduplication. Five tasks live there:
- BackgroundOptimization — the hourly low-priority task you (probably) disabled
- ThroughputOptimization + ThroughputOptimization-2 — the two windows you configured
- GarbageCollection — weekly cleanup of stale chunks no longer referenced by any file. Don’t disable this; the chunk store grows without bound otherwise.
- Scrubbing — weekly integrity check of the chunk store. Also don’t disable.
Right-click any of them to Run manually, useful for forcing a Garbage Collection pass after deleting a lot of files or kicking off Scrubbing on demand if you suspect chunk-store corruption.
Things that bite people in production
NEVER enable dedup on volumes hosting databases, VHDX files, or WSUS
This is the one rule. Dedup operates on chunks within files, and any of these workloads either rewrites file contents in-place at high frequency (databases, VHDX) or has its own internal deduplication that conflicts (WSUS). Enabling dedup on a SQL data volume can cause severe performance regression and, in edge cases, file corruption. Enabling on a VHDX volume causes the same plus VM crashes. Use it on file shares, backup targets, and archives. Not on databases, VMs, or WSUS.
Background optimization on a busy server is a bad time
The hourly low-priority task interferes with end-user I/O even though it’s “low priority.” Disable it. Throughput Optimization windows scheduled for off-hours give better savings without the user-impact tax.
File age tuning matters
0-day file age is fine for testing or backup-target volumes. Production file shares should be 3–7 days — longer for write-heavy workloads. Files actively being written to during the dedup pass can cause optimization delays and occasional retries.
Exclude already-compressed formats
Dedup spends CPU looking for chunk matches. ZIPs, MP4s, JPGs, ISOs — all already compressed; dedup will find nothing and burn cycles trying. Exclude these extensions to keep dedup focused on file types where it can actually find savings.
Don’t disable Garbage Collection or Scrubbing
The two weekly maintenance tasks aren’t optional. GarbageCollection reclaims chunk-store space from deleted files; without it the chunk store grows forever. Scrubbing detects chunk-store corruption early; without it, you find out about corruption when a file fails to read months later.
Plan for restore performance
Reading from a deduplicated volume is slightly slower than reading from a non-deduplicated one — the I/O has to look up chunks instead of reading sequentially. Acceptable for normal file-share access; potentially noticeable when restoring large files from backup. If you’re moving deduplicated data via robocopy or similar bulk-copy tools, expect read throughput to be lower than the underlying disk would suggest.
Where this fits
Data Deduplication is the storage-efficiency layer for file servers. The companion pieces are FSRM quotas for size limits, FSRM file screens for content-type control, and DFS file management for multi-server share presentation. The broader Windows Server Administration pathway covers the rest of file-server hygiene.