DNS reverse lookup zones are one of those configurations that get overlooked — until something breaks. Mail servers start rejecting your emails, security tools display raw IP addresses instead of hostnames, or a network audit flags missing PTR records. Getting this right from the start saves real headaches later.
This guide walks through the complete setup of a DNS reverse lookup zone and PTR records on Windows Server, with context on why each step matters and what to watch out for when things go wrong.
Understanding Reverse DNS
Standard DNS resolves names to addresses — you query server.corp.local and get back 192.168.1.10. A reverse lookup zone inverts this: given an IP like 192.168.1.10, DNS returns the hostname.
This reverse mapping uses the .in-addr.arpa convention. For a 192.168.1.x subnet, the zone is named 1.168.192.in-addr.arpa — the network octets written in reverse. Within that zone, PTR (Pointer) records map each IP to its fully qualified domain name (FQDN).
Why Reverse DNS Matters
- Email deliverability: SMTP servers perform a PTR lookup on the sending IP. A missing or mismatched record gets mail flagged as spam. Verify with MXToolbox Reverse Lookup.
- SIEM and security tools: Elastic SIEM, Wazuh, and Splunk enrich logs with reverse DNS — without PTR records, every alert shows a raw IP.
- Network monitoring: Tools like Nagios, PRTG, and built-in Windows commands (
ping -a,tracert,nslookup) rely on PTR records to show hostnames. - Compliance: CIS Benchmarks and PCI-DSS interpretations require valid forward and reverse DNS for all servers.
For background, see RFC 1912 and Microsoft DNS Server documentation.
Prerequisites
- Windows Server 2016, 2019, or 2022 with the DNS Server role installed
- Administrator credentials and RDP access
- The network address of the subnet (e.g.,
192.168.1.0/24)
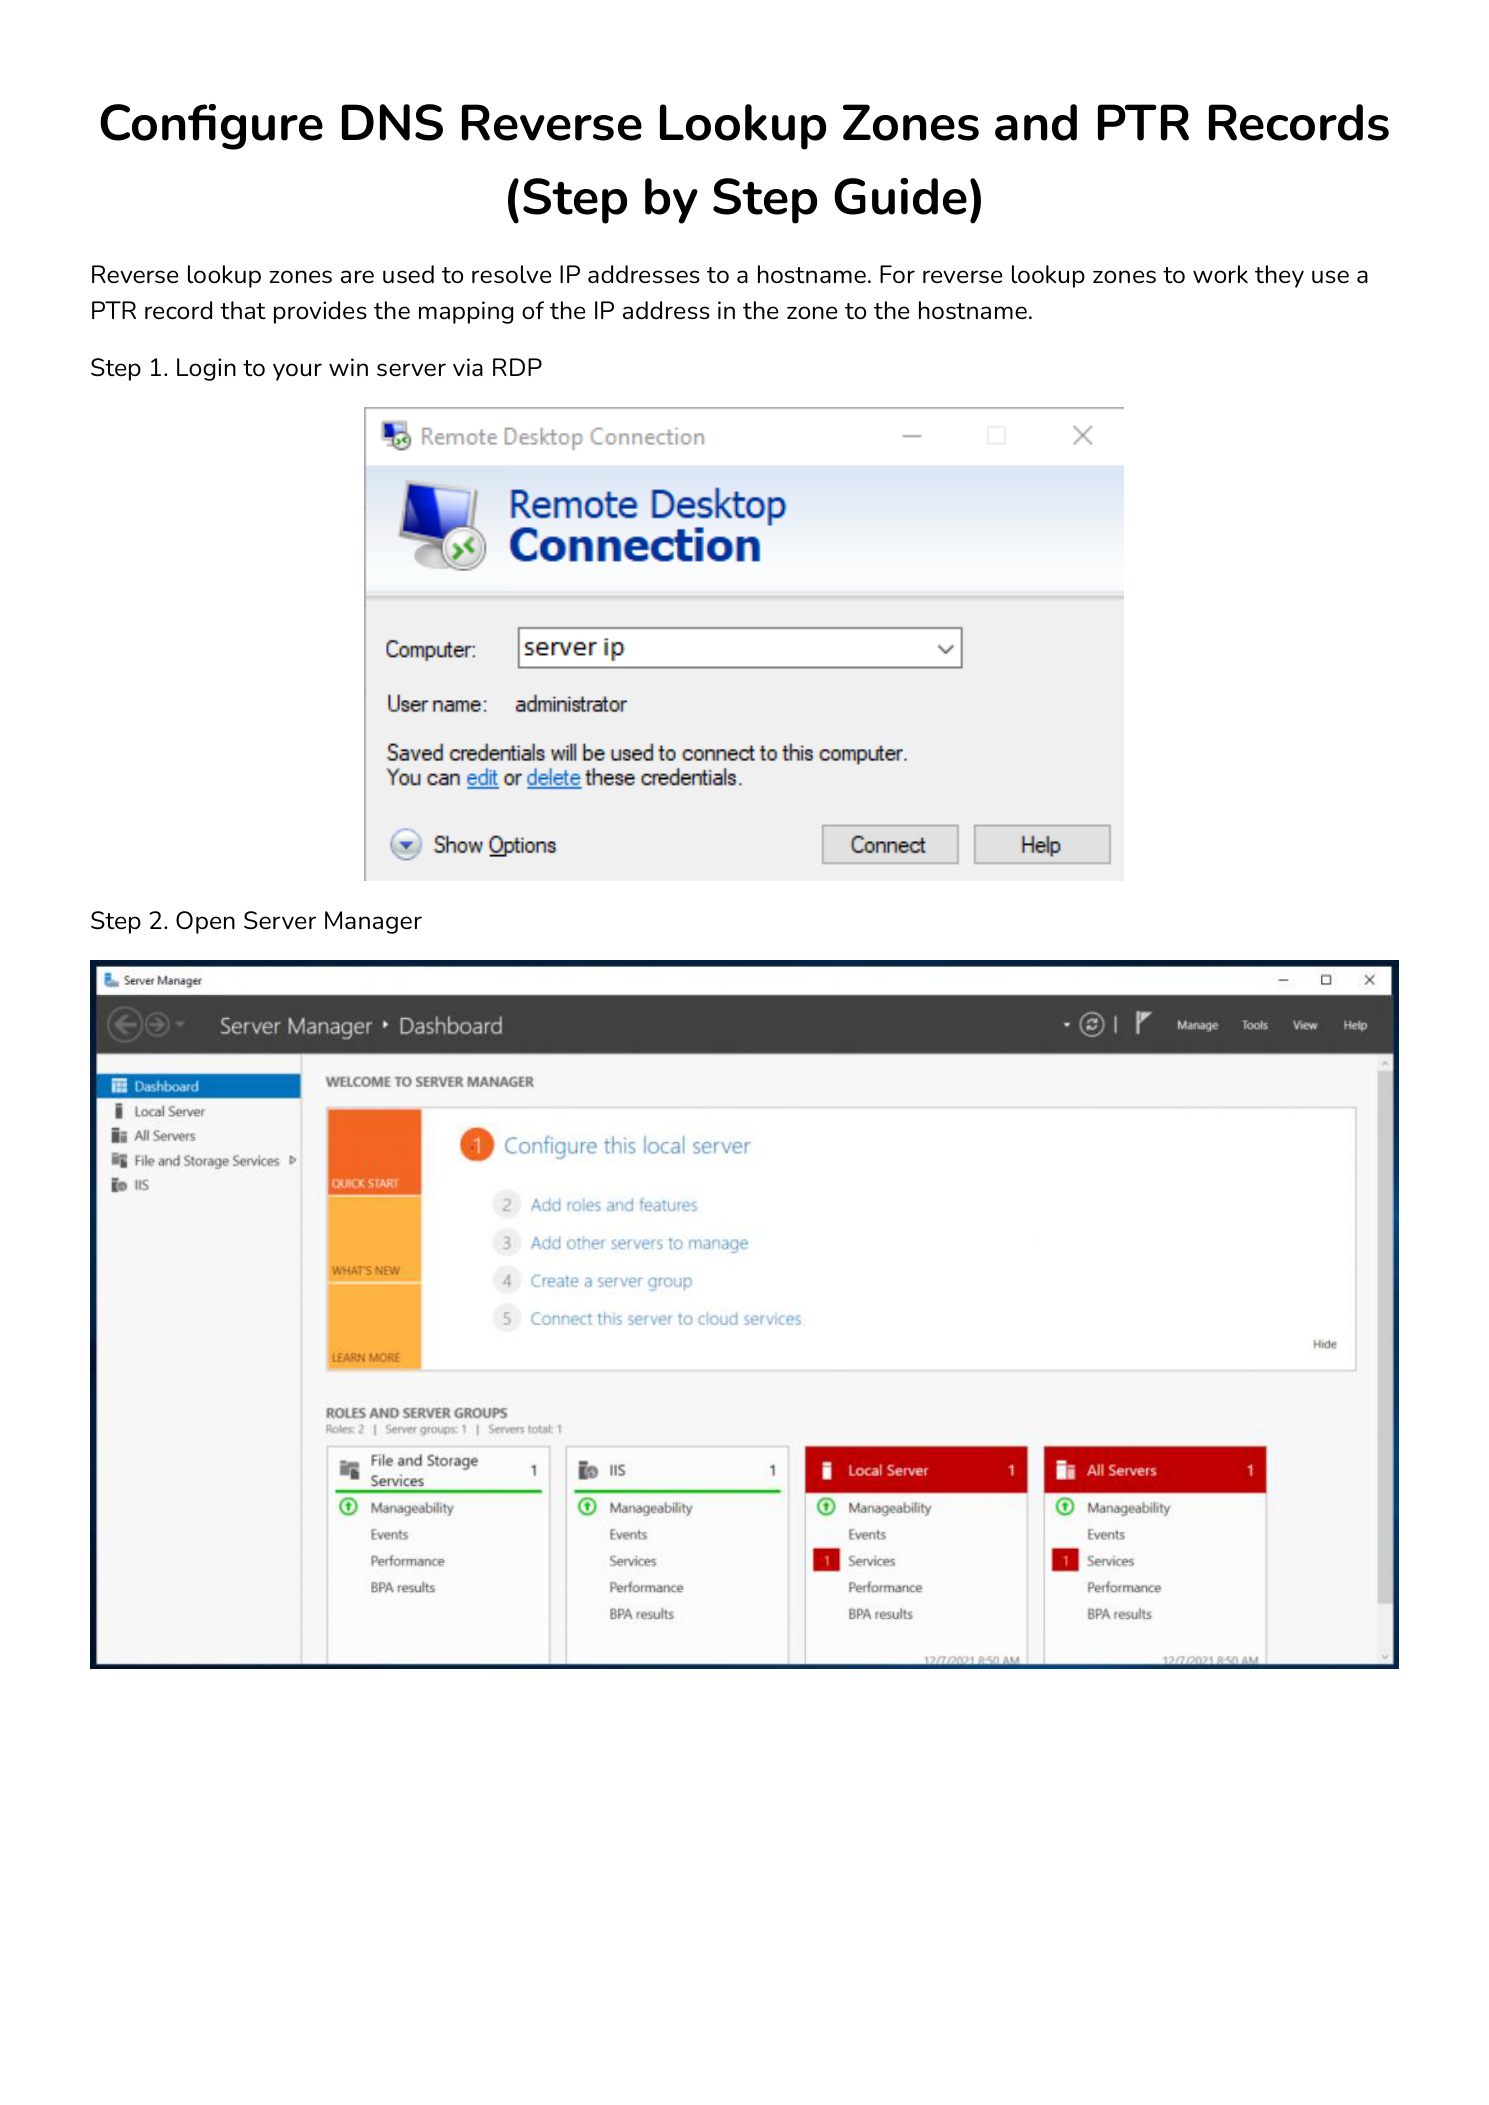
Install-WindowsFeature -Name DNS -IncludeManagementToolsStep 1 — Connect to the Server via RDP
Open Remote Desktop Connection (mstsc), enter the server IP, and authenticate as Administrator. Windows Admin Center is a good alternative for managing multiple servers from one browser interface.
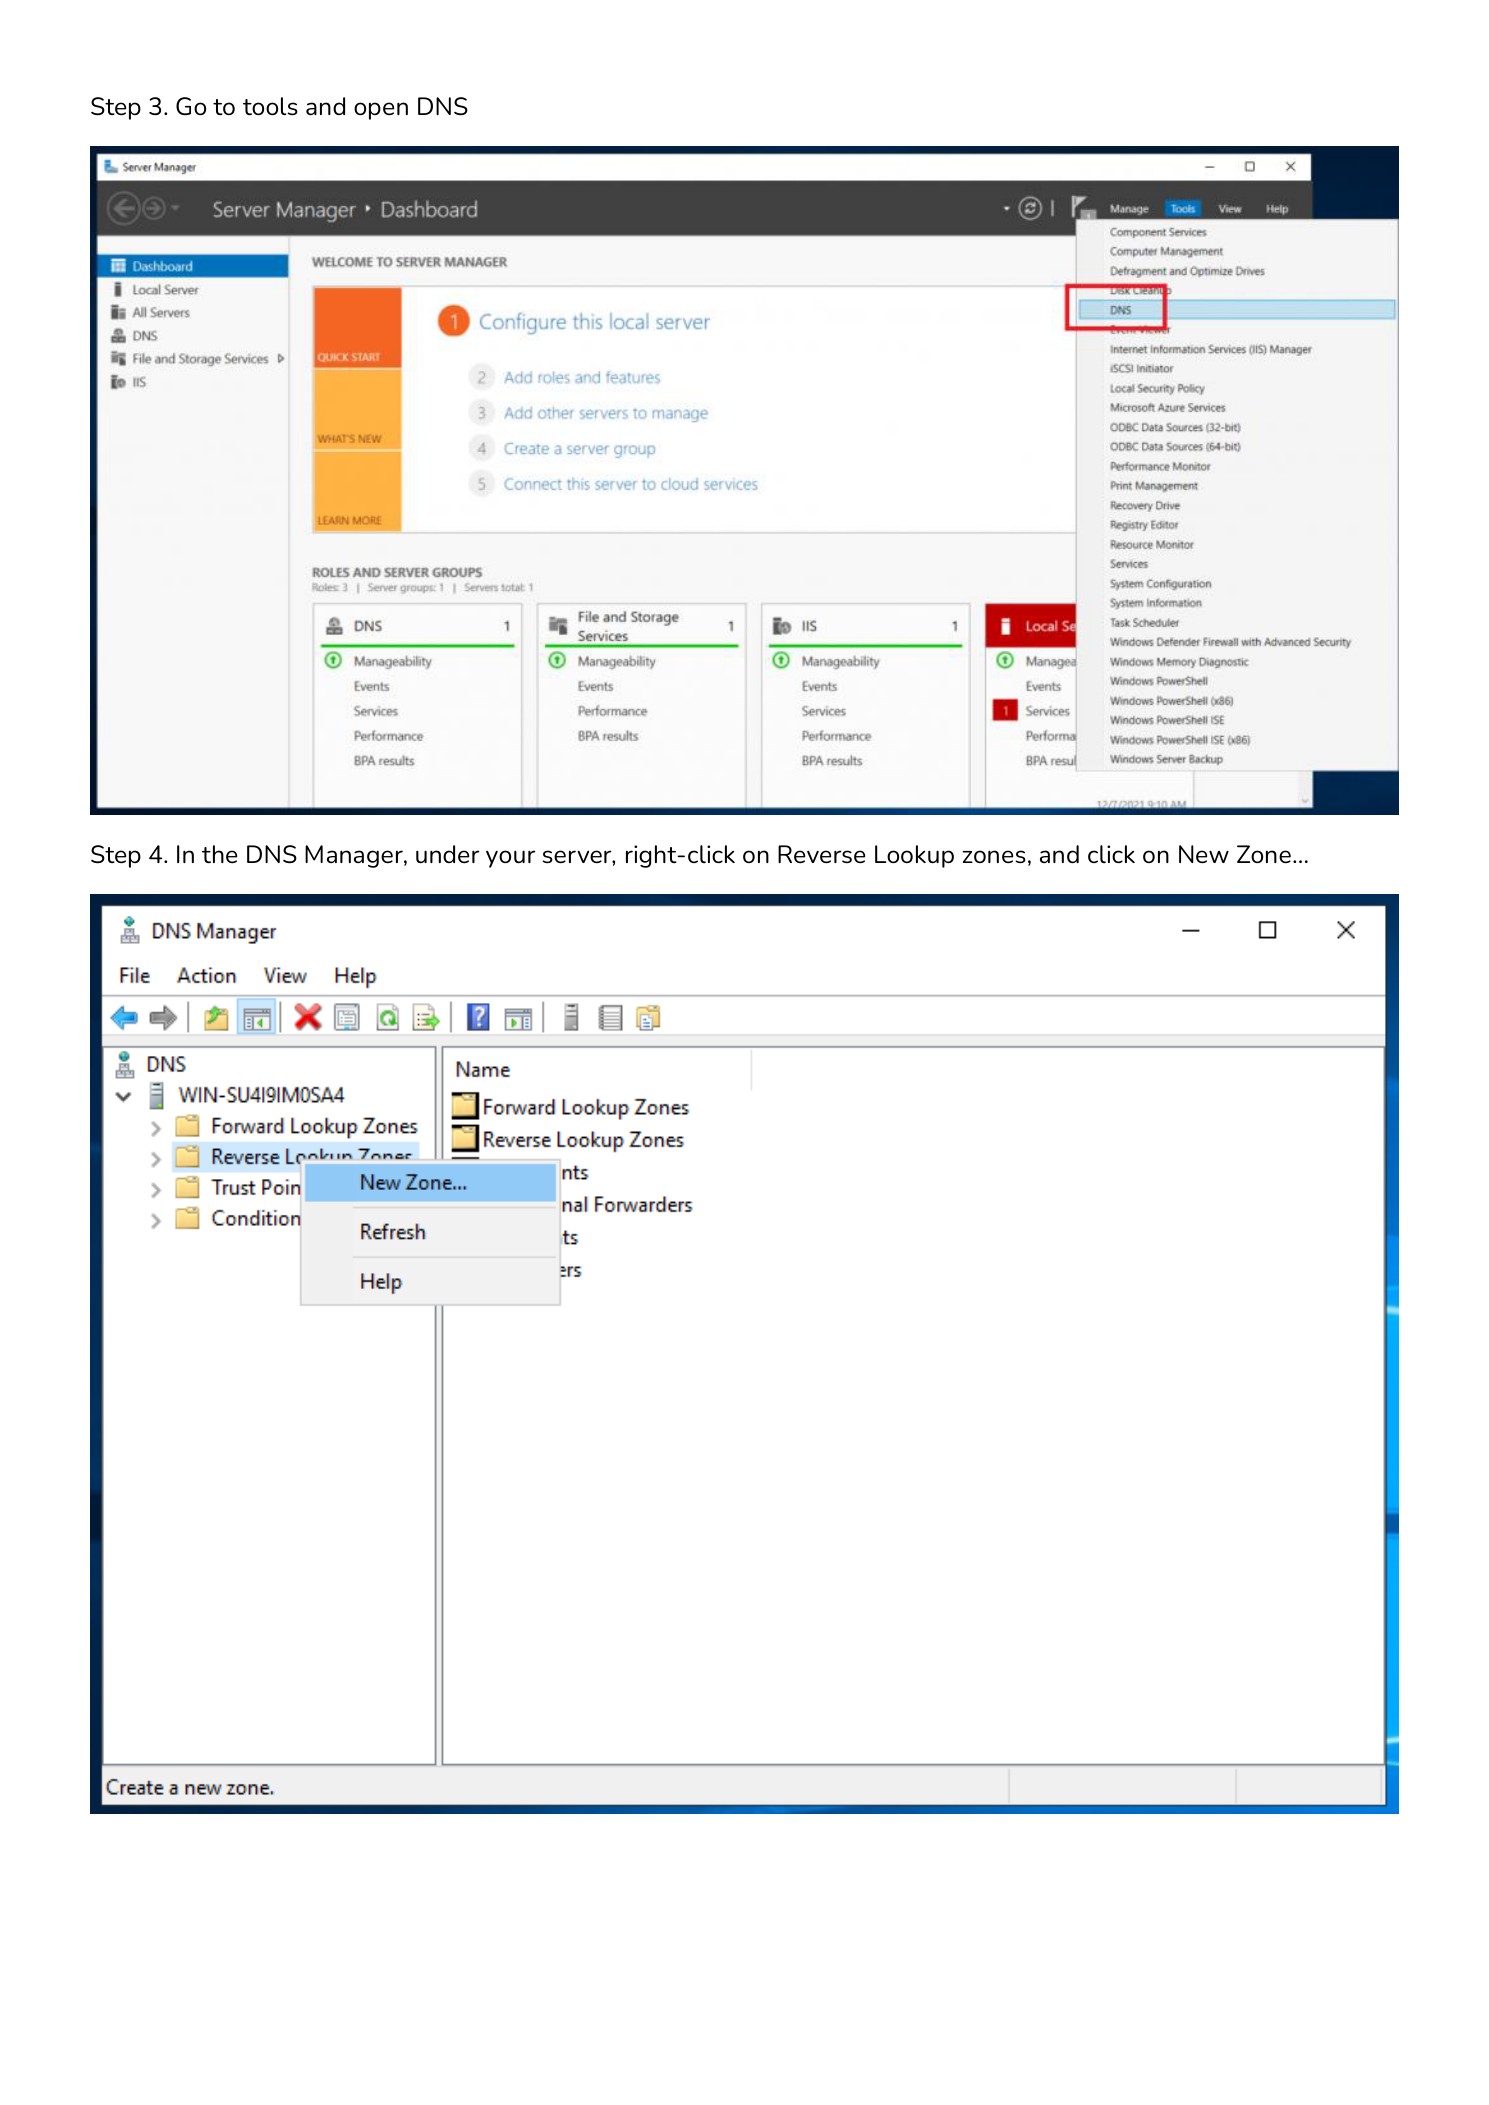
Step 2 — Open Server Manager
Server Manager launches automatically on login. If not visible, open it from the Start menu. All DNS management flows through the Tools menu here.
Step 3 — Launch DNS Manager
Click Tools in the top-right of Server Manager and select DNS. Alternatively, run dnsmgmt.msc from the Run dialog (Win+R) to jump straight to DNS Manager.
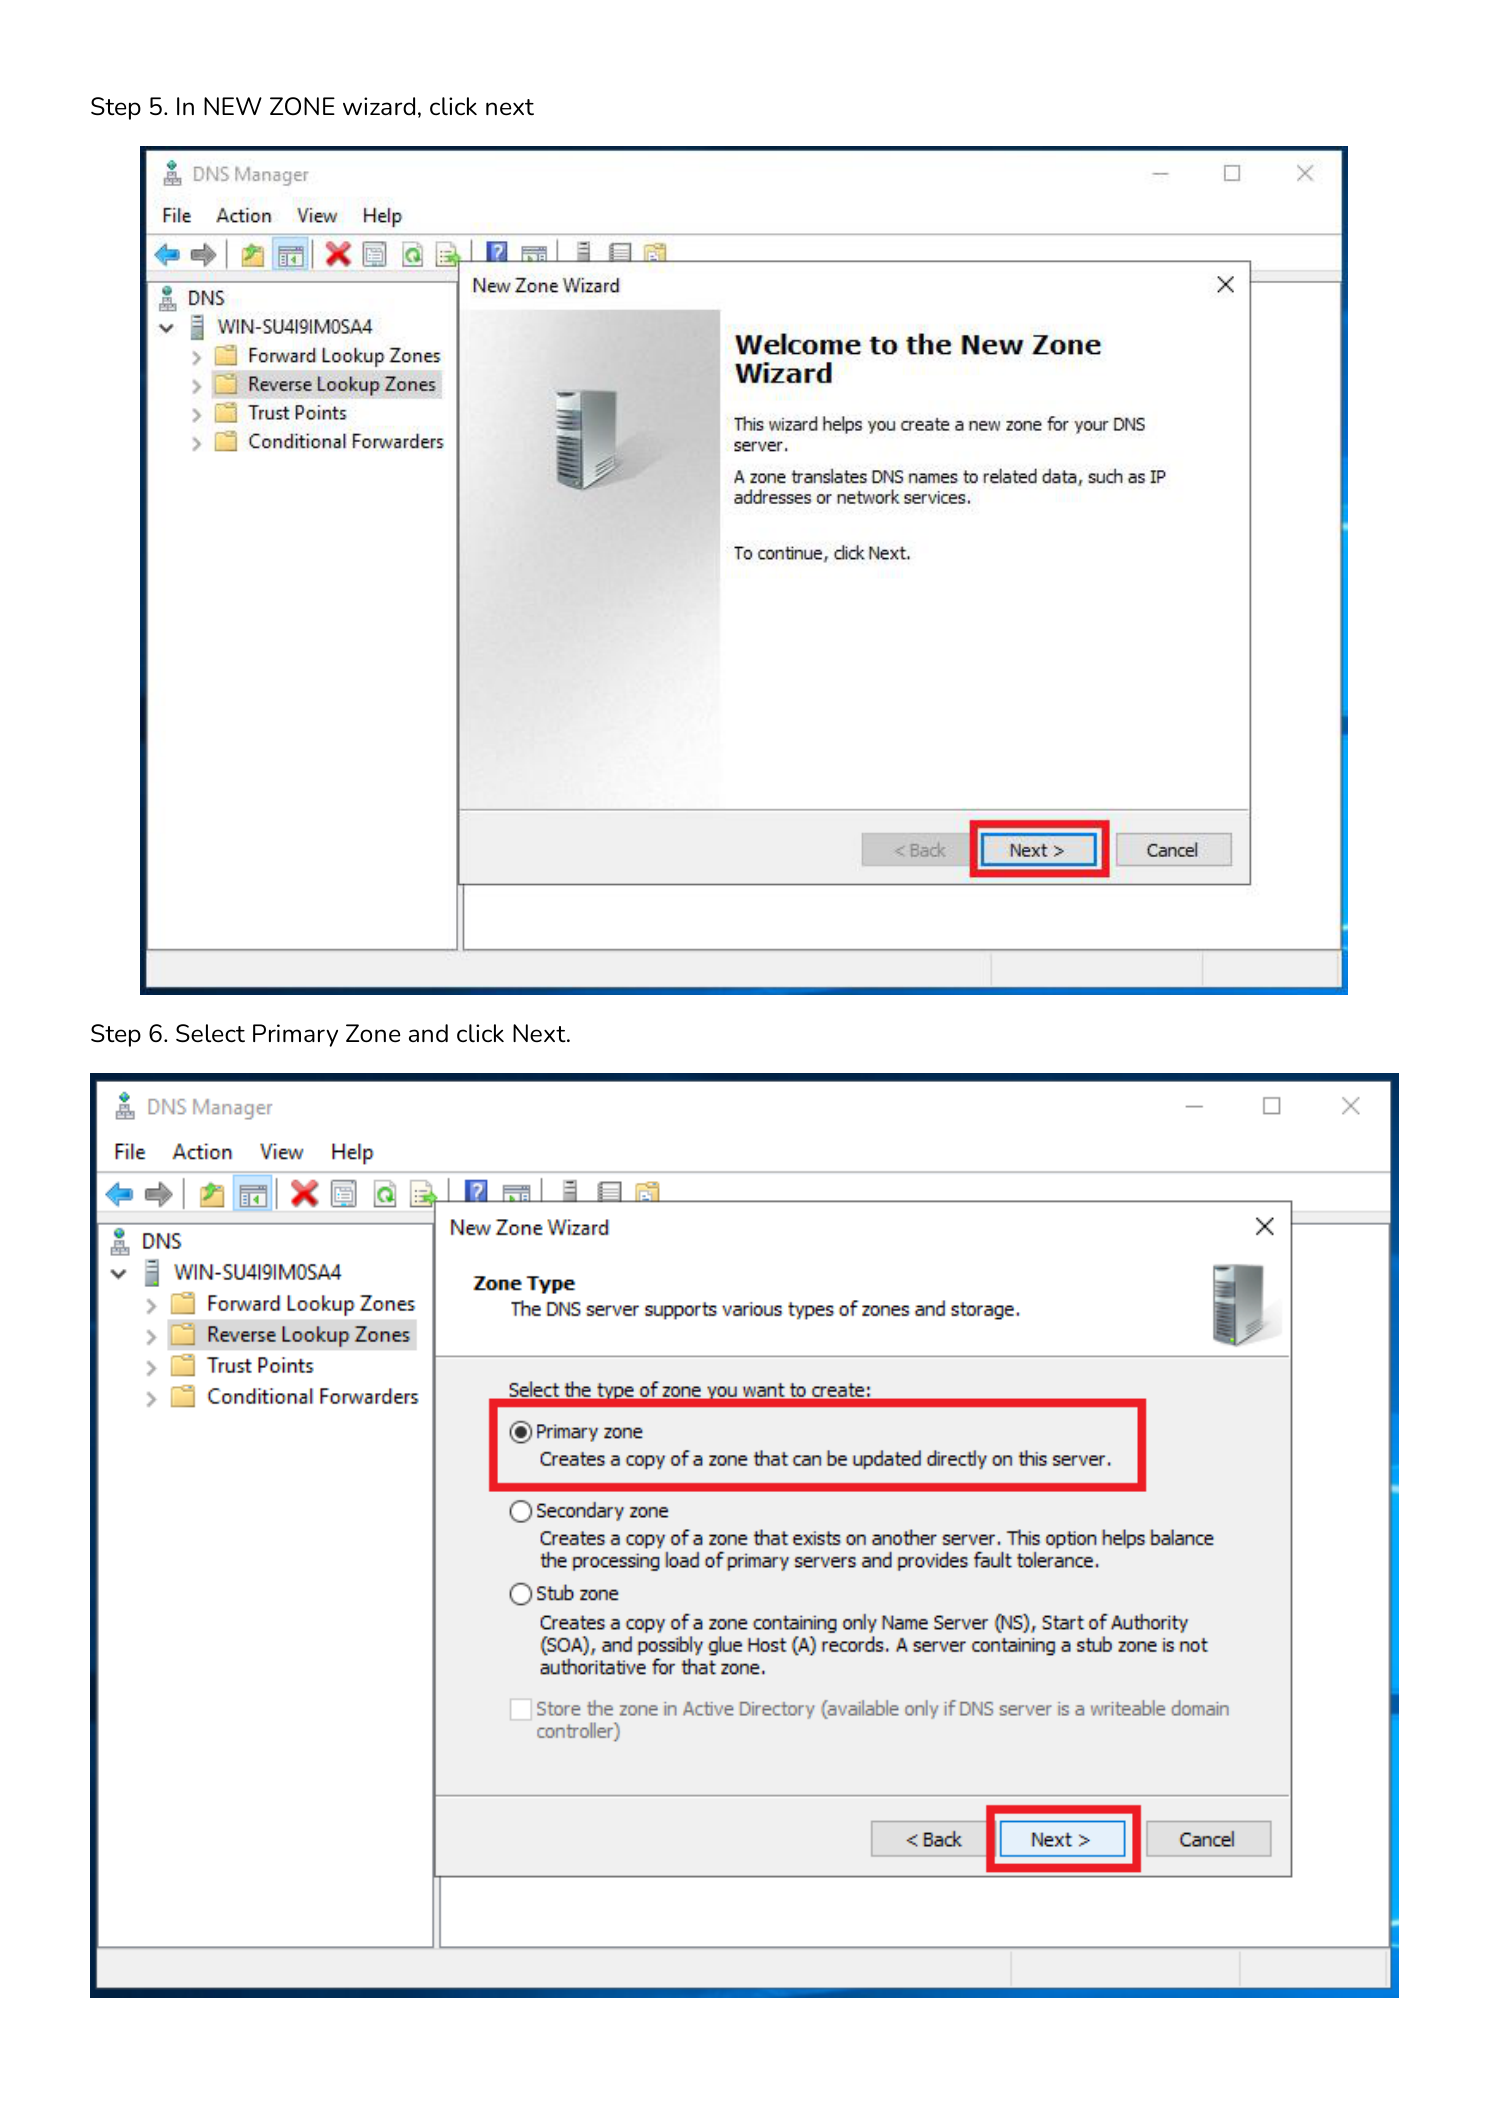
Step 4 — Create a New Reverse Lookup Zone
In the left pane, expand your server name. Right-click Reverse Lookup Zones and select New Zone… to launch the New Zone Wizard.
Step 5 — Start the New Zone Wizard
Click Next on the Welcome screen to begin the guided setup.
Step 6 — Select Zone Type: Primary Zone
Select Primary Zone and click Next. This creates an authoritative read-write copy of the zone on this server. If this server is an Active Directory domain controller, also check Store the zone in Active Directory for automatic replication. See Microsoft’s AD-integrated DNS guide for details.
| Zone Type | Use Case |
|---|---|
| Primary | Authoritative read-write copy — use for new configurations |
| Secondary | Read-only replica from another server — used for redundancy |
| Stub | Stores NS and SOA only — maintains awareness of delegated zones |
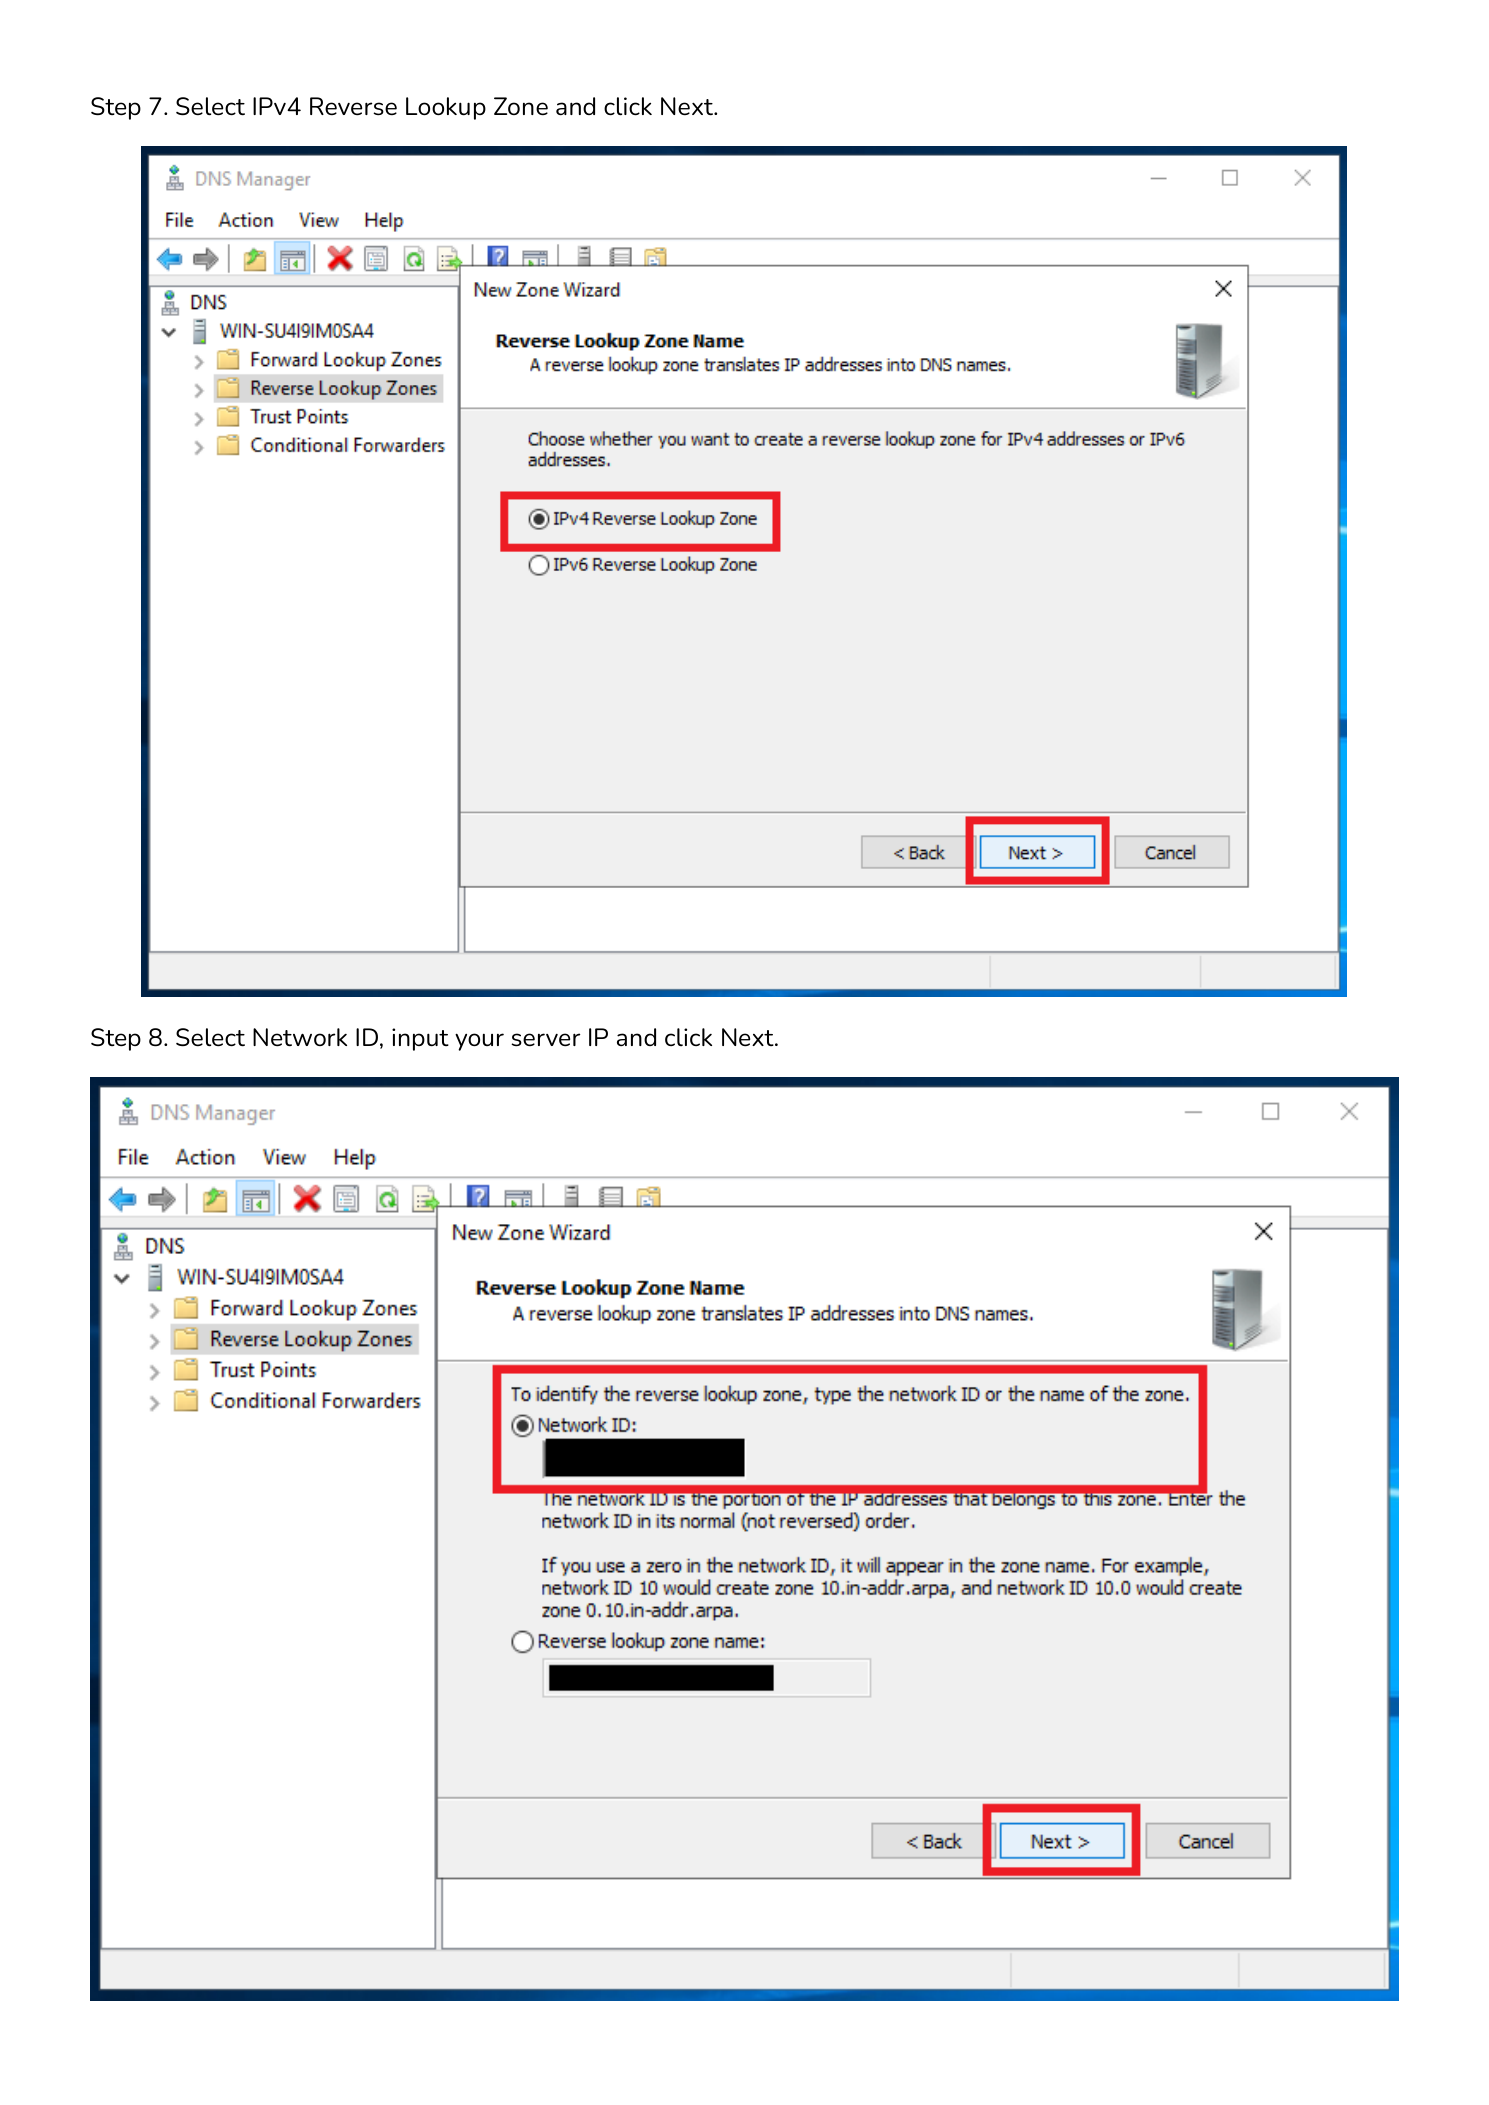
Step 7 — Select IPv4 Reverse Lookup Zone
Choose IPv4 Reverse Lookup Zone and click Next. Select IPv6 only when configuring ip6.arpa zones — IPv4 is correct for most Windows Server environments.
Step 8 — Enter the Network ID
Enter the network portion of your subnet — the octets that identify the network, not the host:
192.168.1.x— enter192.168.1to generate zone1.168.192.in-addr.arpa10.0.0.x— enter10.0.0to generate zone0.0.10.in-addr.arpa172.16.0.x— enter172.16.0to generate zone0.16.172.in-addr.arpa
DNS Manager constructs the correct reverse zone name automatically. Click Next.
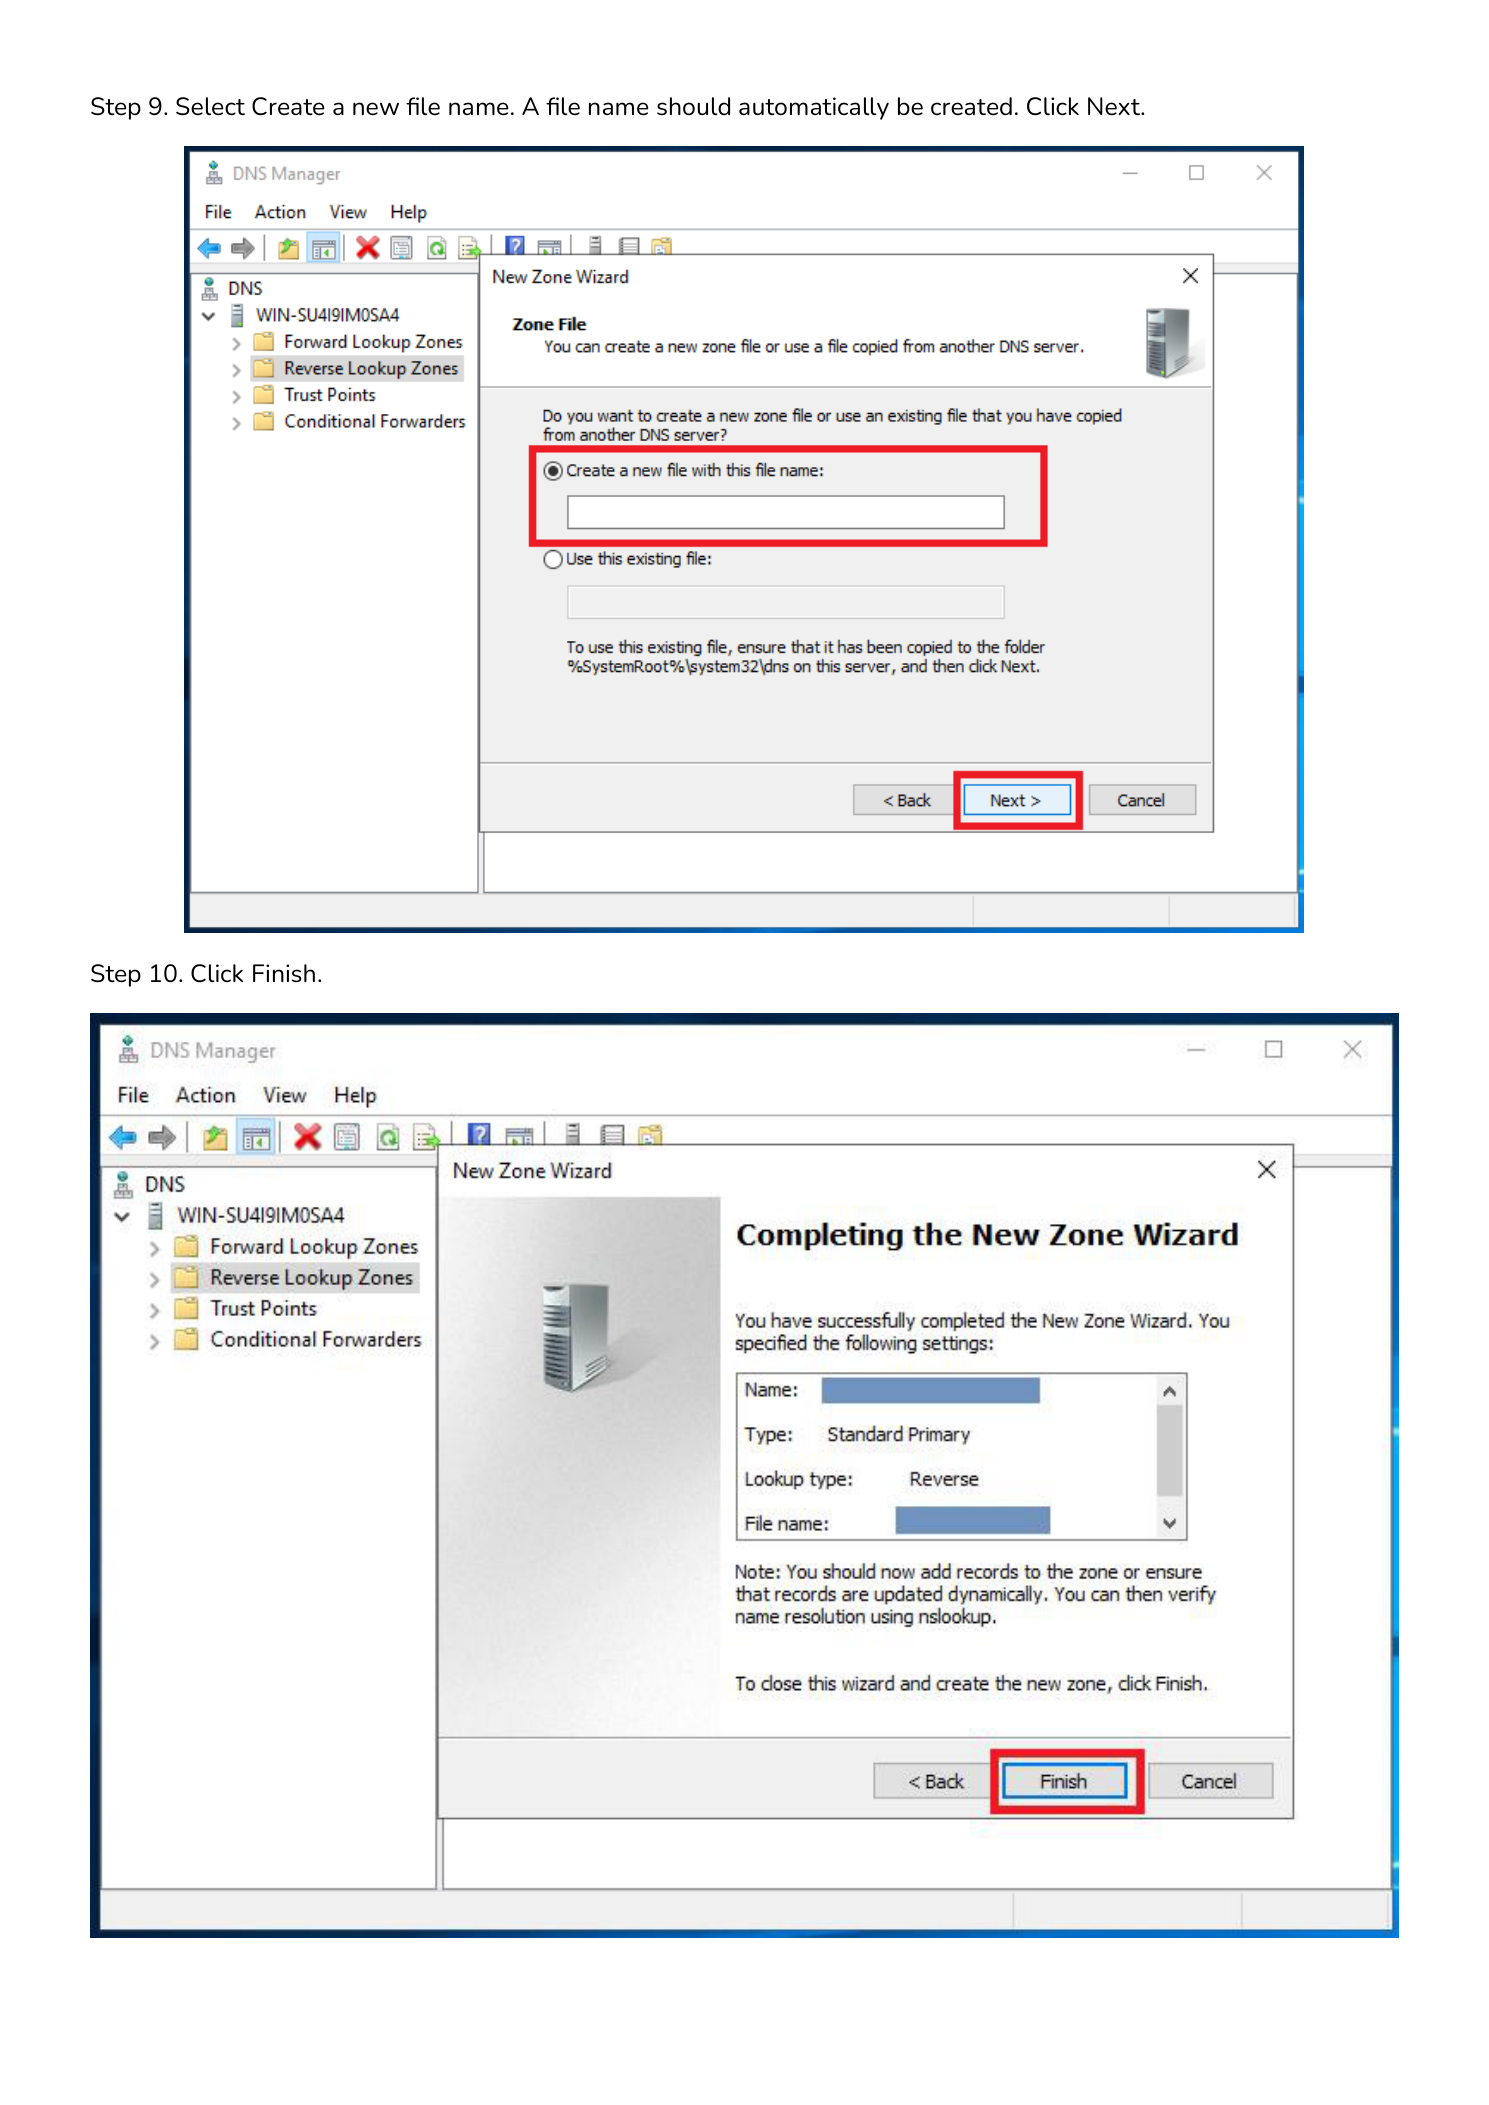
Step 9 — Create the Zone File
Select Create a new file with this file name. The wizard auto-populates the name (e.g., 1.168.192.in-addr.arpa.dns). Accept the default and click Next. Zone files are stored at %SystemRoot%\System32\dns\.
Step 10 — Dynamic Updates and Finish
Choose a dynamic update option, click Next, then click Finish.
- Secure dynamic updates only — Recommended for domain environments. Only AD-authenticated members can modify records.
- Both nonsecure and secure — For workgroups where non-domain devices self-register.
- No dynamic updates — Fully manual. For highly controlled environments.
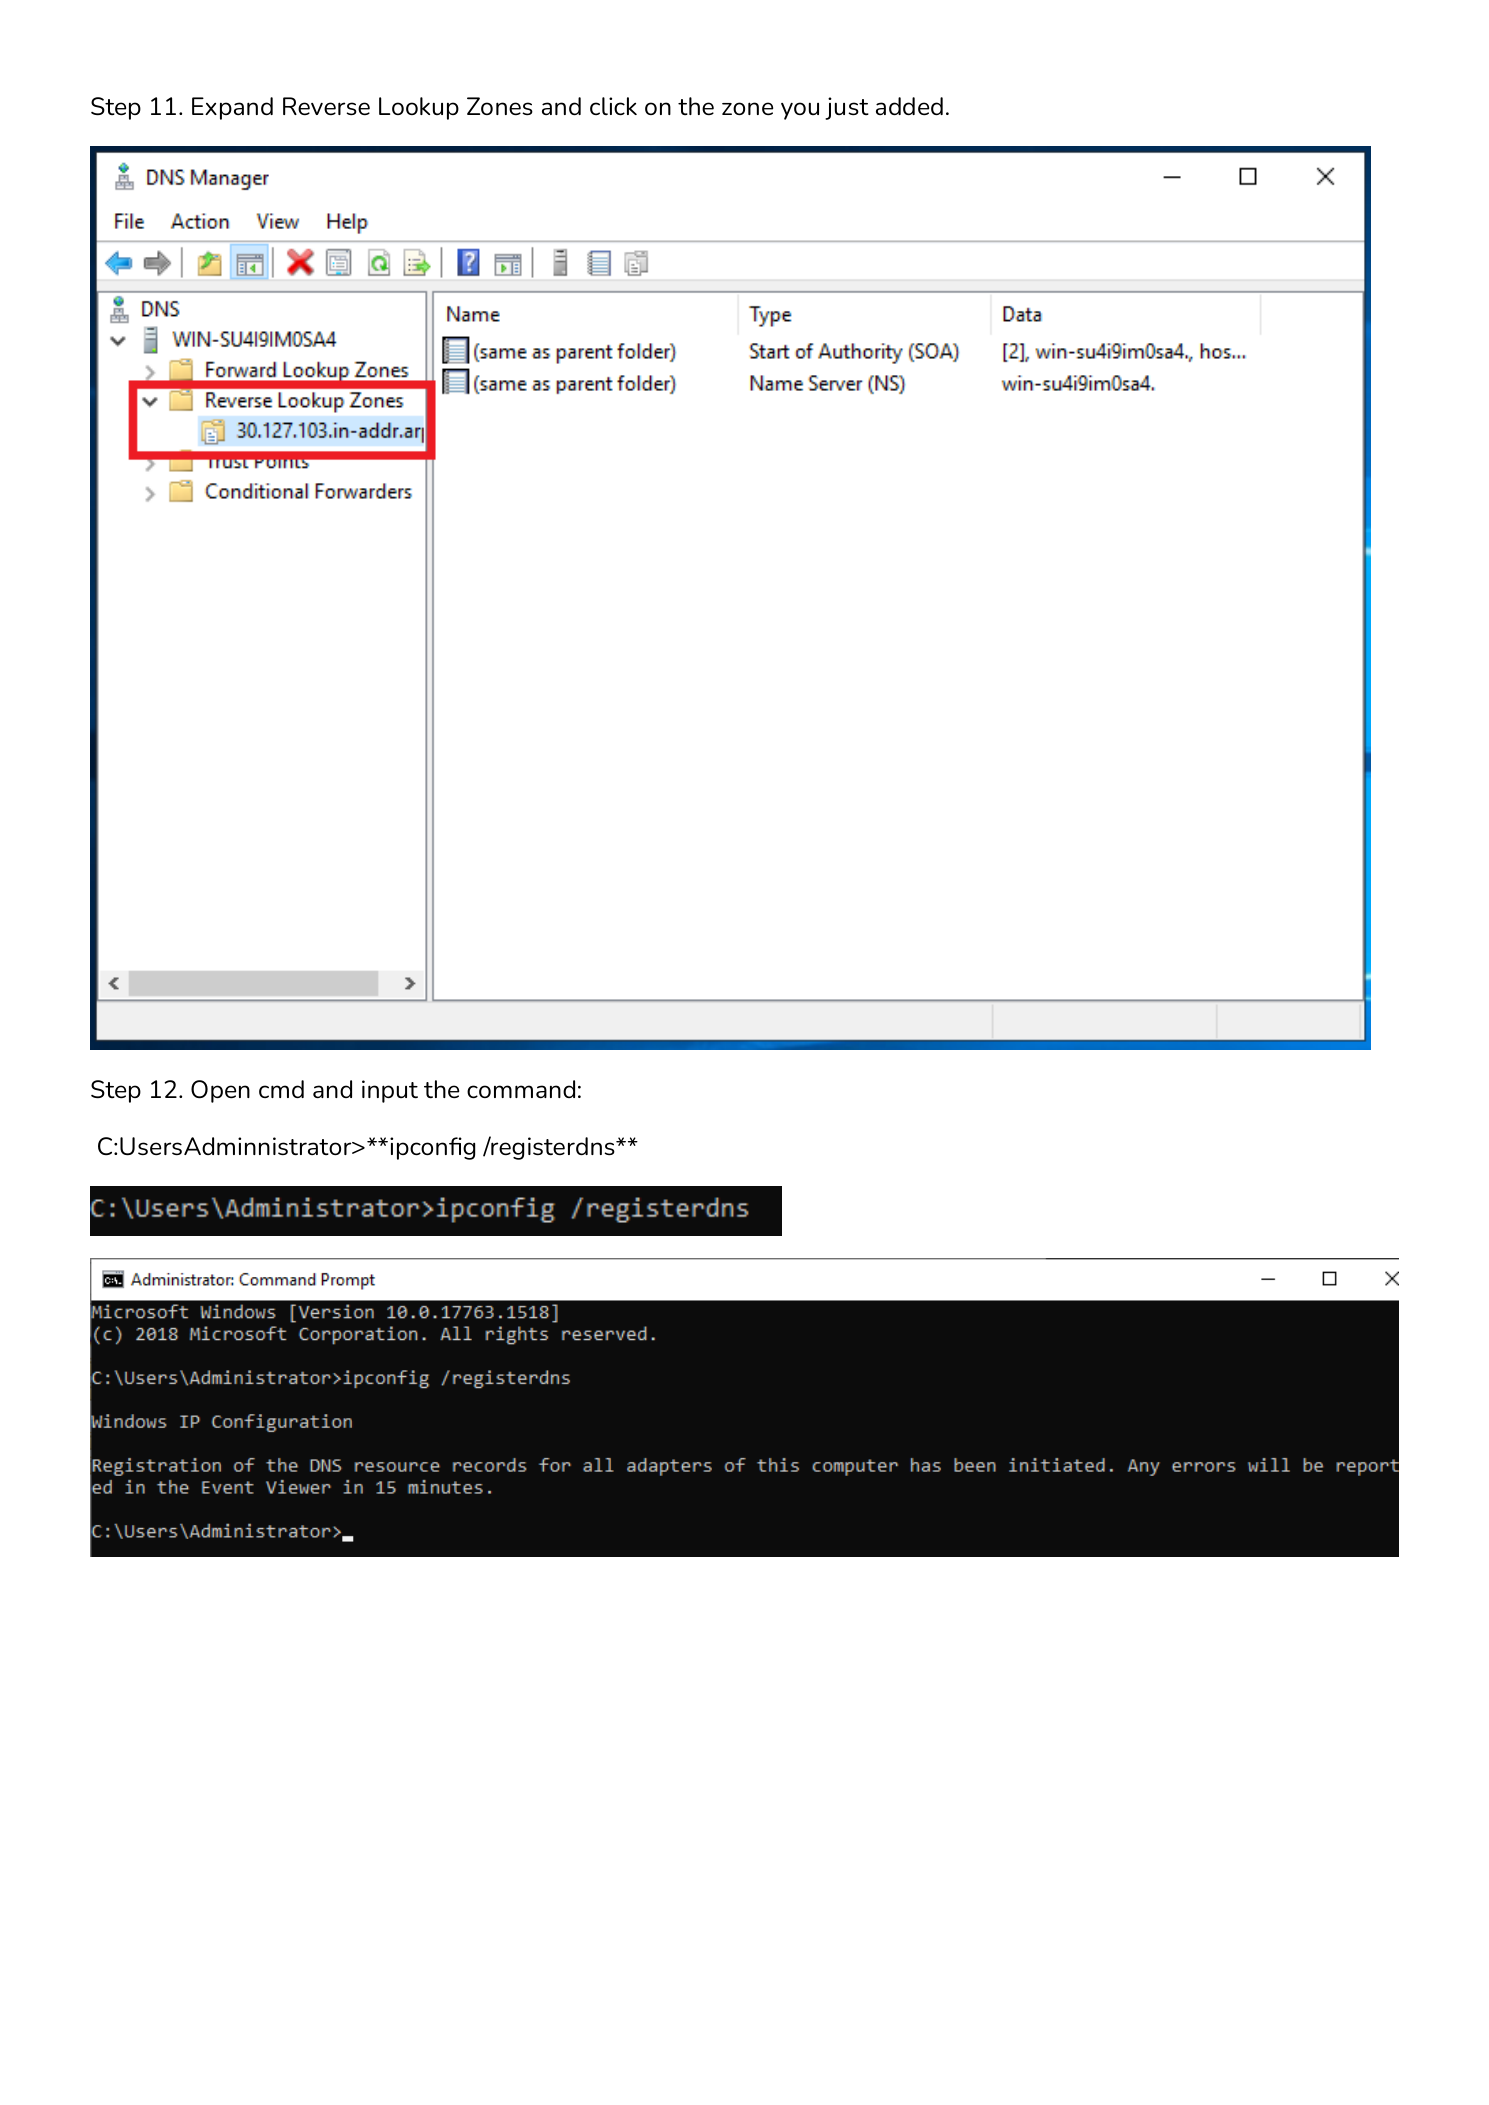
Step 11 — Verify the Zone Was Created
Expand Reverse Lookup Zones in the left pane. Your new zone should appear with SOA and NS records already in the right pane — these are created automatically.
Step 12 — Register DNS Records with ipconfig
On the server, open Command Prompt as Administrator and run:
ipconfig /registerdnsThis forces the server to re-register its DNS records including its own PTR record. Check Event Viewer → Windows Logs → System after 15 minutes — Event ID 1501 is success, 1502 is failure.
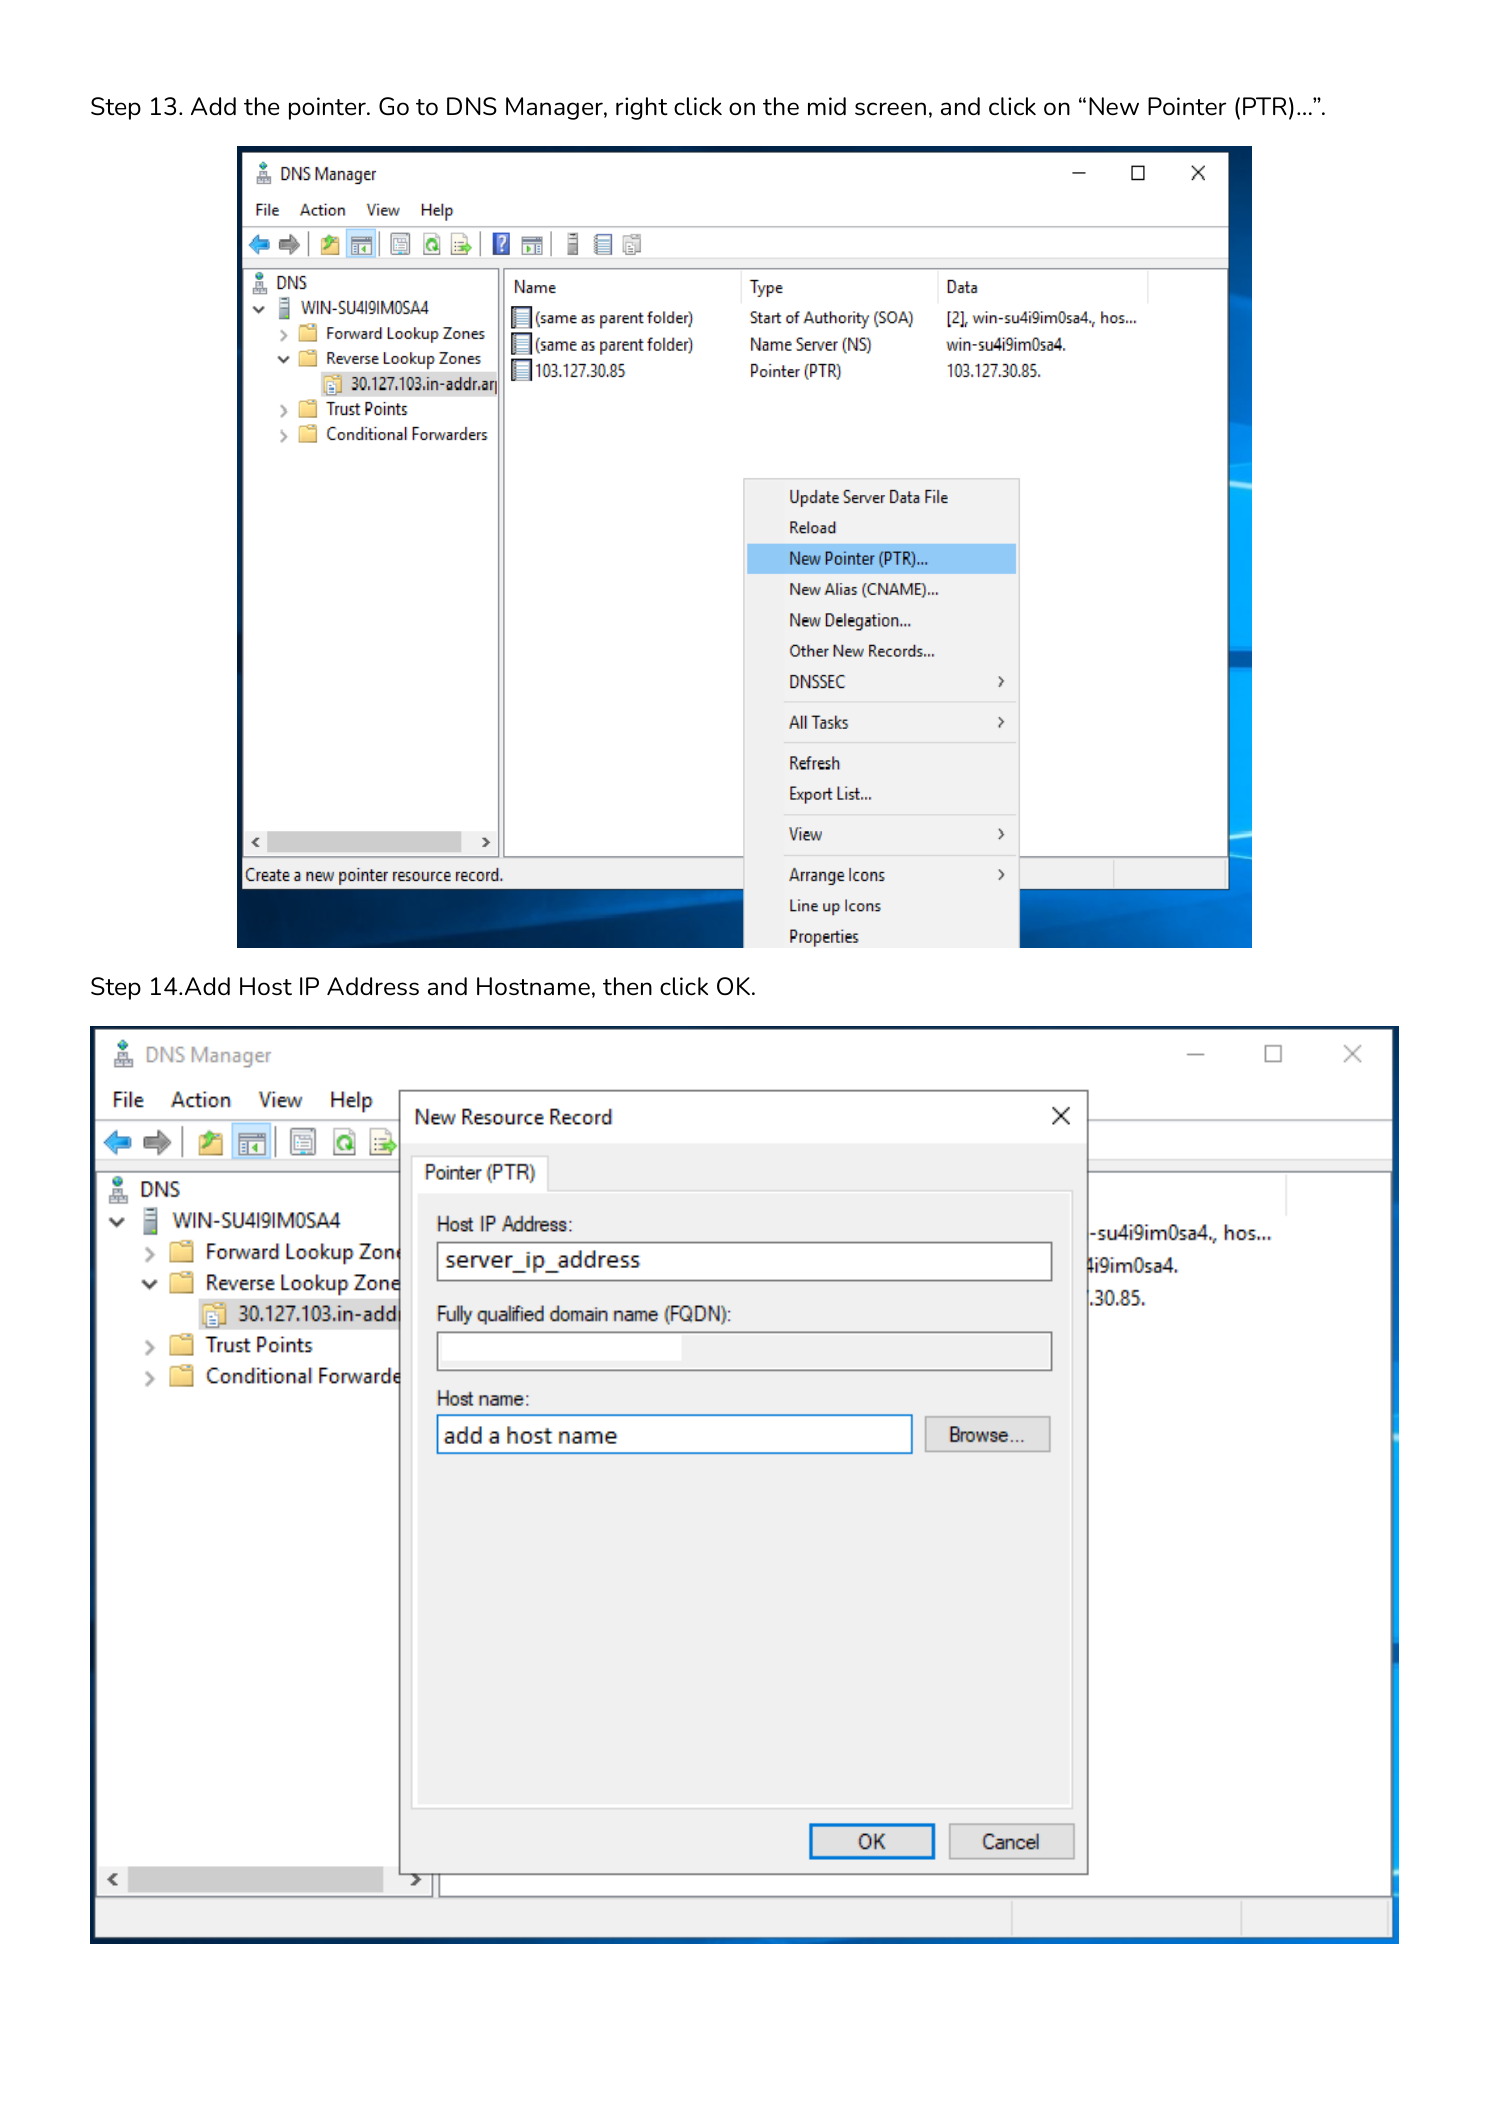
Step 13 — Manually Create a PTR Record
For devices that don’t register dynamically (Linux servers, network appliances, printers), create PTR records by hand. In DNS Manager, expand Reverse Lookup Zones, click your zone, then right-click in the right pane and select New Pointer (PTR)…
Fill in the fields:
- Host IP Address: The last octet only. For
192.168.1.10, enter10. - Host name (FQDN): The full hostname, e.g.
server01.corp.local. Use the Browse button to select from the forward lookup zone.
Click OK. The record is active immediately — no DNS restart needed.
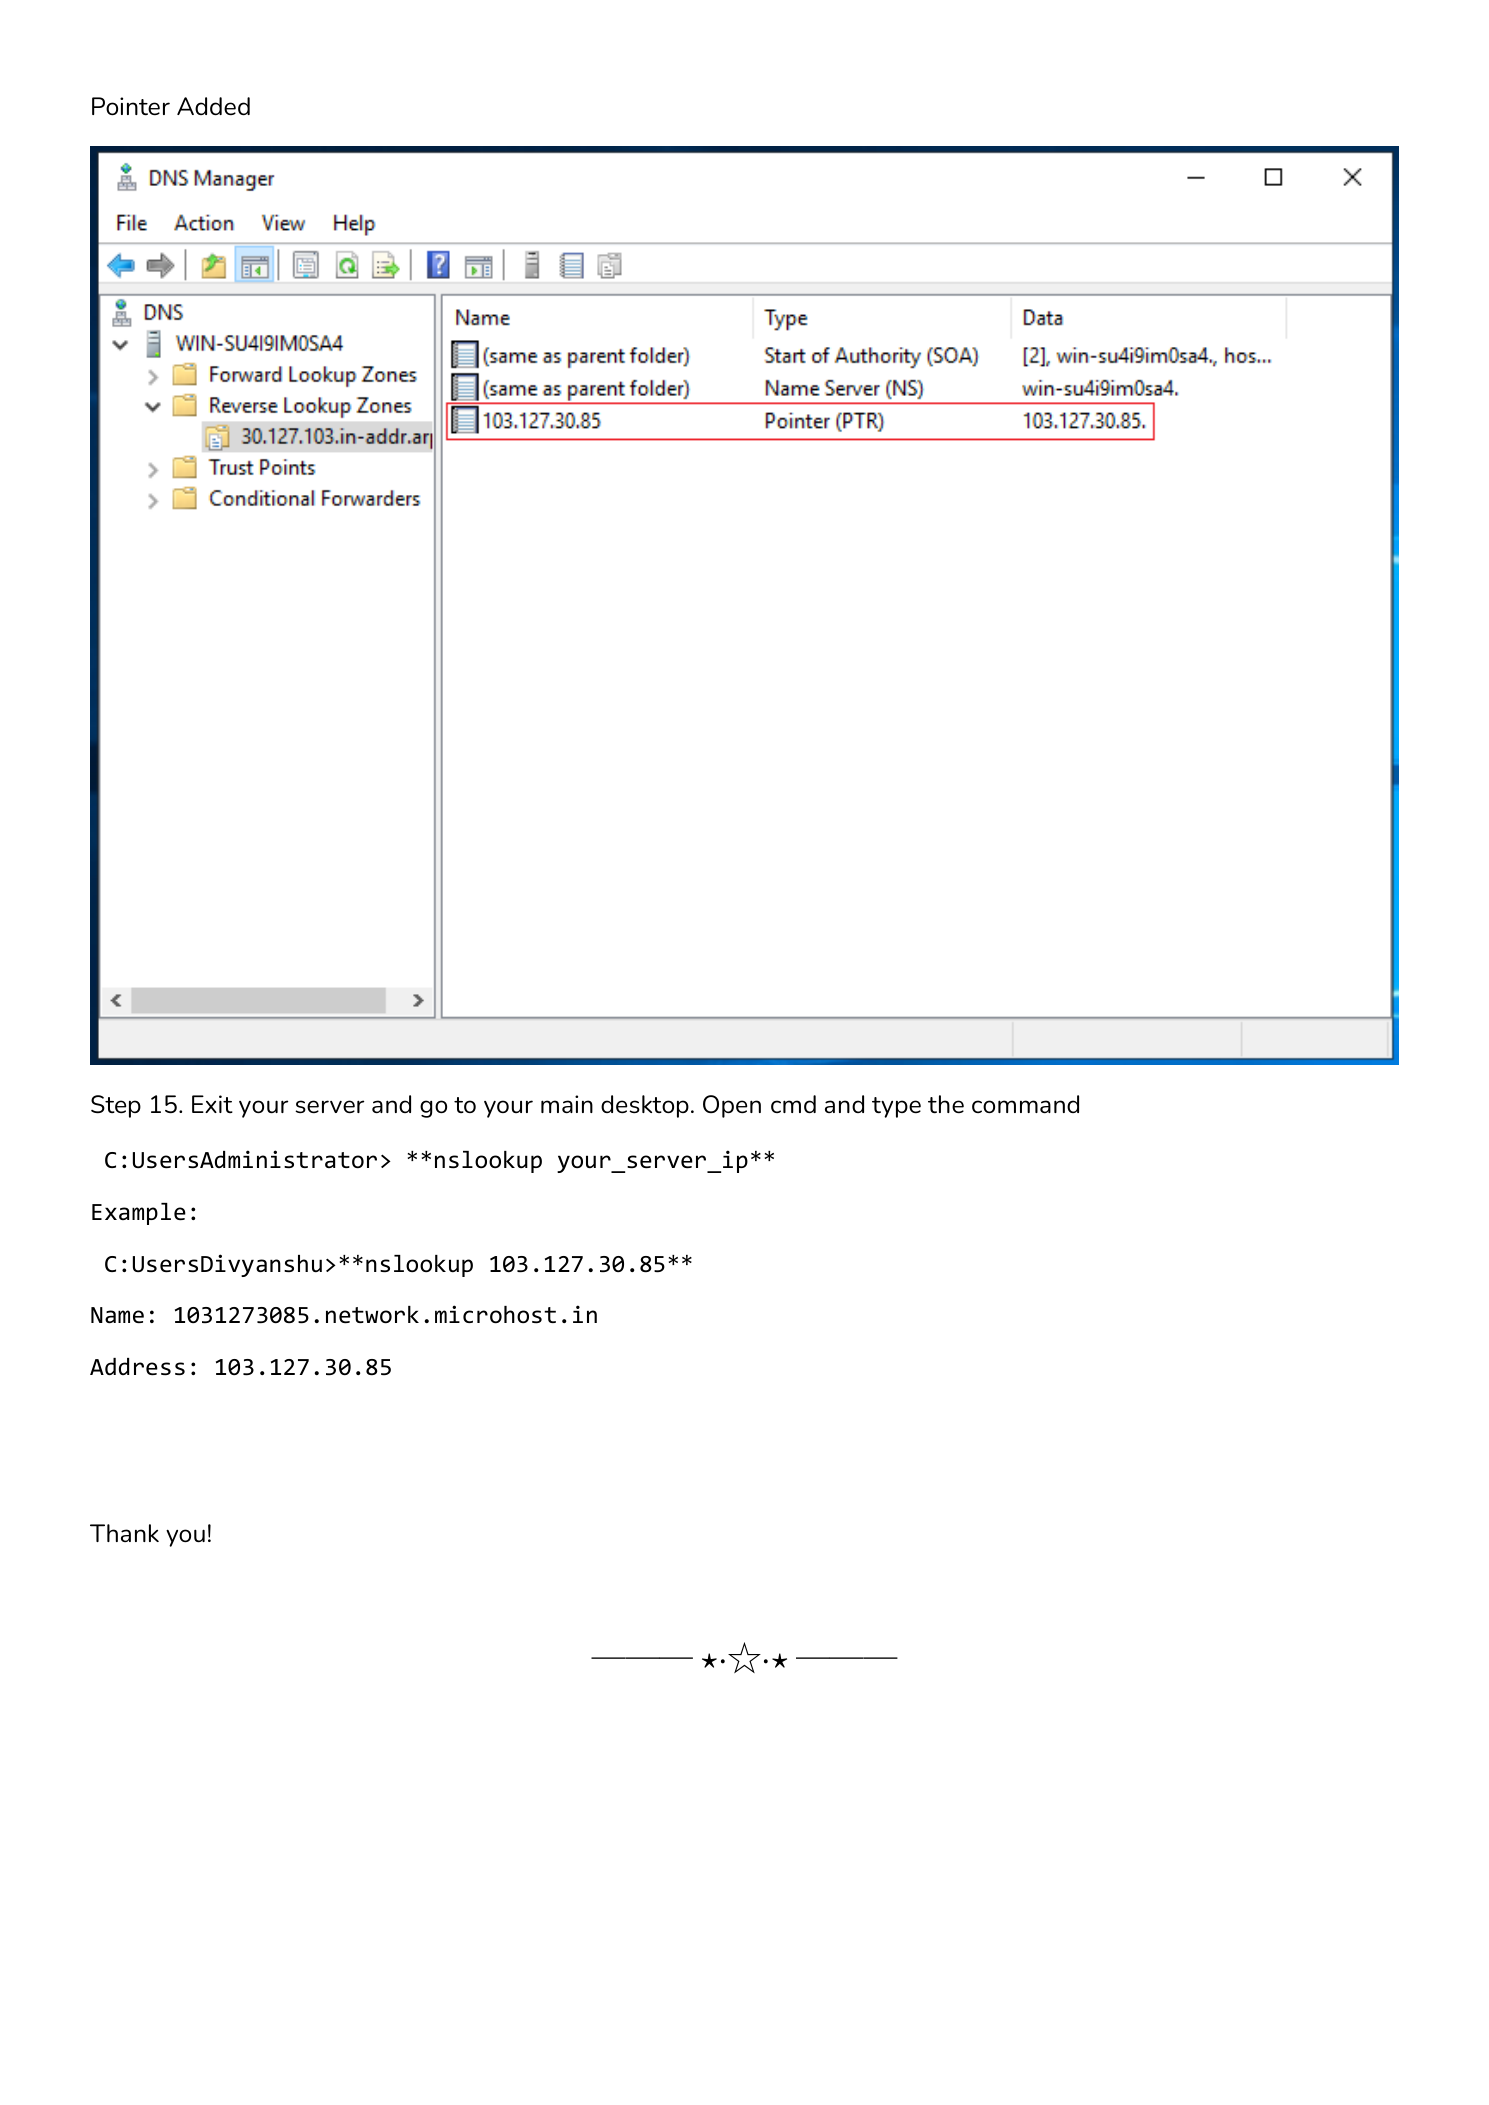
Step 14 — Verify Reverse Lookup with nslookup
From any machine on the network, run:
nslookup 192.168.1.10A successful response returns:
Server:  dns01.corp.local
Address:  192.168.1.1

Name:    server01.corp.local
Address:  192.168.1.10
Or verify with PowerShell:
Resolve-DnsName -Name 192.168.1.10 -Type PTRFor public servers, check externally with MXToolbox PTR Lookup or WhatsMyDNS.
Troubleshooting
PTR record doesn’t appear after ipconfig /registerdns
- Confirm the reverse zone matches your server’s subnet.
- Check dynamic updates are enabled: right-click zone → Properties → General → Dynamic updates.
- Review Event Viewer → Windows Logs → System for source “DnsApi” errors.
nslookup returns the IP but no hostname
- The PTR record may not exist — create it manually per Step 13.
- Check which server nslookup is querying (the “Server:” line). Run
nslookup 192.168.1.10 dns01.corp.localto query the authoritative server directly.
Mail still flagged as spam after adding PTR record
For public mail servers, reverse DNS for public IPs is controlled by your ISP or hosting provider — not by your DNS server. Contact them with the exact PTR value you need. Then verify the full mail config with MXToolbox Deliverability.
Summary
Reverse lookup zones and PTR records are foundational DNS hygiene. They improve email deliverability, make incident response faster by resolving IPs to hostnames in logs, and satisfy the DNS requirements that security frameworks and compliance audits expect.