The Hyper-V checkpoint is a save-state of a running VM — configuration, optionally memory, and a differencing-disk overlay that captures every block the VM writes after the snapshot is taken. Reverting walks back to the saved state with one menu click; the differencing-disk overlay is discarded; the VM resumes as if no time has passed since the snapshot. The pattern is invaluable for risky operations: pre-update snapshots before patching a server, pre-config snapshots before testing a GPO change, dev snapshots before refactoring an app deployment. The catch is that the snapshot type matters — Standard captures memory along with disk and is fast but app-inconsistent (bad for SQL/AD/Exchange in flight); Production uses guest-side VSS to flush writers and produces an app-consistent snapshot but skips memory. This post walks both types, the snapshot creation flow, the per-snapshot files Hyper-V writes, the revert flow, and the delete + rename housekeeping.
What you need before starting
- A Hyper-V host with at least one VM you can experiment on (the lab uses
Win11-VM02). For Production snapshots, the guest needs Hyper-V Integration Services + VSS (Windows) or fsfreeze (Linux) capable. - Sufficient free disk where the VM’s VHDX lives. Each snapshot creates a differencing disk that grows with writes; expect a fraction of the parent disk size per snapshot for typical workloads.
- Administrator rights on the Hyper-V host.
- An understanding that snapshots are NOT backups — they live alongside the VM on the same storage; a host failure loses snapshot and parent together. Pair snapshots with real backups.
The two snapshot types — pick deliberately
Standard (the freeze-everything one)
Captures the entire runtime state — CPU register contents, RAM contents, device state, disk state — at the moment of the snapshot. The VM is paused for milliseconds while the state is captured; revert restores the VM to that exact paused-instant.
Implications:
- Memory contents are part of the snapshot. A 16 GB VM produces a snapshot file with 16 GB of state. Disk overhead is real.
- No application consistency. If SQL Server is mid-transaction or Active Directory is mid-replication when the snapshot fires, the captured state has those operations frozen mid-flight. Reverting back can corrupt the database or trigger USN-rollback protections in AD.
- Fast revert. Restore reattaches the captured memory and devices; the VM resumes as if from a paused state. Quicker than Production for the rollback step.
- Right for: dev/test workloads, pre-experiment snapshots on disposable VMs, anything where you don’t care about app integrity at the moment of capture.
Production (the application-consistent one)
The default in modern Hyper-V. Asks the guest OS to use its native backup integration (VSS on Windows, file-system freeze on Linux) to put applications into a quiescent state, THEN captures only the disk — not memory.
Implications:
- Application-consistent. SQL writers flush in-flight transactions, Exchange flushes its log buffers, AD reaches a stable replication checkpoint — all before the disk capture happens. Reverting produces a state that the apps can recover from cleanly.
- No memory captured. Smaller snapshot files; revert results in the VM coming back as if from a clean shutdown rather than a paused state. Apps re-initialise rather than resuming.
- Slower create. Asking VSS to flush takes a few seconds longer than freezing memory; revert takes longer too because the OS has to boot rather than resume.
- Fallback to Standard. If the guest doesn’t support VSS (very old Linux without integration components, broken VSS writers), the host can be configured to fall back to a Standard snapshot rather than failing.
- Right for: production VMs running real services, anything you can’t afford to corrupt on revert.
Step 1 — Configure the snapshot type per VM
- In Hyper-V Manager, right-click the target VM → Settings.
- In the Settings dialog, under the Management section, click Checkpoints.
- Choose the Checkpoint type radio: Production checkpoints (recommended default) or Standard checkpoints.
- If Production: tick If production checkpoints can’t be created, use standard checkpoints. This fallback prevents snapshot failures on guests where VSS isn’t available.
- If Standard: optionally tick Automatic Checkpoints. This auto-creates a snapshot every time the VM starts and discards it when the VM stops — useful for dev VMs but fills disk on long-running servers.
- Optionally change the snapshot storage path (default is the VM’s folder; pin to a fast SSD if your snapshot operations are storage-bound).
- Click OK.

The setting is per-VM, not per-snapshot — switching the type later affects only future snapshots, not existing ones.
Step 2 — Create a snapshot
- In Hyper-V Manager, right-click the running VM. Pick Checkpoint.
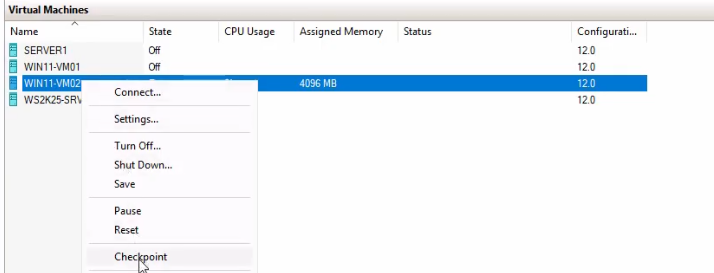
- Hyper-V kicks off the snapshot operation. For a Production snapshot, the host calls the guest’s VSS writer to flush in-flight writes; for Standard, the host pauses the VM for milliseconds and captures memory.

- The Checkpoints pane in the bottom of the VM’s detail view shows the new snapshot with a default timestamped name (e.g.,
Win11-VM02 - (5/9/2026 - 11:42:18 AM)).
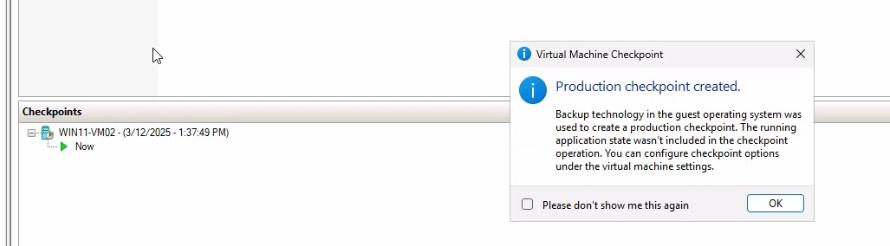
The whole operation takes seconds. The VM stays running throughout (no downtime; the VSS pause is sub-second).
Step 3 — Understand the per-snapshot files
Each snapshot writes a small set of files into the VM’s Snapshots folder (located inside the VM’s configuration root). These files are the snapshot:
.vmcx— binary VM configuration. Captures what the VM was: CPU count, RAM, attached disks, NICs, integration services. Without this file, Hyper-V doesn’t know how to reconstruct the VM at revert time..vmrs— runtime state. For Standard snapshots this includes the captured memory contents; for Production it’s much smaller (just enough to restore the VM’s execution context post-revert)..vmgs— guest state. Captures the integration-services state — heartbeat, time sync, key-value pair channel, integration version — so revert restores the guest-host channel cleanly..avhdx— the differencing disk. Sits in the same folder as the parent.vhdx. Every write the VM makes after the snapshot is captured here, leaving the parent.vhdximmutable for the duration of the snapshot. On revert, the.avhdxis discarded; on delete, it’s merged back into the parent.
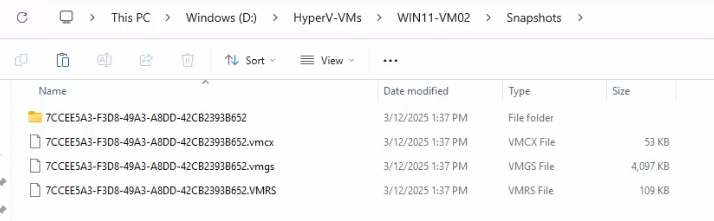
.vmcx/.vmrs/.vmgs trio captures config and state; the .avhdx is the differencing disk that holds writes since the snapshot.The .avhdx grows with writes. A long-lived snapshot on an active VM accumulates a sizeable differencing disk — this is the storage cost of holding a snapshot. Plan for it.
Step 4 — Revert (apply) a snapshot
Walk-through to verify revert works. Inside the VM, make some changes — create a couple of test folders on the desktop, change the wallpaper. Close the VM connection. In Hyper-V Manager:
- Select the VM. Right-click the snapshot in the Checkpoints pane → Apply.
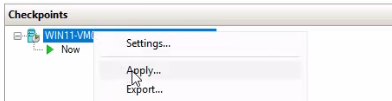
- The Apply Checkpoint dialog offers three buttons:
- Create Checkpoint and Apply — the safe option. Snapshots the current state first (so you can revert your revert), then applies the chosen snapshot. Use this 90% of the time.
- Apply — direct revert. The current state is destroyed. Use only when you’re certain you don’t want to keep the post-snapshot changes.
- Cancel — bails out without changing anything.
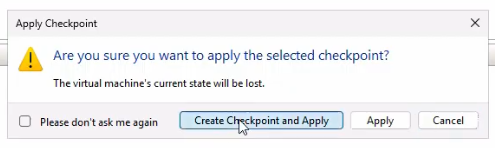
- Pick Create Checkpoint and Apply. Hyper-V takes a new snapshot of the current state, then reverts the VM to the chosen snapshot.
- Start the VM and connect. The test folders should be gone, the wallpaper should be back to whatever it was at snapshot time — the revert worked.
Step 5 — Delete a snapshot
Snapshots eat disk — the longer they live, the larger the .avhdx grows. Delete snapshots once the reason for taking them is gone (the patch worked, the experiment succeeded, the test passed).
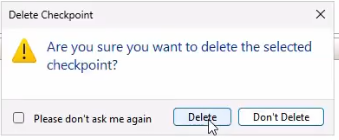
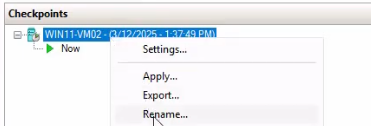
- Right-click the snapshot in the Checkpoints pane → Delete Checkpoint (single) or Delete Checkpoint Subtree (parent + all children).
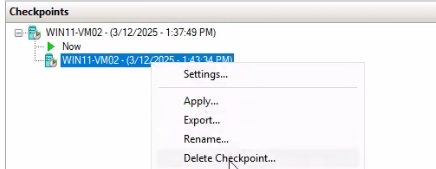
- Confirm the deletion.
Hyper-V merges the snapshot’s .avhdx back into the parent .vhdx in the background — the merge runs while the VM continues to run. Once the merge completes, the .avhdx file is removed and the storage is reclaimed.
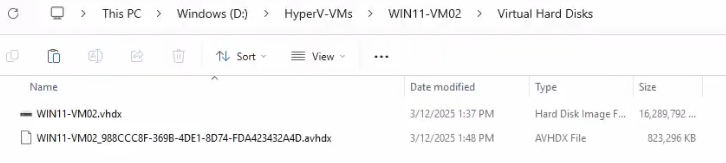
.avhdx is gone and the parent .vhdx contains the merged-in writes. Storage usage drops back to baseline.Verify with File Explorer or Get-ChildItem: the .avhdx for the deleted snapshot should be gone; the parent .vhdx should now contain the merged-in changes.
Step 6 — Rename for clarity
Default snapshot names embed a timestamp. Rename to a description that captures intent: before-Win11-update, pre-AD-promotion, working-state. Right-click → Rename → type the new name → Enter.
PowerShell support
Every operation has a cmdlet equivalent — useful for scripted automation:
# Create
Checkpoint-VM -Name Win11-VM02 -SnapshotName 'pre-update-2026-05-09'

# List
Get-VMSnapshot -VMName Win11-VM02

# Apply
Restore-VMSnapshot -VMName Win11-VM02 -Name 'pre-update-2026-05-09' -Confirm:$false

# Delete
Remove-VMSnapshot -VMName Win11-VM02 -Name 'pre-update-2026-05-09'

# Rename
Rename-VMSnapshot -VMName Win11-VM02 -Name 'old-name' -NewName 'new-name'

# Configure type
Set-VM -Name Win11-VM02 -CheckpointType Production
Set-VM -Name Win11-VM02 -CheckpointType Standard
Set-VM -Name Win11-VM02 -CheckpointType ProductionOnly  # no Standard fallback
Bulk pattern for cleaning up old snapshots across all VMs:
Get-VM | Get-VMSnapshot | Where-Object { $_.CreationTime -lt (Get-Date).AddDays(-30) } | Remove-VMSnapshotRemoves every snapshot older than 30 days across the entire host. Useful as a scheduled cleanup task on lab hosts where snapshots accumulate.
Things that bite people in production
Snapshots are not backups
The most expensive lesson admins learn the hard way. Snapshots live on the same storage as the VM — if the underlying disk fails, both the parent VHDX and the snapshot AVHDX are gone together. A snapshot rolls back time on a healthy VM; it doesn’t protect against host failure, storage failure, or accidental VM deletion. Pair snapshots with real backups (Veeam, Azure Backup, native Windows Server Backup) for actual disaster recovery.
Standard snapshots on Active Directory cause USN rollback
The single most common production catastrophe. AD’s replication uses Update Sequence Numbers (USNs) to track changes. Reverting a DC via a Standard snapshot returns the DC to an earlier USN state — partner DCs see “changes that already happened are now claimed as not happened” and quarantine the reverted DC. Cleanup is painful: demote the reverted DC, clean up its metadata, re-promote. ALWAYS use Production snapshots on DCs (or, better, don’t snapshot DCs at all — restore from backup instead).
Long-lived snapshots accumulate massive AVHDX growth
An AVHDX grows with every block the VM writes. On an active server with 100 GB of daily disk write churn, a 30-day-old snapshot has accumulated up to 3 TB of differencing-disk overhead — on top of the parent VHDX. The disk pressure is invisible until you run out of space. Treat snapshots as short-lived (hours to days, not weeks); use Automatic Checkpoints with care on long-running VMs.
Production snapshot fallback to Standard hides app-inconsistency
The fallback flag (If production checkpoints can’t be created, use standard checkpoints) silently downgrades the snapshot type. If a guest’s VSS writer is broken on snapshot day, you get a Standard snapshot named the same as a Production one — with all the application-inconsistency risk. Either monitor for the fallback condition (Hyper-V event log entries) or use Set-VM -CheckpointType ProductionOnly to force a hard failure rather than silent fallback.
Apply destroys the post-snapshot state without warning
The Apply button on the Apply Checkpoint dialog directly reverts — current VM state is gone, no recovery. The first time admins use this without picking Create Checkpoint and Apply, they often lose work they didn’t mean to lose. Always default to Create Checkpoint and Apply; only use bare Apply when you’re certain.
Snapshot files are tied to the source VM’s identity
Copying a VM’s snapshots to another host doesn’t make them apply to a different VM with the same VHDX path. The snapshot’s metadata embeds the source VM’s VMID; restoring on a different VM fails with “snapshot does not match VM identity.” Migrate snapshots only as part of a full Export-VM/Import-VM operation that preserves the VM identity.
Where this fits
Snapshots are part of the broader Hyper-V VM-lifecycle toolkit. For VM creation see create a VM on Hyper-V using PowerShell; for the golden-image template pattern, build a Hyper-V golden image; for the schema-version side, upgrade a VM configuration schema; for VHDX allocation, flip dynamic vs fixed. The next two posts in this 3-part series cover snapshot merging in depth and using snapshots to duplicate a VM. For the broader virtualization surface area, the Hyper-V virtualization pathway covers live migration, replicas, and the rest.