Part 1 covered creating, applying, and managing snapshots. This post is the consolidation half — what happens when you delete a snapshot and the differencing-disk overlay has to be merged back into the parent VHDX. Most admins encounter the merge mechanic only when troubleshooting (a snapshot deletion is taking longer than expected, an AVHDX file is consuming surprising amounts of disk, the chain has grown to 20+ levels and the VM feels sluggish). The mechanism is straightforward once you see it: every write since the snapshot lives in an AVHDX overlay, deleting the snapshot collapses the overlay back into the parent, and the storage and IO costs of the chain go away. This post walks the merge in detail, the GUI and PowerShell paths to trigger it, the difference between deleting a single snapshot vs the whole subtree, and the recovery options when a merge fails or AVHDX files become orphaned.
What you need before starting
- A VM with one or more existing snapshots (the lab uses
Win11-HF-VM02) - Administrator rights on the Hyper-V host
- Free disk space on the volume holding the parent VHDX — the merge process temporarily needs additional space while writes flow from the AVHDX into the parent
- The VM can stay running during a normal merge; for failed-merge recovery scenarios the VM may need to be shut down
What a merge actually does
Hyper-V’s snapshots use a copy-on-write differencing-disk model. When a snapshot is taken, the parent VHDX becomes immutable and a fresh AVHDX is created as the active write target. Every write the VM makes after the snapshot lands in the AVHDX rather than the parent. Reading a block walks the chain — check the topmost AVHDX first, then each parent in turn, until the block is found. Deleting the snapshot triggers the merge: Hyper-V copies the AVHDX’s changed blocks back into the parent, then removes the AVHDX file. The VM continues running throughout; the merge is transparent at the OS layer.
Why merge becomes necessary
- Storage cost. Every long-lived AVHDX accumulates writes — on a busy VM, that’s gigabytes per day. A 30-day-old snapshot on a database VM might have a 100 GB AVHDX riding on a 200 GB parent, doubling the storage footprint.
- IO cost. Reads against the chain cost extra. A 10-deep chain means up to 10 file lookups per read; sequential reads that should be fast become disk-bound. Performance degrades visibly on busy VMs.
- Corruption risk. Each AVHDX in the chain is a potential point of failure. A power loss, a host crash, a storage glitch on any single AVHDX can corrupt the whole chain. Long chains compound the risk.
- Stability cleanup. Hyper-V supports up to 50 snapshots per VM, but merge problems become more frequent as the chain grows. Healthy production practice keeps chains shallow (1-3 levels max).
Two merge modes — automatic vs manual
Automatic merge (the normal path)
The default. Triggered when you delete a snapshot via Hyper-V Manager or Remove-VMSnapshot. The host:
- Marks the snapshot for deletion in the VM configuration.
- Waits for the VM to be in a state where the merge can proceed (some merges require the VM to be Off; modern Hyper-V handles most cases live).
- Walks the chain bottom-up, copying the deleted snapshot’s AVHDX contents into its parent.
- Removes the AVHDX file once the merge completes.
- Updates the VM’s active disk pointer if needed.
The whole operation runs in the background; the VM continues serving requests throughout (with some IO latency increase during the merge).
Manual merge (when automatic fails)
If the automatic merge fails — orphaned AVHDX files (parent VHDX and AVHDX exist but the snapshot metadata is gone), inconsistent chain state after a host crash, AVHDX files that survived a partial cleanup — you’ll need the manual path. Two routes:
- Hyper-V Manager > Edit Disk wizard. Opens the chain, lets you pick an AVHDX, and offers a Merge action that walks the chain step by step. The VM has to be Off; the wizard refuses to operate on disks attached to a running VM.
- PowerShell
Merge-VHD. Direct cmdlet that takes a child VHD path and merges it into its parent. Same VM-must-be-Off requirement.Merge-VHD -Path "D:\VHDs\snap-2.avhdx"walks one level; for a multi-level chain, run the cmdlet repeatedly from the deepest child up.
Manual merge is the recovery path, not the routine workflow. Routine cleanup uses automatic merge through the standard delete operations.
Step-by-step: GUI merge of a chain
Walk-through with the lab VM. The setup creates two snapshots with marker files in between, then collapses the chain to verify the merge preserves data.
Take snapshot 1
- Open the VM (
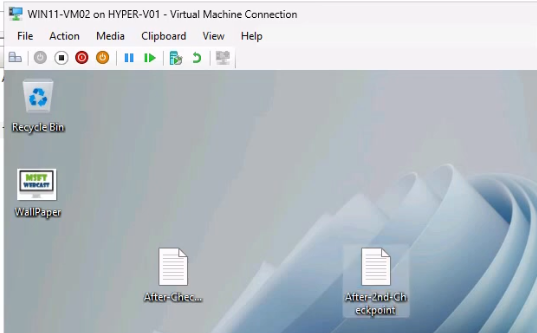
Win11-HF-VM02). Create a marker file on the desktop —AfterHyperCheckpoint1.txt.

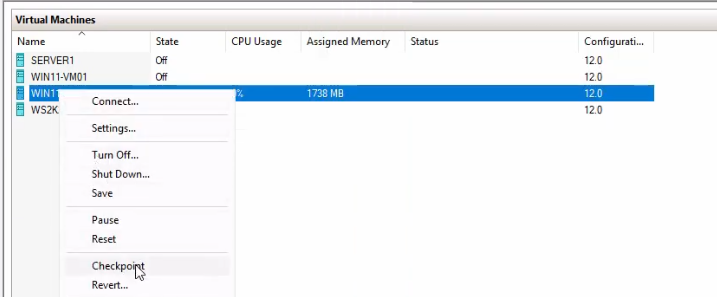
- In Hyper-V Manager, right-click the VM → Checkpoint. The first snapshot is created.
snap-1.avhdx rather than the parent.Take snapshot 2
- Inside the VM, create another marker file —
AfterSecondCheckpoint.txt.
snap-1.avhdx until snapshot 2 is taken, at which point it becomes part of snap-1’s baseline and snapshot 2 starts a fresh AVHDX.- Right-click the VM in Hyper-V Manager → Checkpoint again. Now there are two snapshots in the chain.
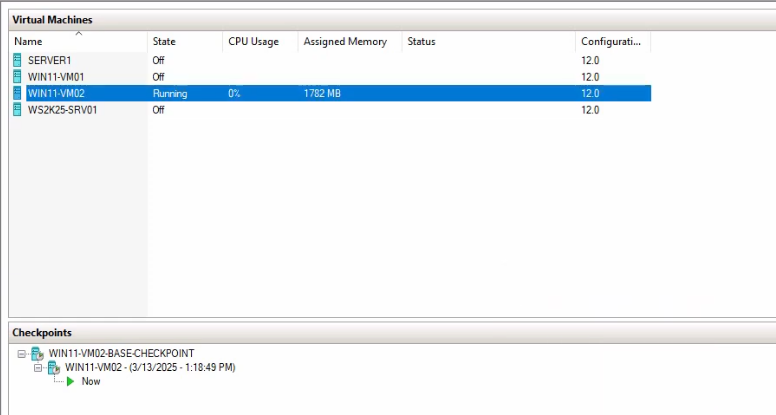
Verify the storage state
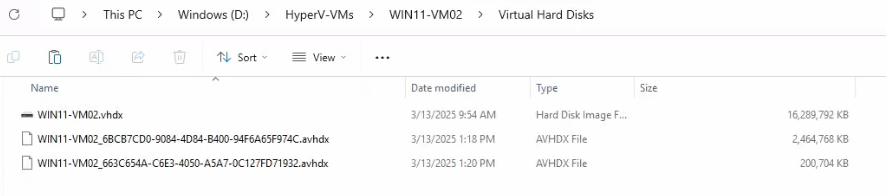
Open File Explorer at the VM’s storage folder (D:\HyperVMs\Win11-HF-VM02\Virtual Hard Disks\ in the lab). You should see:
Win11-HF-VM02.vhdx— the parent VHDX, immutable since snapshot 1....snap-1.avhdx— the differencing disk for snapshot 1; holds writes between snapshot 1 and snapshot 2....snap-2.avhdx— the differencing disk for snapshot 2; the active write target.
Trigger the merge via Delete Checkpoint Subtree
- In Hyper-V Manager’s Checkpoints pane, right-click the OLDEST snapshot → Delete Checkpoint Subtree.
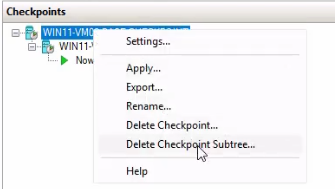
The Subtree variant collapses the entire chain in one operation — both snapshot 1 and snapshot 2’s AVHDX files merge back into the parent. The single-snapshot Delete only collapses the chosen snapshot, leaving the others; for full cleanup, Subtree is the right tool.
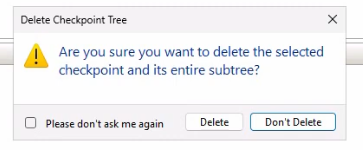
- Confirm the deletion.
- Hyper-V displays Merging in progress in the status pane. The merge runs in the background; the VM continues running normally.

snap-2.avhdx into snap-1.avhdx, then merges that into parent.vhdx. Order matters — the merge respects the chain depth.Verify the post-merge state
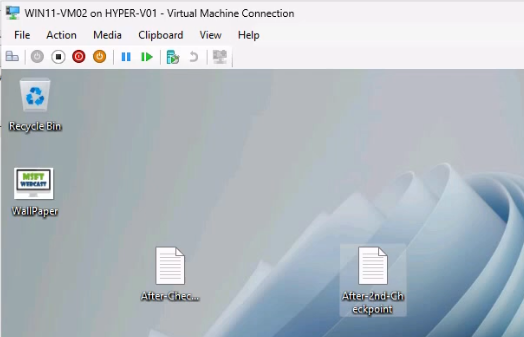
- Connect to the VM. Both marker files (
AfterHyperCheckpoint1.txtandAfterSecondCheckpoint.txt) should still be present — the merge preserves all writes from both snapshots.
- Open File Explorer at the storage folder. Only the parent VHDX should remain — both AVHDX files are gone.

Storage usage drops back to baseline. The chain is collapsed.
Step-by-step: PowerShell merge
The cmdlet equivalent is faster for scripted cleanup. Run from elevated PowerShell on the host:
List existing snapshots
Get-VMCheckpoint -VMName Server1(Note: Get-VMCheckpoint and Get-VMSnapshot are aliases for the same cmdlet; use whichever feels more natural.) Output shows every snapshot for the VM with timestamps and parent relationships.
Bulk-remove and merge
Get-VMCheckpoint -VMName Server1 | Remove-VMCheckpointPipes every snapshot for Server1 into Remove-VMCheckpoint, which triggers the merge for each. The cmdlet runs synchronously per-snapshot but the actual merge is asynchronous — the cmdlet returns once the merge is initiated, not when it completes.
Verify completion
Get-VMCheckpoint -VMName Server1Should return nothing. Then check the VM’s storage folder to confirm only the parent VHDX remains. To wait for the background merge to actually finish before the script exits, poll the VM’s state:
do {
    Start-Sleep -Seconds 5
    $vm = Get-VM -Name Server1
} while ($vm.Status -eq 'Operating normally (Merging disks 50%)')
The Status property includes the merge progress percentage; loop until the merge phrase disappears.

Get-VMCheckpoint Server1 after the bulk-remove pipeline returns nothing — confirms every snapshot has been merged and the host is back to a clean single-VHDX state.Bulk-remove all snapshots older than N days across the whole host
Get-VM | Get-VMCheckpoint | Where-Object { $_.CreationTime -lt (Get-Date).AddDays(-30) } | Remove-VMCheckpointUseful as a scheduled cleanup task on lab hosts where snapshots accumulate. Removes every snapshot older than 30 days across every VM, triggering merges in parallel.
The single-Delete vs Delete-Subtree distinction
The Hyper-V Manager context menu shows two delete options that look similar but behave differently:
- Delete Checkpoint — deletes only the selected snapshot. Hyper-V merges its AVHDX into its parent (which might be the parent VHDX or might be another AVHDX higher up the chain). Other snapshots in the chain stay intact.
- Delete Checkpoint Subtree — deletes the selected snapshot AND every snapshot that descends from it. The whole subtree’s AVHDX files merge back into the highest unchanged ancestor. Use this to collapse a whole chain at once.
For the lab’s 2-snapshot chain with no branching, single-Delete on the oldest would merge snap-1 into the parent (leaving snap-2 alive but now riding directly on the parent). Subtree-Delete on the oldest collapses everything in one go. Subtree is the cleaner cleanup; single-Delete is more surgical.
Things that bite people in production
Never delete .avhdx files manually from the filesystem
The number-one production catastrophe. Deleting an AVHDX from File Explorer (or Remove-Item) bypasses the merge: the VM’s configuration still references the snapshot, the VHDX chain still expects the AVHDX to be there, and the next time the VM tries to read those blocks it can’t find them. Result: the VM fails to boot, fails to apply checkpoints, or experiences silent data loss as reads return zeroed sectors. Always go through Hyper-V Manager or PowerShell — the merge handles cleanup atomically.
Long chains slow merges proportionally
A 10-deep chain takes ~10x as long to fully merge as a 2-deep chain — each AVHDX has to be merged into its immediate parent in sequence. On a busy VM with a deep chain, the merge can take hours. Plan cleanup during quiet windows; consider deleting snapshots one at a time during business hours rather than the whole subtree if you need to control IO impact.
Merging requires temporary disk headroom
The merge writes the AVHDX content into the parent VHDX while the AVHDX still exists. Briefly, both files coexist at full size. If the destination volume doesn’t have free space at least equal to the largest AVHDX in the chain, the merge fails partway and leaves the chain in an inconsistent state. Recovery is via Hyper-V’s Inspect Disk + Edit Disk wizard or via Merge-VHD manual cleanup. Always verify free space before initiating a large merge.
Failed merges leave behind orphan AVHDX files
Power loss during a merge, host crash, or storage interruption can leave the AVHDX in a half-merged state — the VM’s configuration thinks the snapshot is deleted, but the AVHDX file still exists. Hyper-V Manager won’t show it; Get-VMSnapshot won’t list it. The fix is to use Edit Disk > Inspect on the orphan AVHDX to discover its parent, then Merge it manually. Don’t delete the AVHDX file; merge it.
Subtree delete on a branching tree collapses every branch
If a VM has snapshots that branch (an Apply followed by Create-Checkpoint-and-Apply creates a fork), Delete Checkpoint Subtree on a parent collapses every descendant branch — not just the linear path. Verify the chain shape in the Checkpoints pane before using Subtree on a complex tree; you might be merging snapshots you intended to keep.
The 50-snapshot limit is a hard limit
Past 50 snapshots per VM, Checkpoint-VM fails with “Maximum checkpoints reached.” The fix is to delete (and merge) older snapshots before taking new ones. The number is tunable in advanced configurations but the operational reality is that a VM with 30+ snapshots is a sign of housekeeping debt — use the bulk cleanup pipeline above.
Where this fits
This is the consolidation half of the snapshot lifecycle. Part 1 covered creation and revert (Hyper-V Snapshots Part 1); the next post in the 3-part series covers using snapshots to duplicate a VM. For broader Hyper-V VM lifecycle context: create a VM on Hyper-V using PowerShell, build a Hyper-V golden image, upgrade a VM configuration schema, flip dynamic vs fixed VHDX. The broader virtualization surface area lives in the Hyper-V virtualization pathway.