Snapshots in Hyper-V are most often used as rollback points — create one before a risky change, revert if the change misbehaves. There’s a second use that’s less obvious but just as valuable: a snapshot is also a portable VM image. Export the snapshot to disk, import it as a fresh VM with a new unique ID, and you have a full clone of the original VM at the snapshot’s point in time. The clone is independent of the source — safe to run upgrades against, safe to break, safe to throw away. The pattern matters for testing migrations, reproducing bugs in isolation, building training labs from a known baseline, and standing up parallel dev environments without rebuilding from scratch. This post walks the export-and-import flow and the critical pre-flight steps that keep the source VM safe.
What you need before starting
- A Hyper-V host with the source VM and at least one existing snapshot
- Free disk space on the export-target volume equal to the source VM’s on-disk size (VHDX + AVHDX chain + config files)
- Free disk space on the clone-storage volume of similar size for the imported clone
- Administrator rights on the host
- A clear plan for the clone’s networking — either a Private Virtual Switch is already configured, or you’re prepared to disconnect the clone’s NIC entirely
Why a clone, not just a revert
Reverting (Apply) a snapshot rolls the same VM back to that state — the source VM moves; the clone-from-checkpoint workflow leaves the source untouched and produces an additional, independent VM at the snapshot state. The two flows answer different questions:
- Revert: “Undo what happened on this VM since I took the snapshot.” The source VM is the one that changes.
- Clone: “Give me a separate VM that looks the same as this VM did at snapshot time, so I can experiment without affecting the original.” The source VM stays on its current state; a new VM is created.
Clone is the right answer for testing OS upgrades against a production-shaped guest, reproducing a customer-reported bug from a snapshot of a known good state, training labs that need fresh-from-baseline environments per session, side-by-side comparison of two configurations.
The two phases — Export then Import
Hyper-V splits the clone operation into two distinct cmdlets / wizards: Export-VM (or its checkpoint variant Export-VMSnapshot) writes the source state out to disk; Import-VM reads it back and registers a new VM. The two phases run independently, so you can export to one volume, transfer the bundle to another host, and import there. For a same-host clone, both run in immediate sequence.
Phase 1 — Export the checkpoint
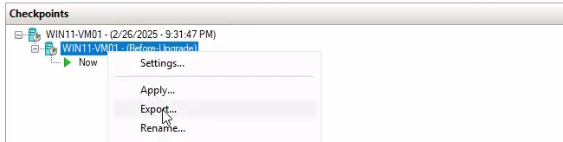
- Open Hyper-V Manager. Find the source VM in the list.
- In the Checkpoints pane, right-click the target snapshot → Export.
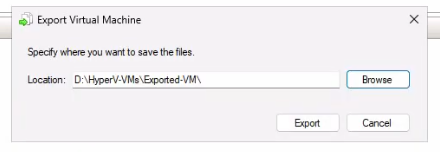
- Browse to the export target. The lab uses
D:\HyperVVMswith a new sub-folderExportedVMcreated. Pick a path with enough free space for the source VM’s entire on-disk size. - Click Select Folder → Export. The host begins copying configuration files, snapshot files, and VHDX/AVHDX into the target folder.
- Monitor progress in the Status column on the source VM. Time depends on VM size: a small Windows VM with no chain is a few minutes; a multi-TB SQL VM with a long snapshot chain can take an hour.
The source VM stays running throughout. The export is a non-disruptive copy operation; the only impact is on the source storage’s read IOPS during the copy.
Verify the exported bundle
Open File Explorer at the export target. Inside D:\HyperVVMs\ExportedVM\ you’ll find a sub-folder named after the source VM (the lab’s example: Win11HNVM01\). Inside that:
- Snapshots\ — the snapshot configuration and runtime-state files (.vmcx, .vmrs, .vmgs)
- Virtual Hard Disks\ — the parent VHDX plus any AVHDX files representing the snapshot chain
- Virtual Machines\ — the live-VM configuration (the import wizard reads this to know what to register)
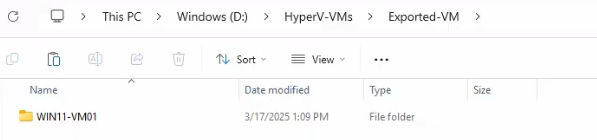
D:\HyperVVMs\ExportedVM\ with the VM’s configuration, snapshot files, and virtual hard disks. This is the bundle the Import wizard reads.This bundle is self-contained — you could copy it to another Hyper-V host and import there.
Phase 2 — Import as a clone
- In Hyper-V Manager, right-click the host name (top of the left pane) → Import Virtual Machine.
- The Import Virtual Machine Wizard opens. Click Next on the welcome page.
- Locate Folder: Browse to the exported bundle (
D:\HyperVVMs\ExportedVM\Win11HNVM01\). Click Next.
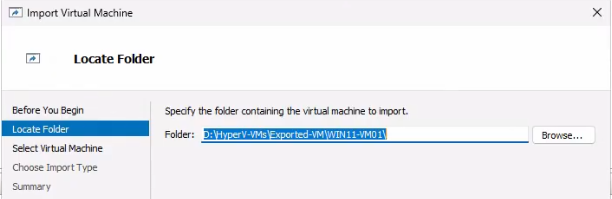
- Select Virtual Machine: the wizard auto-detects the VM in the bundle. Confirm and click Next.
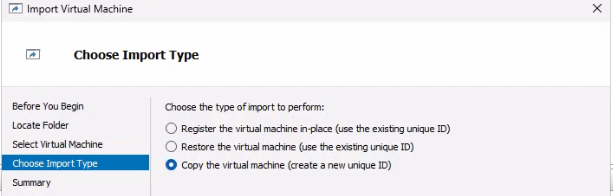
- Choose Import Type — the most important page. Three options:
- Register the virtual machine in-place — uses the source bundle as-is, registers it with the same VMID. Wrong choice for cloning. Reuses the source’s VMID; if both source and clone register the same VMID, the host gets confused and the source VM may be unmanageable.
- Restore the virtual machine — copies files to a new location but keeps the same VMID. Same VMID problem.
- Copy the virtual machine (create a new unique ID) — copies files to a new location AND assigns a new VMID. The right answer. Both source and clone can coexist on the same host without conflict.
- Choose Folders for Virtual Machine Files: tick Store the virtual machine in a different location. Pick a clone-specific folder — the lab uses
D:\HyperVVMs\Clone_Win11HNVM01\. Use the same folder for VM configuration, snapshots, and smart paging files. - Choose Folders to Store Virtual Hard Disks: point at the same clone folder so the cloned VHDX lives alongside the cloned config.
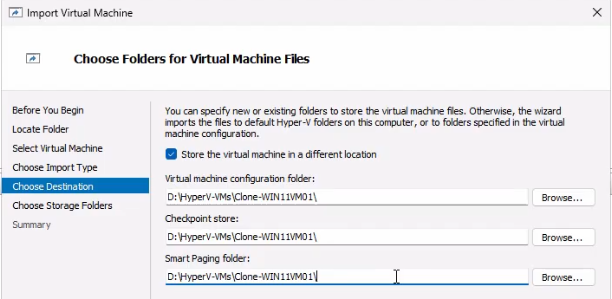
D:\HyperVVMs\Clone_Win11HNVM01\ so the clone is fully isolated from the source on disk. Same folder for config, snapshots, and smart paging keeps things organised.- Summary: review the choices. Click Finish.
The wizard copies the VHDX, regenerates the configuration with a new VMID, and registers the cloned VM with Hyper-V. The cloned VM appears in Hyper-V Manager’s VM list with its source-derived name (you’ll typically rename it after import to make the clone vs source distinction obvious).
PowerShell equivalent
The two-phase flow as a script:
# Export (snapshot variant captures from the named snapshot)
Export-VMSnapshot -VMName Win11HNVM01 -Name 'pre-update-snap' -Path 'D:\HyperVVMs\ExportedVM'

# Import as Copy with new ID
Import-VM -Path 'D:\HyperVVMs\ExportedVM\Win11HNVM01\Virtual Machines\<guid>.vmcx' -Copy -GenerateNewId -VirtualMachinePath 'D:\HyperVVMs\Clone_Win11HNVM01' -VhdDestinationPath 'D:\HyperVVMs\Clone_Win11HNVM01'

# Optional: rename the cloned VM
Get-VM | Where-Object { $_.Path -like '*Clone_Win11HNVM01*' } | Rename-VM -NewName 'Win11HNVM01-Clone'
The -Copy + -GenerateNewId pair is the cmdlet equivalent of the wizard’s “Copy + new unique ID” option. The .vmcx path inside the export bundle is what Import-VM needs — the wizard finds it automatically; for the cmdlet you have to point at it explicitly.
Step 3 — Isolate the clone’s network
The cloned VM is a byte-for-byte duplicate of the source at snapshot time. That includes the hostname, the SID, the IP configuration, the AD computer-account SID if domain-joined — everything that uniquely identifies a Windows machine on a network. Booting the clone with the same network connection as the source instantly creates a duplicate-identity conflict on the wire (duplicate IP, duplicate hostname in DNS, two machines claiming the same AD computer object).
The fix is to switch the clone’s NIC to a network where the conflicts don’t matter:
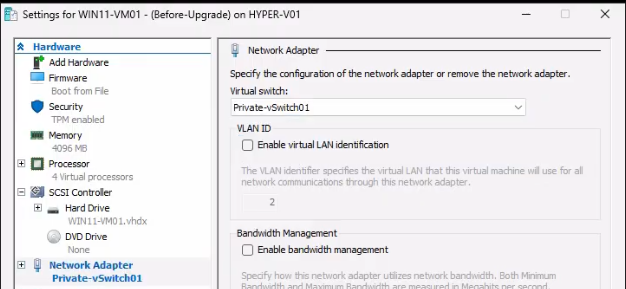
- In Hyper-V Manager, right-click the cloned VM → Settings.
- Pick Network Adapter in the left pane.
- Change the Virtual Switch dropdown from the production switch to a Private Virtual Switch. (Private switches connect VMs to each other but not to the host or the external network — perfect for clone isolation.)
- Alternative: pick Not Connected to disconnect the NIC entirely.
- Click Apply → OK.
From this moment, the clone can boot safely. It’ll see “network not connected” or “limited connectivity” depending on the choice; that’s expected. Inside the clone you can then run sysprep / netsh / hostname-change to give the clone a fresh identity if you want to put it back on a real network later.
Step 4 — Start and verify
- Right-click the clone → Start.
- Right-click again → Connect to open the console.
- Verify the clone boots cleanly. Sign in — the desktop should look identical to the source at snapshot time. Files, installed applications, registry state — all replicated.
- Confirm the clone has a fresh VMID via PowerShell:
(Get-VM Win11HNVM01-Clone).Id
(Get-VM Win11HNVM01).Id
The two GUIDs should differ. Identical GUIDs mean the import was done with the wrong type and needs to be redone.
Things that bite people in production
The Register-in-place option ALWAYS conflicts with the source
The most expensive mistake during clone import. Picking Register the virtual machine in-place on the import-type page tells the host “this is the same VM, just at a new location” — it reuses the VMID. If the source VM is still registered with that VMID, the host’s VMID-to-VM mapping breaks, and one or both VMs may become unmanageable. Recovery is removing one VM’s registration via Remove-VM and re-importing with Copy. ALWAYS pick Copy + new unique ID.
Booting a clone on the production network breaks both VMs
Duplicate hostname, duplicate IP, duplicate AD machine-account SID. The source VM may experience authentication failures, DNS confusion, group-policy refresh failures. The clone may fail to authenticate to the domain at all. Always switch the clone’s NIC to a Private Virtual Switch BEFORE first boot. If you forgot, shut down both VMs immediately, fix the clone’s networking, and let the source recover.
Domain-joined clones need sysprep before re-joining
If the goal is eventually to put the clone on a real network as a separate domain member, the in-place-clone identity isn’t enough — the clone needs sysprep to reset SID, machine name, and AD-account binding. Without sysprep, AD will refuse to accept the clone as a separate member because its SID matches the source’s.
Snapshot files in the export bundle inflate disk requirements
Exporting a snapshot copies the entire snapshot chain — parent VHDX plus every AVHDX in the chain — not just the snapshot-state effective view. A 50 GB VHDX with a 10-deep AVHDX chain can produce a multi-hundred-GB export bundle. Plan for that on the export-target volume.
Cross-host import requires Hyper-V version compatibility
An export from Windows Server 2025 (schema 12.0) won’t import on Windows Server 2019 (schema 10.0 max) without a compatibility fallback — modern Hyper-V handles many cases gracefully, but if the import wizard reports “the imported VM’s configuration version is not compatible,” the destination host needs to upgrade. The reverse direction always works (older config on newer host).
The clone’s snapshots come along too
If the source VM has snapshots, the clone inherits them. From the clone you can independently apply, delete, or take new snapshots without affecting the source. Useful for “clone the source, then iterate snapshot/revert cycles on the clone” testing patterns.
Where this fits
This completes the 3-part Hyper-V Snapshots series — Part 1 covered creating and reverting snapshots, Part 2 covered merging the AVHDX chain, and this Part 3 covered cloning a VM from a snapshot. For broader VM lifecycle: create a VM, build a golden image, upgrade a configuration schema, flip dynamic vs fixed VHDX, enable virtual TPM. The broader virtualization surface area lives in the Hyper-V virtualization pathway.