Part 2 finished with the headquarters location built out and two DCs in Surat-HO. Now the branch. The challenge: promoting a DC over a slow WAN link with a default “replicate from any DC” setting means pulling the entire AD database across the link during promotion, which can take hours and saturate the WAN for the duration. The fix is Install From Media (IFM) — create a snapshot of the directory on a healthy local DC, ship that snapshot to the branch by any means faster than the WAN (USB drive, encrypted file copy, sneakernet, anything), and tell the promotion wizard to seed from the local snapshot. Only the deltas accumulated since the snapshot replicate over the wire.
This post creates the Delhi-BO location object and subnet, generates the IFM package on SRT22-DC01, copies it to DEL22-DC03, and walks the IFM-aware promotion. For the standalone IFM walkthrough see deploy a domain controller via IFM; this post applies the technique inside the multi-location workflow.
What you need before starting
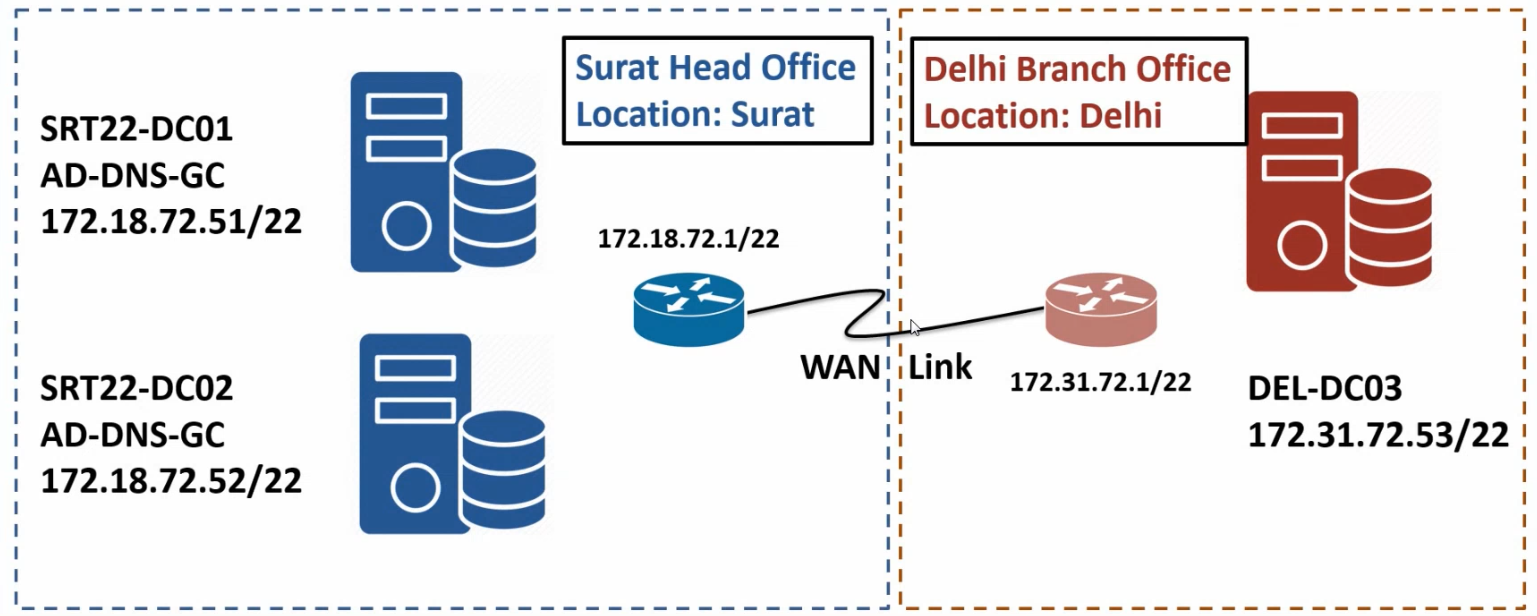
- Part 2 complete — Surat-HO is a real location with two DCs replicating intra-location, and SRT22-DC02 is a working GC
- DEL22-DC03 sitting on the Delhi subnet (172.31.72.53), reachable from SRT22-DC01 via the router VM, with DNS pointed at SRT22-DC01 (172.18.72.51) so it can resolve the domain name
- Domain Admin credentials for the IFM-aware promotion wizard
- Roughly 1–5 GB free on SRT22-DC01’s C: drive for the IFM staging folder, plus the same on DEL22-DC03 to receive the copy
- A way to ship the IFM bundle from SRT22-DC01 to DEL22-DC03 — SMB over the lab network is fine for the demo; in production over a real WAN you might use removable media, an encrypted out-of-band file transfer, or an existing backup-restore channel
Step 1 — Create the Delhi-BO location object
Same workflow as Part 2’s Surat-HO creation, just with a different name. On SRT22-DC01:
- Open
dssite.mscfrom Server Manager → Tools → Active Directory Sites and Services. - Right-click the Sites node and pick New Site.
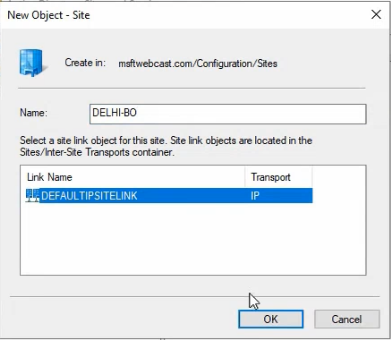
- Name it
Delhi-BO(BO for Branch Office; matches the Surat-HO naming pattern). - Pick
DEFAULTIPSITELINKas the link — same as Surat-HO, since both locations use the default link for now. Part 4 walks the link configuration that splits them properly. - Click OK and dismiss the confirmation.
dssite.msc alongside Surat-HO. Same New Site flow as Part 2 — the only thing that changes is the name.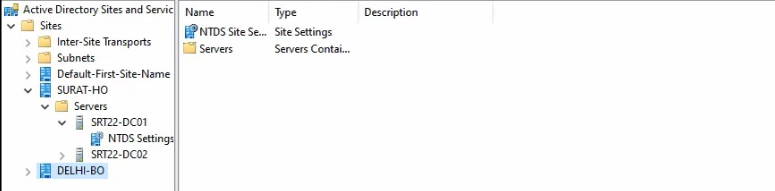
Delhi-BO as the name, DEFAULTIPSITELINK as the linking object (we’ll edit the link cost and schedule in Part 4).The location object exists; nothing’s in it yet.
Step 2 — Attach the 172.31.72.0/22 subnet to Delhi-BO
Same as Part 2 step 2, different prefix:
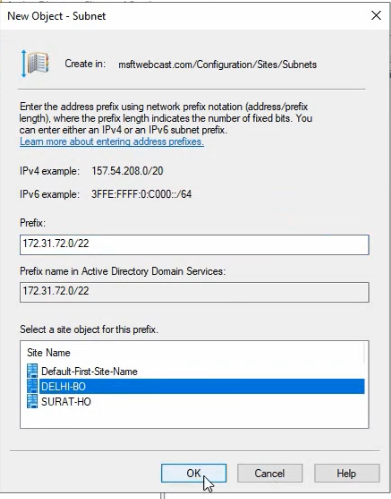
- Right-click Subnets in
dssite.mscand pick New Subnet. - Enter
172.31.72.0/22as the prefix andDelhi-BOas the associated location. - Click OK.
Once Delhi-BO has both an object and an attached subnet, any DC promoted into the 172.31.72.0/22 IP range will land in Delhi-BO automatically — no manual move required, no nltest /dsregdns follow-up. This is exactly why we create the location and subnet BEFORE promoting the branch DC, not after.
Step 3 — Generate the IFM package on SRT22-DC01
The IFM (Install From Media) feature lives inside ntdsutil. The flow is: create a staging folder, run ntdsutil, navigate into the IFM context, and ask it to dump a full snapshot.
Create the staging folder
From PowerShell or Explorer on SRT22-DC01:
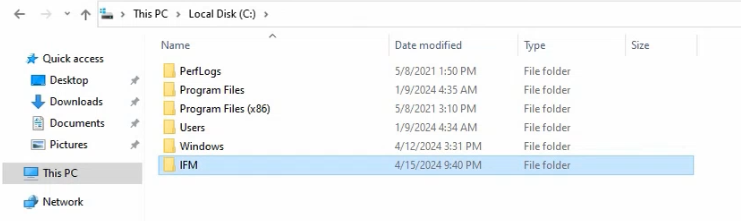
New-Item -ItemType Directory -Path 'C:\IFM' -ForceEmpty folder ready to receive the snapshot.
C:\IFM staging folder on the source DC. ntdsutil will populate it with three sub-folders.Generate the snapshot
Open elevated PowerShell. Launch ntdsutil, navigate into the IFM context, and ask for a full snapshot:
ntdsutil
activate instance ntds
ifm
create sysvol full C:\IFM
quit
quit
activate instance ntds binds the session to the live AD database. ifm drops into the install-from-media subprompt. create sysvol full C:\IFM generates a complete snapshot — AD database, registry hive subset, and SYSVOL contents — and writes them to C:\IFM. The two quits back out of the subprompts and return to PowerShell.
The full variant is the right choice for a regular DC (covers everything). For an RODC, swap to create rodc C:\IFM — the resulting bundle excludes secrets and is appropriate for a read-only DC. We’re building a writable DC here, so full it is.
Generation time depends on directory size. Lab-sized AD: 30 seconds. Production AD with 100k objects: 5–15 minutes. AD with millions of objects and large SYSVOL trees: 30+ minutes. Run during a quiet window if the source DC also serves heavy authentication traffic.
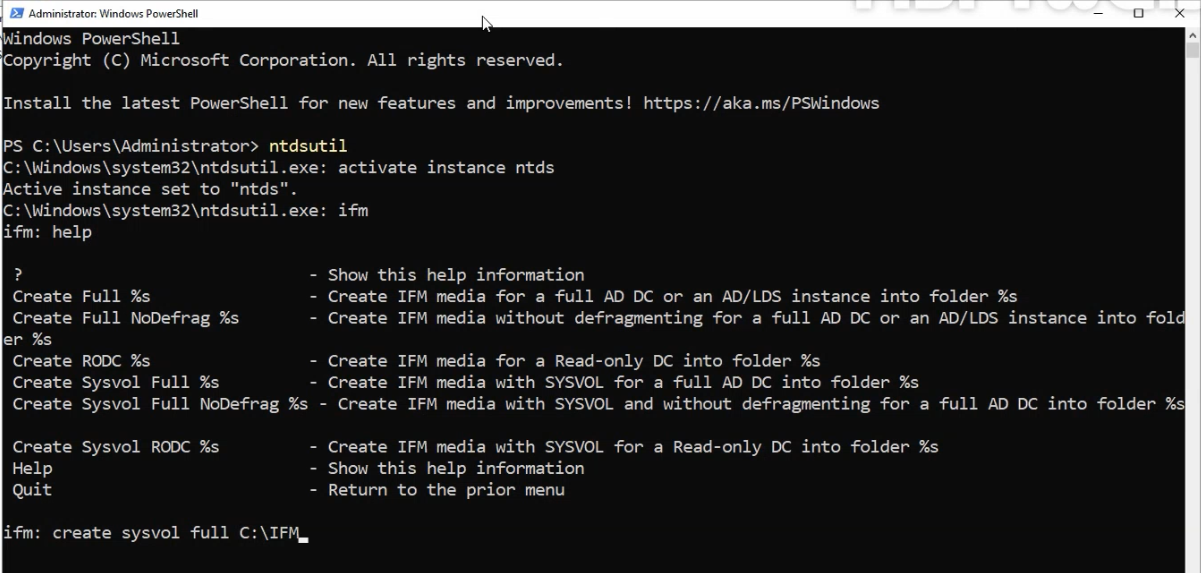
ntdsutil — activate instance ntds binds the session to the live AD database, ifm drops into the install-from-media context, and the next command produces the snapshot.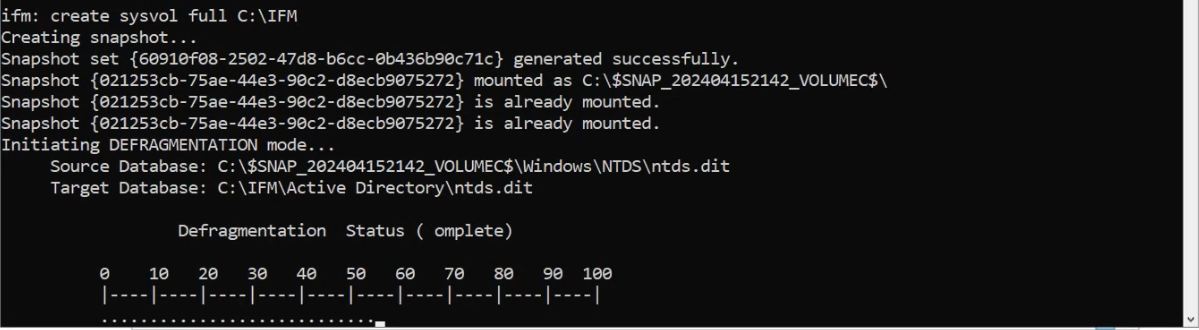
create sysvol full C:\IFM running to completion. The output reports the snapshot copy, the registry hive export, and the SYSVOL seed — in that order. Output sizes vary with directory size; expect a few hundred MB to a few GB.Confirm the output
Open C:\IFM in Explorer. You should see three sub-folders:
- Active Directory — the consistent
ntds.ditsnapshot. - Registry — the subset of
HKLM\System\CurrentControlSet\Services\NTDSrequired to resume the directory service on the new DC. - SYSVOL — the policies and login-script seed (a partial copy; full SYSVOL convergence happens via DFS-R after promotion).
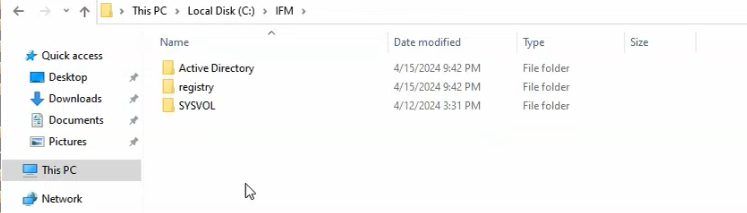
C:\IFM contents: three sub-folders — the database snapshot, the registry-hive subset, and the SYSVOL seed. This is the package that ships to the branch DC.Together this is the IFM bundle. Total size is typically 100–500 MB for a small directory, several GB for a large one. Copy this entire folder to the target DC.
Step 4 — Ship IFM to DEL22-DC03
For the lab over an unconstrained network, SMB-from-source is fine:
robocopy "\\172.18.72.51\c$\IFM" "C:\IFM" /E /Z /R:3 /W:5Run from elevated PowerShell on DEL22-DC03. /E copies sub-directories including empty ones, /Z uses restartable mode in case the link blips, /R:3 /W:5 retries three times with five-second waits per failure. Verify the copy completed by browsing C:\IFM on DEL22-DC03 and confirming the three sub-folders are present.
For a real WAN deployment, the SMB-direct option is usually the wrong choice — the whole point of IFM is to avoid pushing a multi-GB seed across the WAN. Realistic options:
- Removable media — encrypt with BitLocker To Go, ship via a courier with chain-of-custody documentation. Slow but bulletproof; appropriate for very-large directories.
- Out-of-band file transfer — an existing site-to-site data-replication channel (Veeam, Robocopy over a separate VPN, Azure Storage with a SAS URL) used for backups can usually carry the IFM bundle out of business hours.
- Pre-staging during DC build — if the new DC is being shipped from a central staging location to the branch, copy the IFM bundle onto the local disk before the box leaves; promotion happens after the box is racked.
Step 5 — Promote DEL22-DC03 with the IFM seed
Same wizard as Part 2’s SRT22-DC02 promotion, with one extra option turned on: Install from Media.
Pre-flight check
From elevated PowerShell on DEL22-DC03, confirm DNS and IP reachability to the existing DC:
ping msfwebcast.comShould resolve to 172.18.72.51 (SRT22-DC01) and reply. If it doesn’t, fix DNS first — the promotion wizard will fail with an obscure error.
Install the AD DS role
Install-WindowsFeature -Name AD-Domain-Services -IncludeManagementToolsSame as Part 2 — installs the role and the management tools without a reboot on Windows Server 2022.
Run the wizard
Click the yellow flag in Server Manager → Promote this server to a domain controller.
- Deployment Configuration: Add a domain controller to an existing domain; the wizard auto-fills
msfwebcast.com; supplyadministrator@msfwebcast.comcredentials when prompted. - Domain Controller Options: tick DNS server, tick Global Catalog (one GC per location is the standing recommendation; Delhi-BO doesn’t have one yet, this becomes it). The location selector should auto-populate with
Delhi-BObecause DEL22-DC03’s IP (172.31.72.53) matches the subnet object you created in Step 2 — verify it before continuing. - Set the DSRM password. Same warning as Part 2: this is separate from the domain admin password and there’s no recovery if you lose it.
- DNS Options: ignore the parent-zone-delegation warning; AD-integrated DNS in a single-domain forest doesn’t need it.
- Additional Options: this is the IFM page. Tick Install from media and point at
C:\IFM(the path you copied to in Step 4). The “Replicate from” selector below it stays set to a Surat-HO DC — the wizard will use the IFM bundle for the bulk seed and the named DC for the deltas accumulated since the bundle was generated. - Paths: defaults are fine for the lab; isolate to dedicated volumes in production.
- Prerequisites Check: all green, click Install. Promotion + reboot takes 5–10 minutes for a lab-size IFM bundle. The bulk of the work is the local copy from
C:\IFMinto%SystemRoot%\NTDS; the WAN traffic during promotion is just the deltas (kilobytes to megabytes, not gigabytes).
Step 6 — Verify cross-location replication
After DEL22-DC03 reboots and AD DS is up, verify replication is working:
repadmin /showreplon DEL22-DC03 — should show inbound neighbours from SRT22-DC01 and SRT22-DC02 with all five naming contexts replicating successfully via RPC. (See read repadmin /showrepl output for the section-by-section walkthrough of what the output means.)dcdiag /test:replicationson each DC — PASS for every test.- Cross-location write test: create a test user on a Surat DC (
New-ADUser -Name "CrossLocTest"), then query from DEL22-DC03 (Get-ADUser crossloctest). Should appear within seconds of replication completing. - Cleanup: clean up
C:\IFMon both DCs after promotion completes successfully. The bundle contains a snapshot of the directory and shouldn’t live on disk indefinitely.
Things that bite people in production
The IFM bundle has a freshness window
The snapshot was taken at a specific moment in time. The longer the gap between snapshot generation and promotion, the more deltas have to replicate after the IFM seed loads — eventually you re-create the “promote across WAN” problem you used IFM to avoid. As a rule of thumb: generate the bundle within 24–48 hours of the planned promotion. For very large directories where ship-time is measured in days, generate-then-ship-then-generate-fresh-deltas-just-before-promotion is sometimes the right pattern.
Tombstone lifetime is the hard limit
If the bundle is older than the forest’s tombstone lifetime (default 60 days, raised to 180 days on newer forest functional levels), the promotion will fail with the equivalent of “your seed is too old to be reconciled.” Generate fresh; old IFM bundles are not safe to reuse.
Don’t commit the IFM bundle to a repo or backup index
It contains a complete copy of the AD database including password hashes (for full IFM; less for RODC IFM). Treat it like a domain-admin credential dump — encrypt in transit, delete after promotion, never archive.
Verify the destination location BEFORE clicking Install
The wizard’s “The location detected for this domain controller is <name>” line on the Domain Controller Options page is silent if the subnet-to-location mapping is missing — it falls back to Default-First-Site-Name without warning. If you see anything other than Delhi-BO there, cancel out, fix the subnet object, and restart. After-the-fact moves work but require the same nltest /dsregdns dance covered in Part 2.
SMB direct from source DC defeats the whole purpose over a real WAN
The robocopy command shown in Step 4 works in lab because the Surat-Delhi link is just a local router. Over a real WAN it pushes the entire bundle across the link — same outcome as the default “replicate from any DC” approach. Use removable media or an out-of-band channel that isn’t the production WAN link for the file transfer.
SYSVOL doesn’t fully sync via IFM
The SYSVOL portion of the IFM bundle is a seed, not a complete copy. Full SYSVOL convergence happens via DFS-R after promotion completes, which can take hours on a large policy set. Verify with dfsrdiag pollAD /verbose and watch for “DFS Replication has finished initial replication” in the DFS Replication event log before declaring the new DC fully ready.
Where this fits in the series
Both locations now have local DCs — Surat-HO with two, Delhi-BO with one. Part 1 covered the why and the lab; Part 2 built out Surat-HO; this post added Delhi-BO with the IFM-aware DC promotion. Part 4 configures the AD-Sites-and-Services site link between Surat-HO and Delhi-BO with controlled replication scheduling. Part 5 tunes that schedule and verifies cross-location convergence. For the broader replication context, see read repadmin /showrepl output and the Active Directory pathway.