Understanding the Threat: Man-in-the-Middle DNS Attacks
One of the most insidious threats to DNS infrastructure is the man-in-the-middle (MITM) attack. In this scenario, a malicious actor positions themselves between a client and the DNS server. When the client sends a query, the attacker intercepts it, forwards it to the legitimate DNS server, and then tampers with the response before relaying it back to the client. The client unknowingly receives a fraudulent IP address pointing to the attacker’s server.
The consequences are severe: sensitive data submitted through what appears to be a legitimate site goes directly to the attacker, credentials can be harvested, and services can be impersonated without the client detecting anything unusual. DNS, by its original design, provides no mechanism to verify that a response is authentic.
DNSSEC: A Layer of Cryptographic Trust
DNS Security Extensions (DNSSEC) addresses this vulnerability by introducing digital signatures to DNS records. When DNSSEC is enabled on a zone, the DNS server signs each record set with a private cryptographic key. When a client queries a DNSSEC-enabled server, the response includes both the requested data and a corresponding RRSIG (Resource Record Signature). The client (or a validating resolver) verifies the signature using the server’s published public key, confirming that the response is authentic and has not been tampered with.
Any attempt by an attacker to modify a DNS response will invalidate the digital signature, causing the validating client to reject the response – preventing the MITM attack entirely.
Key Components of DNSSEC
- Zone Signing Key (ZSK) – Signs individual DNS resource records within the zone. Uses RSA-SHA-256 and is rotated frequently to limit exposure
- Key Signing Key (KSK) – Acts as the root of trust for the zone. The KSK authenticates the ZSK by signing the DNSKEY record set. It is rotated infrequently and serves as the Trust Anchor distributed to validating resolvers
- RRSIG – A digital signature record attached to each signed record set
- NSEC (Next Secure Record) – Provides authenticated denial of existence, preventing attackers from exploiting gaps in the DNS database
- Trust Anchors – Pre-configured public keys distributed to other DNS servers, enabling them to validate DNSSEC responses and facilitating secure key rollovers
Prerequisites
- A Windows Server DNS server with at least one Active Directory-integrated or primary zone configured
- The zone you wish to sign must be accessible and contain the necessary DNS records
- Domain Admin or DNS Admin permissions
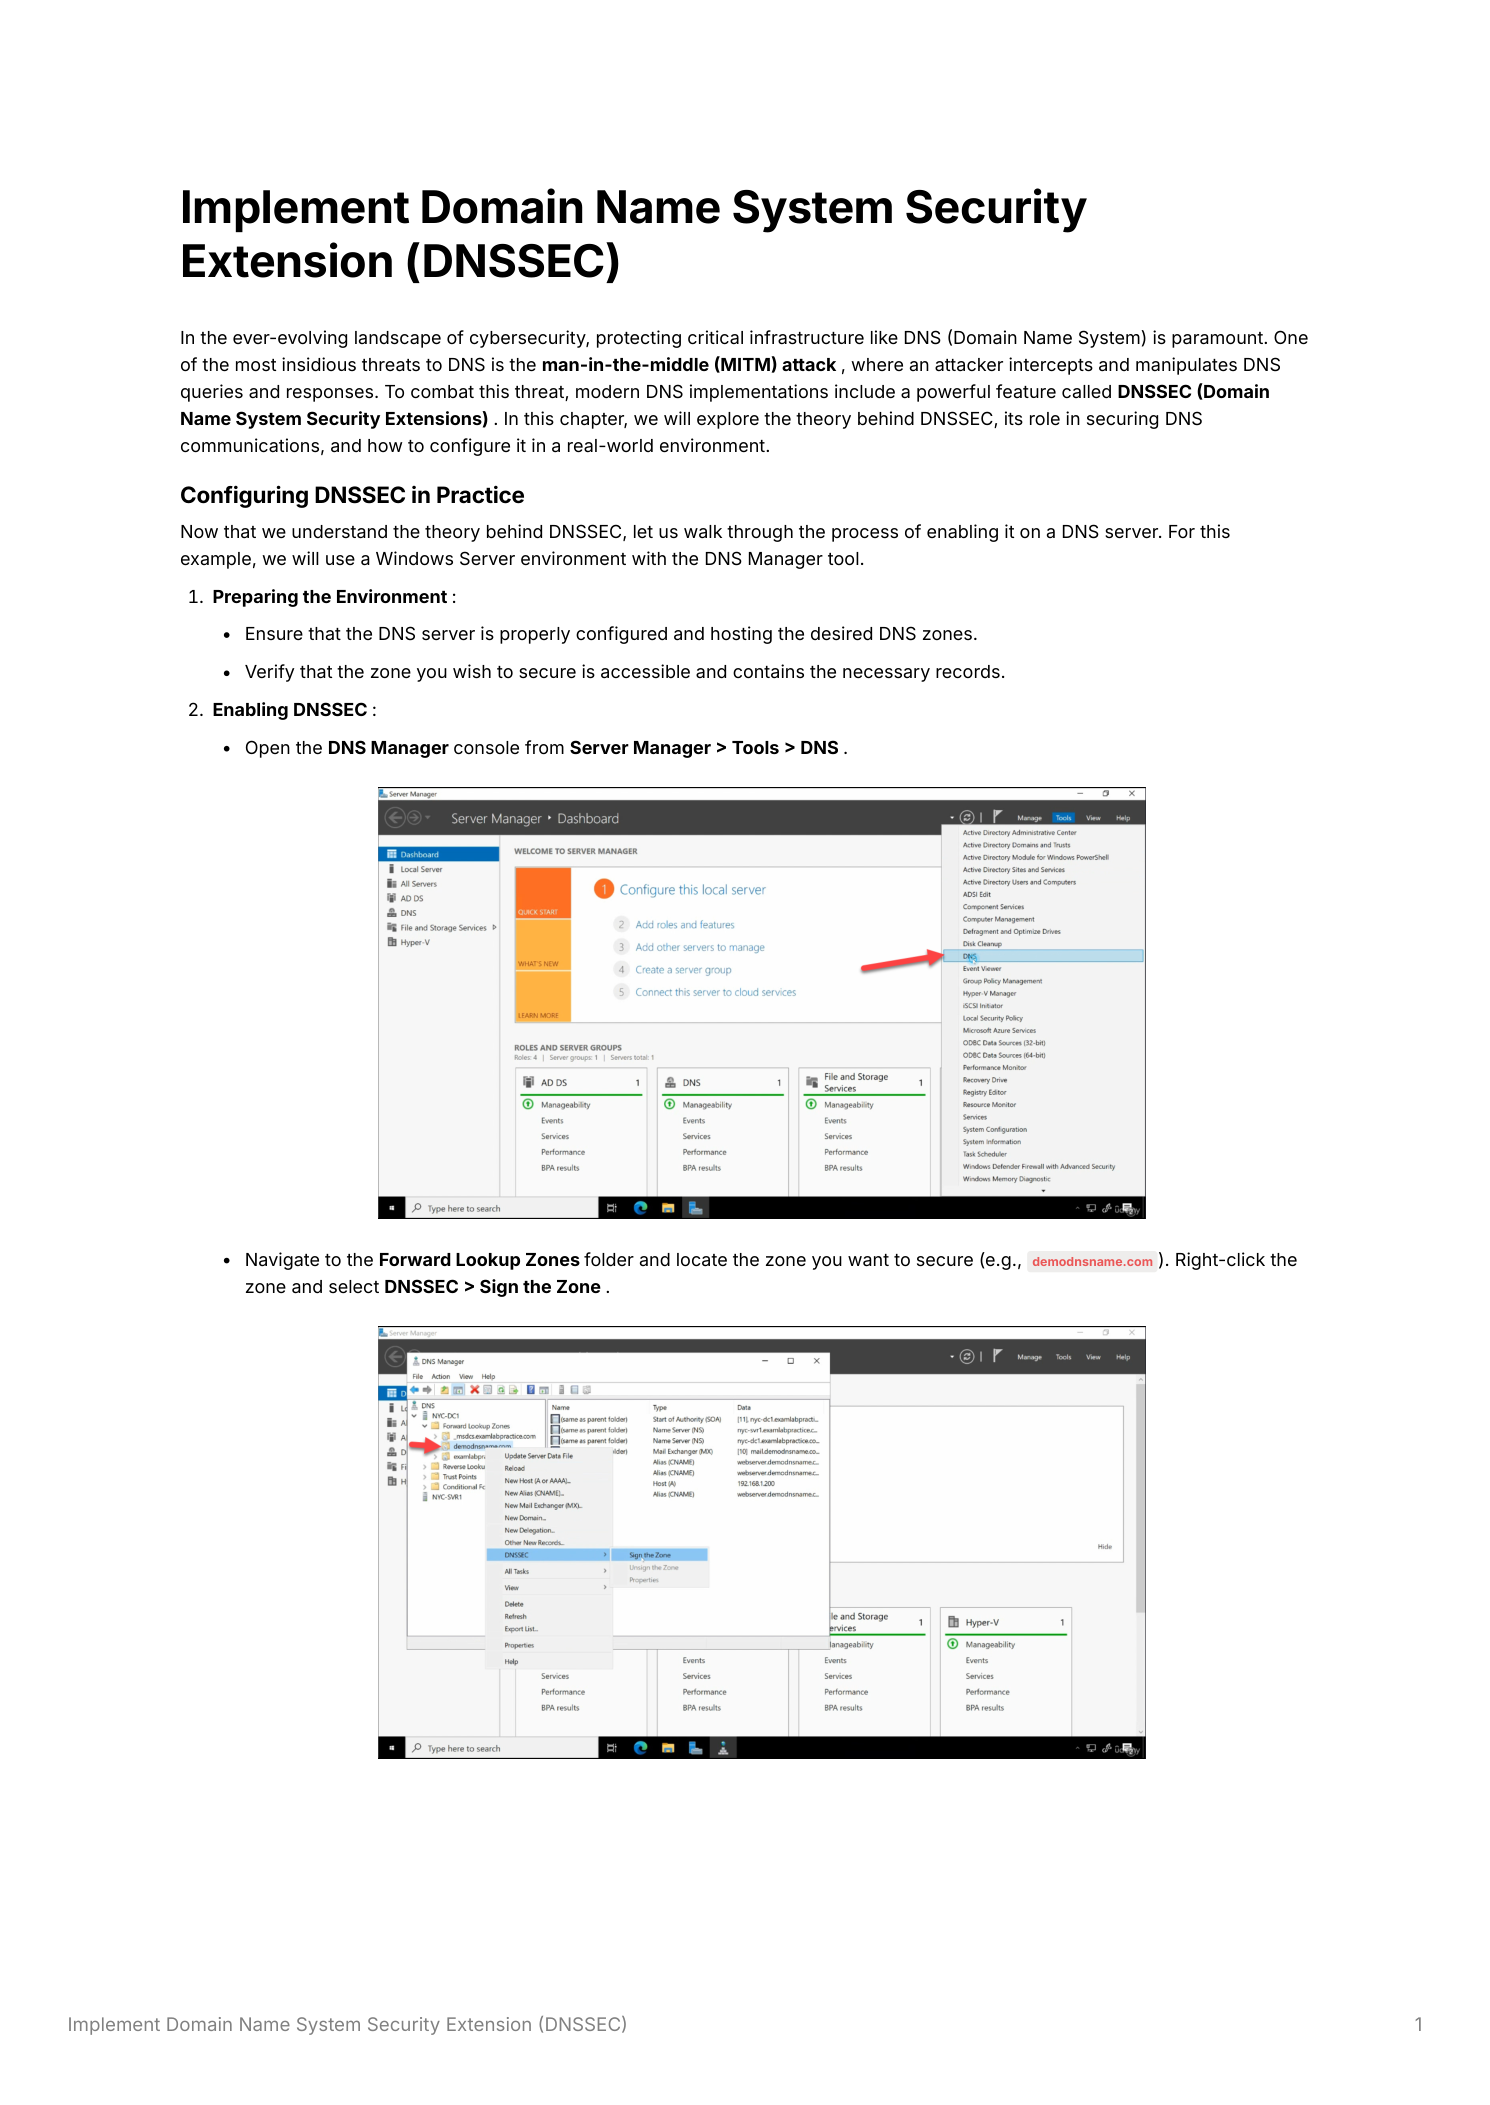
Step 1 – Open DNS Manager and Initiate Zone Signing
Open Server Manager, navigate to Tools, and select DNS. In the DNS Manager console, expand the server node in the left panel and expand Forward Lookup Zones. Locate the zone you want to secure. Right-click the zone name and select DNSSEC → Sign the Zone. This launches the DNS Security Extensions (DNSSEC) Zone Signing Wizard.
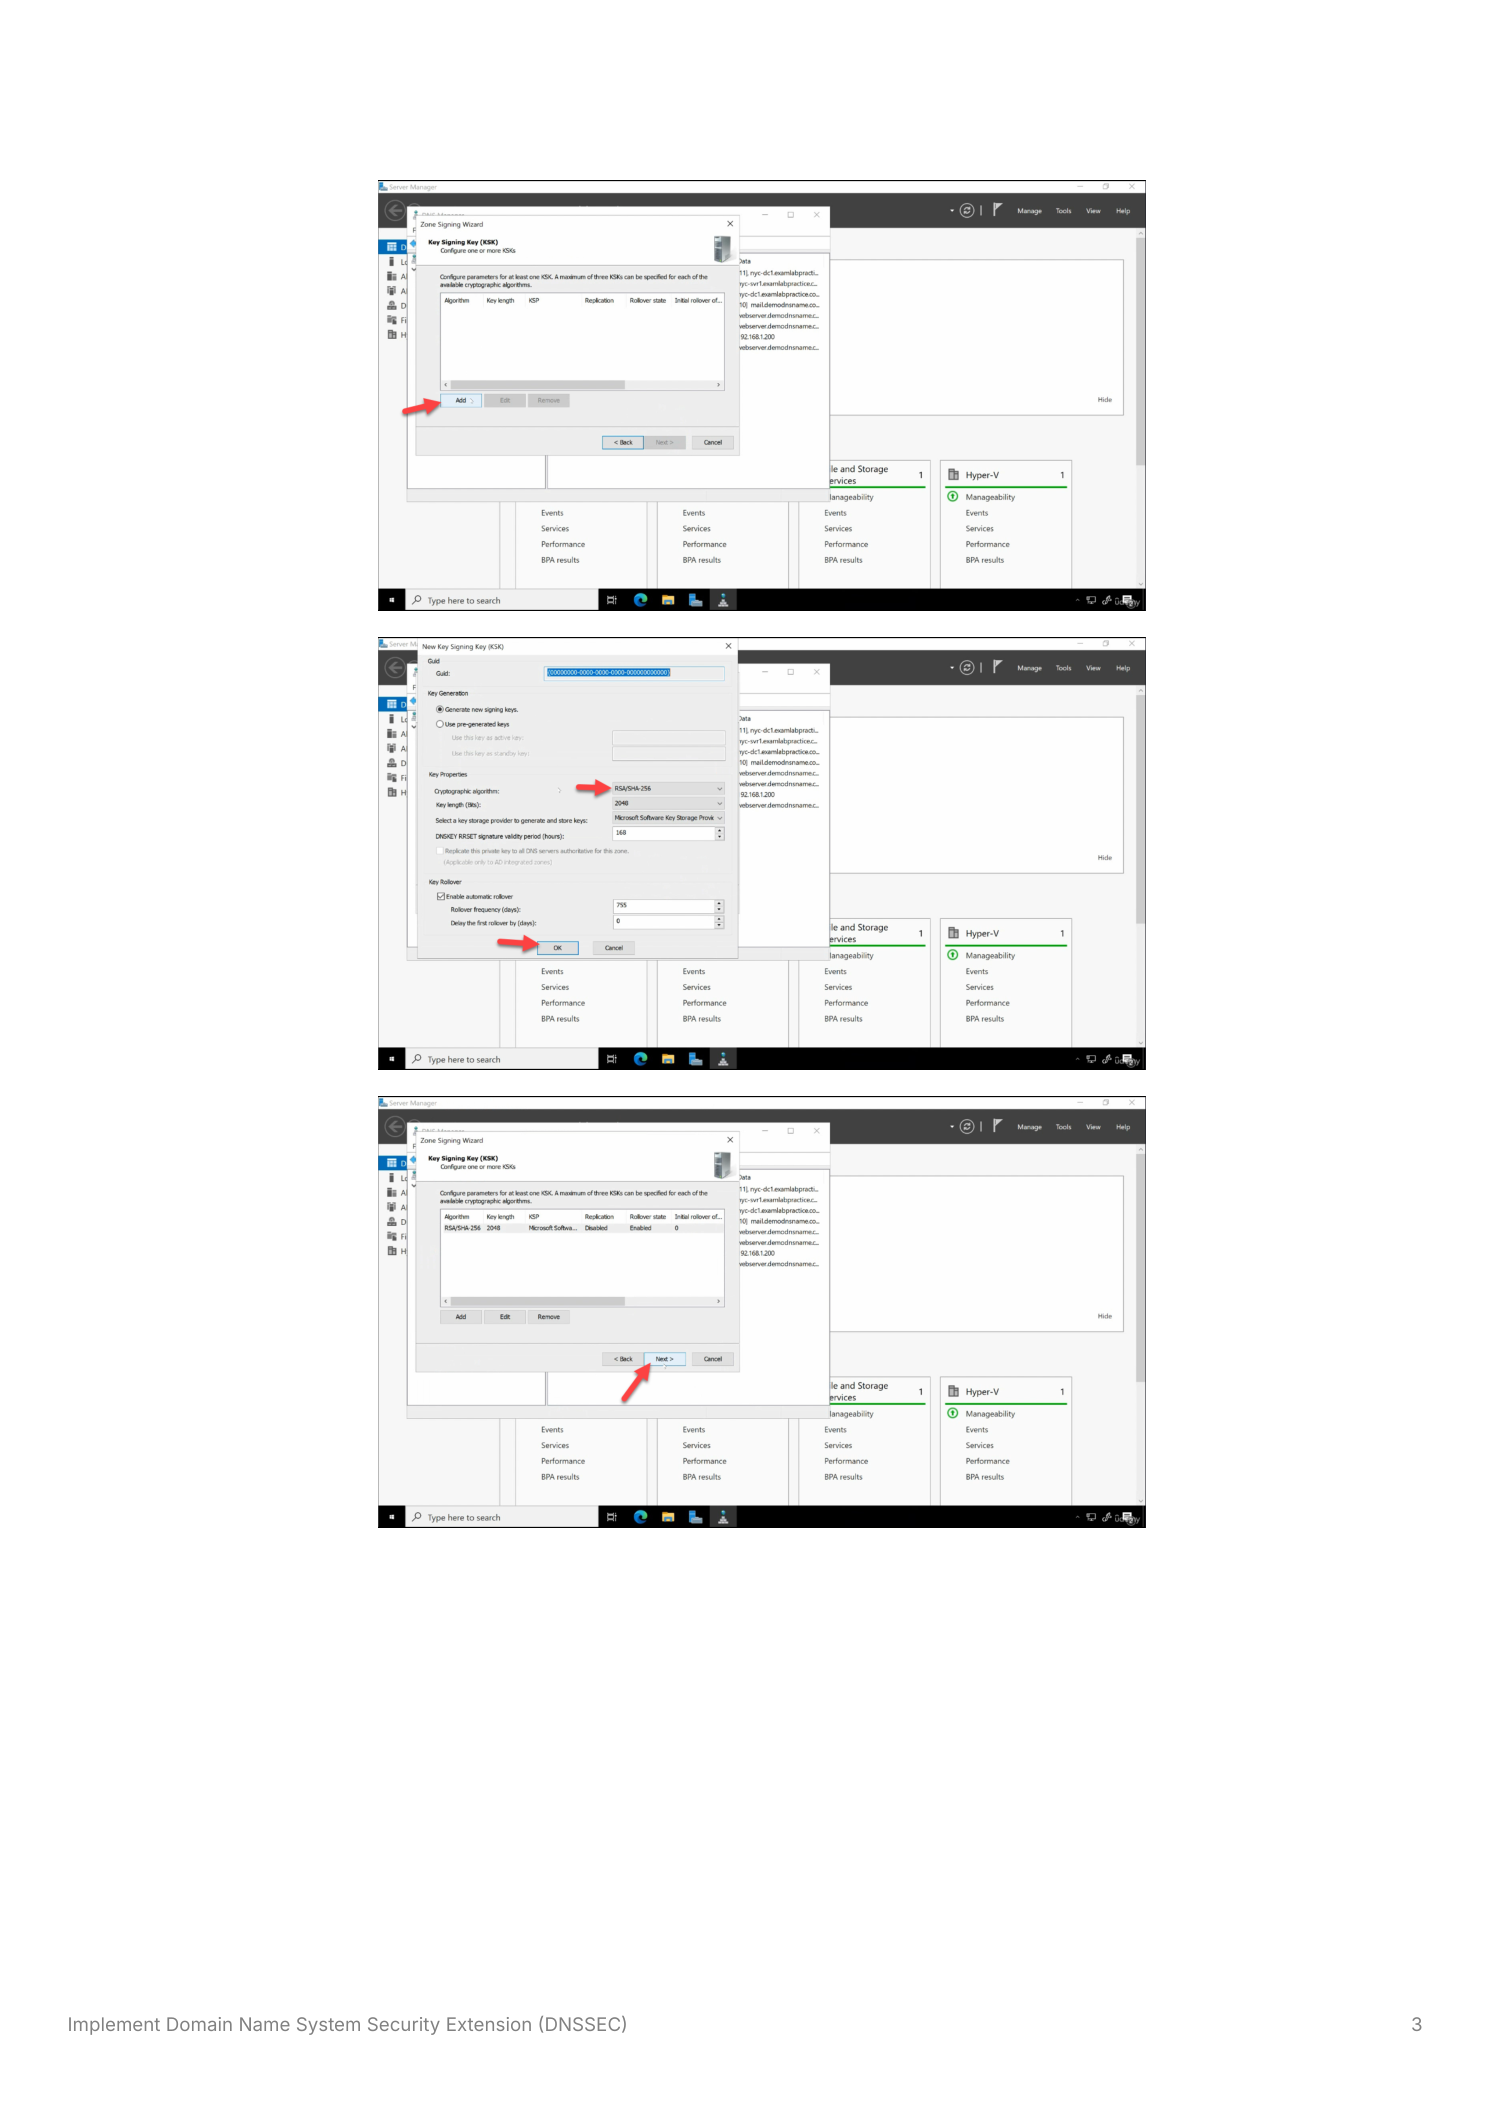
Step 2 – Configure the Key Signing Key (KSK)
The wizard presents signing parameter options. Select Customize zone signing parameters to review the key settings (or accept defaults for a standard deployment). On the Key Signing Key page, click Add to create a new KSK. The default settings use RSA-SHA-256 with a 2048-bit key length, the Microsoft Software Key Storage Provider, and automatic rollover enabled. These defaults are appropriate for most environments. Click OK to create the KSK.
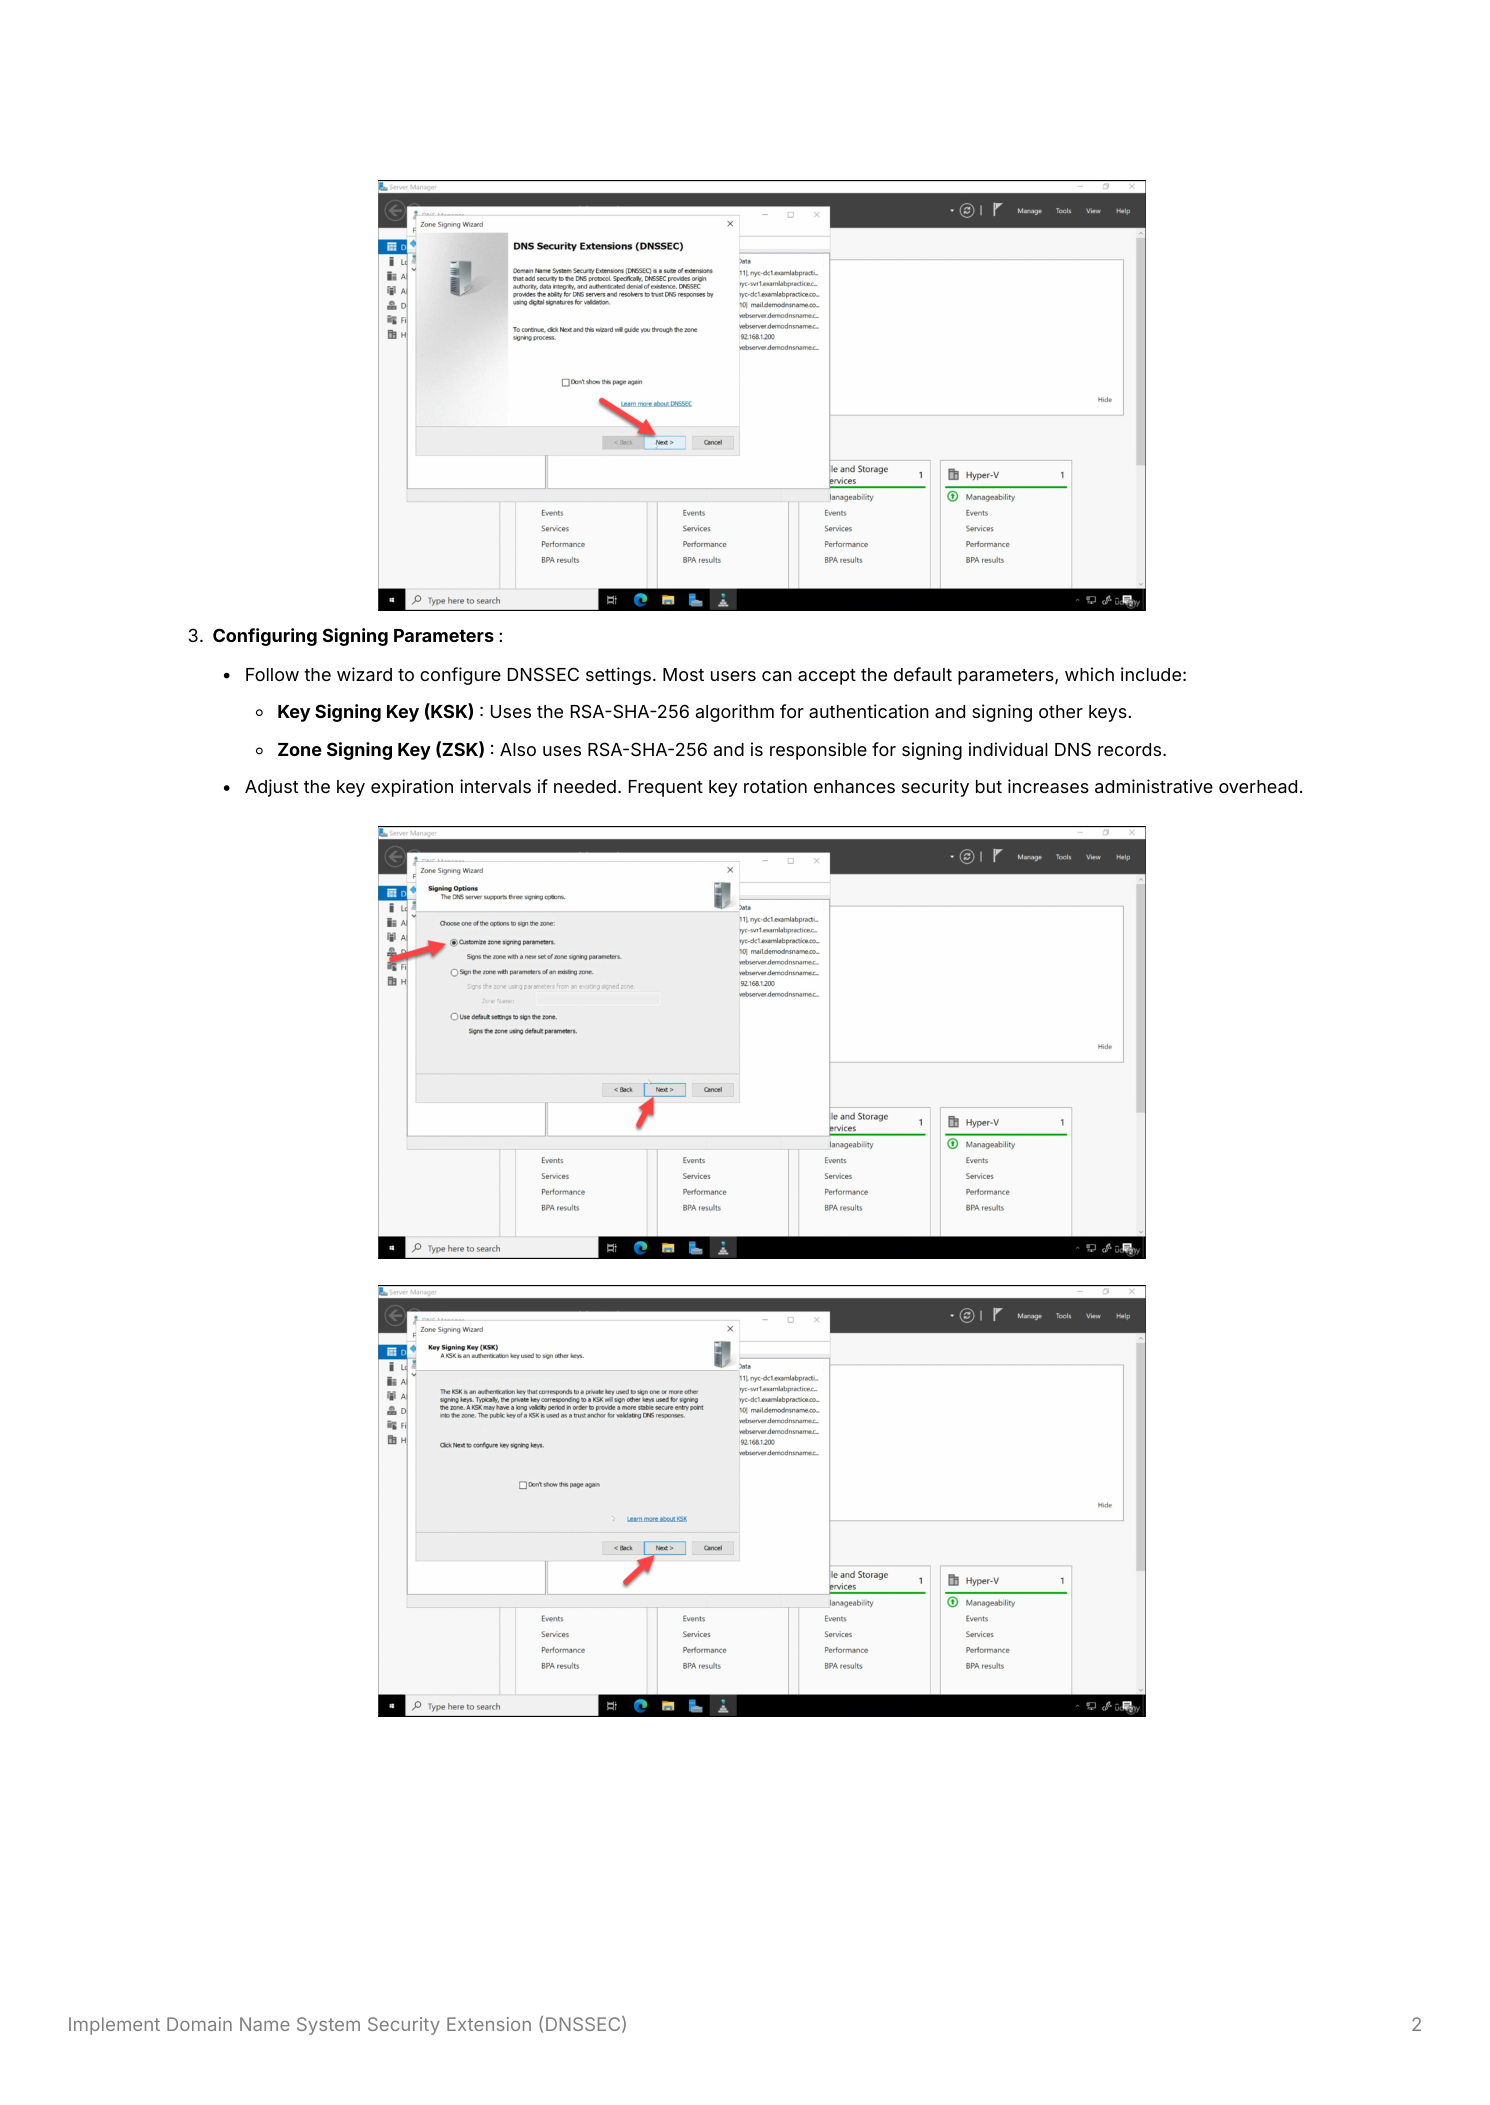
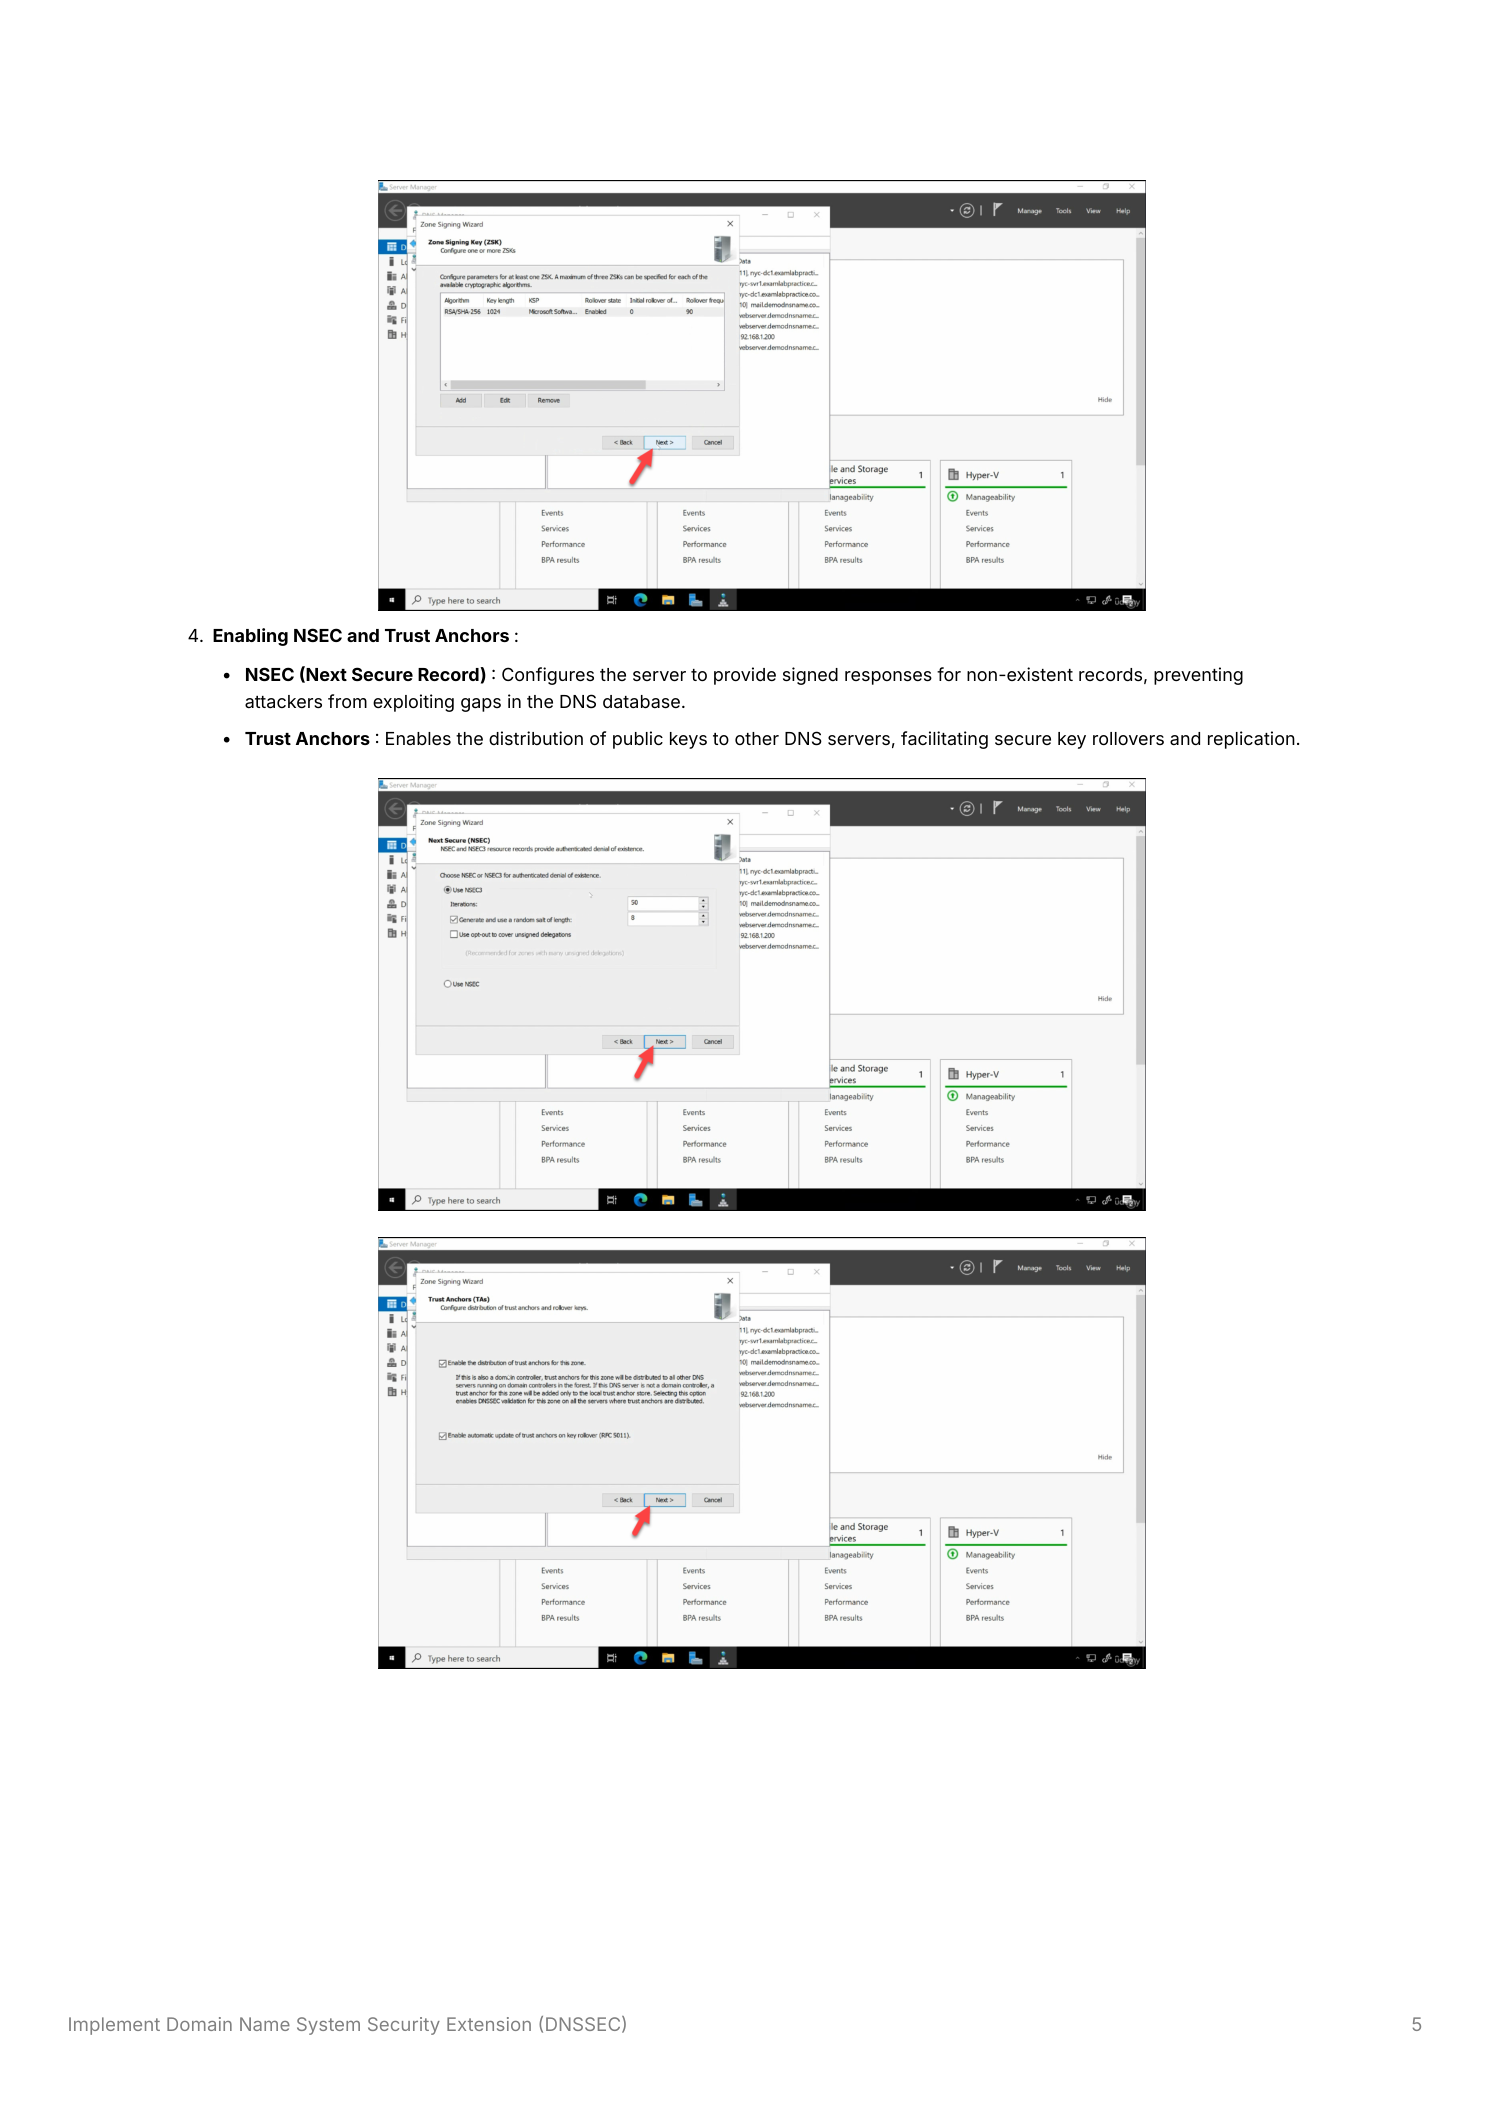
Step 3 – Configure the Zone Signing Key (ZSK)
After configuring the KSK, the wizard moves to the Zone Signing Key page. The ZSK is responsible for signing individual DNS resource records within the zone. Click Add to create a new ZSK. As with the KSK, the defaults use RSA-SHA-256. The ZSK typically uses a shorter key validity period than the KSK – the default rollover schedule rotates the ZSK more frequently (every 90 days by default) to minimize the window of exposure if a key is compromised. Click OK to create the ZSK.

Step 4 – Configure NSEC and Trust Anchors
The wizard then presents two additional configuration options:
- NSEC (Next Secure Record) – Accept the default NSEC3 setting, which provides authenticated denial of existence using hashed record names. NSEC3 prevents zone enumeration attacks while still allowing validating resolvers to confirm that a queried name does not exist in the zone
- Trust Anchors – Enable Enable the distribution of trust anchors for this zone. This allows the DNS server to distribute the KSK public key (the Trust Anchor) to other domain controllers through Active Directory replication, ensuring all DCs in the domain can validate DNSSEC responses without manual configuration
Step 5 – Complete Zone Signing and Verify
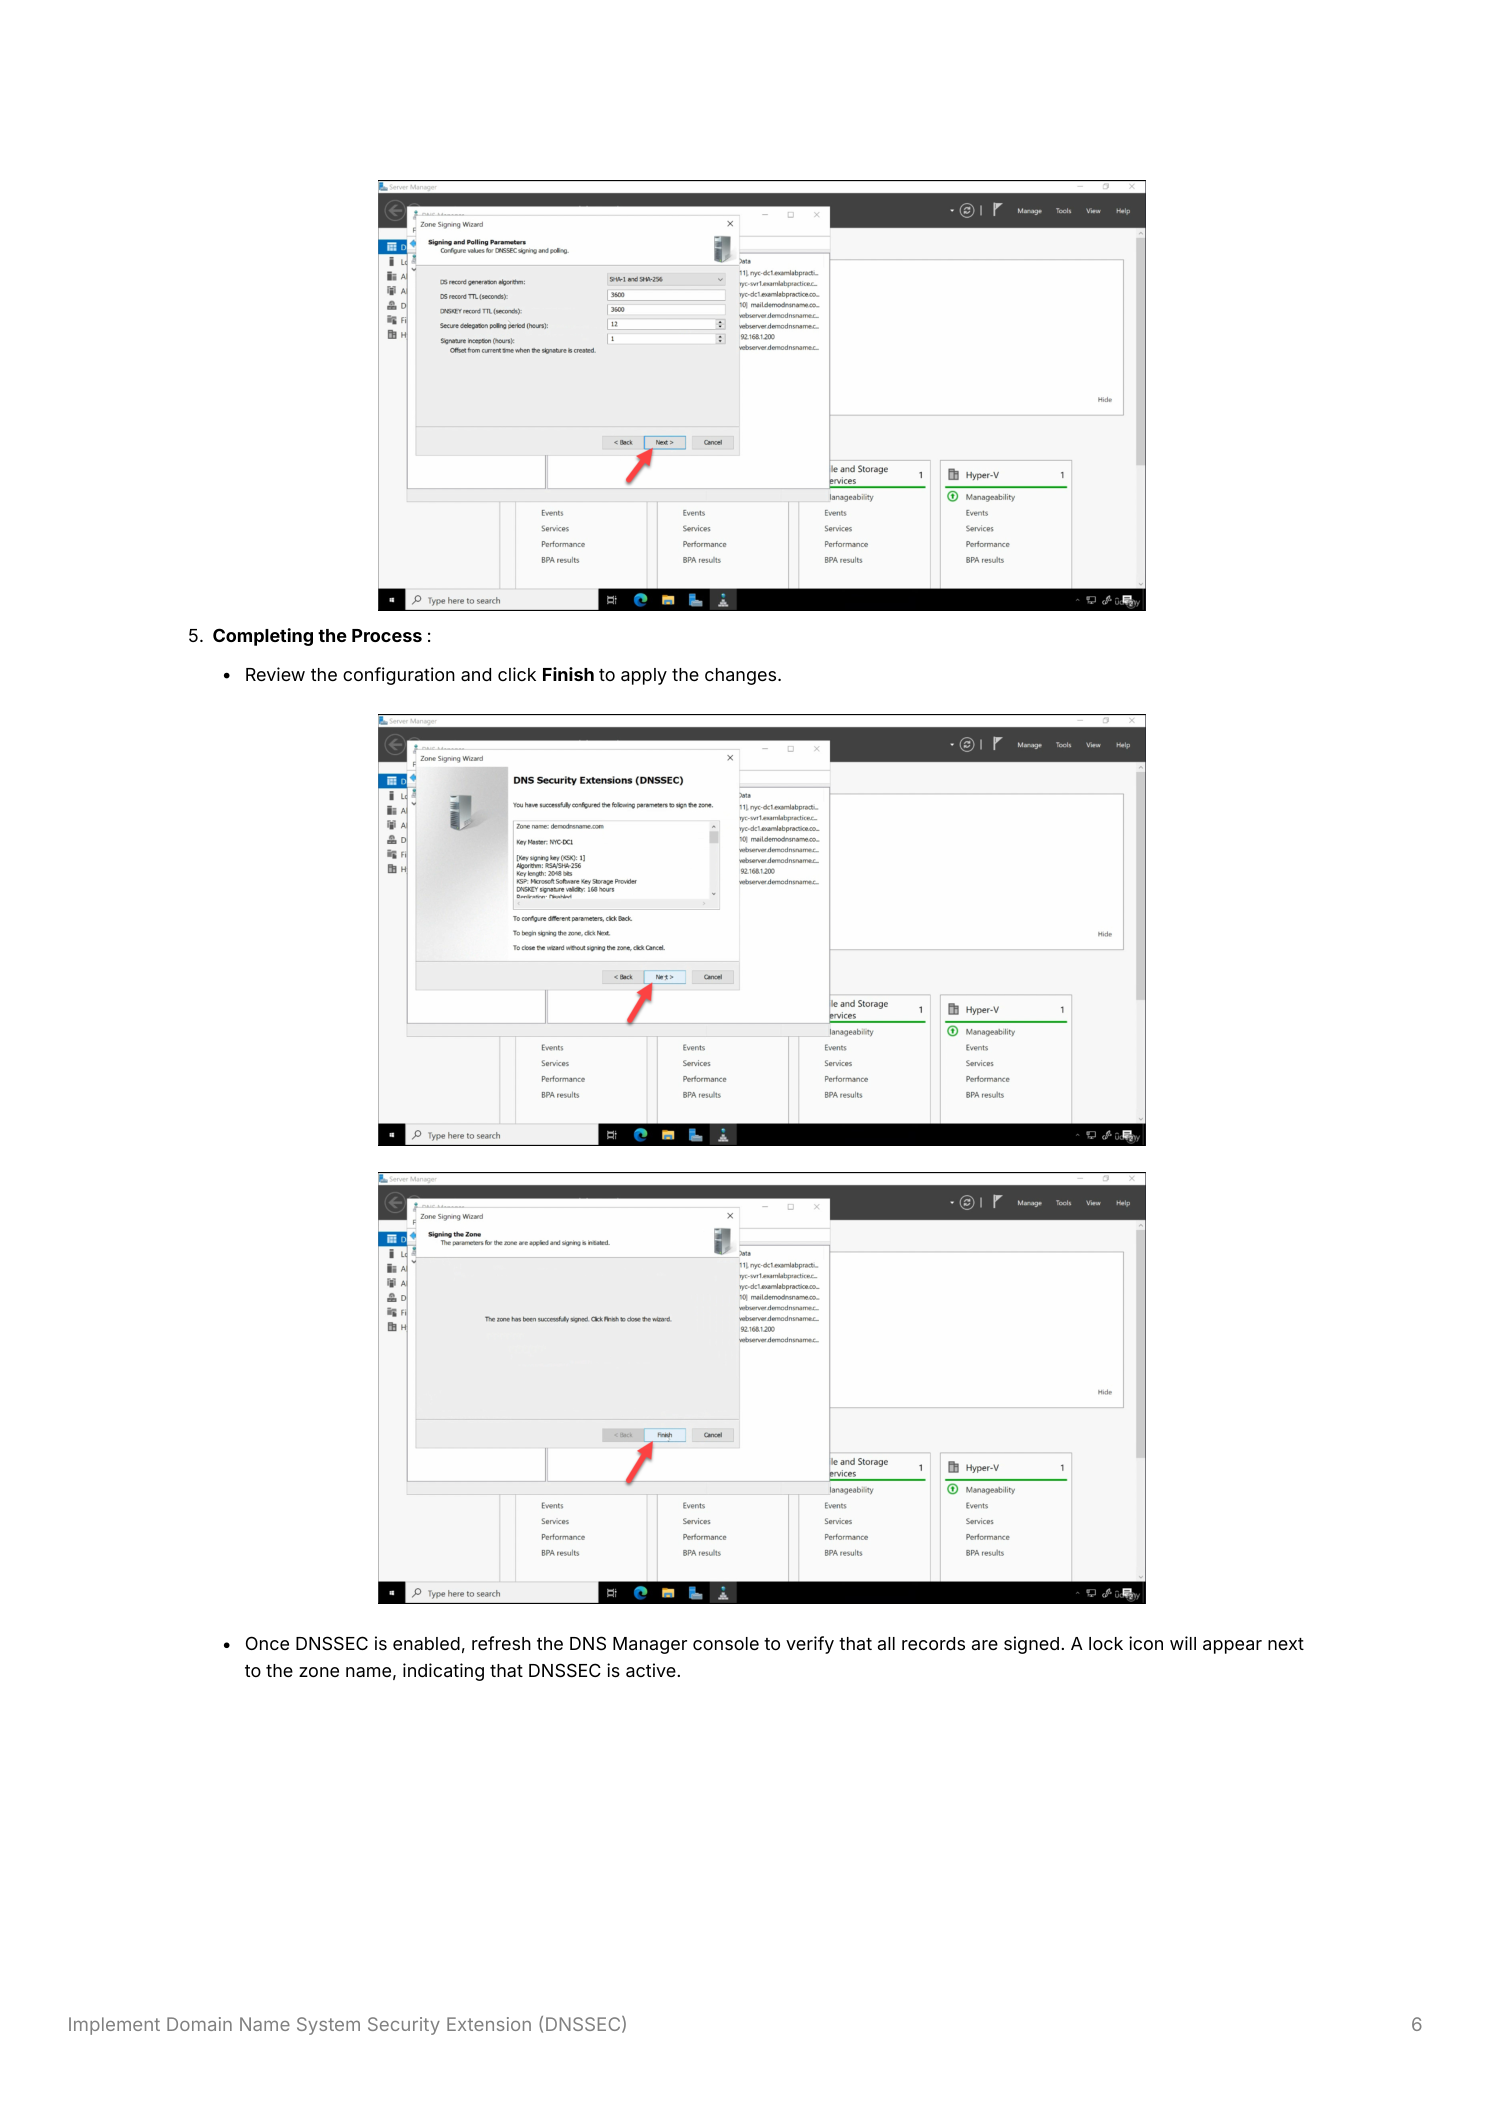
Review the signing configuration summary on the final wizard page and click Finish to apply all settings. The DNS server will now generate the cryptographic keys, sign all records in the zone, and add the RRSIG, DNSKEY, and NSEC3 records to the zone. After the wizard closes, refresh the DNS Manager console. A padlock icon will appear next to the zone name, indicating that DNSSEC is active and the zone is signed.
Testing DNSSEC
After enabling DNSSEC, verify that the zone is properly signed and that responses include digital signatures. Use nslookup in debug mode or PowerShell’s Resolve-DnsName cmdlet:
Resolve-DnsName -Name "yourdomain.com" -Type A -DnsOnly -Server 127.0.0.1To confirm DNSSEC signatures are present, use nslookup:
nslookup -type=DNSKEY yourdomain.comA successful response will include the DNSKEY records containing the zone’s public keys. You can also verify using the dig tool (available via Windows Subsystem for Linux or BIND tools) with the +dnssec flag, which will show the RRSIG records attached to each response. Ensure that clients configured to require signed responses can successfully validate the data returned.
Best Practices
Regular Key Rotation
Rotate Zone Signing Keys on a regular schedule (the default 90-day automatic rollover is appropriate for most organizations) to limit the exposure window if a private key is ever compromised. Update Key Signing Keys periodically following your organization’s security policy – annual or biennial KSK rollovers are common in enterprise environments. Windows Server handles automatic ZSK rollover natively when configured; KSK rollover requires additional steps to update the trust anchor at the parent zone (for public zones) or across DCs (for AD-integrated zones).
Monitoring and Maintenance
Regularly monitor DNS Server event logs for DNSSEC-related errors, particularly after key rollovers or zone transfers. Test DNSSEC functionality after making any DNS infrastructure changes – zone migrations, DC promotions, or DNS server version upgrades – to ensure signatures remain valid and trust anchors are current across all domain controllers.
Client Configuration
Configure DNS clients and resolvers to require signed responses (DNSSEC validation) so that they reject unsigned or tampered data. On Windows, this is controlled through Group Policy under Computer Configuration → Policies → Windows Settings → Name Resolution Policy. Educate administrators about the importance of DNSSEC validation and the implications of disabling it on resolvers.
Compatibility Considerations
Verify that all DNS servers in your environment support DNSSEC – particularly if you have older domain controllers still running Windows Server 2003 or 2008 without the DNSSEC update. Clients and third-party DNS servers that do not support DNSSEC validation will still receive signed responses but will not validate the signatures, receiving the records without the security benefit. Older non-validating systems do not need to be replaced for DNSSEC to function, but validating clients must be on a supported platform.